<?xml version="1.0" encoding="utf-8"?>
<feed xmlns="http://www.w3.org/2005/Atom">
    <id>https://mikelikesrobots.github.io/blog</id>
    <title>Mike Likes Robots Blog</title>
    <updated>2026-08-27T00:00:00.000Z</updated>
    <generator>https://github.com/jpmonette/feed</generator>
    <link rel="alternate" href="https://mikelikesrobots.github.io/blog"/>
    <subtitle>Mike Likes Robots Blog</subtitle>
    <icon>https://mikelikesrobots.github.io/favicon.ico</icon>
    <entry>
        <title type="html"><![CDATA[Setting Up and Calibrating the Autonomous Viam Rover]]></title>
        <id>https://mikelikesrobots.github.io/blog/viam-rover-calibration</id>
        <link href="https://mikelikesrobots.github.io/blog/viam-rover-calibration"/>
        <updated>2026-08-27T00:00:00.000Z</updated>
        <summary type="html"><![CDATA[Calibrate wheel encoders and build a motor lookup table to prepare the Viam Rover for reliable mapping and navigation.]]></summary>
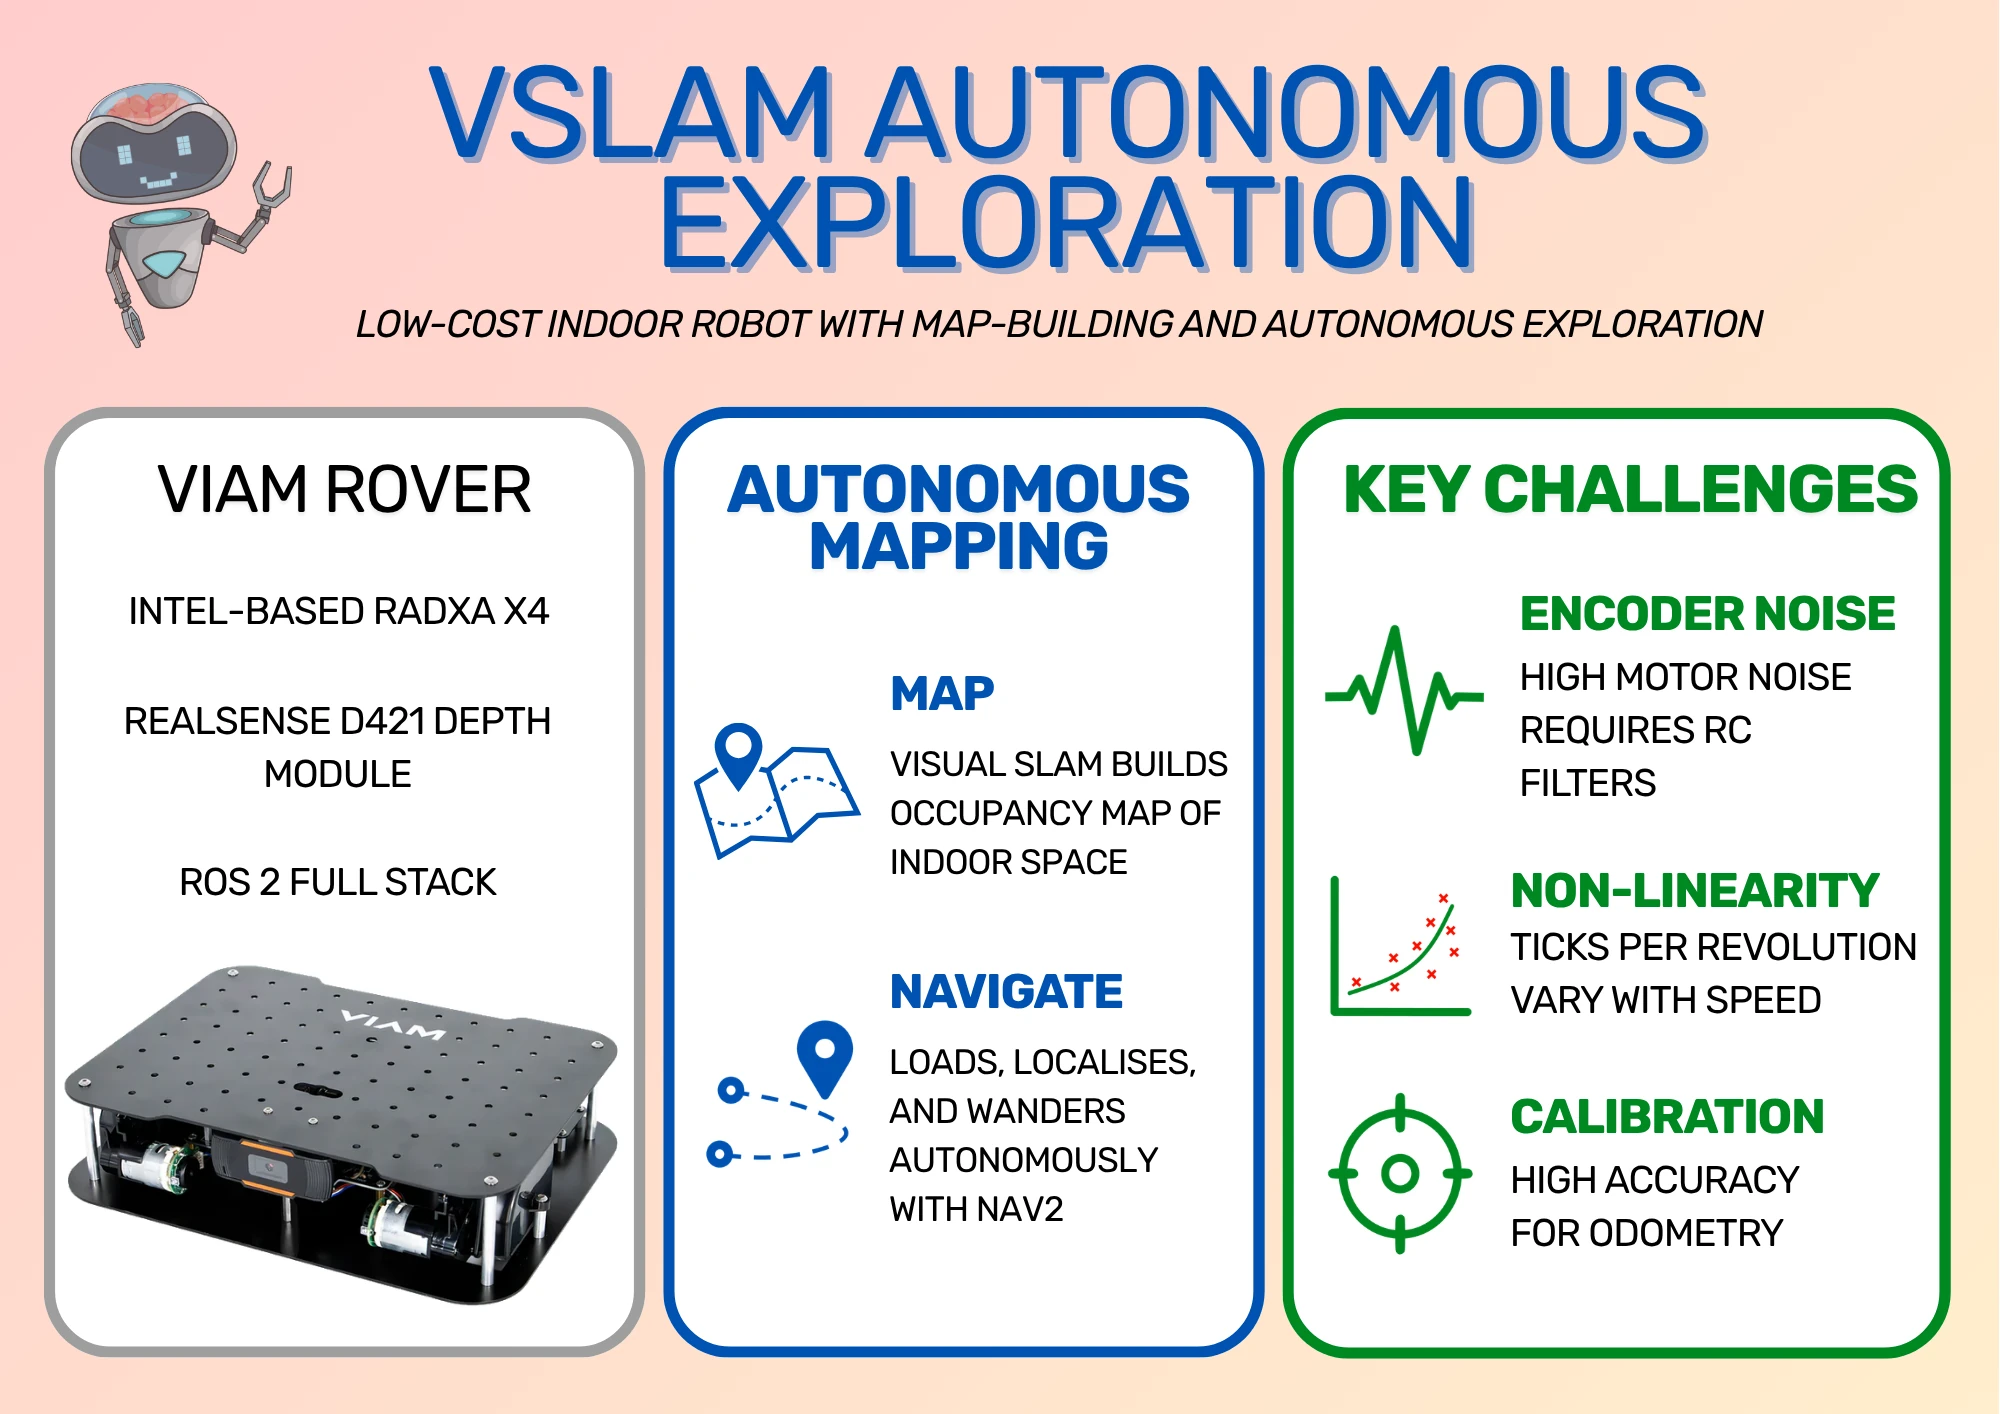
        <content type="html"><![CDATA[<p>Before the Viam Rover can move autonomously, and hence map and navigate reliably, its control system needs accurate encoder measurements and benefits from a motor lookup table. This guide shows how to install the remaining rover software, calibrate both wheels, and generate that lookup table. At the end, the rover will be ready for mapping and navigation, although I'll save that process for a future post so as to give it more focus.</p>
<p>These instructions are available in less detail from the README of the <a href="https://github.com/mikelikesrobots/viam-rover2" target="_blank" rel="noopener noreferrer" class="">GitHub repository</a>. There is also more information on the Viam Rover project in my previous blog post, <a class="" href="https://mikelikesrobots.github.io/blog/autonomous-viam-rover">Autonomously Mapping with Visual SLAM</a>.</p>
<div class="video_jswG"><button type="button" class="poster_B6DH" aria-label="Play video: Setting Up and Calibrating the Autonomous Viam Rover"><img src="https://i.ytimg.com/vi/KgZdrtvqItI/hqdefault.jpg" alt="" width="480" height="360" loading="lazy"><span class="play_lEvZ" aria-hidden="true">▶</span><span class="caption_yrhJ">Watch: <!-- -->Setting Up and Calibrating the Autonomous Viam Rover</span></button></div><noscript><p><a href="https://www.youtube.com/watch?v=KgZdrtvqItI&amp;t=0">Watch <!-- -->Setting Up and Calibrating the Autonomous Viam Rover<!-- --> on YouTube</a></p></noscript>
<h2 class="anchor anchorTargetStickyNavbar_Vzrq" id="installing-the-dependencies">Installing the Dependencies<a href="https://mikelikesrobots.github.io/blog/viam-rover-calibration#installing-the-dependencies" class="hash-link" aria-label="Direct link to Installing the Dependencies" title="Direct link to Installing the Dependencies" translate="no">​</a></h2>
<div class="theme-admonition theme-admonition-note admonition_xJq3 alert alert--secondary"><div class="admonitionHeading_Gvgb"><span class="admonitionIcon_Rf37"><svg viewBox="0 0 14 16"><path fill-rule="evenodd" d="M6.3 5.69a.942.942 0 0 1-.28-.7c0-.28.09-.52.28-.7.19-.18.42-.28.7-.28.28 0 .52.09.7.28.18.19.28.42.28.7 0 .28-.09.52-.28.7a1 1 0 0 1-.7.3c-.28 0-.52-.11-.7-.3zM8 7.99c-.02-.25-.11-.48-.31-.69-.2-.19-.42-.3-.69-.31H6c-.27.02-.48.13-.69.31-.2.2-.3.44-.31.69h1v3c.02.27.11.5.31.69.2.2.42.31.69.31h1c.27 0 .48-.11.69-.31.2-.19.3-.42.31-.69H8V7.98v.01zM7 2.3c-3.14 0-5.7 2.54-5.7 5.68 0 3.14 2.56 5.7 5.7 5.7s5.7-2.55 5.7-5.7c0-3.15-2.56-5.69-5.7-5.69v.01zM7 .98c3.86 0 7 3.14 7 7s-3.14 7-7 7-7-3.12-7-7 3.14-7 7-7z"></path></svg></span>Radxa X4 setup</div><div class="admonitionContent_BuS1"><p>All instructions should be executed from the Radxa X4, either directly or through an SSH session. I have a video on how to set up the Radxa X4 below. The process is essentially creating a standard USB installation drive with <a href="https://releases.ubuntu.com/noble/" target="_blank" rel="noopener noreferrer" class="">Ubuntu 24.04</a> and installing it onto the Radxa X4, set up with a heat sink and M.2 SSD. The full robot should also be assembled and ready to use.</p><div class="video_jswG"><button type="button" class="poster_B6DH" aria-label="Play video: Setting Up and Calibrating the Autonomous Viam Rover — supporting video"><img src="https://i.ytimg.com/vi/v7vi2d8ITEQ/hqdefault.jpg" alt="" width="480" height="360" loading="lazy"><span class="play_lEvZ" aria-hidden="true">▶</span><span class="caption_yrhJ">Watch: <!-- -->Setting Up and Calibrating the Autonomous Viam Rover — supporting video</span></button></div><noscript><p><a href="https://www.youtube.com/watch?v=v7vi2d8ITEQ&amp;t=0">Watch <!-- -->Setting Up and Calibrating the Autonomous Viam Rover — supporting video<!-- --> on YouTube</a></p></noscript></div></div>
<h3 class="anchor anchorTargetStickyNavbar_Vzrq" id="ros-2-installation">ROS 2 Installation<a href="https://mikelikesrobots.github.io/blog/viam-rover-calibration#ros-2-installation" class="hash-link" aria-label="Direct link to ROS 2 Installation" title="Direct link to ROS 2 Installation" translate="no">​</a></h3>
<p>Almost all ROS 2 dependencies can be installed using the helper script provided by Intel in their <a href="https://docs.openedgeplatform.intel.com/dev/edge-ai-suites/robotics-ai-suite/robotics/gsg_robot/index.html" target="_blank" rel="noopener noreferrer" class="">Getting Started guide</a>. The command is as follows:</p>
<div class="language-bash codeBlockContainer_Ckt0 theme-code-block" style="--prism-color:#393A34;--prism-background-color:#f6f8fa"><div class="codeBlockContent_QJqH"><pre tabindex="0" class="prism-code language-bash codeBlock_bY9V thin-scrollbar" style="color:#393A34;background-color:#f6f8fa"><code class="codeBlockLines_e6Vv"><div class="token-line" style="color:#393A34"><span class="token plain">wget https://raw.githubusercontent.com/open-edge-platform/edge-ai-suites/refs/tags/v2026.1.0-rc1/robotics-ai-suite/scripts/setup-robotics-jazzy.sh</span><br></div><div class="token-line" style="color:#393A34"><span class="token plain">chmod +x setup-robotics-jazzy.sh</span><br></div><div class="token-line" style="color:#393A34"><span class="token plain">export USE_PROXY=0</span><br></div><div class="token-line" style="color:#393A34"><span class="token plain">./setup-robotics-jazzy.sh</span><br></div></code></pre></div></div>
<p>This will set up ROS 2 Jazzy plus some extra dependencies needed for building the code. The rest of the dependencies needed for the ROS 2 packages will be installed using <code>rosdep</code> in the <a href="https://mikelikesrobots.github.io/blog/viam-rover-calibration#build-the-package" class="">Build the Package</a> section.</p>
<h3 class="anchor anchorTargetStickyNavbar_Vzrq" id="rp2040-setup">RP2040 Setup<a href="https://mikelikesrobots.github.io/blog/viam-rover-calibration#rp2040-setup" class="hash-link" aria-label="Direct link to RP2040 Setup" title="Direct link to RP2040 Setup" translate="no">​</a></h3>
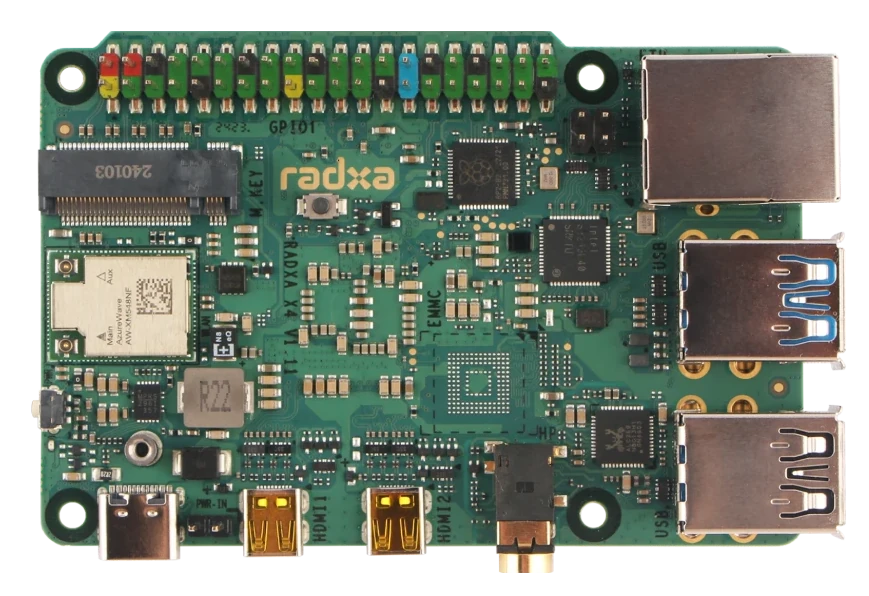
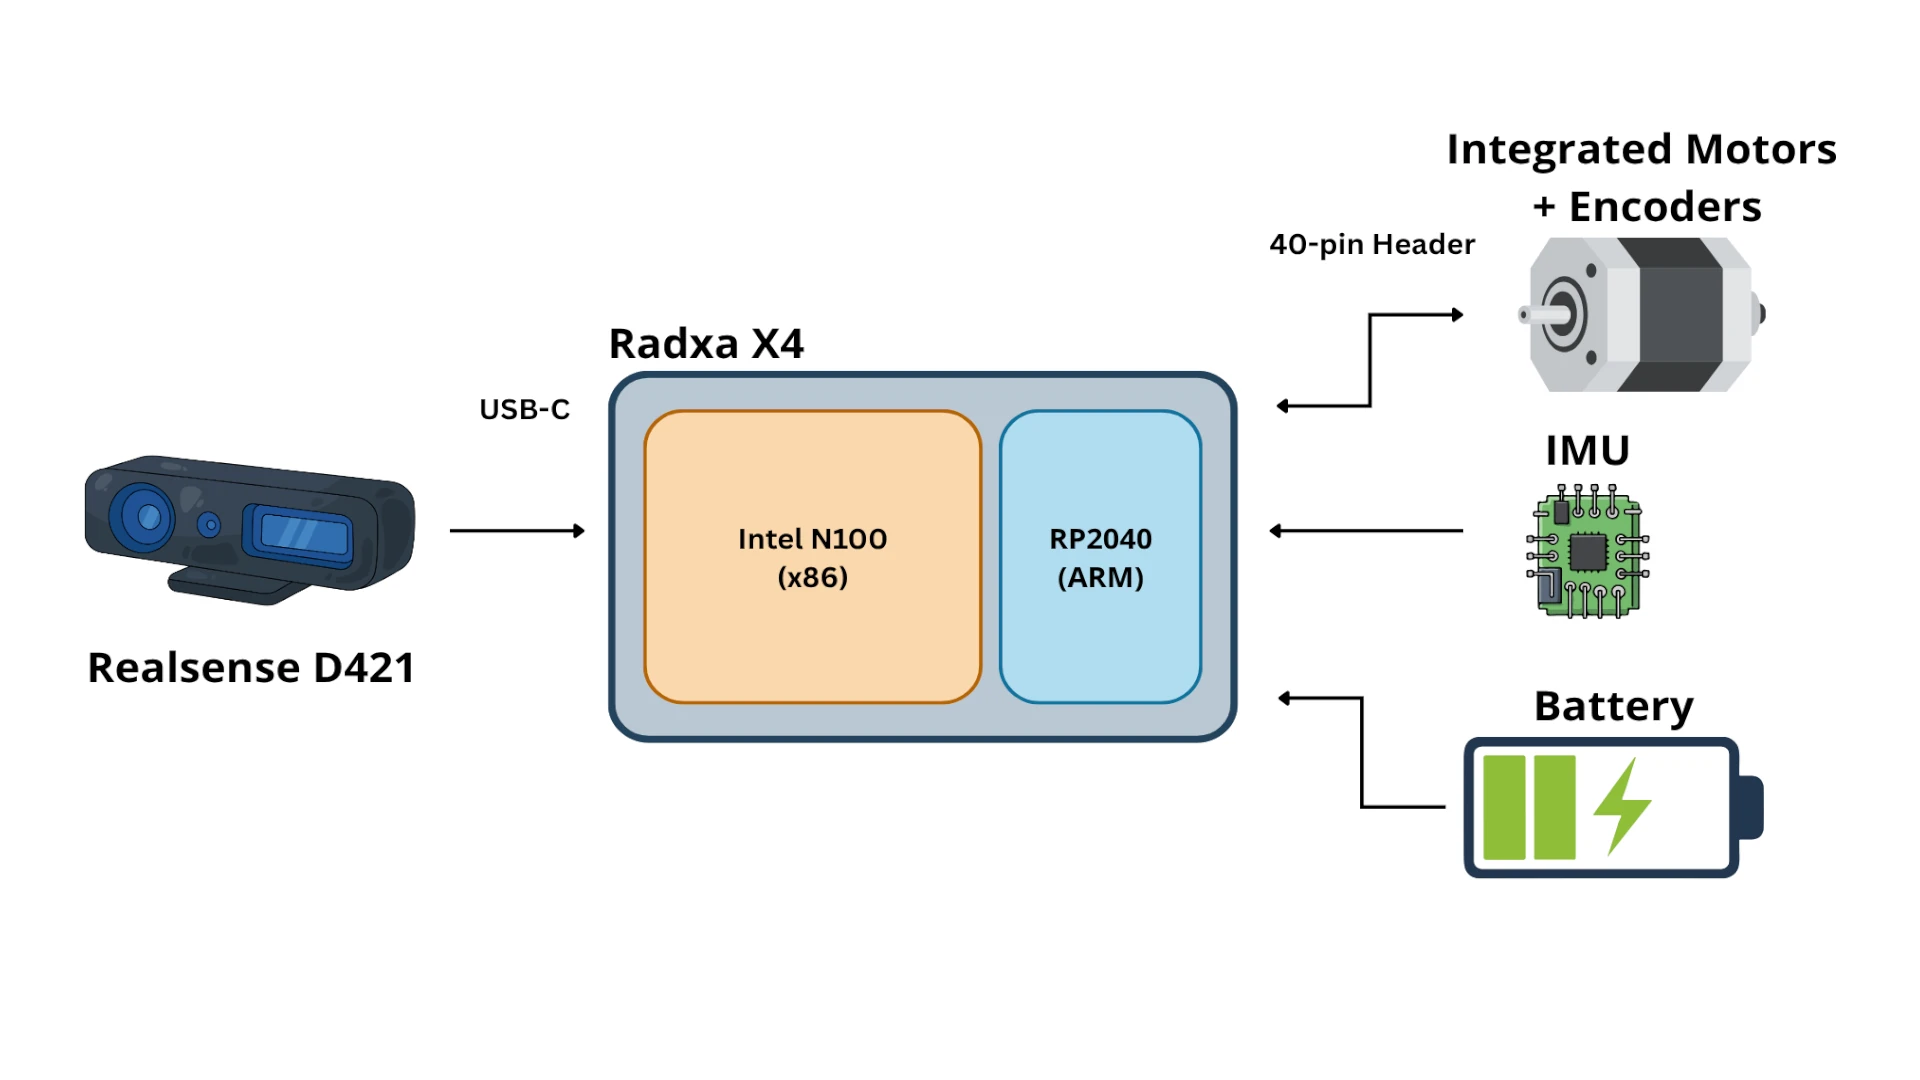
<p>We also need to perform a one-time setup for the RP2040. The RP2040 is visible to the Intel N100 chip as a USB device, and the scripts in my project are configured to automatically mount the USB device and send the latest firmware to it, which is the flashing process. The RP2040 will then automatically restart running the new firmware.</p>
<p>To mount the USB device automatically and without being prompted for <code>sudo</code> access every time, we need to set up some permissions in advance. First, install the system dependencies:</p>
<div class="language-bash codeBlockContainer_Ckt0 theme-code-block" style="--prism-color:#393A34;--prism-background-color:#f6f8fa"><div class="codeBlockContent_QJqH"><pre tabindex="0" class="prism-code language-bash codeBlock_bY9V thin-scrollbar" style="color:#393A34;background-color:#f6f8fa"><code class="codeBlockLines_e6Vv"><div class="token-line" style="color:#393A34"><span class="token plain">sudo apt install -y \</span><br></div><div class="token-line" style="color:#393A34"><span class="token plain">  cmake \</span><br></div><div class="token-line" style="color:#393A34"><span class="token plain">  gcc-arm-none-eabi \</span><br></div><div class="token-line" style="color:#393A34"><span class="token plain">  libnewlib-arm-none-eabi \</span><br></div><div class="token-line" style="color:#393A34"><span class="token plain">  libstdc++-arm-none-eabi-newlib \</span><br></div><div class="token-line" style="color:#393A34"><span class="token plain">  libgpiod2 \</span><br></div><div class="token-line" style="color:#393A34"><span class="token plain">  gpiod \</span><br></div><div class="token-line" style="color:#393A34"><span class="token plain">  udisks2</span><br></div></code></pre></div></div>
<p>Then, to set the permissions up correctly, we execute the following:</p>
<div class="language-bash codeBlockContainer_Ckt0 theme-code-block" style="--prism-color:#393A34;--prism-background-color:#f6f8fa"><div class="codeBlockContent_QJqH"><pre tabindex="0" class="prism-code language-bash codeBlock_bY9V thin-scrollbar" style="color:#393A34;background-color:#f6f8fa"><code class="codeBlockLines_e6Vv"><div class="token-line" style="color:#393A34"><span class="token plain">sudo sh -c 'echo "SUBSYSTEM==\"gpio\", KERNEL==\"gpiochip[0-9]*\", MODE=\"0660\", GROUP=\"dialout\"" &gt; /etc/udev/rules.d/99-gpio.rules'</span><br></div><div class="token-line" style="color:#393A34"><span class="token plain">sudo udevadm control --reload-rules</span><br></div><div class="token-line" style="color:#393A34"><span class="token plain">sudo udevadm trigger</span><br></div><div class="token-line" style="color:#393A34"><span class="token plain">sudo usermod -aG dialout "$USER"</span><br></div></code></pre></div></div>
<p>Log out and back in to enforce the new permissions. This will allow the build script to automatically mount and flash the RP2040.</p>
<h3 class="anchor anchorTargetStickyNavbar_Vzrq" id="build-the-package">Build the Package<a href="https://mikelikesrobots.github.io/blog/viam-rover-calibration#build-the-package" class="hash-link" aria-label="Direct link to Build the Package" title="Direct link to Build the Package" translate="no">​</a></h3>
<p>We can now check out the code, install dependencies, and build it as follows:</p>
<div class="language-bash codeBlockContainer_Ckt0 theme-code-block" style="--prism-color:#393A34;--prism-background-color:#f6f8fa"><div class="codeBlockContent_QJqH"><pre tabindex="0" class="prism-code language-bash codeBlock_bY9V thin-scrollbar" style="color:#393A34;background-color:#f6f8fa"><code class="codeBlockLines_e6Vv"><div class="token-line" style="color:#393A34"><span class="token plain">mkdir -p ~/ros2_ws</span><br></div><div class="token-line" style="color:#393A34"><span class="token plain">cd ~/ros2_ws</span><br></div><div class="token-line" style="color:#393A34"><span class="token plain">git clone https://github.com/mikelikesrobots/viam-rover2.git --recurse-submodules src/viam_rover2</span><br></div><div class="token-line" style="color:#393A34"><span class="token plain" style="display:inline-block"></span><br></div><div class="token-line" style="color:#393A34"><span class="token plain"># Install ROS dependencies</span><br></div><div class="token-line" style="color:#393A34"><span class="token plain">source /opt/ros/jazzy/setup.bash</span><br></div><div class="token-line" style="color:#393A34"><span class="token plain">rosdep install --from-paths src --ignore-src -r -y</span><br></div><div class="token-line" style="color:#393A34"><span class="token plain" style="display:inline-block"></span><br></div><div class="token-line" style="color:#393A34"><span class="token plain"># Build</span><br></div><div class="token-line" style="color:#393A34"><span class="token plain">colcon build</span><br></div><div class="token-line" style="color:#393A34"><span class="token plain">source install/setup.bash</span><br></div></code></pre></div></div>
<div class="theme-admonition theme-admonition-tip admonition_xJq3 alert alert--success"><div class="admonitionHeading_Gvgb"><span class="admonitionIcon_Rf37"><svg viewBox="0 0 12 16"><path fill-rule="evenodd" d="M6.5 0C3.48 0 1 2.19 1 5c0 .92.55 2.25 1 3 1.34 2.25 1.78 2.78 2 4v1h5v-1c.22-1.22.66-1.75 2-4 .45-.75 1-2.08 1-3 0-2.81-2.48-5-5.5-5zm3.64 7.48c-.25.44-.47.8-.67 1.11-.86 1.41-1.25 2.06-1.45 3.23-.02.05-.02.11-.02.17H5c0-.06 0-.13-.02-.17-.2-1.17-.59-1.83-1.45-3.23-.2-.31-.42-.67-.67-1.11C2.44 6.78 2 5.65 2 5c0-2.2 2.02-4 4.5-4 1.22 0 2.36.42 3.22 1.19C10.55 2.94 11 3.94 11 5c0 .66-.44 1.78-.86 2.48zM4 14h5c-.23 1.14-1.3 2-2.5 2s-2.27-.86-2.5-2z"></path></svg></span>Sourcing the ROS 2 Environment</div><div class="admonitionContent_BuS1"><p>As with all ROS 2 projects, remember to source the environment for each terminal, or ROS 2 won't be able to find your applications and launch files. This is the <code>source install/setup.bash</code> line above.</p></div></div>
<p>The commands above will:</p>
<ol>
<li class="">Check out the latest source code from the GitHub repository</li>
<li class="">Build the ROS 2 packages</li>
<li class="">Build the firmware for the RP2040</li>
<li class="">Flash the firmware onto the RP2040</li>
</ol>
<p>The RP2040 will then be ready to start feeding sensor data back to the main board, as well as accepting motor commands, which is exactly what we need for the next step: calibrating the encoders.</p>
<h2 class="anchor anchorTargetStickyNavbar_Vzrq" id="encoder-calibration">Encoder Calibration<a href="https://mikelikesrobots.github.io/blog/viam-rover-calibration#encoder-calibration" class="hash-link" aria-label="Direct link to Encoder Calibration" title="Direct link to Encoder Calibration" translate="no">​</a></h2>
<div class="theme-admonition theme-admonition-warning admonition_xJq3 alert alert--warning"><div class="admonitionHeading_Gvgb"><span class="admonitionIcon_Rf37"><svg viewBox="0 0 16 16"><path fill-rule="evenodd" d="M8.893 1.5c-.183-.31-.52-.5-.887-.5s-.703.19-.886.5L.138 13.499a.98.98 0 0 0 0 1.001c.193.31.53.501.886.501h13.964c.367 0 .704-.19.877-.5a1.03 1.03 0 0 0 .01-1.002L8.893 1.5zm.133 11.497H6.987v-2.003h2.039v2.003zm0-3.004H6.987V5.987h2.039v4.006z"></path></svg></span>Measuring Distance</div><div class="admonitionContent_BuS1"><p>Calibrating the encoders requires a long ruler (e.g. 1m) or a tape measure, preferably with metric measurements. If you only have imperial available, you can convert the imperial units to metric before using the equations here.</p></div></div>
<p>We need to calibrate the encoders so that the feedback system for the robot works correctly. You can read more about the control system in my previous blog post, <a class="" href="https://mikelikesrobots.github.io/blog/rover-ros2-control">Controlling the Viam Rover with ros2_control</a>.</p>
<p>For the control system of the robot to correctly track the robot's movement, it needs to be able to calculate the distance travelled by the wheels based on the encoder ticks. Our task is to move the robot a fixed distance and count the ticks measured while travelling that distance.</p>
<div class="theme-admonition theme-admonition-note admonition_xJq3 alert alert--secondary"><div class="admonitionHeading_Gvgb"><span class="admonitionIcon_Rf37"><svg viewBox="0 0 14 16"><path fill-rule="evenodd" d="M6.3 5.69a.942.942 0 0 1-.28-.7c0-.28.09-.52.28-.7.19-.18.42-.28.7-.28.28 0 .52.09.7.28.18.19.28.42.28.7 0 .28-.09.52-.28.7a1 1 0 0 1-.7.3c-.28 0-.52-.11-.7-.3zM8 7.99c-.02-.25-.11-.48-.31-.69-.2-.19-.42-.3-.69-.31H6c-.27.02-.48.13-.69.31-.2.2-.3.44-.31.69h1v3c.02.27.11.5.31.69.2.2.42.31.69.31h1c.27 0 .48-.11.69-.31.2-.19.3-.42.31-.69H8V7.98v.01zM7 2.3c-3.14 0-5.7 2.54-5.7 5.68 0 3.14 2.56 5.7 5.7 5.7s5.7-2.55 5.7-5.7c0-3.15-2.56-5.69-5.7-5.69v.01zM7 .98c3.86 0 7 3.14 7 7s-3.14 7-7 7-7-3.12-7-7 3.14-7 7-7z"></path></svg></span>Manually Turning the Wheels</div><div class="admonitionContent_BuS1"><p>My original method of calibrating the ticks was to mark each wheel with a piece of tape, then slowly turn each wheel 10 full revolutions and see how many ticks it took for each revolution on average. However, this resulted in very inaccurate movements. I'm not certain why, but my theory is that the encoders don't count the same numbers of ticks at low speeds as they do for high speeds, so turning the wheels very slowly gave the wrong tick counts. The method I outline here gave me much better results.</p></div></div>
<h3 class="anchor anchorTargetStickyNavbar_Vzrq" id="straight-line-movement">Straight Line Movement<a href="https://mikelikesrobots.github.io/blog/viam-rover-calibration#straight-line-movement" class="hash-link" aria-label="Direct link to Straight Line Movement" title="Direct link to Straight Line Movement" translate="no">​</a></h3>
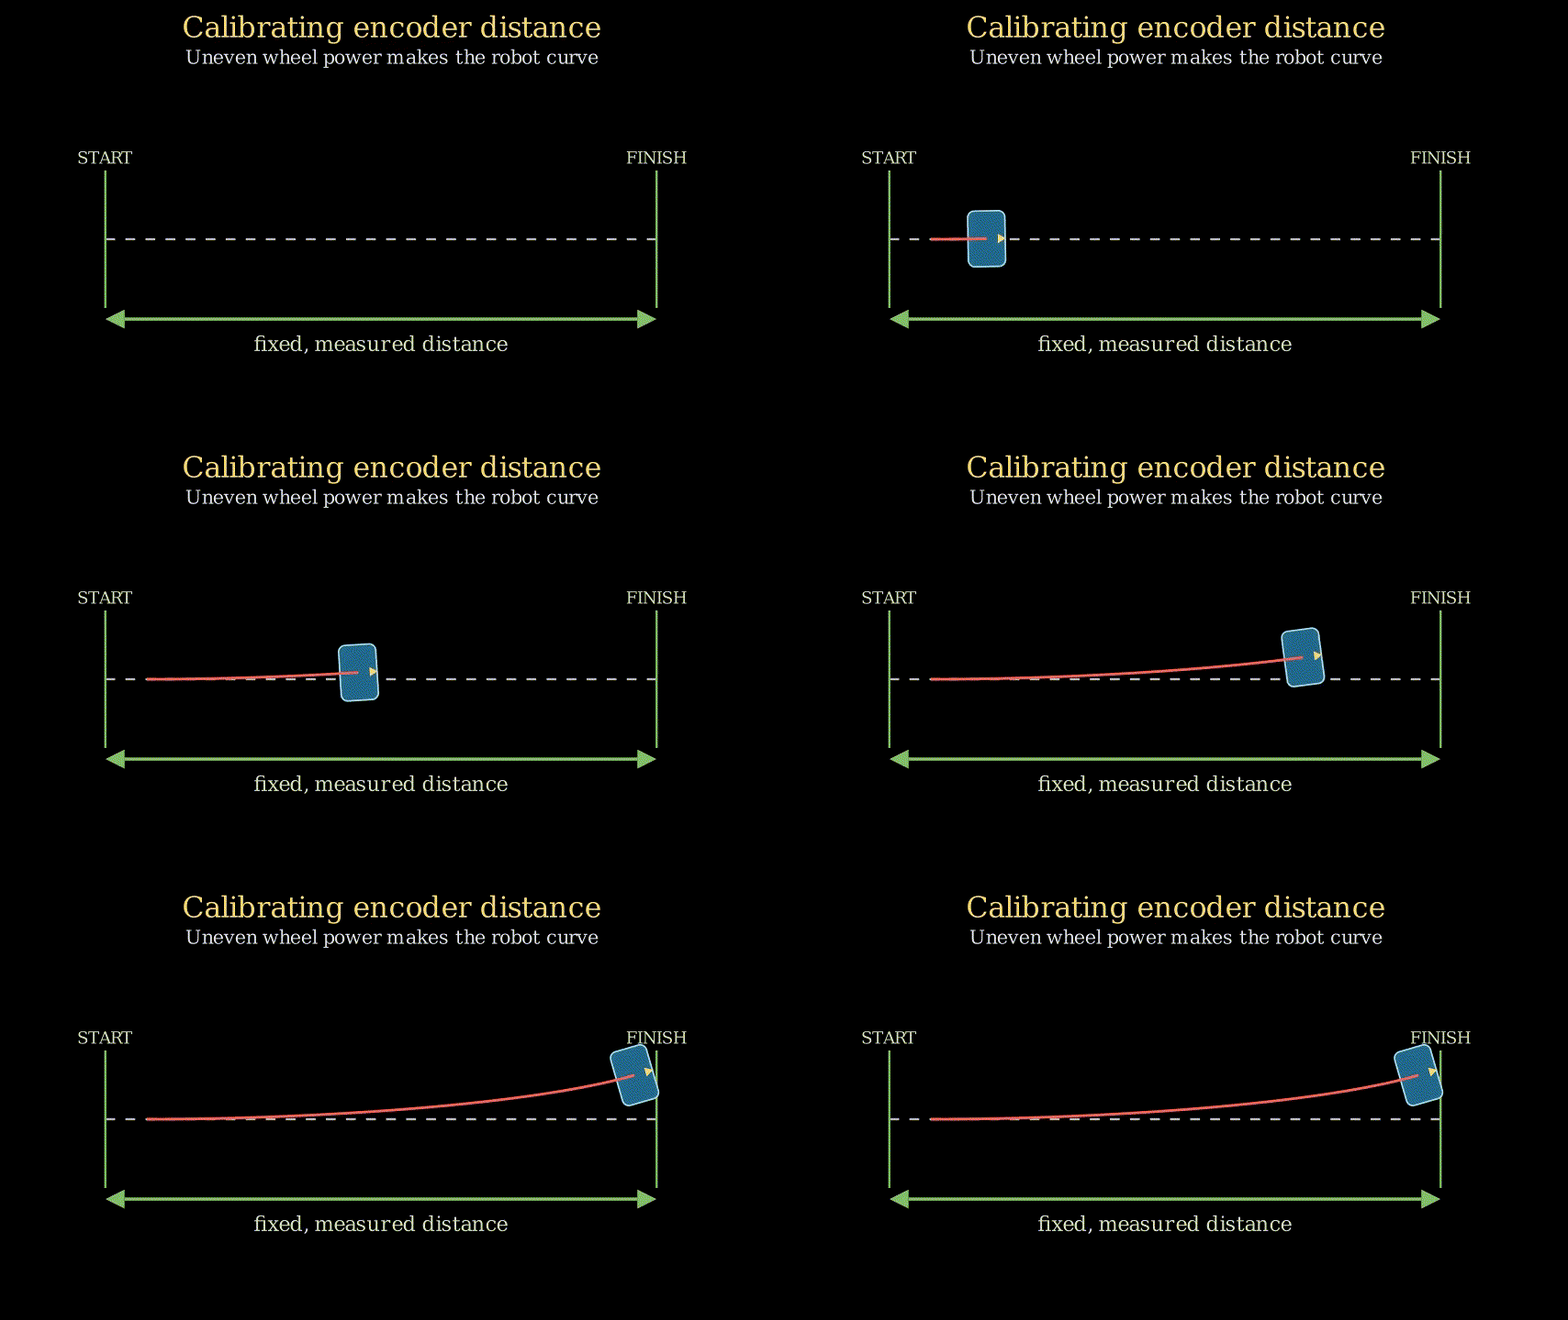
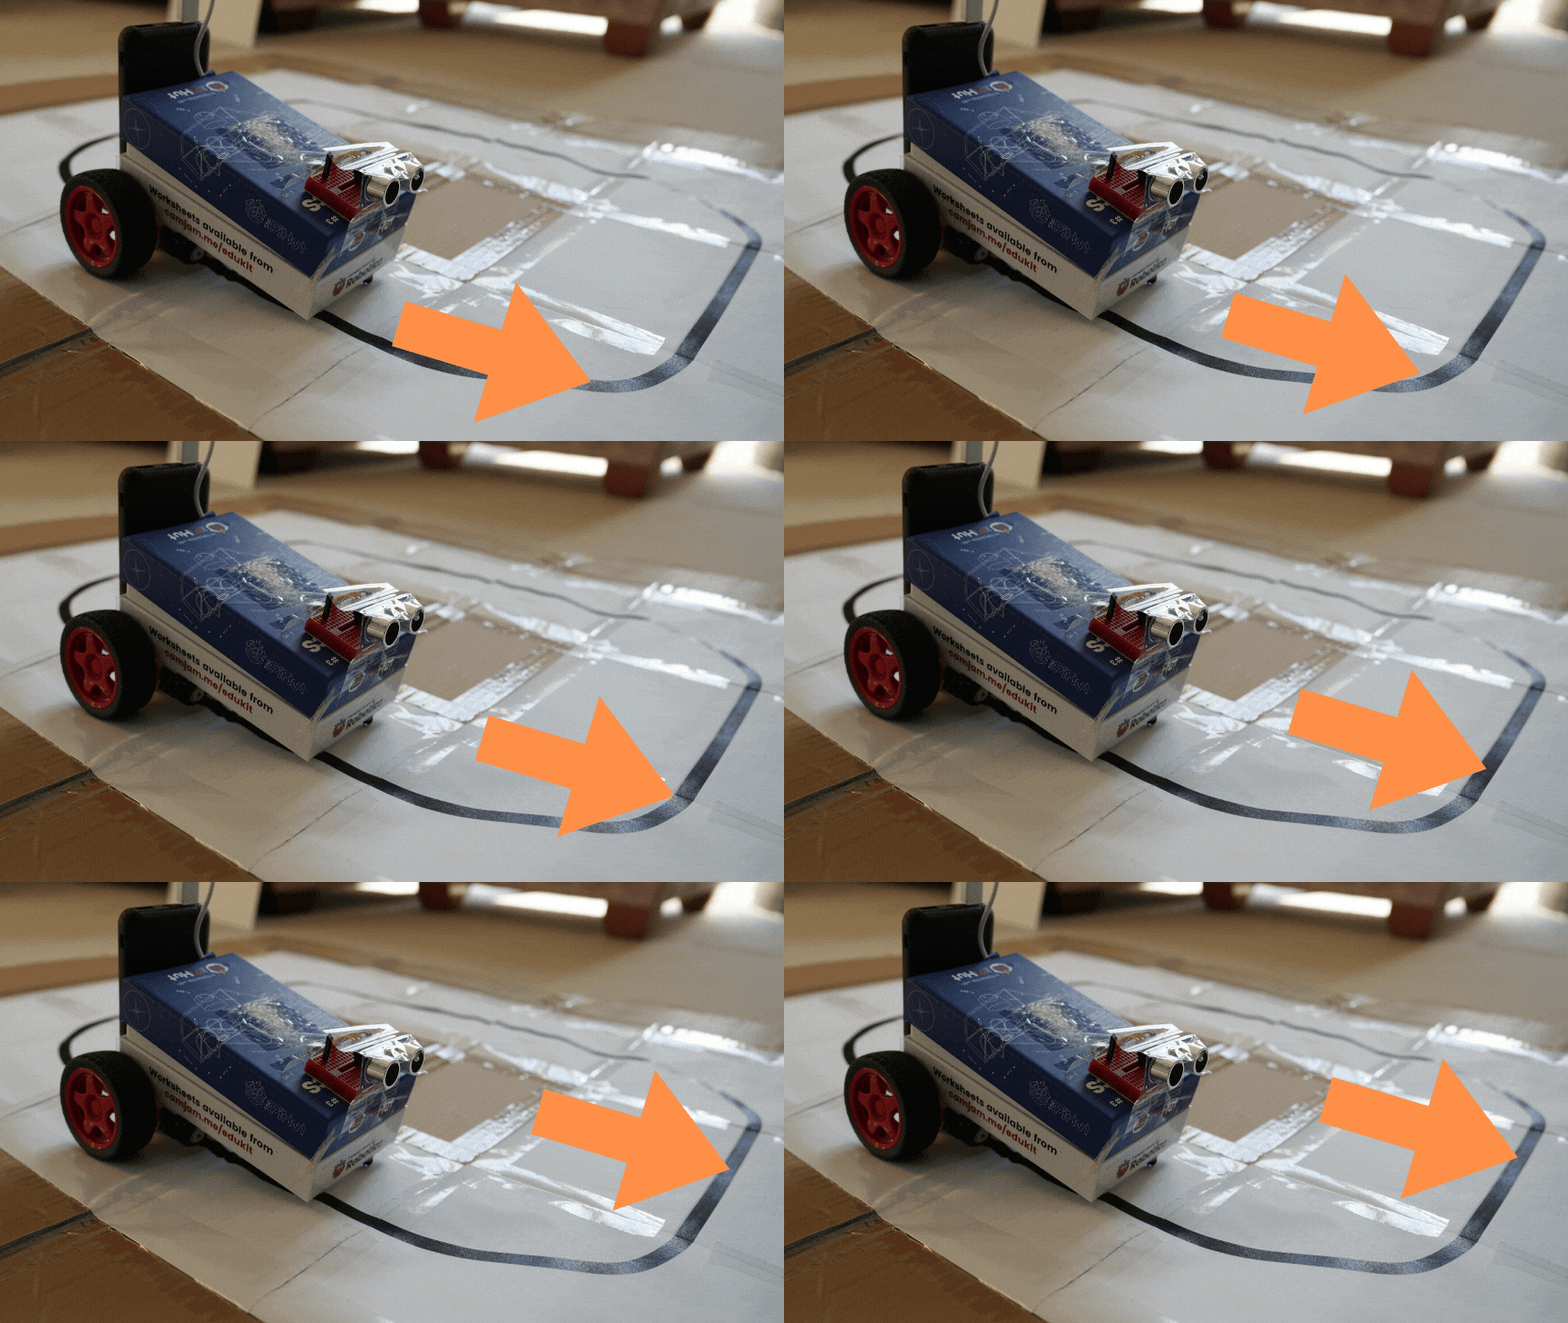
<p>The first step of calibrating the encoders is to make the robot travel in a straight line. Without this step, the robot is very likely to veer off to one side or the other, making it difficult to accurately measure distance travelled for the correct encoder tick counts.</p>
<figure class="text--center"><p><img decoding="async" loading="lazy" alt="Animation showing how uneven wheel power causes the robot to curve" src="https://mikelikesrobots.github.io/assets/images/uneven_wheel_power-03bb4937250a33e15334c6566384e597.gif" width="854" height="480" class="img_ev3q">
</p><figcaption>Animation showing how uneven wheel power causes the robot to curve. Here, the right motor is slightly stronger than the left, causing the robot to arc to the left.</figcaption><p></p></figure>
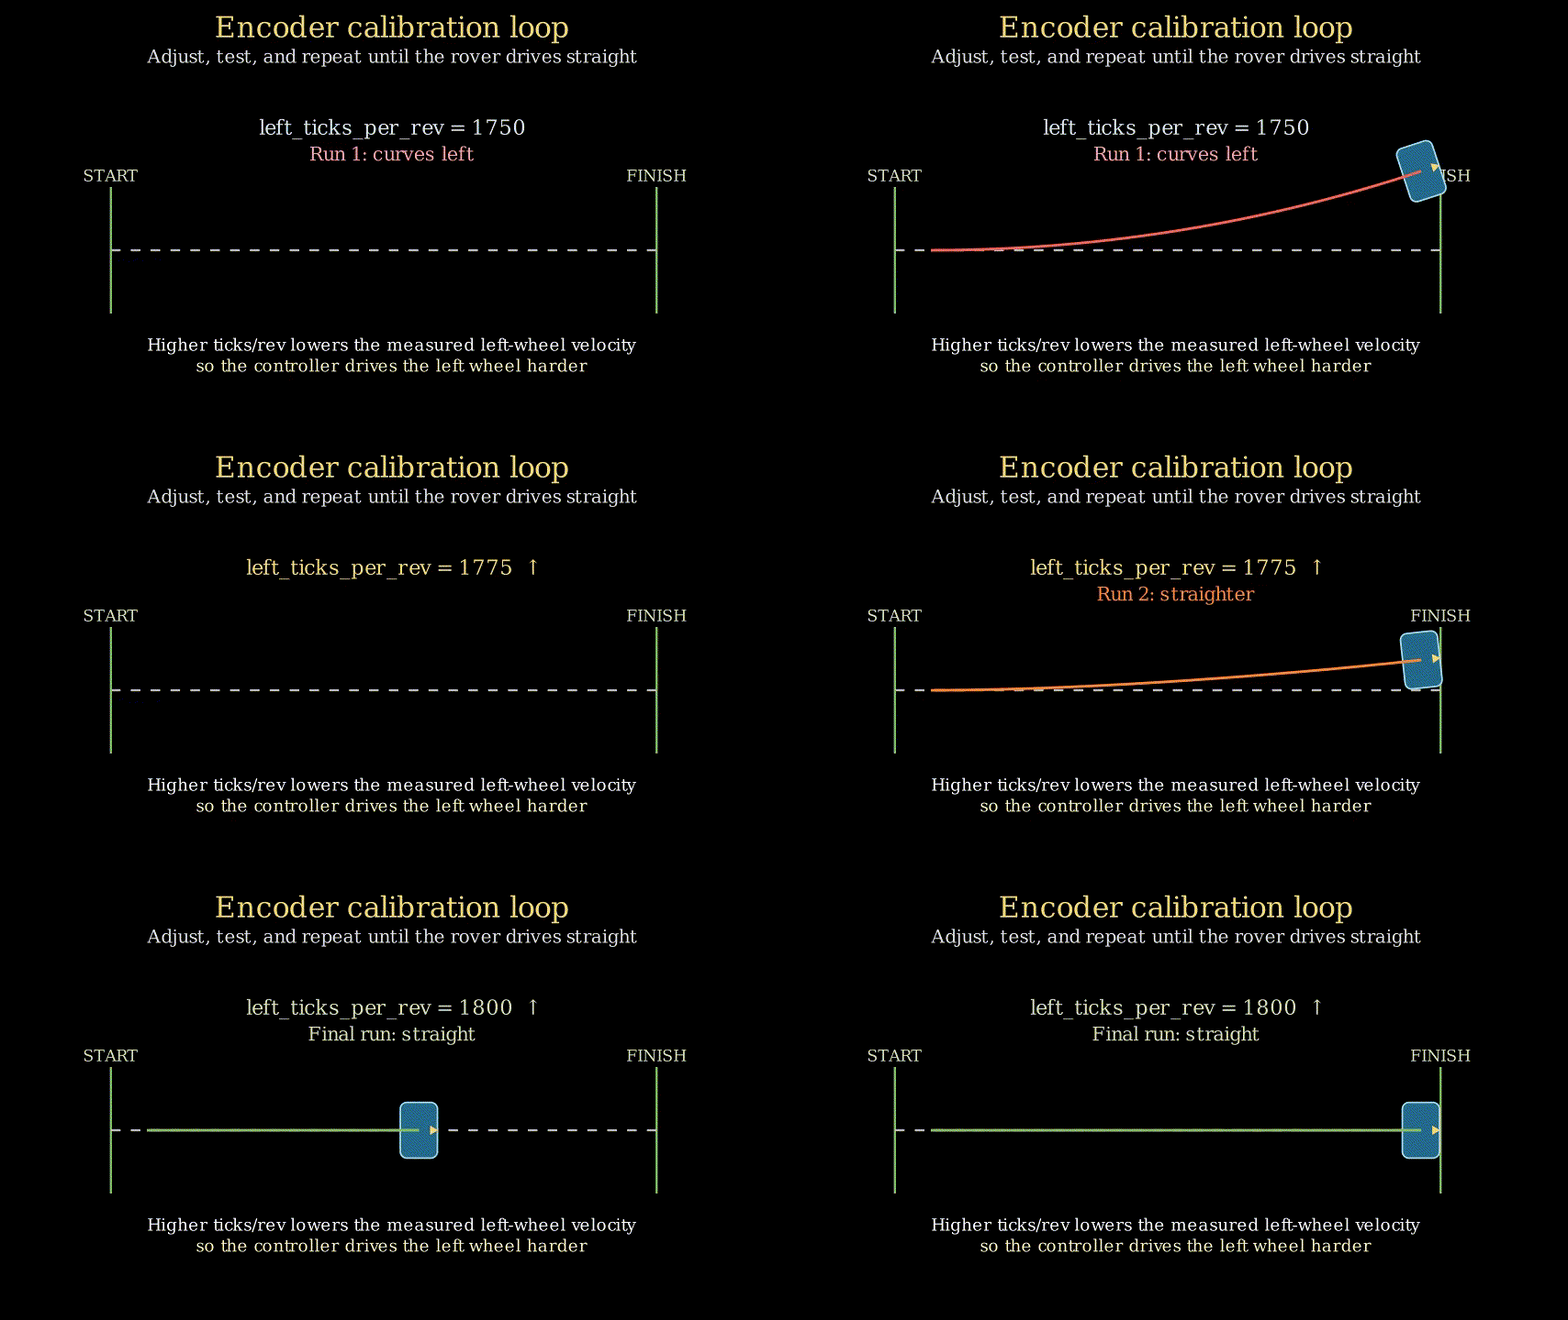
<p>The simplest way to fix this error is to run the full control system for the robot and repeatedly adjust the encoder counts until the robot correctly moves in a straight line. To help with this adjustment, it benefits us to understand how the tick count converts into velocity, so we know which side to accelerate for the robot's movement.</p>
<p><strong>Calculating Distance Travelled from Encoder Ticks</strong></p>
<p>The velocity that the wheel is travelling at is the distance travelled divided by time, and the distance can be calculated as the circumference of the wheel multiplied by the number of revolutions. Hence, the velocity is:</p>
<span class="katex-display"><span class="katex"><span class="katex-mathml"><math xmlns="http://www.w3.org/1998/Math/MathML" display="block"><semantics><mrow><mi>v</mi><mo>=</mo><mfrac><mrow><mn>2</mn><mi>π</mi><mi>r</mi><mo>∗</mo><mi>r</mi><mi>e</mi><mi>v</mi><mi>o</mi><mi>l</mi><mi>u</mi><mi>t</mi><mi>i</mi><mi>o</mi><mi>n</mi><mi>s</mi></mrow><mi>t</mi></mfrac></mrow><annotation encoding="application/x-tex">v = \frac{2 \pi r * revolutions}{t}
</annotation></semantics></math></span><span class="katex-html" aria-hidden="true"><span class="base"><span class="strut" style="height:0.4306em"></span><span class="mord mathnormal" style="margin-right:0.0359em">v</span><span class="mspace" style="margin-right:0.2778em"></span><span class="mrel">=</span><span class="mspace" style="margin-right:0.2778em"></span></span><span class="base"><span class="strut" style="height:2.0574em;vertical-align:-0.686em"></span><span class="mord"><span class="mopen nulldelimiter"></span><span class="mfrac"><span class="vlist-t vlist-t2"><span class="vlist-r"><span class="vlist" style="height:1.3714em"><span style="top:-2.314em"><span class="pstrut" style="height:3em"></span><span class="mord"><span class="mord mathnormal">t</span></span></span><span style="top:-3.23em"><span class="pstrut" style="height:3em"></span><span class="frac-line" style="border-bottom-width:0.04em"></span></span><span style="top:-3.677em"><span class="pstrut" style="height:3em"></span><span class="mord"><span class="mord">2</span><span class="mord mathnormal" style="margin-right:0.0359em">π</span><span class="mord mathnormal" style="margin-right:0.0278em">r</span><span class="mspace" style="margin-right:0.2222em"></span><span class="mbin">∗</span><span class="mspace" style="margin-right:0.2222em"></span><span class="mord mathnormal" style="margin-right:0.0278em">r</span><span class="mord mathnormal">e</span><span class="mord mathnormal" style="margin-right:0.0359em">v</span><span class="mord mathnormal">o</span><span class="mord mathnormal" style="margin-right:0.0197em">l</span><span class="mord mathnormal">u</span><span class="mord mathnormal">t</span><span class="mord mathnormal">i</span><span class="mord mathnormal">o</span><span class="mord mathnormal">n</span><span class="mord mathnormal">s</span></span></span></span><span class="vlist-s">​</span></span><span class="vlist-r"><span class="vlist" style="height:0.686em"><span></span></span></span></span></span><span class="mclose nulldelimiter"></span></span></span></span></span></span>
<p>The revolutions is the number of ticks counted during travel divided by the ticks per revolution:</p>
<span class="katex-display"><span class="katex"><span class="katex-mathml"><math xmlns="http://www.w3.org/1998/Math/MathML" display="block"><semantics><mrow><mi>v</mi><mo>=</mo><mfrac><mrow><mn>2</mn><mi>π</mi><mi>r</mi><mo>∗</mo><mfrac><mrow><mi>t</mi><mi>i</mi><mi>c</mi><mi>k</mi><mi>s</mi></mrow><mrow><mi>t</mi><mi>i</mi><mi>c</mi><mi>k</mi><mi>s</mi><mi mathvariant="normal">_</mi><mi>p</mi><mi>e</mi><mi>r</mi><mi mathvariant="normal">_</mi><mi>r</mi><mi>e</mi><mi>v</mi></mrow></mfrac></mrow><mi>t</mi></mfrac></mrow><annotation encoding="application/x-tex">v = \frac{2 \pi r * \frac{ticks}{ticks\_per\_rev}}{t}
</annotation></semantics></math></span><span class="katex-html" aria-hidden="true"><span class="base"><span class="strut" style="height:0.4306em"></span><span class="mord mathnormal" style="margin-right:0.0359em">v</span><span class="mspace" style="margin-right:0.2778em"></span><span class="mrel">=</span><span class="mspace" style="margin-right:0.2778em"></span></span><span class="base"><span class="strut" style="height:2.5181em;vertical-align:-0.686em"></span><span class="mord"><span class="mopen nulldelimiter"></span><span class="mfrac"><span class="vlist-t vlist-t2"><span class="vlist-r"><span class="vlist" style="height:1.8321em"><span style="top:-2.314em"><span class="pstrut" style="height:3em"></span><span class="mord"><span class="mord mathnormal">t</span></span></span><span style="top:-3.23em"><span class="pstrut" style="height:3em"></span><span class="frac-line" style="border-bottom-width:0.04em"></span></span><span style="top:-3.952em"><span class="pstrut" style="height:3em"></span><span class="mord"><span class="mord">2</span><span class="mord mathnormal" style="margin-right:0.0359em">π</span><span class="mord mathnormal" style="margin-right:0.0278em">r</span><span class="mspace" style="margin-right:0.2222em"></span><span class="mbin">∗</span><span class="mspace" style="margin-right:0.2222em"></span><span class="mord"><span class="mopen nulldelimiter"></span><span class="mfrac"><span class="vlist-t vlist-t2"><span class="vlist-r"><span class="vlist" style="height:0.8801em"><span style="top:-2.655em"><span class="pstrut" style="height:3em"></span><span class="sizing reset-size6 size3 mtight"><span class="mord mtight"><span class="mord mathnormal mtight">t</span><span class="mord mathnormal mtight">i</span><span class="mord mathnormal mtight">c</span><span class="mord mathnormal mtight" style="margin-right:0.0315em">k</span><span class="mord mathnormal mtight">s</span><span class="mord mtight" style="margin-right:0.0278em">_</span><span class="mord mathnormal mtight">p</span><span class="mord mathnormal mtight" style="margin-right:0.0278em">er</span><span class="mord mtight" style="margin-right:0.0278em">_</span><span class="mord mathnormal mtight" style="margin-right:0.0278em">r</span><span class="mord mathnormal mtight">e</span><span class="mord mathnormal mtight" style="margin-right:0.0359em">v</span></span></span></span><span style="top:-3.23em"><span class="pstrut" style="height:3em"></span><span class="frac-line" style="border-bottom-width:0.04em"></span></span><span style="top:-3.394em"><span class="pstrut" style="height:3em"></span><span class="sizing reset-size6 size3 mtight"><span class="mord mtight"><span class="mord mathnormal mtight">t</span><span class="mord mathnormal mtight">i</span><span class="mord mathnormal mtight">c</span><span class="mord mathnormal mtight" style="margin-right:0.0315em">k</span><span class="mord mathnormal mtight">s</span></span></span></span></span><span class="vlist-s">​</span></span><span class="vlist-r"><span class="vlist" style="height:0.562em"><span></span></span></span></span></span><span class="mclose nulldelimiter"></span></span></span></span></span><span class="vlist-s">​</span></span><span class="vlist-r"><span class="vlist" style="height:0.686em"><span></span></span></span></span></span><span class="mclose nulldelimiter"></span></span></span></span></span></span>
<p>To simplify this equation, we can note that the time and radius are not changing, which means that the velocity is <em>proportional</em> to the revolutions counted:</p>
<span class="katex-display"><span class="katex"><span class="katex-mathml"><math xmlns="http://www.w3.org/1998/Math/MathML" display="block"><semantics><mrow><mi>v</mi><mo>∝</mo><mfrac><mrow><mi>t</mi><mi>i</mi><mi>c</mi><mi>k</mi><mi>s</mi></mrow><mrow><mi>t</mi><mi>i</mi><mi>c</mi><mi>k</mi><mi>s</mi><mi mathvariant="normal">_</mi><mi>p</mi><mi>e</mi><mi>r</mi><mi mathvariant="normal">_</mi><mi>r</mi><mi>e</mi><mi>v</mi></mrow></mfrac></mrow><annotation encoding="application/x-tex">v \propto \frac{ticks}{ticks\_per\_rev}
</annotation></semantics></math></span><span class="katex-html" aria-hidden="true"><span class="base"><span class="strut" style="height:0.4306em"></span><span class="mord mathnormal" style="margin-right:0.0359em">v</span><span class="mspace" style="margin-right:0.2778em"></span><span class="mrel">∝</span><span class="mspace" style="margin-right:0.2778em"></span></span><span class="base"><span class="strut" style="height:2.3674em;vertical-align:-0.996em"></span><span class="mord"><span class="mopen nulldelimiter"></span><span class="mfrac"><span class="vlist-t vlist-t2"><span class="vlist-r"><span class="vlist" style="height:1.3714em"><span style="top:-2.314em"><span class="pstrut" style="height:3em"></span><span class="mord"><span class="mord mathnormal">t</span><span class="mord mathnormal">i</span><span class="mord mathnormal">c</span><span class="mord mathnormal" style="margin-right:0.0315em">k</span><span class="mord mathnormal">s</span><span class="mord" style="margin-right:0.0278em">_</span><span class="mord mathnormal">p</span><span class="mord mathnormal" style="margin-right:0.0278em">er</span><span class="mord" style="margin-right:0.0278em">_</span><span class="mord mathnormal" style="margin-right:0.0278em">r</span><span class="mord mathnormal">e</span><span class="mord mathnormal" style="margin-right:0.0359em">v</span></span></span><span style="top:-3.23em"><span class="pstrut" style="height:3em"></span><span class="frac-line" style="border-bottom-width:0.04em"></span></span><span style="top:-3.677em"><span class="pstrut" style="height:3em"></span><span class="mord"><span class="mord mathnormal">t</span><span class="mord mathnormal">i</span><span class="mord mathnormal">c</span><span class="mord mathnormal" style="margin-right:0.0315em">k</span><span class="mord mathnormal">s</span></span></span></span><span class="vlist-s">​</span></span><span class="vlist-r"><span class="vlist" style="height:0.996em"><span></span></span></span></span></span><span class="mclose nulldelimiter"></span></span></span></span></span></span>
<p>If the robot is turning left, that means the left motor is not being driven hard enough by the control system. We need to make the measured velocity <em>appear</em> smaller so the controller will drive that motor harder. To do that, we increase the <span class="katex"><span class="katex-mathml"><math xmlns="http://www.w3.org/1998/Math/MathML"><semantics><mrow><mi>l</mi><mi>e</mi><mi>f</mi><mi>t</mi><mi mathvariant="normal">_</mi><mi>t</mi><mi>i</mi><mi>c</mi><mi>k</mi><mi>s</mi><mi mathvariant="normal">_</mi><mi>p</mi><mi>e</mi><mi>r</mi><mi mathvariant="normal">_</mi><mi>r</mi><mi>e</mi><mi>v</mi></mrow><annotation encoding="application/x-tex">left\_ticks\_per\_rev</annotation></semantics></math></span><span class="katex-html" aria-hidden="true"><span class="base"><span class="strut" style="height:1.0044em;vertical-align:-0.31em"></span><span class="mord mathnormal" style="margin-right:0.0197em">l</span><span class="mord mathnormal">e</span><span class="mord mathnormal" style="margin-right:0.1076em">f</span><span class="mord mathnormal">t</span><span class="mord" style="margin-right:0.0278em">_</span><span class="mord mathnormal">t</span><span class="mord mathnormal">i</span><span class="mord mathnormal">c</span><span class="mord mathnormal" style="margin-right:0.0315em">k</span><span class="mord mathnormal">s</span><span class="mord" style="margin-right:0.0278em">_</span><span class="mord mathnormal">p</span><span class="mord mathnormal" style="margin-right:0.0278em">er</span><span class="mord" style="margin-right:0.0278em">_</span><span class="mord mathnormal" style="margin-right:0.0278em">r</span><span class="mord mathnormal">e</span><span class="mord mathnormal" style="margin-right:0.0359em">v</span></span></span></span>. The same logic works for the right wheel.</p>
<div class="theme-admonition theme-admonition-info admonition_xJq3 alert alert--info"><div class="admonitionHeading_Gvgb"><span class="admonitionIcon_Rf37"><svg viewBox="0 0 14 16"><path fill-rule="evenodd" d="M7 2.3c3.14 0 5.7 2.56 5.7 5.7s-2.56 5.7-5.7 5.7A5.71 5.71 0 0 1 1.3 8c0-3.14 2.56-5.7 5.7-5.7zM7 1C3.14 1 0 4.14 0 8s3.14 7 7 7 7-3.14 7-7-3.14-7-7-7zm1 3H6v5h2V4zm0 6H6v2h2v-2z"></path></svg></span>Adjusting Robot Curve</div><div class="admonitionContent_BuS1"><p>If the robot is curving left, increase <span class="katex"><span class="katex-mathml"><math xmlns="http://www.w3.org/1998/Math/MathML"><semantics><mrow><mi>l</mi><mi>e</mi><mi>f</mi><mi>t</mi><mi mathvariant="normal">_</mi><mi>t</mi><mi>i</mi><mi>c</mi><mi>k</mi><mi>s</mi><mi mathvariant="normal">_</mi><mi>p</mi><mi>e</mi><mi>r</mi><mi mathvariant="normal">_</mi><mi>r</mi><mi>e</mi><mi>v</mi></mrow><annotation encoding="application/x-tex">left\_ticks\_per\_rev</annotation></semantics></math></span><span class="katex-html" aria-hidden="true"><span class="base"><span class="strut" style="height:1.0044em;vertical-align:-0.31em"></span><span class="mord mathnormal" style="margin-right:0.0197em">l</span><span class="mord mathnormal">e</span><span class="mord mathnormal" style="margin-right:0.1076em">f</span><span class="mord mathnormal">t</span><span class="mord" style="margin-right:0.0278em">_</span><span class="mord mathnormal">t</span><span class="mord mathnormal">i</span><span class="mord mathnormal">c</span><span class="mord mathnormal" style="margin-right:0.0315em">k</span><span class="mord mathnormal">s</span><span class="mord" style="margin-right:0.0278em">_</span><span class="mord mathnormal">p</span><span class="mord mathnormal" style="margin-right:0.0278em">er</span><span class="mord" style="margin-right:0.0278em">_</span><span class="mord mathnormal" style="margin-right:0.0278em">r</span><span class="mord mathnormal">e</span><span class="mord mathnormal" style="margin-right:0.0359em">v</span></span></span></span>. <br>
If the robot is curving right, increase <span class="katex"><span class="katex-mathml"><math xmlns="http://www.w3.org/1998/Math/MathML"><semantics><mrow><mi>r</mi><mi>i</mi><mi>g</mi><mi>h</mi><mi>t</mi><mi mathvariant="normal">_</mi><mi>t</mi><mi>i</mi><mi>c</mi><mi>k</mi><mi>s</mi><mi mathvariant="normal">_</mi><mi>p</mi><mi>e</mi><mi>r</mi><mi mathvariant="normal">_</mi><mi>r</mi><mi>e</mi><mi>v</mi></mrow><annotation encoding="application/x-tex">right\_ticks\_per\_rev</annotation></semantics></math></span><span class="katex-html" aria-hidden="true"><span class="base"><span class="strut" style="height:1.0044em;vertical-align:-0.31em"></span><span class="mord mathnormal" style="margin-right:0.0278em">r</span><span class="mord mathnormal">i</span><span class="mord mathnormal" style="margin-right:0.0359em">g</span><span class="mord mathnormal">h</span><span class="mord mathnormal">t</span><span class="mord" style="margin-right:0.0278em">_</span><span class="mord mathnormal">t</span><span class="mord mathnormal">i</span><span class="mord mathnormal">c</span><span class="mord mathnormal" style="margin-right:0.0315em">k</span><span class="mord mathnormal">s</span><span class="mord" style="margin-right:0.0278em">_</span><span class="mord mathnormal">p</span><span class="mord mathnormal" style="margin-right:0.0278em">er</span><span class="mord" style="margin-right:0.0278em">_</span><span class="mord mathnormal" style="margin-right:0.0278em">r</span><span class="mord mathnormal">e</span><span class="mord mathnormal" style="margin-right:0.0359em">v</span></span></span></span>. <br></p><p>You can adjust these values in the <a href="https://github.com/mikelikesrobots/viam-rover2/blob/main/description/ros2_control/rover2.ros2_control.xacro#L13-L14" target="_blank" rel="noopener noreferrer" class=""><code>rover2.ros2_control.xacro</code> file</a>.</p></div></div>
<p>Our task is to place the robot down next to a tape measure or a large ruler and keep running the robot, adjusting the <span class="katex"><span class="katex-mathml"><math xmlns="http://www.w3.org/1998/Math/MathML"><semantics><mrow><mi>t</mi><mi>i</mi><mi>c</mi><mi>k</mi><mi>s</mi><mi mathvariant="normal">_</mi><mi>p</mi><mi>e</mi><mi>r</mi><mi mathvariant="normal">_</mi><mi>r</mi><mi>e</mi><mi>v</mi></mrow><annotation encoding="application/x-tex">ticks\_per\_rev</annotation></semantics></math></span><span class="katex-html" aria-hidden="true"><span class="base"><span class="strut" style="height:1.0044em;vertical-align:-0.31em"></span><span class="mord mathnormal">t</span><span class="mord mathnormal">i</span><span class="mord mathnormal">c</span><span class="mord mathnormal" style="margin-right:0.0315em">k</span><span class="mord mathnormal">s</span><span class="mord" style="margin-right:0.0278em">_</span><span class="mord mathnormal">p</span><span class="mord mathnormal" style="margin-right:0.0278em">er</span><span class="mord" style="margin-right:0.0278em">_</span><span class="mord mathnormal" style="margin-right:0.0278em">r</span><span class="mord mathnormal">e</span><span class="mord mathnormal" style="margin-right:0.0359em">v</span></span></span></span> variables, until the robot drives in a straight line. You will need some clear space for this; I'd suggest around 2m in front of the robot and 1m either side of the robot, just in case the robot veers off or overshoots its target. Also, be ready to pick up the robot if it's travelling too far!</p>
<p>To drive the robot, open two terminals on the robot. Use one to execute:</p>
<div class="language-bash codeBlockContainer_Ckt0 theme-code-block" style="--prism-color:#393A34;--prism-background-color:#f6f8fa"><div class="codeBlockContent_QJqH"><pre tabindex="0" class="prism-code language-bash codeBlock_bY9V thin-scrollbar" style="color:#393A34;background-color:#f6f8fa"><code class="codeBlockLines_e6Vv"><div class="token-line" style="color:#393A34"><span class="token plain"># Terminal 1</span><br></div><div class="token-line" style="color:#393A34"><span class="token plain">ros2 launch viam_rover2 rover2_bringup.launch.py enable_vision:=false</span><br></div></code></pre></div></div>
<p>In the other terminal, every time you want to drive the robot, execute this script:</p>
<div class="language-bash codeBlockContainer_Ckt0 theme-code-block" style="--prism-color:#393A34;--prism-background-color:#f6f8fa"><div class="codeBlockContent_QJqH"><pre tabindex="0" class="prism-code language-bash codeBlock_bY9V thin-scrollbar" style="color:#393A34;background-color:#f6f8fa"><code class="codeBlockLines_e6Vv"><div class="token-line" style="color:#393A34"><span class="token plain"># Terminal 2</span><br></div><div class="token-line" style="color:#393A34"><span class="token plain">python3 tools/forward_velocity_probe.py</span><br></div></code></pre></div></div>
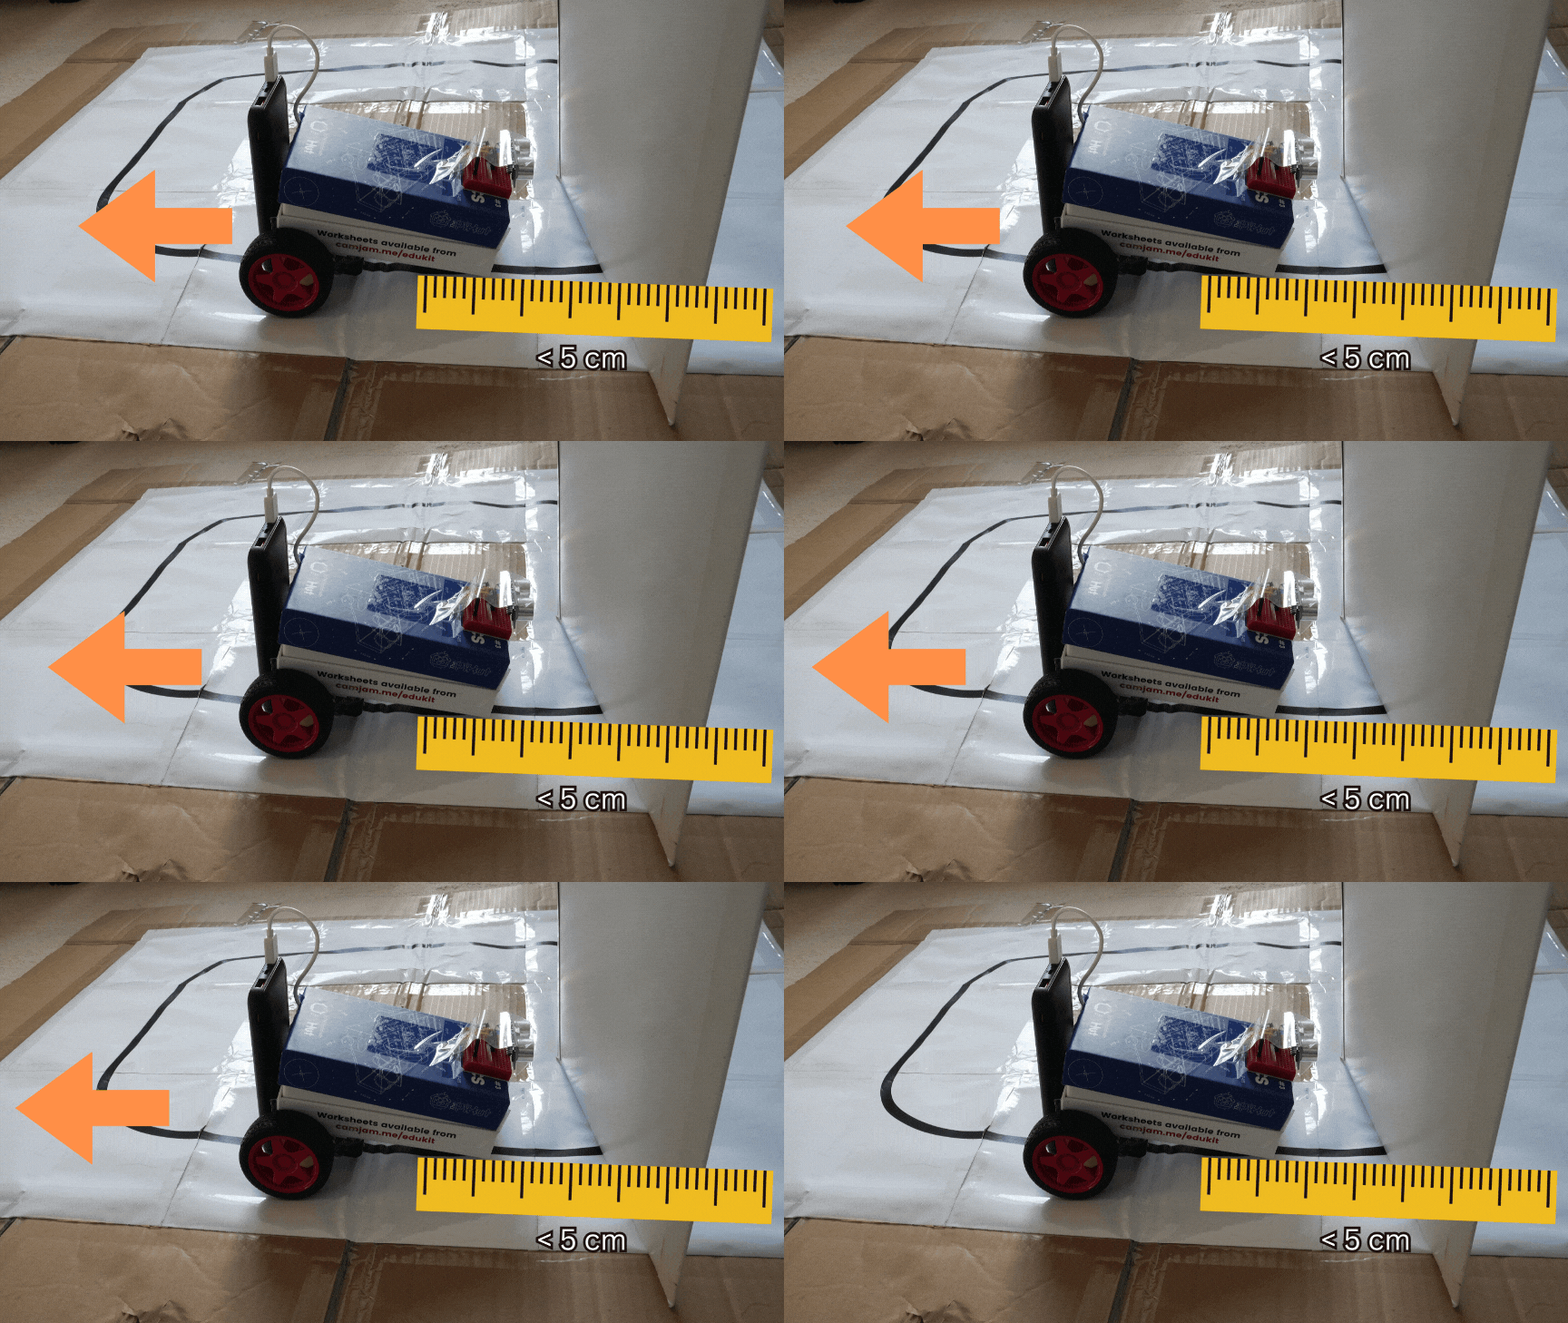
<p>The robot should drive a fixed distance, then output the tick counts measured while travelling. Adjust the ticks per revolution variables, then quit the program running in terminal 1, rebuild, and run again. Try adjusting by about 5% if you're not sure how much to increase it, so 1000 ticks becomes 1050.</p>
<div class="language-bash codeBlockContainer_Ckt0 theme-code-block" style="--prism-color:#393A34;--prism-background-color:#f6f8fa"><div class="codeBlockContent_QJqH"><pre tabindex="0" class="prism-code language-bash codeBlock_bY9V thin-scrollbar" style="color:#393A34;background-color:#f6f8fa"><code class="codeBlockLines_e6Vv"><div class="token-line" style="color:#393A34"><span class="token plain"># Terminal 1</span><br></div><div class="token-line" style="color:#393A34"><span class="token plain">colcon build --packages-select viam_rover2</span><br></div><div class="token-line" style="color:#393A34"><span class="token plain">ros2 launch viam_rover2 rover2_bringup.launch.py enable_vision:=false</span><br></div></code></pre></div></div>
<p>Repeat the process until the robot travels in a straight line. Here's a more compact version:</p>
<ol>
<li class="">Launch the control system.</li>
<li class="">Run <code>forward_velocity_probe.py</code>.</li>
<li class="">Increase the <code>ticks_per_rev</code> value depending on which side the robot veers.</li>
<li class="">Stop the control system and rebuild the package.</li>
</ol>
<div class="theme-admonition theme-admonition-warning admonition_xJq3 alert alert--warning"><div class="admonitionHeading_Gvgb"><span class="admonitionIcon_Rf37"><svg viewBox="0 0 16 16"><path fill-rule="evenodd" d="M8.893 1.5c-.183-.31-.52-.5-.887-.5s-.703.19-.886.5L.138 13.499a.98.98 0 0 0 0 1.001c.193.31.53.501.886.501h13.964c.367 0 .704-.19.877-.5a1.03 1.03 0 0 0 .01-1.002L8.893 1.5zm.133 11.497H6.987v-2.003h2.039v2.003zm0-3.004H6.987V5.987h2.039v4.006z"></path></svg></span>Erratic Robot Movement</div><div class="admonitionContent_BuS1"><p>If your robot is showing extremely erratic movement, with the wheels moving rapidly back and forth and the robot moving around with no inputs, this is likely due to the RC filters not working correctly. Double-check your filter setup. I had the ground pin disconnected while trying to record the accompanying video and didn't realise for 3 days!</p></div></div>
<figure class="text--center"><p><img decoding="async" loading="lazy" alt="Animation demonstrating the encoder tick adjustment loop" src="https://mikelikesrobots.github.io/assets/images/encoder_calibration_loop-9c6064e9b17d6ed001d78c3f25b6f259.gif" width="854" height="480" class="img_ev3q">
</p><figcaption>Animation showing the process of manually adjusting the ticks per revolution until the robot tracks straight.</figcaption><p></p></figure>
<div class="theme-admonition theme-admonition-tip admonition_xJq3 alert alert--success"><div class="admonitionHeading_Gvgb"><span class="admonitionIcon_Rf37"><svg viewBox="0 0 12 16"><path fill-rule="evenodd" d="M6.5 0C3.48 0 1 2.19 1 5c0 .92.55 2.25 1 3 1.34 2.25 1.78 2.78 2 4v1h5v-1c.22-1.22.66-1.75 2-4 .45-.75 1-2.08 1-3 0-2.81-2.48-5-5.5-5zm3.64 7.48c-.25.44-.47.8-.67 1.11-.86 1.41-1.25 2.06-1.45 3.23-.02.05-.02.11-.02.17H5c0-.06 0-.13-.02-.17-.2-1.17-.59-1.83-1.45-3.23-.2-.31-.42-.67-.67-1.11C2.44 6.78 2 5.65 2 5c0-2.2 2.02-4 4.5-4 1.22 0 2.36.42 3.22 1.19C10.55 2.94 11 3.94 11 5c0 .66-.44 1.78-.86 2.48zM4 14h5c-.23 1.14-1.3 2-2.5 2s-2.27-.86-2.5-2z"></path></svg></span>Changing the Distance Travelled</div><div class="admonitionContent_BuS1"><p>The script tries to drive the robot forward 50cm by travelling at 0.10 m/s for five seconds (<span class="katex"><span class="katex-mathml"><math xmlns="http://www.w3.org/1998/Math/MathML"><semantics><mrow><mn>5</mn><mtext> </mtext><mi mathvariant="normal">s</mi><mo>×</mo><mn>0.1</mn><mtext> </mtext><mrow><mi mathvariant="normal">m</mi><mi mathvariant="normal">/</mi><mi mathvariant="normal">s</mi></mrow><mo>=</mo><mn>0.5</mn><mtext> </mtext><mi mathvariant="normal">m</mi></mrow><annotation encoding="application/x-tex">5\,\mathrm{s} \times 0.1\,\mathrm{m/s} = 0.5\,\mathrm{m}</annotation></semantics></math></span><span class="katex-html" aria-hidden="true"><span class="base"><span class="strut" style="height:0.7278em;vertical-align:-0.0833em"></span><span class="mord">5</span><span class="mspace" style="margin-right:0.1667em"></span><span class="mord mathrm">s</span><span class="mspace" style="margin-right:0.2222em"></span><span class="mbin">×</span><span class="mspace" style="margin-right:0.2222em"></span></span><span class="base"><span class="strut" style="height:1em;vertical-align:-0.25em"></span><span class="mord">0.1</span><span class="mspace" style="margin-right:0.1667em"></span><span class="mord"><span class="mord mathrm">m/s</span></span><span class="mspace" style="margin-right:0.2778em"></span><span class="mrel">=</span><span class="mspace" style="margin-right:0.2778em"></span></span><span class="base"><span class="strut" style="height:0.6444em"></span><span class="mord">0.5</span><span class="mspace" style="margin-right:0.1667em"></span><span class="mord mathrm">m</span></span></span></span>). These parameters can be modified in the runtime arguments of the script. For example, to travel 1m at 0.20 m/s, execute this command instead:</p><div class="language-bash codeBlockContainer_Ckt0 theme-code-block" style="--prism-color:#393A34;--prism-background-color:#f6f8fa"><div class="codeBlockContent_QJqH"><pre tabindex="0" class="prism-code language-bash codeBlock_bY9V thin-scrollbar" style="color:#393A34;background-color:#f6f8fa"><code class="codeBlockLines_e6Vv"><div class="token-line" style="color:#393A34"><span class="token plain"># Terminal 2</span><br></div><div class="token-line" style="color:#393A34"><span class="token plain">python3 tools/forward_velocity_probe.py --speed 0.20 --distance 1.0</span><br></div></code></pre></div></div></div></div>
<h3 class="anchor anchorTargetStickyNavbar_Vzrq" id="scaling-the-ticks-per-revolution">Scaling the Ticks per Revolution<a href="https://mikelikesrobots.github.io/blog/viam-rover-calibration#scaling-the-ticks-per-revolution" class="hash-link" aria-label="Direct link to Scaling the Ticks per Revolution" title="Direct link to Scaling the Ticks per Revolution" translate="no">​</a></h3>
<p>Once the robot is moving in a straight line, run the script another time with your chosen parameters. This time, measure the physical distance travelled with the ruler (<span class="katex"><span class="katex-mathml"><math xmlns="http://www.w3.org/1998/Math/MathML"><semantics><mrow><mi>a</mi><mi>c</mi><mi>t</mi><mi>u</mi><mi>a</mi><msub><mi>l</mi><mi>d</mi></msub><mi>i</mi><mi>s</mi><mi>t</mi><mi>a</mi><mi>n</mi><mi>c</mi><mi>e</mi></mrow><annotation encoding="application/x-tex">actual_distance</annotation></semantics></math></span><span class="katex-html" aria-hidden="true"><span class="base"><span class="strut" style="height:0.8444em;vertical-align:-0.15em"></span><span class="mord mathnormal">a</span><span class="mord mathnormal">c</span><span class="mord mathnormal">t</span><span class="mord mathnormal">u</span><span class="mord mathnormal">a</span><span class="mord"><span class="mord mathnormal" style="margin-right:0.0197em">l</span><span class="msupsub"><span class="vlist-t vlist-t2"><span class="vlist-r"><span class="vlist" style="height:0.3361em"><span style="top:-2.55em;margin-left:-0.0197em;margin-right:0.05em"><span class="pstrut" style="height:2.7em"></span><span class="sizing reset-size6 size3 mtight"><span class="mord mathnormal mtight">d</span></span></span></span><span class="vlist-s">​</span></span><span class="vlist-r"><span class="vlist" style="height:0.15em"><span></span></span></span></span></span></span><span class="mord mathnormal">i</span><span class="mord mathnormal">s</span><span class="mord mathnormal">t</span><span class="mord mathnormal">an</span><span class="mord mathnormal">ce</span></span></span></span>), then note the odometry distance reported by the script (<span class="katex"><span class="katex-mathml"><math xmlns="http://www.w3.org/1998/Math/MathML"><semantics><mrow><mi>o</mi><mi>d</mi><mi>o</mi><msub><mi>m</mi><mi>d</mi></msub><mi>i</mi><mi>s</mi><mi>t</mi><mi>a</mi><mi>n</mi><mi>c</mi><mi>e</mi></mrow><annotation encoding="application/x-tex">odom_distance</annotation></semantics></math></span><span class="katex-html" aria-hidden="true"><span class="base"><span class="strut" style="height:0.8444em;vertical-align:-0.15em"></span><span class="mord mathnormal">o</span><span class="mord mathnormal">d</span><span class="mord mathnormal">o</span><span class="mord"><span class="mord mathnormal">m</span><span class="msupsub"><span class="vlist-t vlist-t2"><span class="vlist-r"><span class="vlist" style="height:0.3361em"><span style="top:-2.55em;margin-left:0em;margin-right:0.05em"><span class="pstrut" style="height:2.7em"></span><span class="sizing reset-size6 size3 mtight"><span class="mord mathnormal mtight">d</span></span></span></span><span class="vlist-s">​</span></span><span class="vlist-r"><span class="vlist" style="height:0.15em"><span></span></span></span></span></span></span><span class="mord mathnormal">i</span><span class="mord mathnormal">s</span><span class="mord mathnormal">t</span><span class="mord mathnormal">an</span><span class="mord mathnormal">ce</span></span></span></span>).</p>
<span class="katex-display"><span class="katex"><span class="katex-mathml"><math xmlns="http://www.w3.org/1998/Math/MathML" display="block"><semantics><mrow><mi>n</mi><mi>e</mi><mi>w</mi><mi mathvariant="normal">_</mi><mi>t</mi><mi>i</mi><mi>c</mi><mi>k</mi><mi>s</mi><mi mathvariant="normal">_</mi><mi>p</mi><mi>e</mi><mi>r</mi><mi mathvariant="normal">_</mi><mi>r</mi><mi>e</mi><mi>v</mi><mo>=</mo><mi>o</mi><mi>l</mi><mi>d</mi><mi mathvariant="normal">_</mi><mi>t</mi><mi>i</mi><mi>c</mi><mi>k</mi><mi>s</mi><mi mathvariant="normal">_</mi><mi>p</mi><mi>e</mi><mi>r</mi><mi mathvariant="normal">_</mi><mi>r</mi><mi>e</mi><mi>v</mi><mo>∗</mo><mfrac><mrow><mi>o</mi><mi>d</mi><mi>o</mi><msub><mi>m</mi><mi>d</mi></msub><mi>i</mi><mi>s</mi><mi>t</mi><mi>a</mi><mi>n</mi><mi>c</mi><mi>e</mi></mrow><mrow><mi>a</mi><mi>c</mi><mi>t</mi><mi>u</mi><mi>a</mi><msub><mi>l</mi><mi>d</mi></msub><mi>i</mi><mi>s</mi><mi>t</mi><mi>a</mi><mi>n</mi><mi>c</mi><mi>e</mi></mrow></mfrac></mrow><annotation encoding="application/x-tex">new\_ticks\_per\_rev = old\_ticks\_per\_rev * \frac{odom_distance}{actual_distance}
</annotation></semantics></math></span><span class="katex-html" aria-hidden="true"><span class="base"><span class="strut" style="height:1.0044em;vertical-align:-0.31em"></span><span class="mord mathnormal">n</span><span class="mord mathnormal">e</span><span class="mord mathnormal" style="margin-right:0.0269em">w</span><span class="mord" style="margin-right:0.0278em">_</span><span class="mord mathnormal">t</span><span class="mord mathnormal">i</span><span class="mord mathnormal">c</span><span class="mord mathnormal" style="margin-right:0.0315em">k</span><span class="mord mathnormal">s</span><span class="mord" style="margin-right:0.0278em">_</span><span class="mord mathnormal">p</span><span class="mord mathnormal" style="margin-right:0.0278em">er</span><span class="mord" style="margin-right:0.0278em">_</span><span class="mord mathnormal" style="margin-right:0.0278em">r</span><span class="mord mathnormal">e</span><span class="mord mathnormal" style="margin-right:0.0359em">v</span><span class="mspace" style="margin-right:0.2778em"></span><span class="mrel">=</span><span class="mspace" style="margin-right:0.2778em"></span></span><span class="base"><span class="strut" style="height:1.0044em;vertical-align:-0.31em"></span><span class="mord mathnormal">o</span><span class="mord mathnormal" style="margin-right:0.0197em">l</span><span class="mord mathnormal">d</span><span class="mord" style="margin-right:0.0278em">_</span><span class="mord mathnormal">t</span><span class="mord mathnormal">i</span><span class="mord mathnormal">c</span><span class="mord mathnormal" style="margin-right:0.0315em">k</span><span class="mord mathnormal">s</span><span class="mord" style="margin-right:0.0278em">_</span><span class="mord mathnormal">p</span><span class="mord mathnormal" style="margin-right:0.0278em">er</span><span class="mord" style="margin-right:0.0278em">_</span><span class="mord mathnormal" style="margin-right:0.0278em">r</span><span class="mord mathnormal">e</span><span class="mord mathnormal" style="margin-right:0.0359em">v</span><span class="mspace" style="margin-right:0.2222em"></span><span class="mbin">∗</span><span class="mspace" style="margin-right:0.2222em"></span></span><span class="base"><span class="strut" style="height:2.2074em;vertical-align:-0.836em"></span><span class="mord"><span class="mopen nulldelimiter"></span><span class="mfrac"><span class="vlist-t vlist-t2"><span class="vlist-r"><span class="vlist" style="height:1.3714em"><span style="top:-2.314em"><span class="pstrut" style="height:3em"></span><span class="mord"><span class="mord mathnormal">a</span><span class="mord mathnormal">c</span><span class="mord mathnormal">t</span><span class="mord mathnormal">u</span><span class="mord mathnormal">a</span><span class="mord"><span class="mord mathnormal" style="margin-right:0.0197em">l</span><span class="msupsub"><span class="vlist-t vlist-t2"><span class="vlist-r"><span class="vlist" style="height:0.3361em"><span style="top:-2.55em;margin-left:-0.0197em;margin-right:0.05em"><span class="pstrut" style="height:2.7em"></span><span class="sizing reset-size6 size3 mtight"><span class="mord mathnormal mtight">d</span></span></span></span><span class="vlist-s">​</span></span><span class="vlist-r"><span class="vlist" style="height:0.15em"><span></span></span></span></span></span></span><span class="mord mathnormal">i</span><span class="mord mathnormal">s</span><span class="mord mathnormal">t</span><span class="mord mathnormal">an</span><span class="mord mathnormal">ce</span></span></span><span style="top:-3.23em"><span class="pstrut" style="height:3em"></span><span class="frac-line" style="border-bottom-width:0.04em"></span></span><span style="top:-3.677em"><span class="pstrut" style="height:3em"></span><span class="mord"><span class="mord mathnormal">o</span><span class="mord mathnormal">d</span><span class="mord mathnormal">o</span><span class="mord"><span class="mord mathnormal">m</span><span class="msupsub"><span class="vlist-t vlist-t2"><span class="vlist-r"><span class="vlist" style="height:0.3361em"><span style="top:-2.55em;margin-left:0em;margin-right:0.05em"><span class="pstrut" style="height:2.7em"></span><span class="sizing reset-size6 size3 mtight"><span class="mord mathnormal mtight">d</span></span></span></span><span class="vlist-s">​</span></span><span class="vlist-r"><span class="vlist" style="height:0.15em"><span></span></span></span></span></span></span><span class="mord mathnormal">i</span><span class="mord mathnormal">s</span><span class="mord mathnormal">t</span><span class="mord mathnormal">an</span><span class="mord mathnormal">ce</span></span></span></span><span class="vlist-s">​</span></span><span class="vlist-r"><span class="vlist" style="height:0.836em"><span></span></span></span></span></span><span class="mclose nulldelimiter"></span></span></span></span></span></span>
<p>Multiply both calibrated <code>ticks_per_rev</code> values by the same ratio. This corrects the overall distance scale without changing the left-to-right relationship that makes the rover travel straight. For example, if the robot travelled 45cm and measured 50cm, you would multiply each ticks per revolution value by <span class="katex"><span class="katex-mathml"><math xmlns="http://www.w3.org/1998/Math/MathML"><semantics><mrow><mfrac><mn>50</mn><mn>45</mn></mfrac></mrow><annotation encoding="application/x-tex">\frac{50}{45}</annotation></semantics></math></span><span class="katex-html" aria-hidden="true"><span class="base"><span class="strut" style="height:1.1901em;vertical-align:-0.345em"></span><span class="mord"><span class="mopen nulldelimiter"></span><span class="mfrac"><span class="vlist-t vlist-t2"><span class="vlist-r"><span class="vlist" style="height:0.8451em"><span style="top:-2.655em"><span class="pstrut" style="height:3em"></span><span class="sizing reset-size6 size3 mtight"><span class="mord mtight"><span class="mord mtight">45</span></span></span></span><span style="top:-3.23em"><span class="pstrut" style="height:3em"></span><span class="frac-line" style="border-bottom-width:0.04em"></span></span><span style="top:-3.394em"><span class="pstrut" style="height:3em"></span><span class="sizing reset-size6 size3 mtight"><span class="mord mtight"><span class="mord mtight">50</span></span></span></span></span><span class="vlist-s">​</span></span><span class="vlist-r"><span class="vlist" style="height:0.345em"><span></span></span></span></span></span><span class="mclose nulldelimiter"></span></span></span></span></span>.</p>
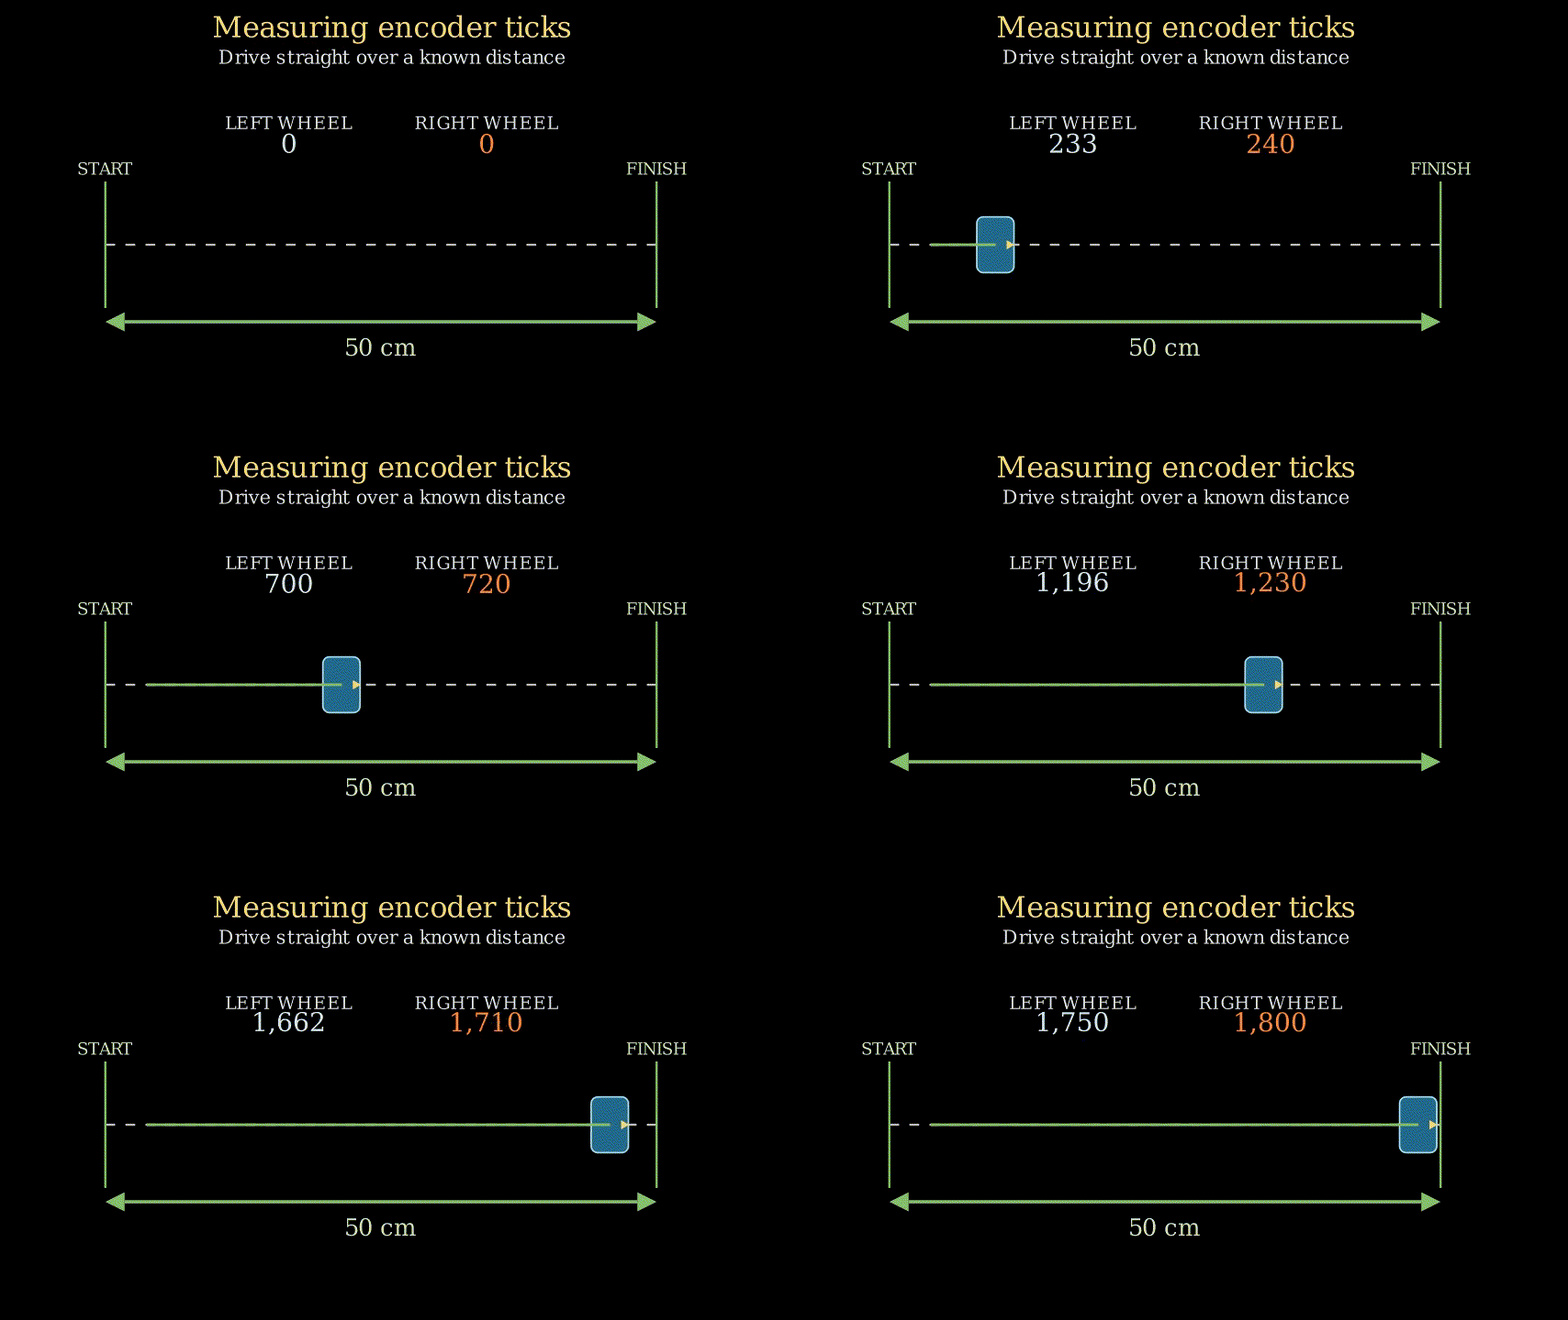
<p>Update the files, rebuild, and run for one last time. The robot should move in a straight line, and the odometry from the robot should be within a few centimetres of the actual value when you measure it.</p>
<figure class="text--center"><p><img decoding="async" loading="lazy" alt="Animation showing the robot tracking straight" src="https://mikelikesrobots.github.io/assets/images/straight_line_encoder_counts-e9dff910e89adbf9652030f834fea9d2.gif" width="854" height="480" class="img_ev3q">
</p><figcaption>Animation showing the robot tracking in a straight line with the corresponding encoder counts as it travels.</figcaption><p></p></figure>
<p>This step is complete; the next step is to generate a motor lookup table (LUT).</p>
<h2 class="anchor anchorTargetStickyNavbar_Vzrq" id="motor-lut-generation">Motor LUT Generation<a href="https://mikelikesrobots.github.io/blog/viam-rover-calibration#motor-lut-generation" class="hash-link" aria-label="Direct link to Motor LUT Generation" title="Direct link to Motor LUT Generation" translate="no">​</a></h2>
<p>The motor LUT is a process that I chose to use for this robot to help output slightly more accurate motor speeds. It's not strictly necessary given that the control system <em>should</em> adjust the motor speed to the commanded value anyway, but the LUT helps it get there with slightly less effort, making the system more responsive and reliable overall. Again, more detail on the LUT and how it works are available in my previous blog post, <a class="" href="https://mikelikesrobots.github.io/blog/rover-ros2-control">Controlling the Viam Rover with ros2_control</a>.</p>
<p>The process is very simple. It requires the encoders to already be calibrated, which we accomplished in the previous step. It also requires the robot's wheels to be free-spinning, so place the robot on a box or similar object that allows it to spin the wheels freely.</p>
<p>The script for measuring wheel speeds does not go through the <code>ros2_control</code>-based system, instead directly commanding the motors and reading the encoders over serial. Hence, we need to manually update the values in the script. (If you'd like to update the script so that it takes these values as parameters instead, feel free to raise a PR!) To update the values, edit lines 23 and 24 in the <a href="https://github.com/mikelikesrobots/viam-rover2/blob/main/tools/motor_diagnostic.py#L23-L24" target="_blank" rel="noopener noreferrer" class=""><code>motor_diagnostic.py</code> script</a> directly.</p>
<p>Once updated, run the script:</p>
<div class="language-bash codeBlockContainer_Ckt0 theme-code-block" style="--prism-color:#393A34;--prism-background-color:#f6f8fa"><div class="codeBlockContent_QJqH"><pre tabindex="0" class="prism-code language-bash codeBlock_bY9V thin-scrollbar" style="color:#393A34;background-color:#f6f8fa"><code class="codeBlockLines_e6Vv"><div class="token-line" style="color:#393A34"><span class="token plain">python3 tools/motor_diagnostic.py</span><br></div></code></pre></div></div>
<p>The script will sweep across PWM values and measure the wheel speeds for each PWM value, then print a LUT block. Example output:</p>
<div class="language-text codeBlockContainer_Ckt0 theme-code-block" style="--prism-color:#393A34;--prism-background-color:#f6f8fa"><div class="codeBlockContent_QJqH"><pre tabindex="0" class="prism-code language-text codeBlock_bY9V thin-scrollbar" style="color:#393A34;background-color:#f6f8fa"><code class="codeBlockLines_e6Vv"><div class="token-line" style="color:#393A34"><span class="token plain">motor_lut_[0] = {  // left</span><br></div><div class="token-line" style="color:#393A34"><span class="token plain">    {0.1374, 0.0},</span><br></div><div class="token-line" style="color:#393A34"><span class="token plain">    {0.3, 1.94}, {0.4, 3.39}, ...</span><br></div><div class="token-line" style="color:#393A34"><span class="token plain">};</span><br></div></code></pre></div></div>
<p>Take this block of code and paste it into <a href="https://github.com/mikelikesrobots/viam-rover2/blob/main/hardware/src/rover2_system.cpp#L103-L114" target="_blank" rel="noopener noreferrer" class=""><code>hardware/src/rover2_system.cpp</code></a>, replacing the existing <code>motor_lut_[0]</code> and <code>motor_lut_[1]</code> entries. Build the code one final time to incorporate the new LUT values.</p>
<p>The encoder calibration and LUT generation are now complete, and the robot is ready to run!</p>
<h2 class="anchor anchorTargetStickyNavbar_Vzrq" id="calibration-complete">Calibration Complete<a href="https://mikelikesrobots.github.io/blog/viam-rover-calibration#calibration-complete" class="hash-link" aria-label="Direct link to Calibration Complete" title="Direct link to Calibration Complete" translate="no">​</a></h2>
<p>The robot should now be fully ready for mapping. It should:</p>
<ul>
<li class="">Travel in a straight line when commanded with only a linear velocity</li>
<li class="">Accurately measure distance travelled with odometry (that is, the velocity probe reports an encoder-measured distance very close to the ruler-measured distance)</li>
<li class="">Have newly generated motor LUTs compiled into the system code</li>
<li class="">Complete a clean <code>colcon build</code> without errors</li>
</ul>
<p>At this point, the robot is ready to map, then autonomously navigate an environment. I decided to leave the navigation steps for the next post so I could dive into the navigation system itself. Check back here for future posts if you want to read about how the navigation system works!</p>]]></content>
        <author>
            <name>Michael Hart</name>
            <uri>https://mikelikesrobots.github.io</uri>
        </author>
        <category label="robotics" term="robotics"/>
        <category label="ros2" term="ros2"/>
        <category label="calibration" term="calibration"/>
        <category label="viam" term="viam"/>
        <category label="control" term="control"/>
    </entry>
    <entry>
        <title type="html"><![CDATA[Controlling the Viam Rover with ros2_control]]></title>
        <id>https://mikelikesrobots.github.io/blog/rover-ros2-control</id>
        <link href="https://mikelikesrobots.github.io/blog/rover-ros2-control"/>
        <updated>2026-08-12T00:00:00.000Z</updated>
        <summary type="html"><![CDATA[This post is part of a series about the Autonomously Exploring Viam Rover (see my previous blog post). The rover is my attempt to build an inexpensive rover that is easy to assemble, so that anyone can replicate it. In this series, I'm showing how both the hardware and the software for the rover work.]]></summary>
        <content type="html"><![CDATA[<p>This post is part of a series about the Autonomously Exploring Viam Rover (see <a class="" href="https://mikelikesrobots.github.io/blog/autonomous-viam-rover">my previous blog post</a>). The rover is my attempt to build an inexpensive rover that is easy to assemble, so that anyone can replicate it. In this series, I'm showing how both the hardware and the software for the rover work.</p>
<p>This post in particular focuses on the control system of the rover, including motor control, sensor reading, and fusing data together to track the robot's position.</p>
<div class="video_jswG"><button type="button" class="poster_B6DH" aria-label="Play video: Controlling the Viam Rover with ros2_control"><img src="https://i.ytimg.com/vi/FyVvHbA4nBs/hqdefault.jpg" alt="" width="480" height="360" loading="lazy"><span class="play_lEvZ" aria-hidden="true">▶</span><span class="caption_yrhJ">Watch: <!-- -->Controlling the Viam Rover with ros2_control</span></button></div><noscript><p><a href="https://www.youtube.com/watch?v=FyVvHbA4nBs&amp;t=0">Watch <!-- -->Controlling the Viam Rover with ros2_control<!-- --> on YouTube</a></p></noscript>
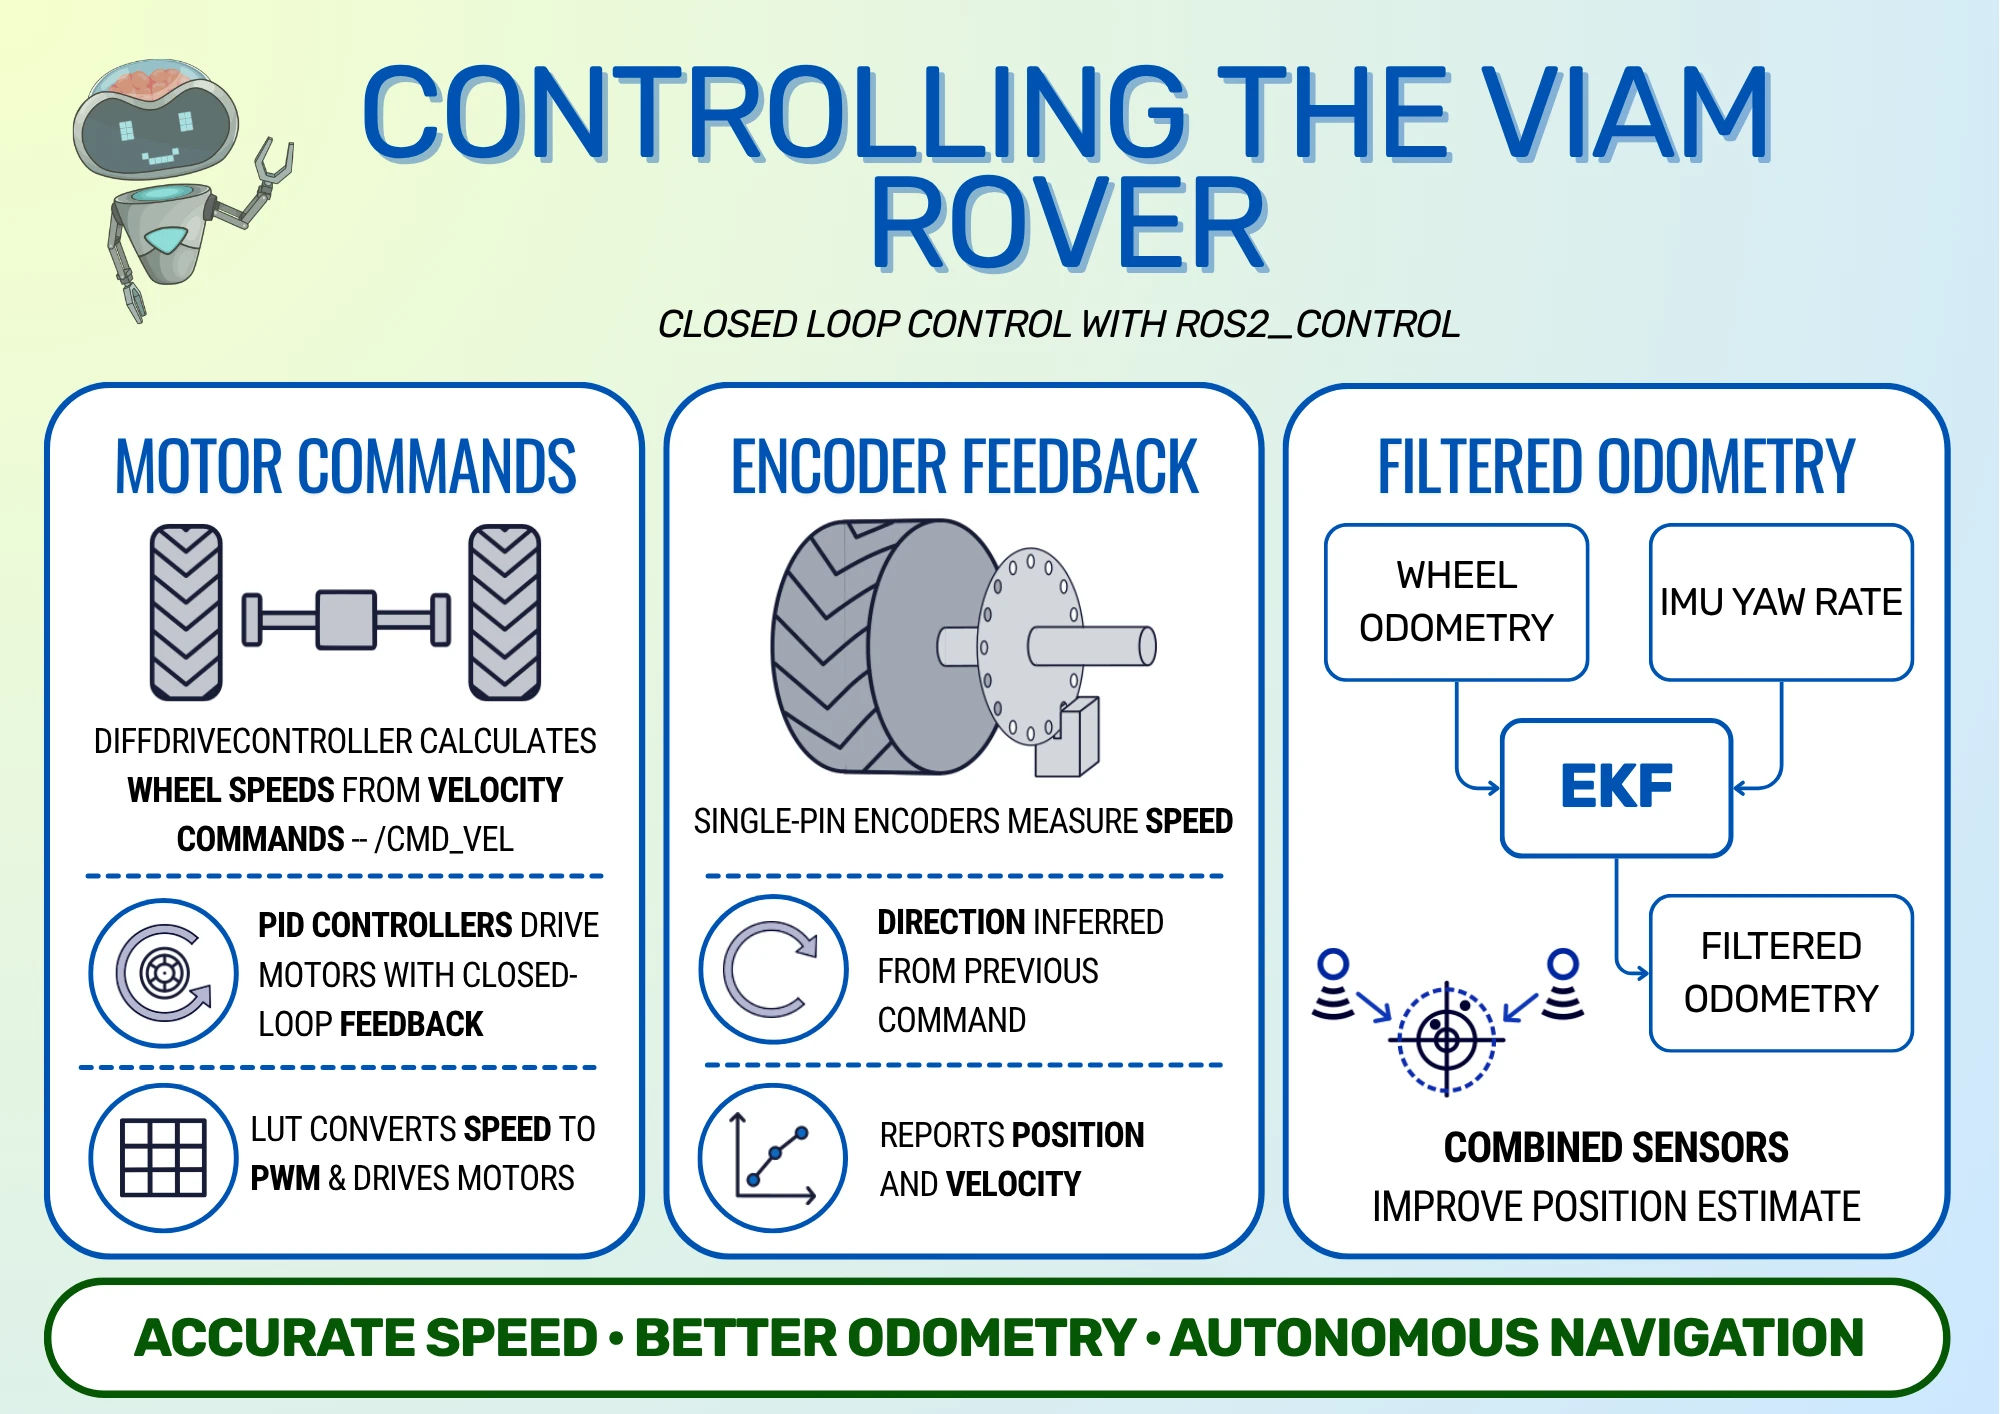
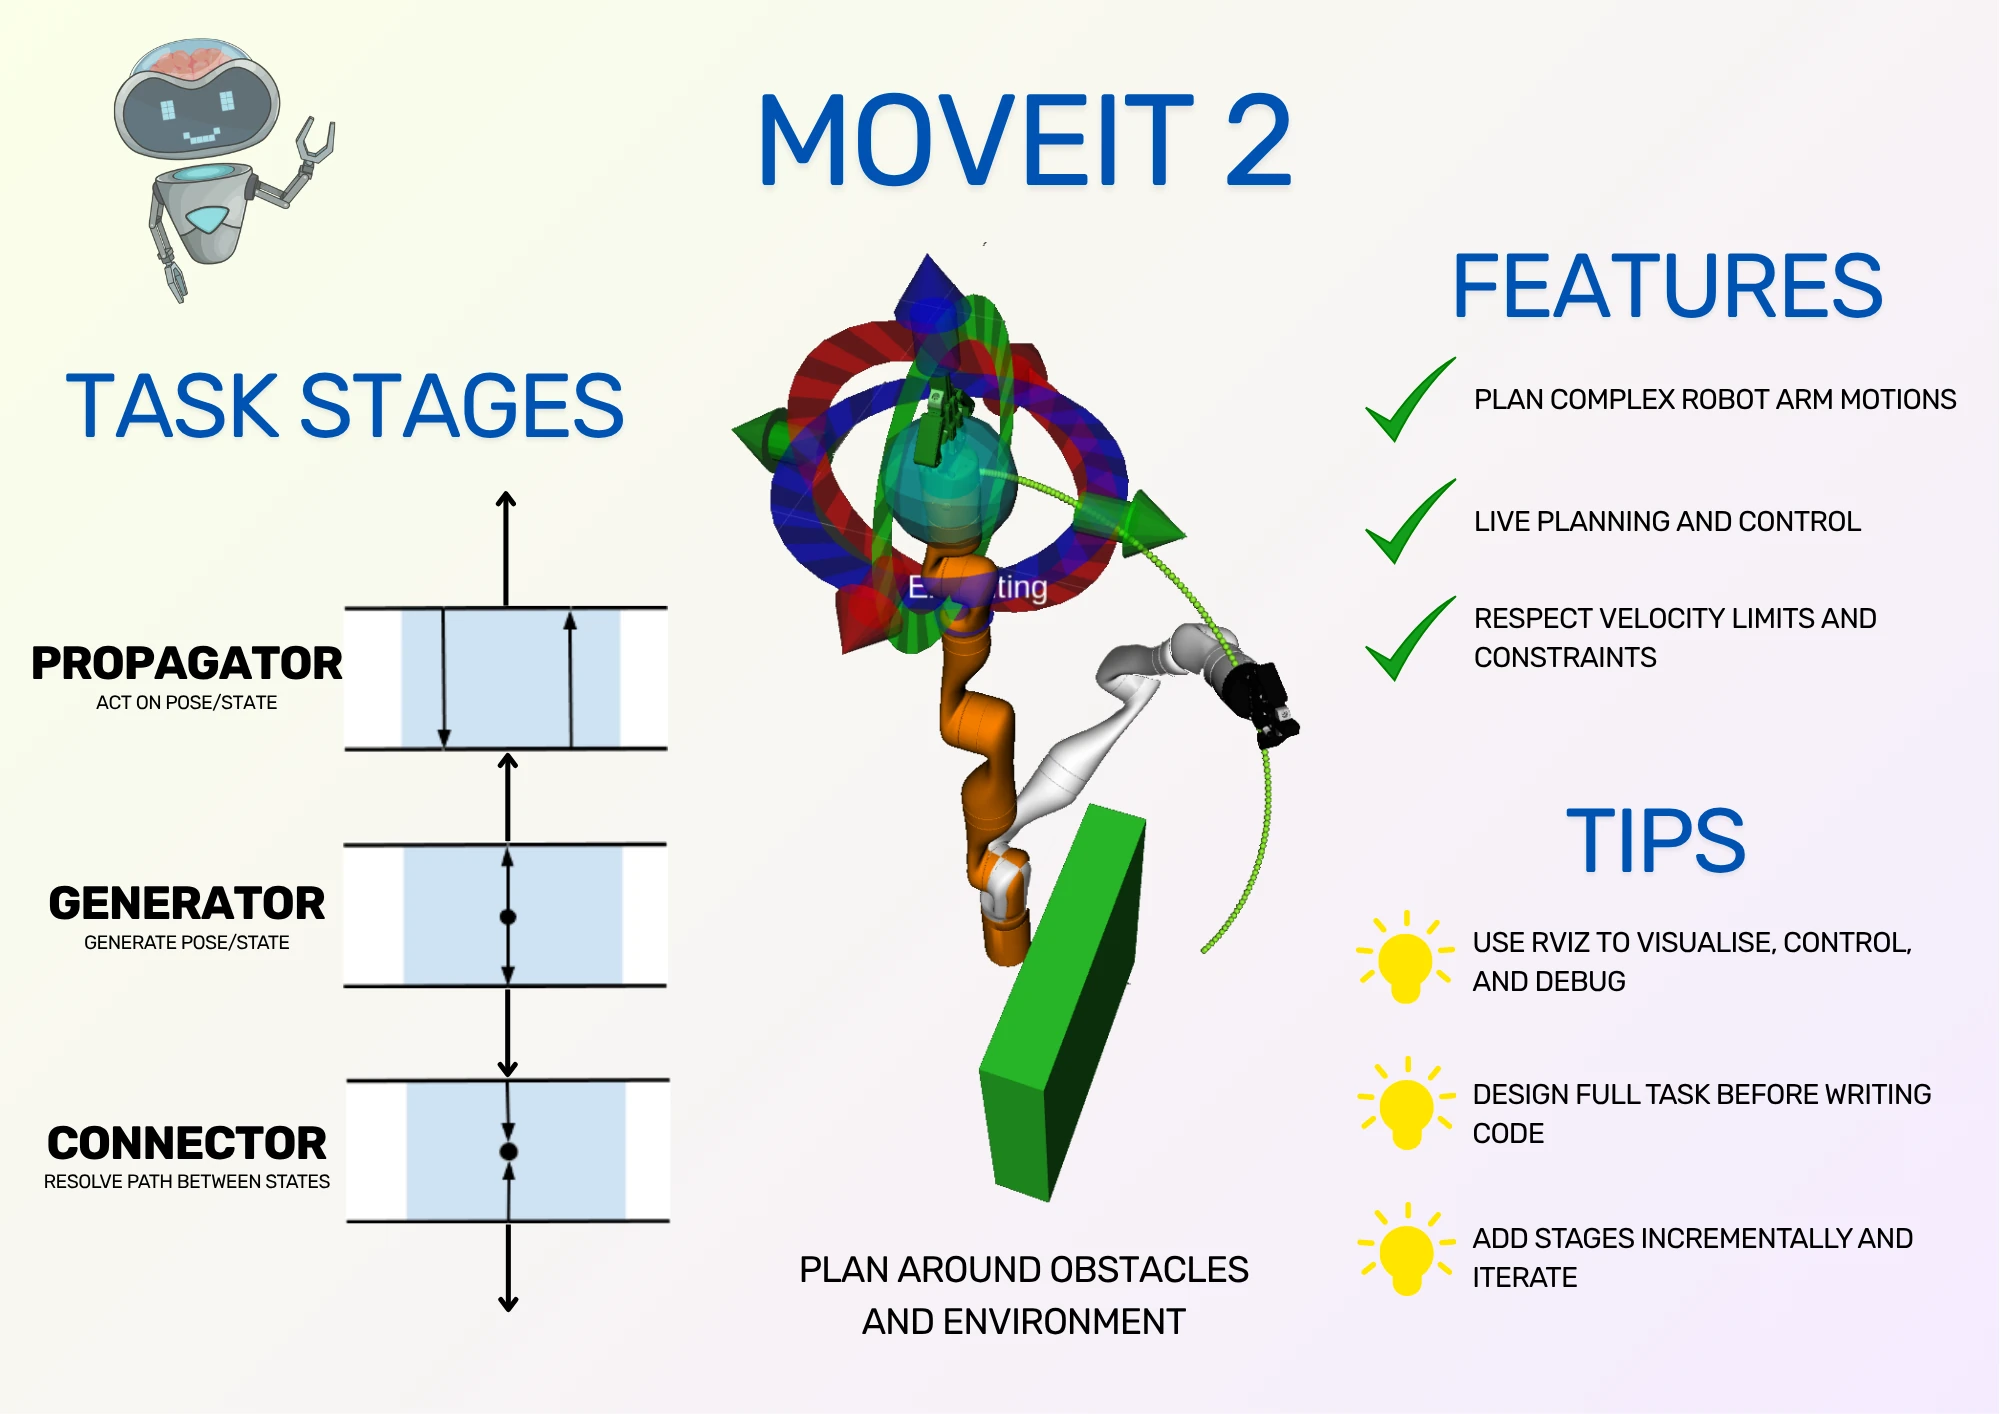
<figure class="text--center"><p><img decoding="async" loading="lazy" alt="Infographic summarising the Viam Rover control system" src="https://mikelikesrobots.github.io/assets/images/viam_ros2control_infographic-689617666b26ce0b0b7390b20c0d84f5.webp" width="2000" height="1414" class="img_ev3q">
</p><figcaption>Infographic showing the complete control flow: navigation commands are converted into regulated wheel movement, encoder feedback produces odometry, and an EKF combines that odometry with IMU measurements.</figcaption><p></p></figure>
<h2 class="anchor anchorTargetStickyNavbar_Vzrq" id="control-system-overview">Control System Overview<a href="https://mikelikesrobots.github.io/blog/rover-ros2-control#control-system-overview" class="hash-link" aria-label="Direct link to Control System Overview" title="Direct link to Control System Overview" translate="no">​</a></h2>
<p>The rover uses a closed-loop control system, which means that it uses feedback from sensors on the robot to adjust the robot's speed to more closely match the desired speed. If the sensor shows that the robot is moving too fast, the control system can slightly slow the motors until it reaches the correct velocity. This is a more accurate way of moving the robot than open-loop control systems, which simply drive the motors at a speed without checking what actually happens. Better accuracy is important when the robot is moving autonomously, as it can track its own position and velocity.</p>
<div class="theme-admonition theme-admonition-tip admonition_xJq3 alert alert--success"><div class="admonitionHeading_Gvgb"><span class="admonitionIcon_Rf37"><svg viewBox="0 0 12 16"><path fill-rule="evenodd" d="M6.5 0C3.48 0 1 2.19 1 5c0 .92.55 2.25 1 3 1.34 2.25 1.78 2.78 2 4v1h5v-1c.22-1.22.66-1.75 2-4 .45-.75 1-2.08 1-3 0-2.81-2.48-5-5.5-5zm3.64 7.48c-.25.44-.47.8-.67 1.11-.86 1.41-1.25 2.06-1.45 3.23-.02.05-.02.11-.02.17H5c0-.06 0-.13-.02-.17-.2-1.17-.59-1.83-1.45-3.23-.2-.31-.42-.67-.67-1.11C2.44 6.78 2 5.65 2 5c0-2.2 2.02-4 4.5-4 1.22 0 2.36.42 3.22 1.19C10.55 2.94 11 3.94 11 5c0 .66-.44 1.78-.86 2.48zM4 14h5c-.23 1.14-1.3 2-2.5 2s-2.27-.86-2.5-2z"></path></svg></span>Source Code</div><div class="admonitionContent_BuS1"><p>All of the code in this post can be found on my <a href="https://github.com/mikelikesrobots/viam-rover2" target="_blank" rel="noopener noreferrer" class="">Viam Rover GitHub repository</a>.</p></div></div>
<p>The rest of this article details how the control system takes commands from the navigation system, converts that into accurate robot movement, and measures the robot's position to feed back to the navigation system. I'll explain how the motor control and encoder reading work, then discuss how <code>ros2_control</code> interfaces with the hardware through PID controllers, and finish by explaining how the EKF fuses <code>ros2_control</code>'s odometry with IMU data to get the best idea of the robot's position.</p>
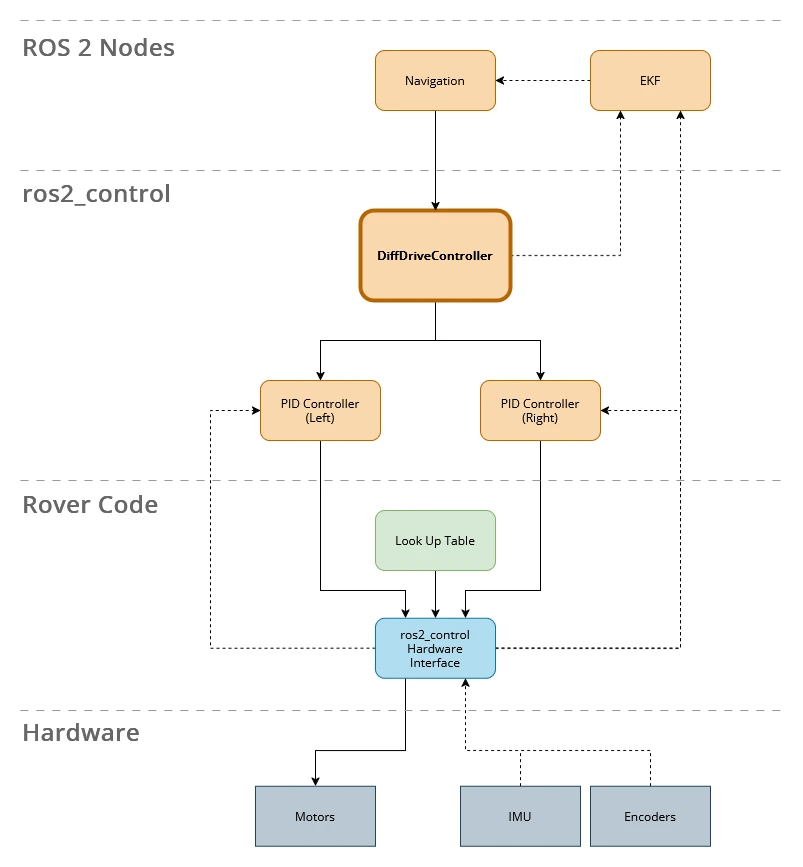
<figure class="text--center"><p><img decoding="async" loading="lazy" alt="Control system architecture diagram" src="https://mikelikesrobots.github.io/assets/images/ros2_control_system_diagram-ebe4b37a7c54d59327f36e38de8bc48c.webp" width="803" height="867" class="img_ev3q">
</p><figcaption>Full system architecture diagram. Each part will be explained in detail throughout the post; this provides a top-level overview for reference.</figcaption><p></p></figure>
<h3 class="anchor anchorTargetStickyNavbar_Vzrq" id="units-of-velocity">Units of Velocity<a href="https://mikelikesrobots.github.io/blog/rover-ros2-control#units-of-velocity" class="hash-link" aria-label="Direct link to Units of Velocity" title="Direct link to Units of Velocity" translate="no">​</a></h3>
<p>To understand how the control system is used to move the robot, think about moving the robot from one position on the floor to another. The navigation system calculates a path that the robot should follow, then calculates the linear and angular speeds that the robot should move at to follow this path. The control system is responsible for moving at these speeds as closely as possible.</p>
<p>The standard units for linear and angular speeds are metres per second (m/s) and radians per second (rad/s) respectively. Radians measure angles, similar to degrees, and can easily be converted to and from degrees. As radians are defined in terms of pi, they have some advantages when calculating speeds and rotations, which is why they are used.</p>
<p>The differential drive controller then converts the linear and rotational velocities to desired wheel velocities. To do this, it needs to know the wheel sizes and how far apart they are spaced. If you're interested in the mathematics behind this, take a look at the <a href="https://www.roboticsbook.org/S52_diffdrive_actions.html" target="_blank" rel="noopener noreferrer" class="">Robotics Book by Frank Dellaert and Seth Hutchinson</a>. For our purposes, it is enough to understand that the controller converts linear and angular speeds into the speeds that the wheels should move at, also defined in rad/s.</p>
<div class="theme-admonition theme-admonition-warning admonition_xJq3 alert alert--warning"><div class="admonitionHeading_Gvgb"><span class="admonitionIcon_Rf37"><svg viewBox="0 0 16 16"><path fill-rule="evenodd" d="M8.893 1.5c-.183-.31-.52-.5-.887-.5s-.703.19-.886.5L.138 13.499a.98.98 0 0 0 0 1.001c.193.31.53.501.886.501h13.964c.367 0 .704-.19.877-.5a1.03 1.03 0 0 0 .01-1.002L8.893 1.5zm.133 11.497H6.987v-2.003h2.039v2.003zm0-3.004H6.987V5.987h2.039v4.006z"></path></svg></span>Different Rotational Velocities</div><div class="admonitionContent_BuS1"><p>Don't confuse the different rotational velocities! There is the overall rotational velocity, which is when the robot is turning left or right, and the wheel rotational velocities, which is how fast and in which direction each wheel should spin.</p></div></div>
<h2 class="anchor anchorTargetStickyNavbar_Vzrq" id="driving-the-motors">Driving the Motors<a href="https://mikelikesrobots.github.io/blog/rover-ros2-control#driving-the-motors" class="hash-link" aria-label="Direct link to Driving the Motors" title="Direct link to Driving the Motors" translate="no">​</a></h2>
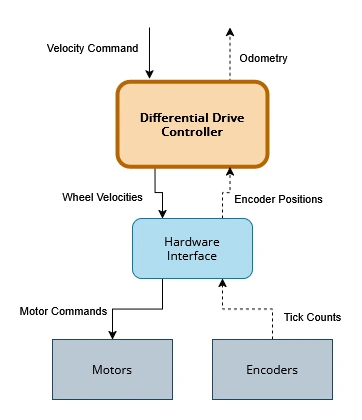
<p>At the lowest level, our hardware controller (later referred to as the hardware interface in <code>ros2_control</code> sections) is responsible for taking the desired wheel velocities and moving the motors at those speeds. The motors on the Viam Rover are driven using Pulse Width Modulation (PWM) signals, so the hardware controller has to convert the wheel speeds to the right PWM values and send PWM signals to the motors.</p>
<div class="theme-admonition theme-admonition-tip admonition_xJq3 alert alert--success"><div class="admonitionHeading_Gvgb"><span class="admonitionIcon_Rf37"><svg viewBox="0 0 12 16"><path fill-rule="evenodd" d="M6.5 0C3.48 0 1 2.19 1 5c0 .92.55 2.25 1 3 1.34 2.25 1.78 2.78 2 4v1h5v-1c.22-1.22.66-1.75 2-4 .45-.75 1-2.08 1-3 0-2.81-2.48-5-5.5-5zm3.64 7.48c-.25.44-.47.8-.67 1.11-.86 1.41-1.25 2.06-1.45 3.23-.02.05-.02.11-.02.17H5c0-.06 0-.13-.02-.17-.2-1.17-.59-1.83-1.45-3.23-.2-.31-.42-.67-.67-1.11C2.44 6.78 2 5.65 2 5c0-2.2 2.02-4 4.5-4 1.22 0 2.36.42 3.22 1.19C10.55 2.94 11 3.94 11 5c0 .66-.44 1.78-.86 2.48zM4 14h5c-.23 1.14-1.3 2-2.5 2s-2.27-.86-2.5-2z"></path></svg></span>PWM Signals</div><div class="admonitionContent_BuS1"><p>More information on PWM can be seen in my <a class="" href="https://mikelikesrobots.github.io/blog/jetbot-motors-pt1#pulse-width-modulation-pwm">Pulse Width Modulation</a> blog post. In essence, PWM is turning the power to a motor on and off very quickly so that the average power reaching the motor makes it move at the desired velocity.</p></div></div>
<p>The PWM signal to send depends on the motors in question. The simplest method is to determine the maximum speed of the motors when driven at full power, which can be measured using the encoders (explained more in the <a href="https://mikelikesrobots.github.io/blog/rover-ros2-control#reading-the-encoders" class="">Reading the Encoders</a> section). The hardware controller can then assume that wheel speed is proportional to the PWM duty cycle.</p>
<p>That means if the motors drive at a maximum speed of 1.0 rad/s, and the desired velocity is 0.5 rad/s, it assumes that the correct signal is 0.5 (PWM doesn't have units because it's a fraction of a maximum). If the desired velocity is 0.25 rad/s, it uses a PWM value of 0.25.</p>
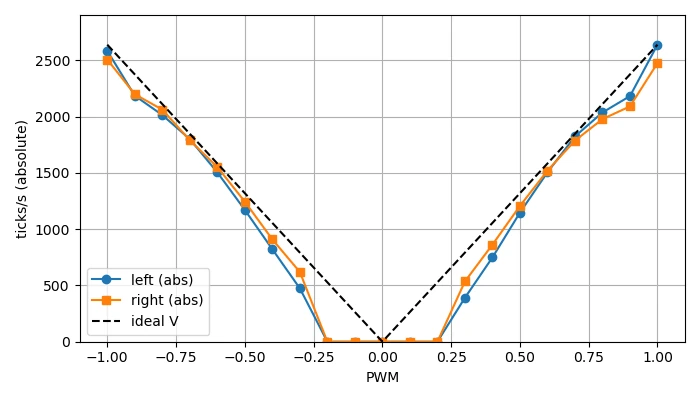
<p>With that said, the real system doesn't behave quite that well. I measured the speed of the wheels against different PWM values to obtain the following graph:</p>
<figure class="text--center"><p><img decoding="async" loading="lazy" alt="Graph of ticks per second against PWM" src="https://mikelikesrobots.github.io/assets/images/ticks_per_s_against_speed-fdb76b7418771889f26d1415576057b2.webp" width="700" height="400" class="img_ev3q">
</p><figcaption>Graph showing how the measured ticks per second vary compared to commanded PWM. The black dashed line is the ideal result, while the blue and orange lines are for the left and right encoder measurements respectively. The deadband is clear for both motors, and the motors follow roughly the same pattern but differ slightly from each other.</figcaption><p></p></figure>
<p>The graph is flat around the middle, which is the deadband of the motors. This is where the motors don't have enough power to overcome inertia, so they can't even start moving. The graph also shows that the motors don't exactly match the expected tick rate (the dotted black line) even after overcoming inertia.</p>
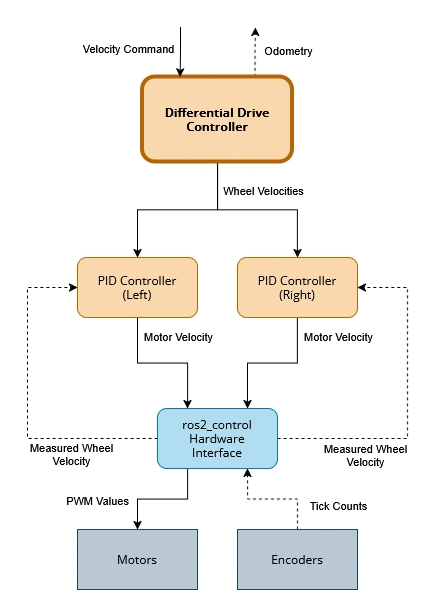
<p>With closed-loop feedback, the <code>ros2_control</code> controller can correct for the motors not moving at the correct speed. Still, the more accurately we can drive the motors at the commanded speed, the less work that controller needs to do to correct the speed. For the rover, we use a Look-Up Table (LUT) to get each motor close to its commanded velocity, so that the PID controllers from <code>ros2_control</code> can remove the remaining error more quickly and reliably.</p>
<h3 class="anchor anchorTargetStickyNavbar_Vzrq" id="mapping-wheel-velocity-to-pwm">Mapping Wheel Velocity to PWM<a href="https://mikelikesrobots.github.io/blog/rover-ros2-control#mapping-wheel-velocity-to-pwm" class="hash-link" aria-label="Direct link to Mapping Wheel Velocity to PWM" title="Direct link to Mapping Wheel Velocity to PWM" translate="no">​</a></h3>
<p>The LUT is used to convert desired wheel velocity to PWM value. The table first has to be built by measuring motor speeds; I have a <a href="https://github.com/mikelikesrobots/viam-rover2/blob/main/tools/motor_diagnostic.py" target="_blank" rel="noopener noreferrer" class="">Motor Diagnostic script</a> that will build the table by sending different PWM signals and measuring the wheel speeds, then using those measured values to build the LUT. The wheels have to be free-spinning for this to work. The user can then copy and paste the output into the <a href="https://github.com/mikelikesrobots/viam-rover2/blob/main/hardware/src/rover2_system.cpp#L96-L114" target="_blank" rel="noopener noreferrer" class=""><code>rover2_system.cpp</code> source code</a>.</p>
<p>The software looks up values from the LUT by following a simple process.</p>
<ol>
<li class="">Is the desired velocity in the table? If yes, use the corresponding PWM value.</li>
<li class="">Is the desired velocity below the minimum? If yes, use the minimum PWM value.</li>
<li class="">Is the desired velocity above the maximum? If yes, use the maximum PWM value.</li>
<li class="">Otherwise, the desired velocity is between two entries in the table. Find the two entries and interpolate between them to find the PWM value.</li>
</ol>
<p>Interpolation calculates an intermediate PWM value by splitting the difference between two adjacent entries. For example, given the following LUT:</p>
<table><thead><tr><th>Desired Velocity (rad/s)</th><th>PWM</th></tr></thead><tbody><tr><td>1.0</td><td>0.5</td></tr><tr><td>2.0</td><td>0.7</td></tr></tbody></table>
<br>
<p>If the desired velocity is 1.4, it is 40% of the distance between 1.0 and 2.0, so the result should be 40% of the distance between the PWM values 0.5 and 0.7, which is 0.58. The relevant code is in <a href="https://github.com/mikelikesrobots/viam-rover2/blob/main/hardware/src/rover2_system.cpp#L390-L410" target="_blank" rel="noopener noreferrer" class="">the <code>rover2_system.cpp</code> file</a>.</p>
<p>This is how the hardware controller will move motors at a commanded speed. Next, we can look at how the controller reads data from the encoders.</p>
<h2 class="anchor anchorTargetStickyNavbar_Vzrq" id="reading-the-encoders">Reading the Encoders<a href="https://mikelikesrobots.github.io/blog/rover-ros2-control#reading-the-encoders" class="hash-link" aria-label="Direct link to Reading the Encoders" title="Direct link to Reading the Encoders" translate="no">​</a></h2>
<p>Encoders are devices that can count how fast a shaft spins. The Viam Rover contains encoders integrated with the motors, but these are single-pin encoders, which means they can detect speed but not direction. This section describes how encoders work, how direction can be <em>detected</em> by the sensor, and how we work around the Viam Rover's speed-only sensing by guessing the direction.</p>
<h3 class="anchor anchorTargetStickyNavbar_Vzrq" id="single-pin">Single-Pin<a href="https://mikelikesrobots.github.io/blog/rover-ros2-control#single-pin" class="hash-link" aria-label="Direct link to Single-Pin" title="Direct link to Single-Pin" translate="no">​</a></h3>
<p>The encoder mechanism is a light source and detector on either side of a disc with evenly-spaced holes around the edge. The encoder is attached to the shaft of a robot's wheel. When the shaft spins, the disc rotates, and the holes alternately block and transmit the light. The light sensor can then detect the presence or absence of light. Each time the light is detected is called a tick, and the rate of ticks can be used to calculate the speed of the shaft.</p>
<figure class="text--center"><p><img decoding="async" loading="lazy" alt="Animation showing single-pin encoder mechanism" src="https://mikelikesrobots.github.io/assets/images/single_pin_encoder-75930e8bc5d954c23241b50fe297be4e.gif" width="854" height="480" class="img_ev3q">
</p><figcaption>Animation showing the single-pin encoder. The graph on the right shows how the sensor outputs the signal. Software on the controller board can then count the ticks in the graph.</figcaption><p></p></figure>
<p>However, single-pin encoders don't know the direction that the shaft is spinning in. A clockwise spinning shaft looks the same as an anticlockwise spinning shaft. That's where quadrature encoders come in.</p>
<h3 class="anchor anchorTargetStickyNavbar_Vzrq" id="quadrature">Quadrature<a href="https://mikelikesrobots.github.io/blog/rover-ros2-control#quadrature" class="hash-link" aria-label="Direct link to Quadrature" title="Direct link to Quadrature" translate="no">​</a></h3>
<p>Quadrature encoders work by having two sets of sensors on the same encoder disc, but spaced at an angle from one another. By looking at which sensor receives the pulses first, it's possible to tell both the direction and the speed of the shaft.</p>
<figure class="text--center"><p><img decoding="async" loading="lazy" alt="Animation showing quadrature encoder mechanism" src="https://mikelikesrobots.github.io/assets/images/quadrature_encoder-229f5466997f298e9144f8d97d22e525.gif" width="854" height="480" class="img_ev3q">
</p><figcaption>Animation showing the quadrature encoder. The graph shows the spin direction by looking at which sensor outputs a tick first compared to the other sensor.</figcaption><p></p></figure>
<details class="details_lb9f alert alert--info details_b_Ee" data-collapsed="true"><summary>Incremental Encoders</summary><div><div class="collapsibleContent_i85q"><div><p></p><p>Many higher-end incremental encoders also include a third channel that
only produces one pulse per revolution. This provides a known reference
position, allowing the controller to re-synchronise its position estimate.
These encoders aren't common in hobbyist robotics, but they're still useful
to know about!</p><p></p><figure class="text--center"><img src="https://mikelikesrobots.github.io/assets/images/industrial_encoder-51ee324ec2612f61018340b395b95239.gif" alt="Animation showing an industrial encoder mechanism"><figcaption><p>Animation showing an industrial encoder with a third channel. The third
channel sees one pulse per revolution, allowing the encoder to determine
a home position and remove accumulated error.</p></figcaption></figure></div></div></div></details>
<h3 class="anchor anchorTargetStickyNavbar_Vzrq" id="interpreting-speed">Interpreting Speed<a href="https://mikelikesrobots.github.io/blog/rover-ros2-control#interpreting-speed" class="hash-link" aria-label="Direct link to Interpreting Speed" title="Direct link to Interpreting Speed" translate="no">​</a></h3>
<p><code>ros2_control</code> requires velocity feedback, which means it needs to know both the speed of movement <em>and the direction</em>. Given that the Viam Rover only has single-pin encoders, we need another way to determine the direction. In this case, that way is to assume that the robot is moving in the direction it's been commanded to, and combine that with the measured speed. This works as long as the robot is moving under its own power; if you drag the robot around by hand, it can quickly get confused!</p>
<p>In <a href="https://github.com/mikelikesrobots/viam-rover2/blob/main/hardware/src/rover2_system.cpp#L267-L276" target="_blank" rel="noopener noreferrer" class="">code</a>, this is done for each motor by checking the last commanded direction, then changing the tick delta to be positive or negative depending on the result.</p>
<div class="language-cpp codeBlockContainer_Ckt0 theme-code-block" style="--prism-color:#393A34;--prism-background-color:#f6f8fa"><div class="codeBlockContent_QJqH"><pre tabindex="0" class="prism-code language-cpp codeBlock_bY9V thin-scrollbar" style="color:#393A34;background-color:#f6f8fa"><code class="codeBlockLines_e6Vv"><div class="token-line" style="color:#393A34"><span class="token comment" style="color:#999988;font-style:italic">// Single-pin encoder can't detect direction; infer purely from commanded velocity.</span><span class="token plain"></span><br></div><div class="token-line" style="color:#393A34"><span class="token plain"></span><span class="token keyword" style="color:#00009f">if</span><span class="token plain"> </span><span class="token punctuation" style="color:#393A34">(</span><span class="token plain">hw_commands_</span><span class="token punctuation" style="color:#393A34">[</span><span class="token plain">i</span><span class="token punctuation" style="color:#393A34">]</span><span class="token plain"> </span><span class="token operator" style="color:#393A34">&lt;</span><span class="token plain"> </span><span class="token number" style="color:#36acaa">0.0</span><span class="token punctuation" style="color:#393A34">)</span><span class="token plain"> </span><span class="token punctuation" style="color:#393A34">{</span><span class="token plain"></span><br></div><div class="token-line" style="color:#393A34"><span class="token plain">    last_direction_</span><span class="token punctuation" style="color:#393A34">[</span><span class="token plain">i</span><span class="token punctuation" style="color:#393A34">]</span><span class="token plain"> </span><span class="token operator" style="color:#393A34">=</span><span class="token plain"> </span><span class="token operator" style="color:#393A34">-</span><span class="token number" style="color:#36acaa">1</span><span class="token punctuation" style="color:#393A34">;</span><span class="token plain"></span><br></div><div class="token-line" style="color:#393A34"><span class="token plain"></span><span class="token punctuation" style="color:#393A34">}</span><span class="token plain"> </span><span class="token keyword" style="color:#00009f">else</span><span class="token plain"> </span><span class="token keyword" style="color:#00009f">if</span><span class="token plain"> </span><span class="token punctuation" style="color:#393A34">(</span><span class="token plain">hw_commands_</span><span class="token punctuation" style="color:#393A34">[</span><span class="token plain">i</span><span class="token punctuation" style="color:#393A34">]</span><span class="token plain"> </span><span class="token operator" style="color:#393A34">&gt;</span><span class="token plain"> </span><span class="token number" style="color:#36acaa">0.0</span><span class="token punctuation" style="color:#393A34">)</span><span class="token plain"> </span><span class="token punctuation" style="color:#393A34">{</span><span class="token plain"></span><br></div><div class="token-line" style="color:#393A34"><span class="token plain">    last_direction_</span><span class="token punctuation" style="color:#393A34">[</span><span class="token plain">i</span><span class="token punctuation" style="color:#393A34">]</span><span class="token plain"> </span><span class="token operator" style="color:#393A34">=</span><span class="token plain"> </span><span class="token number" style="color:#36acaa">1</span><span class="token punctuation" style="color:#393A34">;</span><span class="token plain"></span><br></div><div class="token-line" style="color:#393A34"><span class="token plain"></span><span class="token punctuation" style="color:#393A34">}</span><span class="token plain"></span><br></div><div class="token-line" style="color:#393A34"><span class="token plain" style="display:inline-block"></span><br></div><div class="token-line" style="color:#393A34"><span class="token plain"></span><span class="token keyword" style="color:#00009f">if</span><span class="token plain"> </span><span class="token punctuation" style="color:#393A34">(</span><span class="token plain">last_direction_</span><span class="token punctuation" style="color:#393A34">[</span><span class="token plain">i</span><span class="token punctuation" style="color:#393A34">]</span><span class="token plain"> </span><span class="token operator" style="color:#393A34">&lt;</span><span class="token plain"> </span><span class="token number" style="color:#36acaa">0</span><span class="token punctuation" style="color:#393A34">)</span><span class="token plain"> </span><span class="token punctuation" style="color:#393A34">{</span><span class="token plain"></span><br></div><div class="token-line" style="color:#393A34"><span class="token plain">    delta </span><span class="token operator" style="color:#393A34">=</span><span class="token plain"> </span><span class="token operator" style="color:#393A34">-</span><span class="token plain">delta</span><span class="token punctuation" style="color:#393A34">;</span><span class="token plain"></span><br></div><div class="token-line" style="color:#393A34"><span class="token plain"></span><span class="token punctuation" style="color:#393A34">}</span><br></div></code></pre></div></div>
<p>Now that we've examined how the motors are driven and the encoders are read, it's time to look at how they are combined in the <code>ros2_control</code> system.</p>
<h2 class="anchor anchorTargetStickyNavbar_Vzrq" id="control-using-ros2_control">Control Using <code>ros2_control</code><a href="https://mikelikesrobots.github.io/blog/rover-ros2-control#control-using-ros2_control" class="hash-link" aria-label="Direct link to control-using-ros2_control" title="Direct link to control-using-ros2_control" translate="no">​</a></h2>
<p>The whole robot is running ROS 2 for a few reasons (see <a class="" href="https://mikelikesrobots.github.io/blog/autonomous-viam-rover#ros-2-instead-of-viam">here</a> for details), including the control system, which is built using <code>ros2_control</code>. I have previously written about <code>ros2_control</code> basics and shown how to use it for <a class="" href="https://mikelikesrobots.github.io/blog/6dof-arm-ros2-control">a simulated robot arm</a> and <a class="" href="https://mikelikesrobots.github.io/blog/jetbot-motors-pt2">open-loop control of a real rover</a>, so take a look at those for a more detailed introduction. In brief, the reason to use <code>ros2_control</code> is that it provides modular controllers for different kinds of robots, which means we only need to build the hardware interface that allows <code>ros2_control</code> to connect its existing Differential Drive Controller (DiffDriveController) to our robot.</p>
<p>Hence, the challenge for this robot was to set up a <code>ros2_control</code> system that incorporates feedback. I chose to build all of the hardware interface code into one System, as opposed to splitting it into Sensors and Actuators. This System is the hardware interface between <code>ros2_control</code> and the motors and encoders.</p>
<h3 class="anchor anchorTargetStickyNavbar_Vzrq" id="state-and-command-interfaces">State and Command Interfaces<a href="https://mikelikesrobots.github.io/blog/rover-ros2-control#state-and-command-interfaces" class="hash-link" aria-label="Direct link to State and Command Interfaces" title="Direct link to State and Command Interfaces" translate="no">​</a></h3>
<p>For a robot to be controllable from <code>ros2_control</code>, it must declare the types of commands it can receive and the types of feedback data it produces. These are called command and state interfaces respectively.</p>
<p>For the rover, the motors accept velocity commands, so our System needs to register a velocity command interface. This is the same as for the <a class="" href="https://mikelikesrobots.github.io/blog/jetbot-motors-pt2#jetbot-system-implementation">JetBot</a>, and that robot had no feedback data, so that System only had one command interface. However, our robot also reports sensor feedback data, so we also need to register a <em>state</em> interface.</p>
<p>In our case, we are counting ticks on the encoders. Encoder ticks represent a change in angular position, which tells us the change in position of the wheel. Hence, our System registers a position state interface as well as its velocity command interface.</p>
<p>However, reporting position data alone isn't enough. If we were only using the DiffDriveController, it would accept position data, but wouldn't make any use of it. We need to adjust the output speed based on the feedback data, which means we need to use PID controllers, and PID controllers require velocity data. Hence, every time the encoder positions are read, the velocity is calculated by dividing the change in wheel position by the time since the last read.</p>
<p>In <a href="https://github.com/mikelikesrobots/viam-rover2/blob/main/hardware/src/rover2_system.cpp#L260-L282" target="_blank" rel="noopener noreferrer" class="">code</a>, this is done by dividing the change in radians by the change in time since last read:</p>
<div class="language-cpp codeBlockContainer_Ckt0 theme-code-block" style="--prism-color:#393A34;--prism-background-color:#f6f8fa"><div class="codeBlockContent_QJqH"><pre tabindex="0" class="prism-code language-cpp codeBlock_bY9V thin-scrollbar" style="color:#393A34;background-color:#f6f8fa"><code class="codeBlockLines_e6Vv"><div class="token-line" style="color:#393A34"><span class="token keyword" style="color:#00009f">double</span><span class="token plain"> dt </span><span class="token operator" style="color:#393A34">=</span><span class="token plain"> period</span><span class="token punctuation" style="color:#393A34">.</span><span class="token function" style="color:#d73a49">seconds</span><span class="token punctuation" style="color:#393A34">(</span><span class="token punctuation" style="color:#393A34">)</span><span class="token punctuation" style="color:#393A34">;</span><span class="token plain"></span><br></div><div class="token-line" style="color:#393A34"><span class="token plain"></span><span class="token comment" style="color:#999988;font-style:italic">// ...</span><span class="token plain"></span><br></div><div class="token-line" style="color:#393A34"><span class="token plain"></span><span class="token comment" style="color:#999988;font-style:italic">// Convert tick delta to radians and accumulate position.</span><span class="token plain"></span><br></div><div class="token-line" style="color:#393A34"><span class="token plain"></span><span class="token keyword" style="color:#00009f">double</span><span class="token plain"> delta_rad </span><span class="token operator" style="color:#393A34">=</span><span class="token plain"> </span><span class="token punctuation" style="color:#393A34">(</span><span class="token generic-function function" style="color:#d73a49">static_cast</span><span class="token generic-function generic class-name operator" style="color:#393A34">&lt;</span><span class="token generic-function generic class-name keyword" style="color:#00009f">double</span><span class="token generic-function generic class-name operator" style="color:#393A34">&gt;</span><span class="token punctuation" style="color:#393A34">(</span><span class="token plain">delta</span><span class="token punctuation" style="color:#393A34">)</span><span class="token plain"> </span><span class="token operator" style="color:#393A34">/</span><span class="token plain"> ticks_per_rev_</span><span class="token punctuation" style="color:#393A34">[</span><span class="token plain">i</span><span class="token punctuation" style="color:#393A34">]</span><span class="token punctuation" style="color:#393A34">)</span><span class="token plain"> </span><span class="token operator" style="color:#393A34">*</span><span class="token plain"> </span><span class="token number" style="color:#36acaa">2.0</span><span class="token plain"> </span><span class="token operator" style="color:#393A34">*</span><span class="token plain"> M_PI</span><span class="token punctuation" style="color:#393A34">;</span><span class="token plain"></span><br></div><div class="token-line" style="color:#393A34"><span class="token plain">hw_positions_</span><span class="token punctuation" style="color:#393A34">[</span><span class="token plain">i</span><span class="token punctuation" style="color:#393A34">]</span><span class="token plain"> </span><span class="token operator" style="color:#393A34">+=</span><span class="token plain"> delta_rad</span><span class="token punctuation" style="color:#393A34">;</span><span class="token plain"></span><br></div><div class="token-line" style="color:#393A34"><span class="token plain">hw_velocities_</span><span class="token punctuation" style="color:#393A34">[</span><span class="token plain">i</span><span class="token punctuation" style="color:#393A34">]</span><span class="token plain"> </span><span class="token operator" style="color:#393A34">=</span><span class="token plain"> delta_rad </span><span class="token operator" style="color:#393A34">/</span><span class="token plain"> dt</span><span class="token punctuation" style="color:#393A34">;</span><br></div></code></pre></div></div>
<p>We report this calculated velocity as another state interface for the PID controllers to use.</p>
<p>Our final list of System interfaces is:</p>
<ul>
<li class="">Velocity (command)</li>
<li class="">Velocity (state)</li>
<li class="">Position (state)</li>
</ul>
<p>To set the interfaces, we declare them in <a href="https://github.com/mikelikesrobots/viam-rover2/blob/main/description/ros2_control/rover2.ros2_control.xacro#L27-L36" target="_blank" rel="noopener noreferrer" class="">the <code>rover2.ros2_control.xacro</code> file</a>:</p>
<div class="language-xml codeBlockContainer_Ckt0 theme-code-block" style="--prism-color:#393A34;--prism-background-color:#f6f8fa"><div class="codeBlockContent_QJqH"><pre tabindex="0" class="prism-code language-xml codeBlock_bY9V thin-scrollbar" style="color:#393A34;background-color:#f6f8fa"><code class="codeBlockLines_e6Vv"><div class="token-line" style="color:#393A34"><span class="token tag punctuation" style="color:#393A34">&lt;</span><span class="token tag" style="color:#00009f">joint</span><span class="token tag" style="color:#00009f"> </span><span class="token tag attr-name" style="color:#00a4db">name</span><span class="token tag attr-value punctuation attr-equals" style="color:#393A34">=</span><span class="token tag attr-value punctuation" style="color:#393A34">"</span><span class="token tag attr-value" style="color:#e3116c">${prefix}left_wheel_joint</span><span class="token tag attr-value punctuation" style="color:#393A34">"</span><span class="token tag punctuation" style="color:#393A34">&gt;</span><span class="token plain"></span><br></div><div class="token-line" style="color:#393A34"><span class="token plain"></span><span class="token tag punctuation" style="color:#393A34">&lt;</span><span class="token tag" style="color:#00009f">command_interface</span><span class="token tag" style="color:#00009f"> </span><span class="token tag attr-name" style="color:#00a4db">name</span><span class="token tag attr-value punctuation attr-equals" style="color:#393A34">=</span><span class="token tag attr-value punctuation" style="color:#393A34">"</span><span class="token tag attr-value" style="color:#e3116c">velocity</span><span class="token tag attr-value punctuation" style="color:#393A34">"</span><span class="token tag punctuation" style="color:#393A34">/&gt;</span><span class="token plain"></span><br></div><div class="token-line" style="color:#393A34"><span class="token plain"></span><span class="token tag punctuation" style="color:#393A34">&lt;</span><span class="token tag" style="color:#00009f">state_interface</span><span class="token tag" style="color:#00009f"> </span><span class="token tag attr-name" style="color:#00a4db">name</span><span class="token tag attr-value punctuation attr-equals" style="color:#393A34">=</span><span class="token tag attr-value punctuation" style="color:#393A34">"</span><span class="token tag attr-value" style="color:#e3116c">position</span><span class="token tag attr-value punctuation" style="color:#393A34">"</span><span class="token tag punctuation" style="color:#393A34">/&gt;</span><span class="token plain"></span><br></div><div class="token-line" style="color:#393A34"><span class="token plain"></span><span class="token tag punctuation" style="color:#393A34">&lt;</span><span class="token tag" style="color:#00009f">state_interface</span><span class="token tag" style="color:#00009f"> </span><span class="token tag attr-name" style="color:#00a4db">name</span><span class="token tag attr-value punctuation attr-equals" style="color:#393A34">=</span><span class="token tag attr-value punctuation" style="color:#393A34">"</span><span class="token tag attr-value" style="color:#e3116c">velocity</span><span class="token tag attr-value punctuation" style="color:#393A34">"</span><span class="token tag punctuation" style="color:#393A34">/&gt;</span><span class="token plain"></span><br></div><div class="token-line" style="color:#393A34"><span class="token plain"></span><span class="token tag punctuation" style="color:#393A34">&lt;/</span><span class="token tag" style="color:#00009f">joint</span><span class="token tag punctuation" style="color:#393A34">&gt;</span><span class="token plain"></span><br></div><div class="token-line" style="color:#393A34"><span class="token plain"></span><span class="token tag punctuation" style="color:#393A34">&lt;</span><span class="token tag" style="color:#00009f">joint</span><span class="token tag" style="color:#00009f"> </span><span class="token tag attr-name" style="color:#00a4db">name</span><span class="token tag attr-value punctuation attr-equals" style="color:#393A34">=</span><span class="token tag attr-value punctuation" style="color:#393A34">"</span><span class="token tag attr-value" style="color:#e3116c">${prefix}right_wheel_joint</span><span class="token tag attr-value punctuation" style="color:#393A34">"</span><span class="token tag punctuation" style="color:#393A34">&gt;</span><span class="token plain"></span><br></div><div class="token-line" style="color:#393A34"><span class="token plain"></span><span class="token tag punctuation" style="color:#393A34">&lt;</span><span class="token tag" style="color:#00009f">command_interface</span><span class="token tag" style="color:#00009f"> </span><span class="token tag attr-name" style="color:#00a4db">name</span><span class="token tag attr-value punctuation attr-equals" style="color:#393A34">=</span><span class="token tag attr-value punctuation" style="color:#393A34">"</span><span class="token tag attr-value" style="color:#e3116c">velocity</span><span class="token tag attr-value punctuation" style="color:#393A34">"</span><span class="token tag punctuation" style="color:#393A34">/&gt;</span><span class="token plain"></span><br></div><div class="token-line" style="color:#393A34"><span class="token plain"></span><span class="token tag punctuation" style="color:#393A34">&lt;</span><span class="token tag" style="color:#00009f">state_interface</span><span class="token tag" style="color:#00009f"> </span><span class="token tag attr-name" style="color:#00a4db">name</span><span class="token tag attr-value punctuation attr-equals" style="color:#393A34">=</span><span class="token tag attr-value punctuation" style="color:#393A34">"</span><span class="token tag attr-value" style="color:#e3116c">position</span><span class="token tag attr-value punctuation" style="color:#393A34">"</span><span class="token tag punctuation" style="color:#393A34">/&gt;</span><span class="token plain"></span><br></div><div class="token-line" style="color:#393A34"><span class="token plain"></span><span class="token tag punctuation" style="color:#393A34">&lt;</span><span class="token tag" style="color:#00009f">state_interface</span><span class="token tag" style="color:#00009f"> </span><span class="token tag attr-name" style="color:#00a4db">name</span><span class="token tag attr-value punctuation attr-equals" style="color:#393A34">=</span><span class="token tag attr-value punctuation" style="color:#393A34">"</span><span class="token tag attr-value" style="color:#e3116c">velocity</span><span class="token tag attr-value punctuation" style="color:#393A34">"</span><span class="token tag punctuation" style="color:#393A34">/&gt;</span><span class="token plain"></span><br></div><div class="token-line" style="color:#393A34"><span class="token plain"></span><span class="token tag punctuation" style="color:#393A34">&lt;/</span><span class="token tag" style="color:#00009f">joint</span><span class="token tag punctuation" style="color:#393A34">&gt;</span><br></div></code></pre></div></div>
<p>We also need to <a href="https://github.com/mikelikesrobots/viam-rover2/blob/main/hardware/src/rover2_system.cpp#L173-L194" target="_blank" rel="noopener noreferrer" class="">export the interfaces</a> in code. This is done using the <code>export_state_interfaces</code> and <code>export_command_interfaces</code> functions, which report the available interfaces to the <code>ros2_control</code> resource manager.</p>
<div class="language-cpp codeBlockContainer_Ckt0 theme-code-block" style="--prism-color:#393A34;--prism-background-color:#f6f8fa"><div class="codeBlockContent_QJqH"><pre tabindex="0" class="prism-code language-cpp codeBlock_bY9V thin-scrollbar" style="color:#393A34;background-color:#f6f8fa"><code class="codeBlockLines_e6Vv"><div class="token-line" style="color:#393A34"><span class="token comment" style="color:#999988;font-style:italic">// Declare position and velocity state interfaces for left and right motors</span><span class="token plain"></span><br></div><div class="token-line" style="color:#393A34"><span class="token plain">std</span><span class="token double-colon punctuation" style="color:#393A34">::</span><span class="token plain">vector</span><span class="token operator" style="color:#393A34">&lt;</span><span class="token plain">hardware_interface</span><span class="token double-colon punctuation" style="color:#393A34">::</span><span class="token plain">StateInterface</span><span class="token operator" style="color:#393A34">&gt;</span><span class="token plain"> </span><span class="token class-name">Rover2SystemHardware</span><span class="token double-colon punctuation" style="color:#393A34">::</span><span class="token function" style="color:#d73a49">export_state_interfaces</span><span class="token punctuation" style="color:#393A34">(</span><span class="token punctuation" style="color:#393A34">)</span><span class="token plain"> </span><span class="token punctuation" style="color:#393A34">{</span><span class="token plain"></span><br></div><div class="token-line" style="color:#393A34"><span class="token plain">  std</span><span class="token double-colon punctuation" style="color:#393A34">::</span><span class="token plain">vector</span><span class="token operator" style="color:#393A34">&lt;</span><span class="token plain">hardware_interface</span><span class="token double-colon punctuation" style="color:#393A34">::</span><span class="token plain">StateInterface</span><span class="token operator" style="color:#393A34">&gt;</span><span class="token plain"> state_interfaces</span><span class="token punctuation" style="color:#393A34">;</span><span class="token plain"></span><br></div><div class="token-line" style="color:#393A34"><span class="token plain">  </span><span class="token keyword" style="color:#00009f">for</span><span class="token plain"> </span><span class="token punctuation" style="color:#393A34">(</span><span class="token keyword" style="color:#00009f">auto</span><span class="token plain"> i </span><span class="token operator" style="color:#393A34">=</span><span class="token plain"> </span><span class="token number" style="color:#36acaa">0u</span><span class="token punctuation" style="color:#393A34">;</span><span class="token plain"> i </span><span class="token operator" style="color:#393A34">&lt;</span><span class="token plain"> info_</span><span class="token punctuation" style="color:#393A34">.</span><span class="token plain">joints</span><span class="token punctuation" style="color:#393A34">.</span><span class="token function" style="color:#d73a49">size</span><span class="token punctuation" style="color:#393A34">(</span><span class="token punctuation" style="color:#393A34">)</span><span class="token punctuation" style="color:#393A34">;</span><span class="token plain"> i</span><span class="token operator" style="color:#393A34">++</span><span class="token punctuation" style="color:#393A34">)</span><span class="token plain"> </span><span class="token punctuation" style="color:#393A34">{</span><span class="token plain"></span><br></div><div class="token-line" style="color:#393A34"><span class="token plain">    state_interfaces</span><span class="token punctuation" style="color:#393A34">.</span><span class="token function" style="color:#d73a49">emplace_back</span><span class="token punctuation" style="color:#393A34">(</span><span class="token plain">hardware_interface</span><span class="token double-colon punctuation" style="color:#393A34">::</span><span class="token function" style="color:#d73a49">StateInterface</span><span class="token punctuation" style="color:#393A34">(</span><span class="token plain"></span><br></div><div class="token-line" style="color:#393A34"><span class="token plain">        info_</span><span class="token punctuation" style="color:#393A34">.</span><span class="token plain">joints</span><span class="token punctuation" style="color:#393A34">[</span><span class="token plain">i</span><span class="token punctuation" style="color:#393A34">]</span><span class="token punctuation" style="color:#393A34">.</span><span class="token plain">name</span><span class="token punctuation" style="color:#393A34">,</span><span class="token plain"> hardware_interface</span><span class="token double-colon punctuation" style="color:#393A34">::</span><span class="token plain">HW_IF_POSITION</span><span class="token punctuation" style="color:#393A34">,</span><span class="token plain"> </span><span class="token operator" style="color:#393A34">&amp;</span><span class="token plain">hw_positions_</span><span class="token punctuation" style="color:#393A34">[</span><span class="token plain">i</span><span class="token punctuation" style="color:#393A34">]</span><span class="token punctuation" style="color:#393A34">)</span><span class="token punctuation" style="color:#393A34">)</span><span class="token punctuation" style="color:#393A34">;</span><span class="token plain"></span><br></div><div class="token-line" style="color:#393A34"><span class="token plain">    state_interfaces</span><span class="token punctuation" style="color:#393A34">.</span><span class="token function" style="color:#d73a49">emplace_back</span><span class="token punctuation" style="color:#393A34">(</span><span class="token plain">hardware_interface</span><span class="token double-colon punctuation" style="color:#393A34">::</span><span class="token function" style="color:#d73a49">StateInterface</span><span class="token punctuation" style="color:#393A34">(</span><span class="token plain"></span><br></div><div class="token-line" style="color:#393A34"><span class="token plain">        info_</span><span class="token punctuation" style="color:#393A34">.</span><span class="token plain">joints</span><span class="token punctuation" style="color:#393A34">[</span><span class="token plain">i</span><span class="token punctuation" style="color:#393A34">]</span><span class="token punctuation" style="color:#393A34">.</span><span class="token plain">name</span><span class="token punctuation" style="color:#393A34">,</span><span class="token plain"> hardware_interface</span><span class="token double-colon punctuation" style="color:#393A34">::</span><span class="token plain">HW_IF_VELOCITY</span><span class="token punctuation" style="color:#393A34">,</span><span class="token plain"> </span><span class="token operator" style="color:#393A34">&amp;</span><span class="token plain">hw_velocities_</span><span class="token punctuation" style="color:#393A34">[</span><span class="token plain">i</span><span class="token punctuation" style="color:#393A34">]</span><span class="token punctuation" style="color:#393A34">)</span><span class="token punctuation" style="color:#393A34">)</span><span class="token punctuation" style="color:#393A34">;</span><span class="token plain"></span><br></div><div class="token-line" style="color:#393A34"><span class="token plain">  </span><span class="token punctuation" style="color:#393A34">}</span><span class="token plain"></span><br></div><div class="token-line" style="color:#393A34"><span class="token plain" style="display:inline-block"></span><br></div><div class="token-line" style="color:#393A34"><span class="token plain">  </span><span class="token keyword" style="color:#00009f">return</span><span class="token plain"> state_interfaces</span><span class="token punctuation" style="color:#393A34">;</span><span class="token plain"></span><br></div><div class="token-line" style="color:#393A34"><span class="token plain"></span><span class="token punctuation" style="color:#393A34">}</span><span class="token plain"></span><br></div><div class="token-line" style="color:#393A34"><span class="token plain" style="display:inline-block"></span><br></div><div class="token-line" style="color:#393A34"><span class="token plain"></span><span class="token comment" style="color:#999988;font-style:italic">// Declare velocity command interfaces for left and right motors</span><span class="token plain"></span><br></div><div class="token-line" style="color:#393A34"><span class="token plain">std</span><span class="token double-colon punctuation" style="color:#393A34">::</span><span class="token plain">vector</span><span class="token operator" style="color:#393A34">&lt;</span><span class="token plain">hardware_interface</span><span class="token double-colon punctuation" style="color:#393A34">::</span><span class="token plain">CommandInterface</span><span class="token operator" style="color:#393A34">&gt;</span><span class="token plain"> </span><span class="token class-name">Rover2SystemHardware</span><span class="token double-colon punctuation" style="color:#393A34">::</span><span class="token function" style="color:#d73a49">export_command_interfaces</span><span class="token punctuation" style="color:#393A34">(</span><span class="token punctuation" style="color:#393A34">)</span><span class="token plain"> </span><span class="token punctuation" style="color:#393A34">{</span><span class="token plain"></span><br></div><div class="token-line" style="color:#393A34"><span class="token plain">  std</span><span class="token double-colon punctuation" style="color:#393A34">::</span><span class="token plain">vector</span><span class="token operator" style="color:#393A34">&lt;</span><span class="token plain">hardware_interface</span><span class="token double-colon punctuation" style="color:#393A34">::</span><span class="token plain">CommandInterface</span><span class="token operator" style="color:#393A34">&gt;</span><span class="token plain"> command_interfaces</span><span class="token punctuation" style="color:#393A34">;</span><span class="token plain"></span><br></div><div class="token-line" style="color:#393A34"><span class="token plain">  </span><span class="token keyword" style="color:#00009f">for</span><span class="token plain"> </span><span class="token punctuation" style="color:#393A34">(</span><span class="token keyword" style="color:#00009f">auto</span><span class="token plain"> i </span><span class="token operator" style="color:#393A34">=</span><span class="token plain"> </span><span class="token number" style="color:#36acaa">0u</span><span class="token punctuation" style="color:#393A34">;</span><span class="token plain"> i </span><span class="token operator" style="color:#393A34">&lt;</span><span class="token plain"> info_</span><span class="token punctuation" style="color:#393A34">.</span><span class="token plain">joints</span><span class="token punctuation" style="color:#393A34">.</span><span class="token function" style="color:#d73a49">size</span><span class="token punctuation" style="color:#393A34">(</span><span class="token punctuation" style="color:#393A34">)</span><span class="token punctuation" style="color:#393A34">;</span><span class="token plain"> i</span><span class="token operator" style="color:#393A34">++</span><span class="token punctuation" style="color:#393A34">)</span><span class="token plain"> </span><span class="token punctuation" style="color:#393A34">{</span><span class="token plain"></span><br></div><div class="token-line" style="color:#393A34"><span class="token plain">    command_interfaces</span><span class="token punctuation" style="color:#393A34">.</span><span class="token function" style="color:#d73a49">emplace_back</span><span class="token punctuation" style="color:#393A34">(</span><span class="token plain">hardware_interface</span><span class="token double-colon punctuation" style="color:#393A34">::</span><span class="token function" style="color:#d73a49">CommandInterface</span><span class="token punctuation" style="color:#393A34">(</span><span class="token plain"></span><br></div><div class="token-line" style="color:#393A34"><span class="token plain">        info_</span><span class="token punctuation" style="color:#393A34">.</span><span class="token plain">joints</span><span class="token punctuation" style="color:#393A34">[</span><span class="token plain">i</span><span class="token punctuation" style="color:#393A34">]</span><span class="token punctuation" style="color:#393A34">.</span><span class="token plain">name</span><span class="token punctuation" style="color:#393A34">,</span><span class="token plain"> hardware_interface</span><span class="token double-colon punctuation" style="color:#393A34">::</span><span class="token plain">HW_IF_VELOCITY</span><span class="token punctuation" style="color:#393A34">,</span><span class="token plain"> </span><span class="token operator" style="color:#393A34">&amp;</span><span class="token plain">hw_commands_</span><span class="token punctuation" style="color:#393A34">[</span><span class="token plain">i</span><span class="token punctuation" style="color:#393A34">]</span><span class="token punctuation" style="color:#393A34">)</span><span class="token punctuation" style="color:#393A34">)</span><span class="token punctuation" style="color:#393A34">;</span><span class="token plain"></span><br></div><div class="token-line" style="color:#393A34"><span class="token plain">  </span><span class="token punctuation" style="color:#393A34">}</span><span class="token plain"></span><br></div><div class="token-line" style="color:#393A34"><span class="token plain" style="display:inline-block"></span><br></div><div class="token-line" style="color:#393A34"><span class="token plain">  </span><span class="token keyword" style="color:#00009f">return</span><span class="token plain"> command_interfaces</span><span class="token punctuation" style="color:#393A34">;</span><span class="token plain"></span><br></div><div class="token-line" style="color:#393A34"><span class="token plain"></span><span class="token punctuation" style="color:#393A34">}</span><span class="token plain"></span><br></div><div class="token-line" style="color:#393A34"><span class="token plain" style="display:inline-block"></span><br></div></code></pre></div></div>
<p>The class has the required <code>write</code> and <code>read</code> functions for <code>ros2_control</code>. In both cases, the code is quite long to include verbatim, so the functions are described and linked to below if you want to look for yourself.</p>
<p>The <a href="https://github.com/mikelikesrobots/viam-rover2/blob/main/hardware/src/rover2_system.cpp#L383-L442" target="_blank" rel="noopener noreferrer" class=""><code>write</code> function</a> is responsible for taking the commanded speeds and writing them to the motors. In this case, it uses the LUT to determine the best PWM value for the motors, then sends the requested PWM to the motor controller.</p>
<p>The <a href="https://github.com/mikelikesrobots/viam-rover2/blob/main/hardware/src/rover2_system.cpp#L249-L292" target="_blank" rel="noopener noreferrer" class=""><code>read</code> function</a> is called when the control system needs the latest sensor readings. In open-loop configurations, the simplest action is to report the commanded speed as the measured speed. In our closed-loop case, the function takes the latest encoder readings, guesses the direction of the wheels based on the previous commanded speed, and calculates the velocities of the wheels. It also writes the velocities to a custom sensor publishing node, which runs outside of <code>ros2_control</code> and publishes ROS 2 sensor data; this is helpful as <code>ros2_control</code> needs to be real-time, but it helps to publish ROS 2 data to check what the system is doing.</p>
<p>With position and velocity data being fed back to the controller, the next step is to actually use the data. The default DiffDriveController doesn't do anything with the information directly; we need to add PID controllers.</p>
<h2 class="anchor anchorTargetStickyNavbar_Vzrq" id="chaining-pid-controllers">Chaining PID Controllers<a href="https://mikelikesrobots.github.io/blog/rover-ros2-control#chaining-pid-controllers" class="hash-link" aria-label="Direct link to Chaining PID Controllers" title="Direct link to Chaining PID Controllers" translate="no">​</a></h2>
<p>As stated in the previous section, the DiffDriveController alone does not make use of feedback data - it operates open loop. To use the feedback data, we chain PID controllers with the DiffDriveController.</p>
<figure class="text--center"><p><img decoding="async" loading="lazy" alt="Diagram showing the open loop configuration of ros2_control" src="https://mikelikesrobots.github.io/assets/images/diff_drive_only-5964802706053c7c791af286f90671db.webp" width="362" height="420" class="img_ev3q">
</p><figcaption>Diagram showing the differential drive controlling the rover. Feedback is not used to adjust motor speeds, although it is used to provide robot odometry.</figcaption><p></p></figure>
<p>Adding PID controllers is very easy to do with <code>ros2_control</code> using the concept of chaining controllers (see <a href="https://github.com/ros-controls/ros2_control_demos/tree/master/example_12" target="_blank" rel="noopener noreferrer" class="">example 12</a> of the <a href="https://github.com/ros-controls/ros2_control_demos" target="_blank" rel="noopener noreferrer" class=""><code>ros2_control</code> examples repository</a>). Our main controller, the DiffDriveController, sends desired wheel velocities to the left and right PID controllers. Each PID controller has its own parameters, sends velocity commands to the motors, and reads data from the encoders. They then regulate each wheel to the commanded velocity using the feedback data.</p>
<figure class="text--center"><p><img decoding="async" loading="lazy" alt="Diagram showing the closed-loop PID configuration" src="https://mikelikesrobots.github.io/assets/images/pid_controllers_included-c1b55d54dada6179a568c5b7c9c56447.webp" width="436" height="610" class="img_ev3q">
</p><figcaption>Diagram showing PID controllers chained with the DiffDriveController. Feedback from the encoders is used to regulate motor speeds, and the data is fed up through the controller to publish odometry.</figcaption><p></p></figure>
<p>The DiffDriveController can drive the robot more accurately using the PID controllers, and it will also publish the odometry of the robot. Odometry is data on the robot's position, orientation, and velocity. It allows higher-level systems like the navigation system to track the pose of the robot.</p>
<h3 class="anchor anchorTargetStickyNavbar_Vzrq" id="declaring-controllers">Declaring Controllers<a href="https://mikelikesrobots.github.io/blog/rover-ros2-control#declaring-controllers" class="hash-link" aria-label="Direct link to Declaring Controllers" title="Direct link to Declaring Controllers" translate="no">​</a></h3>
<p>The code for declaring these controllers all takes place in <a href="https://github.com/mikelikesrobots/viam-rover2/blob/main/bringup/config/rover2_controllers.yaml" target="_blank" rel="noopener noreferrer" class="">the <code>rover2_controllers.yaml</code> file</a>. First, the <a href="https://github.com/mikelikesrobots/viam-rover2/blob/main/bringup/config/rover2_controllers.yaml#L1-L15" target="_blank" rel="noopener noreferrer" class="">controller manager is configured to use</a> the two PID controllers and the DiffDriveController:</p>
<div class="language-yaml codeBlockContainer_Ckt0 theme-code-block" style="--prism-color:#393A34;--prism-background-color:#f6f8fa"><div class="codeBlockContent_QJqH"><pre tabindex="0" class="prism-code language-yaml codeBlock_bY9V thin-scrollbar" style="color:#393A34;background-color:#f6f8fa"><code class="codeBlockLines_e6Vv"><div class="token-line" style="color:#393A34"><span class="token key atrule" style="color:#00a4db">controller_manager</span><span class="token punctuation" style="color:#393A34">:</span><span class="token plain"></span><br></div><div class="token-line" style="color:#393A34"><span class="token plain">    </span><span class="token comment" style="color:#999988;font-style:italic"># ...</span><span class="token plain"></span><br></div><div class="token-line" style="color:#393A34"><span class="token plain">    </span><span class="token key atrule" style="color:#00a4db">pid_controller_left_wheel_joint</span><span class="token punctuation" style="color:#393A34">:</span><span class="token plain"></span><br></div><div class="token-line" style="color:#393A34"><span class="token plain">      </span><span class="token key atrule" style="color:#00a4db">type</span><span class="token punctuation" style="color:#393A34">:</span><span class="token plain"> pid_controller/PidController</span><br></div><div class="token-line" style="color:#393A34"><span class="token plain">    </span><span class="token key atrule" style="color:#00a4db">pid_controller_right_wheel_joint</span><span class="token punctuation" style="color:#393A34">:</span><span class="token plain"></span><br></div><div class="token-line" style="color:#393A34"><span class="token plain">      </span><span class="token key atrule" style="color:#00a4db">type</span><span class="token punctuation" style="color:#393A34">:</span><span class="token plain"> pid_controller/PidController</span><br></div><div class="token-line" style="color:#393A34"><span class="token plain">    </span><span class="token key atrule" style="color:#00a4db">rover2_base_controller</span><span class="token punctuation" style="color:#393A34">:</span><span class="token plain"></span><br></div><div class="token-line" style="color:#393A34"><span class="token plain">      </span><span class="token key atrule" style="color:#00a4db">type</span><span class="token punctuation" style="color:#393A34">:</span><span class="token plain"> diff_drive_controller/DiffDriveController</span><br></div></code></pre></div></div>
<p>We can then <a href="https://github.com/mikelikesrobots/viam-rover2/blob/main/bringup/config/rover2_controllers.yaml#L17-L47" target="_blank" rel="noopener noreferrer" class="">configure the PID controllers</a> to interact with the rover's hardware interface. The setup is the same for both controllers; it declares the joint it's going to control, that it sends velocity commands, and that it can reads measured velocities. It also specifies PID parameters with feedforward enabled:</p>
<div class="language-yaml codeBlockContainer_Ckt0 theme-code-block" style="--prism-color:#393A34;--prism-background-color:#f6f8fa"><div class="codeBlockContent_QJqH"><pre tabindex="0" class="prism-code language-yaml codeBlock_bY9V thin-scrollbar" style="color:#393A34;background-color:#f6f8fa"><code class="codeBlockLines_e6Vv"><div class="token-line" style="color:#393A34"><span class="token key atrule" style="color:#00a4db">pid_controller_left_wheel_joint</span><span class="token punctuation" style="color:#393A34">:</span><span class="token plain"></span><br></div><div class="token-line" style="color:#393A34"><span class="token plain">  </span><span class="token key atrule" style="color:#00a4db">ros__parameters</span><span class="token punctuation" style="color:#393A34">:</span><span class="token plain"></span><br></div><div class="token-line" style="color:#393A34"><span class="token plain">    </span><span class="token key atrule" style="color:#00a4db">dof_names</span><span class="token punctuation" style="color:#393A34">:</span><span class="token plain"></span><br></div><div class="token-line" style="color:#393A34"><span class="token plain">      </span><span class="token punctuation" style="color:#393A34">-</span><span class="token plain"> left_wheel_joint</span><br></div><div class="token-line" style="color:#393A34"><span class="token plain">    </span><span class="token key atrule" style="color:#00a4db">command_interface</span><span class="token punctuation" style="color:#393A34">:</span><span class="token plain"> velocity</span><br></div><div class="token-line" style="color:#393A34"><span class="token plain">    </span><span class="token key atrule" style="color:#00a4db">reference_and_state_interfaces</span><span class="token punctuation" style="color:#393A34">:</span><span class="token plain"></span><br></div><div class="token-line" style="color:#393A34"><span class="token plain">      </span><span class="token punctuation" style="color:#393A34">-</span><span class="token plain"> velocity</span><br></div><div class="token-line" style="color:#393A34"><span class="token plain">    </span><span class="token key atrule" style="color:#00a4db">gains</span><span class="token punctuation" style="color:#393A34">:</span><span class="token plain"></span><br></div><div class="token-line" style="color:#393A34"><span class="token plain">      </span><span class="token key atrule" style="color:#00a4db">left_wheel_joint</span><span class="token punctuation" style="color:#393A34">:</span><span class="token plain"> </span><span class="token punctuation" style="color:#393A34">{</span><span class="token key atrule" style="color:#00a4db">"p"</span><span class="token punctuation" style="color:#393A34">:</span><span class="token plain"> </span><span class="token number" style="color:#36acaa">0.5</span><span class="token punctuation" style="color:#393A34">,</span><span class="token plain"> </span><span class="token key atrule" style="color:#00a4db">"i"</span><span class="token punctuation" style="color:#393A34">:</span><span class="token plain"> </span><span class="token number" style="color:#36acaa">2.5</span><span class="token punctuation" style="color:#393A34">,</span><span class="token plain"> </span><span class="token key atrule" style="color:#00a4db">"d"</span><span class="token punctuation" style="color:#393A34">:</span><span class="token plain"> </span><span class="token number" style="color:#36acaa">0.0</span><span class="token punctuation" style="color:#393A34">,</span><span class="token plain"> </span><span class="token key atrule" style="color:#00a4db">"i_clamp_min"</span><span class="token punctuation" style="color:#393A34">:</span><span class="token plain"> </span><span class="token number" style="color:#36acaa">-10.0</span><span class="token punctuation" style="color:#393A34">,</span><span class="token plain"> </span><span class="token key atrule" style="color:#00a4db">"i_clamp_max"</span><span class="token punctuation" style="color:#393A34">:</span><span class="token plain"> </span><span class="token number" style="color:#36acaa">10.0</span><span class="token punctuation" style="color:#393A34">,</span><span class="token plain"> </span><span class="token key atrule" style="color:#00a4db">"antiwindup"</span><span class="token punctuation" style="color:#393A34">:</span><span class="token plain"> </span><span class="token boolean important" style="color:#36acaa">true</span><span class="token punctuation" style="color:#393A34">,</span><span class="token plain"> </span><span class="token key atrule" style="color:#00a4db">"feedforward_gain"</span><span class="token punctuation" style="color:#393A34">:</span><span class="token plain"> </span><span class="token number" style="color:#36acaa">0.95</span><span class="token punctuation" style="color:#393A34">}</span><span class="token plain"></span><br></div><div class="token-line" style="color:#393A34"><span class="token plain">    </span><span class="token key atrule" style="color:#00a4db">enable_feedforward</span><span class="token punctuation" style="color:#393A34">:</span><span class="token plain"> </span><span class="token boolean important" style="color:#36acaa">true</span><br></div></code></pre></div></div>
<p>The PID controllers also use a feedforward gain, which is separate from the LUT compensation. The feedforward term contributes 95% of the requested wheel velocity directly to the controller's output, while the PID terms correct the difference between the requested and measured velocity. The hardware interface then converts that output velocity into PWM using the LUT, compensating for the motor's deadband and non-linear response.</p>
<div class="theme-admonition theme-admonition-warning admonition_xJq3 alert alert--warning"><div class="admonitionHeading_Gvgb"><span class="admonitionIcon_Rf37"><svg viewBox="0 0 16 16"><path fill-rule="evenodd" d="M8.893 1.5c-.183-.31-.52-.5-.887-.5s-.703.19-.886.5L.138 13.499a.98.98 0 0 0 0 1.001c.193.31.53.501.886.501h13.964c.367 0 .704-.19.877-.5a1.03 1.03 0 0 0 .01-1.002L8.893 1.5zm.133 11.497H6.987v-2.003h2.039v2.003zm0-3.004H6.987V5.987h2.039v4.006z"></path></svg></span>PID Parameter Tuning</div><div class="admonitionContent_BuS1"><p>PID controllers have P, I, and D parameters that need to be tuned for best function. If badly configured, they won't work at all! More information on PID controllers is available on my <a class="" href="https://mikelikesrobots.github.io/blog/understand-pid-controllers">interactive blog post</a>, and I'll show how to tune the rover's PID controllers for real in a future post.</p></div></div>
<p>The DiffDriveController is then configured to control these PID controllers. This is done by giving the left and right wheel names as the <a href="https://github.com/mikelikesrobots/viam-rover2/blob/main/bringup/config/rover2_controllers.yaml#L51-L54" target="_blank" rel="noopener noreferrer" class="">PID controller joints</a>:</p>
<div class="language-yaml codeBlockContainer_Ckt0 theme-code-block" style="--prism-color:#393A34;--prism-background-color:#f6f8fa"><div class="codeBlockContent_QJqH"><pre tabindex="0" class="prism-code language-yaml codeBlock_bY9V thin-scrollbar" style="color:#393A34;background-color:#f6f8fa"><code class="codeBlockLines_e6Vv"><div class="token-line" style="color:#393A34"><span class="token key atrule" style="color:#00a4db">rover2_base_controller</span><span class="token punctuation" style="color:#393A34">:</span><span class="token plain"></span><br></div><div class="token-line" style="color:#393A34"><span class="token plain">  </span><span class="token key atrule" style="color:#00a4db">ros__parameters</span><span class="token punctuation" style="color:#393A34">:</span><span class="token plain"></span><br></div><div class="token-line" style="color:#393A34"><span class="token plain">    </span><span class="token key atrule" style="color:#00a4db">left_wheel_names</span><span class="token punctuation" style="color:#393A34">:</span><span class="token plain"> </span><span class="token punctuation" style="color:#393A34">[</span><span class="token string" style="color:#e3116c">"pid_controller_left_wheel_joint/left_wheel_joint"</span><span class="token punctuation" style="color:#393A34">]</span><span class="token plain"></span><br></div><div class="token-line" style="color:#393A34"><span class="token plain">    </span><span class="token key atrule" style="color:#00a4db">right_wheel_names</span><span class="token punctuation" style="color:#393A34">:</span><span class="token plain"> </span><span class="token punctuation" style="color:#393A34">[</span><span class="token string" style="color:#e3116c">"pid_controller_right_wheel_joint/right_wheel_joint"</span><span class="token punctuation" style="color:#393A34">]</span><br></div></code></pre></div></div>
<p>The DiffDriveController has the standard configuration, such as wheel separation and radius, but the crucial difference from the JetBot is to set it to <a href="https://github.com/mikelikesrobots/viam-rover2/blob/main/bringup/config/rover2_controllers.yaml#L70-L71" target="_blank" rel="noopener noreferrer" class="">closed-loop configuration</a>:</p>
<div class="language-yaml codeBlockContainer_Ckt0 theme-code-block" style="--prism-color:#393A34;--prism-background-color:#f6f8fa"><div class="codeBlockContent_QJqH"><pre tabindex="0" class="prism-code language-yaml codeBlock_bY9V thin-scrollbar" style="color:#393A34;background-color:#f6f8fa"><code class="codeBlockLines_e6Vv"><div class="token-line" style="color:#393A34"><span class="token key atrule" style="color:#00a4db">open_loop</span><span class="token punctuation" style="color:#393A34">:</span><span class="token plain"> </span><span class="token boolean important" style="color:#36acaa">false</span><span class="token plain"></span><br></div><div class="token-line" style="color:#393A34"><span class="token plain"></span><span class="token key atrule" style="color:#00a4db">position_feedback</span><span class="token punctuation" style="color:#393A34">:</span><span class="token plain"> </span><span class="token boolean important" style="color:#36acaa">true</span><br></div></code></pre></div></div>
<p>The DiffDriveController doesn't change how it commands the motors when in closed-loop configuration, but it does change how it calculates the robot's odometry. This is used by the navigation system to track the robot.</p>
<p>At this point, we have seen how speeds sent by the navigation system are received by the <code>ros2_control</code> DiffDriveController, which calculates required wheel speeds and sends them to the PID controllers. The PID controllers then use the custom hardware interface System to move the motors at those speeds and use encoder feedback to regulate the speeds. The DiffDriveController also publishes odometry, which can be used to track the robot's motion. Still, encoders are not perfect sources of information, so it helps to add another layer above the control system: an EKF, used to filter the encoder data and combine it with IMU measurements.</p>
<h2 class="anchor anchorTargetStickyNavbar_Vzrq" id="extended-kalman-filter">Extended Kalman Filter<a href="https://mikelikesrobots.github.io/blog/rover-ros2-control#extended-kalman-filter" class="hash-link" aria-label="Direct link to Extended Kalman Filter" title="Direct link to Extended Kalman Filter" translate="no">​</a></h2>
<p>An Extended Kalman Filter (EKF) is an algorithm that can combine multiple sources of sensor data together. It works by making a prediction, then using sensor data to improve that prediction. In our case, this is predicting the pose of the robot, then using the odometry published by <code>ros2_control</code> and the IMU data to improve that prediction. Each source of data is configured with a covariance, which is effectively how much the EKF trusts that source of data.</p>
<p>The EKF is configured to fuse forward velocity and yaw rate from the wheel odometry, along with yaw rate from the IMU. Each measurement includes a covariance describing its uncertainty, which influences how strongly it affects the filter's estimate. In this configuration, the wheel and IMU yaw rate measurements have the same covariance, while forward velocity is supplied only by the wheel odometry.</p>
<p>Combining these measurements allows the sensors to cover the weaknesses of one another. Encoders alone can provide noisy data, and have physical limitations, such as when one of the wheels slips. In this case, the wheel spins a lot and the encoder reports a large change in position, which the controller interprets as the robot spinning, despite the robot not moving. An IMU provides data about the robot's motion independently of wheel movement, so combining its measured yaw rate with the encoder reading produces a better estimate of the robot's pose overall. Even if the final robot pose is incorrect, it should be <em>closer</em> to the truth, which means other layers can more easily correct the mistake: for example, the depth data from the RealSense camera can be used to correct the robot's position as long as the robot is roughly in the right place.</p>
<div class="theme-admonition theme-admonition-note admonition_xJq3 alert alert--secondary"><div class="admonitionHeading_Gvgb"><span class="admonitionIcon_Rf37"><svg viewBox="0 0 14 16"><path fill-rule="evenodd" d="M6.3 5.69a.942.942 0 0 1-.28-.7c0-.28.09-.52.28-.7.19-.18.42-.28.7-.28.28 0 .52.09.7.28.18.19.28.42.28.7 0 .28-.09.52-.28.7a1 1 0 0 1-.7.3c-.28 0-.52-.11-.7-.3zM8 7.99c-.02-.25-.11-.48-.31-.69-.2-.19-.42-.3-.69-.31H6c-.27.02-.48.13-.69.31-.2.2-.3.44-.31.69h1v3c.02.27.11.5.31.69.2.2.42.31.69.31h1c.27 0 .48-.11.69-.31.2-.19.3-.42.31-.69H8V7.98v.01zM7 2.3c-3.14 0-5.7 2.54-5.7 5.68 0 3.14 2.56 5.7 5.7 5.7s5.7-2.55 5.7-5.7c0-3.15-2.56-5.69-5.7-5.69v.01zM7 .98c3.86 0 7 3.14 7 7s-3.14 7-7 7-7-3.12-7-7 3.14-7 7-7z"></path></svg></span>EKF is not part of <code>ros2_control</code></div><div class="admonitionContent_BuS1"><p>EKF is included in this post because it is a key part of the robot's ability to track its own movement, but it operates at a higher level than <code>ros2_control</code>.</p></div></div>
<p>EKF is included by <a href="https://github.com/mikelikesrobots/viam-rover2/blob/main/bringup/config/ekf.yaml" target="_blank" rel="noopener noreferrer" class="">configuring</a> it and <a href="https://github.com/mikelikesrobots/viam-rover2/blob/main/bringup/launch/rover2_control.launch.py#L164-L172" target="_blank" rel="noopener noreferrer" class="">launching</a> it:</p>
<div class="language-python codeBlockContainer_Ckt0 theme-code-block" style="--prism-color:#393A34;--prism-background-color:#f6f8fa"><div class="codeBlockContent_QJqH"><pre tabindex="0" class="prism-code language-python codeBlock_bY9V thin-scrollbar" style="color:#393A34;background-color:#f6f8fa"><code class="codeBlockLines_e6Vv"><div class="token-line" style="color:#393A34"><span class="token plain">ekf_config </span><span class="token operator" style="color:#393A34">=</span><span class="token plain"> LaunchConfiguration</span><span class="token punctuation" style="color:#393A34">(</span><span class="token string" style="color:#e3116c">"ekf_config_file"</span><span class="token punctuation" style="color:#393A34">)</span><span class="token plain"></span><br></div><div class="token-line" style="color:#393A34"><span class="token plain">ekf_node </span><span class="token operator" style="color:#393A34">=</span><span class="token plain"> Node</span><span class="token punctuation" style="color:#393A34">(</span><span class="token plain"></span><br></div><div class="token-line" style="color:#393A34"><span class="token plain">    package</span><span class="token operator" style="color:#393A34">=</span><span class="token string" style="color:#e3116c">"robot_localization"</span><span class="token punctuation" style="color:#393A34">,</span><span class="token plain"></span><br></div><div class="token-line" style="color:#393A34"><span class="token plain">    executable</span><span class="token operator" style="color:#393A34">=</span><span class="token string" style="color:#e3116c">"ekf_node"</span><span class="token punctuation" style="color:#393A34">,</span><span class="token plain"></span><br></div><div class="token-line" style="color:#393A34"><span class="token plain">    name</span><span class="token operator" style="color:#393A34">=</span><span class="token string" style="color:#e3116c">"ekf_filter_node"</span><span class="token punctuation" style="color:#393A34">,</span><span class="token plain"></span><br></div><div class="token-line" style="color:#393A34"><span class="token plain">    output</span><span class="token operator" style="color:#393A34">=</span><span class="token string" style="color:#e3116c">"screen"</span><span class="token punctuation" style="color:#393A34">,</span><span class="token plain"></span><br></div><div class="token-line" style="color:#393A34"><span class="token plain">    parameters</span><span class="token operator" style="color:#393A34">=</span><span class="token punctuation" style="color:#393A34">[</span><span class="token plain">ekf_config</span><span class="token punctuation" style="color:#393A34">,</span><span class="token plain"> </span><span class="token punctuation" style="color:#393A34">{</span><span class="token string" style="color:#e3116c">"use_sim_time"</span><span class="token punctuation" style="color:#393A34">:</span><span class="token plain"> use_sim_time</span><span class="token punctuation" style="color:#393A34">}</span><span class="token punctuation" style="color:#393A34">]</span><span class="token punctuation" style="color:#393A34">,</span><span class="token plain"></span><br></div><div class="token-line" style="color:#393A34"><span class="token plain">    ros_arguments</span><span class="token operator" style="color:#393A34">=</span><span class="token punctuation" style="color:#393A34">[</span><span class="token string" style="color:#e3116c">"--log-level"</span><span class="token punctuation" style="color:#393A34">,</span><span class="token plain"> </span><span class="token string" style="color:#e3116c">"warn"</span><span class="token punctuation" style="color:#393A34">]</span><span class="token punctuation" style="color:#393A34">,</span><span class="token plain"></span><br></div><div class="token-line" style="color:#393A34"><span class="token plain"></span><span class="token punctuation" style="color:#393A34">)</span><br></div></code></pre></div></div>
<p>The EKF is configured to take odometry from <code>/rover2_base_controller/odom</code>, published by <code>ros2_control</code>, and IMU data from <code>/rover2_base_controller/imu</code>, which is <a href="https://github.com/mikelikesrobots/viam-rover2/blob/main/hardware/src/rp2040_sensor_node.cpp#L79-L87" target="_blank" rel="noopener noreferrer" class="">published by the sensor node</a>.</p>
<p>The confidence in the IMU is set by the covariance vector in the <a href="https://github.com/mikelikesrobots/viam-rover2/blob/main/hardware/src/rp2040_sensor_node.cpp#L119-L138" target="_blank" rel="noopener noreferrer" class=""><code>publish_imu</code> function</a>:</p>
<div class="language-cpp codeBlockContainer_Ckt0 theme-code-block" style="--prism-color:#393A34;--prism-background-color:#f6f8fa"><div class="codeBlockContent_QJqH"><pre tabindex="0" class="prism-code language-cpp codeBlock_bY9V thin-scrollbar" style="color:#393A34;background-color:#f6f8fa"><code class="codeBlockLines_e6Vv"><div class="token-line" style="color:#393A34"><span class="token plain">msg</span><span class="token punctuation" style="color:#393A34">.</span><span class="token plain">angular_velocity_covariance</span><span class="token punctuation" style="color:#393A34">[</span><span class="token number" style="color:#36acaa">8</span><span class="token punctuation" style="color:#393A34">]</span><span class="token plain"> </span><span class="token operator" style="color:#393A34">=</span><span class="token plain"> </span><span class="token number" style="color:#36acaa">0.02</span><span class="token punctuation" style="color:#393A34">;</span><br></div></code></pre></div></div>
<p>The confidence in the encoder data is set by <a href="https://github.com/mikelikesrobots/viam-rover2/blob/main/bringup/config/rover2_controllers.yaml#L68" target="_blank" rel="noopener noreferrer" class=""><code>ros2_control</code> configuration</a>:</p>
<div class="language-yaml codeBlockContainer_Ckt0 theme-code-block" style="--prism-color:#393A34;--prism-background-color:#f6f8fa"><div class="codeBlockContent_QJqH"><pre tabindex="0" class="prism-code language-yaml codeBlock_bY9V thin-scrollbar" style="color:#393A34;background-color:#f6f8fa"><code class="codeBlockLines_e6Vv"><div class="token-line" style="color:#393A34"><span class="token key atrule" style="color:#00a4db">twist_covariance_diagonal</span><span class="token punctuation" style="color:#393A34">:</span><span class="token plain"> </span><span class="token punctuation" style="color:#393A34">[</span><span class="token number" style="color:#36acaa">0.001</span><span class="token punctuation" style="color:#393A34">,</span><span class="token plain"> </span><span class="token number" style="color:#36acaa">0.001</span><span class="token punctuation" style="color:#393A34">,</span><span class="token plain"> </span><span class="token number" style="color:#36acaa">0.001</span><span class="token punctuation" style="color:#393A34">,</span><span class="token plain"> </span><span class="token number" style="color:#36acaa">0.001</span><span class="token punctuation" style="color:#393A34">,</span><span class="token plain"> </span><span class="token number" style="color:#36acaa">0.001</span><span class="token punctuation" style="color:#393A34">,</span><span class="token plain"> </span><span class="token number" style="color:#36acaa">0.02</span><span class="token punctuation" style="color:#393A34">]</span><br></div></code></pre></div></div>
<p>It then fuses these two sources together and produces a new odometry topic on <code>/odometry/filtered</code>, which can be used by the localisation node to help keep track of the robot's position.</p>
<h2 class="anchor anchorTargetStickyNavbar_Vzrq" id="conclusion">Conclusion<a href="https://mikelikesrobots.github.io/blog/rover-ros2-control#conclusion" class="hash-link" aria-label="Direct link to Conclusion" title="Direct link to Conclusion" translate="no">​</a></h2>
<p>This post shows how to close the loop between the Viam Rover's motors and encoders using <code>ros2_control</code>, allowing the rover to regulate its wheel speeds instead of relying on open-loop PWM commands. It also shows how to combine the resulting wheel odometry with IMU measurements using an Extended Kalman Filter, producing a more robust motion estimate for localisation and navigation.</p>
<p>For the Viam Rover in particular, the post showed how wheel speeds are turned into PWM values adjusted for the motor's behaviour using a Look-Up Table, and how encoders are read to provide an estimate of the robot's velocity and how much it has moved. These are built into a <code>ros2_control</code> System, which allows the modular DiffDriveController and PID controllers to correct the remaining error and report the robot's movement as odometry. Finally, the EKF fuses that odometry data with IMU measurements to produce a better idea of the robot's position, which forms a much better foundation for navigation systems than either sensor source could provide by itself.</p>
<p>There are still limitations. The single-pin encoders cannot measure direction directly, so the software has to infer it from the last command, and wheel slip can still make the rover appear to move farther than it really has. Nevertheless, the combination of calibration, feedforward mapping, PID feedback, and sensor fusion is accurate enough to support the rover's autonomous mapping and navigation.</p>
<p>All of the configuration and hardware-interface code is available in the <a href="https://github.com/mikelikesrobots/viam-rover2" target="_blank" rel="noopener noreferrer" class="">Viam Rover repository</a>. In a future post, I'll show how to tune the PID controllers for a real robot and perform other calibration for accurate motion.</p>]]></content>
        <author>
            <name>Michael Hart</name>
            <uri>https://mikelikesrobots.github.io</uri>
        </author>
        <category label="robotics" term="robotics"/>
        <category label="ros2" term="ros2"/>
        <category label="ros2control" term="ros2control"/>
        <category label="viam" term="viam"/>
        <category label="control" term="control"/>
    </entry>
    <entry>
        <title type="html"><![CDATA[Autonomously Mapping with Visual SLAM]]></title>
        <id>https://mikelikesrobots.github.io/blog/autonomous-viam-rover</id>
        <link href="https://mikelikesrobots.github.io/blog/autonomous-viam-rover"/>
        <updated>2026-06-05T00:00:00.000Z</updated>
        <summary type="html"><![CDATA[This project is about a low-cost robot that you can drop into a room, have it explore and map the entire space, then set navigating autonomously - all without GPS or lidar.]]></summary>
        <content type="html"><![CDATA[<p>This project is about a low-cost robot that you can drop into a room, have it explore and map the entire space, then set navigating autonomously - all without GPS or lidar.</p>
<p>In this post, I walk through how I built an autonomous indoor mapping robot using the <a href="https://www.viam.com/resources/rover" target="_blank" rel="noopener noreferrer" class="">Viam Rover</a> as a base, swapping out the webcam for an <a href="https://www.realsenseai.com/products/stereo-depth-camera-module-d421/" target="_blank" rel="noopener noreferrer" class="">RealSense Depth Module D421</a> and using a <a href="https://radxa.com/products/x/x4/" target="_blank" rel="noopener noreferrer" class="">Radxa X4</a> as the central compute (instead of the already-supported Raspberry Pi or Jetson Orin). The robot runs a full <a href="https://www.ros.org/" target="_blank" rel="noopener noreferrer" class="">ROS 2</a> stack, including Visual SLAM for map building and Nav2 for autonomous navigation.</p>
<p>While building this robot out, I ran into some interesting challenges around encoder noise and calibration, which I cover in detail. If you want to build one yourself, there's a <a class="" href="https://mikelikesrobots.github.io/blog/autonomous-viam-rover#can-i-build-this-robot">parts list</a> at the bottom, and all the source code is on <a href="https://github.com/mikelikesrobots/viam-rover2" target="_blank" rel="noopener noreferrer" class="">GitHub</a>.</p>
<div class="theme-admonition theme-admonition-note admonition_xJq3 alert alert--secondary"><div class="admonitionHeading_Gvgb"><span class="admonitionIcon_Rf37"><svg viewBox="0 0 14 16"><path fill-rule="evenodd" d="M6.3 5.69a.942.942 0 0 1-.28-.7c0-.28.09-.52.28-.7.19-.18.42-.28.7-.28.28 0 .52.09.7.28.18.19.28.42.28.7 0 .28-.09.52-.28.7a1 1 0 0 1-.7.3c-.28 0-.52-.11-.7-.3zM8 7.99c-.02-.25-.11-.48-.31-.69-.2-.19-.42-.3-.69-.31H6c-.27.02-.48.13-.69.31-.2.2-.3.44-.31.69h1v3c.02.27.11.5.31.69.2.2.42.31.69.31h1c.27 0 .48-.11.69-.31.2-.19.3-.42.31-.69H8V7.98v.01zM7 2.3c-3.14 0-5.7 2.54-5.7 5.68 0 3.14 2.56 5.7 5.7 5.7s5.7-2.55 5.7-5.7c0-3.15-2.56-5.69-5.7-5.69v.01zM7 .98c3.86 0 7 3.14 7 7s-3.14 7-7 7-7-3.12-7-7 3.14-7 7-7z"></path></svg></span>Hardware Provided by Intel</div><div class="admonitionContent_BuS1"><p>This project was built using hardware provided by Intel - thank you, Intel! The choice of hardware was my own, and the purpose of the project was also my idea.</p></div></div>
<p><strong>Autonomous Rover Infographic</strong></p>
<figure class="text--center"><p><img decoding="async" loading="lazy" alt="Infographic describing rover setup, features, and challenges" src="https://mikelikesrobots.github.io/assets/images/infographic-0f37549d0d09ca162bee21be0be50780.webp" width="2000" height="1414" class="img_ev3q">
</p><figcaption>Infographic showing the basics of the robot setup, the mapping and navigation features, and the major challenges I go over in this post. Viam Rover image comes from the <a href="https://www.viam.com/resources/rover" target="_blank" rel="noopener noreferrer" class="">product page</a>.</figcaption><p></p></figure>
<h2 class="anchor anchorTargetStickyNavbar_Vzrq" id="viam-rover">Viam Rover<a href="https://mikelikesrobots.github.io/blog/autonomous-viam-rover#viam-rover" class="hash-link" aria-label="Direct link to Viam Rover" title="Direct link to Viam Rover" translate="no">​</a></h2>
<p>From their <a href="https://docs.viam.com/what-is-viam/" target="_blank" rel="noopener noreferrer" class="">documentation</a>, "Viam is a software platform for building, deploying, and managing robotics applications." To help with being able to deploy their software and try out what they're offering, Viam also sells the <a href="https://www.viam.com/resources/rover" target="_blank" rel="noopener noreferrer" class="">Viam Rover</a>, which is an inexpensive kit that runs Viam software out of the box.</p>
<p>All you need to supply is the Single Board Computer (SBC), like a Raspberry Pi, and compatible batteries. Otherwise, everything comes pre-assembled and ready to go. Configure the power, install the Viam software on the SBC, and you should be ready to drive the robot around! Viam provides the control software and makes the interface for managing the robot very simple.</p>
<figure class="text--center"><p><img decoding="async" loading="lazy" src="https://cdn.shopify.com/s/files/1/0682/7822/3131/files/viam-rover-2-inuse-vertical-crop-72ppi_1000x1500.jpg" alt="Viam Rover image" class="img_ev3q">
</p><figcaption>Image of the Viam Rover, courtesy of the <a href="https://www.viam.com/resources/rover" target="_blank" rel="noopener noreferrer" class="">product page</a>.</figcaption><p></p></figure>
<p>Still, I wanted to develop an inexpensive robot capable of autonomous navigation, and the rover doesn't quite have the hardware to make it happen. It provides encoders, IMU, and webcam, but these sensors alone don't provide enough information for building a map. I decided to swap the webcam for a RealSense camera and use a Radxa X4 board to provide enough computing power to build a map on board. Again, if you're interested in building the robot yourself, I have a <a href="https://mikelikesrobots.github.io/blog/autonomous-viam-rover#can-i-build-this-robot" class="">parts list</a> at the bottom of this post.</p>
<h3 class="anchor anchorTargetStickyNavbar_Vzrq" id="radxa-x4">Radxa X4<a href="https://mikelikesrobots.github.io/blog/autonomous-viam-rover#radxa-x4" class="hash-link" aria-label="Direct link to Radxa X4" title="Direct link to Radxa X4" translate="no">​</a></h3>
<p>The Radxa X4 is a relatively low-cost SBC with a unique selling point: it contains both an Intel N100 chip, for compute-heavy work, and an RP2040 chip, which can be used for real-time embedded software. This works very well for robotics; it's fairly common to use a powerful board to run high-level software like mapping while using a microcontroller for real-time operations. The X4 provides both in one package.</p>
<figure class="text--center"><p><img decoding="async" loading="lazy" alt="Radxa X4 board from Radxa website" src="https://mikelikesrobots.github.io/assets/images/radxa_x4-47f15ef83c2a3b03b8df1340b4f15ad5.webp" width="869" height="596" class="img_ev3q">
</p><figcaption>Radxa X4 board image, courtesy of <a href="https://radxa.com/products/x/x4/" target="_blank" rel="noopener noreferrer" class="">Radxa X4 product page</a>.</figcaption><p></p></figure>
<p>There are a couple of drawbacks of using the X4 for this project. First, it needs its own power supply; the Raspberry Pi can be powered directly from the robot batteries, but the X4 needs its own battery bank with separate connections. Second, it produces quite a bit more heat, so it needs a fairly large heat sink. That expands the size of the robot and means it has to be mounted upside down, which requires extra parts. Thankfully, the rover comes with some parts to expand upwards already, so it's already designed to accommodate larger boards.</p>
<figure class="text--center"><p><img decoding="async" loading="lazy" alt="Hardware diagram of Radxa X4, motors, encoders, IMU, battery, and camera" src="https://mikelikesrobots.github.io/assets/images/high_level_hardware-0b16a770f9e2088c856d1f5e7b6830db.webp" width="1920" height="1080" class="img_ev3q">
</p><figcaption>This diagram shows the Radxa X4 with Intel N100 chip and RP2040 chip. The N100 powers the main board and communicates with the D421 camera over USB. The RP2040 handles the 40-pin header and communicates with the N100 over a serial connection.</figcaption><p></p></figure>
<p>The ROS 2 package I've written will build custom firmware for the RP2040, flash it automatically, and then communicate with the RP2040 over a serial link on UART0. This means the RP2040 is responsible for reading sensors and sending PWM signals to the motors, while the Intel N100 operates with a non-realtime Ubuntu installation.</p>
<h3 class="anchor anchorTargetStickyNavbar_Vzrq" id="realsense-d421">RealSense D421<a href="https://mikelikesrobots.github.io/blog/autonomous-viam-rover#realsense-d421" class="hash-link" aria-label="Direct link to RealSense D421" title="Direct link to RealSense D421" translate="no">​</a></h3>
<p>As I've previously stated, creating a map from webcam data alone simply isn't enough. We either need lidar or some kind of depth data, which is where the RealSense camera comes in. These sensors are very popular in robotics as they automatically calculate depth data from stereo cameras and can output depth images or point clouds. Depending on the model, they can also provide RGB (colour) data. I chose one of the lowest cost models to keep the total cost of the robot down: the RealSense Depth Module D421. This produces infrared images and a depth image that I use with the rover to map its environment.</p>
<figure class="text--center"><p><img decoding="async" loading="lazy" src="https://www.realsenseai.com/wp-content/uploads/2025/07/D421.png" alt="Realsense Depth Module D421 Image" class="img_ev3q">
</p><figcaption>Image of the RealSense Depth Module 421, courtesy of the <a href="https://www.realsenseai.com/products/stereo-depth-camera-module-d421/" target="_blank" rel="noopener noreferrer" class="">product page</a>.</figcaption><p></p></figure>
<div class="theme-admonition theme-admonition-warning admonition_xJq3 alert alert--warning"><div class="admonitionHeading_Gvgb"><span class="admonitionIcon_Rf37"><svg viewBox="0 0 16 16"><path fill-rule="evenodd" d="M8.893 1.5c-.183-.31-.52-.5-.887-.5s-.703.19-.886.5L.138 13.499a.98.98 0 0 0 0 1.001c.193.31.53.501.886.501h13.964c.367 0 .704-.19.877-.5a1.03 1.03 0 0 0 .01-1.002L8.893 1.5zm.133 11.497H6.987v-2.003h2.039v2.003zm0-3.004H6.987V5.987h2.039v4.006z"></path></svg></span>The USB-C connection is sided</div><div class="admonitionContent_BuS1"><p>This depth module has a USB-C connector and connects to a USB 3 port on the Radxa X4. However, I noticed that the camera may not produce data depending on which way the USB-C cable is plugged in. If the camera isn't producing data for you, try flipping the USB-C cable side and seeing if that works any better.</p></div></div>
<h2 class="anchor anchorTargetStickyNavbar_Vzrq" id="ros-2-instead-of-viam">ROS 2 Instead of Viam<a href="https://mikelikesrobots.github.io/blog/autonomous-viam-rover#ros-2-instead-of-viam" class="hash-link" aria-label="Direct link to ROS 2 Instead of Viam" title="Direct link to ROS 2 Instead of Viam" translate="no">​</a></h2>
<p>One of the great advantages of using the Viam Rover is that the software for controlling the rover can be installed and configured very easily. The interface is excellent. However, the Viam system isn't based on ROS 2 (although it can be bridged to it). I chose to implement ROS 2 Jazzy fully on my robot instead of using the Viam software, and this section is to explain my reasoning.</p>
<h3 class="anchor anchorTargetStickyNavbar_Vzrq" id="mapping-isnt-supported-by-viam">Mapping Isn't Supported by Viam<a href="https://mikelikesrobots.github.io/blog/autonomous-viam-rover#mapping-isnt-supported-by-viam" class="hash-link" aria-label="Direct link to Mapping Isn't Supported by Viam" title="Direct link to Mapping Isn't Supported by Viam" translate="no">​</a></h3>
<p>As far as I can tell, Viam doesn't provide modules for indoor mapping and navigation. If you take a look at the <a href="https://docs.viam.com/navigation/how-to/set-up-gps/" target="_blank" rel="noopener noreferrer" class="">Viam navigation documentation</a>, the system requires GPS position and heading to work, which doesn't work with indoor mapping. Hence, my choices were to build the module myself, or use the existing Nav2 framework from ROS 2.</p>
<p>It's possible that I could have used Viam software and separately run a ROS 2 navigation system, then used a Viam module to bridge between them. I wasn't sure how complicated that would have been to do or how efficient the system is at passing data back and forth for high-volume data like images and point clouds, so I didn't go this route.</p>
<h3 class="anchor anchorTargetStickyNavbar_Vzrq" id="no-radxa-x4-support">No Radxa X4 Support<a href="https://mikelikesrobots.github.io/blog/autonomous-viam-rover#no-radxa-x4-support" class="hash-link" aria-label="Direct link to No Radxa X4 Support" title="Direct link to No Radxa X4 Support" translate="no">​</a></h3>
<p>Viam does offer support for a few different SBCs, most notably the Raspberry Pi boards and Jetson Orin Nano series, but doesn't have support for the Radxa X4 already. In fact, I couldn't find support for any x86 board, and <a href="https://discord.com/channels/1083489952408539288/1483504854956769381" target="_blank" rel="noopener noreferrer" class="">asking for help in the forums</a> didn't yield any responses. I had to choose between building a Viam module for the Radxa X4 or building with ROS 2. I chose ROS 2 as I'm much more familiar with the system, and because I don't know how well the Viam module would have handled spanning across both the Intel N100 and the RP2040 chips.</p>
<h3 class="anchor anchorTargetStickyNavbar_Vzrq" id="custom-encoder-software">Custom Encoder Software<a href="https://mikelikesrobots.github.io/blog/autonomous-viam-rover#custom-encoder-software" class="hash-link" aria-label="Direct link to Custom Encoder Software" title="Direct link to Custom Encoder Software" translate="no">​</a></h3>
<p>During development, I found that the encoders used for position feedback on the motors behaved very poorly. The signals from the encoders are very noisy when the motors are running, which required me to add extra hardware to fix the noise. I originally had some software filtering to partially compensate for the noise, which I wouldn't have been able to do with the prebuilt Viam module. I have since removed the software filter due to the hardware fix, but this was originally a factor in my decision, hence including it here.</p>
<p>I did ask <a href="https://discord.com/channels/1083489952408539288/1493941300574031892" target="_blank" rel="noopener noreferrer" class="">in the Viam forums</a> if anyone else had experienced this issue or had a solution, but this also yielded no responses.</p>
<h3 class="anchor anchorTargetStickyNavbar_Vzrq" id="realsense-support">RealSense Support<a href="https://mikelikesrobots.github.io/blog/autonomous-viam-rover#realsense-support" class="hash-link" aria-label="Direct link to RealSense Support" title="Direct link to RealSense Support" translate="no">​</a></h3>
<p>Viam does have a <a href="https://app.viam.com/module/viam/realsense" target="_blank" rel="noopener noreferrer" class="">RealSense module</a> which supports:</p>
<ul>
<li class="">D435</li>
<li class="">D435i</li>
<li class="">D455</li>
</ul>
<p>Unfortunately, the list does not include my D421 model. I either needed to add support for it myself or use the existing ROS 2 support. Again, I could have used the ROS 2 node and bridged it to the Viam system, but this is adding complexity over a complete ROS 2 system.</p>
<h3 class="anchor anchorTargetStickyNavbar_Vzrq" id="teaching-opportunity">Teaching Opportunity<a href="https://mikelikesrobots.github.io/blog/autonomous-viam-rover#teaching-opportunity" class="hash-link" aria-label="Direct link to Teaching Opportunity" title="Direct link to Teaching Opportunity" translate="no">​</a></h3>
<p>The reasons above are challenges that I possibly could have overcome with time and effort, but the major reason I went this route was so I could use it as an example for teaching ROS 2 concepts, such as using ros2_control with closed loop feedback (another future post/video!).</p>
<h2 class="anchor anchorTargetStickyNavbar_Vzrq" id="ros-2-software-architecture">ROS 2 Software Architecture<a href="https://mikelikesrobots.github.io/blog/autonomous-viam-rover#ros-2-software-architecture" class="hash-link" aria-label="Direct link to ROS 2 Software Architecture" title="Direct link to ROS 2 Software Architecture" translate="no">​</a></h2>
<p>Given my decision to build the system fully in ROS 2, I chose to build the following architecture (heavily simplified):</p>
<figure class="text--center"><p><img decoding="async" loading="lazy" alt="System diagram showing high-level system components down to hardware" src="https://mikelikesrobots.github.io/assets/images/rover_system_diagram-11eab390301b64afeff834beef7800ce.webp" width="1026" height="1448" class="img_ev3q">
</p><figcaption>System diagram showing high-level software, such as wandering and navigation, down to low level components, such as motors. Note that the Software section runs on the Intel N100 chip and the Embedded section runs on the RP2040.</figcaption><p></p></figure>
<p>Some components, such as the Navigation Stack, have quite a few parts inside. I'll dive deep into these systems in future videos, or you can take a look at the <a href="https://github.com/mikelikesrobots/viam-rover2" target="_blank" rel="noopener noreferrer" class="">source code</a> for yourself!</p>
<h2 class="anchor anchorTargetStickyNavbar_Vzrq" id="setup-and-encoder-calibration">Setup and Encoder Calibration<a href="https://mikelikesrobots.github.io/blog/autonomous-viam-rover#setup-and-encoder-calibration" class="hash-link" aria-label="Direct link to Setup and Encoder Calibration" title="Direct link to Setup and Encoder Calibration" translate="no">​</a></h2>
<p>The majority of the time on this project went into making sure the robot produced reliable odometry. Odometry is the robot measuring its own movement based on its sensors; in this case, its rotary encoders.</p>
<p>These encoders work by attaching a disc with evenly-spaced holes around its circumference onto the same shaft that the wheels are on. The encoder then shines a light through one side of the disc and detects if it passes through the disc. As the disc rotates with the shaft rotation, the disc holes alternately block and allow the light through, measured as pulses/ticks by the encoder. The faster the ticks occur, the faster the shaft is spinning. To calibrate the encoders, I had to find the ticks per revolution of the wheel.</p>
<p>I had a lot of trouble getting the encoders to reliably produce accurate wheel speeds. The rest of this section details the issues I had and how I dealt with them.</p>
<h3 class="anchor anchorTargetStickyNavbar_Vzrq" id="single-pin-vs-quadrature-encoders">Single-pin Vs Quadrature Encoders<a href="https://mikelikesrobots.github.io/blog/autonomous-viam-rover#single-pin-vs-quadrature-encoders" class="hash-link" aria-label="Direct link to Single-pin Vs Quadrature Encoders" title="Direct link to Single-pin Vs Quadrature Encoders" translate="no">​</a></h3>
<p>The Viam Rover uses motors with single-pin integrated encoders. The difference between single-pin and quadrature is that quadrature has at least two light sources and sensors set at right angles from one another. By comparing the times between the ticks from the different pins, it's possible to tell which sensor detected a change first, and hence both the speed and direction that the shaft is spinning.</p>
<p>Single pin encoders don't have this ability. They can detect speed, but not direction. My control system requires that the direction is also known, which means I have to infer the direction that wheels are being driven based on how they've been told to move. That generally works, as long as the robot only moves under its own power! As soon as you drag the robot backwards to a new position, the robot believes it's been moved forward because the last commanded direction was forwards, and everything gets out of synchronisation again.</p>
<p>I'll give more detail about single-pin and quadrature encoders in a future post.</p>
<h3 class="anchor anchorTargetStickyNavbar_Vzrq" id="encoder-signal-noise">Encoder Signal Noise<a href="https://mikelikesrobots.github.io/blog/autonomous-viam-rover#encoder-signal-noise" class="hash-link" aria-label="Direct link to Encoder Signal Noise" title="Direct link to Encoder Signal Noise" translate="no">​</a></h3>
<p>The signal from the encoders suffers from a lot of high-frequency noise when the motors are being powered. The only time this doesn't happen is when I'm manually turning the wheels, which is exactly how I was initially trying to calibrate the robot! I would slowly turn the wheel ten times, then divide the number of received pulses by ten to get the ticks (pulses) per revolution. When I ran the robot for real, the motors made the tick frequency incredibly high, throwing off any measurements I took - the robot looked like it was zooming along!</p>
<p>I tried a software filter to reject the high-frequency noise, but the real signal was already lost in the noise, so all I succeeded in doing was capping the tick rate at the frequency cutoff.</p>
<p>Eventually, I reluctantly added RC filters to both signal lines to reduce the motor noise. I wanted to avoid this because it adds build complexity for anyone copying my build, and it requires extra parts. Still, the encoders were all but useless without the filters.</p>
<h3 class="anchor anchorTargetStickyNavbar_Vzrq" id="ticks-vary-non-linearly-with-speed">Ticks Vary Non-Linearly With Speed<a href="https://mikelikesrobots.github.io/blog/autonomous-viam-rover#ticks-vary-non-linearly-with-speed" class="hash-link" aria-label="Direct link to Ticks Vary Non-Linearly With Speed" title="Direct link to Ticks Vary Non-Linearly With Speed" translate="no">​</a></h3>
<p>The ticks per revolution seems to vary non-linearly with the speed. By that, I mean that doubling the speed did not double the tick rate - it would be slightly off. Honestly, <em>I don't know why</em>. All I know is that measuring the graph got me the following results for speed versus ticks per revolution:</p>
<figure class="text--center"><p><img decoding="async" loading="lazy" alt="Graph of ticks per second against PWM" src="https://mikelikesrobots.github.io/assets/images/ticks_per_s_against_speed-fdb76b7418771889f26d1415576057b2.webp" width="700" height="400" class="img_ev3q">
</p><figcaption>Graph showing how the measured ticks per second varies compared to the PWM, or speed at which the motors were driven. The black dashed line is the ideal result, while the blue and orange lines are for the left and right encoder measurements respectively. The deadband is clear for both motors, and the encoders follow roughly the same pattern but differ slightly from each other. This made it challenging to drive the motors at the right speed or measure the speed correctly.</figcaption><p></p></figure>
<p>This is an issue because I can't tell if the motors are being driven at the wrong speed or if the encoders measure different speeds as they spin slower/faster. I assume that the encoders are correct because they're the simpler mechanism, so I had to add a new calibration step. I drive the motors at different PWM values and measure the speed according to the encoder ticks, then use this to create a Look-Up Table (LUT). When the system needs to drive at a particular speed, the required PWM is interpolated from the table and sent to the motors so the robot actually drives at the speed it's been commanded to.</p>
<div class="theme-admonition theme-admonition-note admonition_xJq3 alert alert--secondary"><div class="admonitionHeading_Gvgb"><span class="admonitionIcon_Rf37"><svg viewBox="0 0 14 16"><path fill-rule="evenodd" d="M6.3 5.69a.942.942 0 0 1-.28-.7c0-.28.09-.52.28-.7.19-.18.42-.28.7-.28.28 0 .52.09.7.28.18.19.28.42.28.7 0 .28-.09.52-.28.7a1 1 0 0 1-.7.3c-.28 0-.52-.11-.7-.3zM8 7.99c-.02-.25-.11-.48-.31-.69-.2-.19-.42-.3-.69-.31H6c-.27.02-.48.13-.69.31-.2.2-.3.44-.31.69h1v3c.02.27.11.5.31.69.2.2.42.31.69.31h1c.27 0 .48-.11.69-.31.2-.19.3-.42.31-.69H8V7.98v.01zM7 2.3c-3.14 0-5.7 2.54-5.7 5.68 0 3.14 2.56 5.7 5.7 5.7s5.7-2.55 5.7-5.7c0-3.15-2.56-5.69-5.7-5.69v.01zM7 .98c3.86 0 7 3.14 7 7s-3.14 7-7 7-7-3.12-7-7 3.14-7 7-7z"></path></svg></span>Interpolation</div><div class="admonitionContent_BuS1"><p>By interpolation, I mean looking up a value between two entries. If I know that 0.4 m/s requires a PWM of 0.5 and 0.6 m/s requires a PWM of 0.6, then 0.5 m/s must be halfway between those two points, which is a PWM of 0.55.</p><p>If the entry already exists in the table, the value is looked up directly.</p></div></div>
<h3 class="anchor anchorTargetStickyNavbar_Vzrq" id="inaccurate-calibration">Inaccurate Calibration<a href="https://mikelikesrobots.github.io/blog/autonomous-viam-rover#inaccurate-calibration" class="hash-link" aria-label="Direct link to Inaccurate Calibration" title="Direct link to Inaccurate Calibration" translate="no">​</a></h3>
<p>Even with the hardware filter in place, calibrating based on manually turning the wheels gives a poor result from the robot. Again, I'm not sure why not! Instead of putting the robot on a box and carefully measuring the ticks per revolution, my current method is to put the robot on the floor, drive it forwards at a steady speed, and measure how far it travelled. Using the distance travelled and the ticks counted over that distance, I can calculate the ticks per revolution.</p>
<p>However, even that isn't perfect! The motors don't perform identically, which means the robot slightly turns as it moves, veering to one side or the other. This <em>should be</em> easily fixed using a feedback loop that measures the speed and changes the commanded speed to compensate. However, we haven't yet calibrated the speed measurement! Instead, I guess initial values for ticks per revolution, then run the full closed-loop control system to drive the robot and adjust the ticks on each side by eye until the robot drives in a straight line. Once it's driving in a straight line, <em>only then</em> can I perform the calibration process.</p>
<p>Still, in the end, I get values of ticks per revolution for each side that drive the robot in a straight line and allow for somewhat accurate measurement of distance travelled and amount the robot has turned. Having good values here is vital, because building a map from bad robot odometry is very difficult. It leads to phantom obstacles and walls in the wrong place. Worse than that, though - inaccurate odometry means navigation drives the robot erratically, so it frequently drives into walls/obstacles as well as building an inaccurate map.</p>
<h2 class="anchor anchorTargetStickyNavbar_Vzrq" id="building-a-map">Building a Map<a href="https://mikelikesrobots.github.io/blog/autonomous-viam-rover#building-a-map" class="hash-link" aria-label="Direct link to Building a Map" title="Direct link to Building a Map" translate="no">​</a></h2>
<p>I started from Intel's <a href="https://docs.openedgeplatform.intel.com/dev/edge-ai-suites/robotics-ai-suite/robotics/dev_guide/tutorials_amr/navigation/wandering_app/wandering-aaeon-tutorial.html" target="_blank" rel="noopener noreferrer" class="">Wandering Application on AAEON robot</a>, which was originally meant for the UP Xtreme i11 Robotic Kit using the UP development kits.</p>
<figure class="text--center"><p><img decoding="async" loading="lazy" src="https://encrypted-tbn0.gstatic.com/images?q=tbn:ANd9GcTOdYbrO1u7guHkjtHGoO0rltQVIGf7pkfJEQ&amp;s" alt="UP Xtreme i11 Robotic Kit" class="img_ev3q">
</p><figcaption>The UP Xtreme i11 Robotic Kit, intended for use with the Wandering AAEON example from Intel</figcaption><p></p></figure>
<p>The Wandering AAEON example uses the <code>ros2_amr_interface</code> to connect the ROS 2 navigation system to the AMR's controls. As I was starting from scratch, I didn't have AMR controls to interface with, which meant I could directly implement a <code>ros2_control</code> system and connect it directly to the navigation system. The example still gave a great starting point with mapping built from camera data only, and a wandering application to show it in use.</p>
<p>This starting point is especially useful because most autonomous mapping robots use lidar as their source of truth for the environment. Using depth data instead is a process known as Visual SLAM or VSLAM, and it means the robot can only map ahead of itself, where the camera is pointing. The launch file contains a node for converting depth data from the camera into a scan, which looks like it could have come from a lidar, but in a narrow cone in front of the robot; from here, it can be used by the mapping node <code>rtabmap</code>. Hence, the map has to be built by turning the robot to look in every direction.</p>
<p>Another change I made to the application was to have a mapping mode toggle. With mapping on, the robot clears its memory of previous maps, then moves as commanded by a user until a space is completely mapped. With mapping off, the robot loads its existing map and starts wandering. Hence, to build a map, I start by running the wandering application in mapping mode, then using Foxglove teleoperation controls to move the robot around the space until everything is completely mapped out. The command is as follows:</p>
<div class="language-bash codeBlockContainer_Ckt0 theme-code-block" style="--prism-color:#393A34;--prism-background-color:#f6f8fa"><div class="codeBlockContent_QJqH"><pre tabindex="0" class="prism-code language-bash codeBlock_bY9V thin-scrollbar" style="color:#393A34;background-color:#f6f8fa"><code class="codeBlockLines_e6Vv"><div class="token-line" style="color:#393A34"><span class="token plain">ros2 launch viam_rover2 wandering_mapper.launch.py mapping:=true</span><br></div></code></pre></div></div>
<figure class="text--center"><p><img decoding="async" loading="lazy" alt="Foxglove clip showing robot mapping process" src="https://mikelikesrobots.github.io/assets/images/mapping-edf7643c30c979845ecf558016bf257e.gif" width="800" height="450" class="img_ev3q">
</p><figcaption>Clip from Foxglove showing the robot exploring an area, sped up to 4x speed. The purple dots show where the depth data detects an object within range, which is used to build the map.</figcaption><p></p></figure>
<p>With the mapping stage complete, I had a complete map of my office that I could use for the next part, built only from depth and infrared data from the RealSense D421 camera.</p>
<h2 class="anchor anchorTargetStickyNavbar_Vzrq" id="wandering-the-map">Wandering the Map<a href="https://mikelikesrobots.github.io/blog/autonomous-viam-rover#wandering-the-map" class="hash-link" aria-label="Direct link to Wandering the Map" title="Direct link to Wandering the Map" translate="no">​</a></h2>
<p>Once I had a usable occupancy map, I switched to non-mapping mode (or, autonomous mode). This is the mode that allows the robot to wander its saved map, but first I have to tell the robot where it is! The issue here is that the robot can load the map, but has to guess where it is within the map, and I've yet to see the robot get it right the first time. Hence, the trick is to use Foxglove to send an initial pose, which sets the robot to the position you know it to be. You always know it's correct when the laser scan visualisation matches up with the obstacles in the environment.</p>
<p>The wandering application is set on a delay timer, both to give the navigation system time to start up, and to allow me to set the initial pose before it starts wandering. The command is the same except with the mapping argument removed.</p>
<div class="language-bash codeBlockContainer_Ckt0 theme-code-block" style="--prism-color:#393A34;--prism-background-color:#f6f8fa"><div class="codeBlockContent_QJqH"><pre tabindex="0" class="prism-code language-bash codeBlock_bY9V thin-scrollbar" style="color:#393A34;background-color:#f6f8fa"><code class="codeBlockLines_e6Vv"><div class="token-line" style="color:#393A34"><span class="token plain">ros2 launch viam_rover2 wandering_mapper.launch.py</span><br></div></code></pre></div></div>
<p>The first step is to set the initial pose. This is a bit time sensitive, as the wandering application starts up before too long (this can be adjusted in launch file parameters!). The clip below shows me setting the initial pose three times; first, based on my idea of where the robot is; the latter two were adjustments to line the scan up with the environment correctly.</p>
<figure class="text--center"><p><img decoding="async" loading="lazy" alt="Foxglove clip showing robot initial pose setting" src="https://mikelikesrobots.github.io/assets/images/set_pose-0f032db54610a6119146b37093c0bc6b.gif" width="800" height="450" class="img_ev3q">
</p><figcaption>Clip from Foxglove showing the process of setting the initial pose of the robot, before it starts exploring, sped up to 2x speed.</figcaption><p></p></figure>
<p>With the initial pose set and the robot in the right position, it started wandering! I'm not sure if the purpose of the application is to completely map a space or simply wander forever, but my robot seems happy to just keep wandering around. I tend to leave it wandering around (a bit like a pet!) until it gets stuck on an obstacle, like the leg of my desk. The robot is generally pretty good at avoiding obstacles, but obstacles lying flat close to the ground can be hard for it to see and avoid. You can see one example of wandering below:</p>
<figure class="text--center"><p><img decoding="async" loading="lazy" alt="Foxglove clip showing robot wandering" src="https://mikelikesrobots.github.io/assets/images/wandering-aa70fd1b0e08d8eaed53cf325b786570.gif" width="800" height="450" class="img_ev3q">
</p><figcaption>Clip from Foxglove showing the robot wandering, sped up to 4x real time. It starts stuck near my desk, eventually manages to get free, then starts wandering the room. The coloured stroke shows its planned path. Also note how the robot adjusts its position based on the depth camera data matching up with the predetermined environment, which is called localisation.</figcaption><p></p></figure>
<h2 class="anchor anchorTargetStickyNavbar_Vzrq" id="can-i-build-this-robot">Can I build this robot?<a href="https://mikelikesrobots.github.io/blog/autonomous-viam-rover#can-i-build-this-robot" class="hash-link" aria-label="Direct link to Can I build this robot?" title="Direct link to Can I build this robot?" translate="no">​</a></h2>
<p>Yes! The whole idea behind this project was to build an autonomous mapping robot from easily accessible parts. I tried to keep the cost and build complexity to a minimum. This section contains the required parts and some extra parts that you might already have lying around.</p>
<h3 class="anchor anchorTargetStickyNavbar_Vzrq" id="required-parts">Required Parts<a href="https://mikelikesrobots.github.io/blog/autonomous-viam-rover#required-parts" class="hash-link" aria-label="Direct link to Required Parts" title="Direct link to Required Parts" translate="no">​</a></h3>
<table><thead><tr><th>Part</th><th>Cost</th><th>Link</th></tr></thead><tbody><tr><td>Viam Rover</td><td>$99</td><td><a href="https://www.viam.com/resources/rover" target="_blank" rel="noopener noreferrer" class="">Viam Rover product page</a></td></tr><tr><td>Radxa X4 (4GB)</td><td>$110</td><td><a href="https://uk.rs-online.com/web/p/rock-sbc-boards/0329066" target="_blank" rel="noopener noreferrer" class="">Radxa X4 listing (RS Online)</a></td></tr><tr><td>Heat sink for Radxa X4</td><td>$20.91</td><td><a href="https://uk.rs-online.com/web/p/rock-sbc-add-ons/0329071" target="_blank" rel="noopener noreferrer" class="">Radxa X4 heat sink (RS Online)</a></td></tr><tr><td>NVMe/SSD (M.2 2230)</td><td>$92.08</td><td><a href="https://uk.rs-online.com/web/p/hard-drives/0155530" target="_blank" rel="noopener noreferrer" class="">Compatible SSD (RS Online)</a></td></tr><tr><td>5V Power Bank</td><td>$57.77</td><td><a href="https://www.amazon.co.uk/dp/B0CXDXP8VR" target="_blank" rel="noopener noreferrer" class="">5V power bank (Amazon UK)</a></td></tr><tr><td>RealSense D421</td><td>$85.57</td><td><a href="https://www.digikey.co.uk/en/products/detail/realsense/99CLKV/24775599" target="_blank" rel="noopener noreferrer" class="">RealSense D421 (Digi-Key)</a></td></tr><tr><td>18650 batteries &amp; charger</td><td>$33.58</td><td><a href="https://www.amazon.co.uk/Matbc-Rechargeable-Battery-headlamps-Flashlight/dp/B0DDY49P68" target="_blank" rel="noopener noreferrer" class="">18650 battery pack &amp; charger (Amazon UK)</a></td></tr><tr><td><strong>Total</strong></td><td>$399.91</td><td>-</td></tr></tbody></table>
<br>
<p>Note that prices are given based on GBP, which includes VAT, so you might be able to buy these for less!</p>
<div class="theme-admonition theme-admonition-info admonition_xJq3 alert alert--info"><div class="admonitionHeading_Gvgb"><span class="admonitionIcon_Rf37"><svg viewBox="0 0 14 16"><path fill-rule="evenodd" d="M7 2.3c3.14 0 5.7 2.56 5.7 5.7s-2.56 5.7-5.7 5.7A5.71 5.71 0 0 1 1.3 8c0-3.14 2.56-5.7 5.7-5.7zM7 1C3.14 1 0 4.14 0 8s3.14 7 7 7 7-3.14 7-7-3.14-7-7-7zm1 3H6v5h2V4zm0 6H6v2h2v-2z"></path></svg></span>Radxa X4 Stock Issues</div><div class="admonitionContent_BuS1"><p>Unfortunately, the Radxa X4 is out of stock at time of writing this post! Hopefully it will come back in stock soon. It should be fine to get an equivalent Radxa board, but I haven't tested anything else, so I can't tell how well it will work.</p></div></div>
<h3 class="anchor anchorTargetStickyNavbar_Vzrq" id="parts-you-may-already-have">Parts you may already have<a href="https://mikelikesrobots.github.io/blog/autonomous-viam-rover#parts-you-may-already-have" class="hash-link" aria-label="Direct link to Parts you may already have" title="Direct link to Parts you may already have" translate="no">​</a></h3>
<p>On top of the required parts above, there are several parts needed that you might already have in stock. In case you haven't, I've given links to compatible hardware. The downside is that they are mostly sold in kits, as shops don't want to sell 1-2 resistors at a time, so you're likely to have a lot of parts left over. Still, maybe that will be good for future projects!</p>
<div class="theme-admonition theme-admonition-note admonition_xJq3 alert alert--secondary"><div class="admonitionHeading_Gvgb"><span class="admonitionIcon_Rf37"><svg viewBox="0 0 14 16"><path fill-rule="evenodd" d="M6.3 5.69a.942.942 0 0 1-.28-.7c0-.28.09-.52.28-.7.19-.18.42-.28.7-.28.28 0 .52.09.7.28.18.19.28.42.28.7 0 .28-.09.52-.28.7a1 1 0 0 1-.7.3c-.28 0-.52-.11-.7-.3zM8 7.99c-.02-.25-.11-.48-.31-.69-.2-.19-.42-.3-.69-.31H6c-.27.02-.48.13-.69.31-.2.2-.3.44-.31.69h1v3c.02.27.11.5.31.69.2.2.42.31.69.31h1c.27 0 .48-.11.69-.31.2-.19.3-.42.31-.69H8V7.98v.01zM7 2.3c-3.14 0-5.7 2.54-5.7 5.68 0 3.14 2.56 5.7 5.7 5.7s5.7-2.55 5.7-5.7c0-3.15-2.56-5.69-5.7-5.69v.01zM7 .98c3.86 0 7 3.14 7 7s-3.14 7-7 7-7-3.12-7-7 3.14-7 7-7z"></path></svg></span>RS Individual Components</div><div class="admonitionContent_BuS1"><p>RS Online does sell individual electronic components, as long as the total order size is large enough. If you want to keep costs to an absolute minimum, this might be a good way to go.</p></div></div>
<table><thead><tr><th>Part</th><th>Cost</th><th>Link</th></tr></thead><tbody><tr><td>Plastic standoffs</td><td>$9.38</td><td><a href="https://www.amazon.co.uk/dp/B0DCS5C7SN" target="_blank" rel="noopener noreferrer" class="">Plastic standoffs (Amazon UK)</a></td></tr><tr><td>USB-C to USB-C cable</td><td>$6.70</td><td><a href="https://www.amazon.co.uk/UGREEN-Charger-Compatible-MacBook-Samsung/dp/B08FDJ36XW" target="_blank" rel="noopener noreferrer" class="">Charger Cable (Amazon UK)</a></td></tr><tr><td>Resistors, capacitors, jumper cables</td><td>$21.49</td><td><a href="https://www.amazon.co.uk/dp/B099MQV8ZW" target="_blank" rel="noopener noreferrer" class="">480 Pcs Electronics Kit (Amazon UK)</a></td></tr><tr><td>Breadboard</td><td>$9.38</td><td><a href="https://www.amazon.co.uk/ELEGOO-tie-points-Breadboard-Breadboards-Electronic/dp/B01N0YWIR7" target="_blank" rel="noopener noreferrer" class="">ELEGOO Breadboard (Amazon UK)</a></td></tr><tr><td>Large ruler or measuring tape (for calibration)</td><td>$13.44</td><td><a href="https://www.amazon.co.uk/Toolzone-Aluminium-Spirit-Levels-Handle/dp/B002NH4DHO" target="_blank" rel="noopener noreferrer" class="">1m Ruler (Amazon UK)</a></td></tr></tbody></table>
<br>
<p>Hopefully, this is enough to get you going building it yourself. I will release more blog posts and videos in the future to show the full process in detail.</p>
<h2 class="anchor anchorTargetStickyNavbar_Vzrq" id="conclusion">Conclusion<a href="https://mikelikesrobots.github.io/blog/autonomous-viam-rover#conclusion" class="hash-link" aria-label="Direct link to Conclusion" title="Direct link to Conclusion" translate="no">​</a></h2>
<p>Taking the Viam Rover and converting it to use the Radxa X4 and Realsense D421 took a <em>lot longer</em> than I'd hoped! It was a journey of finding the best hardware modifications, writing custom firmware to communicate between Intel chip and RP2040, getting correct robot odometry from encoder data, and debugging a full ROS 2 navigation stack. It required more hardware changes than I initially wanted, but these turned out to be required because of the encoder noise that made them so unreliable.</p>
<p>In the end, this is a project you should be able to replicate for a relatively low price. It provides a way to study closed-loop feedback mechanisms with <code>ros2_control</code>, explore using the ROS 2 Nav2 stack, and operates using only depth data, where most exploration robots use some kind of lidar.</p>
<p>The source code is all available on <a href="https://github.com/mikelikesrobots/viam-rover2" target="_blank" rel="noopener noreferrer" class="">GitHub</a>, and I'll be publishing follow-up posts and videos covering the build process and the software in detail. Subscribe to my <a href="https://youtube.com/@mikelikesrobots" target="_blank" rel="noopener noreferrer" class="">YouTube channel</a> or check back here (<a href="https://mikelikesrobots.github.io/blog/rss.xml" target="_blank" rel="noopener noreferrer" class="">RSS feed</a>) to stay up to date.</p>]]></content>
        <author>
            <name>Michael Hart</name>
            <uri>https://mikelikesrobots.github.io</uri>
        </author>
        <category label="robotics" term="robotics"/>
        <category label="ros2" term="ros2"/>
        <category label="slam" term="slam"/>
        <category label="mapping" term="mapping"/>
        <category label="realsense" term="realsense"/>
        <category label="viam" term="viam"/>
    </entry>
    <entry>
        <title type="html"><![CDATA[FOSDEM Robotics Dev Room Summary]]></title>
        <id>https://mikelikesrobots.github.io/blog/fosdem-robotics-2026</id>
        <link href="https://mikelikesrobots.github.io/blog/fosdem-robotics-2026"/>
        <updated>2026-02-27T00:00:00.000Z</updated>
        <summary type="html"><![CDATA[FOSDEM is a conference which is free to attend. This year's conference (2026) was held in Brussels, Belgium over two days. The talks were separated into tracks based on subject, and one of the tracks was Robotics & Simulation. I managed to see almost all of the talks, but the room was constantly full with a long queue - clearly, robotics is popular!]]></summary>
        <content type="html"><![CDATA[<p>FOSDEM is a conference which is free to attend. This year's conference (2026) was held in Brussels, Belgium over two days. The talks were separated into tracks based on subject, and one of the tracks was Robotics &amp; Simulation. I managed to see almost all of the talks, but the room was constantly full with a long queue - clearly, robotics is popular!</p>
<p>This post is a summary of the talks with links and my own thoughts. If you'd rather go direct to the source, go to the <a href="https://fosdem.org/2026/" target="_blank" rel="noopener noreferrer" class="">FOSDEM 2026 website</a> (specifically, the <a href="https://fosdem.org/2026/schedule/track/robotics-and-simulation/" target="_blank" rel="noopener noreferrer" class="">Robotics &amp; Simulation track page</a>).</p>
<h2 class="anchor anchorTargetStickyNavbar_Vzrq" id="summary">Summary<a href="https://mikelikesrobots.github.io/blog/fosdem-robotics-2026#summary" class="hash-link" aria-label="Direct link to Summary" title="Direct link to Summary" translate="no">​</a></h2>
<p>These are the main trends that I noticed over the whole day of talks:</p>
<ul>
<li class="">
<p>ROS 2 remains the backbone of the robotics open source community. It was mentioned in virtually every talk, which is unsurprising given its popularity in the robotics space. Even the talks that presented alternatives to ROS, like <a href="https://mikelikesrobots.github.io/blog/fosdem-robotics-2026#copper-rs" class="">Copper-rs</a>, compared those alternatives to ROS.</p>
</li>
<li class="">
<p>A surprising theme of the dev room was the use of Rust. It came up in a surprising number of talks, including those that weren't explicitly about Rust libraries like <a href="https://mikelikesrobots.github.io/blog/fosdem-robotics-2026#rclrs" class="">rclrs</a> and <a href="https://mikelikesrobots.github.io/blog/fosdem-robotics-2026#ros-z" class="">ROS-Z</a>. While Rust tools are still new to the scene, they are no longer untested, and are being integrated in many places in open source software. Examples include <a href="https://mikelikesrobots.github.io/blog/fosdem-robotics-2026#a-core-developers-insights-on-gazebos-future" class="">use in Gazebo</a> and using pixi as a build tool.</p>
</li>
<li class="">
<p>Speaking of <a href="https://prefix.dev/" target="_blank" rel="noopener noreferrer" class="">pixi</a>, this was another theme, although explicitly mentioned in fewer talks than Rust. Previously, I only knew of it for dependency management, but the speakers demonstrated it being used for packaging and distributing robotics software as well. It seems like a tool that solves many pain points of building for robots.</p>
</li>
<li class="">
<p>Finally, containerisation seems to be the de facto standard for distributing robotics software. <a href="https://mikelikesrobots.github.io/blog/fosdem-robotics-2026#apptainer" class="">Apptainer</a> offers an interesting way to run containers and is compatible with Docker, while talks like <a href="https://mikelikesrobots.github.io/blog/fosdem-robotics-2026#productionising-ros" class="">Productionising ROS with Bazel</a> showed mature pipelines using Docker alongside hermetic builds.</p>
</li>
</ul>
<p>Conferences like FOSDEM are excellent for getting a view of what the robotics community is excited about. It seems like ROS 2, Rust, pixi, and distributing software using containers are the current trends. I'll be sure to attend FOSDEM 2027 to see if those trends are continuing - hopefully there will be a larger room available to accommodate all the roboticists!</p>
<h2 class="anchor anchorTargetStickyNavbar_Vzrq" id="special-mentions">Special Mentions<a href="https://mikelikesrobots.github.io/blog/fosdem-robotics-2026#special-mentions" class="hash-link" aria-label="Direct link to Special Mentions" title="Direct link to Special Mentions" translate="no">​</a></h2>
<p>The full talk list is below, but I wanted to highlight a few of the talks from the list.</p>
<p>First, <a href="https://mikelikesrobots.github.io/blog/fosdem-robotics-2026#rclrs" class="">Esteve's talk on <code>rclrs</code></a> was great to see. I was familiar with a lot of the concepts and arguments, as I've covered <code>rclrs</code> in a couple of posts on this blog already (see <a class="" href="https://mikelikesrobots.github.io/blog/ros2-rust-comparison">Comparing Rust Libraries for ROS Nodes</a> and <a class="" href="https://mikelikesrobots.github.io/blog/ros2-rust-node">Building a ROS2 node in Rust!</a>). Still, it was great to hear from its creator about what went into it and how it will be officially supported in the ROS build farm soon. Thank you, Esteve!</p>
<p>Next, the <a href="https://mikelikesrobots.github.io/blog/fosdem-robotics-2026#botronics-ixi" class="">longer talk from Botronics</a> was excellent. Seeing the decisions and mistakes that went into a full robot system was fascinating and eye-opening. Not only that, but Botronics will be hosting ROSCon Belgium this year, so make sure to submit papers and buy tickets if you're interested! I'll update this post with links as soon as they're available.</p>
<p>Another talk with some excellent advice was the <a href="https://mikelikesrobots.github.io/blog/fosdem-robotics-2026#calibrate-good-times" class="">"Calibrate good times" talk</a> from Roland and Sam. While I haven't developed data collection systems for robots other than for debugging, I still found the advice here excellent, and anyone looking to collect robotics data should give it a watch.</p>
<p>Finally, a couple of talks inspired me to look deeper into the presented material. In the future, I hope to build <a href="https://mikelikesrobots.github.io/blog/fosdem-robotics-2026#upkie" class="">the Upkie robot</a> for myself, and I also hope to try <a href="https://mikelikesrobots.github.io/blog/fosdem-robotics-2026#copper-rs" class="">copper-rs</a> out on a real robot. In both cases, I'll write up and record my experience to share here. Watch this space or <a href="https://youtube.com/@mikelikesrobots" target="_blank" rel="noopener noreferrer" class="">my YouTube channel</a> if you're interested to see that.</p>
<h2 class="anchor anchorTargetStickyNavbar_Vzrq" id="full-talk-list">Full Talk List<a href="https://mikelikesrobots.github.io/blog/fosdem-robotics-2026#full-talk-list" class="hash-link" aria-label="Direct link to Full Talk List" title="Direct link to Full Talk List" translate="no">​</a></h2>
<p>Each talk is listed below with its duration, a reason you might be interested to watch, and information I could get from the speaker's page about their background.</p>
<p>If any speakers would like their information updated, please contact me and let me know!</p>
<hr>
<ul>
<li class="">
<p><a href="https://fosdem.org/2026/schedule/event/PDWNCJ-map-hacking-a_cheap-robot-vac-with-open-source-sw/" target="_blank" rel="noopener noreferrer" class="">Turning a cheap commercial vacuum cleaner into a useful Open Source mapping tool</a> (25m) - <a href="https://fosdem.org/2026/schedule/speaker/stef_dillo/" target="_blank" rel="noopener noreferrer" class="">Stef Dillo</a> of <a href="https://familiarrobotics.com/" target="_blank" rel="noopener noreferrer" class="">Familiar Robotics</a></p>
<p><strong>You should watch if:</strong></p>
<ul>
<li class="">You work with making maps from <em>real</em> sensor data</li>
<li class="">You're interested in open source mapping robots</li>
<li class="">You enjoy reverse engineering products from others!</li>
</ul>
</li>
</ul>
<hr>
<h3 class="anchor anchorTargetStickyNavbar_Vzrq" id="calibrate-good-times">Calibrate good times<a href="https://mikelikesrobots.github.io/blog/fosdem-robotics-2026#calibrate-good-times" class="hash-link" aria-label="Direct link to Calibrate good times" title="Direct link to Calibrate good times" translate="no">​</a></h3>
<ul>
<li class="">
<p><a href="https://fosdem.org/2026/schedule/event/DJK8WL-calibrate-good-times/" target="_blank" rel="noopener noreferrer" class="">Calibrate good times! The tools and methods to get top-quality robot data</a> (25m) - <a href="https://fosdem.org/2026/schedule/speaker/roland_meertens/" target="_blank" rel="noopener noreferrer" class="">Roland Meertens</a> of <a href="https://wayve.ai/" target="_blank" rel="noopener noreferrer" class="">Wayve</a>, <a href="https://fosdem.org/2026/schedule/speaker/sam_pfeiffer/" target="_blank" rel="noopener noreferrer" class="">Sam Pfeiffer</a> of <a href="https://thehumanoid.ai/" target="_blank" rel="noopener noreferrer" class="">Humanoid</a></p>
<p><strong>You should watch if:</strong></p>
<ul>
<li class="">You want excellent advice, built from experience, about gathering and working with clean data from as early as possible</li>
<li class="">You're gathering data, but not making sure it's clean!</li>
</ul>
</li>
</ul>
<hr>
<h3 class="anchor anchorTargetStickyNavbar_Vzrq" id="copper-rs">Copper-rs<a href="https://mikelikesrobots.github.io/blog/fosdem-robotics-2026#copper-rs" class="hash-link" aria-label="Direct link to Copper-rs" title="Direct link to Copper-rs" translate="no">​</a></h3>
<ul>
<li class="">
<p><a href="https://fosdem.org/2026/schedule/event/SK8EGJ-copper-rust-robotics-runtime/" target="_blank" rel="noopener noreferrer" class="">Bridging robotics and systems programming: Why Copper-rs is a game changer</a> (25m) - <a href="https://fosdem.org/2026/schedule/speaker/guillaume_binet/" target="_blank" rel="noopener noreferrer" class="">Guillaume Binet</a> of <a href="https://www.copper-robotics.com/" target="_blank" rel="noopener noreferrer" class="">Copper Robotics</a></p>
<p><strong>You should watch if:</strong></p>
<ul>
<li class="">You're interested in alternatives to ROS for robotics frameworks</li>
<li class="">You want to see determinism in your robots</li>
<li class="">You want higher performance than ROS can offer from your robots</li>
<li class="">You like Rust!</li>
</ul>
</li>
</ul>
<hr>
<h3 class="anchor anchorTargetStickyNavbar_Vzrq" id="apptainer">Apptainer<a href="https://mikelikesrobots.github.io/blog/fosdem-robotics-2026#apptainer" class="hash-link" aria-label="Direct link to Apptainer" title="Direct link to Apptainer" translate="no">​</a></h3>
<ul>
<li class="">
<p><a href="https://fosdem.org/2026/schedule/event/PHRS33-apptainer-easy-containerization-for-robotics/" target="_blank" rel="noopener noreferrer" class="">Apptainer: Easy Containerization for Robotics</a> (5m) - <a href="https://fosdem.org/2026/schedule/speaker/malte_schrader/" target="_blank" rel="noopener noreferrer" class="">Malte Schrader</a></p>
<p><strong>You should watch if:</strong></p>
<ul>
<li class="">You like Docker for packaging software, but want a better way to provide system access to containers</li>
</ul>
</li>
</ul>
<hr>
<ul>
<li class="">
<p><a href="https://fosdem.org/2026/schedule/event/KCPTX7-just1/" target="_blank" rel="noopener noreferrer" class="">Just1 - An Open-Source Autonomous Mecanum Wheel Robot</a> (5m) - <a href="https://fosdem.org/2026/schedule/speaker/nicolas_rodriguez/" target="_blank" rel="noopener noreferrer" class="">Nicolas Rodriguez</a></p>
<p><strong>You should watch if:</strong></p>
<ul>
<li class="">You want to build a very cheap robot that still has lidar and camera</li>
<li class="">You're interested in mecanum wheels, which allow a 4-wheeled robot to strafe left and right</li>
<li class="">You want a robot with manual and autonomous control out of the box</li>
</ul>
</li>
</ul>
<hr>
<ul>
<li class="">
<p><a href="https://fosdem.org/2026/schedule/event/3SFYWM-hacking-cyber-physical_systems-with-ros2/" target="_blank" rel="noopener noreferrer" class="">Modernizing ROS 2 Skills: Hacking and Orchestrating Cloud Brains, Physical Sensors, and the Network</a> (5m) - <a href="https://fosdem.org/2026/schedule/speaker/miguel_xochicale/" target="_blank" rel="noopener noreferrer" class="">Miguel Xochicale</a> of <a href="https://www.ucl.ac.uk/" target="_blank" rel="noopener noreferrer" class="">University College London</a></p>
<p><strong>You should watch if:</strong></p>
<ul>
<li class="">You want to provide access to ROS for multiple users (in this case, students)</li>
<li class="">You want to use a mainframe for ROS and have clients connect into it</li>
<li class="">You want to effectively network between multiple ROS containers</li>
</ul>
</li>
</ul>
<hr>
<ul>
<li class="">
<p><a href="https://fosdem.org/2026/schedule/event/HCE8C9-lambkin_benchmarking_for_localization_ekumen/" target="_blank" rel="noopener noreferrer" class="">Benchmarking platform for robot localization systems</a> (5m) - <a href="https://fosdem.org/2026/schedule/speaker/julia_marsal/" target="_blank" rel="noopener noreferrer" class="">Júlia Marsal</a> of <a href="https://ekumenlabs.com/" target="_blank" rel="noopener noreferrer" class="">Ekumen</a></p>
<p><strong>You should watch if:</strong></p>
<ul>
<li class="">You're doing navigation or localisation with your robot and want to explore the best option</li>
<li class="">You want to autonomously test localisation conditions, including in Continuous Integration</li>
<li class="">You want to view detailed metrics from benchmarks generated with "lambkin", the presented software</li>
</ul>
</li>
</ul>
<hr>
<ul>
<li class="">
<p><a href="https://fosdem.org/2026/schedule/event/WVUZ3C-rosidlcpp_a_journey_through_ros2_build_time_optimization/" target="_blank" rel="noopener noreferrer" class="">rosidlcpp: A Journey Through ROS2 Build Time Optimization</a> (5m) - <a href="https://fosdem.org/2026/schedule/speaker/anthony_welte/" target="_blank" rel="noopener noreferrer" class="">Anthony Welte</a></p>
<p><strong>You should watch if:</strong></p>
<ul>
<li class="">You're interested in the core parts of ROS compilation</li>
<li class="">You're interested in optimisation techniques</li>
<li class="">You want to see where improvements to ROS come from!</li>
</ul>
</li>
</ul>
<hr>
<h3 class="anchor anchorTargetStickyNavbar_Vzrq" id="a-core-developers-insights-on-gazebos-future">Gazebo’s future<a href="https://mikelikesrobots.github.io/blog/fosdem-robotics-2026#a-core-developers-insights-on-gazebos-future" class="hash-link" aria-label="Direct link to Gazebo’s future" title="Direct link to Gazebo’s future" translate="no">​</a></h3>
<ul>
<li class="">
<p><a href="https://fosdem.org/2026/schedule/event/8HTRVV-a_core_developers_insights_on_gazebos_future/" target="_blank" rel="noopener noreferrer" class="">A Core Developer's insights on Gazebo's Future</a> (45m) - <a href="https://fosdem.org/2026/schedule/speaker/jose_luis_rivero/" target="_blank" rel="noopener noreferrer" class="">Jose Luis Rivero</a>, co-founder of <a href="https://www.honurobotics.com/" target="_blank" rel="noopener noreferrer" class="">Honu Robotics</a> and Project Management Committee member of the Infrastructure and Gazebo project</p>
<p><strong>You should watch if:</strong></p>
<ul>
<li class="">You're interested in the history of Gazebo</li>
<li class="">You want to hear what influences decisions about Gazebo's future, particularly with regards to available technologies</li>
<li class="">You want to know what's in store for Gazebo</li>
<li class="">You want to see Rust being used in more places!</li>
</ul>
</li>
</ul>
<hr>
<h3 class="anchor anchorTargetStickyNavbar_Vzrq" id="rclrs">rclrs<a href="https://mikelikesrobots.github.io/blog/fosdem-robotics-2026#rclrs" class="hash-link" aria-label="Direct link to rclrs" title="Direct link to rclrs" translate="no">​</a></h3>
<ul>
<li class="">
<p><a href="https://fosdem.org/2026/schedule/event/J8ZLKG-introducing_rclrs_the_official_ros_2_client_library_for_rust/" target="_blank" rel="noopener noreferrer" class="">Introducing rclrs: the official ROS 2 client library for Rust</a> (25m) - <a href="https://fosdem.org/2026/schedule/speaker/esteve_fernandez/" target="_blank" rel="noopener noreferrer" class="">Esteve Fernández</a>, an original author of ROS 2</p>
<p><strong>You should watch if:</strong></p>
<ul>
<li class="">You're interested in using Rust for robotics (ROS in particular!)</li>
<li class="">You want to hear from a core ROS 2 developer</li>
<li class="">You want to hear news of Rust being better supported in ROS</li>
</ul>
</li>
</ul>
<hr>
<h3 class="anchor anchorTargetStickyNavbar_Vzrq" id="upkie">Upkie<a href="https://mikelikesrobots.github.io/blog/fosdem-robotics-2026#upkie" class="hash-link" aria-label="Direct link to Upkie" title="Direct link to Upkie" translate="no">​</a></h3>
<ul>
<li class="">
<p><a href="https://fosdem.org/2026/schedule/event/8PUMMD-open-source-robotics-practice-upkie-wheeled-bipeds/" target="_blank" rel="noopener noreferrer" class="">Open-Source Robotics in Practice: Lessons from Upkie Wheeled Bipeds</a> (25m) - <a href="https://fosdem.org/2026/schedule/speaker/stephane_caron/" target="_blank" rel="noopener noreferrer" class="">Stéphane Caron</a></p>
<p><strong>You should watch if:</strong></p>
<ul>
<li class="">You're interested in open source robots in general<!-- -->
<ul>
<li class="">The speaker maintains <a href="https://github.com/stephane-caron/awesome-open-source-robots" target="_blank" rel="noopener noreferrer" class="">awesome-open-source-robots</a>, a list of open source robots</li>
</ul>
</li>
<li class="">You want to build an open source robot of your own</li>
<li class="">You want to learn practical Reinforcement Learning</li>
</ul>
</li>
</ul>
<hr>
<ul>
<li class="">
<p><a href="https://fosdem.org/2026/schedule/event/M7TKVG-meet-iceoryx2/" target="_blank" rel="noopener noreferrer" class="">Middleware Pain? Meet iceoryx2</a> (25m) - <a href="https://fosdem.org/2026/schedule/speaker/michael_poehnl/" target="_blank" rel="noopener noreferrer" class="">Michael Poehnl</a> of <a href="https://ekxide.io/" target="_blank" rel="noopener noreferrer" class="">Ekxide</a></p>
<p><strong>You should watch if:</strong></p>
<ul>
<li class="">You're interested in more ways to move messages around than ROS supports</li>
<li class="">You want to use more advanced events for acting on data</li>
<li class="">You're interested in very high performance robotics, including shared memory transport</li>
</ul>
</li>
</ul>
<hr>
<ul>
<li class="">
<p><a href="https://fosdem.org/2026/schedule/event/XRE97C-precision_landing_with_px4_and_ros_2_using_aruco_markers/" target="_blank" rel="noopener noreferrer" class="">Precision Landing with PX4 and ROS 2 using Aruco Markers</a> (25m) - <a href="https://fosdem.org/2026/schedule/speaker/ramon_roche/" target="_blank" rel="noopener noreferrer" class="">Ramon Roche</a>, <a href="https://fosdem.org/2026/schedule/speaker/beniamino_pozzan/" target="_blank" rel="noopener noreferrer" class="">Beniamino Pozzan</a></p>
<p><strong>You should watch if:</strong></p>
<ul>
<li class="">You want to see how to integrate PX4 with ROS 2</li>
<li class="">You want to hear about custom controllers in PX4</li>
<li class="">You want to see a demo run successfully right at the last moment!</li>
</ul>
</li>
</ul>
<hr>
<ul>
<li class="">
<p><a href="https://fosdem.org/2026/schedule/event/3PBHXY-simple_safe_open_building_your_first_ros_2_rover_with_rust_and_pixi/" target="_blank" rel="noopener noreferrer" class="">Simple, Safe, Open: Building Your First ROS 2 Rover with Rust and Pixi</a> (10m) - <a href="https://fosdem.org/2026/schedule/speaker/christophe_simon/" target="_blank" rel="noopener noreferrer" class="">Christophe Simon</a>, <a href="https://fosdem.org/2026/schedule/speaker/nicolas_daube/" target="_blank" rel="noopener noreferrer" class="">Nicolas Daube</a> of <a href="https://www.botronics.be/" target="_blank" rel="noopener noreferrer" class="">Botronics</a></p>
<p><strong>You should watch if:</strong></p>
<ul>
<li class="">You're interested in the cheapest possible rover build</li>
<li class="">You want better ways to manage dependencies and export builds</li>
<li class="">You're interested in Rust</li>
</ul>
</li>
</ul>
<hr>
<ul>
<li class="">
<p><a href="https://fosdem.org/2026/schedule/event/QXGHRL-vehicle-dynamics-sim/" target="_blank" rel="noopener noreferrer" class="">Vehicle Dynamics Sim: accurately and easily simulate actuation limits</a> (10m) - <a href="https://fosdem.org/2026/schedule/speaker/arne_baeyens/" target="_blank" rel="noopener noreferrer" class="">Arne Baeyens</a> of <a href="https://www.intermodalics.ai/" target="_blank" rel="noopener noreferrer" class="">Intermodalics</a></p>
<p><strong>You should watch if:</strong></p>
<ul>
<li class="">You have issues with vehicle dynamics in commonly-used simulations</li>
<li class="">You want your real robot to behave more closely compared to simulation</li>
<li class="">You want to simulate by only tweaking a few parameters</li>
</ul>
</li>
</ul>
<hr>
<h3 class="anchor anchorTargetStickyNavbar_Vzrq" id="productionising-ros">Productionising ROS<a href="https://mikelikesrobots.github.io/blog/fosdem-robotics-2026#productionising-ros" class="hash-link" aria-label="Direct link to Productionising ROS" title="Direct link to Productionising ROS" translate="no">​</a></h3>
<ul>
<li class="">
<p><a href="https://fosdem.org/2026/schedule/event/MUXVUK-prod-ros-bazel/" target="_blank" rel="noopener noreferrer" class="">Productionising ROS when you have no choice (with Bazel)</a> (10m) - <a href="https://fosdem.org/2026/schedule/speaker/ricardo_delfin/" target="_blank" rel="noopener noreferrer" class="">Ricardo Delfin</a> of <a href="https://thehumanoid.ai/" target="_blank" rel="noopener noreferrer" class="">Humanoid</a></p>
<p><strong>You should watch if:</strong></p>
<ul>
<li class="">You want hermetic builds for your robots</li>
<li class="">You want to see new, reliable ways of building Docker images for your robots</li>
<li class="">You want to use a production stack for building and deploying robot software reliably</li>
</ul>
</li>
</ul>
<hr>
<ul>
<li class="">
<p><a href="https://fosdem.org/2026/schedule/event/98EYLV-ardupilot_advanced_integration/" target="_blank" rel="noopener noreferrer" class="">ArduPilot Advanced Integration</a> (10m) - <a href="https://fosdem.org/2026/schedule/speaker/pierre_kancir/" target="_blank" rel="noopener noreferrer" class="">Pierre Kancir</a></p>
<p><strong>You should watch if:</strong></p>
<ul>
<li class="">You're interested in different drone builds</li>
<li class="">You want to see the internals and parts that make up a drone</li>
<li class="">You want to build drones without using ROS</li>
</ul>
</li>
</ul>
<hr>
<h3 class="anchor anchorTargetStickyNavbar_Vzrq" id="botronics-ixi">Botronics iXi<a href="https://mikelikesrobots.github.io/blog/fosdem-robotics-2026#botronics-ixi" class="hash-link" aria-label="Direct link to Botronics iXi" title="Direct link to Botronics iXi" translate="no">​</a></h3>
<ul>
<li class="">
<p><a href="https://fosdem.org/2026/schedule/event/M38A3V-botronics-robotics-tech-stack/" target="_blank" rel="noopener noreferrer" class="">The Technical Stacks Behind Botronics' iXi Autonomous Golf Trolley</a> (45m) - <a href="https://fosdem.org/2026/schedule/speaker/antoine_van_malleghem/" target="_blank" rel="noopener noreferrer" class="">Antoine Van Malleghem</a>, <a href="https://fosdem.org/2026/schedule/speaker/enzo_ghisoni/" target="_blank" rel="noopener noreferrer" class="">Enzo Ghisoni</a>, <a href="https://fosdem.org/2026/schedule/speaker/david_moli/" target="_blank" rel="noopener noreferrer" class="">David Moli</a> of <a href="https://www.botronics.be/" target="_blank" rel="noopener noreferrer" class="">Botronics</a></p>
<p><strong>You should watch if:</strong></p>
<ul>
<li class="">You want advice from a company making and selling real robots</li>
<li class="">You want to see the full tech stack of a working robot</li>
<li class="">You want to hear about what went into the tech stack that the company settled on, including the mistakes they made</li>
</ul>
</li>
</ul>
<hr>
<h3 class="anchor anchorTargetStickyNavbar_Vzrq" id="ros-z">ROS-Z<a href="https://mikelikesrobots.github.io/blog/fosdem-robotics-2026#ros-z" class="hash-link" aria-label="Direct link to ROS-Z" title="Direct link to ROS-Z" translate="no">​</a></h3>
<ul>
<li class="">
<p><a href="https://fosdem.org/2026/schedule/event/BQ8DVM-ros-z/" target="_blank" rel="noopener noreferrer" class="">ROS-Z: A Rust/Zenoh-native stack, fully ROS 2-compliant</a> (25m) - <a href="https://fosdem.org/2026/schedule/speaker/julien_enoch/" target="_blank" rel="noopener noreferrer" class="">Julien Enoch</a>, <a href="https://fosdem.org/2026/schedule/speaker/yuyuan_yuan/" target="_blank" rel="noopener noreferrer" class="">Yuyuan Yuan</a> of <a href="https://www.zettascale.tech/" target="_blank" rel="noopener noreferrer" class="">ZettaScale</a></p>
<p><strong>You should watch if:</strong></p>
<ul>
<li class="">You're interested in Rust in robotics, particularly ROS</li>
<li class="">You want to use a higher performance version of ROS, as ROS-Z replaces many layers of ROS while remaining compatible with ROS</li>
<li class="">You want to see more from the makers of Zenoh!</li>
</ul>
</li>
</ul>
<hr>
<ul>
<li class="">
<p><a href="https://fosdem.org/2026/schedule/event/VD7GN8-easynav/" target="_blank" rel="noopener noreferrer" class="">EasyNav: An open-source framework for navigating everywhere</a> (25m) - <a href="https://fosdem.org/2026/schedule/speaker/francisco_martin_rico/" target="_blank" rel="noopener noreferrer" class="">Francisco Martín Rico</a>, <a href="https://fosdem.org/2026/schedule/speaker/francisco_miguel_moreno/" target="_blank" rel="noopener noreferrer" class="">Francisco Miguel Moreno</a> of <a href="https://en.urjc.es/" target="_blank" rel="noopener noreferrer" class="">Universidad Rey Juan Carlos</a></p>
<p><strong>You should watch if:</strong></p>
<ul>
<li class="">You have navigation cases that are difficult to solve with Nav2</li>
<li class="">You want to use multiple types of maps to navigate with</li>
<li class="">You need to work with multiple elevations in the same map</li>
</ul>
</li>
</ul>
<hr>
<ul>
<li class="">
<p><a href="https://fosdem.org/2026/schedule/event/RUE39L-auto-apms/" target="_blank" rel="noopener noreferrer" class="">AutoAPMS: Lightweight and versatile integration of behavior trees into the ROS 2 ecosystem</a> (25m) - <a href="https://fosdem.org/2026/schedule/speaker/robin_muller/" target="_blank" rel="noopener noreferrer" class="">Robin Müller</a></p>
<p><strong>You should watch if:</strong></p>
<ul>
<li class="">You want to define behaviour trees in a very flexible way (using CMake)</li>
<li class="">You want to see the power of behaviour trees</li>
<li class="">You enjoy seeing how a simple example can explain complex behaviours</li>
</ul>
</li>
</ul>
<hr>
<ul>
<li class="">
<p><a href="https://fosdem.org/2026/schedule/event/MNT7XJ-plotjuggler_the_log_visualization_tool_loved_by_roboticists/" target="_blank" rel="noopener noreferrer" class="">PlotJuggler: the log visualization tool loved by roboticists</a> (25m) - <a href="https://fosdem.org/2026/schedule/speaker/davide_faconti/" target="_blank" rel="noopener noreferrer" class="">Davide Faconti</a></p>
<p><strong>You should watch if:</strong></p>
<ul>
<li class="">You want to see a more entertaining talk (I enjoyed the James Bond theme!)</li>
<li class="">You're interested in the future of a very widely-used data visualisation tool<!-- -->
<ul>
<li class="">The audience support for PlotJuggler was incredible!</li>
</ul>
</li>
</ul>
</li>
</ul>
<h2 class="anchor anchorTargetStickyNavbar_Vzrq" id="fosdem-2027">FOSDEM 2027<a href="https://mikelikesrobots.github.io/blog/fosdem-robotics-2026#fosdem-2027" class="hash-link" aria-label="Direct link to FOSDEM 2027" title="Direct link to FOSDEM 2027" translate="no">​</a></h2>
<p>FOSDEM will be back in 2027! If you're interested, you can get updates by checking the <a href="https://fosdem.org/" target="_blank" rel="noopener noreferrer" class="">FOSDEM website</a>. There will be a page for 2027 as soon as it's available, which is likely to be late in 2026.</p>]]></content>
        <author>
            <name>Michael Hart</name>
            <uri>https://mikelikesrobots.github.io</uri>
        </author>
        <category label="robotics" term="robotics"/>
        <category label="conference" term="conference"/>
        <category label="fosdem" term="fosdem"/>
    </entry>
    <entry>
        <title type="html"><![CDATA[Deploying Ultralytics YOLO26 Using ROS 2]]></title>
        <id>https://mikelikesrobots.github.io/blog/ultralytics-yolo26-computer-vision</id>
        <link href="https://mikelikesrobots.github.io/blog/ultralytics-yolo26-computer-vision"/>
        <updated>2026-02-19T00:00:00.000Z</updated>
        <summary type="html"><![CDATA[Computer Vision (CV) is when a machine processes visual data to perceive its environment, just as humans can. Robots using CV can operate on single images or continuous video data, which allows them to recognise objects, detect obstacles, track movements over time, and navigate in complex space. For instance, autonomous vehicles can use camera data for safety systems or even fully autonomous driving.]]></summary>
        <content type="html"><![CDATA[<p>Computer Vision (CV) is when a machine processes visual data to perceive its environment, just as humans can. Robots using CV can operate on single images or continuous video data, which allows them to recognise objects, detect obstacles, track movements over time, and navigate in complex space. For instance, autonomous vehicles can use camera data for safety systems or even fully autonomous driving.</p>
<p>This post walks through building a simple ROS 2 node that detects objects in real time using a robot's webcam and the Ultralytics YOLO26 model. The purpose is to show how simple it is to deploy Ultralytics models on a robot using the <code>ultralytics</code> Python package, as well as walking through a simple ROS 2 node for CV.</p>
<div class="video_jswG"><button type="button" class="poster_B6DH" aria-label="Play video: Deploying Ultralytics YOLO26 Using ROS 2"><img src="https://i.ytimg.com/vi/jZtmxtWO3Dk/hqdefault.jpg" alt="" width="480" height="360" loading="lazy"><span class="play_lEvZ" aria-hidden="true">▶</span><span class="caption_yrhJ">Watch: <!-- -->Deploying Ultralytics YOLO26 Using ROS 2</span></button></div><noscript><p><a href="https://www.youtube.com/watch?v=jZtmxtWO3Dk&amp;t=0">Watch <!-- -->Deploying Ultralytics YOLO26 Using ROS 2<!-- --> on YouTube</a></p></noscript>
<div class="theme-admonition theme-admonition-note admonition_xJq3 alert alert--secondary"><div class="admonitionHeading_Gvgb"><span class="admonitionIcon_Rf37"><svg viewBox="0 0 14 16"><path fill-rule="evenodd" d="M6.3 5.69a.942.942 0 0 1-.28-.7c0-.28.09-.52.28-.7.19-.18.42-.28.7-.28.28 0 .52.09.7.28.18.19.28.42.28.7 0 .28-.09.52-.28.7a1 1 0 0 1-.7.3c-.28 0-.52-.11-.7-.3zM8 7.99c-.02-.25-.11-.48-.31-.69-.2-.19-.42-.3-.69-.31H6c-.27.02-.48.13-.69.31-.2.2-.3.44-.31.69h1v3c.02.27.11.5.31.69.2.2.42.31.69.31h1c.27 0 .48-.11.69-.31.2-.19.3-.42.31-.69H8V7.98v.01zM7 2.3c-3.14 0-5.7 2.54-5.7 5.68 0 3.14 2.56 5.7 5.7 5.7s5.7-2.55 5.7-5.7c0-3.15-2.56-5.69-5.7-5.69v.01zM7 .98c3.86 0 7 3.14 7 7s-3.14 7-7 7-7-3.12-7-7 3.14-7 7-7z"></path></svg></span>Sponsored by Ultralytics</div><div class="admonitionContent_BuS1"><p>This post has been sponsored by Ultralytics. Check the following links for more information about Ultralytics YOLO26 or metrics of specific Ultralytics YOLO26 models:</p><p><strong>Ultralytics YOLO26 Docs</strong>: <a href="https://docs.ultralytics.com/models/yolo26/?utm_source=infl&amp;utm_medium=video&amp;utm_campaign=yolo26&amp;utm_term=mh" target="_blank" rel="noopener noreferrer" class="">https://docs.ultralytics.com/models/yolo26/?utm_source=infl&amp;utm_medium=video&amp;utm_campaign=yolo26&amp;utm_term=mh</a></p><p><strong>Ultralytics YOLO26 Platform</strong>: <a href="https://platform.ultralytics.com/ultralytics/yolo26?utm_source=infl&amp;utm_medium=video&amp;utm_campaign=yolo26&amp;utm_term=mh" target="_blank" rel="noopener noreferrer" class="">https://platform.ultralytics.com/ultralytics/yolo26?utm_source=infl&amp;utm_medium=video&amp;utm_campaign=yolo26&amp;utm_term=mh</a></p><p><em>The links have parameters to show you came from here!</em></p></div></div>
<p><strong>Ultralytics YOLO26 Infographic</strong></p>
<figure class="text--center"><p><img decoding="async" loading="lazy" alt="Infographic describing Computer Vision, Ultralytics YOLO26, and Ultralytics in ROS 2" src="https://mikelikesrobots.github.io/assets/images/yolo26_in_ros2_infographic-8bb5e2f831e8b1d8c42a8ee69567b1f2.webp" width="2000" height="1414" class="img_ev3q">
</p><figcaption>Infographic showing the uses of Computer Vision, the benefits of Ultralytics YOLO and Ultralytics YOLO26 in particular, and the key points of using Ultralytics in ROS 2.</figcaption><p></p></figure>
<h2 class="anchor anchorTargetStickyNavbar_Vzrq" id="ultralytics-yolo">Ultralytics YOLO<a href="https://mikelikesrobots.github.io/blog/ultralytics-yolo26-computer-vision#ultralytics-yolo" class="hash-link" aria-label="Direct link to Ultralytics YOLO" title="Direct link to Ultralytics YOLO" translate="no">​</a></h2>
<h3 class="anchor anchorTargetStickyNavbar_Vzrq" id="yolo-models">YOLO Models<a href="https://mikelikesrobots.github.io/blog/ultralytics-yolo26-computer-vision#yolo-models" class="hash-link" aria-label="Direct link to YOLO Models" title="Direct link to YOLO Models" translate="no">​</a></h3>
<p>Ultralytics provides a suite of CV models called YOLO, or You Only Look Once, designed for efficient and accurate CV tasks. These models are widely used due to their strong real-time performance, simple APIs, and broad hardware support. In my case, it was extremely simple to deploy a model to the OriginBot, although it only runs on the CPU; the RDK X5 on board has hardware acceleration available, but I wanted to keep the ROS 2 node simple so it would be easy to understand. See my article <a class="" href="https://mikelikesrobots.github.io/blog/rdk-x3-ai-explore">Exploring AI on the RDK X3 Sunrise</a> for more information on the RDK X5's predecessor, the RDK X3.</p>
<p>YOLO models offer the following applications:</p>
<ul>
<li class=""><strong>Object Detection</strong>: Identify and locate multiple objects within a frame.</li>
<li class=""><strong>Segmentation</strong>: Generates masks, or pixel regions, which belong to a particular object. For example, highlight the areas of an image occupied by ships in a dock.</li>
<li class=""><strong>Image Classification</strong>: Classify an image as belonging to a particular class. For example, an image containing a keyboard may be given the Keyboard class.</li>
<li class=""><strong>Pose estimation</strong>: Estimate the position and orientation of any humans within a frame. Each humans can have a simple skeleton drawn showing the location of their heads, torsos, and limbs.</li>
<li class=""><strong>Tracking</strong>: Tracks an object or person between frames of a video, showing the change in position over time.</li>
</ul>
<figure class="text--center"><p><img decoding="async" loading="lazy" alt="Graphic showing computer vision tasks supported by YOLO" src="https://mikelikesrobots.github.io/assets/images/yolo_applications-a650c169ec225707a3497f10a576a4c0.webp" width="682" height="160" class="img_ev3q">
</p><figcaption>Graphic showing computer vision tasks supported by YOLO, courtesy of blog post <a href="https://www.ultralytics.com/blog/behavioral-ai-is-making-computer-vision-more-impactful" target="_blank" rel="noopener noreferrer" class="">Behavioral AI is making computer vision more impactful by Abirami Vina</a>.</figcaption><p></p></figure>
<p>Ultralytics YOLO26 is available under two licensing options. The AGPL-3.0 license is an OSI-approved open-source license, perfect for students, researchers, and enthusiasts who want to collaborate openly and share their work. For commercial use or private R&amp;D, the Ultralytics Enterprise License allows seamless integration into proprietary products and services without the open-source requirements of AGPL-3.0. I'm using the models under the AGPL-3.0 License for this demo.</p>
<h3 class="anchor anchorTargetStickyNavbar_Vzrq" id="ultralytics-yolo26">Ultralytics YOLO26<a href="https://mikelikesrobots.github.io/blog/ultralytics-yolo26-computer-vision#ultralytics-yolo26" class="hash-link" aria-label="Direct link to Ultralytics YOLO26" title="Direct link to Ultralytics YOLO26" translate="no">​</a></h3>
<p>Ultralytics has released multiple sets of YOLO models over the years, including YOLOv5, YOLOv8, and YOLOv11. The latest model that was released (generally available as of January 2026!) was Ultralytics YOLO26, which is the model we will use for the demo.</p>
<p>Ultralytics YOLO26 is a drop-in replacement for previous YOLO models, so if you're using any other YOLO models (e.g. YOLOv5), it is simple to update your code to use the new model. There are a few advantages to upgrading, as the new architecture of Ultralytics YOLO26 offers faster inference, better performance on large <em>and</em> small objects, and broad hardware compatibility.</p>
<p>The demo from this post only runs on CPU, although it could run much faster with hardware acceleration, and Ultralytics aims to support as many types of hardware acceleration as it can.</p>
<h2 class="anchor anchorTargetStickyNavbar_Vzrq" id="running-ultralytics-yolo26-model-on-my-robot">Running Ultralytics YOLO26 model on my robot<a href="https://mikelikesrobots.github.io/blog/ultralytics-yolo26-computer-vision#running-ultralytics-yolo26-model-on-my-robot" class="hash-link" aria-label="Direct link to Running Ultralytics YOLO26 model on my robot" title="Direct link to Running Ultralytics YOLO26 model on my robot" translate="no">​</a></h2>
<p>To test Ultralytics' claim that the model is easy to deploy, I wrote a simple ROS 2 node that receives images from a camera and performs inference on them. More information on how to build and deploy the node in <a href="https://mikelikesrobots.github.io/blog/ultralytics-yolo26-computer-vision#how-to-run-ultralytics-yolo26-in-a-simple-ros-2-node" class="">this sections</a>.</p>
<p>I ran this node on my OriginBot, which uses the RDK X5 as a brain. The RDK X5 has hardware acceleration on board that can run YOLO models extremely quickly, but I chose to run the model using CPU to keep the node simple and easy to understand. Hence, the images come through more slowly than the board is capable of.</p>
<p>I also ran the node on my desktop computer, as it could process the images much faster, so that I could get some examples of the detections from the model. Hence, running the <code>yolo26n.pt</code> model on my desktop gave some of the following results. I tried a series of objects I had nearby to see what would be recognised by the model to select the objects used below.</p>
<p>First, the model performed very well with fruit like apples and bananas, even when the image wasn't properly focused.</p>
<p><img decoding="async" loading="lazy" alt="Image of apple with bounding box" src="https://mikelikesrobots.github.io/assets/images/apple-0191293f9344f4d38fbc88c360c940cb.webp" width="1240" height="928" class="img_ev3q"></p>
<p><img decoding="async" loading="lazy" alt="Image of apple and banana together with bounding boxes" src="https://mikelikesrobots.github.io/assets/images/apple_banana-419b9e52cdd21ac9fcb29e3db00a1eb8.webp" width="1240" height="928" class="img_ev3q"></p>
<p>The model also performed well for my phone.</p>
<p><img decoding="async" loading="lazy" alt="Image of mobile phone with bounding box" src="https://mikelikesrobots.github.io/assets/images/phone-e6339929eae9fa9b6bcbc3b12c1fbae7.webp" width="1240" height="928" class="img_ev3q"></p>
<p>The model had more trouble with objects like these scissors and toothbrush, but could still recognise the objects most of the time. I found that the model could recognise scissors more easily when up close and opened up.</p>
<p><img decoding="async" loading="lazy" alt="Image of scissors with bounding box" src="https://mikelikesrobots.github.io/assets/images/scissors-fee32835764d66ad3e6fb237b9b1571d.webp" width="1240" height="928" class="img_ev3q">
<img decoding="async" loading="lazy" alt="Image of toothbrush with bounding box" src="https://mikelikesrobots.github.io/assets/images/toothbrush-417f801b6b5ca3dd5f3fc0ffc246a28f.webp" width="1240" height="928" class="img_ev3q"></p>
<p>There were also some objects that the model didn't recognise well. My examples are a water bottle and a screwdriver.</p>
<p><img decoding="async" loading="lazy" alt="Image of water bottle recognised as a remote" src="https://mikelikesrobots.github.io/assets/images/bottle-ae3d8fa25048bded934c163618373efd.webp" width="1240" height="928" class="img_ev3q">
<img decoding="async" loading="lazy" alt="Image of screwdriver recognised as a toothbrush" src="https://mikelikesrobots.github.io/assets/images/screwdriver-7157a4a638c6079b3a5c78f544766624.webp" width="1240" height="928" class="img_ev3q"></p>
<div class="theme-admonition theme-admonition-info admonition_xJq3 alert alert--info"><div class="admonitionHeading_Gvgb"><span class="admonitionIcon_Rf37"><svg viewBox="0 0 14 16"><path fill-rule="evenodd" d="M7 2.3c3.14 0 5.7 2.56 5.7 5.7s-2.56 5.7-5.7 5.7A5.71 5.71 0 0 1 1.3 8c0-3.14 2.56-5.7 5.7-5.7zM7 1C3.14 1 0 4.14 0 8s3.14 7 7 7 7-3.14 7-7-3.14-7-7-7zm1 3H6v5h2V4zm0 6H6v2h2v-2z"></path></svg></span>Further Model Training</div><div class="admonitionContent_BuS1"><p>This isn't surprising, because the model was likely not trained on these objects at all. The model will only be able to recognise objects it has been trained on; otherwise, it will ignore the objects, or label them as a similar object that is has been trained on. If you're using YOLO models in your own application, you may need to train them further for better performance on your required objects. More information is available at <a href="https://docs.ultralytics.com/modes/train/" target="_blank" rel="noopener noreferrer" class="">Model Training with Ultralytics YOLO</a>.</p></div></div>
<p>Finally, as a bonus, my cat was mostly recognised as a cat, but was also labelled as a teddy bear and a dog. I enjoyed that the teddy bear confidence (45%) was higher than the cat confidence (27%), depending on the frame.</p>
<p><img decoding="async" loading="lazy" alt="Image of cat recognised as cat with bounding box" src="https://mikelikesrobots.github.io/assets/images/cat_cat-d2586259f1240b017727c44d415cad64.webp" width="1240" height="928" class="img_ev3q">
<img decoding="async" loading="lazy" alt="Image of cat recognised as teddy bear with bounding box" src="https://mikelikesrobots.github.io/assets/images/cat_teddy_bear-1835c48b5f215204bc8b3d73aba5f7ed.webp" width="1240" height="928" class="img_ev3q">
<img decoding="async" loading="lazy" alt="Image of cat recognised as dog with bounding box" src="https://mikelikesrobots.github.io/assets/images/cat_dog-755b26fdfd543dcbb04ef089c23f1246.webp" width="1240" height="928" class="img_ev3q"></p>
<p>The dog label isn't too surprising to me. Depending on the angle, it can be hard to tell cats and dogs apart.</p>
<p>Now that we've seen some examples of objects detected by the network, let's look at how to deploy the model to a real robot.</p>
<h2 class="anchor anchorTargetStickyNavbar_Vzrq" id="how-to-run-ultralytics-yolo26-in-a-simple-ros-2-node">How to run Ultralytics YOLO26 in a simple ROS 2 node<a href="https://mikelikesrobots.github.io/blog/ultralytics-yolo26-computer-vision#how-to-run-ultralytics-yolo26-in-a-simple-ros-2-node" class="hash-link" aria-label="Direct link to How to run Ultralytics YOLO26 in a simple ROS 2 node" title="Direct link to How to run Ultralytics YOLO26 in a simple ROS 2 node" translate="no">​</a></h2>
<p>I tend to build robotics applications using the ROS 2 framework. ROS 2 comes with a lot of advantages, but the main reason I use it is that it's free and very widely used, which makes it a great teaching tool. For more details on ROS 2, take a look at my previous blog post <a class="" href="https://mikelikesrobots.github.io/blog/getting-started-ros-2">Getting Started with ROS 2</a>.</p>
<p>ROS 2 works by separating robot tasks into different nodes that communicate by passing messages. In a robot with Computer Vision, we might have one node that reads images from the camera and publishes them, and another node that subscribes to those images and performs inference on them. That's exactly the setup in today's demo.</p>
<p>Let's go through installing dependencies and running the code before taking a closer look at the code in the <a href="https://mikelikesrobots.github.io/blog/ultralytics-yolo26-computer-vision#code-deep-dive" class="">Code Deep Dive</a> section.</p>
<h3 class="anchor anchorTargetStickyNavbar_Vzrq" id="install-ros-2">Install ROS 2<a href="https://mikelikesrobots.github.io/blog/ultralytics-yolo26-computer-vision#install-ros-2" class="hash-link" aria-label="Direct link to Install ROS 2" title="Direct link to Install ROS 2" translate="no">​</a></h3>
<p>The first step on a robot is to install ROS 2. If your robot is running Ubuntu, it's very simple - just follow the instructions <a href="https://docs.ros.org/en/humble/Installation/Ubuntu-Install-Debs.html" target="_blank" rel="noopener noreferrer" class="">here</a>.</p>
<div class="theme-admonition theme-admonition-note admonition_xJq3 alert alert--secondary"><div class="admonitionHeading_Gvgb"><span class="admonitionIcon_Rf37"><svg viewBox="0 0 14 16"><path fill-rule="evenodd" d="M6.3 5.69a.942.942 0 0 1-.28-.7c0-.28.09-.52.28-.7.19-.18.42-.28.7-.28.28 0 .52.09.7.28.18.19.28.42.28.7 0 .28-.09.52-.28.7a1 1 0 0 1-.7.3c-.28 0-.52-.11-.7-.3zM8 7.99c-.02-.25-.11-.48-.31-.69-.2-.19-.42-.3-.69-.31H6c-.27.02-.48.13-.69.31-.2.2-.3.44-.31.69h1v3c.02.27.11.5.31.69.2.2.42.31.69.31h1c.27 0 .48-.11.69-.31.2-.19.3-.42.31-.69H8V7.98v.01zM7 2.3c-3.14 0-5.7 2.54-5.7 5.68 0 3.14 2.56 5.7 5.7 5.7s5.7-2.55 5.7-5.7c0-3.15-2.56-5.69-5.7-5.69v.01zM7 .98c3.86 0 7 3.14 7 7s-3.14 7-7 7-7-3.12-7-7 3.14-7 7-7z"></path></svg></span>Not using Ubuntu?</div><div class="admonitionContent_BuS1"><p>If your robot isn't running Ubuntu, there are still installation options. Take a look through the website above for how to install, or run in an Ubuntu VM if you just want to try the demo node out in simulation.</p></div></div>
<p>After installing ROS 2, source the setup file. Change <code>humble</code> for the version of ROS 2 that you've installed:</p>
<div class="language-bash codeBlockContainer_Ckt0 theme-code-block" style="--prism-color:#393A34;--prism-background-color:#f6f8fa"><div class="codeBlockContent_QJqH"><pre tabindex="0" class="prism-code language-bash codeBlock_bY9V thin-scrollbar" style="color:#393A34;background-color:#f6f8fa"><code class="codeBlockLines_e6Vv"><div class="token-line" style="color:#393A34"><span class="token plain">source /opt/ros/humble/setup.bash</span><br></div></code></pre></div></div>
<p>This needs to be done in every terminal session that you run ROS 2 commands in. If you ever get the error that <code>ros2</code> isn't recognised as a command, try running this source command again.</p>
<h3 class="anchor anchorTargetStickyNavbar_Vzrq" id="create-a-workspace">Create a Workspace<a href="https://mikelikesrobots.github.io/blog/ultralytics-yolo26-computer-vision#create-a-workspace" class="hash-link" aria-label="Direct link to Create a Workspace" title="Direct link to Create a Workspace" translate="no">​</a></h3>
<p>To create the workspace for this example, run the following:</p>
<div class="language-bash codeBlockContainer_Ckt0 theme-code-block" style="--prism-color:#393A34;--prism-background-color:#f6f8fa"><div class="codeBlockContent_QJqH"><pre tabindex="0" class="prism-code language-bash codeBlock_bY9V thin-scrollbar" style="color:#393A34;background-color:#f6f8fa"><code class="codeBlockLines_e6Vv"><div class="token-line" style="color:#393A34"><span class="token plain">mkdir -p ~/yolo_ws/src</span><br></div></code></pre></div></div>
<p>This creates the source folder of the workspace, into which we can clone the example node:</p>
<div class="language-bash codeBlockContainer_Ckt0 theme-code-block" style="--prism-color:#393A34;--prism-background-color:#f6f8fa"><div class="codeBlockContent_QJqH"><pre tabindex="0" class="prism-code language-bash codeBlock_bY9V thin-scrollbar" style="color:#393A34;background-color:#f6f8fa"><code class="codeBlockLines_e6Vv"><div class="token-line" style="color:#393A34"><span class="token plain">git clone https://github.com/mikelikesrobots/yolo26_ros2/ ~/yolo_ws/src/yolo26_ros2</span><br></div></code></pre></div></div>
<p>As can be seen from the line above, all of the code for the demo is kept on my GitHub in the <a href="https://github.com/mikelikesrobots/yolo26_ros2/" target="_blank" rel="noopener noreferrer" class="">yolo26_ros2</a> repository.</p>
<p>With the code checked out, we can now install dependencies and build the node. For this, we will use the <code>rosdep</code> tool that comes with ROS 2, which makes it very easy to install extra dependencies for packages as long as they're recognised by the ROS package index. Execute the following:</p>
<div class="language-bash codeBlockContainer_Ckt0 theme-code-block" style="--prism-color:#393A34;--prism-background-color:#f6f8fa"><div class="codeBlockContent_QJqH"><pre tabindex="0" class="prism-code language-bash codeBlock_bY9V thin-scrollbar" style="color:#393A34;background-color:#f6f8fa"><code class="codeBlockLines_e6Vv"><div class="token-line" style="color:#393A34"><span class="token plain"># Only needs to be executed once per system</span><br></div><div class="token-line" style="color:#393A34"><span class="token plain">sudo rosdep init</span><br></div><div class="token-line" style="color:#393A34"><span class="token plain"># Run these for any new package, including our example node</span><br></div><div class="token-line" style="color:#393A34"><span class="token plain">rosdep update</span><br></div><div class="token-line" style="color:#393A34"><span class="token plain">rosdep install --from-paths ~/yolo_ws/src --ignore-src -r -y</span><br></div></code></pre></div></div>
<div class="theme-admonition theme-admonition-note admonition_xJq3 alert alert--secondary"><div class="admonitionHeading_Gvgb"><span class="admonitionIcon_Rf37"><svg viewBox="0 0 14 16"><path fill-rule="evenodd" d="M6.3 5.69a.942.942 0 0 1-.28-.7c0-.28.09-.52.28-.7.19-.18.42-.28.7-.28.28 0 .52.09.7.28.18.19.28.42.28.7 0 .28-.09.52-.28.7a1 1 0 0 1-.7.3c-.28 0-.52-.11-.7-.3zM8 7.99c-.02-.25-.11-.48-.31-.69-.2-.19-.42-.3-.69-.31H6c-.27.02-.48.13-.69.31-.2.2-.3.44-.31.69h1v3c.02.27.11.5.31.69.2.2.42.31.69.31h1c.27 0 .48-.11.69-.31.2-.19.3-.42.31-.69H8V7.98v.01zM7 2.3c-3.14 0-5.7 2.54-5.7 5.68 0 3.14 2.56 5.7 5.7 5.7s5.7-2.55 5.7-5.7c0-3.15-2.56-5.69-5.7-5.69v.01zM7 .98c3.86 0 7 3.14 7 7s-3.14 7-7 7-7-3.12-7-7 3.14-7 7-7z"></path></svg></span>Ultralytics Python Package</div><div class="admonitionContent_BuS1"><p><code>rosdep</code> is installing the Ultralytics Python package automatically. For other robotics frameworks, or to install the package manually, you can run <code>pip3 install ultralytics</code> instead.</p></div></div>
<div class="theme-admonition theme-admonition-warning admonition_xJq3 alert alert--warning"><div class="admonitionHeading_Gvgb"><span class="admonitionIcon_Rf37"><svg viewBox="0 0 16 16"><path fill-rule="evenodd" d="M8.893 1.5c-.183-.31-.52-.5-.887-.5s-.703.19-.886.5L.138 13.499a.98.98 0 0 0 0 1.001c.193.31.53.501.886.501h13.964c.367 0 .704-.19.877-.5a1.03 1.03 0 0 0 .01-1.002L8.893 1.5zm.133 11.497H6.987v-2.003h2.039v2.003zm0-3.004H6.987V5.987h2.039v4.006z"></path></svg></span>Numpy Package Conflict</div><div class="admonitionContent_BuS1"><p>If you're running this command on Ubuntu 24.04, you may find that the <code>ultralytics</code> package doesn't install correctly, and has an odd error about uninstalling <code>numpy</code>. To fix this, the best thing to do is build the OpenCV bridge from source, which bypasses the conflict.</p><div class="language-bash codeBlockContainer_Ckt0 theme-code-block" style="--prism-color:#393A34;--prism-background-color:#f6f8fa"><div class="codeBlockContent_QJqH"><pre tabindex="0" class="prism-code language-bash codeBlock_bY9V thin-scrollbar" style="color:#393A34;background-color:#f6f8fa"><code class="codeBlockLines_e6Vv"><div class="token-line" style="color:#393A34"><span class="token plain">git clone -b humble https://github.com/ros-perception/vision_opencv.git ~/yolo_ws/src/vision_opencv</span><br></div><div class="token-line" style="color:#393A34"><span class="token plain">cd ~/yolo_ws</span><br></div><div class="token-line" style="color:#393A34"><span class="token plain">colcon build --packages-select cv_bridge --cmake-args -DCMAKE_BUILD_TYPE=Release</span><br></div></code></pre></div></div><p>You can then proceed with the instructions as before.</p></div></div>
<p>With all dependencies installed, we can now build the workspace:</p>
<div class="language-bash codeBlockContainer_Ckt0 theme-code-block" style="--prism-color:#393A34;--prism-background-color:#f6f8fa"><div class="codeBlockContent_QJqH"><pre tabindex="0" class="prism-code language-bash codeBlock_bY9V thin-scrollbar" style="color:#393A34;background-color:#f6f8fa"><code class="codeBlockLines_e6Vv"><div class="token-line" style="color:#393A34"><span class="token plain">cd ~/yolo_ws</span><br></div><div class="token-line" style="color:#393A34"><span class="token plain">colcon build --symlink-install</span><br></div></code></pre></div></div>
<p>The code is now fully built and ready to run.</p>
<h3 class="anchor anchorTargetStickyNavbar_Vzrq" id="running-the-node">Running the Node<a href="https://mikelikesrobots.github.io/blog/ultralytics-yolo26-computer-vision#running-the-node" class="hash-link" aria-label="Direct link to Running the Node" title="Direct link to Running the Node" translate="no">​</a></h3>
<p>The package only builds one node called <code>yolo26_ros2</code>. We could run this node by itself, but it's not very useful without being supplied with camera images. To get images from a webcam, we can use a package called <code>usb_cam</code>, which is available for download without us having to build anything. In fact, it's already installed, as it is one of the <code>yolo26_ros2</code>'s dependencies - we only need to run it at the same time as our CV node.</p>
<p>To make running both nodes at the same time easier, the package includes a launch file, which is configured to launch the <code>yolo26_ros2</code> node and the <code>usb_cam</code> node at the same time. The <code>usb_cam</code> node will open the first available camera on the system and publish images from it using ROS 2. By launching these two nodes together, we can open a webcam, move images from the <code>usb_cam</code> node to the <code>yolo26_ros2</code> node, and perform inference on them.</p>
<div class="language-bash codeBlockContainer_Ckt0 theme-code-block" style="--prism-color:#393A34;--prism-background-color:#f6f8fa"><div class="codeBlockContent_QJqH"><pre tabindex="0" class="prism-code language-bash codeBlock_bY9V thin-scrollbar" style="color:#393A34;background-color:#f6f8fa"><code class="codeBlockLines_e6Vv"><div class="token-line" style="color:#393A34"><span class="token plain">source ~/yolo_ws/install/setup.bash</span><br></div><div class="token-line" style="color:#393A34"><span class="token plain">ros2 launch yolo26_ros2 yolo_camera.launch.py</span><br></div></code></pre></div></div>
<p>If you want to run the demo node by itself, use this <code>ros2 run</code> command instead:</p>
<div class="language-bash codeBlockContainer_Ckt0 theme-code-block" style="--prism-color:#393A34;--prism-background-color:#f6f8fa"><div class="codeBlockContent_QJqH"><pre tabindex="0" class="prism-code language-bash codeBlock_bY9V thin-scrollbar" style="color:#393A34;background-color:#f6f8fa"><code class="codeBlockLines_e6Vv"><div class="token-line" style="color:#393A34"><span class="token plain">source ~/yolo_ws/install/setup.bash</span><br></div><div class="token-line" style="color:#393A34"><span class="token plain">ros2 run yolo26_ros2 yolo26_ros2</span><br></div></code></pre></div></div>
<p>Either way you launch the demo node, it will automatically download the model you've requested, which is <code>yolo26n.pt</code> by default, and save it to the <code>share</code> directory of the ROS 2 workspace.</p>
<div class="theme-admonition theme-admonition-note admonition_xJq3 alert alert--secondary"><div class="admonitionHeading_Gvgb"><span class="admonitionIcon_Rf37"><svg viewBox="0 0 14 16"><path fill-rule="evenodd" d="M6.3 5.69a.942.942 0 0 1-.28-.7c0-.28.09-.52.28-.7.19-.18.42-.28.7-.28.28 0 .52.09.7.28.18.19.28.42.28.7 0 .28-.09.52-.28.7a1 1 0 0 1-.7.3c-.28 0-.52-.11-.7-.3zM8 7.99c-.02-.25-.11-.48-.31-.69-.2-.19-.42-.3-.69-.31H6c-.27.02-.48.13-.69.31-.2.2-.3.44-.31.69h1v3c.02.27.11.5.31.69.2.2.42.31.69.31h1c.27 0 .48-.11.69-.31.2-.19.3-.42.31-.69H8V7.98v.01zM7 2.3c-3.14 0-5.7 2.54-5.7 5.68 0 3.14 2.56 5.7 5.7 5.7s5.7-2.55 5.7-5.7c0-3.15-2.56-5.69-5.7-5.69v.01zM7 .98c3.86 0 7 3.14 7 7s-3.14 7-7 7-7-3.12-7-7 3.14-7 7-7z"></path></svg></span>Model Downloading</div><div class="admonitionContent_BuS1"><p>The Ultralytics Python package has a useful feature where it will download a requested model if it's not available on disk. This should be used cautiously in our ROS 2 workspace.</p><p>As <code>colcon build</code> copies <em>source</em> files to the <em>build</em> output, and our node runs from the <em>built</em> files rather than the <em>source</em> files, the Ultralytics package downloads the model to the <code>build</code> area. If you delete the built files while cleaning the workspace, the model will be deleted too. To keep a model permanently, download the model yourself to the <code>models</code> directory of the source <code>yolo26_ros2</code> package, and it will be copied by the build tool.</p><p>If you're not deleting the <em>built</em> files from your workspace, you don't need to worry!</p></div></div>
<div class="theme-admonition theme-admonition-warning admonition_xJq3 alert alert--warning"><div class="admonitionHeading_Gvgb"><span class="admonitionIcon_Rf37"><svg viewBox="0 0 16 16"><path fill-rule="evenodd" d="M8.893 1.5c-.183-.31-.52-.5-.887-.5s-.703.19-.886.5L.138 13.499a.98.98 0 0 0 0 1.001c.193.31.53.501.886.501h13.964c.367 0 .704-.19.877-.5a1.03 1.03 0 0 0 .01-1.002L8.893 1.5zm.133 11.497H6.987v-2.003h2.039v2.003zm0-3.004H6.987V5.987h2.039v4.006z"></path></svg></span>USB Cam Parameters</div><div class="admonitionContent_BuS1"><p>The <code>usb_cam</code> package can be configured with quite a few parameters, including the camera to use and the resolution to capture images at. I've disabled these to keep the launch file more readable, but if you find that you need to change parameters, you can find more information at <a href="https://github.com/ros-drivers/usb_cam" target="_blank" rel="noopener noreferrer" class="">the GitHub page for usb_cam</a>. Use the current launch file as a template for adding the parameters back in.</p></div></div>
<h3 class="anchor anchorTargetStickyNavbar_Vzrq" id="viewing-the-output">Viewing the Output<a href="https://mikelikesrobots.github.io/blog/ultralytics-yolo26-computer-vision#viewing-the-output" class="hash-link" aria-label="Direct link to Viewing the Output" title="Direct link to Viewing the Output" translate="no">​</a></h3>
<p>The <code>yolo26_ros2</code> publishes 3 outputs, mostly for demonstration purposes. For your own use, you can remove the outputs you don't actively need, or separate them into different nodes. The 3 outputs are:</p>
<figure class="text--center"><table><thead><tr><th>Message Type</th><th>Default Topic</th><th>Description</th></tr></thead><tbody><tr><td>Detection2DArray</td><td>/detections</td><td>An array of detections, where each detection has co-ordinates and detected class</td></tr><tr><td>Image</td><td>/image_annotated</td><td>The original image annotated with bounding boxes based on the Detection2DArray</td></tr><tr><td>CompressedImage</td><td>/image_annotated/compressed</td><td>The same as the previous line, except that the image is compressed so it can be sent across a network more easily</td></tr></tbody></table><figcaption>Outputs from the <code>yolo26_ros2</code> node, including the default topic and description of data produced.</figcaption></figure>
<figure class="text--center"><p><img decoding="async" loading="lazy" alt="Figure showing the camera, usb_cam node, yolo26_ros2 node, and produced outputs" src="https://mikelikesrobots.github.io/assets/images/node_architecture-4b8141972d24a19c492e1870d391282e.webp" width="1785" height="552" class="img_ev3q">
</p><figcaption>Diagram showing the data flow from <code>usb_cam</code> (controlling a webcam), to <code>yolo26_ros2</code>, and to any other nodes.</figcaption><p></p></figure>
<p>The easiest way to view the output is to use a tool to visualise the CompressedImage messages. You can either use <code>rqt</code> for this, or my preferred tool, <code>rqt_image_view</code>:</p>
<div class="language-bash codeBlockContainer_Ckt0 theme-code-block" style="--prism-color:#393A34;--prism-background-color:#f6f8fa"><div class="codeBlockContent_QJqH"><pre tabindex="0" class="prism-code language-bash codeBlock_bY9V thin-scrollbar" style="color:#393A34;background-color:#f6f8fa"><code class="codeBlockLines_e6Vv"><div class="token-line" style="color:#393A34"><span class="token plain">ros2 run rqt_image_view rqt_image_view /image_annotated/compressed</span><br></div></code></pre></div></div>
<p>You should be able to see the images streaming live from the robot! You can now try moving it around and seeing what it can detect.</p>
<div class="theme-admonition theme-admonition-warning admonition_xJq3 alert alert--warning"><div class="admonitionHeading_Gvgb"><span class="admonitionIcon_Rf37"><svg viewBox="0 0 16 16"><path fill-rule="evenodd" d="M8.893 1.5c-.183-.31-.52-.5-.887-.5s-.703.19-.886.5L.138 13.499a.98.98 0 0 0 0 1.001c.193.31.53.501.886.501h13.964c.367 0 .704-.19.877-.5a1.03 1.03 0 0 0 .01-1.002L8.893 1.5zm.133 11.497H6.987v-2.003h2.039v2.003zm0-3.004H6.987V5.987h2.039v4.006z"></path></svg></span>No User Interface (UI)</div><div class="admonitionContent_BuS1"><p>If you're running on a robot, you might not have a UI for viewing images. Don't worry! Any computer on the same LAN should be able to view the images from the robot. I tend to use a Windows desktop, so I run an Ubuntu VM via <a href="https://www.virtualbox.org/" target="_blank" rel="noopener noreferrer" class="">VirtualBox</a> with ROS 2 installed to view the images. Normally, I use WSL2 to run ROS 2, but the networking setup makes it difficult to send ROS 2 messages across the network, so I stick with VirtualBox.</p></div></div>
<h3 class="anchor anchorTargetStickyNavbar_Vzrq" id="yolo-model-parameter">YOLO Model Parameter<a href="https://mikelikesrobots.github.io/blog/ultralytics-yolo26-computer-vision#yolo-model-parameter" class="hash-link" aria-label="Direct link to YOLO Model Parameter" title="Direct link to YOLO Model Parameter" translate="no">​</a></h3>
<p>Computer Vision algorithms tend to be divided into classical and Machine Learning. Classical algorithms work by spotting features in images, like edges, whereas Machine Learning versions will build a "model" from training data. This means that it uses a huge set of images with labels of what it should be looking for, and it learns to recognise those labels in those images. Switching out the model will change how the algorithm behaves.</p>
<p>The default model used here is <code>yolo26n.pt</code>, but this isn't the only model you could use. The model is set by a parameter, which is a ROS 2 way to change the configuration of nodes when they start up. In this case, we can set the <code>model_name</code> parameter with a different model name, and the node will attempt to load that model instead. For example, <code>yolo26n.pt</code> and <code>yolo26s.pt</code> are both valid. Take a look at the <a href="https://platform.ultralytics.com/ultralytics/yolo26?utm_source=infl&amp;utm_medium=video&amp;utm_campaign=yolo26&amp;utm_term=mh" target="_blank" rel="noopener noreferrer" class="">metrics for the Ultralytics YOLO26 models</a> to select the right model for yourself. For this example, make sure to use a "Detect" model, as the other models work differently.</p>
<p>To set the parameter, we can either edit <a href="https://github.com/mikelikesrobots/yolo26_ros2/blob/main/launch/yolo_camera.launch.py#L8-L10" target="_blank" rel="noopener noreferrer" class="">the launch file</a>:</p>
<div class="language-python codeBlockContainer_Ckt0 theme-code-block" style="--prism-color:#393A34;--prism-background-color:#f6f8fa"><div class="codeBlockContent_QJqH"><pre tabindex="0" class="prism-code language-python codeBlock_bY9V thin-scrollbar" style="color:#393A34;background-color:#f6f8fa"><code class="codeBlockLines_e6Vv"><div class="token-line" style="color:#393A34"><span class="token comment" style="color:#999988;font-style:italic"># Change the default_value argument</span><span class="token plain"></span><br></div><div class="token-line" style="color:#393A34"><span class="token plain">model_name_arg </span><span class="token operator" style="color:#393A34">=</span><span class="token plain"> DeclareLaunchArgument</span><span class="token punctuation" style="color:#393A34">(</span><span class="token plain"></span><br></div><div class="token-line" style="color:#393A34"><span class="token plain">    </span><span class="token string" style="color:#e3116c">"model_name"</span><span class="token punctuation" style="color:#393A34">,</span><span class="token plain"> default_value</span><span class="token operator" style="color:#393A34">=</span><span class="token string" style="color:#e3116c">"yolo26n.pt"</span><span class="token punctuation" style="color:#393A34">,</span><span class="token plain"> description</span><span class="token operator" style="color:#393A34">=</span><span class="token string" style="color:#e3116c">"YOLO model filename"</span><span class="token plain"></span><br></div><div class="token-line" style="color:#393A34"><span class="token plain"></span><span class="token punctuation" style="color:#393A34">)</span><br></div></code></pre></div></div>
<p>Or we can override the parameter when we launch the node:</p>
<div class="language-bash codeBlockContainer_Ckt0 theme-code-block" style="--prism-color:#393A34;--prism-background-color:#f6f8fa"><div class="codeBlockContent_QJqH"><pre tabindex="0" class="prism-code language-bash codeBlock_bY9V thin-scrollbar" style="color:#393A34;background-color:#f6f8fa"><code class="codeBlockLines_e6Vv"><div class="token-line" style="color:#393A34"><span class="token plain">ros2 launch yolo26_ros2 yolo_camera.launch.py model_name:=yolo26s.pt</span><br></div></code></pre></div></div>
<p>In either case, launching the node will download the new model and run it instead, which gives us the ability to easily change out the model we're using as well as easily deploy it.</p>
<p>Now that we're able to run the node and change the model being used easily, let's take a look at how the code to see how this happens.</p>
<h2 class="anchor anchorTargetStickyNavbar_Vzrq" id="code-deep-dive">Code Deep Dive<a href="https://mikelikesrobots.github.io/blog/ultralytics-yolo26-computer-vision#code-deep-dive" class="hash-link" aria-label="Direct link to Code Deep Dive" title="Direct link to Code Deep Dive" translate="no">​</a></h2>
<p>From running the example, we've already seen that the package:</p>
<ul>
<li class="">Allows ROS 2 to automatically install package dependencies</li>
<li class="">Copies any models in the <code>models</code> directory to the build output</li>
<li class="">Contains a launch file for launching the <code>usb_cam</code> node at the same time as the <code>yolo26_ros2</code> node</li>
<li class="">Contains a node that:<!-- -->
<ul>
<li class="">Can be configured using parameters to change the model being loaded</li>
<li class="">Loads the model using the <code>ultralytics</code> Python package</li>
<li class="">Subscribes to images from the webcam</li>
<li class="">Performs CV inference on those images using the Ultralytics YOLO26 model</li>
<li class="">Publishes the outputs as a Detection2DArray, an annotated image, and a compressed version of the annotated image</li>
</ul>
</li>
</ul>
<p>This section looks closely at the code to show how each of those functions are performed.</p>
<h3 class="anchor anchorTargetStickyNavbar_Vzrq" id="ros-2-package-setup">ROS 2 Package Setup<a href="https://mikelikesrobots.github.io/blog/ultralytics-yolo26-computer-vision#ros-2-package-setup" class="hash-link" aria-label="Direct link to ROS 2 Package Setup" title="Direct link to ROS 2 Package Setup" translate="no">​</a></h3>
<p>This package started with the default Python package template. The template includes package description file <code>package.xml</code>, a Python package build file called <code>setup.py</code>, and the source code of the node in <code>yolo26_ros2/yolo26_ros2.py</code>.</p>
<h3 class="anchor anchorTargetStickyNavbar_Vzrq" id="package-description">Package Description<a href="https://mikelikesrobots.github.io/blog/ultralytics-yolo26-computer-vision#package-description" class="hash-link" aria-label="Direct link to Package Description" title="Direct link to Package Description" translate="no">​</a></h3>
<p>This file contains information about the package, such as the author and the license of the package. It also has a section for package dependencies, which tells ROS 2 which dependencies need to be installed to run the package. <a href="https://github.com/mikelikesrobots/yolo26_ros2/blob/main/package.xml#L15-L21" target="_blank" rel="noopener noreferrer" class="">These lines</a> state the dependencies for the package:</p>
<div class="language-xml codeBlockContainer_Ckt0 theme-code-block" style="--prism-color:#393A34;--prism-background-color:#f6f8fa"><div class="codeBlockContent_QJqH"><pre tabindex="0" class="prism-code language-xml codeBlock_bY9V thin-scrollbar" style="color:#393A34;background-color:#f6f8fa"><code class="codeBlockLines_e6Vv"><div class="token-line" style="color:#393A34"><span class="token tag punctuation" style="color:#393A34">&lt;</span><span class="token tag" style="color:#00009f">depend</span><span class="token tag punctuation" style="color:#393A34">&gt;</span><span class="token plain">rclpy</span><span class="token tag punctuation" style="color:#393A34">&lt;/</span><span class="token tag" style="color:#00009f">depend</span><span class="token tag punctuation" style="color:#393A34">&gt;</span><span class="token plain"></span><br></div><div class="token-line" style="color:#393A34"><span class="token plain"></span><span class="token tag punctuation" style="color:#393A34">&lt;</span><span class="token tag" style="color:#00009f">depend</span><span class="token tag punctuation" style="color:#393A34">&gt;</span><span class="token plain">sensor_msgs</span><span class="token tag punctuation" style="color:#393A34">&lt;/</span><span class="token tag" style="color:#00009f">depend</span><span class="token tag punctuation" style="color:#393A34">&gt;</span><span class="token plain"></span><br></div><div class="token-line" style="color:#393A34"><span class="token plain"></span><span class="token tag punctuation" style="color:#393A34">&lt;</span><span class="token tag" style="color:#00009f">depend</span><span class="token tag punctuation" style="color:#393A34">&gt;</span><span class="token plain">cv_bridge</span><span class="token tag punctuation" style="color:#393A34">&lt;/</span><span class="token tag" style="color:#00009f">depend</span><span class="token tag punctuation" style="color:#393A34">&gt;</span><span class="token plain"></span><br></div><div class="token-line" style="color:#393A34"><span class="token plain"></span><span class="token tag punctuation" style="color:#393A34">&lt;</span><span class="token tag" style="color:#00009f">exec_depend</span><span class="token tag punctuation" style="color:#393A34">&gt;</span><span class="token plain">vision_msgs</span><span class="token tag punctuation" style="color:#393A34">&lt;/</span><span class="token tag" style="color:#00009f">exec_depend</span><span class="token tag punctuation" style="color:#393A34">&gt;</span><span class="token plain"></span><br></div><div class="token-line" style="color:#393A34"><span class="token plain"></span><span class="token tag punctuation" style="color:#393A34">&lt;</span><span class="token tag" style="color:#00009f">exec_depend</span><span class="token tag punctuation" style="color:#393A34">&gt;</span><span class="token plain">python3-ultralytics-pip</span><span class="token tag punctuation" style="color:#393A34">&lt;/</span><span class="token tag" style="color:#00009f">exec_depend</span><span class="token tag punctuation" style="color:#393A34">&gt;</span><span class="token plain"></span><br></div><div class="token-line" style="color:#393A34"><span class="token plain"></span><span class="token tag punctuation" style="color:#393A34">&lt;</span><span class="token tag" style="color:#00009f">exec_depend</span><span class="token tag punctuation" style="color:#393A34">&gt;</span><span class="token plain">usb_cam</span><span class="token tag punctuation" style="color:#393A34">&lt;/</span><span class="token tag" style="color:#00009f">exec_depend</span><span class="token tag punctuation" style="color:#393A34">&gt;</span><br></div></code></pre></div></div>
<p>This means that when <code>rosdep</code> is used to install dependencies for this package, it will look up the right packages to install based on these keys and install them. It also tells the build system that this package needs access to the dependencies to function correctly.</p>
<h3 class="anchor anchorTargetStickyNavbar_Vzrq" id="python-package-build-file">Python Package Build File<a href="https://mikelikesrobots.github.io/blog/ultralytics-yolo26-computer-vision#python-package-build-file" class="hash-link" aria-label="Direct link to Python Package Build File" title="Direct link to Python Package Build File" translate="no">​</a></h3>
<p>The <code>setup.py</code> file also states the package author, as this is standard for a Python package, but it has some extra parameters describing what should be copied during the package build. <a href="https://github.com/mikelikesrobots/yolo26_ros2/blob/main/setup.py#L6-L11" target="_blank" rel="noopener noreferrer" class="">These lines</a> state that all files in the <code>models</code> and <code>launch</code> folders should be copied to the output:</p>
<div class="language-python codeBlockContainer_Ckt0 theme-code-block" style="--prism-color:#393A34;--prism-background-color:#f6f8fa"><div class="codeBlockContent_QJqH"><pre tabindex="0" class="prism-code language-python codeBlock_bY9V thin-scrollbar" style="color:#393A34;background-color:#f6f8fa"><code class="codeBlockLines_e6Vv"><div class="token-line" style="color:#393A34"><span class="token plain">data_files </span><span class="token operator" style="color:#393A34">=</span><span class="token plain"> </span><span class="token punctuation" style="color:#393A34">[</span><span class="token plain"></span><br></div><div class="token-line" style="color:#393A34"><span class="token plain">    </span><span class="token punctuation" style="color:#393A34">(</span><span class="token string" style="color:#e3116c">'share/ament_index/resource_index/packages'</span><span class="token punctuation" style="color:#393A34">,</span><span class="token plain"></span><br></div><div class="token-line" style="color:#393A34"><span class="token plain">        </span><span class="token punctuation" style="color:#393A34">[</span><span class="token string" style="color:#e3116c">'resource/'</span><span class="token plain"> </span><span class="token operator" style="color:#393A34">+</span><span class="token plain"> package_name</span><span class="token punctuation" style="color:#393A34">]</span><span class="token punctuation" style="color:#393A34">)</span><span class="token punctuation" style="color:#393A34">,</span><span class="token plain"></span><br></div><div class="token-line" style="color:#393A34"><span class="token plain">    </span><span class="token punctuation" style="color:#393A34">(</span><span class="token string" style="color:#e3116c">'share/'</span><span class="token plain"> </span><span class="token operator" style="color:#393A34">+</span><span class="token plain"> package_name</span><span class="token punctuation" style="color:#393A34">,</span><span class="token plain"> </span><span class="token punctuation" style="color:#393A34">[</span><span class="token string" style="color:#e3116c">'package.xml'</span><span class="token punctuation" style="color:#393A34">]</span><span class="token punctuation" style="color:#393A34">)</span><span class="token punctuation" style="color:#393A34">,</span><span class="token plain"></span><br></div><div class="token-line" style="color:#393A34"><span class="token plain">    </span><span class="token punctuation" style="color:#393A34">(</span><span class="token string" style="color:#e3116c">'share/'</span><span class="token plain"> </span><span class="token operator" style="color:#393A34">+</span><span class="token plain"> package_name </span><span class="token operator" style="color:#393A34">+</span><span class="token plain"> </span><span class="token string" style="color:#e3116c">'/launch'</span><span class="token punctuation" style="color:#393A34">,</span><span class="token plain"> glob</span><span class="token punctuation" style="color:#393A34">.</span><span class="token plain">glob</span><span class="token punctuation" style="color:#393A34">(</span><span class="token string" style="color:#e3116c">'launch/*.launch.py'</span><span class="token punctuation" style="color:#393A34">)</span><span class="token punctuation" style="color:#393A34">)</span><span class="token punctuation" style="color:#393A34">,</span><span class="token plain"></span><br></div><div class="token-line" style="color:#393A34"><span class="token plain">    </span><span class="token punctuation" style="color:#393A34">(</span><span class="token string" style="color:#e3116c">'share/'</span><span class="token plain"> </span><span class="token operator" style="color:#393A34">+</span><span class="token plain"> package_name </span><span class="token operator" style="color:#393A34">+</span><span class="token plain"> </span><span class="token string" style="color:#e3116c">'/models'</span><span class="token punctuation" style="color:#393A34">,</span><span class="token plain"> glob</span><span class="token punctuation" style="color:#393A34">.</span><span class="token plain">glob</span><span class="token punctuation" style="color:#393A34">(</span><span class="token string" style="color:#e3116c">'models/*'</span><span class="token punctuation" style="color:#393A34">)</span><span class="token punctuation" style="color:#393A34">)</span><span class="token punctuation" style="color:#393A34">,</span><span class="token plain"></span><br></div><div class="token-line" style="color:#393A34"><span class="token plain"></span><span class="token punctuation" style="color:#393A34">]</span><br></div></code></pre></div></div>
<p>When <code>colcon</code> is used to build this package, these data files will be copied to the build output. You can use this to download a YOLO model to the <code>models</code>, then copy it to the build output automatically with <code>colcon</code>.</p>
<h3 class="anchor anchorTargetStickyNavbar_Vzrq" id="launch-file">Launch File<a href="https://mikelikesrobots.github.io/blog/ultralytics-yolo26-computer-vision#launch-file" class="hash-link" aria-label="Direct link to Launch File" title="Direct link to Launch File" translate="no">​</a></h3>
<p>The launch file system is more powerful than a list of nodes to launch at the same time. We are using it for a simple use case, which is to provide the two nodes to launch and the parameters that can be tweaked as we launch them.</p>
<p>The launch file is available at <a href="https://github.com/mikelikesrobots/yolo26_ros2/blob/main/launch/yolo_camera.launch.py" target="_blank" rel="noopener noreferrer" class=""><code>launch/yolo_camera.launch.py</code></a>.</p>
<p>It starts with imports and a function to generate the launch description, which is used by ROS 2 to launch the nodes. The first lines in the launch description are to set parameters, such as <a href="https://github.com/mikelikesrobots/yolo26_ros2/blob/main/launch/yolo_camera.launch.py#L8-L10" target="_blank" rel="noopener noreferrer" class="">the model name</a>:</p>
<div class="language-python codeBlockContainer_Ckt0 theme-code-block" style="--prism-color:#393A34;--prism-background-color:#f6f8fa"><div class="codeBlockContent_QJqH"><pre tabindex="0" class="prism-code language-python codeBlock_bY9V thin-scrollbar" style="color:#393A34;background-color:#f6f8fa"><code class="codeBlockLines_e6Vv"><div class="token-line" style="color:#393A34"><span class="token plain">model_name_arg </span><span class="token operator" style="color:#393A34">=</span><span class="token plain"> DeclareLaunchArgument</span><span class="token punctuation" style="color:#393A34">(</span><span class="token plain"></span><br></div><div class="token-line" style="color:#393A34"><span class="token plain">    </span><span class="token string" style="color:#e3116c">"model_name"</span><span class="token punctuation" style="color:#393A34">,</span><span class="token plain"> default_value</span><span class="token operator" style="color:#393A34">=</span><span class="token string" style="color:#e3116c">"yolo26n.pt"</span><span class="token punctuation" style="color:#393A34">,</span><span class="token plain"> description</span><span class="token operator" style="color:#393A34">=</span><span class="token string" style="color:#e3116c">"YOLO model filename"</span><span class="token plain"></span><br></div><div class="token-line" style="color:#393A34"><span class="token plain"></span><span class="token punctuation" style="color:#393A34">)</span><br></div></code></pre></div></div>
<p>The other parameters are similarly structured.</p>
<p>The launch description then defines the nodes to be launched. For example, the <code>yolo26_ros2</code> node <a href="https://github.com/mikelikesrobots/yolo26_ros2/blob/main/launch/yolo_camera.launch.py#L34-L47" target="_blank" rel="noopener noreferrer" class="">looks like this</a>:</p>
<div class="language-python codeBlockContainer_Ckt0 theme-code-block" style="--prism-color:#393A34;--prism-background-color:#f6f8fa"><div class="codeBlockContent_QJqH"><pre tabindex="0" class="prism-code language-python codeBlock_bY9V thin-scrollbar" style="color:#393A34;background-color:#f6f8fa"><code class="codeBlockLines_e6Vv"><div class="token-line" style="color:#393A34"><span class="token plain">yolo_node </span><span class="token operator" style="color:#393A34">=</span><span class="token plain"> Node</span><span class="token punctuation" style="color:#393A34">(</span><span class="token plain"></span><br></div><div class="token-line" style="color:#393A34"><span class="token plain">    package</span><span class="token operator" style="color:#393A34">=</span><span class="token string" style="color:#e3116c">"yolo26_ros2"</span><span class="token punctuation" style="color:#393A34">,</span><span class="token plain"></span><br></div><div class="token-line" style="color:#393A34"><span class="token plain">    executable</span><span class="token operator" style="color:#393A34">=</span><span class="token string" style="color:#e3116c">"yolo26_ros2"</span><span class="token punctuation" style="color:#393A34">,</span><span class="token plain"></span><br></div><div class="token-line" style="color:#393A34"><span class="token plain">    name</span><span class="token operator" style="color:#393A34">=</span><span class="token string" style="color:#e3116c">"yolo_detector"</span><span class="token punctuation" style="color:#393A34">,</span><span class="token plain"></span><br></div><div class="token-line" style="color:#393A34"><span class="token plain">    parameters</span><span class="token operator" style="color:#393A34">=</span><span class="token punctuation" style="color:#393A34">[</span><span class="token plain"></span><br></div><div class="token-line" style="color:#393A34"><span class="token plain">        </span><span class="token punctuation" style="color:#393A34">{</span><span class="token plain"></span><br></div><div class="token-line" style="color:#393A34"><span class="token plain">            </span><span class="token string" style="color:#e3116c">"image_topic"</span><span class="token punctuation" style="color:#393A34">:</span><span class="token plain"> LaunchConfiguration</span><span class="token punctuation" style="color:#393A34">(</span><span class="token string" style="color:#e3116c">"image_topic"</span><span class="token punctuation" style="color:#393A34">)</span><span class="token punctuation" style="color:#393A34">,</span><span class="token plain"></span><br></div><div class="token-line" style="color:#393A34"><span class="token plain">            </span><span class="token string" style="color:#e3116c">"detections_topic"</span><span class="token punctuation" style="color:#393A34">:</span><span class="token plain"> LaunchConfiguration</span><span class="token punctuation" style="color:#393A34">(</span><span class="token string" style="color:#e3116c">"detections_topic"</span><span class="token punctuation" style="color:#393A34">)</span><span class="token punctuation" style="color:#393A34">,</span><span class="token plain"></span><br></div><div class="token-line" style="color:#393A34"><span class="token plain">            </span><span class="token string" style="color:#e3116c">"annotated_image_topic"</span><span class="token punctuation" style="color:#393A34">:</span><span class="token plain"> LaunchConfiguration</span><span class="token punctuation" style="color:#393A34">(</span><span class="token string" style="color:#e3116c">"annotated_image_topic"</span><span class="token punctuation" style="color:#393A34">)</span><span class="token punctuation" style="color:#393A34">,</span><span class="token plain"></span><br></div><div class="token-line" style="color:#393A34"><span class="token plain">            </span><span class="token string" style="color:#e3116c">"model_name"</span><span class="token punctuation" style="color:#393A34">:</span><span class="token plain"> LaunchConfiguration</span><span class="token punctuation" style="color:#393A34">(</span><span class="token string" style="color:#e3116c">"model_name"</span><span class="token punctuation" style="color:#393A34">)</span><span class="token punctuation" style="color:#393A34">,</span><span class="token plain"></span><br></div><div class="token-line" style="color:#393A34"><span class="token plain">        </span><span class="token punctuation" style="color:#393A34">}</span><span class="token plain"></span><br></div><div class="token-line" style="color:#393A34"><span class="token plain">    </span><span class="token punctuation" style="color:#393A34">]</span><span class="token punctuation" style="color:#393A34">,</span><span class="token plain"></span><br></div><div class="token-line" style="color:#393A34"><span class="token plain">    output</span><span class="token operator" style="color:#393A34">=</span><span class="token string" style="color:#e3116c">"screen"</span><span class="token punctuation" style="color:#393A34">,</span><span class="token plain"></span><br></div><div class="token-line" style="color:#393A34"><span class="token plain"></span><span class="token punctuation" style="color:#393A34">)</span><br></div></code></pre></div></div>
<p>This defines that the <code>yolo26_ros2</code> executable from the <code>yolo26_ros2</code> package should be run with the given parameters, and the node name should be <code>yolo_detector</code>. The <code>output</code> argument just says that the log statements should be printed to the screen when the launch file is run.</p>
<p>Finally, the parameters and nodes are <a href="https://github.com/mikelikesrobots/yolo26_ros2/blob/main/launch/yolo_camera.launch.py#L49-L58" target="_blank" rel="noopener noreferrer" class="">collected together into one list</a>, which forms the <code>LaunchDescription</code>.</p>
<div class="language-python codeBlockContainer_Ckt0 theme-code-block" style="--prism-color:#393A34;--prism-background-color:#f6f8fa"><div class="codeBlockContent_QJqH"><pre tabindex="0" class="prism-code language-python codeBlock_bY9V thin-scrollbar" style="color:#393A34;background-color:#f6f8fa"><code class="codeBlockLines_e6Vv"><div class="token-line" style="color:#393A34"><span class="token keyword" style="color:#00009f">return</span><span class="token plain"> LaunchDescription</span><span class="token punctuation" style="color:#393A34">(</span><span class="token plain"></span><br></div><div class="token-line" style="color:#393A34"><span class="token plain">    </span><span class="token punctuation" style="color:#393A34">[</span><span class="token plain"></span><br></div><div class="token-line" style="color:#393A34"><span class="token plain">        model_name_arg</span><span class="token punctuation" style="color:#393A34">,</span><span class="token plain"></span><br></div><div class="token-line" style="color:#393A34"><span class="token plain">        image_topic_arg</span><span class="token punctuation" style="color:#393A34">,</span><span class="token plain"></span><br></div><div class="token-line" style="color:#393A34"><span class="token plain">        detections_topic_arg</span><span class="token punctuation" style="color:#393A34">,</span><span class="token plain"></span><br></div><div class="token-line" style="color:#393A34"><span class="token plain">        annotated_image_topic_arg</span><span class="token punctuation" style="color:#393A34">,</span><span class="token plain"></span><br></div><div class="token-line" style="color:#393A34"><span class="token plain">        usb_cam_node</span><span class="token punctuation" style="color:#393A34">,</span><span class="token plain"></span><br></div><div class="token-line" style="color:#393A34"><span class="token plain">        yolo_node</span><span class="token punctuation" style="color:#393A34">,</span><span class="token plain"></span><br></div><div class="token-line" style="color:#393A34"><span class="token plain">    </span><span class="token punctuation" style="color:#393A34">]</span><span class="token plain"></span><br></div><div class="token-line" style="color:#393A34"><span class="token plain"></span><span class="token punctuation" style="color:#393A34">)</span><br></div></code></pre></div></div>
<h3 class="anchor anchorTargetStickyNavbar_Vzrq" id="yolo26_ros2-node"><code>yolo26_ros2</code> Node<a href="https://mikelikesrobots.github.io/blog/ultralytics-yolo26-computer-vision#yolo26_ros2-node" class="hash-link" aria-label="Direct link to yolo26_ros2-node" title="Direct link to yolo26_ros2-node" translate="no">​</a></h3>
<p>This node (<a href="https://github.com/mikelikesrobots/yolo26_ros2/blob/main/yolo26_ros2/yolo26_ros2.py" target="_blank" rel="noopener noreferrer" class=""><code>yolo26_ros2/yolo26_ros2.py</code></a>) is where most of the work is being done. Let's go through the file section by section to see how it all fits together.</p>
<p>The first section contains imports for the package. This is standard Python, so we will skip past.</p>
<p>The next line creates a class for the detector node, which extends the ROS 2 Node class. It creates a Python constructor and calls the Node's constructor with the node name (<a href="https://github.com/mikelikesrobots/yolo26_ros2/blob/main/yolo26_ros2/yolo26_ros2.py#L13-L15" target="_blank" rel="noopener noreferrer" class="">source</a>).</p>
<div class="language-python codeBlockContainer_Ckt0 theme-code-block" style="--prism-color:#393A34;--prism-background-color:#f6f8fa"><div class="codeBlockContent_QJqH"><pre tabindex="0" class="prism-code language-python codeBlock_bY9V thin-scrollbar" style="color:#393A34;background-color:#f6f8fa"><code class="codeBlockLines_e6Vv"><div class="token-line" style="color:#393A34"><span class="token keyword" style="color:#00009f">class</span><span class="token plain"> </span><span class="token class-name">YoloDetectorNode</span><span class="token punctuation" style="color:#393A34">(</span><span class="token plain">Node</span><span class="token punctuation" style="color:#393A34">)</span><span class="token punctuation" style="color:#393A34">:</span><span class="token plain"></span><br></div><div class="token-line" style="color:#393A34"><span class="token plain">    </span><span class="token keyword" style="color:#00009f">def</span><span class="token plain"> </span><span class="token function" style="color:#d73a49">__init__</span><span class="token punctuation" style="color:#393A34">(</span><span class="token plain">self</span><span class="token punctuation" style="color:#393A34">)</span><span class="token punctuation" style="color:#393A34">:</span><span class="token plain"></span><br></div><div class="token-line" style="color:#393A34"><span class="token plain">        </span><span class="token builtin">super</span><span class="token punctuation" style="color:#393A34">(</span><span class="token punctuation" style="color:#393A34">)</span><span class="token punctuation" style="color:#393A34">.</span><span class="token plain">__init__</span><span class="token punctuation" style="color:#393A34">(</span><span class="token string" style="color:#e3116c">"yolo_detector"</span><span class="token punctuation" style="color:#393A34">)</span><br></div></code></pre></div></div>
<p>The function continues by <a href="https://github.com/mikelikesrobots/yolo26_ros2/blob/main/yolo26_ros2/yolo26_ros2.py#L17-L27" target="_blank" rel="noopener noreferrer" class="">setting up parameters</a>. These are ways to configure the node's behaviour, such as changing the YOLO mode to be used. Each parameter is declared to ROS 2, then the value of that parameter is retrieved from ROS 2.</p>
<div class="language-python codeBlockContainer_Ckt0 theme-code-block" style="--prism-color:#393A34;--prism-background-color:#f6f8fa"><div class="codeBlockContent_QJqH"><pre tabindex="0" class="prism-code language-python codeBlock_bY9V thin-scrollbar" style="color:#393A34;background-color:#f6f8fa"><code class="codeBlockLines_e6Vv"><div class="token-line" style="color:#393A34"><span class="token comment" style="color:#999988;font-style:italic"># Declare parameters</span><span class="token plain"></span><br></div><div class="token-line" style="color:#393A34"><span class="token plain">self</span><span class="token punctuation" style="color:#393A34">.</span><span class="token plain">declare_parameter</span><span class="token punctuation" style="color:#393A34">(</span><span class="token string" style="color:#e3116c">"image_topic"</span><span class="token punctuation" style="color:#393A34">,</span><span class="token plain"> </span><span class="token string" style="color:#e3116c">"/image_raw"</span><span class="token punctuation" style="color:#393A34">)</span><span class="token plain"></span><br></div><div class="token-line" style="color:#393A34"><span class="token plain">self</span><span class="token punctuation" style="color:#393A34">.</span><span class="token plain">declare_parameter</span><span class="token punctuation" style="color:#393A34">(</span><span class="token string" style="color:#e3116c">"detections_topic"</span><span class="token punctuation" style="color:#393A34">,</span><span class="token plain"> </span><span class="token string" style="color:#e3116c">"/detections"</span><span class="token punctuation" style="color:#393A34">)</span><span class="token plain"></span><br></div><div class="token-line" style="color:#393A34"><span class="token plain">self</span><span class="token punctuation" style="color:#393A34">.</span><span class="token plain">declare_parameter</span><span class="token punctuation" style="color:#393A34">(</span><span class="token string" style="color:#e3116c">"annotated_image_topic"</span><span class="token punctuation" style="color:#393A34">,</span><span class="token plain"> </span><span class="token string" style="color:#e3116c">"/image_annotated"</span><span class="token punctuation" style="color:#393A34">)</span><span class="token plain"></span><br></div><div class="token-line" style="color:#393A34"><span class="token plain">self</span><span class="token punctuation" style="color:#393A34">.</span><span class="token plain">declare_parameter</span><span class="token punctuation" style="color:#393A34">(</span><span class="token string" style="color:#e3116c">"model_name"</span><span class="token punctuation" style="color:#393A34">,</span><span class="token plain"> </span><span class="token string" style="color:#e3116c">"yolo26n.pt"</span><span class="token punctuation" style="color:#393A34">)</span><span class="token plain"></span><br></div><div class="token-line" style="color:#393A34"><span class="token plain" style="display:inline-block"></span><br></div><div class="token-line" style="color:#393A34"><span class="token plain"></span><span class="token comment" style="color:#999988;font-style:italic"># Get parameters</span><span class="token plain"></span><br></div><div class="token-line" style="color:#393A34"><span class="token plain">image_topic </span><span class="token operator" style="color:#393A34">=</span><span class="token plain"> self</span><span class="token punctuation" style="color:#393A34">.</span><span class="token plain">get_parameter</span><span class="token punctuation" style="color:#393A34">(</span><span class="token string" style="color:#e3116c">"image_topic"</span><span class="token punctuation" style="color:#393A34">)</span><span class="token punctuation" style="color:#393A34">.</span><span class="token plain">value</span><br></div><div class="token-line" style="color:#393A34"><span class="token plain">detections_topic </span><span class="token operator" style="color:#393A34">=</span><span class="token plain"> self</span><span class="token punctuation" style="color:#393A34">.</span><span class="token plain">get_parameter</span><span class="token punctuation" style="color:#393A34">(</span><span class="token string" style="color:#e3116c">"detections_topic"</span><span class="token punctuation" style="color:#393A34">)</span><span class="token punctuation" style="color:#393A34">.</span><span class="token plain">value</span><br></div><div class="token-line" style="color:#393A34"><span class="token plain">model_name </span><span class="token operator" style="color:#393A34">=</span><span class="token plain"> self</span><span class="token punctuation" style="color:#393A34">.</span><span class="token plain">get_parameter</span><span class="token punctuation" style="color:#393A34">(</span><span class="token string" style="color:#e3116c">"model_name"</span><span class="token punctuation" style="color:#393A34">)</span><span class="token punctuation" style="color:#393A34">.</span><span class="token plain">value</span><br></div><div class="token-line" style="color:#393A34"><span class="token plain">annotated_image_topic </span><span class="token operator" style="color:#393A34">=</span><span class="token plain"> self</span><span class="token punctuation" style="color:#393A34">.</span><span class="token plain">get_parameter</span><span class="token punctuation" style="color:#393A34">(</span><span class="token string" style="color:#e3116c">"annotated_image_topic"</span><span class="token punctuation" style="color:#393A34">)</span><span class="token punctuation" style="color:#393A34">.</span><span class="token plain">value</span><br></div></code></pre></div></div>
<p>The node sets up a <code>CvBridge</code> and finds the right location to load the model from, then constructs the model (<a href="https://github.com/mikelikesrobots/yolo26_ros2/blob/main/yolo26_ros2/yolo26_ros2.py#L32-L38" target="_blank" rel="noopener noreferrer" class="">source</a>). This is the point where the <code>ultralytics</code> library will automatically download the model if it's not already available on disk.</p>
<div class="language-python codeBlockContainer_Ckt0 theme-code-block" style="--prism-color:#393A34;--prism-background-color:#f6f8fa"><div class="codeBlockContent_QJqH"><pre tabindex="0" class="prism-code language-python codeBlock_bY9V thin-scrollbar" style="color:#393A34;background-color:#f6f8fa"><code class="codeBlockLines_e6Vv"><div class="token-line" style="color:#393A34"><span class="token comment" style="color:#999988;font-style:italic"># Load YOLO model from package share directory</span><span class="token plain"></span><br></div><div class="token-line" style="color:#393A34"><span class="token plain">package_share_dir </span><span class="token operator" style="color:#393A34">=</span><span class="token plain"> get_package_share_directory</span><span class="token punctuation" style="color:#393A34">(</span><span class="token string" style="color:#e3116c">"yolo26_ros2"</span><span class="token punctuation" style="color:#393A34">)</span><span class="token plain"></span><br></div><div class="token-line" style="color:#393A34"><span class="token plain">full_model_path </span><span class="token operator" style="color:#393A34">=</span><span class="token plain"> os</span><span class="token punctuation" style="color:#393A34">.</span><span class="token plain">path</span><span class="token punctuation" style="color:#393A34">.</span><span class="token plain">join</span><span class="token punctuation" style="color:#393A34">(</span><span class="token plain">package_share_dir</span><span class="token punctuation" style="color:#393A34">,</span><span class="token plain"> </span><span class="token string" style="color:#e3116c">"models"</span><span class="token punctuation" style="color:#393A34">,</span><span class="token plain"> model_name</span><span class="token punctuation" style="color:#393A34">)</span><span class="token plain"></span><br></div><div class="token-line" style="color:#393A34"><span class="token plain" style="display:inline-block"></span><br></div><div class="token-line" style="color:#393A34"><span class="token plain">self</span><span class="token punctuation" style="color:#393A34">.</span><span class="token plain">get_logger</span><span class="token punctuation" style="color:#393A34">(</span><span class="token punctuation" style="color:#393A34">)</span><span class="token punctuation" style="color:#393A34">.</span><span class="token plain">info</span><span class="token punctuation" style="color:#393A34">(</span><span class="token string-interpolation string" style="color:#e3116c">f"Loading YOLO model from: </span><span class="token string-interpolation interpolation punctuation" style="color:#393A34">{</span><span class="token string-interpolation interpolation">full_model_path</span><span class="token string-interpolation interpolation punctuation" style="color:#393A34">}</span><span class="token string-interpolation string" style="color:#e3116c">"</span><span class="token punctuation" style="color:#393A34">)</span><span class="token plain"></span><br></div><div class="token-line" style="color:#393A34"><span class="token plain">self</span><span class="token punctuation" style="color:#393A34">.</span><span class="token plain">model </span><span class="token operator" style="color:#393A34">=</span><span class="token plain"> YOLO</span><span class="token punctuation" style="color:#393A34">(</span><span class="token plain">full_model_path</span><span class="token punctuation" style="color:#393A34">)</span><span class="token plain"></span><br></div><div class="token-line" style="color:#393A34"><span class="token plain">self</span><span class="token punctuation" style="color:#393A34">.</span><span class="token plain">get_logger</span><span class="token punctuation" style="color:#393A34">(</span><span class="token punctuation" style="color:#393A34">)</span><span class="token punctuation" style="color:#393A34">.</span><span class="token plain">info</span><span class="token punctuation" style="color:#393A34">(</span><span class="token string" style="color:#e3116c">"YOLO model loaded successfully"</span><span class="token punctuation" style="color:#393A34">)</span><br></div></code></pre></div></div>
<p>The model is now loaded and ready for use!</p>
<p>The <a href="https://github.com/mikelikesrobots/yolo26_ros2/blob/main/yolo26_ros2/yolo26_ros2.py#L40-L46" target="_blank" rel="noopener noreferrer" class="">next lines</a> set up the publishers and subscribers for ROS 2. One subscriber subscribes to Image messages from the camera, giving an <code>image_callback</code> function as an argument, which is called whenever an Image message is received. The other lines set up publishers which can publish messages later in the code.</p>
<div class="language-python codeBlockContainer_Ckt0 theme-code-block" style="--prism-color:#393A34;--prism-background-color:#f6f8fa"><div class="codeBlockContent_QJqH"><pre tabindex="0" class="prism-code language-python codeBlock_bY9V thin-scrollbar" style="color:#393A34;background-color:#f6f8fa"><code class="codeBlockLines_e6Vv"><div class="token-line" style="color:#393A34"><span class="token comment" style="color:#999988;font-style:italic"># Create subscriber and publishers</span><span class="token plain"></span><br></div><div class="token-line" style="color:#393A34"><span class="token plain">self</span><span class="token punctuation" style="color:#393A34">.</span><span class="token plain">img_sub </span><span class="token operator" style="color:#393A34">=</span><span class="token plain"> self</span><span class="token punctuation" style="color:#393A34">.</span><span class="token plain">create_subscription</span><span class="token punctuation" style="color:#393A34">(</span><span class="token plain">Image</span><span class="token punctuation" style="color:#393A34">,</span><span class="token plain"> image_topic</span><span class="token punctuation" style="color:#393A34">,</span><span class="token plain"> self</span><span class="token punctuation" style="color:#393A34">.</span><span class="token plain">image_callback</span><span class="token punctuation" style="color:#393A34">,</span><span class="token plain"> </span><span class="token number" style="color:#36acaa">10</span><span class="token punctuation" style="color:#393A34">)</span><span class="token plain"></span><br></div><div class="token-line" style="color:#393A34"><span class="token plain">self</span><span class="token punctuation" style="color:#393A34">.</span><span class="token plain">det_pub </span><span class="token operator" style="color:#393A34">=</span><span class="token plain"> self</span><span class="token punctuation" style="color:#393A34">.</span><span class="token plain">create_publisher</span><span class="token punctuation" style="color:#393A34">(</span><span class="token plain">Detection2DArray</span><span class="token punctuation" style="color:#393A34">,</span><span class="token plain"> detections_topic</span><span class="token punctuation" style="color:#393A34">,</span><span class="token plain"> </span><span class="token number" style="color:#36acaa">10</span><span class="token punctuation" style="color:#393A34">)</span><span class="token plain"></span><br></div><div class="token-line" style="color:#393A34"><span class="token plain">self</span><span class="token punctuation" style="color:#393A34">.</span><span class="token plain">annotated_img_pub </span><span class="token operator" style="color:#393A34">=</span><span class="token plain"> self</span><span class="token punctuation" style="color:#393A34">.</span><span class="token plain">create_publisher</span><span class="token punctuation" style="color:#393A34">(</span><span class="token plain">Image</span><span class="token punctuation" style="color:#393A34">,</span><span class="token plain"> annotated_image_topic</span><span class="token punctuation" style="color:#393A34">,</span><span class="token plain"> </span><span class="token number" style="color:#36acaa">10</span><span class="token punctuation" style="color:#393A34">)</span><span class="token plain"></span><br></div><div class="token-line" style="color:#393A34"><span class="token plain">self</span><span class="token punctuation" style="color:#393A34">.</span><span class="token plain">compressed_img_pub </span><span class="token operator" style="color:#393A34">=</span><span class="token plain"> self</span><span class="token punctuation" style="color:#393A34">.</span><span class="token plain">create_publisher</span><span class="token punctuation" style="color:#393A34">(</span><span class="token plain"></span><br></div><div class="token-line" style="color:#393A34"><span class="token plain">    CompressedImage</span><span class="token punctuation" style="color:#393A34">,</span><span class="token plain"> annotated_image_topic </span><span class="token operator" style="color:#393A34">+</span><span class="token plain"> </span><span class="token string" style="color:#e3116c">"/compressed"</span><span class="token punctuation" style="color:#393A34">,</span><span class="token plain"> </span><span class="token number" style="color:#36acaa">10</span><span class="token plain"></span><br></div><div class="token-line" style="color:#393A34"><span class="token plain"></span><span class="token punctuation" style="color:#393A34">)</span><br></div></code></pre></div></div>
<p>Every time an Image is received by the node, it calls the <a href="https://github.com/mikelikesrobots/yolo26_ros2/blob/main/yolo26_ros2/yolo26_ros2.py#L51-L54" target="_blank" rel="noopener noreferrer" class=""><code>image_callback</code> function</a> with that message as an argument. The function immediately converts the message from the ROS 2 Image message to the OpenCV format, which can be passed to the loaded model.</p>
<div class="language-python codeBlockContainer_Ckt0 theme-code-block" style="--prism-color:#393A34;--prism-background-color:#f6f8fa"><div class="codeBlockContent_QJqH"><pre tabindex="0" class="prism-code language-python codeBlock_bY9V thin-scrollbar" style="color:#393A34;background-color:#f6f8fa"><code class="codeBlockLines_e6Vv"><div class="token-line" style="color:#393A34"><span class="token keyword" style="color:#00009f">def</span><span class="token plain"> </span><span class="token function" style="color:#d73a49">image_callback</span><span class="token punctuation" style="color:#393A34">(</span><span class="token plain">self</span><span class="token punctuation" style="color:#393A34">,</span><span class="token plain"> msg</span><span class="token punctuation" style="color:#393A34">)</span><span class="token punctuation" style="color:#393A34">:</span><span class="token plain"></span><br></div><div class="token-line" style="color:#393A34"><span class="token plain">    </span><span class="token keyword" style="color:#00009f">try</span><span class="token punctuation" style="color:#393A34">:</span><span class="token plain"></span><br></div><div class="token-line" style="color:#393A34"><span class="token plain">        </span><span class="token comment" style="color:#999988;font-style:italic"># Convert ROS Image to OpenCV format</span><span class="token plain"></span><br></div><div class="token-line" style="color:#393A34"><span class="token plain">        cv_image </span><span class="token operator" style="color:#393A34">=</span><span class="token plain"> self</span><span class="token punctuation" style="color:#393A34">.</span><span class="token plain">bridge</span><span class="token punctuation" style="color:#393A34">.</span><span class="token plain">imgmsg_to_cv2</span><span class="token punctuation" style="color:#393A34">(</span><span class="token plain">msg</span><span class="token punctuation" style="color:#393A34">,</span><span class="token plain"> desired_encoding</span><span class="token operator" style="color:#393A34">=</span><span class="token string" style="color:#e3116c">'bgr8'</span><span class="token punctuation" style="color:#393A34">)</span><br></div></code></pre></div></div>
<p>The model can then <a href="https://github.com/mikelikesrobots/yolo26_ros2/blob/main/yolo26_ros2/yolo26_ros2.py#L56-L57" target="_blank" rel="noopener noreferrer" class="">perform inference</a> on the image:</p>
<div class="language-python codeBlockContainer_Ckt0 theme-code-block" style="--prism-color:#393A34;--prism-background-color:#f6f8fa"><div class="codeBlockContent_QJqH"><pre tabindex="0" class="prism-code language-python codeBlock_bY9V thin-scrollbar" style="color:#393A34;background-color:#f6f8fa"><code class="codeBlockLines_e6Vv"><div class="token-line" style="color:#393A34"><span class="token comment" style="color:#999988;font-style:italic"># Run YOLO detection</span><span class="token plain"></span><br></div><div class="token-line" style="color:#393A34"><span class="token plain">results </span><span class="token operator" style="color:#393A34">=</span><span class="token plain"> self</span><span class="token punctuation" style="color:#393A34">.</span><span class="token plain">model</span><span class="token punctuation" style="color:#393A34">(</span><span class="token plain">cv_image</span><span class="token punctuation" style="color:#393A34">,</span><span class="token plain"> verbose</span><span class="token operator" style="color:#393A34">=</span><span class="token boolean" style="color:#36acaa">False</span><span class="token punctuation" style="color:#393A34">)</span><br></div></code></pre></div></div>
<div class="theme-admonition theme-admonition-info admonition_xJq3 alert alert--info"><div class="admonitionHeading_Gvgb"><span class="admonitionIcon_Rf37"><svg viewBox="0 0 14 16"><path fill-rule="evenodd" d="M7 2.3c3.14 0 5.7 2.56 5.7 5.7s-2.56 5.7-5.7 5.7A5.71 5.71 0 0 1 1.3 8c0-3.14 2.56-5.7 5.7-5.7zM7 1C3.14 1 0 4.14 0 8s3.14 7 7 7 7-3.14 7-7-3.14-7-7-7zm1 3H6v5h2V4zm0 6H6v2h2v-2z"></path></svg></span>Ultralytics Code</div><div class="admonitionContent_BuS1"><p>So far the only two lines from the <code>ultralytics</code> package have been to load the model and then use the model to perform inference on an image. These lines respectively are:</p><div class="language-python codeBlockContainer_Ckt0 theme-code-block" style="--prism-color:#393A34;--prism-background-color:#f6f8fa"><div class="codeBlockContent_QJqH"><pre tabindex="0" class="prism-code language-python codeBlock_bY9V thin-scrollbar" style="color:#393A34;background-color:#f6f8fa"><code class="codeBlockLines_e6Vv"><div class="token-line" style="color:#393A34"><span class="token plain">self</span><span class="token punctuation" style="color:#393A34">.</span><span class="token plain">model </span><span class="token operator" style="color:#393A34">=</span><span class="token plain"> YOLO</span><span class="token punctuation" style="color:#393A34">(</span><span class="token plain">full_model_path</span><span class="token punctuation" style="color:#393A34">)</span><span class="token plain"></span><br></div><div class="token-line" style="color:#393A34"><span class="token plain">results </span><span class="token operator" style="color:#393A34">=</span><span class="token plain"> self</span><span class="token punctuation" style="color:#393A34">.</span><span class="token plain">model</span><span class="token punctuation" style="color:#393A34">(</span><span class="token plain">cv_image</span><span class="token punctuation" style="color:#393A34">,</span><span class="token plain"> verbose</span><span class="token operator" style="color:#393A34">=</span><span class="token boolean" style="color:#36acaa">False</span><span class="token punctuation" style="color:#393A34">)</span><br></div></code></pre></div></div><p>The rest of the code has all been code for interacting with ROS 2 so the node can run on the robot. The Ultralytics part has been very simple!</p></div></div>
<p>Now that the node has the results of the inference, it can package it up into the three different outputs. First, it goes over all the results and <a href="https://github.com/mikelikesrobots/yolo26_ros2/blob/main/yolo26_ros2/yolo26_ros2.py#L59-L110" target="_blank" rel="noopener noreferrer" class="">builds a <code>Detection2DArray</code> message</a>:</p>
<div class="language-python codeBlockContainer_Ckt0 theme-code-block" style="--prism-color:#393A34;--prism-background-color:#f6f8fa"><div class="codeBlockContent_QJqH"><pre tabindex="0" class="prism-code language-python codeBlock_bY9V thin-scrollbar" style="color:#393A34;background-color:#f6f8fa"><code class="codeBlockLines_e6Vv"><div class="token-line" style="color:#393A34"><span class="token comment" style="color:#999988;font-style:italic"># Create Detection2DArray message</span><span class="token plain"></span><br></div><div class="token-line" style="color:#393A34"><span class="token plain">detection_array </span><span class="token operator" style="color:#393A34">=</span><span class="token plain"> Detection2DArray</span><span class="token punctuation" style="color:#393A34">(</span><span class="token punctuation" style="color:#393A34">)</span><span class="token plain"></span><br></div><div class="token-line" style="color:#393A34"><span class="token plain">detection_array</span><span class="token punctuation" style="color:#393A34">.</span><span class="token plain">header </span><span class="token operator" style="color:#393A34">=</span><span class="token plain"> msg</span><span class="token punctuation" style="color:#393A34">.</span><span class="token plain">header</span><br></div><div class="token-line" style="color:#393A34"><span class="token plain" style="display:inline-block"></span><br></div><div class="token-line" style="color:#393A34"><span class="token plain"></span><span class="token comment" style="color:#999988;font-style:italic"># Process each detection</span><span class="token plain"></span><br></div><div class="token-line" style="color:#393A34"><span class="token plain"></span><span class="token keyword" style="color:#00009f">for</span><span class="token plain"> result </span><span class="token keyword" style="color:#00009f">in</span><span class="token plain"> results</span><span class="token punctuation" style="color:#393A34">:</span><span class="token plain"></span><br></div><div class="token-line" style="color:#393A34"><span class="token plain">    boxes </span><span class="token operator" style="color:#393A34">=</span><span class="token plain"> result</span><span class="token punctuation" style="color:#393A34">.</span><span class="token plain">boxes</span><br></div><div class="token-line" style="color:#393A34"><span class="token plain">    </span><span class="token keyword" style="color:#00009f">for</span><span class="token plain"> box </span><span class="token keyword" style="color:#00009f">in</span><span class="token plain"> boxes</span><span class="token punctuation" style="color:#393A34">:</span><span class="token plain"></span><br></div><div class="token-line" style="color:#393A34"><span class="token plain">        detection </span><span class="token operator" style="color:#393A34">=</span><span class="token plain"> Detection2D</span><span class="token punctuation" style="color:#393A34">(</span><span class="token punctuation" style="color:#393A34">)</span><span class="token plain"></span><br></div><div class="token-line" style="color:#393A34"><span class="token plain"></span><span class="token punctuation" style="color:#393A34">.</span><span class="token punctuation" style="color:#393A34">.</span><span class="token punctuation" style="color:#393A34">.</span><span class="token plain"></span><br></div><div class="token-line" style="color:#393A34"><span class="token plain"></span><span class="token comment" style="color:#999988;font-style:italic"># Publish detections and annotated image</span><span class="token plain"></span><br></div><div class="token-line" style="color:#393A34"><span class="token plain">self</span><span class="token punctuation" style="color:#393A34">.</span><span class="token plain">det_pub</span><span class="token punctuation" style="color:#393A34">.</span><span class="token plain">publish</span><span class="token punctuation" style="color:#393A34">(</span><span class="token plain">detection_array</span><span class="token punctuation" style="color:#393A34">)</span><br></div></code></pre></div></div>
<p>The lines I've skipped are building the individual <code>Detection2D</code> messages from the results of the inference.</p>
<p>The node also takes the original image and adds green rectangles, class labels, and score percentages for each one (<a href="https://github.com/mikelikesrobots/yolo26_ros2/blob/main/yolo26_ros2/yolo26_ros2.py#L83-L114" target="_blank" rel="noopener noreferrer" class="">source</a>):</p>
<div class="language-python codeBlockContainer_Ckt0 theme-code-block" style="--prism-color:#393A34;--prism-background-color:#f6f8fa"><div class="codeBlockContent_QJqH"><pre tabindex="0" class="prism-code language-python codeBlock_bY9V thin-scrollbar" style="color:#393A34;background-color:#f6f8fa"><code class="codeBlockLines_e6Vv"><div class="token-line" style="color:#393A34"><span class="token plain">cv2</span><span class="token punctuation" style="color:#393A34">.</span><span class="token plain">rectangle</span><span class="token punctuation" style="color:#393A34">(</span><span class="token plain">cv_image</span><span class="token punctuation" style="color:#393A34">,</span><span class="token plain"> </span><span class="token punctuation" style="color:#393A34">(</span><span class="token plain">x1</span><span class="token punctuation" style="color:#393A34">,</span><span class="token plain"> y1</span><span class="token punctuation" style="color:#393A34">)</span><span class="token punctuation" style="color:#393A34">,</span><span class="token plain"> </span><span class="token punctuation" style="color:#393A34">(</span><span class="token plain">x2</span><span class="token punctuation" style="color:#393A34">,</span><span class="token plain"> y2</span><span class="token punctuation" style="color:#393A34">)</span><span class="token punctuation" style="color:#393A34">,</span><span class="token plain"> </span><span class="token punctuation" style="color:#393A34">(</span><span class="token number" style="color:#36acaa">0</span><span class="token punctuation" style="color:#393A34">,</span><span class="token plain"> </span><span class="token number" style="color:#36acaa">255</span><span class="token punctuation" style="color:#393A34">,</span><span class="token plain"> </span><span class="token number" style="color:#36acaa">0</span><span class="token punctuation" style="color:#393A34">)</span><span class="token punctuation" style="color:#393A34">,</span><span class="token plain"> </span><span class="token number" style="color:#36acaa">2</span><span class="token punctuation" style="color:#393A34">)</span><span class="token plain"></span><br></div><div class="token-line" style="color:#393A34"><span class="token plain">label </span><span class="token operator" style="color:#393A34">=</span><span class="token plain"> </span><span class="token builtin">int</span><span class="token punctuation" style="color:#393A34">(</span><span class="token plain">box</span><span class="token punctuation" style="color:#393A34">.</span><span class="token plain">cls</span><span class="token punctuation" style="color:#393A34">[</span><span class="token number" style="color:#36acaa">0</span><span class="token punctuation" style="color:#393A34">]</span><span class="token punctuation" style="color:#393A34">)</span><span class="token plain"></span><br></div><div class="token-line" style="color:#393A34"><span class="token plain">label_readable </span><span class="token operator" style="color:#393A34">=</span><span class="token plain"> self</span><span class="token punctuation" style="color:#393A34">.</span><span class="token plain">model</span><span class="token punctuation" style="color:#393A34">.</span><span class="token plain">names</span><span class="token punctuation" style="color:#393A34">[</span><span class="token plain">label</span><span class="token punctuation" style="color:#393A34">]</span><span class="token plain"></span><br></div><div class="token-line" style="color:#393A34"><span class="token plain">score </span><span class="token operator" style="color:#393A34">=</span><span class="token plain"> </span><span class="token builtin">float</span><span class="token punctuation" style="color:#393A34">(</span><span class="token plain">box</span><span class="token punctuation" style="color:#393A34">.</span><span class="token plain">conf</span><span class="token punctuation" style="color:#393A34">[</span><span class="token number" style="color:#36acaa">0</span><span class="token punctuation" style="color:#393A34">]</span><span class="token punctuation" style="color:#393A34">)</span><span class="token plain"></span><br></div><div class="token-line" style="color:#393A34"><span class="token plain">cv2</span><span class="token punctuation" style="color:#393A34">.</span><span class="token plain">putText</span><span class="token punctuation" style="color:#393A34">(</span><span class="token punctuation" style="color:#393A34">.</span><span class="token punctuation" style="color:#393A34">.</span><span class="token punctuation" style="color:#393A34">.</span><span class="token punctuation" style="color:#393A34">)</span><span class="token plain"></span><br></div><div class="token-line" style="color:#393A34"><span class="token plain">annotated_img_msg </span><span class="token operator" style="color:#393A34">=</span><span class="token plain"> self</span><span class="token punctuation" style="color:#393A34">.</span><span class="token plain">bridge</span><span class="token punctuation" style="color:#393A34">.</span><span class="token plain">cv2_to_imgmsg</span><span class="token punctuation" style="color:#393A34">(</span><span class="token plain">cv_image</span><span class="token punctuation" style="color:#393A34">,</span><span class="token plain"> encoding</span><span class="token operator" style="color:#393A34">=</span><span class="token string" style="color:#e3116c">'bgr8'</span><span class="token punctuation" style="color:#393A34">)</span><span class="token plain"></span><br></div><div class="token-line" style="color:#393A34"><span class="token plain">annotated_img_msg</span><span class="token punctuation" style="color:#393A34">.</span><span class="token plain">header </span><span class="token operator" style="color:#393A34">=</span><span class="token plain"> msg</span><span class="token punctuation" style="color:#393A34">.</span><span class="token plain">header</span><br></div><div class="token-line" style="color:#393A34"><span class="token plain">self</span><span class="token punctuation" style="color:#393A34">.</span><span class="token plain">annotated_img_pub</span><span class="token punctuation" style="color:#393A34">.</span><span class="token plain">publish</span><span class="token punctuation" style="color:#393A34">(</span><span class="token plain">annotated_img_msg</span><span class="token punctuation" style="color:#393A34">)</span><br></div></code></pre></div></div>
<p>One of the key parts of drawing the bounding boxes is labelling the box with what's inside it. However, the model's prediction contains a number rather than a name for the class. That means we need to look up the name from the model. We can look up the name using <a href="https://github.com/mikelikesrobots/yolo26_ros2/blob/main/yolo26_ros2/yolo26_ros2.py#L86" target="_blank" rel="noopener noreferrer" class="">this code</a>:</p>
<div class="language-python codeBlockContainer_Ckt0 theme-code-block" style="--prism-color:#393A34;--prism-background-color:#f6f8fa"><div class="codeBlockContent_QJqH"><pre tabindex="0" class="prism-code language-python codeBlock_bY9V thin-scrollbar" style="color:#393A34;background-color:#f6f8fa"><code class="codeBlockLines_e6Vv"><div class="token-line" style="color:#393A34"><span class="token plain">label_readable </span><span class="token operator" style="color:#393A34">=</span><span class="token plain"> self</span><span class="token punctuation" style="color:#393A34">.</span><span class="token plain">model</span><span class="token punctuation" style="color:#393A34">.</span><span class="token plain">names</span><span class="token punctuation" style="color:#393A34">[</span><span class="token plain">label</span><span class="token punctuation" style="color:#393A34">]</span><br></div></code></pre></div></div>
<p>At this point, the node has published an array of objects it detected in the image, plus the original image annotated with bounding boxes for each detection. The <a href="https://github.com/mikelikesrobots/yolo26_ros2/blob/main/yolo26_ros2/yolo26_ros2.py#L116-L120" target="_blank" rel="noopener noreferrer" class="">last output</a> is simple - it's the JPEG compressed version of the annotated image. This is purely done so that if you are viewing the images across the network like I do, the performance will be much better.</p>
<div class="language-python codeBlockContainer_Ckt0 theme-code-block" style="--prism-color:#393A34;--prism-background-color:#f6f8fa"><div class="codeBlockContent_QJqH"><pre tabindex="0" class="prism-code language-python codeBlock_bY9V thin-scrollbar" style="color:#393A34;background-color:#f6f8fa"><code class="codeBlockLines_e6Vv"><div class="token-line" style="color:#393A34"><span class="token plain">compressed_image_msg </span><span class="token operator" style="color:#393A34">=</span><span class="token plain"> CompressedImage</span><span class="token punctuation" style="color:#393A34">(</span><span class="token punctuation" style="color:#393A34">)</span><span class="token plain"></span><br></div><div class="token-line" style="color:#393A34"><span class="token plain">compressed_image_msg</span><span class="token punctuation" style="color:#393A34">.</span><span class="token plain">header </span><span class="token operator" style="color:#393A34">=</span><span class="token plain"> msg</span><span class="token punctuation" style="color:#393A34">.</span><span class="token plain">header</span><br></div><div class="token-line" style="color:#393A34"><span class="token plain">compressed_image_msg</span><span class="token punctuation" style="color:#393A34">.</span><span class="token builtin">format</span><span class="token plain"> </span><span class="token operator" style="color:#393A34">=</span><span class="token plain"> </span><span class="token string" style="color:#e3116c">"jpeg"</span><span class="token plain"></span><br></div><div class="token-line" style="color:#393A34"><span class="token plain">compressed_image_msg</span><span class="token punctuation" style="color:#393A34">.</span><span class="token plain">data </span><span class="token operator" style="color:#393A34">=</span><span class="token plain"> np</span><span class="token punctuation" style="color:#393A34">.</span><span class="token plain">array</span><span class="token punctuation" style="color:#393A34">(</span><span class="token plain">cv2</span><span class="token punctuation" style="color:#393A34">.</span><span class="token plain">imencode</span><span class="token punctuation" style="color:#393A34">(</span><span class="token string" style="color:#e3116c">".jpg"</span><span class="token punctuation" style="color:#393A34">,</span><span class="token plain"> cv_image</span><span class="token punctuation" style="color:#393A34">)</span><span class="token punctuation" style="color:#393A34">[</span><span class="token number" style="color:#36acaa">1</span><span class="token punctuation" style="color:#393A34">]</span><span class="token punctuation" style="color:#393A34">)</span><span class="token punctuation" style="color:#393A34">.</span><span class="token plain">tobytes</span><span class="token punctuation" style="color:#393A34">(</span><span class="token punctuation" style="color:#393A34">)</span><span class="token plain"></span><br></div><div class="token-line" style="color:#393A34"><span class="token plain">self</span><span class="token punctuation" style="color:#393A34">.</span><span class="token plain">compressed_img_pub</span><span class="token punctuation" style="color:#393A34">.</span><span class="token plain">publish</span><span class="token punctuation" style="color:#393A34">(</span><span class="token plain">compressed_image_msg</span><span class="token punctuation" style="color:#393A34">)</span><br></div></code></pre></div></div>
<p>After this, there are some log statements to print information to the console and exception catching to make sure errors are handled correctly.</p>
<p>The <a href="https://github.com/mikelikesrobots/yolo26_ros2/blob/main/yolo26_ros2/yolo26_ros2.py#L128-L138" target="_blank" rel="noopener noreferrer" class="">final part of the node</a> is very simple. It's the main function, which constructs an instance of the <code>YoloDetectorNode</code> class, then runs it until the process is shut down.</p>
<div class="language-python codeBlockContainer_Ckt0 theme-code-block" style="--prism-color:#393A34;--prism-background-color:#f6f8fa"><div class="codeBlockContent_QJqH"><pre tabindex="0" class="prism-code language-python codeBlock_bY9V thin-scrollbar" style="color:#393A34;background-color:#f6f8fa"><code class="codeBlockLines_e6Vv"><div class="token-line" style="color:#393A34"><span class="token keyword" style="color:#00009f">def</span><span class="token plain"> </span><span class="token function" style="color:#d73a49">main</span><span class="token punctuation" style="color:#393A34">(</span><span class="token plain">args</span><span class="token operator" style="color:#393A34">=</span><span class="token boolean" style="color:#36acaa">None</span><span class="token punctuation" style="color:#393A34">)</span><span class="token punctuation" style="color:#393A34">:</span><span class="token plain"></span><br></div><div class="token-line" style="color:#393A34"><span class="token plain">    rclpy</span><span class="token punctuation" style="color:#393A34">.</span><span class="token plain">init</span><span class="token punctuation" style="color:#393A34">(</span><span class="token plain">args</span><span class="token operator" style="color:#393A34">=</span><span class="token plain">args</span><span class="token punctuation" style="color:#393A34">)</span><span class="token plain"></span><br></div><div class="token-line" style="color:#393A34"><span class="token plain">    node </span><span class="token operator" style="color:#393A34">=</span><span class="token plain"> YoloDetectorNode</span><span class="token punctuation" style="color:#393A34">(</span><span class="token punctuation" style="color:#393A34">)</span><span class="token plain"></span><br></div><div class="token-line" style="color:#393A34"><span class="token plain" style="display:inline-block"></span><br></div><div class="token-line" style="color:#393A34"><span class="token plain">    </span><span class="token keyword" style="color:#00009f">try</span><span class="token punctuation" style="color:#393A34">:</span><span class="token plain"></span><br></div><div class="token-line" style="color:#393A34"><span class="token plain">        rclpy</span><span class="token punctuation" style="color:#393A34">.</span><span class="token plain">spin</span><span class="token punctuation" style="color:#393A34">(</span><span class="token plain">node</span><span class="token punctuation" style="color:#393A34">)</span><span class="token plain"></span><br></div><div class="token-line" style="color:#393A34"><span class="token plain">    </span><span class="token keyword" style="color:#00009f">except</span><span class="token plain"> KeyboardInterrupt</span><span class="token punctuation" style="color:#393A34">:</span><span class="token plain"></span><br></div><div class="token-line" style="color:#393A34"><span class="token plain">        </span><span class="token keyword" style="color:#00009f">pass</span><span class="token plain"></span><br></div><div class="token-line" style="color:#393A34"><span class="token plain">    </span><span class="token keyword" style="color:#00009f">finally</span><span class="token punctuation" style="color:#393A34">:</span><span class="token plain"></span><br></div><div class="token-line" style="color:#393A34"><span class="token plain">        node</span><span class="token punctuation" style="color:#393A34">.</span><span class="token plain">destroy_node</span><span class="token punctuation" style="color:#393A34">(</span><span class="token punctuation" style="color:#393A34">)</span><span class="token plain"></span><br></div><div class="token-line" style="color:#393A34"><span class="token plain">        rclpy</span><span class="token punctuation" style="color:#393A34">.</span><span class="token plain">shutdown</span><span class="token punctuation" style="color:#393A34">(</span><span class="token punctuation" style="color:#393A34">)</span><br></div></code></pre></div></div>
<p>And that's the complete file! The three functions that we used from <code>ultralytics</code> were to load a model, perform inference on an image using the loaded model, and look up the name of a class from the model given the label number from a prediction.</p>
<div class="language-python codeBlockContainer_Ckt0 theme-code-block" style="--prism-color:#393A34;--prism-background-color:#f6f8fa"><div class="codeBlockContent_QJqH"><pre tabindex="0" class="prism-code language-python codeBlock_bY9V thin-scrollbar" style="color:#393A34;background-color:#f6f8fa"><code class="codeBlockLines_e6Vv"><div class="token-line" style="color:#393A34"><span class="token comment" style="color:#999988;font-style:italic"># Load the model from disk, or download if not available</span><span class="token plain"></span><br></div><div class="token-line" style="color:#393A34"><span class="token plain">self</span><span class="token punctuation" style="color:#393A34">.</span><span class="token plain">model </span><span class="token operator" style="color:#393A34">=</span><span class="token plain"> YOLO</span><span class="token punctuation" style="color:#393A34">(</span><span class="token plain">full_model_path</span><span class="token punctuation" style="color:#393A34">)</span><span class="token plain"></span><br></div><div class="token-line" style="color:#393A34"><span class="token plain"></span><span class="token comment" style="color:#999988;font-style:italic"># Perform inference on an image</span><span class="token plain"></span><br></div><div class="token-line" style="color:#393A34"><span class="token plain">results </span><span class="token operator" style="color:#393A34">=</span><span class="token plain"> self</span><span class="token punctuation" style="color:#393A34">.</span><span class="token plain">model</span><span class="token punctuation" style="color:#393A34">(</span><span class="token plain">cv_image</span><span class="token punctuation" style="color:#393A34">,</span><span class="token plain"> verbose</span><span class="token operator" style="color:#393A34">=</span><span class="token boolean" style="color:#36acaa">False</span><span class="token punctuation" style="color:#393A34">)</span><span class="token plain"></span><br></div><div class="token-line" style="color:#393A34"><span class="token plain"></span><span class="token comment" style="color:#999988;font-style:italic"># Look up the name for a label number from a detection</span><span class="token plain"></span><br></div><div class="token-line" style="color:#393A34"><span class="token plain">label_readable </span><span class="token operator" style="color:#393A34">=</span><span class="token plain"> self</span><span class="token punctuation" style="color:#393A34">.</span><span class="token plain">model</span><span class="token punctuation" style="color:#393A34">.</span><span class="token plain">names</span><span class="token punctuation" style="color:#393A34">[</span><span class="token plain">label</span><span class="token punctuation" style="color:#393A34">]</span><br></div></code></pre></div></div>
<p>It's clear that Ultralytics has worked hard to make their <code>ultralytics</code> Python package as simple to use as possible. That's great news for robotics engineers, because intelligent robotics almost certainly needs some kind of CV!</p>
<div class="theme-admonition theme-admonition-info admonition_xJq3 alert alert--info"><div class="admonitionHeading_Gvgb"><span class="admonitionIcon_Rf37"><svg viewBox="0 0 14 16"><path fill-rule="evenodd" d="M7 2.3c3.14 0 5.7 2.56 5.7 5.7s-2.56 5.7-5.7 5.7A5.71 5.71 0 0 1 1.3 8c0-3.14 2.56-5.7 5.7-5.7zM7 1C3.14 1 0 4.14 0 8s3.14 7 7 7 7-3.14 7-7-3.14-7-7-7zm1 3H6v5h2V4zm0 6H6v2h2v-2z"></path></svg></span>Hardware Acceleration Challenge</div><div class="admonitionContent_BuS1"><p>If you've run the demo successfully and you're looking for a challenge, see if you can run the model with hardware acceleration! This could be on your desktop with a GPU, or on any hardware acceleration on the robot's board, such as the NPU or the RDK X5's BPU chip. Measure the latency and framerate against the CPU-only model and let me know your results!</p></div></div>
<h2 class="anchor anchorTargetStickyNavbar_Vzrq" id="summary">Summary<a href="https://mikelikesrobots.github.io/blog/ultralytics-yolo26-computer-vision#summary" class="hash-link" aria-label="Direct link to Summary" title="Direct link to Summary" translate="no">​</a></h2>
<p>In this post, we saw a simple ROS 2 node for performing Computer Vision (CV) inference on images from other ROS 2 nodes. We combined this node with the <code>usb_cam</code> node, which can be used to stream images from a webcam. All of this runs directly on a robot using the CPU, although other hardware acceleration is available.</p>
<p>By looking into the structure of the node, we saw how the <code>ultralytics</code> Python package could be used to download, load, and use the Ultralytics YOLO26 model. With just three lines, we could detect objects in an image with a confidence value, and we could also change the model in use by changing a ROS 2 parameter.</p>
<p>The Ultralytics YOLO26 model proved extremely easy to deploy on a robot. The other reasons to use Ultralytics YOLO26, such as faster inference and better performance on large and small objects, are up to you to test! Try the node for yourself and see what kind of performance you can get from various models. Also see if you can enable hardware acceleration, such as enabling <code>cuda</code> on a machine with a graphics card.</p>]]></content>
        <author>
            <name>Michael Hart</name>
            <uri>https://mikelikesrobots.github.io</uri>
        </author>
        <category label="robotics" term="robotics"/>
        <category label="ros2" term="ros2"/>
        <category label="ai" term="ai"/>
        <category label="yolo" term="yolo"/>
    </entry>
    <entry>
        <title type="html"><![CDATA[Comparing Rust Libraries for ROS Nodes]]></title>
        <id>https://mikelikesrobots.github.io/blog/ros2-rust-comparison</id>
        <link href="https://mikelikesrobots.github.io/blog/ros2-rust-comparison"/>
        <updated>2025-11-03T00:00:00.000Z</updated>
        <summary type="html"><![CDATA[While looking for guest speakers for the Cloud Robotics Working Group, I came across roslibrust, which is a package for building nodes in Rust that can communicate with ROS. Given how different the approach is from ros2rust, I decided to make a few simple nodes in both libraries to see how they compare. This post compares the two libraries by writing the same application in each.]]></summary>
        <content type="html"><![CDATA[<p>While looking for guest speakers for the Cloud Robotics Working Group, I came across roslibrust, which is a package for building nodes in Rust that can communicate with ROS. Given how different the approach is from <a href="https://github.com/ros2-rust/ros2_rust" target="_blank" rel="noopener noreferrer" class="">ros2rust</a>, I decided to make a few simple nodes in both libraries to see how they compare. This post compares the two libraries by writing the same application in each.</p>
<p>This article also includes a video walkthrough.</p>
<div class="video_jswG"><button type="button" class="poster_B6DH" aria-label="Play video: Comparing Rust Libraries for ROS Nodes"><img src="https://i.ytimg.com/vi/ZOuJ2qmd1dc/hqdefault.jpg" alt="" width="480" height="360" loading="lazy"><span class="play_lEvZ" aria-hidden="true">▶</span><span class="caption_yrhJ">Watch: <!-- -->Comparing Rust Libraries for ROS Nodes</span></button></div><noscript><p><a href="https://www.youtube.com/watch?v=ZOuJ2qmd1dc&amp;t=0">Watch <!-- -->Comparing Rust Libraries for ROS Nodes<!-- --> on YouTube</a></p></noscript>
<h2 class="anchor anchorTargetStickyNavbar_Vzrq" id="rust-in-robotics">Rust in Robotics<a href="https://mikelikesrobots.github.io/blog/ros2-rust-comparison#rust-in-robotics" class="hash-link" aria-label="Direct link to Rust in Robotics" title="Direct link to Rust in Robotics" translate="no">​</a></h2>
<p>My previous post on building a ROS 2 Rust node goes into some depth on this - take a look at the <a class="" href="https://mikelikesrobots.github.io/blog/ros2-rust-node">post in question</a>.</p>
<p>Essentially, Rust is a systems level language with an emphasis on speed, safety, and concurrency. It is comparable to C++, which is heavily used for robotics code, particularly real-time and high-performance applications like processing high frequency sensor data. As Rust can operate in the same space as C++ and comes with some advantages, such as more user-friendly tooling and helpful compiler errors, it's a great candidate for programming in robotics.</p>
<p>Rust can operate well at other levels too, such as backends for web services; having one language for every level of your robotics stack, right up to the cloud, does bring significant benefits in code reuse and cross-team collaboration.</p>
<p>I also personally find Rust <em>fun</em> to program in, and tend to look for projects where I can use it!</p>
<div class="theme-admonition theme-admonition-warning admonition_xJq3 alert alert--warning"><div class="admonitionHeading_Gvgb"><span class="admonitionIcon_Rf37"><svg viewBox="0 0 16 16"><path fill-rule="evenodd" d="M8.893 1.5c-.183-.31-.52-.5-.887-.5s-.703.19-.886.5L.138 13.499a.98.98 0 0 0 0 1.001c.193.31.53.501.886.501h13.964c.367 0 .704-.19.877-.5a1.03 1.03 0 0 0 .01-1.002L8.893 1.5zm.133 11.497H6.987v-2.003h2.039v2.003zm0-3.004H6.987V5.987h2.039v4.006z"></path></svg></span>Why Not Rust?</div><div class="admonitionContent_BuS1"><p>The main reason I would warn against using Rust for robotics is that the support for C++ is much better; there are more code samples available and the ROS C++ client library <code>rclcpp</code> is feature-complete.</p></div></div>
<h2 class="anchor anchorTargetStickyNavbar_Vzrq" id="rust-in-ros">Rust in ROS<a href="https://mikelikesrobots.github.io/blog/ros2-rust-comparison#rust-in-ros" class="hash-link" aria-label="Direct link to Rust in ROS" title="Direct link to Rust in ROS" translate="no">​</a></h2>
<figure class="text--center"><p><img decoding="async" loading="lazy" alt="Infographic showing Rust in ROS and comparison between libraries" src="https://mikelikesrobots.github.io/assets/images/ros2_rust_libraries_infographic-ced3d1fcd282fb226e55ca443fd79624.webp" width="2000" height="1414" class="img_ev3q">
</p><figcaption>Infographic showing the reasons to use Rust in ROS, and comparing roslibrust with ros2rust. More details are available in the rest of this post.</figcaption><p></p></figure>
<h3 class="anchor anchorTargetStickyNavbar_Vzrq" id="ros2rust"><code>ros2rust</code><a href="https://mikelikesrobots.github.io/blog/ros2-rust-comparison#ros2rust" class="hash-link" aria-label="Direct link to ros2rust" title="Direct link to ros2rust" translate="no">​</a></h3>
<p>Until now, I had only considered using <code>ros2rust</code> for writing ROS nodes in Rust. This package provides a client library called <code>rclrs</code>, similar to <code>rclcpp</code>, that follows the standard ROS client library layout.</p>
<p>In the standard ROS client library layout, there are two base layers written in C, called <code>rmw</code> and <code>rcl</code>. <code>rcl</code> is the ROS client library. Any client library in another language, such as <code>rclcpp</code> and <code>rclpy</code> for C++ and Python respectively, then call into <code>rcl</code> to interact with ROS. That means that any changes made to <code>rcl</code> will automatically be used in <code>rclcpp</code>, <code>rclpy</code>, and any other client library - including <code>rclrs</code>.</p>
<figure class="text--center" style="background-color:white;padding:20px 20px 10px 20px"><p><img decoding="async" loading="lazy" src="https://docs.ros.org/en/rolling/_images/ros_client_library_api_stack.png" alt="ROS Internal Interfaces Diagram" class="img_ev3q">
</p><figcaption style="color:black">Diagram showing how the internals of ROS work for libraries. The User Application sits on top of <code>rclcpp</code>, <code>rclpy</code>, <code>rclrs</code> and so on. Those libraries call into <code>rcl</code>, which then writes messages to the middleware layer <code>rmw</code>. See the <a href="https://docs.ros.org/en/rolling/Concepts/Advanced/About-Internal-Interfaces.html" target="_blank" rel="noopener noreferrer" class="">ROS 2 documentation</a> for more information.</figcaption><p></p></figure>
<p>It also means that nodes built with <code>ros2rust</code> behave like other ROS nodes. They can be built with <code>colcon</code>, they can be launched from launch files, and messages built in their packages can be accessed by other ROS nodes. In short, it looks like a classic ROS node, just like if it had been built in Python or C++.</p>
<h3 class="anchor anchorTargetStickyNavbar_Vzrq" id="roslibrust"><code>roslibrust</code><a href="https://mikelikesrobots.github.io/blog/ros2-rust-comparison#roslibrust" class="hash-link" aria-label="Direct link to roslibrust" title="Direct link to roslibrust" translate="no">​</a></h3>
<p>The contender to <code>ros2rust</code> in this post is <code>roslibrust</code>, which has a different approach to interacting with ROS. Here are a few reasons to consider using <code>roslibrust</code> over <code>ros2rust</code>:</p>
<ul>
<li class="">The programming interface is built to be async-first. Tasks can be defined and passed to an async framework to run in parallel, which has advantages if the tasks are waiting on data for long periods of time. However, for applications that are processing high volumes of data, the advantage of async is minimal.</li>
<li class="">Instead of using the <code>rcl</code> library, <code>roslibrust</code> rebuilds everything from scratch. This means that it has no dependency on the ROS build system except for the message repositories, so you can build it without a ROS installation before deploying it to your ROS-based system. This makes the build process faster and smoother.</li>
<li class=""><code>roslibrust</code> supports multiple backends by providing the <code>Ros</code> trait. A trait in Rust is like an interface from other languages, such as Java. Any backend implementation that supports the <code>Ros</code> trait can be used by the same <code>roslibrust</code> code, meaning that ROS1 and ROS2 can be supported by the same application code.</li>
<li class="">The same trait abstraction allows <code>roslibrust</code> to support a complete mocking system, allowing for <strong>extremely fast unit tests</strong>. This is a huge selling point to me!</li>
<li class="">The library currently passes data using <code>rosbridge</code> to interact with ROS 2. However, because ROS is soon switching to the Rust-based Zenoh messaging as its default middleware, <code>roslibrust</code> could potentially build a new backend implementation that directly calls into Zenoh. This would bypass the whole <code>rosbridge</code> -&gt; <code>rcl</code> -&gt; <code>rmw</code> -&gt; middleware stack that it currently uses, making it much more efficient.</li>
</ul>
<div class="theme-admonition theme-admonition-tip admonition_xJq3 alert alert--success"><div class="admonitionHeading_Gvgb"><span class="admonitionIcon_Rf37"><svg viewBox="0 0 12 16"><path fill-rule="evenodd" d="M6.5 0C3.48 0 1 2.19 1 5c0 .92.55 2.25 1 3 1.34 2.25 1.78 2.78 2 4v1h5v-1c.22-1.22.66-1.75 2-4 .45-.75 1-2.08 1-3 0-2.81-2.48-5-5.5-5zm3.64 7.48c-.25.44-.47.8-.67 1.11-.86 1.41-1.25 2.06-1.45 3.23-.02.05-.02.11-.02.17H5c0-.06 0-.13-.02-.17-.2-1.17-.59-1.83-1.45-3.23-.2-.31-.42-.67-.67-1.11C2.44 6.78 2 5.65 2 5c0-2.2 2.02-4 4.5-4 1.22 0 2.36.42 3.22 1.19C10.55 2.94 11 3.94 11 5c0 .66-.44 1.78-.86 2.48zM4 14h5c-.23 1.14-1.3 2-2.5 2s-2.27-.86-2.5-2z"></path></svg></span>Looking for Contributors</div><div class="admonitionContent_BuS1"><p>If you are looking for an open-source project to contribute to, <code>roslibrust</code> would love to have you! If you're interested in helping, take a look at <a href="https://github.com/RosLibRust/roslibrust" target="_blank" rel="noopener noreferrer" class="">the Github repository</a>, try the code out for yourself, then look for a good first issue from the <a href="https://github.com/RosLibRust/roslibrust/issues" target="_blank" rel="noopener noreferrer" class="">Issues page</a> and get stuck in.</p></div></div>
<h3 class="anchor anchorTargetStickyNavbar_Vzrq" id="other-client-libraries">Other Client Libraries<a href="https://mikelikesrobots.github.io/blog/ros2-rust-comparison#other-client-libraries" class="hash-link" aria-label="Direct link to Other Client Libraries" title="Direct link to Other Client Libraries" translate="no">​</a></h3>
<p>There are a few other libraries that offer ROS 2 nodes written in Rust. Two take the same approach as <code>roslibrust</code>, meaning that they build the ROS interaction layer from scratch, while one still provides bindings to <code>rcl</code> (but without relying on the ROS 2 build system). However, these projects seem to be less active than <code>roslibrust</code> based on Github commit history when I checked, and they didn't offer the same async-first approach. Having said that, the biggest reason I didn't include them in this post is because I haven't had time to explore them! If you're interested in taking a look at these alternatives, the links are below. If you know of any others, please leave a comment and I'll happily add them.</p>
<ul>
<li class=""><a href="https://github.com/Atostek/ros2-client" target="_blank" rel="noopener noreferrer" class="">ros2-client</a>: A Rust native client library for ROS 2, using RustDDS for communication.</li>
<li class=""><a href="https://github.com/sequenceplanner/r2r" target="_blank" rel="noopener noreferrer" class="">r2r</a>: Provides bindings for ROS 2 that do <em>not</em> require hooking in to the ROS 2 build infrastructure by relying on already-generated C code.</li>
<li class=""><a href="https://github.com/adnanademovic/rosrust" target="_blank" rel="noopener noreferrer" class="">rosrust</a>: A pure Rust implementation of a ROS client library.</li>
</ul>
<p>Let's take a look at a sample application to see the differences between <code>roslibrust</code> and <code>ros2rust</code> in action.</p>
<h2 class="anchor anchorTargetStickyNavbar_Vzrq" id="sample-application">Sample Application<a href="https://mikelikesrobots.github.io/blog/ros2-rust-comparison#sample-application" class="hash-link" aria-label="Direct link to Sample Application" title="Direct link to Sample Application" translate="no">​</a></h2>
<p>This section demonstrates how both libraries handle the ROS fundamentals of publishing, subscribing, and services through a simple test application. The sample application has three nodes:</p>
<ol>
<li class="">A <strong>publisher node</strong>, which publishes an incrementing count once per second. This tests the library's ability to publish ROS standard messages.</li>
<li class="">A <strong>subscriber node</strong>, which subscribes to IMU data and adds up the x values of the angular velocity. This isn't helpful by itself, but does show the ability to receive data and do something with it. I can also test this with a Gazebo simulation to check that the node is integrated into the ROS 2 system correctly, rather than relying on command-line tools alone.</li>
<li class="">A <strong>service</strong> for multiplying two numbers together. Crucially, this uses a custom ROS message to test that both libraries can handle custom messages.</li>
</ol>
<p>With this specification in place, the two implementations are available at <a href="https://github.com/mikelikesrobots/imu_tracker_roslibrust" target="_blank" rel="noopener noreferrer" class="">https://github.com/mikelikesrobots/imu_tracker_roslibrust</a> and <a href="https://github.com/mikelikesrobots/imu_tracker_ros2rust" target="_blank" rel="noopener noreferrer" class="">https://github.com/mikelikesrobots/imu_tracker_ros2rust</a> for <code>roslibrust</code> and <code>ros2rust</code> respectively.</p>
<h3 class="anchor anchorTargetStickyNavbar_Vzrq" id="installing-dependencies">Installing Dependencies<a href="https://mikelikesrobots.github.io/blog/ros2-rust-comparison#installing-dependencies" class="hash-link" aria-label="Direct link to Installing Dependencies" title="Direct link to Installing Dependencies" translate="no">​</a></h3>
<p>To set the repositories up, I used my WSL instance of Ubuntu with ROS 2 Jazzy installed. Each repository got its own ROS 2 workspace. This is where the first caveat comes in: the <code>roslibrust</code> version doesn't need to be in a workspace for its initial build. However, because it has a custom message that I need to access from the ROS 2 system later, it's easier to build it from a ROS 2 workspace to begin with.</p>
<p>Both packages need Rust installed, which on Ubuntu is as simple as:</p>
<div class="language-bash codeBlockContainer_Ckt0 theme-code-block" style="--prism-color:#393A34;--prism-background-color:#f6f8fa"><div class="codeBlockContent_QJqH"><pre tabindex="0" class="prism-code language-bash codeBlock_bY9V thin-scrollbar" style="color:#393A34;background-color:#f6f8fa"><code class="codeBlockLines_e6Vv"><div class="token-line" style="color:#393A34"><span class="token plain">curl --proto '=https' --tlsv1.2 -sSf https://sh.rustup.rs | sh</span><br></div></code></pre></div></div>
<p>Then restart the terminal. <code>ros2rust</code> does need extra dependencies, so ROS 2 needs to be installed (<a href="https://docs.ros.org/en/jazzy/Installation/Ubuntu-Install-Debs.html" target="_blank" rel="noopener noreferrer" class="">installation instructions</a>), as well as a couple of extra tools:</p>
<div class="language-bash codeBlockContainer_Ckt0 theme-code-block" style="--prism-color:#393A34;--prism-background-color:#f6f8fa"><div class="codeBlockContent_QJqH"><pre tabindex="0" class="prism-code language-bash codeBlock_bY9V thin-scrollbar" style="color:#393A34;background-color:#f6f8fa"><code class="codeBlockLines_e6Vv"><div class="token-line" style="color:#393A34"><span class="token plain">pip install git+https://github.com/colcon/colcon-cargo.git</span><br></div><div class="token-line" style="color:#393A34"><span class="token plain">pip install git+https://github.com/colcon/colcon-ros-cargo.git</span><br></div></code></pre></div></div>
<p>These extra tools help integrate the build with <code>colcon</code>, such that after the first <code>colcon build</code>, <code>cargo</code> will work correctly with the package.</p>
<p>Finally, <code>roslibrust</code> requires the <code>rosbridge</code> package to interact with ROS, so that needs to be installed:</p>
<div class="language-bash codeBlockContainer_Ckt0 theme-code-block" style="--prism-color:#393A34;--prism-background-color:#f6f8fa"><div class="codeBlockContent_QJqH"><pre tabindex="0" class="prism-code language-bash codeBlock_bY9V thin-scrollbar" style="color:#393A34;background-color:#f6f8fa"><code class="codeBlockLines_e6Vv"><div class="token-line" style="color:#393A34"><span class="token plain"># Change jazzy for your ROS installation</span><br></div><div class="token-line" style="color:#393A34"><span class="token plain">sudo apt install -y ros-jazzy-rosbridge-server</span><br></div></code></pre></div></div>
<h3 class="anchor anchorTargetStickyNavbar_Vzrq" id="cloning-the-code">Cloning the Code<a href="https://mikelikesrobots.github.io/blog/ros2-rust-comparison#cloning-the-code" class="hash-link" aria-label="Direct link to Cloning the Code" title="Direct link to Cloning the Code" translate="no">​</a></h3>
<p>Setting up the <code>ros2rust</code> version should be familiar for ROS 2 users. The process is to create a workspace, clone the repo, then use the <code>vcs</code> tool to check out the remaining dependencies.</p>
<div class="language-bash codeBlockContainer_Ckt0 theme-code-block" style="--prism-color:#393A34;--prism-background-color:#f6f8fa"><div class="codeBlockContent_QJqH"><pre tabindex="0" class="prism-code language-bash codeBlock_bY9V thin-scrollbar" style="color:#393A34;background-color:#f6f8fa"><code class="codeBlockLines_e6Vv"><div class="token-line" style="color:#393A34"><span class="token plain">mkdir -p ~/ros2rust_ws/src</span><br></div><div class="token-line" style="color:#393A34"><span class="token plain">git clone https://github.com/mikelikesrobots/imu_tracker_ros2rust ~/ros2rust_ws/src/imu_tracker_ros2rust</span><br></div><div class="token-line" style="color:#393A34"><span class="token plain" style="display:inline-block"></span><br></div><div class="token-line" style="color:#393A34"><span class="token plain">vcs import ~/ros2rust_ws/src &lt; ~/ros2rust_ws/src/imu_tracker_ros2rust/imu_tracker_ros2rust.repos</span><br></div><div class="token-line" style="color:#393A34"><span class="token plain">vcs import ~/ros2rust_ws/src &lt; ~/ros2rust_ws/src/ros2_rust/ros2_rust_jazzy.repos</span><br></div></code></pre></div></div>
<p>The <code>roslibrust</code> version is similar, but with just two clone commands. Recurse submodules is used to check out the message packages needed for message generation. The <code>mult_msgs</code> package contains a single custom message for the service, and could have been checked out <em>inside</em> <code>imu_tracker_roslibrust</code>. I did it this way to ensure the custom messages are available to other users of the ROS workspace.</p>
<div class="language-bash codeBlockContainer_Ckt0 theme-code-block" style="--prism-color:#393A34;--prism-background-color:#f6f8fa"><div class="codeBlockContent_QJqH"><pre tabindex="0" class="prism-code language-bash codeBlock_bY9V thin-scrollbar" style="color:#393A34;background-color:#f6f8fa"><code class="codeBlockLines_e6Vv"><div class="token-line" style="color:#393A34"><span class="token plain">mkdir -p ~/roslibrust_ws/src</span><br></div><div class="token-line" style="color:#393A34"><span class="token plain">git clone --recurse-submodules https://github.com/mikelikesrobots/imu_tracker_roslibrust ~/roslibrust_ws/src/imu_tracker_roslibrust</span><br></div><div class="token-line" style="color:#393A34"><span class="token plain">git clone https://github.com/mikelikesrobots/mult_msgs ~/roslibrust_ws/src/mult_msgs</span><br></div></code></pre></div></div>
<h3 class="anchor anchorTargetStickyNavbar_Vzrq" id="building-the-code">Building the Code<a href="https://mikelikesrobots.github.io/blog/ros2-rust-comparison#building-the-code" class="hash-link" aria-label="Direct link to Building the Code" title="Direct link to Building the Code" translate="no">​</a></h3>
<p>The <code>ros2rust</code> workspace must initially be built using <code>colcon</code>, as follows:</p>
<div class="language-bash codeBlockContainer_Ckt0 theme-code-block" style="--prism-color:#393A34;--prism-background-color:#f6f8fa"><div class="codeBlockContent_QJqH"><pre tabindex="0" class="prism-code language-bash codeBlock_bY9V thin-scrollbar" style="color:#393A34;background-color:#f6f8fa"><code class="codeBlockLines_e6Vv"><div class="token-line" style="color:#393A34"><span class="token plain"># Source ROS, if not already done</span><br></div><div class="token-line" style="color:#393A34"><span class="token plain">source /opt/ros/jazzy/setup.bash</span><br></div><div class="token-line" style="color:#393A34"><span class="token plain">cd ~/ros2rust_ws</span><br></div><div class="token-line" style="color:#393A34"><span class="token plain">colcon build</span><br></div><div class="token-line" style="color:#393A34"><span class="token plain">source install/setup.bash</span><br></div></code></pre></div></div>
<p>This build will take a significant amount of time, because it's building all of <code>ros2rust</code> alongside the application package. Also, subsequent builds will check all of the <code>ros2rust</code> packages for changes, which still takes quite a bit of time even if you haven't made any changes. Instead, after the first build, you can select only the application package to build or directly use <code>cargo</code>:</p>
<div class="language-bash codeBlockContainer_Ckt0 theme-code-block" style="--prism-color:#393A34;--prism-background-color:#f6f8fa"><div class="codeBlockContent_QJqH"><pre tabindex="0" class="prism-code language-bash codeBlock_bY9V thin-scrollbar" style="color:#393A34;background-color:#f6f8fa"><code class="codeBlockLines_e6Vv"><div class="token-line" style="color:#393A34"><span class="token plain">colcon build --packages-select imu_tracker_ros2rust</span><br></div><div class="token-line" style="color:#393A34"><span class="token plain"># Alternatively:</span><br></div><div class="token-line" style="color:#393A34"><span class="token plain">cd ~/ros2rust_ws/src/imu_tracker_ros2rust</span><br></div><div class="token-line" style="color:#393A34"><span class="token plain">cargo build</span><br></div></code></pre></div></div>
<div class="theme-admonition theme-admonition-tip admonition_xJq3 alert alert--success"><div class="admonitionHeading_Gvgb"><span class="admonitionIcon_Rf37"><svg viewBox="0 0 12 16"><path fill-rule="evenodd" d="M6.5 0C3.48 0 1 2.19 1 5c0 .92.55 2.25 1 3 1.34 2.25 1.78 2.78 2 4v1h5v-1c.22-1.22.66-1.75 2-4 .45-.75 1-2.08 1-3 0-2.81-2.48-5-5.5-5zm3.64 7.48c-.25.44-.47.8-.67 1.11-.86 1.41-1.25 2.06-1.45 3.23-.02.05-.02.11-.02.17H5c0-.06 0-.13-.02-.17-.2-1.17-.59-1.83-1.45-3.23-.2-.31-.42-.67-.67-1.11C2.44 6.78 2 5.65 2 5c0-2.2 2.02-4 4.5-4 1.22 0 2.36.42 3.22 1.19C10.55 2.94 11 3.94 11 5c0 .66-.44 1.78-.86 2.48zM4 14h5c-.23 1.14-1.3 2-2.5 2s-2.27-.86-2.5-2z"></path></svg></span>Visual Studio Code Support</div><div class="admonitionContent_BuS1"><p>If you use VSCode with extensions that support Rust, you can open up the <code>imu_tracker_ros2rust</code> directory with VSCode and it should work correctly, including autocompletion and looking up symbols. The same is true of the <code>imu_tracker_roslibrust</code> directory in the next section.</p></div></div>
<p>For <code>imu_tracker_roslibrust</code>, the process is just to use <code>cargo</code>:</p>
<div class="language-bash codeBlockContainer_Ckt0 theme-code-block" style="--prism-color:#393A34;--prism-background-color:#f6f8fa"><div class="codeBlockContent_QJqH"><pre tabindex="0" class="prism-code language-bash codeBlock_bY9V thin-scrollbar" style="color:#393A34;background-color:#f6f8fa"><code class="codeBlockLines_e6Vv"><div class="token-line" style="color:#393A34"><span class="token plain">cd ~/roslibrust_ws/src/imu_tracker_roslibrust</span><br></div><div class="token-line" style="color:#393A34"><span class="token plain">cargo build</span><br></div></code></pre></div></div>
<p>This will download <code>roslibrust</code> as a dependency crate and build it. However, it doesn't make our custom messages available to the ROS 2 ecosystem, so we still need to use ROS 2 for that part:</p>
<div class="language-bash codeBlockContainer_Ckt0 theme-code-block" style="--prism-color:#393A34;--prism-background-color:#f6f8fa"><div class="codeBlockContent_QJqH"><pre tabindex="0" class="prism-code language-bash codeBlock_bY9V thin-scrollbar" style="color:#393A34;background-color:#f6f8fa"><code class="codeBlockLines_e6Vv"><div class="token-line" style="color:#393A34"><span class="token plain">cd ~/roslibrust_ws</span><br></div><div class="token-line" style="color:#393A34"><span class="token plain">colcon build</span><br></div><div class="token-line" style="color:#393A34"><span class="token plain">source install/setup.bash</span><br></div></code></pre></div></div>
<h3 class="anchor anchorTargetStickyNavbar_Vzrq" id="testing-each-application">Testing Each Application<a href="https://mikelikesrobots.github.io/blog/ros2-rust-comparison#testing-each-application" class="hash-link" aria-label="Direct link to Testing Each Application" title="Direct link to Testing Each Application" translate="no">​</a></h3>
<p><code>roslibrust</code> relies on <code>rosbridge</code> to pass messages, so run this as a separate node, making sure to source the <code>roslibrust</code> workspace to get access to its custom messages:</p>
<div class="language-bash codeBlockContainer_Ckt0 theme-code-block" style="--prism-color:#393A34;--prism-background-color:#f6f8fa"><div class="codeBlockContent_QJqH"><pre tabindex="0" class="prism-code language-bash codeBlock_bY9V thin-scrollbar" style="color:#393A34;background-color:#f6f8fa"><code class="codeBlockLines_e6Vv"><div class="token-line" style="color:#393A34"><span class="token plain"># Get access to mult_msgs package with custom message</span><br></div><div class="token-line" style="color:#393A34"><span class="token plain">source ~/roslibrust_ws/install/setup.bash</span><br></div><div class="token-line" style="color:#393A34"><span class="token plain"># Run rosbridge</span><br></div><div class="token-line" style="color:#393A34"><span class="token plain">ros2 launch rosbridge_server rosbridge_websocket_launch.xml</span><br></div></code></pre></div></div>
<p>From here onwards, the instructions are the same, except for changing <code>ros2rust</code> for <code>roslibrust</code>. Hence, I'll only write the details once for <code>ros2rust</code>.</p>
<p>Set the application running:</p>
<div class="language-bash codeBlockContainer_Ckt0 theme-code-block" style="--prism-color:#393A34;--prism-background-color:#f6f8fa"><div class="codeBlockContent_QJqH"><pre tabindex="0" class="prism-code language-bash codeBlock_bY9V thin-scrollbar" style="color:#393A34;background-color:#f6f8fa"><code class="codeBlockLines_e6Vv"><div class="token-line" style="color:#393A34"><span class="token plain">source ~/ros2rust_ws/install/setup.bash</span><br></div><div class="token-line" style="color:#393A34"><span class="token plain">ros2 run imu_tracker_ros2rust imu_tracker_ros2rust</span><br></div></code></pre></div></div>
<p>This gave a startup log:</p>
<div class="language-bash codeBlockContainer_Ckt0 theme-code-block" style="--prism-color:#393A34;--prism-background-color:#f6f8fa"><div class="codeBlockContent_QJqH"><pre tabindex="0" class="prism-code language-bash codeBlock_bY9V thin-scrollbar" style="color:#393A34;background-color:#f6f8fa"><code class="codeBlockLines_e6Vv"><div class="token-line" style="color:#393A34"><span class="token plain">Counting node has started!</span><br></div><div class="token-line" style="color:#393A34"><span class="token plain">counter: Published 0</span><br></div><div class="token-line" style="color:#393A34"><span class="token plain">IMU summing node has started!</span><br></div><div class="token-line" style="color:#393A34"><span class="token plain">Float multiplying service has started!</span><br></div></code></pre></div></div>
<p>I could then subscribe to the <code>/example_counter</code> topic to get the count:</p>
<div class="language-bash codeBlockContainer_Ckt0 theme-code-block" style="--prism-color:#393A34;--prism-background-color:#f6f8fa"><div class="codeBlockContent_QJqH"><pre tabindex="0" class="prism-code language-bash codeBlock_bY9V thin-scrollbar" style="color:#393A34;background-color:#f6f8fa"><code class="codeBlockLines_e6Vv"><div class="token-line" style="color:#393A34"><span class="token plain">ros2 topic echo /example_counter</span><br></div></code></pre></div></div>
<p>Which gave the following output:</p>
<div class="language-bash codeBlockContainer_Ckt0 theme-code-block" style="--prism-color:#393A34;--prism-background-color:#f6f8fa"><div class="codeBlockContent_QJqH"><pre tabindex="0" class="prism-code language-bash codeBlock_bY9V thin-scrollbar" style="color:#393A34;background-color:#f6f8fa"><code class="codeBlockLines_e6Vv"><div class="token-line" style="color:#393A34"><span class="token plain">---</span><br></div><div class="token-line" style="color:#393A34"><span class="token plain">data: 40</span><br></div><div class="token-line" style="color:#393A34"><span class="token plain">---</span><br></div><div class="token-line" style="color:#393A34"><span class="token plain">data: 41</span><br></div><div class="token-line" style="color:#393A34"><span class="token plain">---</span><br></div><div class="token-line" style="color:#393A34"><span class="token plain">data: 42</span><br></div><div class="token-line" style="color:#393A34"><span class="token plain">---</span><br></div></code></pre></div></div>
<p>The count is incrementing, and there's one new message per second, just as expected.</p>
<p>Next is the float multiplication service. This needs the custom messages available to work correctly:</p>
<div class="language-bash codeBlockContainer_Ckt0 theme-code-block" style="--prism-color:#393A34;--prism-background-color:#f6f8fa"><div class="codeBlockContent_QJqH"><pre tabindex="0" class="prism-code language-bash codeBlock_bY9V thin-scrollbar" style="color:#393A34;background-color:#f6f8fa"><code class="codeBlockLines_e6Vv"><div class="token-line" style="color:#393A34"><span class="token plain">source ~/ros2rust_ws/install/setup.bash</span><br></div><div class="token-line" style="color:#393A34"><span class="token plain">ros2 service call /mult_floats mult_msgs/MultFloats "{x: 2.5, y: 4.0}"</span><br></div></code></pre></div></div>
<p>That gave me the following:</p>
<div class="language-bash codeBlockContainer_Ckt0 theme-code-block" style="--prism-color:#393A34;--prism-background-color:#f6f8fa"><div class="codeBlockContent_QJqH"><pre tabindex="0" class="prism-code language-bash codeBlock_bY9V thin-scrollbar" style="color:#393A34;background-color:#f6f8fa"><code class="codeBlockLines_e6Vv"><div class="token-line" style="color:#393A34"><span class="token plain">waiting for service to become available...</span><br></div><div class="token-line" style="color:#393A34"><span class="token plain">requester: making request: mult_msgs.srv.MultFloats_Request(x=2.5, y=4.0)</span><br></div><div class="token-line" style="color:#393A34"><span class="token plain" style="display:inline-block"></span><br></div><div class="token-line" style="color:#393A34"><span class="token plain">response:</span><br></div><div class="token-line" style="color:#393A34"><span class="token plain">mult_msgs.srv.MultFloats_Response(result=10.0)</span><br></div></code></pre></div></div>
<p>So far, so good! The node can accept custom messages that I've defined and give the correct response.</p>
<p>Finally, I can test the IMU code. This also tests that the application is able to subscribe to other topics from ROS2 other than messages I've published. To do so, I install the Turtlebot 3 simulation package with:</p>
<div class="language-bash codeBlockContainer_Ckt0 theme-code-block" style="--prism-color:#393A34;--prism-background-color:#f6f8fa"><div class="codeBlockContent_QJqH"><pre tabindex="0" class="prism-code language-bash codeBlock_bY9V thin-scrollbar" style="color:#393A34;background-color:#f6f8fa"><code class="codeBlockLines_e6Vv"><div class="token-line" style="color:#393A34"><span class="token plain">sudo apt install -y ros-jazzy-turtlebot3-simulations</span><br></div></code></pre></div></div>
<p>Then ran the simulation with:</p>
<div class="language-bash codeBlockContainer_Ckt0 theme-code-block" style="--prism-color:#393A34;--prism-background-color:#f6f8fa"><div class="codeBlockContent_QJqH"><pre tabindex="0" class="prism-code language-bash codeBlock_bY9V thin-scrollbar" style="color:#393A34;background-color:#f6f8fa"><code class="codeBlockLines_e6Vv"><div class="token-line" style="color:#393A34"><span class="token plain">export TURTLEBOT3_MODEL=waffle_pi</span><br></div><div class="token-line" style="color:#393A34"><span class="token plain">ros2 launch turtlebot3_gazebo turtlebot3_world.launch.py</span><br></div></code></pre></div></div>
<p>My node then started printing out the data it was receiving:</p>
<div class="language-bash codeBlockContainer_Ckt0 theme-code-block" style="--prism-color:#393A34;--prism-background-color:#f6f8fa"><div class="codeBlockContent_QJqH"><pre tabindex="0" class="prism-code language-bash codeBlock_bY9V thin-scrollbar" style="color:#393A34;background-color:#f6f8fa"><code class="codeBlockLines_e6Vv"><div class="token-line" style="color:#393A34"><span class="token plain">Got x: 0.00016605295940326384, sum: 0.0013029570806488157</span><br></div><div class="token-line" style="color:#393A34"><span class="token plain">Got x: -0.00010373969315866868, sum: 0.001199217387490147</span><br></div><div class="token-line" style="color:#393A34"><span class="token plain">Got x: -0.00007269928155955913, sum: 0.0011265181059305878</span><br></div><div class="token-line" style="color:#393A34"><span class="token plain">Got x: 0.00002150106849010582, sum: 0.0011480191744206937</span><br></div><div class="token-line" style="color:#393A34"><span class="token plain">Got x: -0.0004081654500772328, sum: 0.0007398537243434609</span><br></div><div class="token-line" style="color:#393A34"><span class="token plain">Got x: 0.000375131405007245, sum: 0.001114985129350706</span><br></div><div class="token-line" style="color:#393A34"><span class="token plain">Got x: 0.00020263544247801625, sum: 0.0013176205718287222</span><br></div><div class="token-line" style="color:#393A34"><span class="token plain">Got x: 0.0002873354535022987, sum: 0.001604956025331021</span><br></div><div class="token-line" style="color:#393A34"><span class="token plain">Got x: -0.00023864045717770534, sum: 0.0013663155681533155</span><br></div><div class="token-line" style="color:#393A34"><span class="token plain">Got x: -0.000059679387952645265, sum: 0.0013066361802006703</span><br></div></code></pre></div></div>
<p>Perfect - data received from another node in a ROS 2 network successfully.</p>
<p>I then repeated this full set of tests with <code>roslibrust</code>, and got the same correct behaviour, albeit with printed lines being slightly different. Both libraries have the basics working, so the next step is to dig into the code to see how the API looks.</p>
<h2 class="anchor anchorTargetStickyNavbar_Vzrq" id="comparing-code-from-each-library">Comparing Code From Each Library<a href="https://mikelikesrobots.github.io/blog/ros2-rust-comparison#comparing-code-from-each-library" class="hash-link" aria-label="Direct link to Comparing Code From Each Library" title="Direct link to Comparing Code From Each Library" translate="no">​</a></h2>
<h3 class="anchor anchorTargetStickyNavbar_Vzrq" id="counting-node">Counting Node<a href="https://mikelikesrobots.github.io/blog/ros2-rust-comparison#counting-node" class="hash-link" aria-label="Direct link to Counting Node" title="Direct link to Counting Node" translate="no">​</a></h3>
<p><strong><code>ros2rust</code></strong></p>
<p><code>ros2rust</code> commonly uses a pattern where each node has a struct that contains everything it needs. In this case, the struct contains the node itself, the publisher for <code>example_counter</code> topic, and the data that is being incremented. Each of these are wrapped in <code>Arc</code>s, which makes them sharable across threads. Sharing across threads makes a lot of sense in a system that allows callbacks and multi-threading as ROS does.</p>
<div class="language-rust codeBlockContainer_Ckt0 theme-code-block" style="--prism-color:#393A34;--prism-background-color:#f6f8fa"><div class="codeBlockContent_QJqH"><pre tabindex="0" class="prism-code language-rust codeBlock_bY9V thin-scrollbar" style="color:#393A34;background-color:#f6f8fa"><code class="codeBlockLines_e6Vv"><div class="token-line" style="color:#393A34"><span class="token keyword" style="color:#00009f">struct</span><span class="token plain"> </span><span class="token type-definition class-name">CounterNode</span><span class="token plain"> </span><span class="token punctuation" style="color:#393A34">{</span><span class="token plain"></span><br></div><div class="token-line" style="color:#393A34"><span class="token plain">    _node</span><span class="token punctuation" style="color:#393A34">:</span><span class="token plain"> </span><span class="token class-name">Arc</span><span class="token operator" style="color:#393A34">&lt;</span><span class="token namespace" style="opacity:0.7">rclrs</span><span class="token namespace punctuation" style="opacity:0.7;color:#393A34">::</span><span class="token class-name">NodeState</span><span class="token operator" style="color:#393A34">&gt;</span><span class="token punctuation" style="color:#393A34">,</span><span class="token plain"></span><br></div><div class="token-line" style="color:#393A34"><span class="token plain">    publisher</span><span class="token punctuation" style="color:#393A34">:</span><span class="token plain"> </span><span class="token class-name">Arc</span><span class="token operator" style="color:#393A34">&lt;</span><span class="token namespace" style="opacity:0.7">rclrs</span><span class="token namespace punctuation" style="opacity:0.7;color:#393A34">::</span><span class="token class-name">PublisherState</span><span class="token operator" style="color:#393A34">&lt;</span><span class="token class-name">Int16Msg</span><span class="token operator" style="color:#393A34">&gt;&gt;</span><span class="token punctuation" style="color:#393A34">,</span><span class="token plain"></span><br></div><div class="token-line" style="color:#393A34"><span class="token plain">    data</span><span class="token punctuation" style="color:#393A34">:</span><span class="token plain"> </span><span class="token class-name">Arc</span><span class="token operator" style="color:#393A34">&lt;</span><span class="token class-name">Mutex</span><span class="token operator" style="color:#393A34">&lt;</span><span class="token keyword" style="color:#00009f">i16</span><span class="token operator" style="color:#393A34">&gt;&gt;</span><span class="token punctuation" style="color:#393A34">,</span><span class="token plain"></span><br></div><div class="token-line" style="color:#393A34"><span class="token plain"></span><span class="token punctuation" style="color:#393A34">}</span><br></div></code></pre></div></div>
<p>Initialisation comes from creating a new struct from a Ros <code>Executor</code> object. This might have issues, so the function returns a Result in case any errors occur. The current count is stored in the struct as the <code>data</code> object so it can keep being incremented between publish calls.</p>
<div class="language-rust codeBlockContainer_Ckt0 theme-code-block" style="--prism-color:#393A34;--prism-background-color:#f6f8fa"><div class="codeBlockContent_QJqH"><pre tabindex="0" class="prism-code language-rust codeBlock_bY9V thin-scrollbar" style="color:#393A34;background-color:#f6f8fa"><code class="codeBlockLines_e6Vv"><div class="token-line" style="color:#393A34"><span class="token keyword" style="color:#00009f">fn</span><span class="token plain"> </span><span class="token function-definition function" style="color:#d73a49">new</span><span class="token punctuation" style="color:#393A34">(</span><span class="token plain">executor</span><span class="token punctuation" style="color:#393A34">:</span><span class="token plain"> </span><span class="token operator" style="color:#393A34">&amp;</span><span class="token namespace" style="opacity:0.7">rclrs</span><span class="token namespace punctuation" style="opacity:0.7;color:#393A34">::</span><span class="token class-name">Executor</span><span class="token punctuation" style="color:#393A34">)</span><span class="token plain"> </span><span class="token punctuation" style="color:#393A34">-&gt;</span><span class="token plain"> </span><span class="token class-name">Result</span><span class="token operator" style="color:#393A34">&lt;</span><span class="token keyword" style="color:#00009f">Self</span><span class="token punctuation" style="color:#393A34">,</span><span class="token plain"> </span><span class="token namespace" style="opacity:0.7">rclrs</span><span class="token namespace punctuation" style="opacity:0.7;color:#393A34">::</span><span class="token class-name">RclrsError</span><span class="token operator" style="color:#393A34">&gt;</span><span class="token plain"> </span><span class="token punctuation" style="color:#393A34">{</span><span class="token plain"></span><br></div><div class="token-line" style="color:#393A34"><span class="token plain">    </span><span class="token keyword" style="color:#00009f">let</span><span class="token plain"> node </span><span class="token operator" style="color:#393A34">=</span><span class="token plain"> executor</span><span class="token punctuation" style="color:#393A34">.</span><span class="token function" style="color:#d73a49">create_node</span><span class="token punctuation" style="color:#393A34">(</span><span class="token string" style="color:#e3116c">"counter"</span><span class="token punctuation" style="color:#393A34">)</span><span class="token operator" style="color:#393A34">?</span><span class="token punctuation" style="color:#393A34">;</span><span class="token plain"></span><br></div><div class="token-line" style="color:#393A34"><span class="token plain">    </span><span class="token keyword" style="color:#00009f">let</span><span class="token plain"> data </span><span class="token operator" style="color:#393A34">=</span><span class="token plain"> </span><span class="token class-name">Arc</span><span class="token punctuation" style="color:#393A34">::</span><span class="token function" style="color:#d73a49">new</span><span class="token punctuation" style="color:#393A34">(</span><span class="token class-name">Mutex</span><span class="token punctuation" style="color:#393A34">::</span><span class="token function" style="color:#d73a49">new</span><span class="token punctuation" style="color:#393A34">(</span><span class="token number" style="color:#36acaa">0i16</span><span class="token punctuation" style="color:#393A34">)</span><span class="token punctuation" style="color:#393A34">)</span><span class="token punctuation" style="color:#393A34">;</span><span class="token plain"></span><br></div><div class="token-line" style="color:#393A34"><span class="token plain">    </span><span class="token keyword" style="color:#00009f">let</span><span class="token plain"> publisher </span><span class="token operator" style="color:#393A34">=</span><span class="token plain"> node</span><span class="token punctuation" style="color:#393A34">.</span><span class="token function" style="color:#d73a49">create_publisher</span><span class="token punctuation" style="color:#393A34">::</span><span class="token operator" style="color:#393A34">&lt;</span><span class="token class-name">Int16Msg</span><span class="token operator" style="color:#393A34">&gt;</span><span class="token punctuation" style="color:#393A34">(</span><span class="token string" style="color:#e3116c">"example_counter"</span><span class="token punctuation" style="color:#393A34">)</span><span class="token operator" style="color:#393A34">?</span><span class="token punctuation" style="color:#393A34">;</span><span class="token plain"></span><br></div><div class="token-line" style="color:#393A34"><span class="token plain">    </span><span class="token class-name">Ok</span><span class="token punctuation" style="color:#393A34">(</span><span class="token keyword" style="color:#00009f">Self</span><span class="token plain"> </span><span class="token punctuation" style="color:#393A34">{</span><span class="token plain"></span><br></div><div class="token-line" style="color:#393A34"><span class="token plain">        _node</span><span class="token punctuation" style="color:#393A34">:</span><span class="token plain"> node</span><span class="token punctuation" style="color:#393A34">,</span><span class="token plain"></span><br></div><div class="token-line" style="color:#393A34"><span class="token plain">        publisher</span><span class="token punctuation" style="color:#393A34">,</span><span class="token plain"></span><br></div><div class="token-line" style="color:#393A34"><span class="token plain">        data</span><span class="token punctuation" style="color:#393A34">,</span><span class="token plain"></span><br></div><div class="token-line" style="color:#393A34"><span class="token plain">    </span><span class="token punctuation" style="color:#393A34">}</span><span class="token punctuation" style="color:#393A34">)</span><span class="token plain"></span><br></div><div class="token-line" style="color:#393A34"><span class="token plain"></span><span class="token punctuation" style="color:#393A34">}</span><br></div></code></pre></div></div>
<p>I then run the publishing node in its own thread, where each iteration of the thread publishes the count, prints out a message, increments the count, then waits for a second.</p>
<div class="language-rust codeBlockContainer_Ckt0 theme-code-block" style="--prism-color:#393A34;--prism-background-color:#f6f8fa"><div class="codeBlockContent_QJqH"><pre tabindex="0" class="prism-code language-rust codeBlock_bY9V thin-scrollbar" style="color:#393A34;background-color:#f6f8fa"><code class="codeBlockLines_e6Vv"><div class="token-line" style="color:#393A34"><span class="token keyword" style="color:#00009f">fn</span><span class="token plain"> </span><span class="token function-definition function" style="color:#d73a49">start</span><span class="token punctuation" style="color:#393A34">(</span><span class="token keyword" style="color:#00009f">self</span><span class="token punctuation" style="color:#393A34">)</span><span class="token plain"> </span><span class="token punctuation" style="color:#393A34">{</span><span class="token plain"></span><br></div><div class="token-line" style="color:#393A34"><span class="token plain">    </span><span class="token namespace" style="opacity:0.7">std</span><span class="token namespace punctuation" style="opacity:0.7;color:#393A34">::</span><span class="token namespace" style="opacity:0.7">thread</span><span class="token namespace punctuation" style="opacity:0.7;color:#393A34">::</span><span class="token function" style="color:#d73a49">spawn</span><span class="token punctuation" style="color:#393A34">(</span><span class="token keyword" style="color:#00009f">move</span><span class="token plain"> </span><span class="token closure-params closure-punctuation punctuation" style="color:#393A34">|</span><span class="token closure-params closure-punctuation punctuation" style="color:#393A34">|</span><span class="token plain"> </span><span class="token punctuation" style="color:#393A34">-&gt;</span><span class="token plain"> </span><span class="token class-name">Result</span><span class="token operator" style="color:#393A34">&lt;</span><span class="token punctuation" style="color:#393A34">(</span><span class="token punctuation" style="color:#393A34">)</span><span class="token punctuation" style="color:#393A34">,</span><span class="token plain"> </span><span class="token namespace" style="opacity:0.7">rclrs</span><span class="token namespace punctuation" style="opacity:0.7;color:#393A34">::</span><span class="token class-name">RclrsError</span><span class="token operator" style="color:#393A34">&gt;</span><span class="token plain"> </span><span class="token punctuation" style="color:#393A34">{</span><span class="token plain"></span><br></div><div class="token-line" style="color:#393A34"><span class="token plain">        </span><span class="token keyword" style="color:#00009f">loop</span><span class="token plain"> </span><span class="token punctuation" style="color:#393A34">{</span><span class="token plain"></span><br></div><div class="token-line" style="color:#393A34"><span class="token plain">            </span><span class="token keyword" style="color:#00009f">self</span><span class="token punctuation" style="color:#393A34">.</span><span class="token plain">publisher</span><span class="token punctuation" style="color:#393A34">.</span><span class="token function" style="color:#d73a49">publish</span><span class="token punctuation" style="color:#393A34">(</span><span class="token operator" style="color:#393A34">&amp;</span><span class="token class-name">Int16Msg</span><span class="token plain"> </span><span class="token punctuation" style="color:#393A34">{</span><span class="token plain"></span><br></div><div class="token-line" style="color:#393A34"><span class="token plain">                data</span><span class="token punctuation" style="color:#393A34">:</span><span class="token plain"> </span><span class="token operator" style="color:#393A34">*</span><span class="token keyword" style="color:#00009f">self</span><span class="token punctuation" style="color:#393A34">.</span><span class="token plain">data</span><span class="token punctuation" style="color:#393A34">.</span><span class="token function" style="color:#d73a49">lock</span><span class="token punctuation" style="color:#393A34">(</span><span class="token punctuation" style="color:#393A34">)</span><span class="token punctuation" style="color:#393A34">.</span><span class="token function" style="color:#d73a49">unwrap</span><span class="token punctuation" style="color:#393A34">(</span><span class="token punctuation" style="color:#393A34">)</span><span class="token punctuation" style="color:#393A34">,</span><span class="token plain"></span><br></div><div class="token-line" style="color:#393A34"><span class="token plain">            </span><span class="token punctuation" style="color:#393A34">}</span><span class="token punctuation" style="color:#393A34">)</span><span class="token operator" style="color:#393A34">?</span><span class="token punctuation" style="color:#393A34">;</span><span class="token plain"></span><br></div><div class="token-line" style="color:#393A34"><span class="token plain">            </span><span class="token macro property" style="color:#36acaa">println!</span><span class="token punctuation" style="color:#393A34">(</span><span class="token string" style="color:#e3116c">"counter: Published {}"</span><span class="token punctuation" style="color:#393A34">,</span><span class="token plain"> </span><span class="token operator" style="color:#393A34">*</span><span class="token keyword" style="color:#00009f">self</span><span class="token punctuation" style="color:#393A34">.</span><span class="token plain">data</span><span class="token punctuation" style="color:#393A34">.</span><span class="token function" style="color:#d73a49">lock</span><span class="token punctuation" style="color:#393A34">(</span><span class="token punctuation" style="color:#393A34">)</span><span class="token punctuation" style="color:#393A34">.</span><span class="token function" style="color:#d73a49">unwrap</span><span class="token punctuation" style="color:#393A34">(</span><span class="token punctuation" style="color:#393A34">)</span><span class="token punctuation" style="color:#393A34">)</span><span class="token punctuation" style="color:#393A34">;</span><span class="token plain"></span><br></div><div class="token-line" style="color:#393A34"><span class="token plain">            </span><span class="token operator" style="color:#393A34">*</span><span class="token keyword" style="color:#00009f">self</span><span class="token punctuation" style="color:#393A34">.</span><span class="token plain">data</span><span class="token punctuation" style="color:#393A34">.</span><span class="token function" style="color:#d73a49">lock</span><span class="token punctuation" style="color:#393A34">(</span><span class="token punctuation" style="color:#393A34">)</span><span class="token punctuation" style="color:#393A34">.</span><span class="token function" style="color:#d73a49">unwrap</span><span class="token punctuation" style="color:#393A34">(</span><span class="token punctuation" style="color:#393A34">)</span><span class="token plain"> </span><span class="token operator" style="color:#393A34">+=</span><span class="token plain"> </span><span class="token number" style="color:#36acaa">1</span><span class="token punctuation" style="color:#393A34">;</span><span class="token plain"></span><br></div><div class="token-line" style="color:#393A34"><span class="token plain">            </span><span class="token namespace" style="opacity:0.7">std</span><span class="token namespace punctuation" style="opacity:0.7;color:#393A34">::</span><span class="token namespace" style="opacity:0.7">thread</span><span class="token namespace punctuation" style="opacity:0.7;color:#393A34">::</span><span class="token function" style="color:#d73a49">sleep</span><span class="token punctuation" style="color:#393A34">(</span><span class="token namespace" style="opacity:0.7">std</span><span class="token namespace punctuation" style="opacity:0.7;color:#393A34">::</span><span class="token namespace" style="opacity:0.7">time</span><span class="token namespace punctuation" style="opacity:0.7;color:#393A34">::</span><span class="token class-name">Duration</span><span class="token punctuation" style="color:#393A34">::</span><span class="token function" style="color:#d73a49">from_millis</span><span class="token punctuation" style="color:#393A34">(</span><span class="token number" style="color:#36acaa">1000</span><span class="token punctuation" style="color:#393A34">)</span><span class="token punctuation" style="color:#393A34">)</span><span class="token punctuation" style="color:#393A34">;</span><span class="token plain"></span><br></div><div class="token-line" style="color:#393A34"><span class="token plain">        </span><span class="token punctuation" style="color:#393A34">}</span><span class="token plain"></span><br></div><div class="token-line" style="color:#393A34"><span class="token plain">    </span><span class="token punctuation" style="color:#393A34">}</span><span class="token punctuation" style="color:#393A34">)</span><span class="token punctuation" style="color:#393A34">;</span><span class="token plain"></span><br></div><div class="token-line" style="color:#393A34"><span class="token plain"></span><span class="token punctuation" style="color:#393A34">}</span><br></div></code></pre></div></div>
<div class="theme-admonition theme-admonition-note admonition_xJq3 alert alert--secondary"><div class="admonitionHeading_Gvgb"><span class="admonitionIcon_Rf37"><svg viewBox="0 0 14 16"><path fill-rule="evenodd" d="M6.3 5.69a.942.942 0 0 1-.28-.7c0-.28.09-.52.28-.7.19-.18.42-.28.7-.28.28 0 .52.09.7.28.18.19.28.42.28.7 0 .28-.09.52-.28.7a1 1 0 0 1-.7.3c-.28 0-.52-.11-.7-.3zM8 7.99c-.02-.25-.11-.48-.31-.69-.2-.19-.42-.3-.69-.31H6c-.27.02-.48.13-.69.31-.2.2-.3.44-.31.69h1v3c.02.27.11.5.31.69.2.2.42.31.69.31h1c.27 0 .48-.11.69-.31.2-.19.3-.42.31-.69H8V7.98v.01zM7 2.3c-3.14 0-5.7 2.54-5.7 5.68 0 3.14 2.56 5.7 5.7 5.7s5.7-2.55 5.7-5.7c0-3.15-2.56-5.69-5.7-5.69v.01zM7 .98c3.86 0 7 3.14 7 7s-3.14 7-7 7-7-3.12-7-7 3.14-7 7-7z"></path></svg></span>ROS Logging</div><div class="admonitionContent_BuS1"><p>I could have used the <code>log_info</code> macro instead of <code>println</code> here, which would have worked better with the ROS logging system. Instead, I chose to match the behaviour of <code>roslibrust</code> using <code>println</code>, as <code>roslibrust</code> doesn't support ROS logging (that I know of).</p></div></div>
<p><strong><code>roslibrust</code></strong></p>
<p><code>roslibrust</code>'s way of operating is to use async tasks instead of full threads. One function creates a publisher, stores data in local variables, and starts looping. Each loop publishes the count variable, then uses <code>tokio</code> time intervals to wait until the next second has elapsed. Tokio is the async framework that handles all the task execution logic, which is how all the tasks can run in parallel within the same thread.</p>
<div class="theme-admonition theme-admonition-note admonition_xJq3 alert alert--secondary"><div class="admonitionHeading_Gvgb"><span class="admonitionIcon_Rf37"><svg viewBox="0 0 14 16"><path fill-rule="evenodd" d="M6.3 5.69a.942.942 0 0 1-.28-.7c0-.28.09-.52.28-.7.19-.18.42-.28.7-.28.28 0 .52.09.7.28.18.19.28.42.28.7 0 .28-.09.52-.28.7a1 1 0 0 1-.7.3c-.28 0-.52-.11-.7-.3zM8 7.99c-.02-.25-.11-.48-.31-.69-.2-.19-.42-.3-.69-.31H6c-.27.02-.48.13-.69.31-.2.2-.3.44-.31.69h1v3c.02.27.11.5.31.69.2.2.42.31.69.31h1c.27 0 .48-.11.69-.31.2-.19.3-.42.31-.69H8V7.98v.01zM7 2.3c-3.14 0-5.7 2.54-5.7 5.68 0 3.14 2.56 5.7 5.7 5.7s5.7-2.55 5.7-5.7c0-3.15-2.56-5.69-5.7-5.69v.01zM7 .98c3.86 0 7 3.14 7 7s-3.14 7-7 7-7-3.12-7-7 3.14-7 7-7z"></path></svg></span>Tokio Threading</div><div class="admonitionContent_BuS1"><p>While <code>roslibrust</code> application code is written as async tasks, these tasks can be executed in the same thread or across multiple threads. This depends on the tokio configuration. By default, Tokio creates as many worker threads as there are cores.</p></div></div>
<div class="language-rust codeBlockContainer_Ckt0 theme-code-block" style="--prism-color:#393A34;--prism-background-color:#f6f8fa"><div class="codeBlockContent_QJqH"><pre tabindex="0" class="prism-code language-rust codeBlock_bY9V thin-scrollbar" style="color:#393A34;background-color:#f6f8fa"><code class="codeBlockLines_e6Vv"><div class="token-line" style="color:#393A34"><span class="token keyword" style="color:#00009f">async</span><span class="token plain"> </span><span class="token keyword" style="color:#00009f">fn</span><span class="token plain"> </span><span class="token function-definition function" style="color:#d73a49">pub_counter</span><span class="token punctuation" style="color:#393A34">(</span><span class="token plain">ros</span><span class="token punctuation" style="color:#393A34">:</span><span class="token plain"> </span><span class="token keyword" style="color:#00009f">impl</span><span class="token plain"> </span><span class="token namespace" style="opacity:0.7">roslibrust</span><span class="token namespace punctuation" style="opacity:0.7;color:#393A34">::</span><span class="token class-name">Ros</span><span class="token punctuation" style="color:#393A34">)</span><span class="token plain"> </span><span class="token punctuation" style="color:#393A34">{</span><span class="token plain"></span><br></div><div class="token-line" style="color:#393A34"><span class="token plain">    </span><span class="token keyword" style="color:#00009f">let</span><span class="token plain"> publisher </span><span class="token operator" style="color:#393A34">=</span><span class="token plain"> ros</span><br></div><div class="token-line" style="color:#393A34"><span class="token plain">        </span><span class="token punctuation" style="color:#393A34">.</span><span class="token function" style="color:#d73a49">advertise</span><span class="token punctuation" style="color:#393A34">::</span><span class="token operator" style="color:#393A34">&lt;</span><span class="token namespace" style="opacity:0.7">std_msgs</span><span class="token namespace punctuation" style="opacity:0.7;color:#393A34">::</span><span class="token class-name">Int16</span><span class="token operator" style="color:#393A34">&gt;</span><span class="token punctuation" style="color:#393A34">(</span><span class="token string" style="color:#e3116c">"example_counter"</span><span class="token punctuation" style="color:#393A34">)</span><span class="token plain"></span><br></div><div class="token-line" style="color:#393A34"><span class="token plain">        </span><span class="token punctuation" style="color:#393A34">.</span><span class="token keyword" style="color:#00009f">await</span><span class="token plain"></span><br></div><div class="token-line" style="color:#393A34"><span class="token plain">        </span><span class="token punctuation" style="color:#393A34">.</span><span class="token function" style="color:#d73a49">unwrap</span><span class="token punctuation" style="color:#393A34">(</span><span class="token punctuation" style="color:#393A34">)</span><span class="token punctuation" style="color:#393A34">;</span><span class="token plain"></span><br></div><div class="token-line" style="color:#393A34"><span class="token plain">    </span><span class="token keyword" style="color:#00009f">let</span><span class="token plain"> </span><span class="token keyword" style="color:#00009f">mut</span><span class="token plain"> counter </span><span class="token operator" style="color:#393A34">=</span><span class="token plain"> </span><span class="token number" style="color:#36acaa">0</span><span class="token punctuation" style="color:#393A34">;</span><span class="token plain"></span><br></div><div class="token-line" style="color:#393A34"><span class="token plain">    </span><span class="token keyword" style="color:#00009f">let</span><span class="token plain"> </span><span class="token keyword" style="color:#00009f">mut</span><span class="token plain"> interval </span><span class="token operator" style="color:#393A34">=</span><span class="token plain"> </span><span class="token namespace" style="opacity:0.7">tokio</span><span class="token namespace punctuation" style="opacity:0.7;color:#393A34">::</span><span class="token namespace" style="opacity:0.7">time</span><span class="token namespace punctuation" style="opacity:0.7;color:#393A34">::</span><span class="token function" style="color:#d73a49">interval</span><span class="token punctuation" style="color:#393A34">(</span><span class="token namespace" style="opacity:0.7">tokio</span><span class="token namespace punctuation" style="opacity:0.7;color:#393A34">::</span><span class="token namespace" style="opacity:0.7">time</span><span class="token namespace punctuation" style="opacity:0.7;color:#393A34">::</span><span class="token class-name">Duration</span><span class="token punctuation" style="color:#393A34">::</span><span class="token function" style="color:#d73a49">from_secs</span><span class="token punctuation" style="color:#393A34">(</span><span class="token number" style="color:#36acaa">1</span><span class="token punctuation" style="color:#393A34">)</span><span class="token punctuation" style="color:#393A34">)</span><span class="token punctuation" style="color:#393A34">;</span><span class="token plain"></span><br></div><div class="token-line" style="color:#393A34"><span class="token plain">    </span><span class="token keyword" style="color:#00009f">loop</span><span class="token plain"> </span><span class="token punctuation" style="color:#393A34">{</span><span class="token plain"></span><br></div><div class="token-line" style="color:#393A34"><span class="token plain">        interval</span><span class="token punctuation" style="color:#393A34">.</span><span class="token function" style="color:#d73a49">tick</span><span class="token punctuation" style="color:#393A34">(</span><span class="token punctuation" style="color:#393A34">)</span><span class="token punctuation" style="color:#393A34">.</span><span class="token keyword" style="color:#00009f">await</span><span class="token punctuation" style="color:#393A34">;</span><span class="token plain"></span><br></div><div class="token-line" style="color:#393A34"><span class="token plain">        publisher</span><br></div><div class="token-line" style="color:#393A34"><span class="token plain">            </span><span class="token punctuation" style="color:#393A34">.</span><span class="token function" style="color:#d73a49">publish</span><span class="token punctuation" style="color:#393A34">(</span><span class="token operator" style="color:#393A34">&amp;</span><span class="token namespace" style="opacity:0.7">std_msgs</span><span class="token namespace punctuation" style="opacity:0.7;color:#393A34">::</span><span class="token class-name">Int16</span><span class="token plain"> </span><span class="token punctuation" style="color:#393A34">{</span><span class="token plain"> data</span><span class="token punctuation" style="color:#393A34">:</span><span class="token plain"> counter </span><span class="token punctuation" style="color:#393A34">}</span><span class="token punctuation" style="color:#393A34">)</span><span class="token plain"></span><br></div><div class="token-line" style="color:#393A34"><span class="token plain">            </span><span class="token punctuation" style="color:#393A34">.</span><span class="token keyword" style="color:#00009f">await</span><span class="token plain"></span><br></div><div class="token-line" style="color:#393A34"><span class="token plain">            </span><span class="token punctuation" style="color:#393A34">.</span><span class="token function" style="color:#d73a49">unwrap</span><span class="token punctuation" style="color:#393A34">(</span><span class="token punctuation" style="color:#393A34">)</span><span class="token punctuation" style="color:#393A34">;</span><span class="token plain"></span><br></div><div class="token-line" style="color:#393A34"><span class="token plain">        </span><span class="token macro property" style="color:#36acaa">println!</span><span class="token punctuation" style="color:#393A34">(</span><span class="token string" style="color:#e3116c">"Published {counter}"</span><span class="token punctuation" style="color:#393A34">)</span><span class="token punctuation" style="color:#393A34">;</span><span class="token plain"></span><br></div><div class="token-line" style="color:#393A34"><span class="token plain">        counter </span><span class="token operator" style="color:#393A34">+=</span><span class="token plain"> </span><span class="token number" style="color:#36acaa">1</span><span class="token punctuation" style="color:#393A34">;</span><span class="token plain"></span><br></div><div class="token-line" style="color:#393A34"><span class="token plain">    </span><span class="token punctuation" style="color:#393A34">}</span><span class="token plain"></span><br></div><div class="token-line" style="color:#393A34"><span class="token plain"></span><span class="token punctuation" style="color:#393A34">}</span><br></div></code></pre></div></div>
<p>Note that the publisher is constructed from the <code>ros</code> object passed in to the function, which implements the <code>Ros</code> trait. This is how <code>roslibrust</code> handles different backends; create a backend implementation that supports the <code>Ros</code> trait, and the code inside the function can use that implementation without knowing what it is. That means this code works just as well for ROS 1 as it does for ROS 2 - just pass in a different backend implementation. This is also how <code>roslibrust</code> supports excellent mocking: pass in a backend that uses mock data structures, and you can fully unit test your code. Here's a unit test doing exactly that:</p>
<div class="language-rust codeBlockContainer_Ckt0 theme-code-block" style="--prism-color:#393A34;--prism-background-color:#f6f8fa"><div class="codeBlockContent_QJqH"><pre tabindex="0" class="prism-code language-rust codeBlock_bY9V thin-scrollbar" style="color:#393A34;background-color:#f6f8fa"><code class="codeBlockLines_e6Vv"><div class="token-line" style="color:#393A34"><span class="token plain">    </span><span class="token attribute attr-name" style="color:#00a4db">#[tokio::test(start_paused = true)]</span><span class="token plain"></span><br></div><div class="token-line" style="color:#393A34"><span class="token plain">    </span><span class="token keyword" style="color:#00009f">async</span><span class="token plain"> </span><span class="token keyword" style="color:#00009f">fn</span><span class="token plain"> </span><span class="token function-definition function" style="color:#d73a49">test_pub_counter</span><span class="token punctuation" style="color:#393A34">(</span><span class="token punctuation" style="color:#393A34">)</span><span class="token plain"> </span><span class="token punctuation" style="color:#393A34">{</span><span class="token plain"></span><br></div><div class="token-line" style="color:#393A34"><span class="token plain">        </span><span class="token keyword" style="color:#00009f">let</span><span class="token plain"> ros </span><span class="token operator" style="color:#393A34">=</span><span class="token plain"> </span><span class="token namespace" style="opacity:0.7">roslibrust</span><span class="token namespace punctuation" style="opacity:0.7;color:#393A34">::</span><span class="token namespace" style="opacity:0.7">mock</span><span class="token namespace punctuation" style="opacity:0.7;color:#393A34">::</span><span class="token class-name">MockRos</span><span class="token punctuation" style="color:#393A34">::</span><span class="token function" style="color:#d73a49">new</span><span class="token punctuation" style="color:#393A34">(</span><span class="token punctuation" style="color:#393A34">)</span><span class="token punctuation" style="color:#393A34">;</span><span class="token plain"></span><br></div><div class="token-line" style="color:#393A34"><span class="token plain">        </span><span class="token keyword" style="color:#00009f">let</span><span class="token plain"> </span><span class="token keyword" style="color:#00009f">mut</span><span class="token plain"> subscriber </span><span class="token operator" style="color:#393A34">=</span><span class="token plain"> ros</span><br></div><div class="token-line" style="color:#393A34"><span class="token plain">            </span><span class="token punctuation" style="color:#393A34">.</span><span class="token function" style="color:#d73a49">subscribe</span><span class="token punctuation" style="color:#393A34">::</span><span class="token operator" style="color:#393A34">&lt;</span><span class="token namespace" style="opacity:0.7">std_msgs</span><span class="token namespace punctuation" style="opacity:0.7;color:#393A34">::</span><span class="token class-name">Int16</span><span class="token operator" style="color:#393A34">&gt;</span><span class="token punctuation" style="color:#393A34">(</span><span class="token string" style="color:#e3116c">"example_counter"</span><span class="token punctuation" style="color:#393A34">)</span><span class="token plain"></span><br></div><div class="token-line" style="color:#393A34"><span class="token plain">            </span><span class="token punctuation" style="color:#393A34">.</span><span class="token keyword" style="color:#00009f">await</span><span class="token plain"></span><br></div><div class="token-line" style="color:#393A34"><span class="token plain">            </span><span class="token punctuation" style="color:#393A34">.</span><span class="token function" style="color:#d73a49">unwrap</span><span class="token punctuation" style="color:#393A34">(</span><span class="token punctuation" style="color:#393A34">)</span><span class="token punctuation" style="color:#393A34">;</span><span class="token plain"></span><br></div><div class="token-line" style="color:#393A34"><span class="token plain">        </span><span class="token namespace" style="opacity:0.7">tokio</span><span class="token namespace punctuation" style="opacity:0.7;color:#393A34">::</span><span class="token function" style="color:#d73a49">spawn</span><span class="token punctuation" style="color:#393A34">(</span><span class="token keyword" style="color:#00009f">async</span><span class="token plain"> </span><span class="token keyword" style="color:#00009f">move</span><span class="token plain"> </span><span class="token punctuation" style="color:#393A34">{</span><span class="token plain"> </span><span class="token function" style="color:#d73a49">pub_counter</span><span class="token punctuation" style="color:#393A34">(</span><span class="token plain">ros</span><span class="token punctuation" style="color:#393A34">)</span><span class="token punctuation" style="color:#393A34">.</span><span class="token keyword" style="color:#00009f">await</span><span class="token plain"> </span><span class="token punctuation" style="color:#393A34">}</span><span class="token punctuation" style="color:#393A34">)</span><span class="token punctuation" style="color:#393A34">;</span><span class="token plain"></span><br></div><div class="token-line" style="color:#393A34"><span class="token plain" style="display:inline-block"></span><br></div><div class="token-line" style="color:#393A34"><span class="token plain">        </span><span class="token comment" style="color:#999988;font-style:italic">// Confirm we get the first message</span><span class="token plain"></span><br></div><div class="token-line" style="color:#393A34"><span class="token plain">        </span><span class="token keyword" style="color:#00009f">let</span><span class="token plain"> msg </span><span class="token operator" style="color:#393A34">=</span><span class="token plain"> subscriber</span><span class="token punctuation" style="color:#393A34">.</span><span class="token function" style="color:#d73a49">next</span><span class="token punctuation" style="color:#393A34">(</span><span class="token punctuation" style="color:#393A34">)</span><span class="token punctuation" style="color:#393A34">.</span><span class="token keyword" style="color:#00009f">await</span><span class="token punctuation" style="color:#393A34">.</span><span class="token function" style="color:#d73a49">unwrap</span><span class="token punctuation" style="color:#393A34">(</span><span class="token punctuation" style="color:#393A34">)</span><span class="token punctuation" style="color:#393A34">;</span><span class="token plain"></span><br></div><div class="token-line" style="color:#393A34"><span class="token plain">        </span><span class="token macro property" style="color:#36acaa">assert_eq!</span><span class="token punctuation" style="color:#393A34">(</span><span class="token plain">msg</span><span class="token punctuation" style="color:#393A34">.</span><span class="token plain">data</span><span class="token punctuation" style="color:#393A34">,</span><span class="token plain"> </span><span class="token number" style="color:#36acaa">0</span><span class="token punctuation" style="color:#393A34">)</span><span class="token punctuation" style="color:#393A34">;</span><span class="token plain"></span><br></div><div class="token-line" style="color:#393A34"><span class="token plain">        </span><span class="token punctuation" style="color:#393A34">...</span><span class="token plain"></span><br></div><div class="token-line" style="color:#393A34"><span class="token plain">    </span><span class="token punctuation" style="color:#393A34">}</span><br></div></code></pre></div></div>
<p>This test shows constructing a mock backend, subscribing to the same topic that the publisher publishes to, then building the counter and passing it to Tokio to manage. This is all the setup needed before checking received messages, and Tokio simulates time passing instead of actually waiting, meaning that all the tests run <em>extremely</em> quickly. The test in the source code also checks the timing of publishing and the counter being incremented, but I left these out for brevity.</p>
<h3 class="anchor anchorTargetStickyNavbar_Vzrq" id="imu-summing-node">IMU Summing Node<a href="https://mikelikesrobots.github.io/blog/ros2-rust-comparison#imu-summing-node" class="hash-link" aria-label="Direct link to IMU Summing Node" title="Direct link to IMU Summing Node" translate="no">​</a></h3>
<p><strong><code>ros2rust</code></strong></p>
<p>In <code>ros2rust</code>, the subscription takes a function that can be called when a new message is received:</p>
<div class="language-rust codeBlockContainer_Ckt0 theme-code-block" style="--prism-color:#393A34;--prism-background-color:#f6f8fa"><div class="codeBlockContent_QJqH"><pre tabindex="0" class="prism-code language-rust codeBlock_bY9V thin-scrollbar" style="color:#393A34;background-color:#f6f8fa"><code class="codeBlockLines_e6Vv"><div class="token-line" style="color:#393A34"><span class="token keyword" style="color:#00009f">let</span><span class="token plain"> subscription </span><span class="token operator" style="color:#393A34">=</span><span class="token plain"></span><br></div><div class="token-line" style="color:#393A34"><span class="token plain">    worker</span><span class="token punctuation" style="color:#393A34">.</span><span class="token function" style="color:#d73a49">create_subscription</span><span class="token punctuation" style="color:#393A34">(</span><span class="token string" style="color:#e3116c">"/imu"</span><span class="token punctuation" style="color:#393A34">,</span><span class="token plain"> </span><span class="token closure-params closure-punctuation punctuation" style="color:#393A34">|</span><span class="token closure-params">data</span><span class="token closure-params punctuation" style="color:#393A34">:</span><span class="token closure-params"> </span><span class="token closure-params operator" style="color:#393A34">&amp;</span><span class="token closure-params keyword" style="color:#00009f">mut</span><span class="token closure-params"> </span><span class="token closure-params class-name">SumData</span><span class="token closure-params punctuation" style="color:#393A34">,</span><span class="token closure-params"> msg</span><span class="token closure-params punctuation" style="color:#393A34">:</span><span class="token closure-params"> </span><span class="token closure-params class-name">ImuMsg</span><span class="token closure-params closure-punctuation punctuation" style="color:#393A34">|</span><span class="token plain"> </span><span class="token punctuation" style="color:#393A34">{</span><span class="token plain"></span><br></div><div class="token-line" style="color:#393A34"><span class="token plain">        data</span><span class="token punctuation" style="color:#393A34">.</span><span class="token plain">sum </span><span class="token operator" style="color:#393A34">+=</span><span class="token plain"> msg</span><span class="token punctuation" style="color:#393A34">.</span><span class="token plain">angular_velocity</span><span class="token punctuation" style="color:#393A34">.</span><span class="token plain">x</span><span class="token punctuation" style="color:#393A34">;</span><span class="token plain"></span><br></div><div class="token-line" style="color:#393A34"><span class="token plain">        </span><span class="token macro property" style="color:#36acaa">println!</span><span class="token punctuation" style="color:#393A34">(</span><span class="token string" style="color:#e3116c">"Got x: {}, sum: {}"</span><span class="token punctuation" style="color:#393A34">,</span><span class="token plain"> msg</span><span class="token punctuation" style="color:#393A34">.</span><span class="token plain">angular_velocity</span><span class="token punctuation" style="color:#393A34">.</span><span class="token plain">x</span><span class="token punctuation" style="color:#393A34">,</span><span class="token plain"> data</span><span class="token punctuation" style="color:#393A34">.</span><span class="token plain">sum</span><span class="token punctuation" style="color:#393A34">)</span><span class="token punctuation" style="color:#393A34">;</span><span class="token plain"></span><br></div><div class="token-line" style="color:#393A34"><span class="token plain">    </span><span class="token punctuation" style="color:#393A34">}</span><span class="token punctuation" style="color:#393A34">)</span><span class="token operator" style="color:#393A34">?</span><span class="token punctuation" style="color:#393A34">;</span><br></div></code></pre></div></div>
<p>The <code>data</code> passed in here is the running sum of data, and <code>ros2rust</code> will pass the updated data to each invocation of the callback function, which allows it to keep a sum of data over time.</p>
<p><strong><code>roslibrust</code></strong></p>
<p>In <code>roslibrust</code>, instead of the subscription taking a callback function as a parameter, the task itself waits for messages to be received before acting on them. Once any message is received, it adds the x value to the <code>state</code> variable originally passed into the function and prints out the new value. This is slightly different from the publisher function storing the data locally, but by passing in a reference to an <code>f64</code> instead of using local data, we can then check the value is added to correctly in unit tests.</p>
<div class="language-rust codeBlockContainer_Ckt0 theme-code-block" style="--prism-color:#393A34;--prism-background-color:#f6f8fa"><div class="codeBlockContent_QJqH"><pre tabindex="0" class="prism-code language-rust codeBlock_bY9V thin-scrollbar" style="color:#393A34;background-color:#f6f8fa"><code class="codeBlockLines_e6Vv"><div class="token-line" style="color:#393A34"><span class="token keyword" style="color:#00009f">async</span><span class="token plain"> </span><span class="token keyword" style="color:#00009f">fn</span><span class="token plain"> </span><span class="token function-definition function" style="color:#d73a49">imu_summer</span><span class="token punctuation" style="color:#393A34">(</span><span class="token plain">ros</span><span class="token punctuation" style="color:#393A34">:</span><span class="token plain"> </span><span class="token keyword" style="color:#00009f">impl</span><span class="token plain"> </span><span class="token namespace" style="opacity:0.7">roslibrust</span><span class="token namespace punctuation" style="opacity:0.7;color:#393A34">::</span><span class="token class-name">Ros</span><span class="token punctuation" style="color:#393A34">,</span><span class="token plain"> state</span><span class="token punctuation" style="color:#393A34">:</span><span class="token plain"> </span><span class="token class-name">Arc</span><span class="token operator" style="color:#393A34">&lt;</span><span class="token class-name">Mutex</span><span class="token operator" style="color:#393A34">&lt;</span><span class="token keyword" style="color:#00009f">f64</span><span class="token operator" style="color:#393A34">&gt;&gt;</span><span class="token punctuation" style="color:#393A34">)</span><span class="token plain"> </span><span class="token punctuation" style="color:#393A34">{</span><span class="token plain"></span><br></div><div class="token-line" style="color:#393A34"><span class="token plain">    </span><span class="token keyword" style="color:#00009f">let</span><span class="token plain"> </span><span class="token keyword" style="color:#00009f">mut</span><span class="token plain"> subscriber </span><span class="token operator" style="color:#393A34">=</span><span class="token plain"> ros</span><br></div><div class="token-line" style="color:#393A34"><span class="token plain">        </span><span class="token punctuation" style="color:#393A34">.</span><span class="token function" style="color:#d73a49">subscribe</span><span class="token punctuation" style="color:#393A34">::</span><span class="token operator" style="color:#393A34">&lt;</span><span class="token namespace" style="opacity:0.7">sensor_msgs</span><span class="token namespace punctuation" style="opacity:0.7;color:#393A34">::</span><span class="token class-name">Imu</span><span class="token operator" style="color:#393A34">&gt;</span><span class="token punctuation" style="color:#393A34">(</span><span class="token string" style="color:#e3116c">"/imu"</span><span class="token punctuation" style="color:#393A34">)</span><span class="token plain"></span><br></div><div class="token-line" style="color:#393A34"><span class="token plain">        </span><span class="token punctuation" style="color:#393A34">.</span><span class="token keyword" style="color:#00009f">await</span><span class="token plain"></span><br></div><div class="token-line" style="color:#393A34"><span class="token plain">        </span><span class="token punctuation" style="color:#393A34">.</span><span class="token function" style="color:#d73a49">expect</span><span class="token punctuation" style="color:#393A34">(</span><span class="token string" style="color:#e3116c">"Could not create subscriber!"</span><span class="token punctuation" style="color:#393A34">)</span><span class="token punctuation" style="color:#393A34">;</span><span class="token plain"></span><br></div><div class="token-line" style="color:#393A34"><span class="token plain" style="display:inline-block"></span><br></div><div class="token-line" style="color:#393A34"><span class="token plain">    </span><span class="token keyword" style="color:#00009f">loop</span><span class="token plain"> </span><span class="token punctuation" style="color:#393A34">{</span><span class="token plain"></span><br></div><div class="token-line" style="color:#393A34"><span class="token plain">        </span><span class="token keyword" style="color:#00009f">let</span><span class="token plain"> msg </span><span class="token operator" style="color:#393A34">=</span><span class="token plain"> subscriber</span><span class="token punctuation" style="color:#393A34">.</span><span class="token function" style="color:#d73a49">next</span><span class="token punctuation" style="color:#393A34">(</span><span class="token punctuation" style="color:#393A34">)</span><span class="token punctuation" style="color:#393A34">.</span><span class="token keyword" style="color:#00009f">await</span><span class="token punctuation" style="color:#393A34">.</span><span class="token function" style="color:#d73a49">expect</span><span class="token punctuation" style="color:#393A34">(</span><span class="token string" style="color:#e3116c">"Failed to get a message!"</span><span class="token punctuation" style="color:#393A34">)</span><span class="token punctuation" style="color:#393A34">;</span><span class="token plain"></span><br></div><div class="token-line" style="color:#393A34"><span class="token plain">        </span><span class="token operator" style="color:#393A34">*</span><span class="token plain">state</span><span class="token punctuation" style="color:#393A34">.</span><span class="token function" style="color:#d73a49">lock</span><span class="token punctuation" style="color:#393A34">(</span><span class="token punctuation" style="color:#393A34">)</span><span class="token punctuation" style="color:#393A34">.</span><span class="token keyword" style="color:#00009f">await</span><span class="token plain"> </span><span class="token operator" style="color:#393A34">+=</span><span class="token plain"> msg</span><span class="token punctuation" style="color:#393A34">.</span><span class="token plain">angular_velocity</span><span class="token punctuation" style="color:#393A34">.</span><span class="token plain">x</span><span class="token punctuation" style="color:#393A34">;</span><span class="token plain"></span><br></div><div class="token-line" style="color:#393A34"><span class="token plain">        </span><span class="token macro property" style="color:#36acaa">println!</span><span class="token punctuation" style="color:#393A34">(</span><span class="token plain"></span><br></div><div class="token-line" style="color:#393A34"><span class="token plain">            </span><span class="token string" style="color:#e3116c">"Got x: {}, sum: {}"</span><span class="token punctuation" style="color:#393A34">,</span><span class="token plain"></span><br></div><div class="token-line" style="color:#393A34"><span class="token plain">            msg</span><span class="token punctuation" style="color:#393A34">.</span><span class="token plain">angular_velocity</span><span class="token punctuation" style="color:#393A34">.</span><span class="token plain">x</span><span class="token punctuation" style="color:#393A34">,</span><span class="token plain"></span><br></div><div class="token-line" style="color:#393A34"><span class="token plain">            </span><span class="token operator" style="color:#393A34">*</span><span class="token plain">state</span><span class="token punctuation" style="color:#393A34">.</span><span class="token function" style="color:#d73a49">lock</span><span class="token punctuation" style="color:#393A34">(</span><span class="token punctuation" style="color:#393A34">)</span><span class="token punctuation" style="color:#393A34">.</span><span class="token keyword" style="color:#00009f">await</span><span class="token plain"></span><br></div><div class="token-line" style="color:#393A34"><span class="token plain">        </span><span class="token punctuation" style="color:#393A34">)</span><span class="token punctuation" style="color:#393A34">;</span><span class="token plain"></span><br></div><div class="token-line" style="color:#393A34"><span class="token plain">    </span><span class="token punctuation" style="color:#393A34">}</span><span class="token plain"></span><br></div><div class="token-line" style="color:#393A34"><span class="token plain"></span><span class="token punctuation" style="color:#393A34">}</span><br></div></code></pre></div></div>
<h3 class="anchor anchorTargetStickyNavbar_Vzrq" id="float-multiplication-node">Float Multiplication Node<a href="https://mikelikesrobots.github.io/blog/ros2-rust-comparison#float-multiplication-node" class="hash-link" aria-label="Direct link to Float Multiplication Node" title="Direct link to Float Multiplication Node" translate="no">​</a></h3>
<p>In both versions of the service, the service is created with a callback function to respond to the incoming request.</p>
<p><strong><code>ros2rust</code></strong></p>
<p>In <code>ros2rust</code>, the callback function is given a request structure and some information, and is expected to return a response:</p>
<div class="language-rust codeBlockContainer_Ckt0 theme-code-block" style="--prism-color:#393A34;--prism-background-color:#f6f8fa"><div class="codeBlockContent_QJqH"><pre tabindex="0" class="prism-code language-rust codeBlock_bY9V thin-scrollbar" style="color:#393A34;background-color:#f6f8fa"><code class="codeBlockLines_e6Vv"><div class="token-line" style="color:#393A34"><span class="token keyword" style="color:#00009f">fn</span><span class="token plain"> </span><span class="token function-definition function" style="color:#d73a49">handle_mult_floats</span><span class="token punctuation" style="color:#393A34">(</span><span class="token plain">request</span><span class="token punctuation" style="color:#393A34">:</span><span class="token plain"> </span><span class="token class-name">MultFloats_Request</span><span class="token punctuation" style="color:#393A34">,</span><span class="token plain"> _info</span><span class="token punctuation" style="color:#393A34">:</span><span class="token plain"> </span><span class="token class-name">ServiceInfo</span><span class="token punctuation" style="color:#393A34">)</span><span class="token plain"> </span><span class="token punctuation" style="color:#393A34">-&gt;</span><span class="token plain"> </span><span class="token class-name">MultFloats_Response</span><span class="token plain"> </span><span class="token punctuation" style="color:#393A34">{</span><span class="token plain"></span><br></div><div class="token-line" style="color:#393A34"><span class="token plain">    </span><span class="token macro property" style="color:#36acaa">println!</span><span class="token punctuation" style="color:#393A34">(</span><span class="token string" style="color:#e3116c">"Received request: {:?}"</span><span class="token punctuation" style="color:#393A34">,</span><span class="token plain"> request</span><span class="token punctuation" style="color:#393A34">)</span><span class="token punctuation" style="color:#393A34">;</span><span class="token plain"></span><br></div><div class="token-line" style="color:#393A34"><span class="token plain">    </span><span class="token keyword" style="color:#00009f">let</span><span class="token plain"> result </span><span class="token operator" style="color:#393A34">=</span><span class="token plain"> request</span><span class="token punctuation" style="color:#393A34">.</span><span class="token plain">x </span><span class="token operator" style="color:#393A34">*</span><span class="token plain"> request</span><span class="token punctuation" style="color:#393A34">.</span><span class="token plain">y</span><span class="token punctuation" style="color:#393A34">;</span><span class="token plain"></span><br></div><div class="token-line" style="color:#393A34"><span class="token plain">    </span><span class="token macro property" style="color:#36acaa">println!</span><span class="token punctuation" style="color:#393A34">(</span><span class="token string" style="color:#e3116c">"Responding with result: {}"</span><span class="token punctuation" style="color:#393A34">,</span><span class="token plain"> result</span><span class="token punctuation" style="color:#393A34">)</span><span class="token punctuation" style="color:#393A34">;</span><span class="token plain"></span><br></div><div class="token-line" style="color:#393A34"><span class="token plain">    </span><span class="token class-name">MultFloats_Response</span><span class="token plain"> </span><span class="token punctuation" style="color:#393A34">{</span><span class="token plain"> result </span><span class="token punctuation" style="color:#393A34">}</span><span class="token plain"></span><br></div><div class="token-line" style="color:#393A34"><span class="token plain"></span><span class="token punctuation" style="color:#393A34">}</span><br></div></code></pre></div></div>
<p>Note that the service handler can only return a response, not a Result type.</p>
<p>The service is then constructed and stored in its own <code>MultFloatsNode</code> structure:</p>
<div class="language-rust codeBlockContainer_Ckt0 theme-code-block" style="--prism-color:#393A34;--prism-background-color:#f6f8fa"><div class="codeBlockContent_QJqH"><pre tabindex="0" class="prism-code language-rust codeBlock_bY9V thin-scrollbar" style="color:#393A34;background-color:#f6f8fa"><code class="codeBlockLines_e6Vv"><div class="token-line" style="color:#393A34"><span class="token keyword" style="color:#00009f">fn</span><span class="token plain"> </span><span class="token function-definition function" style="color:#d73a49">new</span><span class="token punctuation" style="color:#393A34">(</span><span class="token plain">executor</span><span class="token punctuation" style="color:#393A34">:</span><span class="token plain"> </span><span class="token operator" style="color:#393A34">&amp;</span><span class="token namespace" style="opacity:0.7">rclrs</span><span class="token namespace punctuation" style="opacity:0.7;color:#393A34">::</span><span class="token class-name">Executor</span><span class="token punctuation" style="color:#393A34">)</span><span class="token plain"> </span><span class="token punctuation" style="color:#393A34">-&gt;</span><span class="token plain"> </span><span class="token class-name">Result</span><span class="token operator" style="color:#393A34">&lt;</span><span class="token keyword" style="color:#00009f">Self</span><span class="token punctuation" style="color:#393A34">,</span><span class="token plain"> </span><span class="token namespace" style="opacity:0.7">rclrs</span><span class="token namespace punctuation" style="opacity:0.7;color:#393A34">::</span><span class="token class-name">RclrsError</span><span class="token operator" style="color:#393A34">&gt;</span><span class="token plain"> </span><span class="token punctuation" style="color:#393A34">{</span><span class="token plain"></span><br></div><div class="token-line" style="color:#393A34"><span class="token plain">    </span><span class="token keyword" style="color:#00009f">let</span><span class="token plain"> node </span><span class="token operator" style="color:#393A34">=</span><span class="token plain"> executor</span><span class="token punctuation" style="color:#393A34">.</span><span class="token function" style="color:#d73a49">create_node</span><span class="token punctuation" style="color:#393A34">(</span><span class="token string" style="color:#e3116c">"mult_floats"</span><span class="token punctuation" style="color:#393A34">)</span><span class="token operator" style="color:#393A34">?</span><span class="token punctuation" style="color:#393A34">;</span><span class="token plain"></span><br></div><div class="token-line" style="color:#393A34"><span class="token plain">    </span><span class="token keyword" style="color:#00009f">let</span><span class="token plain"> service </span><span class="token operator" style="color:#393A34">=</span><span class="token plain"></span><br></div><div class="token-line" style="color:#393A34"><span class="token plain">        node</span><span class="token punctuation" style="color:#393A34">.</span><span class="token function" style="color:#d73a49">create_service</span><span class="token punctuation" style="color:#393A34">::</span><span class="token operator" style="color:#393A34">&lt;</span><span class="token class-name">MultFloats</span><span class="token punctuation" style="color:#393A34">,</span><span class="token plain"> _</span><span class="token operator" style="color:#393A34">&gt;</span><span class="token punctuation" style="color:#393A34">(</span><span class="token string" style="color:#e3116c">"mult_floats"</span><span class="token punctuation" style="color:#393A34">,</span><span class="token plain"> </span><span class="token keyword" style="color:#00009f">Self</span><span class="token punctuation" style="color:#393A34">::</span><span class="token plain">handle_mult_floats</span><span class="token punctuation" style="color:#393A34">)</span><span class="token operator" style="color:#393A34">?</span><span class="token punctuation" style="color:#393A34">;</span><span class="token plain"></span><br></div><div class="token-line" style="color:#393A34"><span class="token plain">    </span><span class="token class-name">Ok</span><span class="token punctuation" style="color:#393A34">(</span><span class="token keyword" style="color:#00009f">Self</span><span class="token plain"> </span><span class="token punctuation" style="color:#393A34">{</span><span class="token plain"> service </span><span class="token punctuation" style="color:#393A34">}</span><span class="token punctuation" style="color:#393A34">)</span><span class="token plain"></span><br></div><div class="token-line" style="color:#393A34"><span class="token plain"></span><span class="token punctuation" style="color:#393A34">}</span><br></div></code></pre></div></div>
<p><strong><code>roslibrust</code></strong></p>
<p>In <code>roslibrust</code>, the process is very similar. The callback function is defined first:</p>
<div class="language-rust codeBlockContainer_Ckt0 theme-code-block" style="--prism-color:#393A34;--prism-background-color:#f6f8fa"><div class="codeBlockContent_QJqH"><pre tabindex="0" class="prism-code language-rust codeBlock_bY9V thin-scrollbar" style="color:#393A34;background-color:#f6f8fa"><code class="codeBlockLines_e6Vv"><div class="token-line" style="color:#393A34"><span class="token keyword" style="color:#00009f">fn</span><span class="token plain"> </span><span class="token function-definition function" style="color:#d73a49">handle_mult_float</span><span class="token punctuation" style="color:#393A34">(</span><span class="token plain"></span><br></div><div class="token-line" style="color:#393A34"><span class="token plain">    req</span><span class="token punctuation" style="color:#393A34">:</span><span class="token plain"> </span><span class="token namespace" style="opacity:0.7">mult_msgs</span><span class="token namespace punctuation" style="opacity:0.7;color:#393A34">::</span><span class="token class-name">MultFloatsRequest</span><span class="token punctuation" style="color:#393A34">,</span><span class="token plain"></span><br></div><div class="token-line" style="color:#393A34"><span class="token plain"></span><span class="token punctuation" style="color:#393A34">)</span><span class="token plain"> </span><span class="token punctuation" style="color:#393A34">-&gt;</span><span class="token plain"> </span><span class="token class-name">Result</span><span class="token operator" style="color:#393A34">&lt;</span><span class="token namespace" style="opacity:0.7">mult_msgs</span><span class="token namespace punctuation" style="opacity:0.7;color:#393A34">::</span><span class="token class-name">MultFloatsResponse</span><span class="token punctuation" style="color:#393A34">,</span><span class="token plain"> </span><span class="token class-name">ServiceError</span><span class="token operator" style="color:#393A34">&gt;</span><span class="token plain"> </span><span class="token punctuation" style="color:#393A34">{</span><span class="token plain"></span><br></div><div class="token-line" style="color:#393A34"><span class="token plain">    </span><span class="token macro property" style="color:#36acaa">println!</span><span class="token punctuation" style="color:#393A34">(</span><span class="token string" style="color:#e3116c">"Received request: {:?}"</span><span class="token punctuation" style="color:#393A34">,</span><span class="token plain"> req</span><span class="token punctuation" style="color:#393A34">)</span><span class="token punctuation" style="color:#393A34">;</span><span class="token plain"></span><br></div><div class="token-line" style="color:#393A34"><span class="token plain">    </span><span class="token keyword" style="color:#00009f">let</span><span class="token plain"> result </span><span class="token operator" style="color:#393A34">=</span><span class="token plain"> req</span><span class="token punctuation" style="color:#393A34">.</span><span class="token plain">x </span><span class="token operator" style="color:#393A34">*</span><span class="token plain"> req</span><span class="token punctuation" style="color:#393A34">.</span><span class="token plain">y</span><span class="token punctuation" style="color:#393A34">;</span><span class="token plain"></span><br></div><div class="token-line" style="color:#393A34"><span class="token plain">    </span><span class="token macro property" style="color:#36acaa">println!</span><span class="token punctuation" style="color:#393A34">(</span><span class="token string" style="color:#e3116c">"Responding with result: {}"</span><span class="token punctuation" style="color:#393A34">,</span><span class="token plain"> result</span><span class="token punctuation" style="color:#393A34">)</span><span class="token punctuation" style="color:#393A34">;</span><span class="token plain"></span><br></div><div class="token-line" style="color:#393A34"><span class="token plain">    </span><span class="token class-name">Ok</span><span class="token punctuation" style="color:#393A34">(</span><span class="token namespace" style="opacity:0.7">mult_msgs</span><span class="token namespace punctuation" style="opacity:0.7;color:#393A34">::</span><span class="token class-name">MultFloatsResponse</span><span class="token plain"> </span><span class="token punctuation" style="color:#393A34">{</span><span class="token plain"> result </span><span class="token punctuation" style="color:#393A34">}</span><span class="token punctuation" style="color:#393A34">)</span><span class="token plain"></span><br></div><div class="token-line" style="color:#393A34"><span class="token plain"></span><span class="token punctuation" style="color:#393A34">}</span><br></div></code></pre></div></div>
<p>In this case, the return type is a Result, meaning that the function can return an error if something went wrong.</p>
<p>The service itself is then built using:</p>
<div class="language-rust codeBlockContainer_Ckt0 theme-code-block" style="--prism-color:#393A34;--prism-background-color:#f6f8fa"><div class="codeBlockContent_QJqH"><pre tabindex="0" class="prism-code language-rust codeBlock_bY9V thin-scrollbar" style="color:#393A34;background-color:#f6f8fa"><code class="codeBlockLines_e6Vv"><div class="token-line" style="color:#393A34"><span class="token keyword" style="color:#00009f">async</span><span class="token plain"> </span><span class="token keyword" style="color:#00009f">fn</span><span class="token plain"> </span><span class="token function-definition function" style="color:#d73a49">mult_floats</span><span class="token punctuation" style="color:#393A34">(</span><span class="token plain">ros</span><span class="token punctuation" style="color:#393A34">:</span><span class="token plain"> </span><span class="token keyword" style="color:#00009f">impl</span><span class="token plain"> </span><span class="token namespace" style="opacity:0.7">roslibrust</span><span class="token namespace punctuation" style="opacity:0.7;color:#393A34">::</span><span class="token class-name">Ros</span><span class="token punctuation" style="color:#393A34">)</span><span class="token plain"> </span><span class="token punctuation" style="color:#393A34">{</span><span class="token plain"></span><br></div><div class="token-line" style="color:#393A34"><span class="token plain">    </span><span class="token keyword" style="color:#00009f">let</span><span class="token plain"> _handle </span><span class="token operator" style="color:#393A34">=</span><span class="token plain"> ros</span><br></div><div class="token-line" style="color:#393A34"><span class="token plain">        </span><span class="token punctuation" style="color:#393A34">.</span><span class="token function" style="color:#d73a49">advertise_service</span><span class="token punctuation" style="color:#393A34">::</span><span class="token operator" style="color:#393A34">&lt;</span><span class="token namespace" style="opacity:0.7">mult_msgs</span><span class="token namespace punctuation" style="opacity:0.7;color:#393A34">::</span><span class="token class-name">MultFloats</span><span class="token punctuation" style="color:#393A34">,</span><span class="token plain"> _</span><span class="token operator" style="color:#393A34">&gt;</span><span class="token punctuation" style="color:#393A34">(</span><span class="token string" style="color:#e3116c">"/mult_floats"</span><span class="token punctuation" style="color:#393A34">,</span><span class="token plain"> handle_mult_float</span><span class="token punctuation" style="color:#393A34">)</span><span class="token plain"></span><br></div><div class="token-line" style="color:#393A34"><span class="token plain">        </span><span class="token punctuation" style="color:#393A34">.</span><span class="token keyword" style="color:#00009f">await</span><span class="token plain"></span><br></div><div class="token-line" style="color:#393A34"><span class="token plain">        </span><span class="token punctuation" style="color:#393A34">.</span><span class="token function" style="color:#d73a49">unwrap</span><span class="token punctuation" style="color:#393A34">(</span><span class="token punctuation" style="color:#393A34">)</span><span class="token punctuation" style="color:#393A34">;</span><span class="token plain"></span><br></div><div class="token-line" style="color:#393A34"><span class="token plain" style="display:inline-block"></span><br></div><div class="token-line" style="color:#393A34"><span class="token plain">    </span><span class="token namespace" style="opacity:0.7">tokio</span><span class="token namespace punctuation" style="opacity:0.7;color:#393A34">::</span><span class="token namespace" style="opacity:0.7">signal</span><span class="token namespace punctuation" style="opacity:0.7;color:#393A34">::</span><span class="token function" style="color:#d73a49">ctrl_c</span><span class="token punctuation" style="color:#393A34">(</span><span class="token punctuation" style="color:#393A34">)</span><span class="token punctuation" style="color:#393A34">.</span><span class="token keyword" style="color:#00009f">await</span><span class="token punctuation" style="color:#393A34">.</span><span class="token function" style="color:#d73a49">unwrap</span><span class="token punctuation" style="color:#393A34">(</span><span class="token punctuation" style="color:#393A34">)</span><span class="token punctuation" style="color:#393A34">;</span><span class="token plain"></span><br></div><div class="token-line" style="color:#393A34"><span class="token plain"></span><span class="token punctuation" style="color:#393A34">}</span><br></div></code></pre></div></div>
<p>Waiting on the Ctrl+C signal allows the service to operate without being cleaned up until the node is terminated.</p>
<h3 class="anchor anchorTargetStickyNavbar_Vzrq" id="main-function">Main Function<a href="https://mikelikesrobots.github.io/blog/ros2-rust-comparison#main-function" class="hash-link" aria-label="Direct link to Main Function" title="Direct link to Main Function" translate="no">​</a></h3>
<p><strong><code>ros2rust</code></strong></p>
<p>To start all of the nodes in <code>ros2rust</code>, an executor is the simplest method:</p>
<div class="language-rust codeBlockContainer_Ckt0 theme-code-block" style="--prism-color:#393A34;--prism-background-color:#f6f8fa"><div class="codeBlockContent_QJqH"><pre tabindex="0" class="prism-code language-rust codeBlock_bY9V thin-scrollbar" style="color:#393A34;background-color:#f6f8fa"><code class="codeBlockLines_e6Vv"><div class="token-line" style="color:#393A34"><span class="token keyword" style="color:#00009f">fn</span><span class="token plain"> </span><span class="token function-definition function" style="color:#d73a49">main</span><span class="token punctuation" style="color:#393A34">(</span><span class="token punctuation" style="color:#393A34">)</span><span class="token plain"> </span><span class="token punctuation" style="color:#393A34">-&gt;</span><span class="token plain"> </span><span class="token class-name">Result</span><span class="token operator" style="color:#393A34">&lt;</span><span class="token punctuation" style="color:#393A34">(</span><span class="token punctuation" style="color:#393A34">)</span><span class="token punctuation" style="color:#393A34">,</span><span class="token plain"> </span><span class="token namespace" style="opacity:0.7">rclrs</span><span class="token namespace punctuation" style="opacity:0.7;color:#393A34">::</span><span class="token class-name">RclrsError</span><span class="token operator" style="color:#393A34">&gt;</span><span class="token plain"> </span><span class="token punctuation" style="color:#393A34">{</span><span class="token plain"></span><br></div><div class="token-line" style="color:#393A34"><span class="token plain">    </span><span class="token keyword" style="color:#00009f">let</span><span class="token plain"> </span><span class="token keyword" style="color:#00009f">mut</span><span class="token plain"> executor </span><span class="token operator" style="color:#393A34">=</span><span class="token plain"> </span><span class="token namespace" style="opacity:0.7">rclrs</span><span class="token namespace punctuation" style="opacity:0.7;color:#393A34">::</span><span class="token class-name">Context</span><span class="token punctuation" style="color:#393A34">::</span><span class="token function" style="color:#d73a49">default_from_env</span><span class="token punctuation" style="color:#393A34">(</span><span class="token punctuation" style="color:#393A34">)</span><span class="token operator" style="color:#393A34">?</span><span class="token punctuation" style="color:#393A34">.</span><span class="token function" style="color:#d73a49">create_basic_executor</span><span class="token punctuation" style="color:#393A34">(</span><span class="token punctuation" style="color:#393A34">)</span><span class="token punctuation" style="color:#393A34">;</span><span class="token plain"></span><br></div><div class="token-line" style="color:#393A34"><span class="token plain">    </span><span class="token keyword" style="color:#00009f">let</span><span class="token plain"> counter </span><span class="token operator" style="color:#393A34">=</span><span class="token plain"> </span><span class="token class-name">CounterNode</span><span class="token punctuation" style="color:#393A34">::</span><span class="token function" style="color:#d73a49">new</span><span class="token punctuation" style="color:#393A34">(</span><span class="token operator" style="color:#393A34">&amp;</span><span class="token plain">executor</span><span class="token punctuation" style="color:#393A34">)</span><span class="token operator" style="color:#393A34">?</span><span class="token punctuation" style="color:#393A34">;</span><span class="token plain"></span><br></div><div class="token-line" style="color:#393A34"><span class="token plain">    counter</span><span class="token punctuation" style="color:#393A34">.</span><span class="token function" style="color:#d73a49">start</span><span class="token punctuation" style="color:#393A34">(</span><span class="token punctuation" style="color:#393A34">)</span><span class="token punctuation" style="color:#393A34">;</span><span class="token plain"></span><br></div><div class="token-line" style="color:#393A34"><span class="token plain">    </span><span class="token punctuation" style="color:#393A34">...</span><span class="token plain"></span><br></div><div class="token-line" style="color:#393A34"><span class="token plain" style="display:inline-block"></span><br></div></code></pre></div></div>
<p>Once all the nodes have started, the main process spins until stopped or an error occurs:</p>
<div class="language-rust codeBlockContainer_Ckt0 theme-code-block" style="--prism-color:#393A34;--prism-background-color:#f6f8fa"><div class="codeBlockContent_QJqH"><pre tabindex="0" class="prism-code language-rust codeBlock_bY9V thin-scrollbar" style="color:#393A34;background-color:#f6f8fa"><code class="codeBlockLines_e6Vv"><div class="token-line" style="color:#393A34"><span class="token plain">    </span><span class="token punctuation" style="color:#393A34">...</span><span class="token plain"></span><br></div><div class="token-line" style="color:#393A34"><span class="token plain">    executor</span><span class="token punctuation" style="color:#393A34">.</span><span class="token function" style="color:#d73a49">spin</span><span class="token punctuation" style="color:#393A34">(</span><span class="token namespace" style="opacity:0.7">rclrs</span><span class="token namespace punctuation" style="opacity:0.7;color:#393A34">::</span><span class="token class-name">SpinOptions</span><span class="token punctuation" style="color:#393A34">::</span><span class="token function" style="color:#d73a49">default</span><span class="token punctuation" style="color:#393A34">(</span><span class="token punctuation" style="color:#393A34">)</span><span class="token punctuation" style="color:#393A34">)</span><span class="token punctuation" style="color:#393A34">.</span><span class="token function" style="color:#d73a49">first_error</span><span class="token punctuation" style="color:#393A34">(</span><span class="token punctuation" style="color:#393A34">)</span><span class="token operator" style="color:#393A34">?</span><span class="token punctuation" style="color:#393A34">;</span><span class="token plain"></span><br></div><div class="token-line" style="color:#393A34"><span class="token plain">    </span><span class="token class-name">Ok</span><span class="token punctuation" style="color:#393A34">(</span><span class="token punctuation" style="color:#393A34">(</span><span class="token punctuation" style="color:#393A34">)</span><span class="token punctuation" style="color:#393A34">)</span><span class="token plain"></span><br></div><div class="token-line" style="color:#393A34"><span class="token plain"></span><span class="token punctuation" style="color:#393A34">}</span><br></div></code></pre></div></div>
<p><strong><code>roslibrust</code></strong></p>
<p>In <code>roslibrust</code>, the main function creates the backend for all of the nodes, then starts each node, and finally waits for the Ctrl+C signal to terminate the node.</p>
<div class="language-rust codeBlockContainer_Ckt0 theme-code-block" style="--prism-color:#393A34;--prism-background-color:#f6f8fa"><div class="codeBlockContent_QJqH"><pre tabindex="0" class="prism-code language-rust codeBlock_bY9V thin-scrollbar" style="color:#393A34;background-color:#f6f8fa"><code class="codeBlockLines_e6Vv"><div class="token-line" style="color:#393A34"><span class="token attribute attr-name" style="color:#00a4db">#[tokio::main]</span><span class="token plain"></span><br></div><div class="token-line" style="color:#393A34"><span class="token plain"></span><span class="token keyword" style="color:#00009f">async</span><span class="token plain"> </span><span class="token keyword" style="color:#00009f">fn</span><span class="token plain"> </span><span class="token function-definition function" style="color:#d73a49">main</span><span class="token punctuation" style="color:#393A34">(</span><span class="token punctuation" style="color:#393A34">)</span><span class="token plain"> </span><span class="token punctuation" style="color:#393A34">{</span><span class="token plain"></span><br></div><div class="token-line" style="color:#393A34"><span class="token plain">    </span><span class="token comment" style="color:#999988;font-style:italic">// Create a rosbridge client we can use</span><span class="token plain"></span><br></div><div class="token-line" style="color:#393A34"><span class="token plain">    </span><span class="token keyword" style="color:#00009f">let</span><span class="token plain"> ros </span><span class="token operator" style="color:#393A34">=</span><span class="token plain"> </span><span class="token namespace" style="opacity:0.7">roslibrust</span><span class="token namespace punctuation" style="opacity:0.7;color:#393A34">::</span><span class="token namespace" style="opacity:0.7">rosbridge</span><span class="token namespace punctuation" style="opacity:0.7;color:#393A34">::</span><span class="token class-name">ClientHandle</span><span class="token punctuation" style="color:#393A34">::</span><span class="token function" style="color:#d73a49">new</span><span class="token punctuation" style="color:#393A34">(</span><span class="token string" style="color:#e3116c">"ws://localhost:9090"</span><span class="token punctuation" style="color:#393A34">)</span><span class="token plain"></span><br></div><div class="token-line" style="color:#393A34"><span class="token plain">        </span><span class="token punctuation" style="color:#393A34">.</span><span class="token keyword" style="color:#00009f">await</span><span class="token plain"></span><br></div><div class="token-line" style="color:#393A34"><span class="token plain">        </span><span class="token punctuation" style="color:#393A34">.</span><span class="token function" style="color:#d73a49">unwrap</span><span class="token punctuation" style="color:#393A34">(</span><span class="token punctuation" style="color:#393A34">)</span><span class="token punctuation" style="color:#393A34">;</span><span class="token plain"></span><br></div><div class="token-line" style="color:#393A34"><span class="token plain" style="display:inline-block"></span><br></div><div class="token-line" style="color:#393A34"><span class="token plain">    </span><span class="token namespace" style="opacity:0.7">tokio</span><span class="token namespace punctuation" style="opacity:0.7;color:#393A34">::</span><span class="token function" style="color:#d73a49">spawn</span><span class="token punctuation" style="color:#393A34">(</span><span class="token function" style="color:#d73a49">pub_counter</span><span class="token punctuation" style="color:#393A34">(</span><span class="token plain">ros</span><span class="token punctuation" style="color:#393A34">.</span><span class="token function" style="color:#d73a49">clone</span><span class="token punctuation" style="color:#393A34">(</span><span class="token punctuation" style="color:#393A34">)</span><span class="token punctuation" style="color:#393A34">)</span><span class="token punctuation" style="color:#393A34">)</span><span class="token punctuation" style="color:#393A34">;</span><span class="token plain"></span><br></div><div class="token-line" style="color:#393A34"><span class="token plain">    </span><span class="token macro property" style="color:#36acaa">println!</span><span class="token punctuation" style="color:#393A34">(</span><span class="token string" style="color:#e3116c">"Counting node has started!"</span><span class="token punctuation" style="color:#393A34">)</span><span class="token punctuation" style="color:#393A34">;</span><span class="token plain"></span><br></div><div class="token-line" style="color:#393A34"><span class="token plain">    </span><span class="token namespace" style="opacity:0.7">tokio</span><span class="token namespace punctuation" style="opacity:0.7;color:#393A34">::</span><span class="token function" style="color:#d73a49">spawn</span><span class="token punctuation" style="color:#393A34">(</span><span class="token function" style="color:#d73a49">imu_summer</span><span class="token punctuation" style="color:#393A34">(</span><span class="token plain">ros</span><span class="token punctuation" style="color:#393A34">.</span><span class="token function" style="color:#d73a49">clone</span><span class="token punctuation" style="color:#393A34">(</span><span class="token punctuation" style="color:#393A34">)</span><span class="token punctuation" style="color:#393A34">,</span><span class="token plain"> </span><span class="token class-name">Arc</span><span class="token punctuation" style="color:#393A34">::</span><span class="token function" style="color:#d73a49">new</span><span class="token punctuation" style="color:#393A34">(</span><span class="token class-name">Mutex</span><span class="token punctuation" style="color:#393A34">::</span><span class="token function" style="color:#d73a49">new</span><span class="token punctuation" style="color:#393A34">(</span><span class="token number" style="color:#36acaa">0.0</span><span class="token punctuation" style="color:#393A34">)</span><span class="token punctuation" style="color:#393A34">)</span><span class="token punctuation" style="color:#393A34">)</span><span class="token punctuation" style="color:#393A34">)</span><span class="token punctuation" style="color:#393A34">;</span><span class="token plain"></span><br></div><div class="token-line" style="color:#393A34"><span class="token plain">    </span><span class="token macro property" style="color:#36acaa">println!</span><span class="token punctuation" style="color:#393A34">(</span><span class="token string" style="color:#e3116c">"IMU summing node has started!"</span><span class="token punctuation" style="color:#393A34">)</span><span class="token punctuation" style="color:#393A34">;</span><span class="token plain"></span><br></div><div class="token-line" style="color:#393A34"><span class="token plain">    </span><span class="token namespace" style="opacity:0.7">tokio</span><span class="token namespace punctuation" style="opacity:0.7;color:#393A34">::</span><span class="token function" style="color:#d73a49">spawn</span><span class="token punctuation" style="color:#393A34">(</span><span class="token function" style="color:#d73a49">mult_floats</span><span class="token punctuation" style="color:#393A34">(</span><span class="token plain">ros</span><span class="token punctuation" style="color:#393A34">.</span><span class="token function" style="color:#d73a49">clone</span><span class="token punctuation" style="color:#393A34">(</span><span class="token punctuation" style="color:#393A34">)</span><span class="token punctuation" style="color:#393A34">)</span><span class="token punctuation" style="color:#393A34">)</span><span class="token punctuation" style="color:#393A34">;</span><span class="token plain"></span><br></div><div class="token-line" style="color:#393A34"><span class="token plain">    </span><span class="token macro property" style="color:#36acaa">println!</span><span class="token punctuation" style="color:#393A34">(</span><span class="token string" style="color:#e3116c">"Float multiplying service has started!"</span><span class="token punctuation" style="color:#393A34">)</span><span class="token punctuation" style="color:#393A34">;</span><span class="token plain"></span><br></div><div class="token-line" style="color:#393A34"><span class="token plain" style="display:inline-block"></span><br></div><div class="token-line" style="color:#393A34"><span class="token plain">    </span><span class="token comment" style="color:#999988;font-style:italic">// Wait for ctrl_c</span><span class="token plain"></span><br></div><div class="token-line" style="color:#393A34"><span class="token plain">    </span><span class="token namespace" style="opacity:0.7">tokio</span><span class="token namespace punctuation" style="opacity:0.7;color:#393A34">::</span><span class="token namespace" style="opacity:0.7">signal</span><span class="token namespace punctuation" style="opacity:0.7;color:#393A34">::</span><span class="token function" style="color:#d73a49">ctrl_c</span><span class="token punctuation" style="color:#393A34">(</span><span class="token punctuation" style="color:#393A34">)</span><span class="token punctuation" style="color:#393A34">.</span><span class="token keyword" style="color:#00009f">await</span><span class="token punctuation" style="color:#393A34">.</span><span class="token function" style="color:#d73a49">unwrap</span><span class="token punctuation" style="color:#393A34">(</span><span class="token punctuation" style="color:#393A34">)</span><span class="token punctuation" style="color:#393A34">;</span><span class="token plain"></span><br></div><div class="token-line" style="color:#393A34"><span class="token plain"></span><span class="token punctuation" style="color:#393A34">}</span><br></div></code></pre></div></div>
<h2 class="anchor anchorTargetStickyNavbar_Vzrq" id="overall-comparison">Overall Comparison<a href="https://mikelikesrobots.github.io/blog/ros2-rust-comparison#overall-comparison" class="hash-link" aria-label="Direct link to Overall Comparison" title="Direct link to Overall Comparison" translate="no">​</a></h2>
<p>In short, my recommendation is to use <code>ros2rust</code> for libraries and <code>roslibrust</code> for applications. That is, if you're looking to provide software support for a sensor or other device, it would work better to build it with <code>ros2rust</code> so it fully integrates in the ROS ecosystem. However, if you're looking to build something to run <em>on your robot</em>, <code>roslibrust</code> is a great choice. Neither library would be a bad choice, of course - it comes down to your personal preferences and what you're trying to achieve with your project.</p>
<p>I would still advise you to try out both libraries (and the other client libraries as well) to find their pros and cons. Here are my preferences between the two libraries:</p>
<figure class="text--center"><table><thead><tr><th>Category</th><th>Winner</th><th>Reason</th></tr></thead><tbody><tr><td>ROS Integration</td><td><code>ros2rust</code></td><td>Native <code>rcl</code> bindings</td></tr><tr><td>Feature Support</td><td><code>ros2rust</code></td><td>More mature, better feature support</td></tr><tr><td>Ease of Setup</td><td><code>roslibrust</code></td><td>No ROS dependency</td></tr><tr><td>Build Speed</td><td><code>roslibrust</code></td><td>Much less dependency code to compile</td></tr><tr><td>Backend Support</td><td><code>roslibrust</code></td><td>Supports ROS1, ROS2, and more</td></tr><tr><td>Unit Testing</td><td><code>roslibrust</code></td><td>Mocked backend</td></tr><tr><td>Code Clarity</td><td><code>roslibrust</code></td><td>Async syntax, fewer callbacks</td></tr><tr><td>Performance</td><td>Unknown</td><td>Not measured</td></tr></tbody></table><figcaption>Table of Preferences between <code>ros2rust</code> and <code>roslibrust</code>.</figcaption></figure>
<p>The reasons given above are very high level. Below, I give more detail to explain my reasoning.</p>
<ul>
<li class=""><strong>ROS Integration</strong>: <code>ros2rust</code>. All else being equal, I would prefer full ROS integration, such as launching with launch files and building the node alongside other nodes in the same workspace.</li>
<li class=""><strong>Feature Support</strong>: <code>ros2rust</code>. Without giving the full list, <code>ros2rust</code> is more full-featured than <code>roslibrust</code>, such as logging integration. Whether this matters for your use case depends on there features you need.</li>
<li class=""><strong>Ease of Setup</strong>: <code>roslibrust</code>. Not needing a full ROS 2 installation makes the initial setup easier.</li>
<li class=""><strong>Build Speed</strong>: <code>roslibrust</code>. As <code>ros2rust</code> still needs the full library to be compiled alongside the application, the build time is much longer. <code>roslibrust</code> has a much smaller set of code to compile, so it compiles much faster.</li>
<li class=""><strong>Backend Support</strong>: <code>roslibrust</code>. This is a minor point for me as I'm generally going to use the ROS 2 backend, but if you need that flexibility, this may be more of a factor for you. Having said that, it would be a bigger plus once the direct Zenoh support is implemented in <code>roslibrust</code>.</li>
<li class=""><strong>The Code</strong>: <code>roslibrust</code>. I slightly prefer the async syntax of <code>roslibrust</code> because it uses fewer callbacks, although still not none. Fewer callbacks makes it easier to reason about, which is really important when designing a system.</li>
<li class=""><strong>Unit Testing</strong>: <code>roslibrust</code>, by far. The complete mocking system is excellent. It is possible to unit test on <code>ros2rust</code>, but it makes writing the code trickier to do, as you need to pass in your own mock structures. You could also do end-to-end testing with ROS in the loop, but this is much slower than unit tests with mocks.</li>
<li class=""><strong>Performance</strong>: I didn't measure. Measuring performance is tricky to do well, and could change between machines based on factors like how many cores it has. If you know of a good performance comparison, let me know, and I'll happily include it!</li>
</ul>
<p>Overall, I was surprised at how much I enjoyed using <code>roslibrust</code>. I'm likely to use it for my own ROS 2 code when it's code I'm not planning to share. However, for code that I distribute on Github or this blog for educational purposes, I would still use <code>ros2rust</code> because of that complete ROS integration and extra feature set. The advantages of <code>roslibrust</code> seem numerous above, but are individually minor advantages compared to the ecosystem integration.</p>
<p>I'll always love having a fully mocked backend for unit tests, though.</p>
<h2 class="anchor anchorTargetStickyNavbar_Vzrq" id="summary">Summary<a href="https://mikelikesrobots.github.io/blog/ros2-rust-comparison#summary" class="hash-link" aria-label="Direct link to Summary" title="Direct link to Summary" translate="no">​</a></h2>
<p>Rust is a language operating at the same level as C++, although it's not as commonly used in the space, so support is not as mature. Still, it offers great performance, strong safety checks, and modern tooling, so it's a great choice for writing robotics code. I also personally find it very fun to work with!</p>
<p>There are a few libraries available for writing ROS 2 nodes in Rust. <code>ros2rust</code> and <code>roslibrust</code> seem to be the most actively maintained, and they take fundamentally different approaches.</p>
<ul>
<li class=""><code>ros2rust</code> integrates with the ROS ecosystem through <code>rclrs</code>, giving full compatibility with launch files, ROS-based logging, and the colcon build system. It's ideal when you need native ROS behaviour, a more feature-complete client library, or plan to distribute your nodes as part of a larger ROS project.</li>
<li class=""><code>roslibrust</code> is a pure Rust implementation designed around async execution. It builds faster, doesn't require a full ROS installation, supports ROS1 and ROS2 backends, and enabled extremely quick mock-based unit testing. This makes it great for applications running on your own robots.</li>
</ul>
<p>For my personal projects, I'll likely reach for <code>roslibrust</code>, but stick with <code>ros2rust</code> for sharing code meant for others to learn from. Both are good choices for writing robotics code. Choose the library that works best for your application, and let me know what you think of them!</p>]]></content>
        <author>
            <name>Michael Hart</name>
            <uri>https://mikelikesrobots.github.io</uri>
        </author>
        <category label="robotics" term="robotics"/>
        <category label="rust" term="rust"/>
        <category label="ros2" term="ros2"/>
    </entry>
    <entry>
        <title type="html"><![CDATA[Cost-Effective Robotics Simulation in the Cloud]]></title>
        <id>https://mikelikesrobots.github.io/blog/ec2-spot-sims</id>
        <link href="https://mikelikesrobots.github.io/blog/ec2-spot-sims"/>
        <updated>2025-10-13T00:00:00.000Z</updated>
        <summary type="html"><![CDATA[This post shows how to deploy an EC2 Spot Instance on AWS capable of running O3DE, Ignition Gazebo, and NVIDIA Isaac Sim at a reduced cost. This Spot Instance is part of a system that uses an Amazon S3 bucket to store project data, such as robot environment levels, and scripts to automate starting up and shutting down instances to save on costs when the simulation instance is not in use; the whole system is deployed using CDK, except for a few manual setup steps.]]></summary>
        <content type="html"><![CDATA[<p>This post shows how to deploy an EC2 Spot Instance on AWS capable of running <a href="https://o3de.org/" target="_blank" rel="noopener noreferrer" class="">O3DE</a>, <a href="https://gazebosim.org/home" target="_blank" rel="noopener noreferrer" class="">Ignition Gazebo</a>, and <a href="https://developer.nvidia.com/isaac/sim" target="_blank" rel="noopener noreferrer" class="">NVIDIA Isaac Sim</a> at a reduced cost. This Spot Instance is part of a system that uses an Amazon S3 bucket to store project data, such as robot environment levels, and scripts to automate starting up and shutting down instances to save on costs when the simulation instance is not in use; the whole system is deployed using CDK, except for a few manual setup steps.</p>
<p>By the end of this post, you’ll have a fully automated system to spin up high-end GPU simulation machines for a fraction of the usual cost. What's more, you'll have ROS 2 access, remote desktop viewing, and one-line start/stop scripts to manage the instances.</p>
<p>This article also includes a video walkthrough.</p>
<div class="video_jswG"><button type="button" class="poster_B6DH" aria-label="Play video: Cost-Effective Robotics Simulation in the Cloud"><img src="https://i.ytimg.com/vi/62QHXpeWVqw/hqdefault.jpg" alt="" width="480" height="360" loading="lazy"><span class="play_lEvZ" aria-hidden="true">▶</span><span class="caption_yrhJ">Watch: <!-- -->Cost-Effective Robotics Simulation in the Cloud</span></button></div><noscript><p><a href="https://www.youtube.com/watch?v=62QHXpeWVqw&amp;t=0">Watch <!-- -->Cost-Effective Robotics Simulation in the Cloud<!-- --> on YouTube</a></p></noscript>
<h2 class="anchor anchorTargetStickyNavbar_Vzrq" id="running-simulations-in-the-cloud">Running Simulations in the Cloud<a href="https://mikelikesrobots.github.io/blog/ec2-spot-sims#running-simulations-in-the-cloud" class="hash-link" aria-label="Direct link to Running Simulations in the Cloud" title="Direct link to Running Simulations in the Cloud" translate="no">​</a></h2>
<p>Robotics simulators are highly useful for development, but very resource-intensive to run. One way to get access to computers with huge hard drives and powerful GPUs is to access them from a cloud provider like AWS. Of course, this does cost money; you need to pay for what you use. That means it's a great option if you infrequently run simulations, or if you want to run simulations in the background for testing, for example. If you need to run simulations frequently, you may prefer to buy your own computer and graphics card capable of running simulations.</p>
<p>The system is summarised in this infographic:</p>
<figure class="text--center"><p><img decoding="async" loading="lazy" alt="Infographic showing cloud provider, supported simulators, and pros and cons" src="https://mikelikesrobots.github.io/assets/images/ec2-spot-sims-infographic-572558997a43a10892f41f835b2de508.webp" width="2000" height="1414" class="img_ev3q">
</p><figcaption>Infographic summarising the blog post. O3DE, Gazebo, and NVIDIA Isaac Sim are the supported simulators, and the infrastructure is hosted on AWS. Pros and Cons are listed on the left.</figcaption><p></p></figure>
<p>I have previously written about <a class="" href="https://mikelikesrobots.github.io/blog/simulation-in-cloud">running simulations in the cloud</a>. However, that post was about setting up O3DE and uses on-demand instances. O3DE is now much easier to set up thanks to a community AMI from <a href="https://www.robotec.ai/" target="_blank" rel="noopener noreferrer" class="">Robotec AI</a>, which means that all the setup necessary for O3DE and remote desktop viewing via DCV is already available on the EC2 instance starting up - it's like resuming a system snapshot with everything already installed. Also, on-demand instances can be off-putting in terms of machine and storage costs. Instead, I'll show how to use Spot Instances to reduce EC2 costs and Amazon S3 to reduce storage costs.</p>
<h2 class="anchor anchorTargetStickyNavbar_Vzrq" id="what-are-spot-instances">What are Spot Instances?<a href="https://mikelikesrobots.github.io/blog/ec2-spot-sims#what-are-spot-instances" class="hash-link" aria-label="Direct link to What are Spot Instances?" title="Direct link to What are Spot Instances?" translate="no">​</a></h2>
<p>Spot Instances are an alternative way to run virtual machines in the cloud using Amazon EC2. Instead of on-demand instances, where you are guaranteed an instance for as long as you need it, Spot Instances can be taken away with only a few minutes' notice. This is because AWS needs to reclaim the instance space for another customer. In exchange, the Spot Instances cost less, often 60-70% less than the equivalent on-demand instance! That means instead of <span class="katex"><span class="katex-mathml"><math xmlns="http://www.w3.org/1998/Math/MathML"><semantics><mrow><mn>1</mn><mi>p</mi><mi>e</mi><mi>r</mi><mi>h</mi><mi>o</mi><mi>u</mi><mi>r</mi><mi>f</mi><mi>o</mi><mi>r</mi><mi>a</mi><mi>p</mi><mi>o</mi><mi>w</mi><mi>e</mi><mi>r</mi><mi>f</mi><mi>u</mi><mi>l</mi><mi>G</mi><mi>P</mi><mi>U</mi><mi>i</mi><mi>n</mi><mi>s</mi><mi>t</mi><mi>a</mi><mi>n</mi><mi>c</mi><mi>e</mi><mo separator="true">,</mo><mi>y</mi><mi>o</mi><mi>u</mi><mi>c</mi><mi>a</mi><mi>n</mi><mi>p</mi><mi>a</mi><mi>y</mi><mi>a</mi><mi>s</mi><mi>l</mi><mi>o</mi><mi>w</mi><mi>a</mi><mi>s</mi></mrow><annotation encoding="application/x-tex">1 per hour for a powerful GPU instance, you can pay as low as </annotation></semantics></math></span><span class="katex-html" aria-hidden="true"><span class="base"><span class="strut" style="height:0.8889em;vertical-align:-0.1944em"></span><span class="mord">1</span><span class="mord mathnormal">p</span><span class="mord mathnormal" style="margin-right:0.0278em">er</span><span class="mord mathnormal">h</span><span class="mord mathnormal">o</span><span class="mord mathnormal">u</span><span class="mord mathnormal" style="margin-right:0.0278em">r</span><span class="mord mathnormal" style="margin-right:0.1076em">f</span><span class="mord mathnormal" style="margin-right:0.0278em">or</span><span class="mord mathnormal">a</span><span class="mord mathnormal">p</span><span class="mord mathnormal">o</span><span class="mord mathnormal" style="margin-right:0.0269em">w</span><span class="mord mathnormal" style="margin-right:0.0278em">er</span><span class="mord mathnormal" style="margin-right:0.1076em">f</span><span class="mord mathnormal">u</span><span class="mord mathnormal" style="margin-right:0.0197em">l</span><span class="mord mathnormal" style="margin-right:0.1389em">GP</span><span class="mord mathnormal" style="margin-right:0.109em">U</span><span class="mord mathnormal">in</span><span class="mord mathnormal">s</span><span class="mord mathnormal">t</span><span class="mord mathnormal">an</span><span class="mord mathnormal">ce</span><span class="mpunct">,</span><span class="mspace" style="margin-right:0.1667em"></span><span class="mord mathnormal" style="margin-right:0.0359em">y</span><span class="mord mathnormal">o</span><span class="mord mathnormal">u</span><span class="mord mathnormal">c</span><span class="mord mathnormal">an</span><span class="mord mathnormal">p</span><span class="mord mathnormal">a</span><span class="mord mathnormal" style="margin-right:0.0359em">y</span><span class="mord mathnormal">a</span><span class="mord mathnormal">s</span><span class="mord mathnormal" style="margin-right:0.0197em">l</span><span class="mord mathnormal">o</span><span class="mord mathnormal" style="margin-right:0.0269em">w</span><span class="mord mathnormal">a</span><span class="mord mathnormal">s</span></span></span></span>0.30 per hour.</p>
<p>However, that's not the only downside of Spot Instances. Due to the way that Spot Instances are requested and terminated, we need to set up a system to quickly restore a Spot Instance if removed, including simulator installation and project data. If reducing costs is worth this risk to you, then read on - but even if not, this post and the accompanying CDK code show how to install Ignition Gazebo and Isaac Sim reliably, so you can use it for your own setup. O3DE is already installed by the AMI, so no extra installation is necessary.</p>
<div class="theme-admonition theme-admonition-note admonition_xJq3 alert alert--secondary"><div class="admonitionHeading_Gvgb"><span class="admonitionIcon_Rf37"><svg viewBox="0 0 14 16"><path fill-rule="evenodd" d="M6.3 5.69a.942.942 0 0 1-.28-.7c0-.28.09-.52.28-.7.19-.18.42-.28.7-.28.28 0 .52.09.7.28.18.19.28.42.28.7 0 .28-.09.52-.28.7a1 1 0 0 1-.7.3c-.28 0-.52-.11-.7-.3zM8 7.99c-.02-.25-.11-.48-.31-.69-.2-.19-.42-.3-.69-.31H6c-.27.02-.48.13-.69.31-.2.2-.3.44-.31.69h1v3c.02.27.11.5.31.69.2.2.42.31.69.31h1c.27 0 .48-.11.69-.31.2-.19.3-.42.31-.69H8V7.98v.01zM7 2.3c-3.14 0-5.7 2.54-5.7 5.68 0 3.14 2.56 5.7 5.7 5.7s5.7-2.55 5.7-5.7c0-3.15-2.56-5.69-5.7-5.69v.01zM7 .98c3.86 0 7 3.14 7 7s-3.14 7-7 7-7-3.12-7-7 3.14-7 7-7z"></path></svg></span>In My Experience</div><div class="admonitionContent_BuS1"><p>In practice, Spot interruptions are rare. I’ve only seen it happen once, and even then I might have been mistaken! It seems very rare, because it's only done when Amazon completely runs out of that instance type. You can also make it more rare by specifying multiple acceptable instance types to make losing an instance less likely.</p></div></div>
<p>In this post, we use an Amazon S3 bucket to store project data. We launch Spot Instances with startup scripts that automatically copy all the project data in the bucket onto the Spot Instance, ready to use. O3DE is installed as part of the base AMI, Gazebo can be optionally installed with startup scripts, and NVIDIA Isaac Sim can be launched from a secondary drive snapshot that we build as a separate one-time setup. When we're ready to save our work and shut down, one command will synchronise all your data with the bucket, ready for your next run.</p>
<h2 class="anchor anchorTargetStickyNavbar_Vzrq" id="simulation-spot-instance-setup">Simulation Spot Instance Setup<a href="https://mikelikesrobots.github.io/blog/ec2-spot-sims#simulation-spot-instance-setup" class="hash-link" aria-label="Direct link to Simulation Spot Instance Setup" title="Direct link to Simulation Spot Instance Setup" translate="no">​</a></h2>
<p>Let's take a look at the system we'll be setting up. Here are the system components as a diagram, divided into stacks:</p>
<figure class="text--center"><p><img decoding="async" loading="lazy" alt="System diagram showing Spot Instance system setup on AWS" src="https://mikelikesrobots.github.io/assets/images/system-diagram-351e0eb35ab3caf6511aa6609867a201.webp" width="821" height="651" class="img_ev3q">
</p><figcaption>System Diagram showing AWS system components deployed using different stacks from the CDK code. Components are described separately above.</figcaption><p></p></figure>
<p>The components break down as follows:</p>
<ol>
<li class=""><strong>Amazon S3 Bucket</strong>: used to store project data. The contents are copied automatically into the simulator instance on startup.</li>
<li class=""><strong>Isaac Sim EBS Snapshot</strong>: as Isaac Sim is a large program with a lot of data to download, we set up an EBS snapshot with the simulator on. This means we can create a virtual hard drive with Isaac Sim installed at a moment's notice and attach it to our simulator instance. EBS is Elastic Block Storage, which is AWS's way of providing virtual hard drives.</li>
<li class=""><strong>Spot Fleet Request</strong>: this requests a Spot Instance for running simulations on. You can scale your Spot Instance fleet up or down by changing its target capacity: 1 to launch an instance, 0 to stop it.</li>
<li class=""><strong>AWS Secrets Manager</strong>: you can choose whether to set your own password or securely generate one. If you generate one, it is stored in AWS Secrets Manager.</li>
<li class=""><strong>O3DE AMI</strong>: an Amazon Machine Image (AMI) is the software that the instance will start up with. The O3DE AMI is a free community AMI from <a href="https://www.robotec.ai/" target="_blank" rel="noopener noreferrer" class="">Robotec AI</a> that comes with O3DE, ROS 2 Humble, graphics drivers, and the DCV server already installed and configured (DCV allows for remote desktop streaming). This makes O3DE installation incredibly easy: just launch an EC2 instance with this AMI, and you'll have full remote control of an instance with a graphics card running O3DE!</li>
</ol>
<div class="theme-admonition theme-admonition-tip admonition_xJq3 alert alert--success"><div class="admonitionHeading_Gvgb"><span class="admonitionIcon_Rf37"><svg viewBox="0 0 12 16"><path fill-rule="evenodd" d="M6.5 0C3.48 0 1 2.19 1 5c0 .92.55 2.25 1 3 1.34 2.25 1.78 2.78 2 4v1h5v-1c.22-1.22.66-1.75 2-4 .45-.75 1-2.08 1-3 0-2.81-2.48-5-5.5-5zm3.64 7.48c-.25.44-.47.8-.67 1.11-.86 1.41-1.25 2.06-1.45 3.23-.02.05-.02.11-.02.17H5c0-.06 0-.13-.02-.17-.2-1.17-.59-1.83-1.45-3.23-.2-.31-.42-.67-.67-1.11C2.44 6.78 2 5.65 2 5c0-2.2 2.02-4 4.5-4 1.22 0 2.36.42 3.22 1.19C10.55 2.94 11 3.94 11 5c0 .66-.44 1.78-.86 2.48zM4 14h5c-.23 1.14-1.3 2-2.5 2s-2.27-.86-2.5-2z"></path></svg></span>AWS Cost Summary</div><div class="admonitionContent_BuS1"><p>AWS charges for resources you create and for how you use them. Some costs include:</p><ul>
<li class="">Spot Instance: ~$0.30/hr (g4dn.2xlarge)</li>
<li class="">EBS Snapshot (for Isaac Sim only): ~<span class="katex"><span class="katex-mathml"><math xmlns="http://www.w3.org/1998/Math/MathML"><semantics><mrow><mn>0.05</mn><mi mathvariant="normal">/</mi><mi>G</mi><mi>B</mi><mi mathvariant="normal">/</mi><mi>m</mi><mi>o</mi><mi>n</mi><mi>t</mi><mi>h</mi><mi mathvariant="normal">.</mi><mi>T</mi><mi>h</mi><mi>e</mi><mi>S</mi><mi>n</mi><mi>a</mi><mi>p</mi><mi>s</mi><mi>h</mi><mi>o</mi><mi>t</mi><mi>w</mi><mi>i</mi><mi>l</mi><mi>l</mi><mi>b</mi><mi>e</mi><mi>a</mi><mi>r</mi><mi>o</mi><mi>u</mi><mi>n</mi><mi>d</mi><mn>30</mn><mi>G</mi><mi>B</mi><mi>f</mi><mi>o</mi><mi>r</mi><mi>a</mi><mi>t</mi><mi>o</mi><mi>t</mi><mi>a</mi><mi>l</mi><mi>o</mi><mi>f</mi></mrow><annotation encoding="application/x-tex">0.05/GB/month. The Snapshot will be around 30 GB for a total of </annotation></semantics></math></span><span class="katex-html" aria-hidden="true"><span class="base"><span class="strut" style="height:1em;vertical-align:-0.25em"></span><span class="mord">0.05/</span><span class="mord mathnormal" style="margin-right:0.0502em">GB</span><span class="mord">/</span><span class="mord mathnormal">m</span><span class="mord mathnormal">o</span><span class="mord mathnormal">n</span><span class="mord mathnormal">t</span><span class="mord mathnormal">h</span><span class="mord">.</span><span class="mord mathnormal" style="margin-right:0.1389em">T</span><span class="mord mathnormal">h</span><span class="mord mathnormal">e</span><span class="mord mathnormal" style="margin-right:0.0576em">S</span><span class="mord mathnormal">na</span><span class="mord mathnormal">p</span><span class="mord mathnormal">s</span><span class="mord mathnormal">h</span><span class="mord mathnormal">o</span><span class="mord mathnormal" style="margin-right:0.0269em">tw</span><span class="mord mathnormal">i</span><span class="mord mathnormal" style="margin-right:0.0197em">l</span><span class="mord mathnormal" style="margin-right:0.0197em">l</span><span class="mord mathnormal">b</span><span class="mord mathnormal">e</span><span class="mord mathnormal">a</span><span class="mord mathnormal" style="margin-right:0.0278em">r</span><span class="mord mathnormal">o</span><span class="mord mathnormal">u</span><span class="mord mathnormal">n</span><span class="mord mathnormal">d</span><span class="mord">30</span><span class="mord mathnormal" style="margin-right:0.0502em">GB</span><span class="mord mathnormal" style="margin-right:0.1076em">f</span><span class="mord mathnormal" style="margin-right:0.0278em">or</span><span class="mord mathnormal">a</span><span class="mord mathnormal">t</span><span class="mord mathnormal">o</span><span class="mord mathnormal">t</span><span class="mord mathnormal">a</span><span class="mord mathnormal" style="margin-right:0.0197em">l</span><span class="mord mathnormal">o</span><span class="mord mathnormal" style="margin-right:0.1076em">f</span></span></span></span>1.50/month of EBS snapshot storage.</li>
<li class="">S3 Storage: ~$0.023/GB/month</li>
<li class="">Network usage: depends on downloads. This will be increased by downloading large assets, including the startup installation of Gazebo.</li>
</ul></div></div>
<p>Because there are a few different parts to this setup, I've written CDK code that automates almost all of it. This also makes it easier to specify startup scripts that synchronise project data, install extra dependencies, and so on. CDK stands for Cloud Development Kit, which is an AWS tool that lets you define Infrastructure as Code (IaC), meaning that it's easier to version, reuse, and automate deployment of systems like the one from this post.</p>
<p>I'll explain how to <a href="https://mikelikesrobots.github.io/blog/ec2-spot-sims#downloading-and-configuring-the-cdk-code" class="">run the setup code</a> and how to <a href="https://mikelikesrobots.github.io/blog/ec2-spot-sims#deploying-and-using-the-simulation-stack" class="">use the simulation instance</a>, then dive into the code to <a href="https://mikelikesrobots.github.io/blog/ec2-spot-sims#popping-the-cdk-stacks" class="">explain how the system is built</a>.</p>
<h3 class="anchor anchorTargetStickyNavbar_Vzrq" id="installing-dependencies">Installing Dependencies<a href="https://mikelikesrobots.github.io/blog/ec2-spot-sims#installing-dependencies" class="hash-link" aria-label="Direct link to Installing Dependencies" title="Direct link to Installing Dependencies" translate="no">​</a></h3>
<p>You'll need the following dependencies to run the CDK stack:</p>
<ul>
<li class="">git</li>
<li class="">Node Package Manager (<code>npm</code>)</li>
<li class="">AWS CDK</li>
<li class="">AWS CLI (Command Line Interface)</li>
</ul>
<p>Once the stack is up, you will also need the NICE DCV Client to view the remote desktop. The files are available on the <a href="https://www.amazondcv.com/" target="_blank" rel="noopener noreferrer" class="">Amazon DCV site</a>, so follow the installation instructions there.</p>
<h4 class="anchor anchorTargetStickyNavbar_Vzrq" id="linux">Linux<a href="https://mikelikesrobots.github.io/blog/ec2-spot-sims#linux" class="hash-link" aria-label="Direct link to Linux" title="Direct link to Linux" translate="no">​</a></h4>
<p>Use <code>apt</code> or your equivalent package manager to install the first two dependencies:</p>
<div class="language-bash codeBlockContainer_Ckt0 theme-code-block" style="--prism-color:#393A34;--prism-background-color:#f6f8fa"><div class="codeBlockContent_QJqH"><pre tabindex="0" class="prism-code language-bash codeBlock_bY9V thin-scrollbar" style="color:#393A34;background-color:#f6f8fa"><code class="codeBlockLines_e6Vv"><div class="token-line" style="color:#393A34"><span class="token plain">sudo apt install -y git npm</span><br></div></code></pre></div></div>
<p>The AWS CLI has its own installation instructions, available from the <a href="https://docs.aws.amazon.com/cli/latest/userguide/getting-started-install.html" target="_blank" rel="noopener noreferrer" class="">AWS CLI user guide</a>. I've copied the latest instructions as of time of writing for your convenience:</p>
<div class="language-bash codeBlockContainer_Ckt0 theme-code-block" style="--prism-color:#393A34;--prism-background-color:#f6f8fa"><div class="codeBlockContent_QJqH"><pre tabindex="0" class="prism-code language-bash codeBlock_bY9V thin-scrollbar" style="color:#393A34;background-color:#f6f8fa"><code class="codeBlockLines_e6Vv"><div class="token-line" style="color:#393A34"><span class="token plain">curl "https://awscli.amazonaws.com/awscli-exe-linux-x86_64.zip" -o "awscliv2.zip"</span><br></div><div class="token-line" style="color:#393A34"><span class="token plain">unzip awscliv2.zip</span><br></div><div class="token-line" style="color:#393A34"><span class="token plain">sudo ./aws/install</span><br></div></code></pre></div></div>
<p>Finally, the AWS CDK can be installed using <code>npm</code>:</p>
<div class="language-bash codeBlockContainer_Ckt0 theme-code-block" style="--prism-color:#393A34;--prism-background-color:#f6f8fa"><div class="codeBlockContent_QJqH"><pre tabindex="0" class="prism-code language-bash codeBlock_bY9V thin-scrollbar" style="color:#393A34;background-color:#f6f8fa"><code class="codeBlockLines_e6Vv"><div class="token-line" style="color:#393A34"><span class="token plain">npm install -g aws-cdk</span><br></div></code></pre></div></div>
<h4 class="anchor anchorTargetStickyNavbar_Vzrq" id="windows">Windows<a href="https://mikelikesrobots.github.io/blog/ec2-spot-sims#windows" class="hash-link" aria-label="Direct link to Windows" title="Direct link to Windows" translate="no">​</a></h4>
<p>On Windows, you can download installers for three of the four tools from these links:</p>
<ul>
<li class="">git: <a href="https://git-scm.com/downloads/win" target="_blank" rel="noopener noreferrer" class="">https://git-scm.com/downloads/win</a></li>
<li class=""><code>npm</code>: <a href="https://docs.npmjs.com/downloading-and-installing-node-js-and-npm" target="_blank" rel="noopener noreferrer" class="">https://docs.npmjs.com/downloading-and-installing-node-js-and-npm</a></li>
<li class="">AWS CLI: <a href="https://awscli.amazonaws.com/AWSCLIV2.msi" target="_blank" rel="noopener noreferrer" class="">https://awscli.amazonaws.com/AWSCLIV2.msi</a></li>
</ul>
<p>Once installed, the final dependency can be installed using <code>npm</code>:</p>
<div class="language-powershell codeBlockContainer_Ckt0 theme-code-block" style="--prism-color:#393A34;--prism-background-color:#f6f8fa"><div class="codeBlockContent_QJqH"><pre tabindex="0" class="prism-code language-powershell codeBlock_bY9V thin-scrollbar" style="color:#393A34;background-color:#f6f8fa"><code class="codeBlockLines_e6Vv"><div class="token-line" style="color:#393A34"><span class="token plain">npm install -g aws-cdk</span><br></div></code></pre></div></div>
<h3 class="anchor anchorTargetStickyNavbar_Vzrq" id="downloading-and-configuring-the-cdk-code">Downloading and Configuring the CDK code<a href="https://mikelikesrobots.github.io/blog/ec2-spot-sims#downloading-and-configuring-the-cdk-code" class="hash-link" aria-label="Direct link to Downloading and Configuring the CDK code" title="Direct link to Downloading and Configuring the CDK code" translate="no">​</a></h3>
<p>Clone the code:</p>
<div class="language-text codeBlockContainer_Ckt0 theme-code-block" style="--prism-color:#393A34;--prism-background-color:#f6f8fa"><div class="codeBlockContent_QJqH"><pre tabindex="0" class="prism-code language-text codeBlock_bY9V thin-scrollbar" style="color:#393A34;background-color:#f6f8fa"><code class="codeBlockLines_e6Vv"><div class="token-line" style="color:#393A34"><span class="token plain">git clone https://github.com/mikelikesrobots/spot_instance_sims</span><br></div><div class="token-line" style="color:#393A34"><span class="token plain">cd spot_instance_sims</span><br></div></code></pre></div></div>
<p>Open the code folder in your preferred editor, then open the <code>bin/spot-instance-sims.ts</code> file. Lines 17 and 27 use an insecure password: either change this to your own password, or remove the lines completely to use a password generated by AWS Secrets Manager.</p>
<div class="theme-admonition theme-admonition-warning admonition_xJq3 alert alert--warning"><div class="admonitionHeading_Gvgb"><span class="admonitionIcon_Rf37"><svg viewBox="0 0 16 16"><path fill-rule="evenodd" d="M8.893 1.5c-.183-.31-.52-.5-.887-.5s-.703.19-.886.5L.138 13.499a.98.98 0 0 0 0 1.001c.193.31.53.501.886.501h13.964c.367 0 .704-.19.877-.5a1.03 1.03 0 0 0 .01-1.002L8.893 1.5zm.133 11.497H6.987v-2.003h2.039v2.003zm0-3.004H6.987V5.987h2.039v4.006z"></path></svg></span>Copying into the Instance</div><div class="admonitionContent_BuS1"><p>Using a generated password is likely to be more secure, especially because the stack is configured to print out your specified password if you're not generating one, which can be read from logs. However, I found that copying the password into the instance using the DCV Viewer doesn't work well out of the box, which makes it really inconvenient to use!</p></div></div>
<p>Line 23 has a TODO where you can paste the snapshot ID from <a href="https://mikelikesrobots.github.io/blog/ec2-spot-sims#optional-set-up-the-isaac-sim-ebs-snapshot" class="">setting up the Isaac Sim EBS Snapshot</a>, if you choose to do so.</p>
<p>Finally, line 26 has a flag to <code>installGazebo</code>. If you want to use Gazebo, leave this as it is, but it does need to be installed on every startup, which takes time and may incur bandwidth costs (AWS charges extra for uploads and downloads).</p>
<p>Once you've set up all the options as you want them, we need to set up AWS credentials to be able to deploy the resources.</p>
<h3 class="anchor anchorTargetStickyNavbar_Vzrq" id="aws-credentials-setup">AWS Credentials Setup<a href="https://mikelikesrobots.github.io/blog/ec2-spot-sims#aws-credentials-setup" class="hash-link" aria-label="Direct link to AWS Credentials Setup" title="Direct link to AWS Credentials Setup" translate="no">​</a></h3>
<p>There are a few methods to provide CDK with AWS credentials. I'm going to use IAM user long-term credentials as it's one of the quickest to set up, although it's not recommended by AWS. You can pick your preferred method from <a href="https://docs.aws.amazon.com/cli/v1/userguide/cli-chap-authentication.html" target="_blank" rel="noopener noreferrer" class="">Authentication and access credentials for the AWS CLI</a>.</p>
<p>Sign in to the <a href="https://eu-north-1.signin.aws.amazon.com/" target="_blank" rel="noopener noreferrer" class="">AWS Console</a>, then navigate to the <a href="https://us-east-1.console.aws.amazon.com/iam/home?region=us-east-1#/home" target="_blank" rel="noopener noreferrer" class="">IAM service</a>. Access the <a href="https://us-east-1.console.aws.amazon.com/iam/home?region=us-east-1#/users" target="_blank" rel="noopener noreferrer" class="">Users page</a> and create a user if you don't have one already.</p>
<p>To create the user, give it your preferred name, then on the "Set permissions" page, select "Attach policies directly" and select "AdministratorAccess". This will grant all privileges to AWS. <em>I will leave constructing a least permissive policy as an exercise to the user!</em></p>
<figure class="text--center"><p><img decoding="async" loading="lazy" alt="Select AdministratorAccess policy on IAM user creation" src="https://mikelikesrobots.github.io/assets/images/select-policy-cf9ee57fbf1f9c05019fdd6359708ad2.webp" width="1085" height="732" class="img_ev3q">
</p><figcaption>When creating a user in the IAM console, select the Attach policies directly button and attach AdministratorAccess.</figcaption><p></p></figure>
<p>Once the user is created, select it and navigate to the "Security credentials" tab. Scroll down to Access keys and click Create access key.</p>
<figure class="text--center"><p><img decoding="async" loading="lazy" alt="Create access key in security credentials tab" src="https://mikelikesrobots.github.io/assets/images/create-access-key-23688bf2f2e6fff272d46444f60f125e.webp" width="1087" height="797" class="img_ev3q">
</p><figcaption>Select the user's Security credentials, then Create access key.</figcaption><p></p></figure>
<p>The access key should be for "Command Line Interface (CLI)". Read the confirmation statement at the bottom and check it if you agree, then click Next. Set a description tag if you want, then go to retrieve access keys. Keep this page open until the AWS CLI has been fully configured!</p>
<p>Open a command prompt or terminal, then execute:</p>
<div class="language-bash codeBlockContainer_Ckt0 theme-code-block" style="--prism-color:#393A34;--prism-background-color:#f6f8fa"><div class="codeBlockContent_QJqH"><pre tabindex="0" class="prism-code language-bash codeBlock_bY9V thin-scrollbar" style="color:#393A34;background-color:#f6f8fa"><code class="codeBlockLines_e6Vv"><div class="token-line" style="color:#393A34"><span class="token plain">aws configure</span><br></div></code></pre></div></div>
<p>This will prompt you for details of your access key. Copy the access key ID and secret from the AWS Console. The region and output format are up to you: I use <code>eu-west-2</code> and <code>json</code> respectively.</p>
<p>Once the configuration is complete, you can close the AWS Console if you want, although it will come in useful in later steps.</p>
<h3 class="anchor anchorTargetStickyNavbar_Vzrq" id="deploy-the-dependency-stack">Deploy the Dependency Stack<a href="https://mikelikesrobots.github.io/blog/ec2-spot-sims#deploy-the-dependency-stack" class="hash-link" aria-label="Direct link to Deploy the Dependency Stack" title="Direct link to Deploy the Dependency Stack" translate="no">​</a></h3>
<p>Open a command prompt or terminal and navigate to the CDK code folder:</p>
<div class="language-bash codeBlockContainer_Ckt0 theme-code-block" style="--prism-color:#393A34;--prism-background-color:#f6f8fa"><div class="codeBlockContent_QJqH"><pre tabindex="0" class="prism-code language-bash codeBlock_bY9V thin-scrollbar" style="color:#393A34;background-color:#f6f8fa"><code class="codeBlockLines_e6Vv"><div class="token-line" style="color:#393A34"><span class="token plain">cd path/to/spot_instance_sims</span><br></div></code></pre></div></div>
<p>The code is divided into a few stacks. The first to deploy is the dependency stack, which only contains the Amazon S3 bucket for storing project data. This is separate so that it can be referenced by other stacks and won't be deleted when other stacks are deleted.</p>
<div class="theme-admonition theme-admonition-warning admonition_xJq3 alert alert--warning"><div class="admonitionHeading_Gvgb"><span class="admonitionIcon_Rf37"><svg viewBox="0 0 16 16"><path fill-rule="evenodd" d="M8.893 1.5c-.183-.31-.52-.5-.887-.5s-.703.19-.886.5L.138 13.499a.98.98 0 0 0 0 1.001c.193.31.53.501.886.501h13.964c.367 0 .704-.19.877-.5a1.03 1.03 0 0 0 .01-1.002L8.893 1.5zm.133 11.497H6.987v-2.003h2.039v2.003zm0-3.004H6.987V5.987h2.039v4.006z"></path></svg></span>Clean Up Resources</div><div class="admonitionContent_BuS1"><p>If you want to completely clean up your AWS account resources, make sure to empty and delete this bucket!</p></div></div>
<p>First, we need to initialise the environment, which means creating a few resources that CDK needs to help with deployment:</p>
<div class="language-bash codeBlockContainer_Ckt0 theme-code-block" style="--prism-color:#393A34;--prism-background-color:#f6f8fa"><div class="codeBlockContent_QJqH"><pre tabindex="0" class="prism-code language-bash codeBlock_bY9V thin-scrollbar" style="color:#393A34;background-color:#f6f8fa"><code class="codeBlockLines_e6Vv"><div class="token-line" style="color:#393A34"><span class="token plain">cdk bootstrap</span><br></div></code></pre></div></div>
<p>Then we can deploy the dependency stack using the following command:</p>
<div class="language-bash codeBlockContainer_Ckt0 theme-code-block" style="--prism-color:#393A34;--prism-background-color:#f6f8fa"><div class="codeBlockContent_QJqH"><pre tabindex="0" class="prism-code language-bash codeBlock_bY9V thin-scrollbar" style="color:#393A34;background-color:#f6f8fa"><code class="codeBlockLines_e6Vv"><div class="token-line" style="color:#393A34"><span class="token plain">cdk deploy spot-sim-deps</span><br></div></code></pre></div></div>
<p>Accept the changes, then wait for deployment to complete.</p>
<h3 class="anchor anchorTargetStickyNavbar_Vzrq" id="optional-set-up-the-isaac-sim-ebs-snapshot">[Optional] Set up the Isaac Sim EBS Snapshot<a href="https://mikelikesrobots.github.io/blog/ec2-spot-sims#optional-set-up-the-isaac-sim-ebs-snapshot" class="hash-link" aria-label="Direct link to [Optional] Set up the Isaac Sim EBS Snapshot" title="Direct link to [Optional] Set up the Isaac Sim EBS Snapshot" translate="no">​</a></h3>
<p>This step is completely optional and can be skipped if you don't plan to use Isaac Sim. It's also very time-consuming: doing it takes more than an hour, all told.</p>
<p>If you don't want to use NVIDIA Isaac Sim, make sure to delete the section in <code>bin/spot-instance-sims.ts</code> for <code>isaacSimParams</code>. If the <code>isaacSimParams</code> configuration section doesn't exist, the CDK will not take any actions towards deploying Isaac Sim.</p>
<p>If you <em>do</em> want to use Isaac Sim, you will need to deploy a stack and then go through a few manual steps. First, we will deploy an EC2 Spot Instance with a fast EBS volume for storing Isaac Sim on:</p>
<div class="language-bash codeBlockContainer_Ckt0 theme-code-block" style="--prism-color:#393A34;--prism-background-color:#f6f8fa"><div class="codeBlockContent_QJqH"><pre tabindex="0" class="prism-code language-bash codeBlock_bY9V thin-scrollbar" style="color:#393A34;background-color:#f6f8fa"><code class="codeBlockLines_e6Vv"><div class="token-line" style="color:#393A34"><span class="token plain">cdk deploy isaac-builder</span><br></div></code></pre></div></div>
<p>This instance will have instructions to download and extract Isaac Sim automatically. You can either wait for around thirty minutes for the instance to do its work, or you can monitor it by signing in and monitoring the log. If you wish to do so, the method of accessing the Spot Instance are the same as in <a href="https://mikelikesrobots.github.io/blog/ec2-spot-sims#deploying-and-using-the-simulation-stack" class="">Deploying and Using the Simulation Stack</a>; <a href="https://mikelikesrobots.github.io/blog/ec2-spot-sims#get-sim-ip" class="">get the instance's IP address</a>, then log in using the DCV Viewer. Once you have desktop access, use the following command in a termianl:</p>
<div class="language-bash codeBlockContainer_Ckt0 theme-code-block" style="--prism-color:#393A34;--prism-background-color:#f6f8fa"><div class="codeBlockContent_QJqH"><pre tabindex="0" class="prism-code language-bash codeBlock_bY9V thin-scrollbar" style="color:#393A34;background-color:#f6f8fa"><code class="codeBlockLines_e6Vv"><div class="token-line" style="color:#393A34"><span class="token plain">sudo tail -f /var/log/cloud-init-output.log</span><br></div></code></pre></div></div>
<p>This will show what the startup script is doing. Once it gets to running the simulator headlessly, it will wait for 10 minutes, then quit the simulator. That's the point where you can access the instance and check that Isaac Sim is working correctly.</p>
<p>Once complete, open a terminal and execute <code>isaac</code>. This should load the simulator up. Wait until it's fully loaded, which takes around five minutes, then click the Play button to run the simulation. It will show an empty world. If you reach this point, congratulations! You have an EBS volume with NVIDIA Isaac Sim installed on it.</p>
<figure class="text--center"><p><img decoding="async" loading="lazy" alt="Screenshot of Isaac Sim running on Spot Instance" src="https://mikelikesrobots.github.io/assets/images/isaac-sim-70fbcee624921f8903d78caa1ecd11ff.webp" width="2153" height="955" class="img_ev3q">
</p><figcaption>NVIDIA Isaac Sim running on the Spot Instance. Note that the time shows 477s before the app is fully ready, which is about 7-8 minutes.</figcaption><p></p></figure>
<p>With Isaac Sim installed, the next step is to take a snapshot that can be used for future Spot Instances. The work of our current Spot Instance is done, so we can delete it to save on costs - see the <a href="https://mikelikesrobots.github.io/blog/ec2-spot-sims#stop-sim" class="">stop sim script</a>.</p>
<p>Next, navigate to the <a href="https://eu-west-2.console.aws.amazon.com/ec2/home?region=eu-west-2#Volumes" target="_blank" rel="noopener noreferrer" class="">Volumes page in the EC2 Console</a>. Once the volume is no longer in use, check the checkbox and select Create snapshot from the Actions menu.</p>
<figure class="text--center"><p><img decoding="async" loading="lazy" alt="Screenshot showing available volume with create snapshot item highlighted" src="https://mikelikesrobots.github.io/assets/images/volume-snapshot-ee8179f6998cbc64764fd9ed32779b33.webp" width="1851" height="468" class="img_ev3q">
</p><figcaption>Once the volume says Available, highlight it, click Actions, then Create snapshot.</figcaption><p></p></figure>
<p>Add a description and tags, if you like, then click Create snapshot. This operation will take a while, roughly 15-20 minutes, so settle in! Once complete, copy the Snapshot ID and replace the placeholder in the sim stack on line 24 of <code>bin/spot-instance-sims.ts</code>.</p>
<figure class="text--center"><p><img decoding="async" loading="lazy" alt="Screenshot showing completed snapshot from volume" src="https://mikelikesrobots.github.io/assets/images/volume-snapshot-ee8179f6998cbc64764fd9ed32779b33.webp" width="1851" height="468" class="img_ev3q">
</p><figcaption>Once the Snapshot status is Completed, copy the Snapshot ID into the CDK code.</figcaption><p></p></figure>
<p>Once the snapshot is complete, you can delete the Volume used to create it. It won't be needed any more, and it does cost money to keep it around.</p>
<figure class="text--center"><p><img decoding="async" loading="lazy" alt="Screenshot the volume delete confirmation dialog box from the AWS Console" src="https://mikelikesrobots.github.io/assets/images/delete-volume-1223dfce629f1ac92804f9eb01b6c548.webp" width="758" height="328" class="img_ev3q">
</p><figcaption>Go back to the Volumes page, select the volume, then select Delete volume from the Actions menu. Enter the given text to confirm deletion.</figcaption><p></p></figure>
<p>That's all the setup you need for Isaac Sim - you can follow the rest of the instructions below.</p>
<h3 class="anchor anchorTargetStickyNavbar_Vzrq" id="deploying-and-using-the-simulation-stack">Deploying and Using the Simulation Stack<a href="https://mikelikesrobots.github.io/blog/ec2-spot-sims#deploying-and-using-the-simulation-stack" class="hash-link" aria-label="Direct link to Deploying and Using the Simulation Stack" title="Direct link to Deploying and Using the Simulation Stack" translate="no">​</a></h3>
<p>To get your simulation stack running, there's just one more stack to deploy:</p>
<div class="language-bash codeBlockContainer_Ckt0 theme-code-block" style="--prism-color:#393A34;--prism-background-color:#f6f8fa"><div class="codeBlockContent_QJqH"><pre tabindex="0" class="prism-code language-bash codeBlock_bY9V thin-scrollbar" style="color:#393A34;background-color:#f6f8fa"><code class="codeBlockLines_e6Vv"><div class="token-line" style="color:#393A34"><span class="token plain">cdk deploy spot-sim</span><br></div></code></pre></div></div>
<p>Accept the changes to your AWS account, and it will create all of the resources.</p>
<div class="theme-admonition theme-admonition-warning admonition_xJq3 alert alert--warning"><div class="admonitionHeading_Gvgb"><span class="admonitionIcon_Rf37"><svg viewBox="0 0 16 16"><path fill-rule="evenodd" d="M8.893 1.5c-.183-.31-.52-.5-.887-.5s-.703.19-.886.5L.138 13.499a.98.98 0 0 0 0 1.001c.193.31.53.501.886.501h13.964c.367 0 .704-.19.877-.5a1.03 1.03 0 0 0 .01-1.002L8.893 1.5zm.133 11.497H6.987v-2.003h2.039v2.003zm0-3.004H6.987V5.987h2.039v4.006z"></path></svg></span>EC2 Instance</div><div class="admonitionContent_BuS1"><p>You have now created the Spot Fleet Request that will start a Spot Instance for you. This Spot Instance is what costs the most money out of the whole system, so be careful not to leave it running unused! You can either destroy the stack or use the <code>stop_sim</code> script to make sure nothing is running and costing you money.</p></div></div>
<p>At this point, your simulation instance is very likely to have started up already. If you are installing Gazebo, it may take a couple of minutes before it's ready to be used, but either way you can start the remote desktop viewer.</p>
<p>To access the instance, you need to find the IP address. Unfortunately, CDK can't directly give this to us because it creates the <em>fleet request</em>, not the Spot Instance itself, and it can't wait until the Spot Instance is up to find the IP address. One option is to use the AWS Console:</p>
<figure class="text--center"><p><img decoding="async" loading="lazy" alt="Screenshot showing Spot Instance IP from AWS Console" src="https://mikelikesrobots.github.io/assets/images/spot-instance-ip-ba5f1a48bd0a1b8bf9bb65720c568754.webp" width="1157" height="560" class="img_ev3q">
</p><figcaption>Find the Spot Instance under the Running Instances list or directly from the fleet request. Scroll right to find the Public IPv4 address, or select the instance and look at the information at the bottom.</figcaption><p></p></figure>
<p>Another option is to use one of the provided scripts:</p>
<h4 class="anchor anchorTargetStickyNavbar_Vzrq" id="get-sim-ip">Get the instance IP address<a href="https://mikelikesrobots.github.io/blog/ec2-spot-sims#get-sim-ip" class="hash-link" aria-label="Direct link to Get the instance IP address" title="Direct link to Get the instance IP address" translate="no">​</a></h4>
<div class="language-bash codeBlockContainer_Ckt0 theme-code-block" style="--prism-color:#393A34;--prism-background-color:#f6f8fa"><div class="codeBlockContent_QJqH"><pre tabindex="0" class="prism-code language-bash codeBlock_bY9V thin-scrollbar" style="color:#393A34;background-color:#f6f8fa"><code class="codeBlockLines_e6Vv"><div class="token-line" style="color:#393A34"><span class="token plain"># Windows</span><br></div><div class="token-line" style="color:#393A34"><span class="token plain">.\scripts\get_sim_ip.bat</span><br></div><div class="token-line" style="color:#393A34"><span class="token plain"># Linux</span><br></div><div class="token-line" style="color:#393A34"><span class="token plain">./scripts/get_sim_ip.sh</span><br></div></code></pre></div></div>
<p>The scripts work by looking up a Spot Instance with a particular tag, created automatically by the CDK stack, and getting its public IP. An example output is:</p>
<div class="language-bash codeBlockContainer_Ckt0 theme-code-block" style="--prism-color:#393A34;--prism-background-color:#f6f8fa"><div class="codeBlockContent_QJqH"><pre tabindex="0" class="prism-code language-bash codeBlock_bY9V thin-scrollbar" style="color:#393A34;background-color:#f6f8fa"><code class="codeBlockLines_e6Vv"><div class="token-line" style="color:#393A34"><span class="token plain">$ .\scripts\get_sim_ip.bat</span><br></div><div class="token-line" style="color:#393A34"><span class="token plain">-------------------------------------------       </span><br></div><div class="token-line" style="color:#393A34"><span class="token plain">|            DescribeInstances            |       </span><br></div><div class="token-line" style="color:#393A34"><span class="token plain">+----------------------+------------------+       </span><br></div><div class="token-line" style="color:#393A34"><span class="token plain">|  i-08e3bb78d5f8d29ff |  18.171.186.197  |       </span><br></div><div class="token-line" style="color:#393A34"><span class="token plain">+----------------------+------------------+</span><br></div></code></pre></div></div>
<p>If you chose to generate a password, now is also a good time to look that password up. You can either use the AWS CLI to obtain it (replace the placeholder ARN with the ARN from the CDK stack output):</p>
<div class="language-bash codeBlockContainer_Ckt0 theme-code-block" style="--prism-color:#393A34;--prism-background-color:#f6f8fa"><div class="codeBlockContent_QJqH"><pre tabindex="0" class="prism-code language-bash codeBlock_bY9V thin-scrollbar" style="color:#393A34;background-color:#f6f8fa"><code class="codeBlockLines_e6Vv"><div class="token-line" style="color:#393A34"><span class="token plain">aws secretsmanager get-secret-value --secret-id arn:your-arn-here</span><br></div></code></pre></div></div>
<p>Or, you can open up the <a href="https://eu-west-2.console.aws.amazon.com/secretsmanager/listsecrets?region=eu-west-2" target="_blank" rel="noopener noreferrer" class="">AWS Secrets Manager console</a> and access it there.</p>
<figure class="text--center"><p><img decoding="async" loading="lazy" alt="Screenshot showing the retrieve secret value button in the AWS Console." src="https://mikelikesrobots.github.io/assets/images/retrieve-secret-value-de195f0c0ecfe97b436d335a72d46089.webp" width="2052" height="564" class="img_ev3q">
</p><figcaption>Select the secret in the AWS console, then click Retrieve secret value.</figcaption><p></p></figure>
<p>Open the DCV Viewer application and paste the IP address in. Click Trust and Connect, then use the username <code>o3de</code> and your chosen or generated password to log in. You'll then need to log in to the Ubuntu desktop itself with the same username and password.</p>
<p>At this point, you should have the full Ubuntu desktop available! You can test by launching each simulator that you've installed in turn, and seeing if that simulator will load and run. Open a terminal and try each of these commands:</p>
<div class="language-bash codeBlockContainer_Ckt0 theme-code-block" style="--prism-color:#393A34;--prism-background-color:#f6f8fa"><div class="codeBlockContent_QJqH"><pre tabindex="0" class="prism-code language-bash codeBlock_bY9V thin-scrollbar" style="color:#393A34;background-color:#f6f8fa"><code class="codeBlockLines_e6Vv"><div class="token-line" style="color:#393A34"><span class="token plain"># For O3DE</span><br></div><div class="token-line" style="color:#393A34"><span class="token plain">o3de</span><br></div><div class="token-line" style="color:#393A34"><span class="token plain"># For Gazebo</span><br></div><div class="token-line" style="color:#393A34"><span class="token plain">gz sim shapes.sdf</span><br></div><div class="token-line" style="color:#393A34"><span class="token plain"># For NVIDIA Isaac Sim</span><br></div><div class="token-line" style="color:#393A34"><span class="token plain">isaac</span><br></div></code></pre></div></div>
<p>Remember, only O3DE is installed by default! For Gazebo, you need to have the flag set to true in the CDK stack, and for NVIDIA Isaac Sim, you need to follow the <a href="https://mikelikesrobots.github.io/blog/ec2-spot-sims#optional-set-up-the-isaac-sim-ebs-snapshot" class="">optional setup steps</a> <em>and</em> update the CDK stack information with the EBS snapshot ID.</p>
<div class="theme-admonition theme-admonition-note admonition_xJq3 alert alert--secondary"><div class="admonitionHeading_Gvgb"><span class="admonitionIcon_Rf37"><svg viewBox="0 0 14 16"><path fill-rule="evenodd" d="M6.3 5.69a.942.942 0 0 1-.28-.7c0-.28.09-.52.28-.7.19-.18.42-.28.7-.28.28 0 .52.09.7.28.18.19.28.42.28.7 0 .28-.09.52-.28.7a1 1 0 0 1-.7.3c-.28 0-.52-.11-.7-.3zM8 7.99c-.02-.25-.11-.48-.31-.69-.2-.19-.42-.3-.69-.31H6c-.27.02-.48.13-.69.31-.2.2-.3.44-.31.69h1v3c.02.27.11.5.31.69.2.2.42.31.69.31h1c.27 0 .48-.11.69-.31.2-.19.3-.42.31-.69H8V7.98v.01zM7 2.3c-3.14 0-5.7 2.54-5.7 5.68 0 3.14 2.56 5.7 5.7 5.7s5.7-2.55 5.7-5.7c0-3.15-2.56-5.69-5.7-5.69v.01zM7 .98c3.86 0 7 3.14 7 7s-3.14 7-7 7-7-3.12-7-7 3.14-7 7-7z"></path></svg></span>Isaac Sim Asset Caching</div><div class="admonitionContent_BuS1"><p>The CDK build does try to cache assets for Isaac Sim. However, I'm not convinced that cached assets are preserved between launches of the Spot Instance. This should be possible by finding the cache paths of Isaac Sim and setting up symlinks to point them to the EBS drive, then add those symlink commands to the user data scripts. If you are able to figure this out, please submit a PR or comment on this article!</p></div></div>
<figure class="text--center"><p><img decoding="async" loading="lazy" alt="Screenshot of O3DE running on the Spot Instance" src="https://mikelikesrobots.github.io/assets/images/o3de-07dac0b7b57576390c20563ea459bf55.webp" width="1985" height="760" class="img_ev3q">
</p><figcaption>O3DE running on the Spot Instance.</figcaption><p></p></figure>
<figure class="text--center"><p><img decoding="async" loading="lazy" alt="Screenshot of Ignition Gazebo running on the Spot Instance" src="https://mikelikesrobots.github.io/assets/images/gazebo-a16afceb673053f4167a5d3a6a491ec2.webp" width="1755" height="751" class="img_ev3q">
</p><figcaption>Ignition Gazebo running on the Spot Instance.</figcaption><p></p></figure>
<figure class="text--center"><p><img decoding="async" loading="lazy" alt="Screenshot of NVIDIA Isaac Sim running on the Spot Instance" src="https://mikelikesrobots.github.io/assets/images/isaac-sim-70fbcee624921f8903d78caa1ecd11ff.webp" width="2153" height="955" class="img_ev3q">
</p><figcaption>NVIDIA Isaac Sim running on the Spot Instance.</figcaption><p></p></figure>
<p>If you do try to run Gazebo or Isaac Sim and get an error, try waiting a few more minutes for the setup script to finish working, then use command <code>source ~/.bashrc</code>. If that still isn't enough, you can try the installation steps yourself to see what went wrong, or comment on this article to see if I can help!</p>
<h4 class="anchor anchorTargetStickyNavbar_Vzrq" id="saving-project-information">Saving Project Information<a href="https://mikelikesrobots.github.io/blog/ec2-spot-sims#saving-project-information" class="hash-link" aria-label="Direct link to Saving Project Information" title="Direct link to Saving Project Information" translate="no">​</a></h4>
<p>The CDK stack will automatically set up a command for syncing project data back to the S3 bucket. The command can't be used automatically by the system, because it isn't guaranteed to have a full shutdown cycle, so instead you will need to remember to save project data back!</p>
<p>The command to use is:</p>
<div class="language-bash codeBlockContainer_Ckt0 theme-code-block" style="--prism-color:#393A34;--prism-background-color:#f6f8fa"><div class="codeBlockContent_QJqH"><pre tabindex="0" class="prism-code language-bash codeBlock_bY9V thin-scrollbar" style="color:#393A34;background-color:#f6f8fa"><code class="codeBlockLines_e6Vv"><div class="token-line" style="color:#393A34"><span class="token plain">s3sync</span><br></div></code></pre></div></div>
<p>This will copy any project files from your spot instance to the S3 bucket created by the CDK stack. The next time a Spot Instance starts up, it will automatically have all data from the bucket copied into it, meaning that your data is preserved between runs. However, only project data created in the <code>/data</code> folder will be copied!</p>
<p>If we open up O3DE and create a new project, you can give that project a folder path of <code>/data/your-project-name</code>. If you do so, running <code>s3sync</code> will copy it to the S3 bucket. You can build the project, run and do any testing, then sync to S3 if you want to keep the changes. On next run, that project will be available on disk, but won't be in the project manager; you'll need to open an existing project to get access to it.</p>
<figure class="text--center"><p><img decoding="async" loading="lazy" alt="Screenshot showing project creation settings in O3DE" src="https://mikelikesrobots.github.io/assets/images/create-project-location-727cf859a4737668e85ef7577b5fca76.webp" width="1198" height="737" class="img_ev3q">
</p><figcaption>When creating a new project in O3DE, make sure to specify a project location in the <code>/data</code> folder so it can be synced back and forth with the S3 bucket.</figcaption><p></p></figure>
<p>After you've finished working with the project, remember to use <code>s3sync</code>:</p>
<div class="language-bash codeBlockContainer_Ckt0 theme-code-block" style="--prism-color:#393A34;--prism-background-color:#f6f8fa"><div class="codeBlockContent_QJqH"><pre tabindex="0" class="prism-code language-bash codeBlock_bY9V thin-scrollbar" style="color:#393A34;background-color:#f6f8fa"><code class="codeBlockLines_e6Vv"><div class="token-line" style="color:#393A34"><span class="token plain">o3de@ip-172-31-17-163:~$ s3sync</span><br></div><div class="token-line" style="color:#393A34"><span class="token plain">Completed 381 Bytes/~47.9 KiB (7.3 KiB/s) with ~27 file(s) remaining (calculatinupload: ../../data/MyNewProject/.gitattributes to s3://spot-sim-deps-simbucket31bbb824-m0194qsbkyyz/MyNewProject/.gitattributes</span><br></div><div class="token-line" style="color:#393A34"><span class="token plain">Completed 381 Bytes/~47.9 KiB (7.3 KiB/s) with ~26 file(s) remaining (calculatinCompleted 2.2 KiB/~134.3 KiB (25.0 KiB/s) with ~46 file(s) remaining (calculatinupload: ../../data/MyNewProject/Examples/slam_navigation/launch/navigation.launch.py to s3://spot-sim-deps-simbucket31bbb824-m0194qsbkyyz/MyNewProject/Examples/slam_navigation/launch/navigation.launch.py</span><br></div><div class="token-line" style="color:#393A34"><span class="token plain">... (Removed for brevity) ...</span><br></div><div class="token-line" style="color:#393A34"><span class="token plain">upload: ../../data/MyNewProject/project.json to s3://spot-sim-deps-simbucket31bbb824-m0194qsbkyyz/MyNewProject/project.json</span><br></div><div class="token-line" style="color:#393A34"><span class="token plain">upload: ../../data/MyNewProject/project.json.bak0 to s3://spot-sim-deps-simbucket31bbb824-m0194qsbkyyz/MyNewProject/project.json.bak0</span><br></div></code></pre></div></div>
<h4 class="anchor anchorTargetStickyNavbar_Vzrq" id="starting-and-stopping-the-instance">Starting and Stopping the Instance<a href="https://mikelikesrobots.github.io/blog/ec2-spot-sims#starting-and-stopping-the-instance" class="hash-link" aria-label="Direct link to Starting and Stopping the Instance" title="Direct link to Starting and Stopping the Instance" translate="no">​</a></h4>
<p>The fleet request has a target capacity of 1, which means that it always tries to have 1 running Spot Instance. If you shut that instance down, the fleet request will start another one up. To stop any new instances being created, we have two options:</p>
<ol>
<li class="">Destroy the CDK stack</li>
<li class="">Set the target capacity to 0</li>
</ol>
<p>Either option will have the desired effect, but destroying the stack takes a lot longer and would require you to redeploy the stack later for another instance. Instead, we can modify the fleet request to have a target capacity of 0. If we do so, it will stop any running instances in a couple of minutes, then wait to be updated. That means we can leave the fleet request where it is for next time we want a Spot Instance!</p>
<p>To make this easier, I've set up tags on the fleet request using the CDK stack, and written a couple of scripts to update the target capacity. These scripts are as follows:</p>
<h5 class="anchor anchorTargetStickyNavbar_Vzrq" id="stop-sim">Stopping the Instance<a href="https://mikelikesrobots.github.io/blog/ec2-spot-sims#stop-sim" class="hash-link" aria-label="Direct link to Stopping the Instance" title="Direct link to Stopping the Instance" translate="no">​</a></h5>
<p>This will stop a running instance in a couple of minutes. If the target capacity is already 0, it has no effect.</p>
<div class="language-bash codeBlockContainer_Ckt0 theme-code-block" style="--prism-color:#393A34;--prism-background-color:#f6f8fa"><div class="codeBlockContent_QJqH"><pre tabindex="0" class="prism-code language-bash codeBlock_bY9V thin-scrollbar" style="color:#393A34;background-color:#f6f8fa"><code class="codeBlockLines_e6Vv"><div class="token-line" style="color:#393A34"><span class="token plain"># Windows</span><br></div><div class="token-line" style="color:#393A34"><span class="token plain">.\scripts\stop_sim.bat</span><br></div><div class="token-line" style="color:#393A34"><span class="token plain"># Linux</span><br></div><div class="token-line" style="color:#393A34"><span class="token plain">./scripts/stop_sim.sh</span><br></div></code></pre></div></div>
<h5 class="anchor anchorTargetStickyNavbar_Vzrq" id="start-sim">Starting the Instance<a href="https://mikelikesrobots.github.io/blog/ec2-spot-sims#start-sim" class="hash-link" aria-label="Direct link to Starting the Instance" title="Direct link to Starting the Instance" translate="no">​</a></h5>
<p>This will start a new instance. If the target capacity is already 1, it has no effect.</p>
<div class="language-bash codeBlockContainer_Ckt0 theme-code-block" style="--prism-color:#393A34;--prism-background-color:#f6f8fa"><div class="codeBlockContent_QJqH"><pre tabindex="0" class="prism-code language-bash codeBlock_bY9V thin-scrollbar" style="color:#393A34;background-color:#f6f8fa"><code class="codeBlockLines_e6Vv"><div class="token-line" style="color:#393A34"><span class="token plain"># Windows</span><br></div><div class="token-line" style="color:#393A34"><span class="token plain">.\scripts\start_sim.bat</span><br></div><div class="token-line" style="color:#393A34"><span class="token plain"># Linux</span><br></div><div class="token-line" style="color:#393A34"><span class="token plain">./scripts/start_sim.sh</span><br></div></code></pre></div></div>
<p>This gives you the option to start and stop instances at your convenience without having to tear down and set up CDK resources.</p>
<h4 class="anchor anchorTargetStickyNavbar_Vzrq" id="cleaning-up-resources">Cleaning Up Resources<a href="https://mikelikesrobots.github.io/blog/ec2-spot-sims#cleaning-up-resources" class="hash-link" aria-label="Direct link to Cleaning Up Resources" title="Direct link to Cleaning Up Resources" translate="no">​</a></h4>
<p>If you want to totally destroy all the resources you've used, there are a couple of resources to destroy manually. Access the S3 bucket and empty it, then delete the bucket. Also, if you created an EBS snapshot in <a href="https://mikelikesrobots.github.io/blog/ec2-spot-sims#optional-set-up-the-isaac-sim-ebs-snapshot" class="">the Isaac Sim setup</a>, this will need to be deleted manually, as it was created manually.</p>
<p>All remaining resources will be destroyed by destroying the CDK stacks:</p>
<div class="language-bash codeBlockContainer_Ckt0 theme-code-block" style="--prism-color:#393A34;--prism-background-color:#f6f8fa"><div class="codeBlockContent_QJqH"><pre tabindex="0" class="prism-code language-bash codeBlock_bY9V thin-scrollbar" style="color:#393A34;background-color:#f6f8fa"><code class="codeBlockLines_e6Vv"><div class="token-line" style="color:#393A34"><span class="token plain">cdk destroy --all</span><br></div></code></pre></div></div>
<p>This will make sure there are no outstanding costs on your AWS account. Still, it is up to you to check that there are no outstanding expenses! If you want help tracking costs and usage on AWS, take a look at my video on the subject below:</p>
<div class="video_jswG"><button type="button" class="poster_B6DH" aria-label="Play video: Cost-Effective Robotics Simulation in the Cloud — supporting video"><img src="https://i.ytimg.com/vi/LreFpJDXZs0/hqdefault.jpg" alt="" width="480" height="360" loading="lazy"><span class="play_lEvZ" aria-hidden="true">▶</span><span class="caption_yrhJ">Watch: <!-- -->Cost-Effective Robotics Simulation in the Cloud — supporting video</span></button></div><noscript><p><a href="https://www.youtube.com/watch?v=LreFpJDXZs0&amp;t=0">Watch <!-- -->Cost-Effective Robotics Simulation in the Cloud — supporting video<!-- --> on YouTube</a></p></noscript>
<h2 class="anchor anchorTargetStickyNavbar_Vzrq" id="popping-the-cdk-stacks">Popping the CDK stacks<a href="https://mikelikesrobots.github.io/blog/ec2-spot-sims#popping-the-cdk-stacks" class="hash-link" aria-label="Direct link to Popping the CDK stacks" title="Direct link to Popping the CDK stacks" translate="no">​</a></h2>
<p>At this point, you should have a running simulator in the cloud! You can use this for running O3DE, Isaac Sim, or Gazebo simulations as you require. If you're interested to learn how the resources are created, this section goes into more depth of how it works. I won't explain every line of code, but I'll highlight the important parts. The repository is available <a href="https://github.com/mikelikesrobots/spot_instance_sims" target="_blank" rel="noopener noreferrer" class="">on Github</a>.</p>
<h3 class="anchor anchorTargetStickyNavbar_Vzrq" id="overall-cdk-application">Overall CDK Application<a href="https://mikelikesrobots.github.io/blog/ec2-spot-sims#overall-cdk-application" class="hash-link" aria-label="Direct link to Overall CDK Application" title="Direct link to Overall CDK Application" translate="no">​</a></h3>
<p>The main file for CDK to read is in <code>bin/spot-instance-sims.ts</code>. This file is simple; it defines some environment variables that it gets from the calling process, and it declares three stacks: <code>spot-sim-deps</code>, <code>isaac-builder</code>, and <code>spot-sim</code>.</p>
<p>Aside from the variables to change how the stacks behave that I first described in <a href="https://mikelikesrobots.github.io/blog/ec2-spot-sims#downloading-and-configuring-the-cdk-code" class="">Downloading and Configuring the CDK code</a>, there is also the <code>dependencyStack</code> variable passed into the <code>spot-sim</code> stack. That's because the dependency stack creates the Amazon S3 bucket separately to preserve it in case the sim stack is destroyed. By passing it into the sim stack, that stack is able to link to the bucket, so it can copy data in and out of it.</p>
<h3 class="anchor anchorTargetStickyNavbar_Vzrq" id="the-dependency-stack">The Dependency Stack<a href="https://mikelikesrobots.github.io/blog/ec2-spot-sims#the-dependency-stack" class="hash-link" aria-label="Direct link to The Dependency Stack" title="Direct link to The Dependency Stack" translate="no">​</a></h3>
<p>This code is contained in <code>lib/sim-dependency-stack.ts</code>. It simply creates an S3 bucket that blocks public access, versions data copied into it, and retains its contents if bucket removal is requested.</p>
<h3 class="anchor anchorTargetStickyNavbar_Vzrq" id="spot-fleet-request">Spot Fleet Request<a href="https://mikelikesrobots.github.io/blog/ec2-spot-sims#spot-fleet-request" class="hash-link" aria-label="Direct link to Spot Fleet Request" title="Direct link to Spot Fleet Request" translate="no">​</a></h3>
<p>This is not a stack, but a component used by the Isaac Sim builder stack and the Sim Spot Instance stack. It is contained in <code>lib/sim-spot-fleet-request.ts</code>, and it has quite a few steps. In fact, most of the complexity of the stack is in this file.</p>
<p>To begin with, it looks up the default VPC, which is required for launching EC2 instances.</p>
<div class="language-typescript codeBlockContainer_Ckt0 theme-code-block" style="--prism-color:#393A34;--prism-background-color:#f6f8fa"><div class="codeBlockContent_QJqH"><pre tabindex="0" class="prism-code language-typescript codeBlock_bY9V thin-scrollbar" style="color:#393A34;background-color:#f6f8fa"><code class="codeBlockLines_e6Vv"><div class="token-line" style="color:#393A34"><span class="token keyword" style="color:#00009f">const</span><span class="token plain"> vpc </span><span class="token operator" style="color:#393A34">=</span><span class="token plain"> ec2</span><span class="token punctuation" style="color:#393A34">.</span><span class="token plain">Vpc</span><span class="token punctuation" style="color:#393A34">.</span><span class="token function" style="color:#d73a49">fromLookup</span><span class="token punctuation" style="color:#393A34">(</span><span class="token plain">props</span><span class="token punctuation" style="color:#393A34">.</span><span class="token plain">callingStack</span><span class="token punctuation" style="color:#393A34">,</span><span class="token plain"> </span><span class="token string" style="color:#e3116c">"DefaultVpc"</span><span class="token punctuation" style="color:#393A34">,</span><span class="token plain"> </span><span class="token punctuation" style="color:#393A34">{</span><span class="token plain"></span><br></div><div class="token-line" style="color:#393A34"><span class="token plain">  isDefault</span><span class="token operator" style="color:#393A34">:</span><span class="token plain"> </span><span class="token boolean" style="color:#36acaa">true</span><span class="token punctuation" style="color:#393A34">,</span><span class="token plain"></span><br></div><div class="token-line" style="color:#393A34"><span class="token plain"></span><span class="token punctuation" style="color:#393A34">}</span><span class="token punctuation" style="color:#393A34">)</span><span class="token punctuation" style="color:#393A34">;</span><br></div></code></pre></div></div>
<p>It creates two IAM roles. The first is required by the fleet request, which allows it to request Spot Instances. It also gains the <code>AmazonEC2SpotFleetTaggingRole</code>, which allows us to tag the fleet request and any Spot Instances with tags to make script automation easier.</p>
<div class="language-typescript codeBlockContainer_Ckt0 theme-code-block" style="--prism-color:#393A34;--prism-background-color:#f6f8fa"><div class="codeBlockContent_QJqH"><pre tabindex="0" class="prism-code language-typescript codeBlock_bY9V thin-scrollbar" style="color:#393A34;background-color:#f6f8fa"><code class="codeBlockLines_e6Vv"><div class="token-line" style="color:#393A34"><span class="token keyword" style="color:#00009f">const</span><span class="token plain"> spotFleetRole </span><span class="token operator" style="color:#393A34">=</span><span class="token plain"> </span><span class="token keyword" style="color:#00009f">new</span><span class="token plain"> </span><span class="token class-name">iam</span><span class="token punctuation" style="color:#393A34">.</span><span class="token function" style="color:#d73a49">Role</span><span class="token punctuation" style="color:#393A34">(</span><span class="token plain">props</span><span class="token punctuation" style="color:#393A34">.</span><span class="token plain">callingStack</span><span class="token punctuation" style="color:#393A34">,</span><span class="token plain"> </span><span class="token string" style="color:#e3116c">"SpotFleetRole"</span><span class="token punctuation" style="color:#393A34">,</span><span class="token plain"> </span><span class="token punctuation" style="color:#393A34">{</span><span class="token plain"></span><br></div><div class="token-line" style="color:#393A34"><span class="token plain">  assumedBy</span><span class="token operator" style="color:#393A34">:</span><span class="token plain"> </span><span class="token keyword" style="color:#00009f">new</span><span class="token plain"> </span><span class="token class-name">iam</span><span class="token punctuation" style="color:#393A34">.</span><span class="token function" style="color:#d73a49">ServicePrincipal</span><span class="token punctuation" style="color:#393A34">(</span><span class="token string" style="color:#e3116c">"spotfleet.amazonaws.com"</span><span class="token punctuation" style="color:#393A34">)</span><span class="token punctuation" style="color:#393A34">,</span><span class="token plain"></span><br></div><div class="token-line" style="color:#393A34"><span class="token plain">  managedPolicies</span><span class="token operator" style="color:#393A34">:</span><span class="token plain"> </span><span class="token punctuation" style="color:#393A34">[</span><span class="token plain"></span><br></div><div class="token-line" style="color:#393A34"><span class="token plain">    iam</span><span class="token punctuation" style="color:#393A34">.</span><span class="token plain">ManagedPolicy</span><span class="token punctuation" style="color:#393A34">.</span><span class="token function" style="color:#d73a49">fromAwsManagedPolicyName</span><span class="token punctuation" style="color:#393A34">(</span><span class="token plain"></span><br></div><div class="token-line" style="color:#393A34"><span class="token plain">      </span><span class="token string" style="color:#e3116c">"service-role/AmazonEC2SpotFleetTaggingRole"</span><span class="token plain"></span><br></div><div class="token-line" style="color:#393A34"><span class="token plain">    </span><span class="token punctuation" style="color:#393A34">)</span><span class="token punctuation" style="color:#393A34">,</span><span class="token plain"></span><br></div><div class="token-line" style="color:#393A34"><span class="token plain">  </span><span class="token punctuation" style="color:#393A34">]</span><span class="token punctuation" style="color:#393A34">,</span><span class="token plain"></span><br></div><div class="token-line" style="color:#393A34"><span class="token plain"></span><span class="token punctuation" style="color:#393A34">}</span><span class="token punctuation" style="color:#393A34">)</span><span class="token punctuation" style="color:#393A34">;</span><br></div></code></pre></div></div>
<p>The second IAM role is reserved for the Spot Instances. The fleet request object must have the role defined now so it can pass it to any Spot Instances it starts up. The policies it has attached are defined by the stacks that are calling it: for the Isaac Sim builder stack, no extra policies are required; for the sim spot stack, it must have read and write access to the S3 bucket.</p>
<div class="language-typescript codeBlockContainer_Ckt0 theme-code-block" style="--prism-color:#393A34;--prism-background-color:#f6f8fa"><div class="codeBlockContent_QJqH"><pre tabindex="0" class="prism-code language-typescript codeBlock_bY9V thin-scrollbar" style="color:#393A34;background-color:#f6f8fa"><code class="codeBlockLines_e6Vv"><div class="token-line" style="color:#393A34"><span class="token keyword" style="color:#00009f">const</span><span class="token plain"> instanceRole </span><span class="token operator" style="color:#393A34">=</span><span class="token plain"> </span><span class="token keyword" style="color:#00009f">new</span><span class="token plain"> </span><span class="token class-name">iam</span><span class="token punctuation" style="color:#393A34">.</span><span class="token function" style="color:#d73a49">Role</span><span class="token punctuation" style="color:#393A34">(</span><span class="token plain">props</span><span class="token punctuation" style="color:#393A34">.</span><span class="token plain">callingStack</span><span class="token punctuation" style="color:#393A34">,</span><span class="token plain"> </span><span class="token string" style="color:#e3116c">"SimInstanceRole"</span><span class="token punctuation" style="color:#393A34">,</span><span class="token plain"> </span><span class="token punctuation" style="color:#393A34">{</span><span class="token plain"></span><br></div><div class="token-line" style="color:#393A34"><span class="token plain">  assumedBy</span><span class="token operator" style="color:#393A34">:</span><span class="token plain"> </span><span class="token keyword" style="color:#00009f">new</span><span class="token plain"> </span><span class="token class-name">iam</span><span class="token punctuation" style="color:#393A34">.</span><span class="token function" style="color:#d73a49">ServicePrincipal</span><span class="token punctuation" style="color:#393A34">(</span><span class="token string" style="color:#e3116c">"ec2.amazonaws.com"</span><span class="token punctuation" style="color:#393A34">)</span><span class="token punctuation" style="color:#393A34">,</span><span class="token plain"></span><br></div><div class="token-line" style="color:#393A34"><span class="token plain"></span><span class="token punctuation" style="color:#393A34">}</span><span class="token punctuation" style="color:#393A34">)</span><span class="token punctuation" style="color:#393A34">;</span><span class="token plain"></span><br></div><div class="token-line" style="color:#393A34"><span class="token plain"></span><span class="token keyword" style="color:#00009f">const</span><span class="token plain"> instanceProfile </span><span class="token operator" style="color:#393A34">=</span><span class="token plain"> </span><span class="token keyword" style="color:#00009f">new</span><span class="token plain"> </span><span class="token class-name">iam</span><span class="token punctuation" style="color:#393A34">.</span><span class="token function" style="color:#d73a49">CfnInstanceProfile</span><span class="token punctuation" style="color:#393A34">(</span><span class="token plain"></span><br></div><div class="token-line" style="color:#393A34"><span class="token plain">  props</span><span class="token punctuation" style="color:#393A34">.</span><span class="token plain">callingStack</span><span class="token punctuation" style="color:#393A34">,</span><span class="token plain"></span><br></div><div class="token-line" style="color:#393A34"><span class="token plain">  </span><span class="token string" style="color:#e3116c">"SimInstanceProfile"</span><span class="token punctuation" style="color:#393A34">,</span><span class="token plain"></span><br></div><div class="token-line" style="color:#393A34"><span class="token plain">  </span><span class="token punctuation" style="color:#393A34">{</span><span class="token plain"></span><br></div><div class="token-line" style="color:#393A34"><span class="token plain">    roles</span><span class="token operator" style="color:#393A34">:</span><span class="token plain"> </span><span class="token punctuation" style="color:#393A34">[</span><span class="token plain">instanceRole</span><span class="token punctuation" style="color:#393A34">.</span><span class="token plain">roleName</span><span class="token punctuation" style="color:#393A34">]</span><span class="token punctuation" style="color:#393A34">,</span><span class="token plain"></span><br></div><div class="token-line" style="color:#393A34"><span class="token plain">  </span><span class="token punctuation" style="color:#393A34">}</span><span class="token plain"></span><br></div><div class="token-line" style="color:#393A34"><span class="token plain"></span><span class="token punctuation" style="color:#393A34">)</span><span class="token punctuation" style="color:#393A34">;</span><span class="token plain"></span><br></div><div class="token-line" style="color:#393A34"><span class="token plain">props</span><span class="token operator" style="color:#393A34">?.</span><span class="token plain">additionalPolicies</span><span class="token operator" style="color:#393A34">?.</span><span class="token function" style="color:#d73a49">forEach</span><span class="token punctuation" style="color:#393A34">(</span><span class="token punctuation" style="color:#393A34">(</span><span class="token plain">policy</span><span class="token punctuation" style="color:#393A34">)</span><span class="token plain"> </span><span class="token operator" style="color:#393A34">=&gt;</span><span class="token plain"></span><br></div><div class="token-line" style="color:#393A34"><span class="token plain">  instanceRole</span><span class="token punctuation" style="color:#393A34">.</span><span class="token function" style="color:#d73a49">addToPolicy</span><span class="token punctuation" style="color:#393A34">(</span><span class="token plain">policy</span><span class="token punctuation" style="color:#393A34">)</span><span class="token plain"></span><br></div><div class="token-line" style="color:#393A34"><span class="token plain"></span><span class="token punctuation" style="color:#393A34">)</span><span class="token punctuation" style="color:#393A34">;</span><br></div></code></pre></div></div>
<p>The next section is about setting a password on the instance. If you defined a password, this will output the password to remind you. If you removed the password argument, it will generate a new password with the Secrets manager, and add permission to the Spot Instance IAM role to read that password. It also defines a command to get the password as an AWS CLI call:</p>
<div class="language-typescript codeBlockContainer_Ckt0 theme-code-block" style="--prism-color:#393A34;--prism-background-color:#f6f8fa"><div class="codeBlockContent_QJqH"><pre tabindex="0" class="prism-code language-typescript codeBlock_bY9V thin-scrollbar" style="color:#393A34;background-color:#f6f8fa"><code class="codeBlockLines_e6Vv"><div class="token-line" style="color:#393A34"><span class="token plain">getPasswordCommand </span><span class="token operator" style="color:#393A34">=</span><span class="token plain"> </span><span class="token template-string template-punctuation string" style="color:#e3116c">`</span><span class="token template-string string" style="color:#e3116c">O3DE_PASSWORD=$(aws secretsmanager get-secret-value --secret-id "</span><span class="token template-string interpolation interpolation-punctuation punctuation" style="color:#393A34">${</span><span class="token template-string interpolation">passwordSecret</span><span class="token template-string interpolation punctuation" style="color:#393A34">.</span><span class="token template-string interpolation">secretName</span><span class="token template-string interpolation interpolation-punctuation punctuation" style="color:#393A34">}</span><span class="token template-string string" style="color:#e3116c">" --region </span><span class="token template-string interpolation interpolation-punctuation punctuation" style="color:#393A34">${</span><span class="token template-string interpolation">region</span><span class="token template-string interpolation interpolation-punctuation punctuation" style="color:#393A34">}</span><span class="token template-string string" style="color:#e3116c"> --query 'SecretString' --output text | jq -r .password)</span><span class="token template-string template-punctuation string" style="color:#e3116c">`</span><span class="token punctuation" style="color:#393A34">;</span><br></div></code></pre></div></div>
<p>The stack creates a security group for the Spot Instances to use. This allows SSH and DCV access.</p>
<div class="language-typescript codeBlockContainer_Ckt0 theme-code-block" style="--prism-color:#393A34;--prism-background-color:#f6f8fa"><div class="codeBlockContent_QJqH"><pre tabindex="0" class="prism-code language-typescript codeBlock_bY9V thin-scrollbar" style="color:#393A34;background-color:#f6f8fa"><code class="codeBlockLines_e6Vv"><div class="token-line" style="color:#393A34"><span class="token keyword" style="color:#00009f">const</span><span class="token plain"> sg </span><span class="token operator" style="color:#393A34">=</span><span class="token plain"> </span><span class="token keyword" style="color:#00009f">new</span><span class="token plain"> </span><span class="token class-name">ec2</span><span class="token punctuation" style="color:#393A34">.</span><span class="token function" style="color:#d73a49">SecurityGroup</span><span class="token punctuation" style="color:#393A34">(</span><span class="token plain">props</span><span class="token punctuation" style="color:#393A34">.</span><span class="token plain">callingStack</span><span class="token punctuation" style="color:#393A34">,</span><span class="token plain"> </span><span class="token string" style="color:#e3116c">"SimInstanceSG"</span><span class="token punctuation" style="color:#393A34">,</span><span class="token plain"> </span><span class="token punctuation" style="color:#393A34">{</span><span class="token plain"></span><br></div><div class="token-line" style="color:#393A34"><span class="token plain">  vpc</span><span class="token punctuation" style="color:#393A34">,</span><span class="token plain"></span><br></div><div class="token-line" style="color:#393A34"><span class="token plain">  description</span><span class="token operator" style="color:#393A34">:</span><span class="token plain"> </span><span class="token string" style="color:#e3116c">"Allow SSH and DCV"</span><span class="token punctuation" style="color:#393A34">,</span><span class="token plain"></span><br></div><div class="token-line" style="color:#393A34"><span class="token plain">  allowAllOutbound</span><span class="token operator" style="color:#393A34">:</span><span class="token plain"> </span><span class="token boolean" style="color:#36acaa">true</span><span class="token punctuation" style="color:#393A34">,</span><span class="token plain"></span><br></div><div class="token-line" style="color:#393A34"><span class="token plain"></span><span class="token punctuation" style="color:#393A34">}</span><span class="token punctuation" style="color:#393A34">)</span><span class="token punctuation" style="color:#393A34">;</span><span class="token plain"></span><br></div><div class="token-line" style="color:#393A34"><span class="token plain">sg</span><span class="token punctuation" style="color:#393A34">.</span><span class="token function" style="color:#d73a49">addIngressRule</span><span class="token punctuation" style="color:#393A34">(</span><span class="token plain">ec2</span><span class="token punctuation" style="color:#393A34">.</span><span class="token plain">Peer</span><span class="token punctuation" style="color:#393A34">.</span><span class="token function" style="color:#d73a49">anyIpv4</span><span class="token punctuation" style="color:#393A34">(</span><span class="token punctuation" style="color:#393A34">)</span><span class="token punctuation" style="color:#393A34">,</span><span class="token plain"> ec2</span><span class="token punctuation" style="color:#393A34">.</span><span class="token plain">Port</span><span class="token punctuation" style="color:#393A34">.</span><span class="token function" style="color:#d73a49">tcp</span><span class="token punctuation" style="color:#393A34">(</span><span class="token number" style="color:#36acaa">22</span><span class="token punctuation" style="color:#393A34">)</span><span class="token punctuation" style="color:#393A34">,</span><span class="token plain"> </span><span class="token string" style="color:#e3116c">"Allow SSH"</span><span class="token punctuation" style="color:#393A34">)</span><span class="token punctuation" style="color:#393A34">;</span><span class="token plain"></span><br></div><div class="token-line" style="color:#393A34"><span class="token plain">sg</span><span class="token punctuation" style="color:#393A34">.</span><span class="token function" style="color:#d73a49">addIngressRule</span><span class="token punctuation" style="color:#393A34">(</span><span class="token plain">ec2</span><span class="token punctuation" style="color:#393A34">.</span><span class="token plain">Peer</span><span class="token punctuation" style="color:#393A34">.</span><span class="token function" style="color:#d73a49">anyIpv4</span><span class="token punctuation" style="color:#393A34">(</span><span class="token punctuation" style="color:#393A34">)</span><span class="token punctuation" style="color:#393A34">,</span><span class="token plain"> ec2</span><span class="token punctuation" style="color:#393A34">.</span><span class="token plain">Port</span><span class="token punctuation" style="color:#393A34">.</span><span class="token function" style="color:#d73a49">tcp</span><span class="token punctuation" style="color:#393A34">(</span><span class="token number" style="color:#36acaa">8443</span><span class="token punctuation" style="color:#393A34">)</span><span class="token punctuation" style="color:#393A34">,</span><span class="token plain"> </span><span class="token string" style="color:#e3116c">"Allow DCV"</span><span class="token punctuation" style="color:#393A34">)</span><span class="token punctuation" style="color:#393A34">;</span><br></div></code></pre></div></div>
<p>Then, the stack defines user data commands. These are commands that the Spot Instance runs automatically on startup. At this point, it retrieves the password that the instance should use, then changes the password on the system and restarts the DCV server. It also adds any extra user data commands, which are defined by the stack using the component. We will see these commands in <a href="https://mikelikesrobots.github.io/blog/ec2-spot-sims#isaac-sim-builder-stack" class="">Isaac Sim Builder Stack</a> and <a href="https://mikelikesrobots.github.io/blog/ec2-spot-sims#sim-spot-instance-stack" class="">Sim Spot Instance Stack</a>.</p>
<div class="language-typescript codeBlockContainer_Ckt0 theme-code-block" style="--prism-color:#393A34;--prism-background-color:#f6f8fa"><div class="codeBlockContent_QJqH"><pre tabindex="0" class="prism-code language-typescript codeBlock_bY9V thin-scrollbar" style="color:#393A34;background-color:#f6f8fa"><code class="codeBlockLines_e6Vv"><div class="token-line" style="color:#393A34"><span class="token keyword" style="color:#00009f">const</span><span class="token plain"> userData </span><span class="token operator" style="color:#393A34">=</span><span class="token plain"> ec2</span><span class="token punctuation" style="color:#393A34">.</span><span class="token plain">UserData</span><span class="token punctuation" style="color:#393A34">.</span><span class="token function" style="color:#d73a49">forLinux</span><span class="token punctuation" style="color:#393A34">(</span><span class="token punctuation" style="color:#393A34">)</span><span class="token punctuation" style="color:#393A34">;</span><span class="token plain"></span><br></div><div class="token-line" style="color:#393A34"><span class="token plain">userData</span><span class="token punctuation" style="color:#393A34">.</span><span class="token function" style="color:#d73a49">addCommands</span><span class="token punctuation" style="color:#393A34">(</span><span class="token plain"></span><br></div><div class="token-line" style="color:#393A34"><span class="token plain">  </span><span class="token comment" style="color:#999988;font-style:italic">// Change o3de user's password and restart DCV</span><span class="token plain"></span><br></div><div class="token-line" style="color:#393A34"><span class="token plain">  getPasswordCommand</span><span class="token punctuation" style="color:#393A34">,</span><span class="token plain"></span><br></div><div class="token-line" style="color:#393A34"><span class="token plain">  </span><span class="token template-string template-punctuation string" style="color:#e3116c">`</span><span class="token template-string string" style="color:#e3116c">echo "o3de:$O3DE_PASSWORD" | chpasswd</span><span class="token template-string template-punctuation string" style="color:#e3116c">`</span><span class="token punctuation" style="color:#393A34">,</span><span class="token plain"></span><br></div><div class="token-line" style="color:#393A34"><span class="token plain">  </span><span class="token string" style="color:#e3116c">"systemctl restart dcvserver"</span><span class="token plain"></span><br></div><div class="token-line" style="color:#393A34"><span class="token plain"></span><span class="token punctuation" style="color:#393A34">)</span><span class="token punctuation" style="color:#393A34">;</span><span class="token plain"></span><br></div><div class="token-line" style="color:#393A34"><span class="token plain"></span><span class="token keyword" style="color:#00009f">if</span><span class="token plain"> </span><span class="token punctuation" style="color:#393A34">(</span><span class="token plain">props</span><span class="token operator" style="color:#393A34">?.</span><span class="token plain">additionalUserDataCommands</span><span class="token punctuation" style="color:#393A34">)</span><span class="token plain"> </span><span class="token punctuation" style="color:#393A34">{</span><span class="token plain"></span><br></div><div class="token-line" style="color:#393A34"><span class="token plain">  userData</span><span class="token punctuation" style="color:#393A34">.</span><span class="token function" style="color:#d73a49">addCommands</span><span class="token punctuation" style="color:#393A34">(</span><span class="token operator" style="color:#393A34">...</span><span class="token plain">props</span><span class="token punctuation" style="color:#393A34">.</span><span class="token plain">additionalUserDataCommands</span><span class="token punctuation" style="color:#393A34">)</span><span class="token punctuation" style="color:#393A34">;</span><span class="token plain"></span><br></div><div class="token-line" style="color:#393A34"><span class="token plain"></span><span class="token punctuation" style="color:#393A34">}</span><br></div></code></pre></div></div>
<p>The final step of this stack is to make the actual fleet request, which is what everything else has been building up to. It mostly passes in data that was already defined, but there are a few extra parts to highlight.</p>
<p>First, the following image ID is used. This <a href="https://aws.amazon.com/marketplace/pp/prodview-o3x2kjp3r3mgi" target="_blank" rel="noopener noreferrer" class="">O3DE for 3D Games and Simulations on Ubuntu</a> image already has the DCV server, O3DE, and graphics drivers installed.</p>
<div class="language-typescript codeBlockContainer_Ckt0 theme-code-block" style="--prism-color:#393A34;--prism-background-color:#f6f8fa"><div class="codeBlockContent_QJqH"><pre tabindex="0" class="prism-code language-typescript codeBlock_bY9V thin-scrollbar" style="color:#393A34;background-color:#f6f8fa"><code class="codeBlockLines_e6Vv"><div class="token-line" style="color:#393A34"><span class="token plain">imageId</span><span class="token operator" style="color:#393A34">:</span><span class="token plain"> </span><span class="token string" style="color:#e3116c">"ami-070cda0e6952fbf24"</span><span class="token punctuation" style="color:#393A34">,</span><br></div></code></pre></div></div>
<p>Next, the <code>blockDeviceMappings</code> are passed in to the component. If this array is empty, it doesn't add any disks to the Spot Instances. If it has one or more entries, these will be automatically attached to Spot Instances that are launched. This is how we can attach a drive with the Isaac Sim installation: define the EBS drive parameters, including the snapshot ID, and it will be created and attached automatically.</p>
<div class="language-typescript codeBlockContainer_Ckt0 theme-code-block" style="--prism-color:#393A34;--prism-background-color:#f6f8fa"><div class="codeBlockContent_QJqH"><pre tabindex="0" class="prism-code language-typescript codeBlock_bY9V thin-scrollbar" style="color:#393A34;background-color:#f6f8fa"><code class="codeBlockLines_e6Vv"><div class="token-line" style="color:#393A34"><span class="token plain">blockDeviceMappings</span><span class="token operator" style="color:#393A34">:</span><span class="token plain"> props</span><span class="token operator" style="color:#393A34">?.</span><span class="token plain">blockDeviceMappings </span><span class="token operator" style="color:#393A34">||</span><span class="token plain"> </span><span class="token punctuation" style="color:#393A34">[</span><span class="token punctuation" style="color:#393A34">]</span><span class="token punctuation" style="color:#393A34">,</span><br></div></code></pre></div></div>
<p>Finally, the instance type is specified as <code>g4dn.2xlarge</code>. You could change this to a larger image type if you like. When I tried to change it to a smaller one, it refused to launch, but feel free to try for yourself!</p>
<p>Also, there can only be one instance type specified here. To specify a second instance type, you will need to create another entry in <code>launchSpecifications</code>.</p>
<div class="language-typescript codeBlockContainer_Ckt0 theme-code-block" style="--prism-color:#393A34;--prism-background-color:#f6f8fa"><div class="codeBlockContent_QJqH"><pre tabindex="0" class="prism-code language-typescript codeBlock_bY9V thin-scrollbar" style="color:#393A34;background-color:#f6f8fa"><code class="codeBlockLines_e6Vv"><div class="token-line" style="color:#393A34"><span class="token plain">instanceType</span><span class="token operator" style="color:#393A34">:</span><span class="token plain"> </span><span class="token string" style="color:#e3116c">'g4dn.2xlarge'</span><span class="token punctuation" style="color:#393A34">,</span><br></div></code></pre></div></div>
<p>That's mostly it! There are also a couple of tag definitions, and one last output with the username, which is always <code>o3de</code> from the AMI. Next, we'll see how this component is used by the Isaac Builder stack and the sim spot stack.</p>
<h4 class="anchor anchorTargetStickyNavbar_Vzrq" id="isaac-sim-builder-stack">Isaac Sim Builder Stack<a href="https://mikelikesrobots.github.io/blog/ec2-spot-sims#isaac-sim-builder-stack" class="hash-link" aria-label="Direct link to Isaac Sim Builder Stack" title="Direct link to Isaac Sim Builder Stack" translate="no">​</a></h4>
<p>This is the simpler of the two stacks that use the <code>SimSpotFleetRequest</code> component from the previous section, defined in <code>lib/isaac-sim-builder-stack.ts</code>. It specifies an additional set of commands to run on startup which mount a drive, make a filesystem on it, then install Isaac Sim there. Finally, it does one headless launch to cache assets, terminating automatically after 10 minutes to allow the user to check the installation.</p>
<p>As well as the script, it creates the EBS volume that Isaac Sim is to be installed on. Crucially, the volume is <strong>not deleted on termination</strong>, which means you can create snapshots from it even after the Spot Instance has been deleted. However, it also means that destroying the CDK stack won't delete it - it will stay around forever, costing money, unless you delete it manually.</p>
<div class="language-typescript codeBlockContainer_Ckt0 theme-code-block" style="--prism-color:#393A34;--prism-background-color:#f6f8fa"><div class="codeBlockContent_QJqH"><pre tabindex="0" class="prism-code language-typescript codeBlock_bY9V thin-scrollbar" style="color:#393A34;background-color:#f6f8fa"><code class="codeBlockLines_e6Vv"><div class="token-line" style="color:#393A34"><span class="token keyword" style="color:#00009f">const</span><span class="token plain"> blockDeviceMappings</span><span class="token operator" style="color:#393A34">:</span><span class="token plain"> DeviceMapping</span><span class="token punctuation" style="color:#393A34">[</span><span class="token punctuation" style="color:#393A34">]</span><span class="token plain"> </span><span class="token operator" style="color:#393A34">=</span><span class="token plain"> </span><span class="token punctuation" style="color:#393A34">[</span><span class="token plain"></span><br></div><div class="token-line" style="color:#393A34"><span class="token plain">  </span><span class="token punctuation" style="color:#393A34">{</span><span class="token plain"></span><br></div><div class="token-line" style="color:#393A34"><span class="token plain">    deviceName</span><span class="token operator" style="color:#393A34">:</span><span class="token plain"> </span><span class="token string" style="color:#e3116c">"/dev/sdf"</span><span class="token punctuation" style="color:#393A34">,</span><span class="token plain"></span><br></div><div class="token-line" style="color:#393A34"><span class="token plain">    ebs</span><span class="token operator" style="color:#393A34">:</span><span class="token plain"> </span><span class="token punctuation" style="color:#393A34">{</span><span class="token plain"></span><br></div><div class="token-line" style="color:#393A34"><span class="token plain">      volumeType</span><span class="token operator" style="color:#393A34">:</span><span class="token plain"> </span><span class="token string" style="color:#e3116c">"gp3"</span><span class="token punctuation" style="color:#393A34">,</span><span class="token plain"></span><br></div><div class="token-line" style="color:#393A34"><span class="token plain">      deleteOnTermination</span><span class="token operator" style="color:#393A34">:</span><span class="token plain"> </span><span class="token boolean" style="color:#36acaa">false</span><span class="token punctuation" style="color:#393A34">,</span><span class="token plain"></span><br></div><div class="token-line" style="color:#393A34"><span class="token plain">      iops</span><span class="token operator" style="color:#393A34">:</span><span class="token plain"> </span><span class="token number" style="color:#36acaa">16000</span><span class="token punctuation" style="color:#393A34">,</span><span class="token plain"></span><br></div><div class="token-line" style="color:#393A34"><span class="token plain">      volumeSize</span><span class="token operator" style="color:#393A34">:</span><span class="token plain"> </span><span class="token number" style="color:#36acaa">60</span><span class="token punctuation" style="color:#393A34">,</span><span class="token plain"></span><br></div><div class="token-line" style="color:#393A34"><span class="token plain">    </span><span class="token punctuation" style="color:#393A34">}</span><span class="token punctuation" style="color:#393A34">,</span><span class="token plain"></span><br></div><div class="token-line" style="color:#393A34"><span class="token plain">  </span><span class="token punctuation" style="color:#393A34">}</span><span class="token punctuation" style="color:#393A34">,</span><span class="token plain"></span><br></div><div class="token-line" style="color:#393A34"><span class="token plain"></span><span class="token punctuation" style="color:#393A34">]</span><span class="token punctuation" style="color:#393A34">;</span><br></div></code></pre></div></div>
<h4 class="anchor anchorTargetStickyNavbar_Vzrq" id="sim-spot-instance-stack">Sim Spot Instance Stack<a href="https://mikelikesrobots.github.io/blog/ec2-spot-sims#sim-spot-instance-stack" class="hash-link" aria-label="Direct link to Sim Spot Instance Stack" title="Direct link to Sim Spot Instance Stack" translate="no">​</a></h4>
<p>This is where the main sim instance is created. It starts by getting the URL and ARN for the S3 bucket created by the dependency stack and adding an inline policy to allow read and write access to it.</p>
<div class="language-typescript codeBlockContainer_Ckt0 theme-code-block" style="--prism-color:#393A34;--prism-background-color:#f6f8fa"><div class="codeBlockContent_QJqH"><pre tabindex="0" class="prism-code language-typescript codeBlock_bY9V thin-scrollbar" style="color:#393A34;background-color:#f6f8fa"><code class="codeBlockLines_e6Vv"><div class="token-line" style="color:#393A34"><span class="token keyword" style="color:#00009f">const</span><span class="token plain"> bucketURL </span><span class="token operator" style="color:#393A34">=</span><span class="token plain"> props</span><span class="token operator" style="color:#393A34">?.</span><span class="token plain">dependencyStack</span><span class="token punctuation" style="color:#393A34">.</span><span class="token plain">bucket</span><span class="token operator" style="color:#393A34">?.</span><span class="token function" style="color:#d73a49">s3UrlForObject</span><span class="token punctuation" style="color:#393A34">(</span><span class="token punctuation" style="color:#393A34">)</span><span class="token punctuation" style="color:#393A34">;</span><span class="token plain"></span><br></div><div class="token-line" style="color:#393A34"><span class="token plain"></span><span class="token keyword" style="color:#00009f">const</span><span class="token plain"> bucketArn </span><span class="token operator" style="color:#393A34">=</span><span class="token plain"> props</span><span class="token operator" style="color:#393A34">?.</span><span class="token plain">dependencyStack</span><span class="token punctuation" style="color:#393A34">.</span><span class="token plain">bucket</span><span class="token operator" style="color:#393A34">?.</span><span class="token plain">bucketArn</span><span class="token punctuation" style="color:#393A34">;</span><span class="token plain"></span><br></div><div class="token-line" style="color:#393A34"><span class="token plain"></span><span class="token keyword" style="color:#00009f">if</span><span class="token plain"> </span><span class="token punctuation" style="color:#393A34">(</span><span class="token plain">bucketArn</span><span class="token punctuation" style="color:#393A34">)</span><span class="token plain"> </span><span class="token punctuation" style="color:#393A34">{</span><span class="token plain"></span><br></div><div class="token-line" style="color:#393A34"><span class="token plain">  additionalPolicies</span><span class="token punctuation" style="color:#393A34">.</span><span class="token function" style="color:#d73a49">push</span><span class="token punctuation" style="color:#393A34">(</span><span class="token keyword" style="color:#00009f">new</span><span class="token plain"> </span><span class="token class-name">iam</span><span class="token punctuation" style="color:#393A34">.</span><span class="token function" style="color:#d73a49">PolicyStatement</span><span class="token punctuation" style="color:#393A34">(</span><span class="token punctuation" style="color:#393A34">{</span><span class="token plain"></span><br></div><div class="token-line" style="color:#393A34"><span class="token plain">    </span><span class="token operator" style="color:#393A34">...</span><br></div></code></pre></div></div>
<p>Most of the rest of the file define the user data commands to run on startup. First, no matter the simulators used, it installs the AWS CLI and synchronises data from the S3 bucket into <code>/data</code> on the system. It also creates the sync command alias that allows you to run the <code>s3sync</code> command.</p>
<p>Next, it checks whether Isaac Sim is being used, and if it is, adds extra commands and an EBS volume to support it. The commands attach the device and mount it, then create the <code>isaac</code> command to run it. The EBS volume is defined by the snapshot ID passed in to the stack, and is set to delete on termination, so that when the Spot Instance is destroyed, that EBS volume is as well.</p>
<div class="language-typescript codeBlockContainer_Ckt0 theme-code-block" style="--prism-color:#393A34;--prism-background-color:#f6f8fa"><div class="codeBlockContent_QJqH"><pre tabindex="0" class="prism-code language-typescript codeBlock_bY9V thin-scrollbar" style="color:#393A34;background-color:#f6f8fa"><code class="codeBlockLines_e6Vv"><div class="token-line" style="color:#393A34"><span class="token plain">blockDeviceMappings</span><span class="token punctuation" style="color:#393A34">.</span><span class="token function" style="color:#d73a49">push</span><span class="token punctuation" style="color:#393A34">(</span><span class="token punctuation" style="color:#393A34">{</span><span class="token plain"></span><br></div><div class="token-line" style="color:#393A34"><span class="token plain">  deviceName</span><span class="token operator" style="color:#393A34">:</span><span class="token plain"> deviceName</span><span class="token punctuation" style="color:#393A34">,</span><span class="token plain"></span><br></div><div class="token-line" style="color:#393A34"><span class="token plain">  ebs</span><span class="token operator" style="color:#393A34">:</span><span class="token plain"> </span><span class="token punctuation" style="color:#393A34">{</span><span class="token plain"></span><br></div><div class="token-line" style="color:#393A34"><span class="token plain">    snapshotId</span><span class="token operator" style="color:#393A34">:</span><span class="token plain"> props</span><span class="token operator" style="color:#393A34">?.</span><span class="token plain">isaacSimParams</span><span class="token punctuation" style="color:#393A34">.</span><span class="token plain">snapshotId</span><span class="token punctuation" style="color:#393A34">,</span><span class="token plain"></span><br></div><div class="token-line" style="color:#393A34"><span class="token plain">    volumeType</span><span class="token operator" style="color:#393A34">:</span><span class="token plain"> </span><span class="token string" style="color:#e3116c">"gp3"</span><span class="token punctuation" style="color:#393A34">,</span><span class="token plain"></span><br></div><div class="token-line" style="color:#393A34"><span class="token plain">    deleteOnTermination</span><span class="token operator" style="color:#393A34">:</span><span class="token plain"> </span><span class="token boolean" style="color:#36acaa">true</span><span class="token punctuation" style="color:#393A34">,</span><span class="token plain"></span><br></div><div class="token-line" style="color:#393A34"><span class="token plain">  </span><span class="token punctuation" style="color:#393A34">}</span><span class="token punctuation" style="color:#393A34">,</span><span class="token plain"></span><br></div><div class="token-line" style="color:#393A34"><span class="token plain"></span><span class="token punctuation" style="color:#393A34">}</span><span class="token punctuation" style="color:#393A34">)</span><span class="token punctuation" style="color:#393A34">;</span><br></div></code></pre></div></div>
<p>The last set of commands are only run if the <code>installGazebo</code> command is true. It adds extra <code>apt</code> repositories for Gazebo, then installs the <code>libignition-gazebo7-dev</code> package.</p>
<div class="language-typescript codeBlockContainer_Ckt0 theme-code-block" style="--prism-color:#393A34;--prism-background-color:#f6f8fa"><div class="codeBlockContent_QJqH"><pre tabindex="0" class="prism-code language-typescript codeBlock_bY9V thin-scrollbar" style="color:#393A34;background-color:#f6f8fa"><code class="codeBlockLines_e6Vv"><div class="token-line" style="color:#393A34"><span class="token keyword" style="color:#00009f">if</span><span class="token plain"> </span><span class="token punctuation" style="color:#393A34">(</span><span class="token plain">props</span><span class="token operator" style="color:#393A34">?.</span><span class="token plain">installGazebo</span><span class="token punctuation" style="color:#393A34">)</span><span class="token plain"> </span><span class="token punctuation" style="color:#393A34">{</span><span class="token plain"></span><br></div><div class="token-line" style="color:#393A34"><span class="token plain">  </span><span class="token keyword" style="color:#00009f">const</span><span class="token plain"> gazeboCommands </span><span class="token operator" style="color:#393A34">=</span><span class="token plain"> </span><span class="token punctuation" style="color:#393A34">[</span><span class="token plain"></span><br></div><div class="token-line" style="color:#393A34"><span class="token plain">    </span><span class="token string" style="color:#e3116c">'echo "deb http://packages.osrfoundation.org/gazebo/ubuntu-stable `lsb_release -cs` main" &gt; /etc/apt/sources.list.d/gazebo-stable.list'</span><span class="token punctuation" style="color:#393A34">,</span><span class="token plain"></span><br></div><div class="token-line" style="color:#393A34"><span class="token plain">    </span><span class="token string" style="color:#e3116c">"wget http://packages.osrfoundation.org/gazebo.key -O - | sudo apt-key add -"</span><span class="token punctuation" style="color:#393A34">,</span><span class="token plain"></span><br></div><div class="token-line" style="color:#393A34"><span class="token plain">    </span><span class="token string" style="color:#e3116c">"sudo apt update"</span><span class="token punctuation" style="color:#393A34">,</span><span class="token plain"></span><br></div><div class="token-line" style="color:#393A34"><span class="token plain">    </span><span class="token string" style="color:#e3116c">"sudo apt install -y libignition-gazebo7-dev"</span><span class="token punctuation" style="color:#393A34">,</span><span class="token plain"></span><br></div><div class="token-line" style="color:#393A34"><span class="token plain">  </span><span class="token punctuation" style="color:#393A34">]</span><span class="token punctuation" style="color:#393A34">;</span><span class="token plain"></span><br></div><div class="token-line" style="color:#393A34"><span class="token plain">  additionalUserDataCommands </span><span class="token operator" style="color:#393A34">=</span><span class="token plain"> </span><span class="token punctuation" style="color:#393A34">[</span><span class="token plain"></span><br></div><div class="token-line" style="color:#393A34"><span class="token plain">    </span><span class="token operator" style="color:#393A34">...</span><span class="token plain">additionalUserDataCommands</span><span class="token punctuation" style="color:#393A34">,</span><span class="token plain"></span><br></div><div class="token-line" style="color:#393A34"><span class="token plain">    </span><span class="token operator" style="color:#393A34">...</span><span class="token plain">gazeboCommands</span><span class="token punctuation" style="color:#393A34">,</span><span class="token plain"></span><br></div><div class="token-line" style="color:#393A34"><span class="token plain">  </span><span class="token punctuation" style="color:#393A34">]</span><span class="token punctuation" style="color:#393A34">;</span><span class="token plain"></span><br></div><div class="token-line" style="color:#393A34"><span class="token plain"></span><span class="token punctuation" style="color:#393A34">}</span><br></div></code></pre></div></div>
<h4 class="anchor anchorTargetStickyNavbar_Vzrq" id="other-repository-files">Other Repository Files<a href="https://mikelikesrobots.github.io/blog/ec2-spot-sims#other-repository-files" class="hash-link" aria-label="Direct link to Other Repository Files" title="Direct link to Other Repository Files" translate="no">​</a></h4>
<p>Apart from the CDK code, the files are mostly supporting the CDK deployment, such as <code>package.json</code> defining the <code>npm</code> packages needed. The <code>scripts</code> folder does contain some useful scripts which I welcome you to look through, but the functions are pretty simple:</p>
<ul>
<li class=""><strong>get_sim_ip</strong>: write a table of IP addresses for all EC2 instances with the <code>sim-spot-instance</code> tag</li>
<li class=""><strong>start_sim</strong>: list all fleet requests, check each one for the spot-fleet tag, and set the first matching fleet request to have target capacity of 1</li>
<li class=""><strong>stop_sim</strong>: the same as <strong>start_sim</strong>, except that it sets the target capacity to 0</li>
</ul>
<p>That's all the code that's used!</p>
<h2 class="anchor anchorTargetStickyNavbar_Vzrq" id="whats-next">What's Next<a href="https://mikelikesrobots.github.io/blog/ec2-spot-sims#whats-next" class="hash-link" aria-label="Direct link to What's Next" title="Direct link to What's Next" translate="no">​</a></h2>
<p>So far, we've seen that Spot Instances can be used in Amazon EC2 to control virtual machines capable of running robotic simulators.
Spot Instances have drawbacks in that they need to be initialised in a particular way and may be closed down by AWS with a couple of minutes' notice.
On the other hand, the prices are reduced by up to 60-70%, making this a potentially great trade-off.
We can use CDK code to define the Spot Instances, their dependencies, <em>and</em> the startup scripts to automatically install the simulators we need to run in the cloud.</p>
<p>To get access to O3DE, we can use a particular AMI, which <em>also</em> provides remote desktop access and ROS2 installation. For Gazebo, we can install it automatically on startup, and for NVIDIA Isaac Sim, we can create an EBS snapshot with the simulator already installed, then create a new drive from that snapshot for every new Spot Instance.</p>
<p>If you need to run infrequent or background robotic simulations, running in the cloud might be a great option for you. The CDK code can help you get up and running, and with it being open source under a permissive licence, you can make any changes you want, including installing extra simulators.</p>
<p>In a future post, I will show how to use the new ROS 2 <a href="https://github.com/ros-simulation/simulation_interfaces" target="_blank" rel="noopener noreferrer" class="">simulation interface messages</a>. This is a new package that allows control of different simulators from the same set of messages. What's more, we can send those messages from an RViz plugin, which means no matter the simulator in use, we can control it from the same ROS 2 environment! So far, this package is supported on O3DE and Isaac Sim, and support for Gazebo is planned.</p>]]></content>
        <author>
            <name>Michael Hart</name>
            <uri>https://mikelikesrobots.github.io</uri>
        </author>
        <category label="robotics" term="robotics"/>
        <category label="cloud" term="cloud"/>
        <category label="aws" term="aws"/>
        <category label="ec2" term="ec2"/>
        <category label="simulation" term="simulation"/>
    </entry>
    <entry>
        <title type="html"><![CDATA[Controlling Robots using a Large Language Model]]></title>
        <id>https://mikelikesrobots.github.io/blog/llm-robot-control</id>
        <link href="https://mikelikesrobots.github.io/blog/llm-robot-control"/>
        <updated>2025-08-14T00:00:00.000Z</updated>
        <summary type="html"><![CDATA[In the past, a human controlling a robot has depended entirely on what commands the human can send the robot, either through structured messages or through user interfaces. That's changing with Large Language Models (LLMs), because we can provide a few tools for controlling robots to an LLM and then give commands in natural language, and the LLM works out how to send the right commands to the robot. This gives us a lot more flexibility in how we can interact with robots.]]></summary>
        <content type="html"><![CDATA[<p>In the past, a human controlling a robot has depended entirely on what commands the human can send the robot, either through structured messages or through user interfaces. That's changing with Large Language Models (LLMs), because we can provide a few tools for controlling robots to an LLM and then give commands in natural language, and the LLM works out how to send the right commands to the robot. This gives us a lot more flexibility in how we can interact with robots.</p>
<p>In this post, I show an example project that runs a Gazebo simulation of a robot in a small house.
The project uses <a href="https://www.anthropic.com/claude" target="_blank" rel="noopener noreferrer" class="">Claude</a>, an LLM from Anthropic, to interact with the robot, which allows the user to give the robot natural language commands and see those changes happen in simulation.</p>
<p>After the demo, I show how to set it up, then talk about how the code interfaces with Claude.</p>
<div class="theme-admonition theme-admonition-note admonition_xJq3 alert alert--secondary"><div class="admonitionHeading_Gvgb"><span class="admonitionIcon_Rf37"><svg viewBox="0 0 14 16"><path fill-rule="evenodd" d="M6.3 5.69a.942.942 0 0 1-.28-.7c0-.28.09-.52.28-.7.19-.18.42-.28.7-.28.28 0 .52.09.7.28.18.19.28.42.28.7 0 .28-.09.52-.28.7a1 1 0 0 1-.7.3c-.28 0-.52-.11-.7-.3zM8 7.99c-.02-.25-.11-.48-.31-.69-.2-.19-.42-.3-.69-.31H6c-.27.02-.48.13-.69.31-.2.2-.3.44-.31.69h1v3c.02.27.11.5.31.69.2.2.42.31.69.31h1c.27 0 .48-.11.69-.31.2-.19.3-.42.31-.69H8V7.98v.01zM7 2.3c-3.14 0-5.7 2.54-5.7 5.68 0 3.14 2.56 5.7 5.7 5.7s5.7-2.55 5.7-5.7c0-3.15-2.56-5.69-5.7-5.69v.01zM7 .98c3.86 0 7 3.14 7 7s-3.14 7-7 7-7-3.12-7-7 3.14-7 7-7z"></path></svg></span>With Thanks</div><div class="admonitionContent_BuS1"><p>The demonstration project in this post is from a university-based robotics course. One of the groups on the course kindly released their submission on Github so that I could show it in this post. Therefore, I'd like to thank <a href="https://www.linkedin.com/in/giovannitoffetti/" target="_blank" rel="noopener noreferrer" class="">Senior Lecturer Giovanni Toffetti</a> at <a href="https://www.zhaw.ch/en/university" target="_blank" rel="noopener noreferrer" class="">Zurich University of Applied Sciences</a> and his students <a href="https://www.linkedin.com/in/alexander-kolenaty/" target="_blank" rel="noopener noreferrer" class="">Alexander Kolenaty</a>, <a href="https://www.linkedin.com/in/jan-affeltranger-a03a10219" target="_blank" rel="noopener noreferrer" class="">Jan Affeltranger</a>, and Ilimea Gall.</p></div></div>
<p>This article also includes a video walkthrough.</p>
<div class="video_jswG"><button type="button" class="poster_B6DH" aria-label="Play video: Controlling Robots using a Large Language Model"><img src="https://i.ytimg.com/vi/Lr-LjwPR1hM/hqdefault.jpg" alt="" width="480" height="360" loading="lazy"><span class="play_lEvZ" aria-hidden="true">▶</span><span class="caption_yrhJ">Watch: <!-- -->Controlling Robots using a Large Language Model</span></button></div><noscript><p><a href="https://www.youtube.com/watch?v=Lr-LjwPR1hM&amp;t=0">Watch <!-- -->Controlling Robots using a Large Language Model<!-- --> on YouTube</a></p></noscript>
<h2 class="anchor anchorTargetStickyNavbar_Vzrq" id="why-control-robots-with-an-llm">Why Control Robots With an LLM?<a href="https://mikelikesrobots.github.io/blog/llm-robot-control#why-control-robots-with-an-llm" class="hash-link" aria-label="Direct link to Why Control Robots With an LLM?" title="Direct link to Why Control Robots With an LLM?" translate="no">​</a></h2>
<p>LLMs are AI models that perform very well at understanding human language and intentions. That means using an LLM to control a robot comes with a few benefits:</p>
<ul>
<li class="">Humans can request high-level actions from the LLM, expressed in natural language. The LLM can translate these into commands for the robot and automatically execute them.</li>
<li class="">LLMs allow extra tools to be added that aren't directly programmed into the robot, such as moving forwards for a set amount of time. For this, the LLM approximates the robot's location after that time, and requests movement to that location. This depends on the capabilities of the LLM.</li>
<li class="">LLMs can break down high level tasks into separate sub-tasks, as they often understand the steps necessary to complete an overall task.</li>
<li class="">LLMs can give human-readable responses to requests, which provides an excellent feedback mechanism for understanding what the robot is doing.</li>
</ul>
<p>Unfortunately, LLMs are computationally very expensive, and most robots are limited on their compute power and energy storage. This means that running a capable LLM such as Claude is all but impossible to do on most robots. LLMs are generally only deployed to large servers or run in data centers.</p>
<p>To get around this limitation, we give the robot a network connection and configure it to communicate with an LLM operating in the cloud. This does have its drawbacks as robots that don't have a stable network connection will be unable to communicate properly with the LLM. This isn't an issue in simulation, but for a real robot, think carefully before making the robot's behaviour depend on the LLM. If you're interested in why you should connect your robots to the cloud, <a class="" href="https://mikelikesrobots.github.io/blog/why-use-cloud-robotics">take a look at my post here</a>.</p>
<p>With our robot connected to the internet, we can issue commands to Claude, which then breaks down the command and translates it into commands for the robot. For this to work, we need to define commands in the robot software that the LLM can use. Take a look at the <a href="https://mikelikesrobots.github.io/blog/llm-robot-control#code-description" class="">Code Description</a> section to see how this works.</p>
<figure class="text--center"><p><img decoding="async" loading="lazy" alt="LLM Robot Control Infographic" src="https://mikelikesrobots.github.io/assets/images/llm_robot_control-fa619f1e43ee47cb9d2a1cf10fdb670a.webp" width="2000" height="1414" class="img_ev3q">
</p><figcaption>Infographic showing issuing commands to the LLM, which breaks the commanded task into subtasks and passes them to the robot. The feedback is then interpreted by the LLM and given to the user.</figcaption><p></p></figure>
<p>For now, let's see how this works in simulation using a demonstration project.</p>
<h2 class="anchor anchorTargetStickyNavbar_Vzrq" id="gazebo-simulation-demo">Gazebo Simulation Demo<a href="https://mikelikesrobots.github.io/blog/llm-robot-control#gazebo-simulation-demo" class="hash-link" aria-label="Direct link to Gazebo Simulation Demo" title="Direct link to Gazebo Simulation Demo" translate="no">​</a></h2>
<p>To set up the demo for yourself, take a look at the <a href="https://mikelikesrobots.github.io/blog/llm-robot-control#demo-setup-instructions" class="">Demo Setup Instructions</a>.</p>
<p>Once the project is running, there will be 3 windows:</p>
<ol>
<li class="">Gazebo simulation of a small room containing a <a href="https://robotnik.eu/products/mobile-robots/rb-summit/" target="_blank" rel="noopener noreferrer" class="">Robotnik Summit</a> robot.</li>
<li class="">RViz window to show the currently loaded map and robot location.</li>
<li class="">Claude prompt for sending instructions to the robot.</li>
</ol>
<p>After starting the project, the simulation hasn't yet started <em>simulating</em>, which means the map is blank.</p>
<figure class="text--center"><p><img decoding="async" loading="lazy" alt="Initial simulation showing room containing robot" src="https://mikelikesrobots.github.io/assets/images/initial_sim-0cfecd1412651b0d4cdecfae841418a5.webp" width="1134" height="746" class="img_ev3q">
</p><figcaption>Initial Gazebo simulation window. The simulation contains a single floor of a small house along with a robot, which will be used for the demo.</figcaption><p></p></figure>
<figure class="text--center"><p><img decoding="async" loading="lazy" alt="Initial RViz window showing blank map" src="https://mikelikesrobots.github.io/assets/images/initial_rviz-565ac347b85cf95b7dc99f96c2850c9a.webp" width="951" height="573" class="img_ev3q">
</p><figcaption>Before the simulation has started, there is no data to build a map from, so the map is blank.</figcaption><p></p></figure>
<p>Clicking the play button in the bottom left of the simulation window will start the simulation. The data can now be used to form a map, shown in RViz.</p>
<figure class="text--center"><p><img decoding="async" loading="lazy" alt="Gazebo window with simulation started" src="https://mikelikesrobots.github.io/assets/images/started_sim-fb66709730a034ae5f541e86d8dc529b.webp" width="1143" height="753" class="img_ev3q">
</p><figcaption>Gazebo window with simulation started. The camera has been reoriented to show the robot position.</figcaption><p></p></figure>
<figure class="text--center"><p><img decoding="async" loading="lazy" alt="RViz window showing map from start position" src="https://mikelikesrobots.github.io/assets/images/started_rviz-8cc785371997b377af44f1ade8695a21.webp" width="952" height="575" class="img_ev3q">
</p><figcaption>The map has been built up from data sent from Gazebo.</figcaption><p></p></figure>
<p>We also have the Claude prompt ready:</p>
<div class="language-text codeBlockContainer_Ckt0 theme-code-block" style="--prism-color:#393A34;--prism-background-color:#f6f8fa"><div class="codeBlockContent_QJqH"><pre tabindex="0" class="prism-code language-text codeBlock_bY9V thin-scrollbar" style="color:#393A34;background-color:#f6f8fa"><code class="codeBlockLines_e6Vv"><div class="token-line" style="color:#393A34"><span class="token plain">Hi from rosa_summit.</span><br></div><div class="token-line" style="color:#393A34"><span class="token plain">Using Anthropic API with Claude Sonnet 3.5</span><br></div><div class="token-line" style="color:#393A34"><span class="token plain">Type 'exit' or 'quit' to end the program</span><br></div><div class="token-line" style="color:#393A34"><span class="token plain">Enter your request:</span><br></div></code></pre></div></div>
<div class="theme-admonition theme-admonition-note admonition_xJq3 alert alert--secondary"><div class="admonitionHeading_Gvgb"><span class="admonitionIcon_Rf37"><svg viewBox="0 0 14 16"><path fill-rule="evenodd" d="M6.3 5.69a.942.942 0 0 1-.28-.7c0-.28.09-.52.28-.7.19-.18.42-.28.7-.28.28 0 .52.09.7.28.18.19.28.42.28.7 0 .28-.09.52-.28.7a1 1 0 0 1-.7.3c-.28 0-.52-.11-.7-.3zM8 7.99c-.02-.25-.11-.48-.31-.69-.2-.19-.42-.3-.69-.31H6c-.27.02-.48.13-.69.31-.2.2-.3.44-.31.69h1v3c.02.27.11.5.31.69.2.2.42.31.69.31h1c.27 0 .48-.11.69-.31.2-.19.3-.42.31-.69H8V7.98v.01zM7 2.3c-3.14 0-5.7 2.54-5.7 5.68 0 3.14 2.56 5.7 5.7 5.7s5.7-2.55 5.7-5.7c0-3.15-2.56-5.69-5.7-5.69v.01zM7 .98c3.86 0 7 3.14 7 7s-3.14 7-7 7-7-3.12-7-7 3.14-7 7-7z"></path></svg></span>LLM Response Sections</div><div class="admonitionContent_BuS1"><p>For the rest of the article, I'll use collapsible sections for the LLM outputs, as they tend to be quite wordy!</p></div></div>
<p>The simplest operations are relative moves. We can request a relative movement with a simple sentence:</p>
<details class="details_lb9f alert alert--info details_b_Ee" data-collapsed="true"><summary>Move backwards 1.5 meters</summary><div><div class="collapsibleContent_i85q"><p>Enter your request: <em>Move backwards 1.5 meters</em></p><p>Request sent</p><p>Great! I've sent the command to move backwards 1.5 meters. Here's what I did:</p><ol>
<li class="">I used the navigate_relative function, which moves the robot relative to its current position.</li>
<li class="">I set the x parameter to -1.5, which represents moving backwards 1.5 meters.</li>
<li class="">I kept y at 0 since we don't want any sideways movement.</li>
<li class="">For the orientation, I used z_orientation = 0 and w_orientation = 1, which means we're maintaining our current orientation (not turning).</li>
</ol><p>The system has confirmed that the relative navigation goal has been sent successfully. The robot should now be moving backwards 1.5 meters from its current position.</p><p>Is there anything else you'd like me to do, or do you have any questions about the movement?</p></div></div></details>
<p>This causes the robot to move backwards 1.5m, then straighten back to its original orientation. I haven't included the RViz screen as it doesn't add too much to the map based on this simple movement.</p>
<figure class="text--center"><p><img decoding="async" loading="lazy" alt="Gif showing robot moving backwards" src="https://mikelikesrobots.github.io/assets/images/move_back-1a4d7df340917f1c996e6de3bdc57259.gif" width="1280" height="720" class="img_ev3q">
</p><figcaption>The robot moves backwards 1.5m, then straightens up. Sped up 10x from slow simulation speed.</figcaption><p></p></figure>
<p>To find out what other operations are possible, we can just <em>ask the LLM directly</em>.</p>
<details class="details_lb9f alert alert--info details_b_Ee" data-collapsed="true"><summary>What operations do you have available?</summary><div><div class="collapsibleContent_i85q"><p>Enter your request: <em>What operations do you have available?</em></p><p>Request sent</p><p>Thank you for your patience. Based on the available topics, nodes, and services, I can provide you with an overview of the operations I have available. These operations allow me to interact with the robotic system and perform various tasks. Here's a summary of the key functionalities:</p><ol>
<li class="">
<p>Navigation and Movement:</p>
<ul>
<li class="">Move to specific poses or locations</li>
<li class="">Navigate through a series of poses</li>
<li class="">Control velocity (forward, backward, turning)</li>
<li class="">Follow waypoints</li>
</ul>
</li>
<li class="">
<p>Mapping and Localization:</p>
<ul>
<li class="">Perform SLAM (Simultaneous Localization and Mapping)</li>
<li class="">Save and load maps</li>
<li class="">Access and modify costmaps (for obstacle avoidance)</li>
</ul>
</li>
<li class="">
<p>Sensor Data:</p>
<ul>
<li class="">Access data from various sensors (cameras, lasers, point clouds)</li>
<li class="">Merge laser scan data</li>
</ul>
</li>
<li class="">
<p>Path Planning:</p>
<ul>
<li class="">Plan paths to avoid obstacles</li>
<li class="">Smooth trajectories</li>
</ul>
</li>
<li class="">
<p>Exploration:</p>
<ul>
<li class="">Autonomous exploration of the environment</li>
</ul>
</li>
<li class="">
<p>Robot State and Control:</p>
<ul>
<li class="">Monitor and control joint states</li>
<li class="">Access odometry data</li>
<li class="">Manage the robot's lifecycle (start, stop, pause operations)</li>
</ul>
</li>
<li class="">
<p>Parameter Management:</p>
<ul>
<li class="">Get and set various parameters for different nodes</li>
</ul>
</li>
<li class="">
<p>Visualization:</p>
<ul>
<li class="">Interact with RViz for visualization purposes</li>
</ul>
</li>
<li class="">
<p>Collision Monitoring:</p>
<ul>
<li class="">Monitor and respond to potential collisions</li>
</ul>
</li>
<li class="">
<p>Docking:</p>
<ul>
<li class="">Perform docking operations</li>
</ul>
</li>
<li class="">
<p>Diagnostics:</p>
<ul>
<li class="">Access diagnostic information about the robot's systems</li>
</ul>
</li>
</ol><p>Some specific operations I can perform include:</p><ul>
<li class="">Moving the robot to a specific position and orientation</li>
<li class="">Navigating to predefined locations</li>
<li class="">Starting or stopping autonomous exploration</li>
<li class="">Saving the current map</li>
<li class="">Listing saved maps</li>
<li class="">Reading sensor data (e.g., camera images, laser scans)</li>
<li class="">Controlling the robot's velocity</li>
<li class="">Checking the robot's current pose and odometry</li>
<li class="">Managing and querying various parameters of the robot's systems</li>
</ul><p>Is there a specific type of operation you're interested in, or would you like more details about any of these functionalities?</p></div></div></details>
<p>From this list, I'll show the fixed point navigation and the autonomous exploration. If you'd like to see the other operations in action, feel free to set up the demo and try it for yourself!</p>
<p>For fixed point navigation, I first need to know what locations are defined.</p>
<details class="details_lb9f alert alert--info details_b_Ee" data-collapsed="true"><summary>What predefined locations do you know?</summary><div><div class="collapsibleContent_i85q"><p>Enter your request: <em>What predefined locations do you know?</em></p><p>Request sent</p><p>Great! I've retrieved the list of predefined locations that I know. Here are the available locations:</p><ol>
<li class="">Gym</li>
<li class="">Kitchen</li>
<li class="">Living Room</li>
<li class="">Office</li>
<li class="">Bedroom</li>
</ol><p>These are the locations that have been pre-programmed into my system. I can navigate to any of these locations using their names. For example, if you want me to go to the kitchen, you can simply ask me to "navigate to the kitchen," and I'll use the <code>navigate_to_location_by_name</code> function to move there.</p><p>Is there a specific location you'd like me to navigate to, or do you have any questions about these predefined locations?</p></div></div></details>
<p>With the list defined, I'll request navigation to the kitchen.</p>
<details class="details_lb9f alert alert--info details_b_Ee" data-collapsed="true"><summary>Navigate to the kitchen</summary><div><div class="collapsibleContent_i85q"><p>Enter your request: <em>Navigate to the kitchen</em></p><p>Request sent</p><p>Great! The navigation goal has been sent successfully. I'm now moving towards the kitchen. The system has provided me with the target position and orientation for the kitchen location:</p><ul>
<li class="">Position: x = 7.35, y = -3.46, z = 0.0</li>
<li class="">Orientation: x = 0.0, y = 0.0, z = -0.073, w = 0.997</li>
</ul><p>These coordinates represent the kitchen's location in the map. The orientation values (especially z and w) indicate that I'll be facing a specific direction when I arrive at the kitchen.</p><p>The navigation system will now guide me to this location, avoiding any obstacles along the way. It may take a moment for me to reach the destination, depending on my current location and any potential obstacles in the environment.</p><p>Is there anything specific you'd like me to do once I reach the kitchen, or do you have any questions about the navigation process?</p></div></div></details>
<p>Requesting navigation to the kitchen from the LLM results in the robot planning a path to the kitchen, shown as a red line in RViz. The robot does seem to get stuck on the rug, as it thinks there's an obstacle there, before proceeding to move to the kitchen.</p>
<figure class="text--center"><p><img decoding="async" loading="lazy" alt="Gif showing robot navigating to the kitchen" src="https://mikelikesrobots.github.io/assets/images/nav_to_kitchen-67d9562761764e7b1d078fe55dbd1ca9.gif" width="1280" height="720" class="img_ev3q">
</p><figcaption>The robot navigates to the kitchen, with a red line on the RViz window showing the planned path, and the map filling in as the robot moves.</figcaption><p></p></figure>
<p>Finally, for this demo, we can also autonomously explore the map. Once the map has been explored, exploration will end.</p>
<details class="details_lb9f alert alert--info details_b_Ee" data-collapsed="true"><summary>Fully explore the map</summary><div><div class="collapsibleContent_i85q"><p>Enter your request: <em>Fully explore the map</em></p><p>Request sent</p><p>Great! The autonomous exploration has been successfully started. The robot will now move around the environment, using its sensors to map out unexplored areas and update its internal map. This process will continue until the entire accessible area has been explored or until we decide to stop it.</p><p>During the exploration:</p><ol>
<li class="">I'll use my sensors (like LIDAR) to detect obstacles and open spaces.</li>
<li class="">I'll continuously update the map as I discover new areas.</li>
<li class="">I'll plan paths to unexplored regions, prioritizing efficiency and coverage.</li>
<li class="">I'll avoid obstacles and ensure safe navigation throughout the process.</li>
</ol><p>Keep in mind that the time required for full exploration depends on the size and complexity of the environment. It could take several minutes or even longer for larger or more complex spaces.</p><p>Would you like me to provide updates on the exploration progress, or is there anything specific you'd like me to look out for during the exploration?</p></div></div></details>
<p>The robot does explore the map fully, but it gets stuck right at the end. It looks like the robot is afraid of colliding as it moves sideways through the gap, so it stops where it is. Navigation is triggered by the LLM but controlled by the robot software and navigation stack.</p>
<figure class="text--center"><p><img decoding="async" loading="lazy" alt="Gif showing robot autonomously exploring" src="https://mikelikesrobots.github.io/assets/images/autonomous_explore-51d8aa406ccc91c2572feb5b7faf38d3.gif" width="1280" height="720" class="img_ev3q">
</p><figcaption>The robot explores the rest of the floor, starting in the kitchen, until it gets stuck passing between a surface. At this point, the map is almost entirely filled in thanks to SLAM.</figcaption><p></p></figure>
<p>Those are a few of the commands available. There are far more complex commands that are possible using the LLM. For example, I have previously requested moving to a location, then moving relative to that location, then spinning on the spot - all in one prompt. The limit depends on the LLM used and the tools it has available.</p>
<p>If you are interested in setting this demo up for yourself, read on! The next section shows how to set it up for yourself. If you are only interested in how the code interfaces with the LLM, take a look at the <a href="https://mikelikesrobots.github.io/blog/llm-robot-control#code-description" class="">Code Description</a> section.</p>
<h2 class="anchor anchorTargetStickyNavbar_Vzrq" id="demo-setup-instructions">Demo Setup Instructions<a href="https://mikelikesrobots.github.io/blog/llm-robot-control#demo-setup-instructions" class="hash-link" aria-label="Direct link to Demo Setup Instructions" title="Direct link to Demo Setup Instructions" translate="no">​</a></h2>
<h3 class="anchor anchorTargetStickyNavbar_Vzrq" id="system-requirements">System Requirements<a href="https://mikelikesrobots.github.io/blog/llm-robot-control#system-requirements" class="hash-link" aria-label="Direct link to System Requirements" title="Direct link to System Requirements" translate="no">​</a></h3>
<p>This demo is run using <a href="https://docs.docker.com/engine/install/" target="_blank" rel="noopener noreferrer" class="">Docker</a>. Ideally, Linux should be used, but it is possible to run on Windows if <a href="https://docs.docker.com/desktop/features/wsl/" target="_blank" rel="noopener noreferrer" class="">Docker Desktop with WSL</a> is correctly installed.</p>
<div class="theme-admonition theme-admonition-tip admonition_xJq3 alert alert--success"><div class="admonitionHeading_Gvgb"><span class="admonitionIcon_Rf37"><svg viewBox="0 0 12 16"><path fill-rule="evenodd" d="M6.5 0C3.48 0 1 2.19 1 5c0 .92.55 2.25 1 3 1.34 2.25 1.78 2.78 2 4v1h5v-1c.22-1.22.66-1.75 2-4 .45-.75 1-2.08 1-3 0-2.81-2.48-5-5.5-5zm3.64 7.48c-.25.44-.47.8-.67 1.11-.86 1.41-1.25 2.06-1.45 3.23-.02.05-.02.11-.02.17H5c0-.06 0-.13-.02-.17-.2-1.17-.59-1.83-1.45-3.23-.2-.31-.42-.67-.67-1.11C2.44 6.78 2 5.65 2 5c0-2.2 2.02-4 4.5-4 1.22 0 2.36.42 3.22 1.19C10.55 2.94 11 3.94 11 5c0 .66-.44 1.78-.86 2.48zM4 14h5c-.23 1.14-1.3 2-2.5 2s-2.27-.86-2.5-2z"></path></svg></span>GPU Acceleration</div><div class="admonitionContent_BuS1"><p>The simulation is sped up a lot using GPU acceleration, which is why I recommend using a Linux system with GPU available. I spent a lot of time trying to get GPU acceleration in Docker for Windows, but I unfortunately wasn't able to do so! I plan to show my process for debugging graphics acceleration in a future post, as it took a lot of time to get GPU acceleration working for Linux as well.</p><p>Let me know in the comments if this would be useful for you. Also, comment if you'd like to see a post on performing this simulation in the cloud instead.</p></div></div>
<p>On top of Docker, the NVIDIA Container Toolkit is needed, which makes it possible to create the Gazebo and RViz windows. Follow the instructions from NVIDIA to install the <a href="https://docs.nvidia.com/datacenter/cloud-native/container-toolkit/latest/install-guide.html" target="_blank" rel="noopener noreferrer" class="">NVIDIA Container Toolkit</a>.</p>
<h3 class="anchor anchorTargetStickyNavbar_Vzrq" id="anthropic-api-key">Anthropic API Key<a href="https://mikelikesrobots.github.io/blog/llm-robot-control#anthropic-api-key" class="hash-link" aria-label="Direct link to Anthropic API Key" title="Direct link to Anthropic API Key" translate="no">​</a></h3>
<p>To be able to connect the robot to the LLM, we need to provide credentials for the connection in the form of an Anthropic API key.</p>
<p>You can sign up for an Anthropic developer account on the <a href="https://www.anthropic.com/api" target="_blank" rel="noopener noreferrer" class="">Anthropic API page</a>. Click the "Start building" button and set up an account. Once logged in, click "Get API Key". This will prompt you to enter billing information to add $5 to your account, which is necessary to access the LLM.</p>
<p>On the <a href="https://console.anthropic.com/settings/keys" target="_blank" rel="noopener noreferrer" class="">API keys page</a>, click Create Key. Give it a name of your choice and use the Default workspace.</p>
<p>An API key will be generated and displayed on the page. Make sure to copy this and save it somewhere, as once it stops being displayed, Anthropic won't provide it again! You can always delete the key and regenerate it if necessary.</p>
<p>At this point, create a folder somewhere on your computer and save the key inside in a file called <code>api-key.txt</code>. For example:</p>
<div class="language-bash codeBlockContainer_Ckt0 theme-code-block" style="--prism-color:#393A34;--prism-background-color:#f6f8fa"><div class="codeBlockContent_QJqH"><pre tabindex="0" class="prism-code language-bash codeBlock_bY9V thin-scrollbar" style="color:#393A34;background-color:#f6f8fa"><code class="codeBlockLines_e6Vv"><div class="token-line" style="color:#393A34"><span class="token plain">mkdir ~/llm-robot-control</span><br></div><div class="token-line" style="color:#393A34"><span class="token plain">cd ~/llm-robot-control</span><br></div><div class="token-line" style="color:#393A34"><span class="token plain"># Paste the key inside this file:</span><br></div><div class="token-line" style="color:#393A34"><span class="token plain">nano api-key.txt</span><br></div></code></pre></div></div>
<p>With the API key ready, it's time to build the simulation Docker image!</p>
<h3 class="anchor anchorTargetStickyNavbar_Vzrq" id="docker-image-build">Docker Image Build<a href="https://mikelikesrobots.github.io/blog/llm-robot-control#docker-image-build" class="hash-link" aria-label="Direct link to Docker Image Build" title="Direct link to Docker Image Build" translate="no">​</a></h3>
<p>The instructions here are adapted from the <a href="https://github.com/RAP-2025-Project-Group-2/RAP-2025-Project-Group-2" target="_blank" rel="noopener noreferrer" class="">README of the source repository</a>. I have added a Dockerfile in <a href="https://github.com/mikelikesrobots/RAP-2025-Project-Group-2" target="_blank" rel="noopener noreferrer" class="">my own fork of the repository</a> to make it simpler to build the image directly.</p>
<p>Download the Dockerfile from my repo and build it with these commands:</p>
<div class="language-bash codeBlockContainer_Ckt0 theme-code-block" style="--prism-color:#393A34;--prism-background-color:#f6f8fa"><div class="codeBlockContent_QJqH"><pre tabindex="0" class="prism-code language-bash codeBlock_bY9V thin-scrollbar" style="color:#393A34;background-color:#f6f8fa"><code class="codeBlockLines_e6Vv"><div class="token-line" style="color:#393A34"><span class="token plain">cd ~/llm-robot-control</span><br></div><div class="token-line" style="color:#393A34"><span class="token plain">wget https://raw.githubusercontent.com/mikelikesrobots/RAP-2025-Project-Group-2/refs/heads/main/Dockerfile</span><br></div><div class="token-line" style="color:#393A34"><span class="token plain">docker build -t llm-robot-control:latest .</span><br></div></code></pre></div></div>
<div class="theme-admonition theme-admonition-warning admonition_xJq3 alert alert--warning"><div class="admonitionHeading_Gvgb"><span class="admonitionIcon_Rf37"><svg viewBox="0 0 16 16"><path fill-rule="evenodd" d="M8.893 1.5c-.183-.31-.52-.5-.887-.5s-.703.19-.886.5L.138 13.499a.98.98 0 0 0 0 1.001c.193.31.53.501.886.501h13.964c.367 0 .704-.19.877-.5a1.03 1.03 0 0 0 .01-1.002L8.893 1.5zm.133 11.497H6.987v-2.003h2.039v2.003zm0-3.004H6.987V5.987h2.039v4.006z"></path></svg></span>API Key Safety</div><div class="admonitionContent_BuS1"><p>After this build, the Docker image <em>contains</em> your API key. Don't distribute the key or the image you've just built if you want to keep your key safe!</p></div></div>
<p>Once built, you can run a container using one of the commands below. Use the first command if you're running on a computer with no graphics card, and the second command if you're running on a Linux laptop that has access to the GPU. Both have extra flags that are necessary to create UI windows that you can interact with.</p>
<div class="language-bash codeBlockContainer_Ckt0 theme-code-block" style="--prism-color:#393A34;--prism-background-color:#f6f8fa"><div class="codeBlockContent_QJqH"><pre tabindex="0" class="prism-code language-bash codeBlock_bY9V thin-scrollbar" style="color:#393A34;background-color:#f6f8fa"><code class="codeBlockLines_e6Vv"><div class="token-line" style="color:#393A34"><span class="token plain"># Command for most machines</span><br></div><div class="token-line" style="color:#393A34"><span class="token plain">docker run -it --rm \</span><br></div><div class="token-line" style="color:#393A34"><span class="token plain">    --gpus all \</span><br></div><div class="token-line" style="color:#393A34"><span class="token plain">    -v /tmp/.X11-unix:/tmp/.X11-unix \</span><br></div><div class="token-line" style="color:#393A34"><span class="token plain">    -e NVIDIA_DRIVER_CAPABILITIES=all \</span><br></div><div class="token-line" style="color:#393A34"><span class="token plain">    -e DISPLAY=$DISPLAY \</span><br></div><div class="token-line" style="color:#393A34"><span class="token plain">    -e XDG_RUNTIME_DIR=$XDG_RUNTIME_DIR \</span><br></div><div class="token-line" style="color:#393A34"><span class="token plain">    -e XAUTHORITY=$XAUTH \</span><br></div><div class="token-line" style="color:#393A34"><span class="token plain">    --name robotcontrol \</span><br></div><div class="token-line" style="color:#393A34"><span class="token plain">    llm-robot-control:latest \</span><br></div><div class="token-line" style="color:#393A34"><span class="token plain">    bash -c "ros2 launch rosa_summit summit.launch.py slam:=True"</span><br></div><div class="token-line" style="color:#393A34"><span class="token plain" style="display:inline-block"></span><br></div><div class="token-line" style="color:#393A34"><span class="token plain"># Command for Linux laptops with GPU</span><br></div><div class="token-line" style="color:#393A34"><span class="token plain">docker run -it --rm \</span><br></div><div class="token-line" style="color:#393A34"><span class="token plain">    --gpus all \</span><br></div><div class="token-line" style="color:#393A34"><span class="token plain">    --device /dev/dri \</span><br></div><div class="token-line" style="color:#393A34"><span class="token plain">    -v /tmp/.X11-unix:/tmp/.X11-unix \</span><br></div><div class="token-line" style="color:#393A34"><span class="token plain">    -e NVIDIA_DRIVER_CAPABILITIES=all \</span><br></div><div class="token-line" style="color:#393A34"><span class="token plain">    -e DISPLAY=$DISPLAY \</span><br></div><div class="token-line" style="color:#393A34"><span class="token plain">    -e XDG_RUNTIME_DIR=$XDG_RUNTIME_DIR \</span><br></div><div class="token-line" style="color:#393A34"><span class="token plain">    -e XAUTHORITY=$XAUTH \</span><br></div><div class="token-line" style="color:#393A34"><span class="token plain">    --name robotcontrol \</span><br></div><div class="token-line" style="color:#393A34"><span class="token plain">    llm-robot-control:latest \</span><br></div><div class="token-line" style="color:#393A34"><span class="token plain">    bash -c "__NV_PRIME_RENDER_OFFLOAD=1 __GLX_VENDOR_LIBRARY_NAME=nvidia ros2 launch rosa_summit summit.launch.py slam:=True"</span><br></div></code></pre></div></div>
<p>Gazebo and RViz should pop up. These windows will be slow to load, particularly if your system does not have a dedicated GPU, so be patient! Once the simulation is loaded, click the Play button in the bottom left to start simulating.</p>
<p>To start the prompt for Claude, open another terminal and execute the following:</p>
<div class="language-bash codeBlockContainer_Ckt0 theme-code-block" style="--prism-color:#393A34;--prism-background-color:#f6f8fa"><div class="codeBlockContent_QJqH"><pre tabindex="0" class="prism-code language-bash codeBlock_bY9V thin-scrollbar" style="color:#393A34;background-color:#f6f8fa"><code class="codeBlockLines_e6Vv"><div class="token-line" style="color:#393A34"><span class="token plain">docker exec -it robotcontrol /ros_entrypoint.sh ros2 run rosa_summit rosa_summit</span><br></div></code></pre></div></div>
<p>This will start another process in the same container as the simulation command. It will read the API key and use it to authorise a connection to Claude, then wait for your prompt.</p>
<p>Give it a try! Commands sent to Claude at this point should move your robot around. The next section is about how the code interfaces with Claude, so you can add your own tools or extend the existing ones.</p>
<h2 class="anchor anchorTargetStickyNavbar_Vzrq" id="code-description">Code Description<a href="https://mikelikesrobots.github.io/blog/llm-robot-control#code-description" class="hash-link" aria-label="Direct link to Code Description" title="Direct link to Code Description" translate="no">​</a></h2>
<p>Claude can interact with the code by using <em>tools</em>. These are defined in <a href="https://github.com/RAP-2025-Project-Group-2/RAP-2025-Project-Group-2/blob/main/rosa_summit/rosa_summit.py" target="_blank" rel="noopener noreferrer" class="">one file in the demo repository</a>, which makes it easy to find all of the functions.</p>
<h3 class="anchor anchorTargetStickyNavbar_Vzrq" id="llm-cloud-connection">LLM Cloud Connection<a href="https://mikelikesrobots.github.io/blog/llm-robot-control#llm-cloud-connection" class="hash-link" aria-label="Direct link to LLM Cloud Connection" title="Direct link to LLM Cloud Connection" translate="no">​</a></h3>
<p>The project uses <a href="https://python.langchain.com/docs/introduction/" target="_blank" rel="noopener noreferrer" class="">LangChain</a> for the LLM connection, which is "a framework for developing applications powered by large language models". The LLM connection is created by <a href="https://github.com/RAP-2025-Project-Group-2/RAP-2025-Project-Group-2/blob/main/rosa_summit/rosa_summit.py#L335-L340" target="_blank" rel="noopener noreferrer" class="">this code</a>:</p>
<div class="language-python codeBlockContainer_Ckt0 theme-code-block" style="--prism-color:#393A34;--prism-background-color:#f6f8fa"><div class="codeBlockContent_QJqH"><pre tabindex="0" class="prism-code language-python codeBlock_bY9V thin-scrollbar" style="color:#393A34;background-color:#f6f8fa"><code class="codeBlockLines_e6Vv"><div class="token-line" style="color:#393A34"><span class="token plain">llm </span><span class="token operator" style="color:#393A34">=</span><span class="token plain"> ChatAnthropic</span><span class="token punctuation" style="color:#393A34">(</span><span class="token plain"></span><br></div><div class="token-line" style="color:#393A34"><span class="token plain">      model</span><span class="token operator" style="color:#393A34">=</span><span class="token string" style="color:#e3116c">"claude-3-5-sonnet-20240620"</span><span class="token punctuation" style="color:#393A34">,</span><span class="token plain"></span><br></div><div class="token-line" style="color:#393A34"><span class="token plain">      temperature</span><span class="token operator" style="color:#393A34">=</span><span class="token number" style="color:#36acaa">0</span><span class="token punctuation" style="color:#393A34">,</span><span class="token plain"></span><br></div><div class="token-line" style="color:#393A34"><span class="token plain">      anthropic_api_key</span><span class="token operator" style="color:#393A34">=</span><span class="token plain">api_key</span><span class="token punctuation" style="color:#393A34">,</span><span class="token plain"></span><br></div><div class="token-line" style="color:#393A34"><span class="token plain">      max_tokens</span><span class="token operator" style="color:#393A34">=</span><span class="token number" style="color:#36acaa">4096</span><span class="token punctuation" style="color:#393A34">,</span><span class="token plain"></span><br></div><div class="token-line" style="color:#393A34"><span class="token plain"></span><span class="token punctuation" style="color:#393A34">)</span><br></div></code></pre></div></div>
<p>The API key is read from file, and the model used is specified here. You can change this to another model, if you prefer.</p>
<h3 class="anchor anchorTargetStickyNavbar_Vzrq" id="llm-to-robot-interaction">LLM to Robot Interaction<a href="https://mikelikesrobots.github.io/blog/llm-robot-control#llm-to-robot-interaction" class="hash-link" aria-label="Direct link to LLM to Robot Interaction" title="Direct link to LLM to Robot Interaction" translate="no">​</a></h3>
<p>With the connection complete, the next step is to provide the LLM with the tools defined in the code. This is accomplished using <a href="https://github.com/nasa-jpl/rosa" target="_blank" rel="noopener noreferrer" class="">ROSA</a>, which is a layer on top of LangChain built to allow LLMs to interact with ROS and ROS 2. It is the key framework for interacting with robots using natural language.</p>
<p>On top of the tools that we define in code, it can also perform operations with ROS 2 like listing topics, summarising information from topics, and so on. Take a look at <a href="https://github.com/nasa-jpl/rosa" target="_blank" rel="noopener noreferrer" class="">the ROSA repository</a> to see what else it can do!</p>
<p>The ROSA layer is started by creating a new object with access to the LLM, the tools available, and the prompt for the LLM. The code is <a href="https://github.com/RAP-2025-Project-Group-2/RAP-2025-Project-Group-2/blob/main/rosa_summit/rosa_summit.py#L345-L364" target="_blank" rel="noopener noreferrer" class="">here</a>:</p>
<div class="language-python codeBlockContainer_Ckt0 theme-code-block" style="--prism-color:#393A34;--prism-background-color:#f6f8fa"><div class="codeBlockContent_QJqH"><pre tabindex="0" class="prism-code language-python codeBlock_bY9V thin-scrollbar" style="color:#393A34;background-color:#f6f8fa"><code class="codeBlockLines_e6Vv"><div class="token-line" style="color:#393A34"><span class="token plain">prompt </span><span class="token operator" style="color:#393A34">=</span><span class="token plain"> RobotSystemPrompts</span><span class="token punctuation" style="color:#393A34">(</span><span class="token punctuation" style="color:#393A34">)</span><span class="token plain"></span><br></div><div class="token-line" style="color:#393A34"><span class="token plain">prompt</span><span class="token punctuation" style="color:#393A34">.</span><span class="token plain">embodiment </span><span class="token operator" style="color:#393A34">=</span><span class="token plain"> </span><span class="token string" style="color:#e3116c">"You are an helpful robot named Summit, designed to assist users in a simulated environment. You can navigate, explore, and interact with the environment using various tools."</span><span class="token plain"></span><br></div><div class="token-line" style="color:#393A34"><span class="token plain" style="display:inline-block"></span><br></div><div class="token-line" style="color:#393A34"><span class="token plain"></span><span class="token comment" style="color:#999988;font-style:italic"># Pass the LLM to ROSA with both tools available</span><span class="token plain"></span><br></div><div class="token-line" style="color:#393A34"><span class="token plain">agent </span><span class="token operator" style="color:#393A34">=</span><span class="token plain"> ROSA</span><span class="token punctuation" style="color:#393A34">(</span><span class="token plain"></span><br></div><div class="token-line" style="color:#393A34"><span class="token plain">   ros_version</span><span class="token operator" style="color:#393A34">=</span><span class="token number" style="color:#36acaa">2</span><span class="token punctuation" style="color:#393A34">,</span><span class="token plain"></span><br></div><div class="token-line" style="color:#393A34"><span class="token plain">   llm</span><span class="token operator" style="color:#393A34">=</span><span class="token plain">llm</span><span class="token punctuation" style="color:#393A34">,</span><span class="token plain"></span><br></div><div class="token-line" style="color:#393A34"><span class="token plain">   tools</span><span class="token operator" style="color:#393A34">=</span><span class="token punctuation" style="color:#393A34">[</span><span class="token plain"></span><br></div><div class="token-line" style="color:#393A34"><span class="token plain">      send_vel</span><span class="token punctuation" style="color:#393A34">,</span><span class="token plain"></span><br></div><div class="token-line" style="color:#393A34"><span class="token plain">      stop</span><span class="token punctuation" style="color:#393A34">,</span><span class="token plain"></span><br></div><div class="token-line" style="color:#393A34"><span class="token plain">      toggle_auto_exploration</span><span class="token punctuation" style="color:#393A34">,</span><span class="token plain"></span><br></div><div class="token-line" style="color:#393A34"><span class="token plain">      navigate_to_pose</span><span class="token punctuation" style="color:#393A34">,</span><span class="token plain"></span><br></div><div class="token-line" style="color:#393A34"><span class="token plain">      navigate_relative</span><span class="token punctuation" style="color:#393A34">,</span><span class="token plain"></span><br></div><div class="token-line" style="color:#393A34"><span class="token plain">      save_map</span><span class="token punctuation" style="color:#393A34">,</span><span class="token plain"></span><br></div><div class="token-line" style="color:#393A34"><span class="token plain">      list_saved_maps</span><span class="token punctuation" style="color:#393A34">,</span><span class="token plain"></span><br></div><div class="token-line" style="color:#393A34"><span class="token plain">      get_location_names</span><span class="token punctuation" style="color:#393A34">,</span><span class="token plain"></span><br></div><div class="token-line" style="color:#393A34"><span class="token plain">      navigate_to_location_by_name</span><span class="token punctuation" style="color:#393A34">,</span><span class="token plain"></span><br></div><div class="token-line" style="color:#393A34"><span class="token plain">   </span><span class="token punctuation" style="color:#393A34">]</span><span class="token punctuation" style="color:#393A34">,</span><span class="token plain"></span><br></div><div class="token-line" style="color:#393A34"><span class="token plain">   prompts</span><span class="token operator" style="color:#393A34">=</span><span class="token plain">prompt</span><span class="token punctuation" style="color:#393A34">,</span><span class="token plain"></span><br></div><div class="token-line" style="color:#393A34"><span class="token plain"></span><span class="token punctuation" style="color:#393A34">)</span><br></div></code></pre></div></div>
<p>The rest of the <code>main</code> function waits for typed requests, passes them to the <code>agent</code> object, and prints the response.</p>
<p>Let's take a look at the tool functions to see how to define our own interactions between the LLM and the robot code.</p>
<h3 class="anchor anchorTargetStickyNavbar_Vzrq" id="tool-definitions">Tool Definitions<a href="https://mikelikesrobots.github.io/blog/llm-robot-control#tool-definitions" class="hash-link" aria-label="Direct link to Tool Definitions" title="Direct link to Tool Definitions" translate="no">​</a></h3>
<p>Each of the tool definitions takes the same form. The function optionally takes an argument, such as the velocity to travel at, and returns a <code>str</code>. The idea is that the LLM can directly call these functions with data and get a string response that it can then interpret. For instance, if the function returns a <code>str</code> stating that exploration has started, the LLM can then change its response to the user to reflect this information.</p>
<p>The <a href="https://github.com/RAP-2025-Project-Group-2/RAP-2025-Project-Group-2/blob/main/rosa_summit/rosa_summit.py#L121-L130" target="_blank" rel="noopener noreferrer" class=""><code>stop</code> tool</a> is the simplest tool:</p>
<div class="language-python codeBlockContainer_Ckt0 theme-code-block" style="--prism-color:#393A34;--prism-background-color:#f6f8fa"><div class="codeBlockContent_QJqH"><pre tabindex="0" class="prism-code language-python codeBlock_bY9V thin-scrollbar" style="color:#393A34;background-color:#f6f8fa"><code class="codeBlockLines_e6Vv"><div class="token-line" style="color:#393A34"><span class="token decorator annotation punctuation" style="color:#393A34">@tool</span><span class="token plain"></span><br></div><div class="token-line" style="color:#393A34"><span class="token plain"></span><span class="token keyword" style="color:#00009f">def</span><span class="token plain"> </span><span class="token function" style="color:#d73a49">stop</span><span class="token punctuation" style="color:#393A34">(</span><span class="token punctuation" style="color:#393A34">)</span><span class="token plain"> </span><span class="token operator" style="color:#393A34">-</span><span class="token operator" style="color:#393A34">&gt;</span><span class="token plain"> </span><span class="token builtin">str</span><span class="token punctuation" style="color:#393A34">:</span><span class="token plain"></span><br></div><div class="token-line" style="color:#393A34"><span class="token plain">    </span><span class="token triple-quoted-string string" style="color:#e3116c">"""</span><br></div><div class="token-line" style="color:#393A34"><span class="token triple-quoted-string string" style="color:#e3116c">    Stops or halts the robot by setting its velocity to zero</span><br></div><div class="token-line" style="color:#393A34"><span class="token triple-quoted-string string" style="display:inline-block;color:#e3116c"></span><br></div><div class="token-line" style="color:#393A34"><span class="token triple-quoted-string string" style="color:#e3116c">    """</span><span class="token plain"></span><br></div><div class="token-line" style="color:#393A34"><span class="token plain">    </span><span class="token keyword" style="color:#00009f">global</span><span class="token plain"> vel_publisher</span><br></div><div class="token-line" style="color:#393A34"><span class="token plain">    twist </span><span class="token operator" style="color:#393A34">=</span><span class="token plain"> Twist</span><span class="token punctuation" style="color:#393A34">(</span><span class="token punctuation" style="color:#393A34">)</span><span class="token plain"></span><br></div><div class="token-line" style="color:#393A34"><span class="token plain">    vel_publisher</span><span class="token punctuation" style="color:#393A34">.</span><span class="token plain">publish</span><span class="token punctuation" style="color:#393A34">(</span><span class="token plain">twist</span><span class="token punctuation" style="color:#393A34">)</span><span class="token plain"></span><br></div><div class="token-line" style="color:#393A34"><span class="token plain">    </span><span class="token keyword" style="color:#00009f">return</span><span class="token plain"> </span><span class="token string" style="color:#e3116c">"Robot stopped"</span><br></div></code></pre></div></div>
<p>There is no argument, because the function behaves the same no matter what data would be passed to it. It accesses a global velocity publishes and publishes an empty <code>Twist</code> object, which tells the robot to stop. It then returns a response that the robot as stopped for the LLM.</p>
<p>The key part is that the tool can either execute code directly, like in the <code>list_saved_maps</code> function, or can publish ROS 2 messages for other parts of the robot system to use. This could be velocity commands; messages for the <code>nav2</code> framework, which allows the robot to set a destination and handles the navigation to it; or just toggling autonomous exploration on or off.</p>
<p>A couple more examples:</p>
<p><a href="https://github.com/RAP-2025-Project-Group-2/RAP-2025-Project-Group-2/blob/main/rosa_summit/rosa_summit.py#L261-L266" target="_blank" rel="noopener noreferrer" class=""><code>get_location_names</code></a> has a dictionary containing all of the fixed locations, such as the office, bedroom, and kitchen. This tool simply returns those locations to the LLM so it understands where the robot can navigate to. Another tool called <code>navigate_to_location_by_name</code> then defines the position and orientation for a given location, so the LLM can command the robot to move there.</p>
<div class="language-python codeBlockContainer_Ckt0 theme-code-block" style="--prism-color:#393A34;--prism-background-color:#f6f8fa"><div class="codeBlockContent_QJqH"><pre tabindex="0" class="prism-code language-python codeBlock_bY9V thin-scrollbar" style="color:#393A34;background-color:#f6f8fa"><code class="codeBlockLines_e6Vv"><div class="token-line" style="color:#393A34"><span class="token decorator annotation punctuation" style="color:#393A34">@tool</span><span class="token plain"></span><br></div><div class="token-line" style="color:#393A34"><span class="token plain"></span><span class="token keyword" style="color:#00009f">def</span><span class="token plain"> </span><span class="token function" style="color:#d73a49">get_location_names</span><span class="token punctuation" style="color:#393A34">(</span><span class="token punctuation" style="color:#393A34">)</span><span class="token plain"> </span><span class="token operator" style="color:#393A34">-</span><span class="token operator" style="color:#393A34">&gt;</span><span class="token plain"> </span><span class="token builtin">str</span><span class="token punctuation" style="color:#393A34">:</span><span class="token plain"></span><br></div><div class="token-line" style="color:#393A34"><span class="token plain">    </span><span class="token triple-quoted-string string" style="color:#e3116c">"""</span><br></div><div class="token-line" style="color:#393A34"><span class="token triple-quoted-string string" style="color:#e3116c">    Returns a list of available location names.</span><br></div><div class="token-line" style="color:#393A34"><span class="token triple-quoted-string string" style="color:#e3116c">    """</span><span class="token plain"></span><br></div><div class="token-line" style="color:#393A34"><span class="token plain">    </span><span class="token keyword" style="color:#00009f">return</span><span class="token plain"> </span><span class="token string-interpolation string" style="color:#e3116c">f"Available locations: </span><span class="token string-interpolation interpolation punctuation" style="color:#393A34">{</span><span class="token string-interpolation interpolation string" style="color:#e3116c">', '</span><span class="token string-interpolation interpolation punctuation" style="color:#393A34">.</span><span class="token string-interpolation interpolation">join</span><span class="token string-interpolation interpolation punctuation" style="color:#393A34">(</span><span class="token string-interpolation interpolation">LOCATIONS</span><span class="token string-interpolation interpolation punctuation" style="color:#393A34">.</span><span class="token string-interpolation interpolation">keys</span><span class="token string-interpolation interpolation punctuation" style="color:#393A34">(</span><span class="token string-interpolation interpolation punctuation" style="color:#393A34">)</span><span class="token string-interpolation interpolation punctuation" style="color:#393A34">)</span><span class="token string-interpolation interpolation punctuation" style="color:#393A34">}</span><span class="token string-interpolation string" style="color:#e3116c">"</span><br></div></code></pre></div></div>
<p><a href="https://github.com/RAP-2025-Project-Group-2/RAP-2025-Project-Group-2/blob/main/rosa_summit/rosa_summit.py#L133-L148" target="_blank" rel="noopener noreferrer" class=""><code>toggle_auto_exploration</code></a> interacts with the <code>nav2</code> library to toggle autonomous exploration. It takes a data argument of whether to explore or not, then constructs a ROS 2 message and publishes it to the <code>explore_publisher</code>.</p>
<div class="language-python codeBlockContainer_Ckt0 theme-code-block" style="--prism-color:#393A34;--prism-background-color:#f6f8fa"><div class="codeBlockContent_QJqH"><pre tabindex="0" class="prism-code language-python codeBlock_bY9V thin-scrollbar" style="color:#393A34;background-color:#f6f8fa"><code class="codeBlockLines_e6Vv"><div class="token-line" style="color:#393A34"><span class="token decorator annotation punctuation" style="color:#393A34">@tool</span><span class="token plain"></span><br></div><div class="token-line" style="color:#393A34"><span class="token plain"></span><span class="token keyword" style="color:#00009f">def</span><span class="token plain"> </span><span class="token function" style="color:#d73a49">toggle_auto_exploration</span><span class="token punctuation" style="color:#393A34">(</span><span class="token plain">resume_exploration</span><span class="token punctuation" style="color:#393A34">:</span><span class="token plain"> </span><span class="token builtin">bool</span><span class="token punctuation" style="color:#393A34">)</span><span class="token plain"> </span><span class="token operator" style="color:#393A34">-</span><span class="token operator" style="color:#393A34">&gt;</span><span class="token plain"> </span><span class="token builtin">str</span><span class="token punctuation" style="color:#393A34">:</span><span class="token plain"></span><br></div><div class="token-line" style="color:#393A34"><span class="token plain">    </span><span class="token triple-quoted-string string" style="color:#e3116c">"""</span><br></div><div class="token-line" style="color:#393A34"><span class="token triple-quoted-string string" style="color:#e3116c">    Starts or stops the autonomous exploration.</span><br></div><div class="token-line" style="color:#393A34"><span class="token triple-quoted-string string" style="display:inline-block;color:#e3116c"></span><br></div><div class="token-line" style="color:#393A34"><span class="token triple-quoted-string string" style="color:#e3116c">    :param resume_exploration: True to start/resume exploration, False to stop/pause exploration.</span><br></div><div class="token-line" style="color:#393A34"><span class="token triple-quoted-string string" style="color:#e3116c">    """</span><span class="token plain"></span><br></div><div class="token-line" style="color:#393A34"><span class="token plain">    </span><span class="token keyword" style="color:#00009f">global</span><span class="token plain"> explore_publisher</span><br></div><div class="token-line" style="color:#393A34"><span class="token plain">    msg </span><span class="token operator" style="color:#393A34">=</span><span class="token plain"> Bool</span><span class="token punctuation" style="color:#393A34">(</span><span class="token punctuation" style="color:#393A34">)</span><span class="token plain"></span><br></div><div class="token-line" style="color:#393A34"><span class="token plain">    msg</span><span class="token punctuation" style="color:#393A34">.</span><span class="token plain">data </span><span class="token operator" style="color:#393A34">=</span><span class="token plain"> resume_exploration</span><br></div><div class="token-line" style="color:#393A34"><span class="token plain">    explore_publisher</span><span class="token punctuation" style="color:#393A34">.</span><span class="token plain">publish</span><span class="token punctuation" style="color:#393A34">(</span><span class="token plain">msg</span><span class="token punctuation" style="color:#393A34">)</span><span class="token plain"></span><br></div><div class="token-line" style="color:#393A34"><span class="token plain" style="display:inline-block"></span><br></div><div class="token-line" style="color:#393A34"><span class="token plain">    </span><span class="token keyword" style="color:#00009f">if</span><span class="token plain"> resume_exploration</span><span class="token punctuation" style="color:#393A34">:</span><span class="token plain"></span><br></div><div class="token-line" style="color:#393A34"><span class="token plain">        </span><span class="token keyword" style="color:#00009f">return</span><span class="token plain"> </span><span class="token string" style="color:#e3116c">"Autonomous exploration started/resumed."</span><span class="token plain"></span><br></div><div class="token-line" style="color:#393A34"><span class="token plain">    </span><span class="token keyword" style="color:#00009f">else</span><span class="token punctuation" style="color:#393A34">:</span><span class="token plain"></span><br></div><div class="token-line" style="color:#393A34"><span class="token plain">        </span><span class="token keyword" style="color:#00009f">return</span><span class="token plain"> </span><span class="token string" style="color:#e3116c">"Autonomous exploration stopped/paused."</span><br></div></code></pre></div></div>
<p>There are other tools defined in the code! Take a look at the remaining functions to understand how they work. Once you understand the framework, you can begin to define your own tools to upgrade the robot's capability. What's more, this works for real robots as well as for simulated. Give it a try on a real robot!</p>
<h2 class="anchor anchorTargetStickyNavbar_Vzrq" id="summary">Summary<a href="https://mikelikesrobots.github.io/blog/llm-robot-control#summary" class="hash-link" aria-label="Direct link to Summary" title="Direct link to Summary" translate="no">​</a></h2>
<p>This post demonstrates how a robot can be controlled through natural language by using a large language model (LLM). By supplementing Claude with extra tools using the ROSA Python library, Claude can translate a user's instructions into commands the robot can understand directly. This is only possible by connecting to an LLM in the cloud due to the high compute power required for LLMs to work.</p>
<p>The post showed a demonstration project of a Gazebo simulation, where you can move a Robotnik Summit robot around using natural language commands. It then showed how to set up the project on your own computer, and finally discussed the basics of setting up the tools that the demonstration project has available.</p>
<p>Armed with this knowledge, you can now use an LLM to supplement your robots! See if you can get the demo project running, then extend it with your own tools to increase what the robot is capable of. Remember that ROSA gives access to all the ROS 2 topics, meaning any simulated data produced can be used by LLM tools as well.</p>]]></content>
        <author>
            <name>Michael Hart</name>
            <uri>https://mikelikesrobots.github.io</uri>
        </author>
        <category label="robotics" term="robotics"/>
        <category label="ai" term="ai"/>
        <category label="llm" term="llm"/>
        <category label="simulation" term="simulation"/>
        <category label="control" term="control"/>
    </entry>
    <entry>
        <title type="html"><![CDATA[Understanding PID Controllers]]></title>
        <id>https://mikelikesrobots.github.io/blog/understand-pid-controllers</id>
        <link href="https://mikelikesrobots.github.io/blog/understand-pid-controllers"/>
        <updated>2025-06-24T00:00:00.000Z</updated>
        <summary type="html"><![CDATA[This post takes a look at the PID Controller, which is widely used in robotics for providing more accurate motions of any moving parts on a robot. We will go through some basic control theory to give a better understanding of what a PID controller is, then look at each of the P, I, and D terms to develop a more intuitive understanding of the controller. From there, you should be able to use the controller in your own projects.]]></summary>
        <content type="html"><![CDATA[<p>This post takes a look at the PID Controller, which is widely used in robotics for providing more accurate motions of any moving parts on a robot. We will go through some basic control theory to give a better understanding of what a PID controller is, then look at each of the P, I, and D terms to develop a more intuitive understanding of the controller. From there, you should be able to use the controller in your own projects.</p>
<p>If you're interested in seeing this post in video form, check the YouTube link below:</p>
<div class="video_jswG"><button type="button" class="poster_B6DH" aria-label="Play video: Understanding PID Controllers"><img src="https://i.ytimg.com/vi/z50ZXCzaVoI/hqdefault.jpg" alt="" width="480" height="360" loading="lazy"><span class="play_lEvZ" aria-hidden="true">▶</span><span class="caption_yrhJ">Watch: <!-- -->Understanding PID Controllers</span></button></div><noscript><p><a href="https://www.youtube.com/watch?v=z50ZXCzaVoI&amp;t=0">Watch <!-- -->Understanding PID Controllers<!-- --> on YouTube</a></p></noscript>
<h2 class="anchor anchorTargetStickyNavbar_Vzrq" id="what-is-pid-control">What is PID Control?<a href="https://mikelikesrobots.github.io/blog/understand-pid-controllers#what-is-pid-control" class="hash-link" aria-label="Direct link to What is PID Control?" title="Direct link to What is PID Control?" translate="no">​</a></h2>
<p>The PID in PID control stands for <strong>P</strong>roportional <strong>I</strong>ntegral <strong>D</strong>erivative. It is a way for robots to control their movements to be smooth and accurate, which helps them carry out their tasks correctly. For example, PID control can help a robot arm move to pick up an object without hitting into it or missing it entirely. Another example is moving wheels at the requested speed to make navigation more accurate.</p>
<p>PID control is used in many different fields, not just in robotics, but this post focuses on the use of PID control in robotics.</p>
<figure class="text--center"><p><img decoding="async" loading="lazy" alt="PID Controller Infographic" src="https://mikelikesrobots.github.io/assets/images/pid_controller_infographic-636199a32163e7ff887606ee991b7885.webp" width="2000" height="1414" class="img_ev3q">
</p><figcaption>Infographic showing the uses of PID Controller, and breaking down the four terms into their uses and drawbacks.</figcaption><p></p></figure>
<p>To explain more about what PID control is and how it works, including the general overview from the diagram above, it helps to define a few terms from control theory.</p>
<h3 class="anchor anchorTargetStickyNavbar_Vzrq" id="control-theory-terminology">Control Theory Terminology<a href="https://mikelikesrobots.github.io/blog/understand-pid-controllers#control-theory-terminology" class="hash-link" aria-label="Direct link to Control Theory Terminology" title="Direct link to Control Theory Terminology" translate="no">​</a></h3>
<p>First, any kind of <strong>control</strong> is the process of adjusting an output to be at a required level, or <strong>setpoint</strong>. This could be the heat level of a tank of water, which can be controlled by burning gas to heat the water. Another type of control is controlling the speed of a motor to spin a wheel or move a robot arm's joint.</p>
<p>A <strong>controller</strong> is a process responsible for controlling the output. In cars, the controller is a human, and the control process is to reach and maintain a certain speed by changing the acceleration of the car with an accelerator pedal. The controller should also respond to changes in speed as quickly as it can; if the desired speed increases, the controller should accelerate to the new setpoint, then maintain the speed there. Controllers should try to reach the setpoint quickly without overshooting or oscillating about the setpoint.</p>
<p>The controller produces a <strong>system input</strong>, which is the signal it uses to adjust the system. In a car, the system input is the accelerator position. In turn, the <strong>system response</strong> or <strong>system output</strong> is how the system behaves based on the system input; in a car, the system response is to speed up. Finally, the <strong>measured output</strong> is the measured value of the system response, such as the reading on a speedometer.</p>
<figure class="text--center"><p><img decoding="async" loading="lazy" alt="Control System Terms" src="data:image/webp;base64,UklGRjoeAABXRUJQVlA4IC4eAAAQegCdASrMAskAPikUh0MhoQiE3pYMAUJaW74X6mZbAfwD2/NL/7llQf4PXloyUtPB/8Q/Av9g/Fz+O/hf+2/+L9m/wj4d+c/jF/b/9//odMb+JfSP5l/Tf1U/sX/Y/ynv5/SPxC/LL2/9QH4gfAF+H/wr+T/ij/Z//X/keMKxvzAvSP4h/O/7v+wH9W/9v+b9hP86/Bb3A/AP6V/OfxV+gD+EfxH+if1b9ef63/3fp/v9O+PpA+wL+J/yD+1f5H+8/53+9/+37Qv0D+2/4b+6f7D+6//L3d/kn9P/yP+F/wv+w/xP/2/AP+Kfxv+wf2L/E/6D+3//3/c/bb6vP269iD9Qv9h+cI75VVVVVVVVVVVVVVVVVVVVVVVVVVVVVURnbw5iRrWMs6rbXs/OrvEe0S7nDJQX5PwPuLxYBzIPQkWMor3SVkftZPDnFOm5CmUR7H+ru+f0MofNWl71Arta0Zg323F6cW/AcG8dDfHq5PujVDZWMZB5AmBFaE150hx4aY4PQvb9JU6MtoqZBMCgTpWyIQA7Nv+b+SfbLgRrBMy2tivasgATv4/9SdBNPIbhiGNrv6qHHpip98oJG/8zC3ALN4nSHDW970rCk2brCkT+nvDOAIYJGnH9a26xbQxO8cpgx+79hrFdIegOhDjKOBj/atcAiBWPVs22td4hsm5ozbeXyBM7sZAP9zOm9gO9o+mcnl9onUrXh4OwLSXNXnP2OEFqVBzmQRwu+7J1ZOYYPaiFIr5U7R669n46W8mqL6p4d/C0frAdhmxjn4AA6Q9rNF7aBwoGbmkFylRrV/UrLhSxDDceYjj7GC6hElxV1UP2wEmGug2uYJuQpYLDoH4kJiNc5AWnRkuuHQPyqqqodj1cUU8mMZaZTmPm4DnQbZFcOOWo3zN2xHEzybp0ZLrh0D8qqqqqqpIYbUDalkmGug2yddNqtmZmZmZmZmZmWCw6B+VVUTqrljWzN212t1jRsKAmzUskw10G2TrptVszMzMzK++KRVxDakV3oNbzTpuQpmZmZmZlKy2HU1eAsqxuZOUkT+SovjH/p6jGmBsbf3yddZnLoGWBAV5GjTSHPqGaomewsdk8YAhR/019oLaF4feHdsBXOcJSRBlDCbiMxss2EFAoKz5UEEYbUDalkmGug2ycJgyuLyaFqCKt6gLNx5sgeaBJlteLNSgHSClpIBKABveobw6V/EfFWtDXB+bP4awiJB0kwzjc66dNyFMzMzMzMzMzMzMzMzMp8/sIY2Zu2vBoSrOCPyqqqqqqqqqqqqqqqqqqqqqqqqqqqqqqqqqqqoQAAP7//U4gFqf5KU35Cdy+hTipz8bQz/YqxvXV8FTEhdWUF1zZsAjAjIcnbKv+grJSerF9mcadjF3VC6ttKZCK4Qv+VqhWf9F4dV77n5bM0QJyHa5f1FZ6DNgU+36ZqD90wVCtsfFRbakZJY8WTlCVfMEsUmgNYE41BZ8otwShN/yxcphgpWQXFaEhhP0MDd/2uSjeadqg/0yMVBbljMuN2/q01b135mNg4h4Us8aWAYh63BDrpwj3XBp5Y7hl0yz04iTeahVzoOuwTrH/H3xgfpSHUq54DaeCZfYKa7iOBlgLJYZtnZ2geERdK6LUWx44M/0/4VH5yUymL3IkQLLLn+HplnJT9/1ayqkW1kxpcBIlaAMUig14rEnuYQxpApqgTAxAMHWS9vFZk2x16Haiyh9Pu4m9fXK4DcvJf+o1qUXiijn5IafQHpOOoDyud3o+vSGCRmCQjmzN5IsWAL8d1CA3r+lhhvfiPGoSKvYkJ7mvCWH/IJkYFbz9VqW0vyoFifAjA4AIZxeuJoi4h0/hrncUjCp2EV5sP7S7qJdzsuG0qxwbxV3xL5oqcbyzHgnIdAO6iFLaRtfX1wk29jN4yaTkGh8LW135tdCkYcBnpQbP/9TZGWI4yRluH2XBIh5e6sACB/2FbBekt///IZIAo+DUYuc2sn7P2gvMxzhuHD1K7JZDrdJu5l6wOvTFd6DDjgMhHsolOvkiTxGf/0srpYsZ0qN4Yv+sVvLUfbiJq0VQNqXzjSXQrdLWCZ/nCvb3mOtKiCDi0i5rmBQzbHWAN0w/IelhsI5+VRqeCsLtWvzWRMQ+bfFiy04J5IJKMEUNB9v1d5geIPgBZsP9ZKSskCnYr3kn10e3xFOz1H8t5IoGSRyjRHYqpg6WS8//7Qms/mkX0xFR45TvAlYfqja/qvqqbDxfi9CVBQRMwwMkXhxkjgY9GlZtpboKasrIfFMgOvB6l8G0n3lAgvKlIqqx/St0B7wqd0GtzNZSHTrYVzEsQP/TX/pUwMwBcuYidoeHCNf+kEaA+0N5u2bq//hbYxt2ZlxRxHOSo4UXCH7KA97cv6BBIQwYySY4Kmwm1QPnjy45xM6hUzP31fKfxvyY1upwjTx/+9rMs5tWOGc6Csbh8YC+gtYUCQqoUe9oSUjIUn2i/arRNFWecGs19VdAYT+vm6g0JYd8ucxnCUapPQ3/jIUvpBL+iSLQGxUvy/KvP1oOAFG6w0b558PSq8WV3xXA5LB+TqiTybW3AliYkLzr+HFUEiuKneziQFCLIiZaBS2KCEAKtf+7Vh2TsnwSGjGV/NF+PDBUixyUlhddqNNbkfOO722dsN2uQ8oxs9PWtc1soMD973YZ4nP/BpZveKdHG0O0oL7m5QLkhp2Sem4oApphwiVpdCtNzGlhlLmQNUYhlYZm3i+H6IIepC4S1Mvfu/mWjEt3pQAuDg2e3mCMQUjkerQgFDVr47ZHX9Ghu+1Wahnsua9rHF8QKHxav7qjubnA8bnw3X39Jv/p4NNzGrf+bMykyMfRewZkn/97JOt5MFX8Gg7AWarilcAtmCnbn15gY810Pftz8wbeBAUdk2Wq71q508vtDhjAdBIfdsN7/iCUXw4xWptQUyPGPleEk5ZYVBEKY+ZQOZiSWmr+fluSOCq4QRtzHHjk/JJVStFZtE9VdATs7WwHbrqgivwbJTI1DXbQOmuJdYHc0Po1pDZWbC3JUf/kh77slJghCJCZmR/q+enyW6dLz2Smq+dKj+M/VNP4BQFuJft4t+8N9mvttuXxeFYGgAb6o9wpSplHgxz+eEWTRn5U7hxAPU8/YPK6MqVtjgqEFDZterlzyAgDe507/sNfPZEbYbuueR4cnAjCT/D7f0T9l1gXxlvVxrJi/ip0XG7T0/rn8KkZi0J99Rz6edvw6D33MayaVEovFgO75MFSvJnstvQw9xNG4wXk3CTYQBkJIC/uKBybZn7WuYCKAzmkbYID/Fjl0Oon1o0lUuFx6yjnbHiBKqkTA1spode+IOVGMuFECgkq+e7S4QHjiWS2mJmMMeuggMI0t4ChH4zS3RRQcmQOnMlW9TnRQbRlABN1l4sT+G1LUAZiALjGOBM1roz043tK4bkgiPfGW07gS8nAk7JO3rL/Xf5X/79hohr/hyynxXOyKQPJMXeAoHBQwebcueQEW0fgZ9za1RsZldwA3AOv6v9RaJi/qAaMSqF2i5RDVE+mrjrM8eluOKCpSNvJSf9E6hgfQxqoZaw0JWRkJ7nSbxEmIFUubyd7nCUhdX7PLYGxwdVgg/meSN7SY/GLR0o056ovqZ6KyM7K4s3RQuREwwG9IUICILiglB3YI9L7P54SZAIWDjVr5ozNhMXZQ9F/HHlUetjyg602ES/3uR9ZYf68VW+HCue8VBo3tclTDuIMpiu0uNE/IwtdUrVjN2nfgvIZ5PbuWM0BDXFNEl07yFGjExxg2/eIUGhXGeb1M8Y9mI+yjeU/t8yQ0zI+LSFjOZflEGiqPoY4PnIE/lnFJe2F2dGUXrK5n2f9QSvBi1liW0vRuZwP3MGKE3Pa1YeOHmkWFxsAD827hQGW6G1VWyd0oGLtyLGo2wbG5gTUmfO2qe5AE5G62xoaogydeZLJPBu8FLbbE48oBqi6Lrj65rROpexRY01EYmYRTFN/AmjAE3lgl0cl0i9o+DIHOakNROnj1g4FMxW8DBa8CR1Exlb+AUJc41GmzdRy5tkjXZJ1W2hFlrKBuGNYoKBPvjI4qwrJm+/d53NzeGUpLE5zJ/703kViaGjrbzEVr6M5B3m3f+3XVHIu2YS1rV82ex/GvRI0yA3tnZJ8gHhY0Cs5+s70hbwPJj0ov1LlNFer04awrP0n0gUoauBvtroFsE1OcIlnqk7eXfYUHMQJk9ewV3tSCkCIwBaSfrVvlI1n1AVOqSk+dbkhk0PWnCYC6nYRvzKcBNUIyh2jw6m6u+lQsscXa07IP22dRRkCW9i6chtHQGdMACwjwKniBkMmKDguV/+d1Jzdi88Fnw5SHI91223UrU8hr9ndpxct7mZmfQbT3IvfkVwYLV3wCdj9pb70LTQBdkkIMxjjjoH/F3eocqyoj7MIWXSlpVtz+SF3Je+XJnHQAOJhpc995gi65cNl/GuiCqPWcdjbYgdAVfI+HMQkvqdejH1Q+0uhix6oYHbXYimmRvNZOiprv1tH8OW9jPWCW7CzgLtJGa4Vp4zBjkZcRHbDbsAfjfpjflLVQgwrakCw7Wy+uX6VYR7sGInaUriqbcNfoIxghyCpGv/CQNyHer+UjC/WtTS0Z1MfvLwEzO/2F17NE/HWKK9g/m119lPSIYKvaUnO0MY8rqCy9Ztr9v7LMkTrUYGLqH38IeEyQVhDNcBqQz0wSrbT69vClAe0krLtX9eXQLI+wWwrUGAT8S3oRpWYdL0G63WYhBg3AqmVAi4sZ0lt+HKvAD9915ndyjY/gTOCLPaTYdHld+DeWVVkJ+PkIGOLRzpE9AUXaEA9s2Cnw1P6QArWcFwlKCZ0zme0+o8a7t7Js7dQutJXMZGSMt5P0wWdpxKmKL83oNg+VgB8zasUzBiwu1mJTkzK5PVlD4e8UlC9cvoow4jVxuvp9sXeguhKTDHsjwcXfrS1JCmybiiSVOcNEbqFZLUrvPGAKkbygQ7FlHOf1fFcoMzL4FFRRMU3zSDTwseh2if7g7g0OS5sjju5K7spY4L83xF8qSok3vIeAqKFxj763OEZysN7HAMV6nyCuXtbvDgQgQ0fwnj4rVarC/BEfBGaCyyuu8xEPVCNT0qqN1DY0yBR06ADTTH0gOjhrNe23FSdW3JHi4lYM+XrhOAL2FEmFwYPMu5iclbfbs/uMhsC0lJMkeAWjI6SCxK+9h8Bo6k1qLlxW0JwzGPsRD5KGg+lU4BGy4lrhcOfdXDiXhX9Z/jiN9JRhGPAnWYJSy1oPnDp1krt9GAffJNRswCMVE48bUHyNqJF/tupYHXaogfvaqo2r9G4SZo535PFPCY5FEONYs9NsmaKRDejZKhFiu6WiqWesiNcdZ6zgiSkDvg66GrsaarUrWgVhkvBejW7vwL35IPHnR5uegKcJW2fULElza0nmRQ3ggAeR/WdnrEMeSAN3otm2f7sJZ/tBcIBBBAhmklHeqY+TpG5DIJshSldpcaJ+Rha6pWrGbtO/BeQzye3csX/dNDb6iEouMVQCXGkmhddyoPgySiGIIU3ocQm7l+o2+m8+L29c+NoSmmajCIOb+evB7qltHMtnfCRwjvcq+xJCP8JBEVq0QeFcofoIMIK/5ahEFfBxr2loMCs/g/aknYfgSFgElM3FTlPRuuYeRPiKtL4iI+91T08iUUZUR23kZCawNaGooUyJfBmURPGhq2dRbguP2xqdDYcLSGUGjUetCI7jhgSLCpWaxVxmiciXgVlIwSYMBu6kc7xhA68rkMhLkDv/xn/yhga9hvaWfeRG7w6SFcoBzfGFBo3AgTj7wbjoK8XtTAr79iQIn8VADTv+Q856uUFprKwqfughLjmAZnceOEsQsbsmQIkFp1iRWIfj5VvJYRURN5Q2iGvlDl8EDKFt0RUdUxsbA+A85kS67Ele23z11Fd4lmmvZH4FANqv42xrp/ZDsyHxBJQp10olKlQl0+1Mt1NvaTC84NJqiaDQ9gQI/PGURySG3hGTlTZbboqDu1jZ97bMGUWfoTK2emrK2D3PgI5gwTpvW1kpW8Gwme2L1Yojm1EgnxCC7Oy236VBDEILgQQLIwzEndSf9SJSsaqwI7kga0gzPoSjjYZ8RtIKxXRFUdwbe7mF224EAJlSeRxn4Wi30ajSa30N5kkVcj7p53xDXZTcvBPDZalqks8wtBemOFet2XcdwTLh8iEpkJ6TmZkb/Jlu75lXT/z/TjlZUShYwSjo67zZPz9yfe0OFB9PQsBcU9BZ0YWHw/0+H6mDR7GsR+pQomTpOkkcg90M5rBvCQoueD7DDSllmKEUty79cSCvD/tB4VhN7GY/Td7vVVtHzubVINb2n7M6gjWccE2LYB6zlIJz6dTj+QguvEAZEXkOsOD60cL3VVQb6/OfL0TjVESiFirXSw/G9Tv5NYjKO1E17jaxAHdP0m7CYXDirD/+Kvgs2hD0iE6Vx+hMVeo99uj9K3jkthFtJcmc5A74WkTjfzyPoWJsIe3NwYgZhMsTKTra6biKsq08gHfyNh3GX2X+Tcz5Ucjrumj1DIFI1lGw5Z3/SpQ19doWUpegNF/UAMcFbcNOwwHZZYtb6u6sret2vwGFwyy71cceyXi8JnJ4DnJtzLgMHA8pLq9236+nHGSTssK4GUdLqskhjwka3zamxulr7EoLwqwk0XT8DoRq+AcisdmttWKSwt5D18gqqd2YPSC68Ch81I7+CCYzg1fBL++7D6CXRtMHzWPJMWRMjEg3JrVOWGOMHK4QjwO3a0OU05X5nU2AUiZNngZiCrgVYWk38ThRI+rEAbof30DMWgfAP41a+CU84XTaY4UBNj0m3QBlB58f0dv7avLVg921BYGU2NyJUUzy1gHCzUqrR+6G9hWb/YA8QGRq65SjJiXIwwxNfqus6A/UtgK+ap+we8ScoUJ4Q6KEQH83ok7O3mc7h0VLgbi5HWp0Dbl1EO2yDt6ElcNhDZOapjhwB3TmfwoQWcy1m3nNr15UwUjhbQkqFvhtf68g7VsnTA1XMqD7SKiIIq6AyoAoEd39Y59lQIL8JYP+nsrnysWBadx5i5Z80MU+T4zzlVA1+Rg2/fM4t0R4HBXdYnydmoVSHVM+7cJbcJG11LwIkOqrDE2C/gCXhQt+r84rm51sseSx6vQo3E0P9WIoOJiGKtAAbXepLB5BAl1+w+iXoXhPW3b6VzqnRqAzmQYGL3+vHmbG4M++/UGEZfVYwbVxJIszIThamjwu/RL3Bj+aeIIxrla7DTVwqNO+goC9mthb3F2I9hz1N+zL3PsnvqJn0Ihu7OZLyaIWCD0qovYQIIAw5306IKIto/Cu+BuKv8qCGje68PX+5HaPi9j4sJY+mKNAJ/HetH7DlGIGcjW3YVFjUwwg6Jg2q2n9RR+8S1HAX/QpiYKhKNCQIpqJs51J2bZs190Y1TtWQhKjDaw0nA4B9lqKb+hxImwBObM5aBRXGHxjIv0/RqBOkUu3T6Gm4kUlIBlA/Py+nBhfKXEFmy1g7PFjFsxBH4vxwC1ahJjAjU8IFX7YB77HUucjAl5VRKzJnbWwk2+P5YpXlHUyAm6wlsQYNCOAW81zA0sD5nxWQQ69At7wt+iXS8E5iS0d/LQVWC4yfXqnk4lcwW7IAK+o6zpdpkWvj2IKnYqE5UvZgJyzV9LRK0dbg5pdMlAx+oD012dQqVjpf5VmeFWZZYEm7CC4BvUEgQOzYQWtwCWtqj3kQheAAAECun4dlVDWgXfsFNdxHAywFkswCS+GsvdIE4fHFAaU5yBlgIvxZa32D+Vkj4xPbDqHIX1ZynX6ts9S3yGU5ZcuvfnLHKAwRpsJ4sS8HOPGPV9KWGrqea2VX0mSIgCEbjGdGxgDR1VL/F6YK1IPLXyiS+4tgxbUq4mqPMOO7FX7IyZCHwkWhBso2lTcMtPxuc5irugHVXGnAL27Rz/9xFU+heFjd5Ep22jD+ZhFI9MJ6VaVj8d/9nhn1ywRYJMaA5QP1XKux75Mgl36dnBBAgrLbgkISI8SBB4pU2WdgBjb/34ObWPyh47PHorJLrW6F3R4yCnjw4TtO1ArfcV2pO/ziLhvdDSx+A/A+Or0A6X/jd6sloTKQ0NkmYb0EPqIot0xD6MSar+niT+MItHxnl3oJfhbRNbu4Sb65hYJibhzYhwg193p+jQjAY5a3UpsT6HqSZ/Ll3qa6EHbeX3QLwl+ZkP+Uw1pNvJ8f8YgGgsaELaYmVjjMGMtiux+nLDMkraEWKwQpDiUlZ0nNZoVRz8zHzq0iPrUF9sDdfCC8qFNNF8GA8EyoQI3a6ZrcMTY/m04BKcYh2d57qbfZLAGBDFvMpbYeqPtVkQKKl8FQOFvoz2a7mSfGXk5qhlvLK1qlOtxDoLL6pYSUMAY0iUuervbClaS505x3b/mp4dnLMgNkNC/dkgUexPxLLoayfOqQZpUDSwuGne9O08t2IsCrUxkQyxN1SC0lFospj9YJqhpQfbxbz4RoxMP9J10TdSO/gDqTf74q20xjDeYBC0Qj79KU1waLh0DFaY7kYnJ26ZIFXW3P1kd4z5V76uKcRdRQRMqUDERQRlQPuIKFFSt3rkE8Ur9M3VR6cVcYOv2Uhr7Kz5LLXIvx5Z64R+VxoMmmY/QpaJmcHPKQYyfj7DnKqzL7O2d4YY+cX7NvBi3kD1QYdxsxW/ygbhAcA0CJijybSZGp8RxybFs4SabMLfm0R0c7JM6ahTbwhA253hWyuB2ST3PX/LdiidWj0mqxaVzyaulCzyUz9XYtHnVkSLHXMMRWeYd9vaI9HOLHeQbIvxSdPF55WPMfyfBhUxqQYbch3s0QIllH+I5bcVTwzwENxlRY3rRYZwULHabamkCEYcRh3eAlRLQpseYznQlJFmXKXl364cR5fgFhGF3b9C6qG73ev05NtIiSLp+lQmJ5tSoJxiD+/UncQD1cFqSrQVQP8Htpi+EwDzHh+lA3+HKd2ZQnlhcmac/SrGkAmFraMkI4QjN/Km3xKLNiXfCxGuh+ZzI3OyMjCoLZ/0Bv9p5qTnwB7X0GM9QAf8Dfz5w1Sdd0spwumD6y/IN0lEKsydydY8e0LXCMbebHfcbLUXwO4900rxApjJNpRBk35alqsrKywDC28jaLBqvb54pFJACzLN22/1INH77Hf/pslbL9mqASw+TN6QtDeDAOh6YKv3skUZKRa0Fr9qsGMue5MotApBl3hiF3ogP5dgtksLjNfGonje2tiznctqJpmpjpEVTXQmIwbdi6sVX8g9ukqY6FbqHglG/SneiMNmph217M3YdRutpuj1mp2GEl23NCpnXbkSXpYwQnKMVt3AV7Ez/QBQqGzuhyks3tEVLFYReAhKDjZ/Qtwp/EbOMPHBCIrhvYBZhw/EYvXamcf2j7ZIGyZucc5VbCVsM8KA+KaMLKmoJNYUyesQDrxVmr+/CxElYw68v5pHpEGw+IrMno9NIWhb/gY54idHD4kWIiOEDBICeAaH2DN/4yslryGUFPIS+urULaFQUzrN51eMwOCFErI4aEKO3h4XQVDnR3R8dFqnVz7hA4J1U950xfegm1hnsrTTCc3sOcT95sNwBJKp3T8M7zPSALYfnuMQDbD/wZsdicTvls1JooZvA6gAMfgctiRH6dzXDyTdW6+Lk1kPcTRrhaGdndtp+4NKq4htbVanoh0sEuegcqcQSYTXr2GXYR5DUY+vXXKQlJU4Jntsn+p4xL8yBdlGBVf3ueCNhMb3skglgzAN1u5UFkkvcjlcarIstZWr9pt7cL97UuXyoyuvVMrsFaj+Gw1JNYORtUQ9c7w30NxvP4sAzeFd+0px2bVU53ck8ZkcGriLnbT3VmiLbbQSnLB4tCteErZqJOsV7m1FnV9XgLUIoqxxiNIi2eARtBUwsK2ztMJqnV3DV5g9X9JTWh2KN3Et52kGEixxxoq+gxH3hYl9aG30GLnCWAUyWUIx4AwcVKBAsKe2CZR71/IvVv7HHqPkT4PkPilmz+3U6IOg0ZEszQe2cCjYt+brZ5w4Gf7/2vWrcmEzg/ocn63mk2AFwTlccZQXTYi/F5od1tOvKWHmQCUW3ipyuFqVtmgokyX7byYmNQ+IpKNQjbj8ehIdT64lKsyvWr8ic2gPRte4yAPOgbp0V2Ah54pWO3v53iMPkMTM8qbh9Y1qJSk8uILx3JIRhADcLeSwrIrkBO727AxbKOpk8rTaSxzk3n77RlOtC0tzQWLdlxI5C3haDV6YL87RijnHjMzQtSVrJYn1e0GngAAAlt2o9dfdZyscusYxiJeAIvYDdVny5OGM4xNxgAAAAAAA" width="716" height="201" class="img_ev3q">
</p><figcaption>Control Theory Terms defined above, shown in a feedback loop.</figcaption><p></p></figure>
<h4 class="anchor anchorTargetStickyNavbar_Vzrq" id="open-and-closed-loop-controllers">Open and Closed Loop Controllers<a href="https://mikelikesrobots.github.io/blog/understand-pid-controllers#open-and-closed-loop-controllers" class="hash-link" aria-label="Direct link to Open and Closed Loop Controllers" title="Direct link to Open and Closed Loop Controllers" translate="no">​</a></h4>
<p>Controllers can either be <strong>open loop</strong> or <strong>closed loop</strong>, depending on whether they measure and react to the system as part of the control process.</p>
<p><strong>Open loop</strong> controllers do not react to the measured output as part of the control process. Instead, the controller guesses the correct system input to reach the setpoint and assumes the system responds as expected. For example, it tells two motors to move at a particular speed and assumes that they move at exactly that speed, with no issues. This control works well enough in many applications, and it's the type of control <a class="" href="https://mikelikesrobots.github.io/blog/jetbot-motors-pt2">we used for the JetBot</a>.</p>
<figure class="text--center"><p><img decoding="async" loading="lazy" alt="Open loop controller system" src="data:image/webp;base64,UklGRioVAABXRUJQVlA4IB4VAAAQVgCdASrMAmUAPikUh0MhoQiuArwMAUJaW74X6mZbAfwD2/NL/7llJI2g+H6Afw/8EP2V8Yf43+Gf7jerf4T8O/Nvxi/cP/TaY/8S+kfzf+n/qh/Xv/F/lPgX+vfij57+nT8VfgC/D/4V/KvxN/t3/u/xXGFZL5gXpN8P/oP95/X3+tf+j/S+wV+cfgf7gfSX+c/i59AH8F/iP9A/rv67f1j/vdHp3d9IH2B/xH+Pf2f/Hf4L/Xf3z/1faN+hf2j/Hf2n/Yf4D/5+778n/qH+L/yP+C/2X9+/+X4B/xP+N/1z+u/4r/O/2n/+/7D7cPWB+23sPfp997hLPZtexsHlXKeza9jYPKuU9m17GweVcp7Nm501IQRJJZvd88kLTCRSpzF8lsD+CPrCmdoN7oL7fGpZXKIuPlc6VHjxEY9m17GwJxBlL8rq65+KpErXZjUV6DdN22244GOsXd8OtZ5bFbJ90zR3zgcwJIHRO6hOhcQpvUqB3A74xWW3PzKRnaM09bOwSKp0+bpqcuuMFHxXmwv8XJk7lq1NnMOlC1zgUiBYikC8Da4lDj2Vv2bSrGH0XVrD0QKIeX4X4/6cKTZuppdL7Xf6/JLacZtX4TI4lQGhuLJrJmYAPgerpD0C+8586hoQMeR7C4sUV+j6nSGU2FrKNq6bLBYm6CGbbY/YNCJZdmQfYiRSvusWPoH/kXR7SjRdYKngHJUHOZBHE7ZHVFXCSvULwKdNkXDsOEED5WTXvTXopVTQFNgYZYjfxrP5AVq1wYSvTDqgXd2EGNKiEG4oeNEng58U0JlG3rRS3DwH4WRdIdm17FsfB5Vw22eza6s7mjW0TbGweVcp7Nr2Ng6grb5IWmEiqhgieeVcH+Kl9AyyyxfT3Jmns2vY2DyrlPZtexsHlXKeza9jYPKuU9m17GweVcnQAP7/6SYALCxQDj9t4Mpl5zCA5Oj+upmg1+8zgqHRax/BNz7O24vGEBW3vF/6C1ZYSmvzYUK4dO6Dt/clHK/rIXWjcHCr/gkPqX9UxdUFMku55PjSETpxNsHX1NKd4L7QLNMW/4tkXD1/FBZJeonTIXiWoXimAQd7NvqvYob5caCeeIaOLhiaQF2/Ra2BkpoTeKrhp0Y7UTD18zkxJvonP6r11I9hOoBSvEP4NrKAkt9Fyn6Bs7gtC4zwYiiXydjziAAw0MrXV61ENXA80oClOmdw/DxNra2+t9gpDBQkUdBYjA3QC6oYUeGKOKd17pzYEXkz8KkRJELQ86rJgV1gD+NkjP8Hd8zZbFrgCB/PY6O3L3d7ReD1/mt5xf9rf26v1DLpPKqDv8SNFQd1cly0De9vWK50tsnXY+DWa+1kuaS+5fTXhxOzw8AM55Gppf08k3y4YG3RRsFYQYKnddo8Gaq+Jt67RHq0aK9jYStQ5bxmOTruQoaac23Um7SlzgdBBEWdy7ZEc3rimuEQRBH3TQFg9TEHFmr0Kv1gPURMV6yXP4zjxuPXbO4J4Z8/fmT0YnB5L/RwJkpGL5pVVTYwjzmwX/yTkxl/PQolf6kT5rP/+pqwGXNOD69ODYglxtenqb3usE3hMJkRP//kMOOR+slp60P0BFON64Y3ixRpzCJ/VRn3xN9MUIuOjnLpqZWd1PjI70CucA9jZL/+6T74x9vUxFe0/6xMOge9t/5RpzQ8JPX6a5tX2+nN1uvDxUJ4TyZsL8nSLFt53iWfZX/QsEzwEWVxQXW0WWoZcXkIwM/hByu7vqgAWR9W3s7xLL3KfaYt7s6wfK+R1RyVoQqz6BytBbs/j2p+UvjL8kDDMWQxlRWHdDmP0K306gX8crwQQXoQaQ8sF4U9SroyzFGOmwXipgefBpQDfe9i0lBENM+rIGYp/JUgOaY76z1W+VFwlshXDcJG22EoO23rZEU034hcFdHCh4oJEMe6NNYckIOJT7chw9Bd0K4/BC0H7c2WWl46Rv6hjVO2dX/C3L/KuIGle18gas2Hvnjq+MvLeYpNZLDk4cgHD8+2YKCLdRma1+D1riPC3vvZ3mqXf1bbATMGwZeM41sgqj4+oJOJeceXLr7GHEvD7mNBKmDpp/z3Jv5wvDGR7KuAMhaOYQAwXofu5yGgtR++5IP8x6ITcJpLQdCe4QIoD5paou6bcKL28sKFapMJnlah7I2Trevucnx5uL0V9MsqWhGmFYxfM1UqqD/b2QYv6JTHQT8xHTudAl7AgHyrq4nqT5jkmWwFp8R8VDqkoVCc+5IChlinhTybWldwdiunAfJwojZf8D+kRMMFvmSCDibiE0PvB7Fr/zpEPKC6KD0w6wZLCmD1FsM6bYLNgDkMaYpweGJzJMOUk3jj6bJe9Lb16xQG+sJK4VmaCkuF1iigBbhByrEuocB4TMSZsXahOn249BpU75I2LtwkG5R2c+72Uyes+KWFboDOZSu4dLsiNl1R3/JGPI/jftm7A+U/CBug0PkRcmayP/d7ferJ4tOoJsFT3FilYjQidONDAWf3Nj5kscKwVxZQr8GGEhszHd3H4tu+ScGT+6ulNAvW+mM1E8eg5OMSlV8NsQK0LreEOQyxTpFdiUumTIkwcuPdUGv9hhr7tsXO5aNaWU2gjVI4HjZsVWnGPbnanke9j5eW5iEJppBApWroWs+jT5exhO8lgM+loG7okp29ofjo6S2Pp1AGrz8EdFnGCl40ICceTo5BWSkra1Yl4KvHti79zsAgV9JbosDdgaTlOuwuDx9a8QyjgE7884VKtobqrlOq1k0AZG1ycgh7Ydv1EPAzd6zEzW932JDcNhvKl4E+rS1afC6V/0nuU8xjfJiZBbNWPGsbD446rKpjHkHaC23oLuWtZtb6QhIkjMV4HmQ8t9aWeIud+s3YODznwmPObgtLz9BLM47GVo4fBVUItSZnxLeIcdnjfgkBfEG51dSoXjMW57X5aNs1bBYudzRUUCeSR/qFGVnDYBSGvq84Z/mtZtLBUTYSeYhX9byxPU6xsq3NkTzwhsFx6Q4sIp+Pfmu+SWGJkw2A3wLQD6tfFRA8J759s/tqlCuZQXPmOuDu0hWe8AqxmaSOI9yVOK7CwS+oxLsgFmCOParDZZF2711in+4qZELSXI7VipiY2+p6/xQkckMGtvKIDQm6xpPdsCemUYRHEDliXBCCS+It6RMo34KLc9+efmNXmZbtYQ+qQzxBqm2aAGxJKMDDzOZAU8uWMq5EqvDrLf92QPmZ8l2Hg7AjVl0BYCiI3zfPwjufBQPB4kqS27qhs4fElCiY6G7ZXsm3BQmHtmwjW6SqMsHvhBx7nPHfupthxdBe0ykr3HZOop13M+yTK88QcrN2pxkSwUI+ji4qBAlV0UlXhg47Xf3eUXtThlXkR1G0pbZw2Y/nbRFoFodJ3mnbm3207Ed+BcFfnjLSRMDr9Wg79g/bt31pEHjF+BIycFrkoIz/rvXrLV7inCfRFpilc/fNSjmi5CTr6OuoyXOeI1ek7OV9+BbjY810lmeW9NXRXRgMxcd2pieF5WAPJ/O6vyDYxGxDUw20RjyP2jOIOYWAoWUI3oN4Hw2pV/B5gk5sWzk3nb1pY8WsASLC7X6m2iXVbGYFwRpUxBjwQJO8+OIpf0naTiiQFO/j9vcWySFLfVPuNCkxZsAHGgwZZc9q38QGHoopxCcJi6a/VMNPJDgr4bXwj5AwA0leSv4Zmm0StOvshqbh677rE99I74J2M8XbMfq4VkGSegIIjEyxhDCkJbZRO+2He7Os2F1y8LcyjLnjgqUafhDC1zo+yIh3rkz+xbrDG7t2Q3Iu7PaK+a4BKm0yEl2qMQLEhPkBqt3wSPM4GbXQrnk8SbNjhWQMHFR3EmpLmv2XgI4BVn7fSuOcL+8iq+GSSbJZUzpIHdEn1r31vexrkn78CZ8FMUF/C4J5S4uosECmzSawVpc62SCz95HMlEfFLf8VV8Gr9+u5UKHTlLDjiUV/VFg8B1GgL5YfMqq9l4qL9muGKQnCOY08jItjAq/hm151/3A1s9l9KBRfiCrSLG2hZ3OEhxyPou625iSoplRhO/iz35XzSWZOqShCtZb6xEtopPF597ACCnA6Iuo9BdAnij2gC6k3L852akmZdDHUkonE93UJWoK8JMVpm1S7x3q4niDBkBiR19oUZJYcSSkhtuViuRfc64SLrHxXO+MI0UP6u8e+GWuoVPCeTnzqa5b8w7eihpThMfSDKqZQlAjqkEmpwR/AhHxsucltk8Wprdz25X0mnGIwgqRr2ezNXJsNF9seH9m7c8TYqbqMigGMpbwJCkMU1OK2ObtYAeRO1NyOv8fPxi1Q5/xH7t57GwdWEXOl56tfmnXRVdPmw/5e4kcoKiiZH7OikfJvbHTtURB6c5MiyAIdxJ27on/qzdBze0hw+HOQTLx4EuYCc2uqucHbYJEFslJ+kpj/G9ohTOTRbOLC6/XO9FtzCMVIhuCxa2nJbLFt9W9j+mn27+DR42TLs9ff4sr4bozyQnEb8GUHxsqz+vwrtP987kGY27aMNIGW92xDB0ZV+8WGh3YLwidlzGaGv9s9PndzN73IL6DCUrhdGirvF57DAzb1p4rju25PFvCf2EJf53GVmi66qNSIGG8i05NL20Sge2dSQW+1hpqwsCUDScYfXkBY4W9B/tUecE6ZHUzZKATedzTZUqqwYmj0Uh+GuoWd6wGZqRCzWzjr/DlnOAaD/KpyTPSTMmhsFX9HXLVmkeOzGf2yiaAFSsgVnu6hSJj4HxMD1GnVdEHmQ7Mg13FzfJeyO+Vpn5NEK/VV7pQ6s+bwvHVprnPCXb6TAPpBQOZhh932cThtImTiu2C21F0HvvKqX6r8A2KOxowXzO4flOtgzpVpny8e6tX5KC6RKCZBGsgAMPTo1X0h2Hg1OkkLko3lPII62i3kC5ZvU5YtT4TOqieiOZObEYlo4oRpH1oNxZFfnocu49jvCAeTzt19RdKlR+43vOqjwNAxfLNJSIRmI8VOLJp8wcQ0JV7fz0oXe8+7kYZOhWunH6343AyTau3HAke1n1Jv0Gz6iRk3HKbrbQ4Qee/zMAj3ifsxtHzTLEQYMyfCRlHgl2WRNXvncxKfujGMV9mcv7ia+LA4rphcXQOgUjYfqO0wUyTE1putuNPSHutk0zZrSRObnil8hzW0GjbOujMotdxISar1qCIelnw6saH63FH1vOY0htGzFZGGpsHItnfCRwjvcq+xJCP8JBEVqyweFcofoIMIK/5ahEFs6yWSbQpp7Fj6BnqjVzbEA47UL7yR93ti1H+eLrZ4TzLiFutvBcc3x5DwTGXE4xvFYyuSLVzTFCzsfWHELetDnVTAqSWUQdvoPFsvK4vskp6hye5cMfS/IFnXyMgFZl9gwG+3tqvD/5IywNShEfMaN3ZxFPkJCdYH3er0LOlEoJA/JFE7aNmfaoSJieqLVIzPqmXVZ12mAL3p/5KxrcGXEkBLB5/MOBXL0bwf0GaeZQ3WvVB6gGT9dI5p8t0k8txEi15ge/hFpX8pFNk39HGJKVsFznDDbVxhWPsvEKx+yhv7pc12CCjmED9tO7H08ioO0O7Fs12cdylVaQjw/1xmxORv9B2trrnuKCE2GtkWj9my5mfX/Q0VOZ6txhAlZJ9fjykTd+t3pAwusGlEjM2PevB4LvIctUxjf4WPdantUG+JeVSQV5A4PKUTHYrJgZQBWAukzcwoTAjnD7zR0r97WgQ6C3l/2cpiqb7JmE5jrQn4/MOLIIkkT5mB3jOrenYpfSHgkCNpH0JuQG7YmYVJA17yHKGjMoUHijlJR+Ktyti9HuPCK/r+SWbtlAqltxTKwBScGPL11P6p4ye0fnTF8O2Nr+lRDGWOUS5w5XG5emHeRI/h2gMVoulIz4nq9hFHeVeS1kXYOdkABIyNxbgUMIDqJ2+LkFOrLoxFx4JnqdP+YmkqFb1H+qgCsYf6g0EdVlFpfuF3lvQPg5y3/VBALh2APjI802vT9NNFXGgsb/8ZV6+eRUrGxX62Zqsk+tZuuzsLiNl0ruryGJIyjcB8zsUXjKC21udpaQ6GgyYQZBEsOj//iq9XG8lNQ2nYtGGCxfbG13cgIuIZ23QxrKCtwltdWiHDq+Va/GAYpEA9CTjvM8hGCIDq0lmErygeq9vTEjloE//zla34EKUNZHZea+MxiQD6dzotyYkeNPP3bQ1KRkGMwCMMdd5o/UNnOyyYtfpDFSYojhS3oJ08GNeZH8BWcAtYni+uKA3DiCRwLIf6bE1x6KBiXEBm2OXBgQv/JIpcJuL3fFNXLquP3bozkCPaiNwhPzwIonE9Zk7VP8A3c0Cs/FWC+1qreDeIo2D/fM4dZ1AAEMj/sdcbGKVVKTenHqjvM7qPsRf4tNRCrfJ12x5yOjd+dpd53wQgXDzekbHvfSKJo56oCYn/Zv5X7N6A3tdGlXgU75HupJEyF+N80gjASp5ArD+krj6pje4MPOn+rjP84HoIhQrdkAsNwC4KU1RtybuPFBYxXy9BNiQcgQ/8dE5MaokAdJsDIXdyZJlo78IQzAr+QaRclr4KtCUIDe1/Cs3GowygrBitsX8bWZdjT13UE9wtK0w67SWYIg2MZaDEyWznNDeZ2Nelvqg2nNVzTfHR3bows4OoT6F0UhABEgw7doKVdquOW43mQKDcJeuUCPpzDzk6DbQ+ZIeNwMrIUVgcc5y3ocBBA8bJQelTSEsle6y4kF24iXRYDs6LrNXcAJLUAUhcDTBys7XLB4wai5XGIS1QsRdGzuoAKDHUrx3CLViKoPOtFQLWukjviF4UrTyGBq/iF8oeSscYz3hQebXX94VJ0P1jb2TxytiwHnoSGj0/fMv2L2sztRMXWIE/5vqIG5gnsQdjeC4C8sDK8S/FXAyC2BI/8nnQM0d4q6VtZCX3JNM6nZQqTchtLQXSshacOdADB6SBvatHmeQuDYOD09alqiQr4zkJJINTny9gCL+hhmBfZoCXQ4+jEA3nGO6LALNC99fkmwgzOtmEcZQj1joAVQ9O7E+n/dVN/6FL+sZzocXRYJhTXyMjdkTDqP3o7DhE2vz101EufGHa6SGxMZADFh8Ze9vtdEvH84zboHG4oLMkRyBpgi0uFfCMOHizF2MaQSaKwXIdW/GufXc09wEc/YoKw5sJdRQVyl73UvaKt6fJ4RzikY5OIpTGz3fB8rVWLiIQZJ77u4XIjIaG2tgeQJN9fKVLFXfgAAAAAAA=" width="716" height="101" class="img_ev3q">
</p><figcaption>Open loop system. Setpoint fed to controller, which controls the system, assuming the system behaves perfectly.</figcaption><p></p></figure>
<p><strong>Closed loop</strong> controllers use measured output from the system to adjust the system input for better control. With a differential mobile robot, the controller can use wheel encoders to measure how fast the motors are actually moving, then adjust how fast it tells the motors to move to correct for the change. This allows the robot to keep a constant speed even if one motor is slightly more powerful than the other one.</p>
<figure class="text--center"><p><img decoding="async" loading="lazy" alt="Closed loop controller system" src="data:image/webp;base64,UklGRjoeAABXRUJQVlA4IC4eAAAQegCdASrMAskAPikUh0MhoQiE3pYMAUJaW74X6mZbAfwD2/NL/7llQf4PXloyUtPB/8Q/Av9g/Fz+O/hf+2/+L9m/wj4d+c/jF/b/9//odMb+JfSP5l/Tf1U/sX/Y/ynv5/SPxC/LL2/9QH4gfAF+H/wr+T/ij/Z//X/keMKxvzAvSP4h/O/7v+wH9W/9v+b9hP86/Bb3A/AP6V/OfxV+gD+EfxH+if1b9ef63/3fp/v9O+PpA+wL+J/yD+1f5H+8/53+9/+37Qv0D+2/4b+6f7D+6//L3d/kn9P/yP+F/wv+w/xP/2/AP+Kfxv+wf2L/E/6D+3//3/c/bb6vP269iD9Qv9h+cI75VVVVVVVVVVVVVVVVVVVVVVVVVVVVVURnbw5iRrWMs6rbXs/OrvEe0S7nDJQX5PwPuLxYBzIPQkWMor3SVkftZPDnFOm5CmUR7H+ru+f0MofNWl71Arta0Zg323F6cW/AcG8dDfHq5PujVDZWMZB5AmBFaE150hx4aY4PQvb9JU6MtoqZBMCgTpWyIQA7Nv+b+SfbLgRrBMy2tivasgATv4/9SdBNPIbhiGNrv6qHHpip98oJG/8zC3ALN4nSHDW970rCk2brCkT+nvDOAIYJGnH9a26xbQxO8cpgx+79hrFdIegOhDjKOBj/atcAiBWPVs22td4hsm5ozbeXyBM7sZAP9zOm9gO9o+mcnl9onUrXh4OwLSXNXnP2OEFqVBzmQRwu+7J1ZOYYPaiFIr5U7R669n46W8mqL6p4d/C0frAdhmxjn4AA6Q9rNF7aBwoGbmkFylRrV/UrLhSxDDceYjj7GC6hElxV1UP2wEmGug2uYJuQpYLDoH4kJiNc5AWnRkuuHQPyqqqodj1cUU8mMZaZTmPm4DnQbZFcOOWo3zN2xHEzybp0ZLrh0D8qqqqqqpIYbUDalkmGug2yddNqtmZmZmZmZmZmWCw6B+VVUTqrljWzN212t1jRsKAmzUskw10G2TrptVszMzMzK++KRVxDakV3oNbzTpuQpmZmZmZlKy2HU1eAsqxuZOUkT+SovjH/p6jGmBsbf3yddZnLoGWBAV5GjTSHPqGaomewsdk8YAhR/019oLaF4feHdsBXOcJSRBlDCbiMxss2EFAoKz5UEEYbUDalkmGug2ycJgyuLyaFqCKt6gLNx5sgeaBJlteLNSgHSClpIBKABveobw6V/EfFWtDXB+bP4awiJB0kwzjc66dNyFMzMzMzMzMzMzMzMzMp8/sIY2Zu2vBoSrOCPyqqqqqqqqqqqqqqqqqqqqqqqqqqqqqqqqqqqoQAAP7//U4gFqf5KU35Cdy+hTipz8bQz/YqxvXV8FTEhdWUF1zZsAjAjIcnbKv+grJSerF9mcadjF3VC6ttKZCK4Qv+VqhWf9F4dV77n5bM0QJyHa5f1FZ6DNgU+36ZqD90wVCtsfFRbakZJY8WTlCVfMEsUmgNYE41BZ8otwShN/yxcphgpWQXFaEhhP0MDd/2uSjeadqg/0yMVBbljMuN2/q01b135mNg4h4Us8aWAYh63BDrpwj3XBp5Y7hl0yz04iTeahVzoOuwTrH/H3xgfpSHUq54DaeCZfYKa7iOBlgLJYZtnZ2geERdK6LUWx44M/0/4VH5yUymL3IkQLLLn+HplnJT9/1ayqkW1kxpcBIlaAMUig14rEnuYQxpApqgTAxAMHWS9vFZk2x16Haiyh9Pu4m9fXK4DcvJf+o1qUXiijn5IafQHpOOoDyud3o+vSGCRmCQjmzN5IsWAL8d1CA3r+lhhvfiPGoSKvYkJ7mvCWH/IJkYFbz9VqW0vyoFifAjA4AIZxeuJoi4h0/hrncUjCp2EV5sP7S7qJdzsuG0qxwbxV3xL5oqcbyzHgnIdAO6iFLaRtfX1wk29jN4yaTkGh8LW135tdCkYcBnpQbP/9TZGWI4yRluH2XBIh5e6sACB/2FbBekt///IZIAo+DUYuc2sn7P2gvMxzhuHD1K7JZDrdJu5l6wOvTFd6DDjgMhHsolOvkiTxGf/0srpYsZ0qN4Yv+sVvLUfbiJq0VQNqXzjSXQrdLWCZ/nCvb3mOtKiCDi0i5rmBQzbHWAN0w/IelhsI5+VRqeCsLtWvzWRMQ+bfFiy04J5IJKMEUNB9v1d5geIPgBZsP9ZKSskCnYr3kn10e3xFOz1H8t5IoGSRyjRHYqpg6WS8//7Qms/mkX0xFR45TvAlYfqja/qvqqbDxfi9CVBQRMwwMkXhxkjgY9GlZtpboKasrIfFMgOvB6l8G0n3lAgvKlIqqx/St0B7wqd0GtzNZSHTrYVzEsQP/TX/pUwMwBcuYidoeHCNf+kEaA+0N5u2bq//hbYxt2ZlxRxHOSo4UXCH7KA97cv6BBIQwYySY4Kmwm1QPnjy45xM6hUzP31fKfxvyY1upwjTx/+9rMs5tWOGc6Csbh8YC+gtYUCQqoUe9oSUjIUn2i/arRNFWecGs19VdAYT+vm6g0JYd8ucxnCUapPQ3/jIUvpBL+iSLQGxUvy/KvP1oOAFG6w0b558PSq8WV3xXA5LB+TqiTybW3AliYkLzr+HFUEiuKneziQFCLIiZaBS2KCEAKtf+7Vh2TsnwSGjGV/NF+PDBUixyUlhddqNNbkfOO722dsN2uQ8oxs9PWtc1soMD973YZ4nP/BpZveKdHG0O0oL7m5QLkhp2Sem4oApphwiVpdCtNzGlhlLmQNUYhlYZm3i+H6IIepC4S1Mvfu/mWjEt3pQAuDg2e3mCMQUjkerQgFDVr47ZHX9Ghu+1Wahnsua9rHF8QKHxav7qjubnA8bnw3X39Jv/p4NNzGrf+bMykyMfRewZkn/97JOt5MFX8Gg7AWarilcAtmCnbn15gY810Pftz8wbeBAUdk2Wq71q508vtDhjAdBIfdsN7/iCUXw4xWptQUyPGPleEk5ZYVBEKY+ZQOZiSWmr+fluSOCq4QRtzHHjk/JJVStFZtE9VdATs7WwHbrqgivwbJTI1DXbQOmuJdYHc0Po1pDZWbC3JUf/kh77slJghCJCZmR/q+enyW6dLz2Smq+dKj+M/VNP4BQFuJft4t+8N9mvttuXxeFYGgAb6o9wpSplHgxz+eEWTRn5U7hxAPU8/YPK6MqVtjgqEFDZterlzyAgDe507/sNfPZEbYbuueR4cnAjCT/D7f0T9l1gXxlvVxrJi/ip0XG7T0/rn8KkZi0J99Rz6edvw6D33MayaVEovFgO75MFSvJnstvQw9xNG4wXk3CTYQBkJIC/uKBybZn7WuYCKAzmkbYID/Fjl0Oon1o0lUuFx6yjnbHiBKqkTA1spode+IOVGMuFECgkq+e7S4QHjiWS2mJmMMeuggMI0t4ChH4zS3RRQcmQOnMlW9TnRQbRlABN1l4sT+G1LUAZiALjGOBM1roz043tK4bkgiPfGW07gS8nAk7JO3rL/Xf5X/79hohr/hyynxXOyKQPJMXeAoHBQwebcueQEW0fgZ9za1RsZldwA3AOv6v9RaJi/qAaMSqF2i5RDVE+mrjrM8eluOKCpSNvJSf9E6hgfQxqoZaw0JWRkJ7nSbxEmIFUubyd7nCUhdX7PLYGxwdVgg/meSN7SY/GLR0o056ovqZ6KyM7K4s3RQuREwwG9IUICILiglB3YI9L7P54SZAIWDjVr5ozNhMXZQ9F/HHlUetjyg602ES/3uR9ZYf68VW+HCue8VBo3tclTDuIMpiu0uNE/IwtdUrVjN2nfgvIZ5PbuWM0BDXFNEl07yFGjExxg2/eIUGhXGeb1M8Y9mI+yjeU/t8yQ0zI+LSFjOZflEGiqPoY4PnIE/lnFJe2F2dGUXrK5n2f9QSvBi1liW0vRuZwP3MGKE3Pa1YeOHmkWFxsAD827hQGW6G1VWyd0oGLtyLGo2wbG5gTUmfO2qe5AE5G62xoaogydeZLJPBu8FLbbE48oBqi6Lrj65rROpexRY01EYmYRTFN/AmjAE3lgl0cl0i9o+DIHOakNROnj1g4FMxW8DBa8CR1Exlb+AUJc41GmzdRy5tkjXZJ1W2hFlrKBuGNYoKBPvjI4qwrJm+/d53NzeGUpLE5zJ/703kViaGjrbzEVr6M5B3m3f+3XVHIu2YS1rV82ex/GvRI0yA3tnZJ8gHhY0Cs5+s70hbwPJj0ov1LlNFer04awrP0n0gUoauBvtroFsE1OcIlnqk7eXfYUHMQJk9ewV3tSCkCIwBaSfrVvlI1n1AVOqSk+dbkhk0PWnCYC6nYRvzKcBNUIyh2jw6m6u+lQsscXa07IP22dRRkCW9i6chtHQGdMACwjwKniBkMmKDguV/+d1Jzdi88Fnw5SHI91223UrU8hr9ndpxct7mZmfQbT3IvfkVwYLV3wCdj9pb70LTQBdkkIMxjjjoH/F3eocqyoj7MIWXSlpVtz+SF3Je+XJnHQAOJhpc995gi65cNl/GuiCqPWcdjbYgdAVfI+HMQkvqdejH1Q+0uhix6oYHbXYimmRvNZOiprv1tH8OW9jPWCW7CzgLtJGa4Vp4zBjkZcRHbDbsAfjfpjflLVQgwrakCw7Wy+uX6VYR7sGInaUriqbcNfoIxghyCpGv/CQNyHer+UjC/WtTS0Z1MfvLwEzO/2F17NE/HWKK9g/m119lPSIYKvaUnO0MY8rqCy9Ztr9v7LMkTrUYGLqH38IeEyQVhDNcBqQz0wSrbT69vClAe0krLtX9eXQLI+wWwrUGAT8S3oRpWYdL0G63WYhBg3AqmVAi4sZ0lt+HKvAD9915ndyjY/gTOCLPaTYdHld+DeWVVkJ+PkIGOLRzpE9AUXaEA9s2Cnw1P6QArWcFwlKCZ0zme0+o8a7t7Js7dQutJXMZGSMt5P0wWdpxKmKL83oNg+VgB8zasUzBiwu1mJTkzK5PVlD4e8UlC9cvoow4jVxuvp9sXeguhKTDHsjwcXfrS1JCmybiiSVOcNEbqFZLUrvPGAKkbygQ7FlHOf1fFcoMzL4FFRRMU3zSDTwseh2if7g7g0OS5sjju5K7spY4L83xF8qSok3vIeAqKFxj763OEZysN7HAMV6nyCuXtbvDgQgQ0fwnj4rVarC/BEfBGaCyyuu8xEPVCNT0qqN1DY0yBR06ADTTH0gOjhrNe23FSdW3JHi4lYM+XrhOAL2FEmFwYPMu5iclbfbs/uMhsC0lJMkeAWjI6SCxK+9h8Bo6k1qLlxW0JwzGPsRD5KGg+lU4BGy4lrhcOfdXDiXhX9Z/jiN9JRhGPAnWYJSy1oPnDp1krt9GAffJNRswCMVE48bUHyNqJF/tupYHXaogfvaqo2r9G4SZo535PFPCY5FEONYs9NsmaKRDejZKhFiu6WiqWesiNcdZ6zgiSkDvg66GrsaarUrWgVhkvBejW7vwL35IPHnR5uegKcJW2fULElza0nmRQ3ggAeR/WdnrEMeSAN3otm2f7sJZ/tBcIBBBAhmklHeqY+TpG5DIJshSldpcaJ+Rha6pWrGbtO/BeQzye3csX/dNDb6iEouMVQCXGkmhddyoPgySiGIIU3ocQm7l+o2+m8+L29c+NoSmmajCIOb+evB7qltHMtnfCRwjvcq+xJCP8JBEVq0QeFcofoIMIK/5ahEFfBxr2loMCs/g/aknYfgSFgElM3FTlPRuuYeRPiKtL4iI+91T08iUUZUR23kZCawNaGooUyJfBmURPGhq2dRbguP2xqdDYcLSGUGjUetCI7jhgSLCpWaxVxmiciXgVlIwSYMBu6kc7xhA68rkMhLkDv/xn/yhga9hvaWfeRG7w6SFcoBzfGFBo3AgTj7wbjoK8XtTAr79iQIn8VADTv+Q856uUFprKwqfughLjmAZnceOEsQsbsmQIkFp1iRWIfj5VvJYRURN5Q2iGvlDl8EDKFt0RUdUxsbA+A85kS67Ele23z11Fd4lmmvZH4FANqv42xrp/ZDsyHxBJQp10olKlQl0+1Mt1NvaTC84NJqiaDQ9gQI/PGURySG3hGTlTZbboqDu1jZ97bMGUWfoTK2emrK2D3PgI5gwTpvW1kpW8Gwme2L1Yojm1EgnxCC7Oy236VBDEILgQQLIwzEndSf9SJSsaqwI7kga0gzPoSjjYZ8RtIKxXRFUdwbe7mF224EAJlSeRxn4Wi30ajSa30N5kkVcj7p53xDXZTcvBPDZalqks8wtBemOFet2XcdwTLh8iEpkJ6TmZkb/Jlu75lXT/z/TjlZUShYwSjo67zZPz9yfe0OFB9PQsBcU9BZ0YWHw/0+H6mDR7GsR+pQomTpOkkcg90M5rBvCQoueD7DDSllmKEUty79cSCvD/tB4VhN7GY/Td7vVVtHzubVINb2n7M6gjWccE2LYB6zlIJz6dTj+QguvEAZEXkOsOD60cL3VVQb6/OfL0TjVESiFirXSw/G9Tv5NYjKO1E17jaxAHdP0m7CYXDirD/+Kvgs2hD0iE6Vx+hMVeo99uj9K3jkthFtJcmc5A74WkTjfzyPoWJsIe3NwYgZhMsTKTra6biKsq08gHfyNh3GX2X+Tcz5Ucjrumj1DIFI1lGw5Z3/SpQ19doWUpegNF/UAMcFbcNOwwHZZYtb6u6sret2vwGFwyy71cceyXi8JnJ4DnJtzLgMHA8pLq9236+nHGSTssK4GUdLqskhjwka3zamxulr7EoLwqwk0XT8DoRq+AcisdmttWKSwt5D18gqqd2YPSC68Ch81I7+CCYzg1fBL++7D6CXRtMHzWPJMWRMjEg3JrVOWGOMHK4QjwO3a0OU05X5nU2AUiZNngZiCrgVYWk38ThRI+rEAbof30DMWgfAP41a+CU84XTaY4UBNj0m3QBlB58f0dv7avLVg921BYGU2NyJUUzy1gHCzUqrR+6G9hWb/YA8QGRq65SjJiXIwwxNfqus6A/UtgK+ap+we8ScoUJ4Q6KEQH83ok7O3mc7h0VLgbi5HWp0Dbl1EO2yDt6ElcNhDZOapjhwB3TmfwoQWcy1m3nNr15UwUjhbQkqFvhtf68g7VsnTA1XMqD7SKiIIq6AyoAoEd39Y59lQIL8JYP+nsrnysWBadx5i5Z80MU+T4zzlVA1+Rg2/fM4t0R4HBXdYnydmoVSHVM+7cJbcJG11LwIkOqrDE2C/gCXhQt+r84rm51sseSx6vQo3E0P9WIoOJiGKtAAbXepLB5BAl1+w+iXoXhPW3b6VzqnRqAzmQYGL3+vHmbG4M++/UGEZfVYwbVxJIszIThamjwu/RL3Bj+aeIIxrla7DTVwqNO+goC9mthb3F2I9hz1N+zL3PsnvqJn0Ihu7OZLyaIWCD0qovYQIIAw5306IKIto/Cu+BuKv8qCGje68PX+5HaPi9j4sJY+mKNAJ/HetH7DlGIGcjW3YVFjUwwg6Jg2q2n9RR+8S1HAX/QpiYKhKNCQIpqJs51J2bZs190Y1TtWQhKjDaw0nA4B9lqKb+hxImwBObM5aBRXGHxjIv0/RqBOkUu3T6Gm4kUlIBlA/Py+nBhfKXEFmy1g7PFjFsxBH4vxwC1ahJjAjU8IFX7YB77HUucjAl5VRKzJnbWwk2+P5YpXlHUyAm6wlsQYNCOAW81zA0sD5nxWQQ69At7wt+iXS8E5iS0d/LQVWC4yfXqnk4lcwW7IAK+o6zpdpkWvj2IKnYqE5UvZgJyzV9LRK0dbg5pdMlAx+oD012dQqVjpf5VmeFWZZYEm7CC4BvUEgQOzYQWtwCWtqj3kQheAAAECun4dlVDWgXfsFNdxHAywFkswCS+GsvdIE4fHFAaU5yBlgIvxZa32D+Vkj4xPbDqHIX1ZynX6ts9S3yGU5ZcuvfnLHKAwRpsJ4sS8HOPGPV9KWGrqea2VX0mSIgCEbjGdGxgDR1VL/F6YK1IPLXyiS+4tgxbUq4mqPMOO7FX7IyZCHwkWhBso2lTcMtPxuc5irugHVXGnAL27Rz/9xFU+heFjd5Ep22jD+ZhFI9MJ6VaVj8d/9nhn1ywRYJMaA5QP1XKux75Mgl36dnBBAgrLbgkISI8SBB4pU2WdgBjb/34ObWPyh47PHorJLrW6F3R4yCnjw4TtO1ArfcV2pO/ziLhvdDSx+A/A+Or0A6X/jd6sloTKQ0NkmYb0EPqIot0xD6MSar+niT+MItHxnl3oJfhbRNbu4Sb65hYJibhzYhwg193p+jQjAY5a3UpsT6HqSZ/Ll3qa6EHbeX3QLwl+ZkP+Uw1pNvJ8f8YgGgsaELaYmVjjMGMtiux+nLDMkraEWKwQpDiUlZ0nNZoVRz8zHzq0iPrUF9sDdfCC8qFNNF8GA8EyoQI3a6ZrcMTY/m04BKcYh2d57qbfZLAGBDFvMpbYeqPtVkQKKl8FQOFvoz2a7mSfGXk5qhlvLK1qlOtxDoLL6pYSUMAY0iUuervbClaS505x3b/mp4dnLMgNkNC/dkgUexPxLLoayfOqQZpUDSwuGne9O08t2IsCrUxkQyxN1SC0lFospj9YJqhpQfbxbz4RoxMP9J10TdSO/gDqTf74q20xjDeYBC0Qj79KU1waLh0DFaY7kYnJ26ZIFXW3P1kd4z5V76uKcRdRQRMqUDERQRlQPuIKFFSt3rkE8Ur9M3VR6cVcYOv2Uhr7Kz5LLXIvx5Z64R+VxoMmmY/QpaJmcHPKQYyfj7DnKqzL7O2d4YY+cX7NvBi3kD1QYdxsxW/ygbhAcA0CJijybSZGp8RxybFs4SabMLfm0R0c7JM6ahTbwhA253hWyuB2ST3PX/LdiidWj0mqxaVzyaulCzyUz9XYtHnVkSLHXMMRWeYd9vaI9HOLHeQbIvxSdPF55WPMfyfBhUxqQYbch3s0QIllH+I5bcVTwzwENxlRY3rRYZwULHabamkCEYcRh3eAlRLQpseYznQlJFmXKXl364cR5fgFhGF3b9C6qG73ev05NtIiSLp+lQmJ5tSoJxiD+/UncQD1cFqSrQVQP8Htpi+EwDzHh+lA3+HKd2ZQnlhcmac/SrGkAmFraMkI4QjN/Km3xKLNiXfCxGuh+ZzI3OyMjCoLZ/0Bv9p5qTnwB7X0GM9QAf8Dfz5w1Sdd0spwumD6y/IN0lEKsydydY8e0LXCMbebHfcbLUXwO4900rxApjJNpRBk35alqsrKywDC28jaLBqvb54pFJACzLN22/1INH77Hf/pslbL9mqASw+TN6QtDeDAOh6YKv3skUZKRa0Fr9qsGMue5MotApBl3hiF3ogP5dgtksLjNfGonje2tiznctqJpmpjpEVTXQmIwbdi6sVX8g9ukqY6FbqHglG/SneiMNmph217M3YdRutpuj1mp2GEl23NCpnXbkSXpYwQnKMVt3AV7Ez/QBQqGzuhyks3tEVLFYReAhKDjZ/Qtwp/EbOMPHBCIrhvYBZhw/EYvXamcf2j7ZIGyZucc5VbCVsM8KA+KaMLKmoJNYUyesQDrxVmr+/CxElYw68v5pHpEGw+IrMno9NIWhb/gY54idHD4kWIiOEDBICeAaH2DN/4yslryGUFPIS+urULaFQUzrN51eMwOCFErI4aEKO3h4XQVDnR3R8dFqnVz7hA4J1U950xfegm1hnsrTTCc3sOcT95sNwBJKp3T8M7zPSALYfnuMQDbD/wZsdicTvls1JooZvA6gAMfgctiRH6dzXDyTdW6+Lk1kPcTRrhaGdndtp+4NKq4htbVanoh0sEuegcqcQSYTXr2GXYR5DUY+vXXKQlJU4Jntsn+p4xL8yBdlGBVf3ueCNhMb3skglgzAN1u5UFkkvcjlcarIstZWr9pt7cL97UuXyoyuvVMrsFaj+Gw1JNYORtUQ9c7w30NxvP4sAzeFd+0px2bVU53ck8ZkcGriLnbT3VmiLbbQSnLB4tCteErZqJOsV7m1FnV9XgLUIoqxxiNIi2eARtBUwsK2ztMJqnV3DV5g9X9JTWh2KN3Et52kGEixxxoq+gxH3hYl9aG30GLnCWAUyWUIx4AwcVKBAsKe2CZR71/IvVv7HHqPkT4PkPilmz+3U6IOg0ZEszQe2cCjYt+brZ5w4Gf7/2vWrcmEzg/ocn63mk2AFwTlccZQXTYi/F5od1tOvKWHmQCUW3ipyuFqVtmgokyX7byYmNQ+IpKNQjbj8ehIdT64lKsyvWr8ic2gPRte4yAPOgbp0V2Ah54pWO3v53iMPkMTM8qbh9Y1qJSk8uILx3JIRhADcLeSwrIrkBO727AxbKOpk8rTaSxzk3n77RlOtC0tzQWLdlxI5C3haDV6YL87RijnHjMzQtSVrJYn1e0GngAAAlt2o9dfdZyscusYxiJeAIvYDdVny5OGM4xNxgAAAAAAA" width="716" height="201" class="img_ev3q">
</p><figcaption>The same diagram as in the previous section shows a feedback loop, where the measured output from the sensor is fed back to the controller to adjust the system input.</figcaption><p></p></figure>
<h3 class="anchor anchorTargetStickyNavbar_Vzrq" id="pid-controller">PID Controller<a href="https://mikelikesrobots.github.io/blog/understand-pid-controllers#pid-controller" class="hash-link" aria-label="Direct link to PID Controller" title="Direct link to PID Controller" translate="no">​</a></h3>
<p>With our control theory terms defined, we can now define PID control as a form of closed loop control that calculates its system input from proportional, integral, and derivative terms based on the measured output. The controller first calculates the <strong>error</strong> term as the difference between the setpoint and the measured output, then uses the error to form the control terms:</p>
<ol>
<li class=""><strong>Proportional (P)</strong>: the error is directly multiplied by a constant <strong>Kp</strong> to get the proportional term (<strong>p-term</strong>).</li>
<li class=""><strong>Integral (I)</strong>: tracks the total error over time, and multiplies this value by a constant <strong>Ki</strong> to get the integral term (<strong>i-term</strong>).</li>
<li class=""><strong>Derivative (D)</strong>: calculates the change in error by comparing to the previous error, then multiplies this value by a constant <strong>Kd</strong> to get the derivative term (<strong>d-term</strong>).</li>
</ol>
<p>The controller adds these values together to form the system input.</p>
<p>The parameters Kp, Ki, and Kd are the tuning parameters of the controller. These three values alone determine how a controller reacts to the measured input, so adjusting a controller to work for a system (<strong>tuning</strong> the controller) is the process of finding the parameters that get the most reliable output. This is generally done manually by running the system and adjusting parameters to get the best response from the controller.</p>
<figure class="text--center"><p><img decoding="async" loading="lazy" alt="PID Controller" src="https://mikelikesrobots.github.io/assets/images/pid_controller-68653a177d19b953129b19620fb9a70e.webp" width="927" height="392" class="img_ev3q">
</p><figcaption>The setpoint and measured output are compared to find the error, which is used to calculate the proportional, integral, and derivatives. These values are multiplied by the controller parameters and added together for the system input.</figcaption><p></p></figure>
<h2 class="anchor anchorTargetStickyNavbar_Vzrq" id="why-use-a-pid-controller">Why use a PID Controller?<a href="https://mikelikesrobots.github.io/blog/understand-pid-controllers#why-use-a-pid-controller" class="hash-link" aria-label="Direct link to Why use a PID Controller?" title="Direct link to Why use a PID Controller?" translate="no">​</a></h2>
<p>A huge advantage of using a PID controller is that it can be used for any system. Instead of modelling a system and building a controller that works only for that system, PID controllers are versatile enough to work for that system out of the box, even if they don't work quite as well as another controller. As they work very well in most applications, they are widely used in robotics.</p>
<p>PID controllers are therefore used for controlling most moving parts on a robot. When the performance of a robot depends on how well it responds to input commands, PID controllers can help improve that performance, making the robot move along desired paths much more closely or reach for an object more accurately. Some parts don't <em>need</em> PID controllers, or don't have the sensors necessary to provide feedback data; still, PID controllers are very commonly used, so it's worth understanding how they work.</p>
<h2 class="anchor anchorTargetStickyNavbar_Vzrq" id="understanding-pid-controllers">Understanding PID Controllers<a href="https://mikelikesrobots.github.io/blog/understand-pid-controllers#understanding-pid-controllers" class="hash-link" aria-label="Direct link to Understanding PID Controllers" title="Direct link to Understanding PID Controllers" translate="no">​</a></h2>
<p>So far, we've discussed what a PID controller is, and why we use them - particularly in robotics. Now, to give a more intuitive understanding of how they work, we will look at an example, then look at each of the P, I, and D terms in turn to see the effect they have on the system input.</p>
<h3 class="anchor anchorTargetStickyNavbar_Vzrq" id="driving-a-car">Driving a Car<a href="https://mikelikesrobots.github.io/blog/understand-pid-controllers#driving-a-car" class="hash-link" aria-label="Direct link to Driving a Car" title="Direct link to Driving a Car" translate="no">​</a></h3>
<p>Let's take the example of a car with a human driver. The driver has one pedal to accelerate or brake the car; pushing the pedal further down accelerates more, and releasing the pedal slows the car down. The task of the driver is to keep the car at a steady speed in spite of winds, changes in the road, and so on. The driver should also speed up the car or slow it down to turn corners, drive through towns, or any other changes needed.</p>
<p>We're going to make the driver's job more difficult by saying that the pedal is <em>stiff</em>. Releasing the pedal means it slowly brakes, and pressing the pedal takes time because of its stiffness.</p>
<p>The driver is driving through a town at 50 kph and will soon leave the town. Once back on the main road, the driver plans to accelerate up to 90 kph. How should the driver do it?</p>
<figure class="text--center"><p><img decoding="async" loading="lazy" alt="Setpoint changes from 50 kph to 90 kph" src="https://mikelikesrobots.github.io/assets/images/setpoint-666c7d5311f669b7859ad848eee3b897.webp" width="3043" height="1638" class="img_ev3q">
</p><figcaption>The speed setpoint changes from 50 kph to 90 kph as the driver leaves the town.</figcaption><p></p></figure>
<p>The simple solution is to push the pedal hard to accelerate the car, then mostly release the pedal to maintain the correct speed. However, because the pedal is stiff, the car keeps accelerating. The car has now overshot its target speed.</p>
<figure class="text--center"><p><img decoding="async" loading="lazy" alt="The driver overshoots the target speed" src="https://mikelikesrobots.github.io/assets/images/car_response-d47edfdb8515b1064ec2bcf349e6c627.webp" width="3043" height="1638" class="img_ev3q">
</p><figcaption>The driver stops accelerating when they reach the setpoint, so the speed overshoots.</figcaption><p></p></figure>
<p>The driver decides to try a different method: releasing the pedal based on how close to the target speed the car is. This is a P controller (it only contains the P component of the PID controller), as it relies on multiplying the error between the current speed and the set speed. As the car gets closer to the target speed, the error reduces, so the driver releases the accelerator a bit more.</p>
<figure class="text--center"><p><img decoding="async" loading="lazy" alt="The driver correctly reaches the target speed" src="https://mikelikesrobots.github.io/assets/images/p_controller-5282349c58b8d303ffa513a20c0bfb73.webp" width="3017" height="1638" class="img_ev3q">
</p><figcaption>The driver releases the pedal as the error decreases, smoothly meeting the target speed.</figcaption><p></p></figure>
<p>We can see that the car took longer to reach the target speed, but didn't overshoot at all. This is better behaviour for our system, but we could try different Kp values to reach the target speed faster. The best value depends on how the system responds, which is in this is largely defined by how stiff the accelerator pedal is and how fast the car can accelerate.</p>
<h3 class="anchor anchorTargetStickyNavbar_Vzrq" id="pid-visualisation-tool">PID Visualisation Tool<a href="https://mikelikesrobots.github.io/blog/understand-pid-controllers#pid-visualisation-tool" class="hash-link" aria-label="Direct link to PID Visualisation Tool" title="Direct link to PID Visualisation Tool" translate="no">​</a></h3>
<p>The car example is pretty simple, but already needs a closed loop controller. To better show how the different PID terms work, I've built the interactive tool below. (<a href="https://www.cursor.com/" target="_blank" rel="noopener noreferrer" class="">Cursor</a> saved me a <em>lot</em> of time building it - thanks, Cursor!)</p>
<p>The tool shows how a robot arm joint behaves with different PID control parameters. The measured output is the robot joint velocity, and the system input is a desired velocity. However, because the robot arm joint has to move the arm and possibly a payload, it has to accelerate to the requested velocity. This is similar to the car's accelerator pedal being stiff, and causes a lot of oscillation.</p>
<p>The tool is available below. Feel free to play with the sliders for all of the PID components, but these will be discussed in more detail later in the article. The time slider shows the values of the system at any point in time along the system response, including the current integral value (highlighting the relevant area) and the current derivative value (shown as a purple tangent to the line).</p>
<div class="pid-container"><div class="control-panel"><div class="slider-container"><div class="slider-group"><label class="label" for=":R5ipldeh:-kp"><span class="label-text">Proportional Gain (Kp):</span><span class="value">0.50</span></label><input type="range" id=":R5ipldeh:-kp" min="0" max="5" step="0.1" class="slider" value="0.5"></div><div class="slider-group"><label class="label" for=":R5ipldeh:-ki"><span class="label-text">Integral Gain (Ki):</span><span class="value">0.00</span></label><input type="range" id=":R5ipldeh:-ki" min="0" max="5" step="0.1" class="slider" value="0"></div><div class="slider-group"><label class="label" for=":R5ipldeh:-kd"><span class="label-text">Derivative Gain (Kd):</span><span class="value">0.00</span></label><input type="range" id=":R5ipldeh:-kd" min="0" max="5" step="0.1" class="slider" value="0"></div><div class="slider-group"><label class="label" for=":R5ipldeh:-kff"><span class="label-text">Feed Forward Gain (Kff):</span><span class="value">0.00</span></label><input type="range" id=":R5ipldeh:-kff" min="0" max="5" step="0.01" class="slider" value="0"></div></div><div class="button-container"><button class="button">▶ Play</button><button class="button">⏮ Reset</button><button class="button">↺ Reset PID</button></div></div><p id=":R5ipldeh:-description" class="pid-description">Robot joint velocity over time. The solid teal line shows measured velocity; the dashed pink line shows the target. Adjust the gains, then use the time slider to inspect the response.</p><svg class="graph" role="img" aria-label="PID controller response" aria-describedby=":R5ipldeh:-description"></svg><p>At <!-- -->0.0<!-- --> seconds: target <!-- -->1.00<!-- -->, measured velocity <!-- -->0.00<!-- -->, error <!-- -->0.00<!-- -->.</p><div class="time-slider-container"><label class="label" for=":R5ipldeh:-time"><span class="label-text">Time:</span><span class="value">0.0<!-- -->s</span></label><input type="range" id=":R5ipldeh:-time" min="0" max="0" step="1" class="slider" value="0"></div></div>
<h3 class="anchor anchorTargetStickyNavbar_Vzrq" id="proportional-term">Proportional Term<a href="https://mikelikesrobots.github.io/blog/understand-pid-controllers#proportional-term" class="hash-link" aria-label="Direct link to Proportional Term" title="Direct link to Proportional Term" translate="no">​</a></h3>
<p>The first term to look at is the proportional term. This is a multiplication of the error, so it's the simplest to calculate - and to understand! Decreasing Kp will move the system response down and to the right, while increasing it moves it up and to the left. Too large, and the system starts to oscillate.</p>
<p>For this system, the oscillation happens for any amount of Kp. Try moving the Kp value from the very bottom to the very top, and see what happens.</p>
<div class="pid-container"><div class="control-panel"><div class="slider-container"><div class="slider-group"><label class="label" for=":R62pldeh:-kp"><span class="label-text">Proportional Gain (Kp):</span><span class="value">4.00</span></label><input type="range" id=":R62pldeh:-kp" min="0" max="5" step="0.1" class="slider" value="4"></div></div><div class="button-container"><button class="button">▶ Play</button><button class="button">⏮ Reset</button><button class="button">↺ Reset PID</button></div></div><p id=":R62pldeh:-description" class="pid-description">Robot joint velocity over time. The solid teal line shows measured velocity; the dashed pink line shows the target. Adjust the gains, then use the time slider to inspect the response.</p><svg class="graph" role="img" aria-label="PID controller response" aria-describedby=":R62pldeh:-description"></svg><p>At <!-- -->0.0<!-- --> seconds: target <!-- -->1.00<!-- -->, measured velocity <!-- -->0.00<!-- -->, error <!-- -->0.00<!-- -->.</p><div class="time-slider-container"><label class="label" for=":R62pldeh:-time"><span class="label-text">Time:</span><span class="value">0.0<!-- -->s</span></label><input type="range" id=":R62pldeh:-time" min="0" max="0" step="1" class="slider" value="0"></div></div>
<p>P controllers <em>can</em> work in isolation, depending on the system. It is also possible to add only the I term, only the D term, or both I and D terms.</p>
<ul>
<li class="">P + I: PI controller</li>
<li class="">P + D: PD controller</li>
<li class="">P + I + D: PID controller</li>
</ul>
<p>Let's look at adding the derivative term to our controller.</p>
<h3 class="anchor anchorTargetStickyNavbar_Vzrq" id="derivative-term">Derivative Term<a href="https://mikelikesrobots.github.io/blog/understand-pid-controllers#derivative-term" class="hash-link" aria-label="Direct link to Derivative Term" title="Direct link to Derivative Term" translate="no">​</a></h3>
<p>Our controller will now adjust the system input based on the <em>rate of change</em> of the error. This means that at each point in time, the current error is subtracted from the previous error and multiplied by Kd, the derivative constant. Our controller is now a PD controller.</p>
<p>Adding a derivative term effectively dampens the response, meaning that the output can't change as quickly. Take a look at moving the D-term until the system has a smooth ramp up, then flattens out. You should see that the gradient of the line changes as you move the time slider, shown by a purple line. This shows the gradient that is being multiplied by Kd.</p>
<div class="pid-container"><div class="control-panel"><div class="slider-container"><div class="slider-group"><label class="label" for=":R6upldeh:-kp"><span class="label-text">Proportional Gain (Kp):</span><span class="value">1.80</span></label><input type="range" id=":R6upldeh:-kp" min="0" max="5" step="0.1" class="slider" value="1.8"></div><div class="slider-group"><label class="label" for=":R6upldeh:-kd"><span class="label-text">Derivative Gain (Kd):</span><span class="value">0.00</span></label><input type="range" id=":R6upldeh:-kd" min="0" max="5" step="0.1" class="slider" value="0"></div></div><div class="button-container"><button class="button">▶ Play</button><button class="button">⏮ Reset</button><button class="button">↺ Reset PID</button></div></div><p id=":R6upldeh:-description" class="pid-description">Robot joint velocity over time. The solid teal line shows measured velocity; the dashed pink line shows the target. Adjust the gains, then use the time slider to inspect the response.</p><svg class="graph" role="img" aria-label="PID controller response" aria-describedby=":R6upldeh:-description"></svg><p>At <!-- -->0.0<!-- --> seconds: target <!-- -->1.00<!-- -->, measured velocity <!-- -->0.00<!-- -->, error <!-- -->0.00<!-- -->.</p><div class="time-slider-container"><label class="label" for=":R6upldeh:-time"><span class="label-text">Time:</span><span class="value">0.0<!-- -->s</span></label><input type="range" id=":R6upldeh:-time" min="0" max="0" step="1" class="slider" value="0"></div></div>
<div class="theme-admonition theme-admonition-tip admonition_xJq3 alert alert--success"><div class="admonitionHeading_Gvgb"><span class="admonitionIcon_Rf37"><svg viewBox="0 0 12 16"><path fill-rule="evenodd" d="M6.5 0C3.48 0 1 2.19 1 5c0 .92.55 2.25 1 3 1.34 2.25 1.78 2.78 2 4v1h5v-1c.22-1.22.66-1.75 2-4 .45-.75 1-2.08 1-3 0-2.81-2.48-5-5.5-5zm3.64 7.48c-.25.44-.47.8-.67 1.11-.86 1.41-1.25 2.06-1.45 3.23-.02.05-.02.11-.02.17H5c0-.06 0-.13-.02-.17-.2-1.17-.59-1.83-1.45-3.23-.2-.31-.42-.67-.67-1.11C2.44 6.78 2 5.65 2 5c0-2.2 2.02-4 4.5-4 1.22 0 2.36.42 3.22 1.19C10.55 2.94 11 3.94 11 5c0 .66-.44 1.78-.86 2.48zM4 14h5c-.23 1.14-1.3 2-2.5 2s-2.27-.86-2.5-2z"></path></svg></span>tip</div><div class="admonitionContent_BuS1"><p>I get a good response and no overshooting with Kp=1.80, Kd=0.90.</p></div></div>
<p>You should see that the output is getting closer to the setpoint line. This is exactly the behaviour we want! In general, the d-term helps to dampen the system response to make it more stable, but tends be more sensitive to noise. Imagine your sensor is noisy and suddenly produces a false high value; the controller would give a very large response to the large gradient from the false reading.</p>
<p>Still, the system response is not that close to the setpoint. There is a gap between the line and the set point, which we call a <strong>steady-state error</strong>, and can be corrected using the last component of the PID Controller: the I-term.</p>
<h3 class="anchor anchorTargetStickyNavbar_Vzrq" id="integral-term">Integral Term<a href="https://mikelikesrobots.github.io/blog/understand-pid-controllers#integral-term" class="hash-link" aria-label="Direct link to Integral Term" title="Direct link to Integral Term" translate="no">​</a></h3>
<p>For the integral term, the error is added up over time. This is a process called integration, and for our controller it means adding the error to a running total, then using that total error to adjust our system input. The larger the error, or the more time the error exists for, the larger the total error will grow, and the more effort the controller puts in to reach the setpoint. This helps compensate for steady-state errors over time.</p>
<p>Just as with the other terms, we then multiply by a constant, Ki in this case, and add it to the total output of our controller. Increasing Ki to be too large can lead to oscillation and overshooting, but if it's small enough, it can compensate for errors over time and bring the output to the right setpoint.</p>
<p>Try adjusting Ki in the tool below and see the effect on the output for very large and very small values. Then try to match the setpoint as closely as possible, including adjusting the Kp and Kd parameters. As you move the time slider along, you should see the area between the system response and the setpoint highlighted; this is added to the total error over time. You can also see the integral value, which is the total value at that point in time.</p>
<div class="pid-container"><div class="control-panel"><div class="slider-container"><div class="slider-group"><label class="label" for=":R7upldeh:-kp"><span class="label-text">Proportional Gain (Kp):</span><span class="value">1.80</span></label><input type="range" id=":R7upldeh:-kp" min="0" max="5" step="0.1" class="slider" value="1.8"></div><div class="slider-group"><label class="label" for=":R7upldeh:-ki"><span class="label-text">Integral Gain (Ki):</span><span class="value">0.00</span></label><input type="range" id=":R7upldeh:-ki" min="0" max="5" step="0.1" class="slider" value="0"></div><div class="slider-group"><label class="label" for=":R7upldeh:-kd"><span class="label-text">Derivative Gain (Kd):</span><span class="value">0.90</span></label><input type="range" id=":R7upldeh:-kd" min="0" max="5" step="0.1" class="slider" value="0.9"></div></div><div class="button-container"><button class="button">▶ Play</button><button class="button">⏮ Reset</button><button class="button">↺ Reset PID</button></div></div><p id=":R7upldeh:-description" class="pid-description">Robot joint velocity over time. The solid teal line shows measured velocity; the dashed pink line shows the target. Adjust the gains, then use the time slider to inspect the response.</p><svg class="graph" role="img" aria-label="PID controller response" aria-describedby=":R7upldeh:-description"></svg><p>At <!-- -->0.0<!-- --> seconds: target <!-- -->1.00<!-- -->, measured velocity <!-- -->0.00<!-- -->, error <!-- -->0.00<!-- -->.</p><div class="time-slider-container"><label class="label" for=":R7upldeh:-time"><span class="label-text">Time:</span><span class="value">0.0<!-- -->s</span></label><input type="range" id=":R7upldeh:-time" min="0" max="0" step="1" class="slider" value="0"></div></div>
<div class="theme-admonition theme-admonition-tip admonition_xJq3 alert alert--success"><div class="admonitionHeading_Gvgb"><span class="admonitionIcon_Rf37"><svg viewBox="0 0 12 16"><path fill-rule="evenodd" d="M6.5 0C3.48 0 1 2.19 1 5c0 .92.55 2.25 1 3 1.34 2.25 1.78 2.78 2 4v1h5v-1c.22-1.22.66-1.75 2-4 .45-.75 1-2.08 1-3 0-2.81-2.48-5-5.5-5zm3.64 7.48c-.25.44-.47.8-.67 1.11-.86 1.41-1.25 2.06-1.45 3.23-.02.05-.02.11-.02.17H5c0-.06 0-.13-.02-.17-.2-1.17-.59-1.83-1.45-3.23-.2-.31-.42-.67-.67-1.11C2.44 6.78 2 5.65 2 5c0-2.2 2.02-4 4.5-4 1.22 0 2.36.42 3.22 1.19C10.55 2.94 11 3.94 11 5c0 .66-.44 1.78-.86 2.48zM4 14h5c-.23 1.14-1.3 2-2.5 2s-2.27-.86-2.5-2z"></path></svg></span>tip</div><div class="admonitionContent_BuS1"><p>I get a good response by using Kp=1.80, Ki=1.20, and Kd=0.90.</p></div></div>
<h3 class="anchor anchorTargetStickyNavbar_Vzrq" id="feedforward">Feedforward<a href="https://mikelikesrobots.github.io/blog/understand-pid-controllers#feedforward" class="hash-link" aria-label="Direct link to Feedforward" title="Direct link to Feedforward" translate="no">​</a></h3>
<p>Our controller is looking pretty good! It doesn't exactly meet the setpoint when it changes, but in reality, it's not possible for a system to exactly match the setpoint like that. There will always be some delay, and likely some ramping to meet the setpoint. This is true of robots as much as other systems.</p>
<p>Our final (optional) parameter to tune is feedforward. This isn't necessarily a part of PID controllers in general, but it <em>is</em> available in the <code>ros2_control</code> implementation of a PID controller. That's why I haven't mentioned it until now.</p>
<p>The feedforward parameter <strong>Kff</strong> is multiplied by the input value, <em>not the error value</em>. This provides an initial value for the controller that it can change on top of, which means the P and I parameters don't need to work as hard to correct for error.</p>
<figure class="text--center"><p><img decoding="async" loading="lazy" alt="PID controller with feedforward parameter" src="https://mikelikesrobots.github.io/assets/images/pid_with_ff-58b4700d295fbf81101735463050f0fe.webp" width="926" height="496" class="img_ev3q">
</p><figcaption>The PID controller has a new feedforward term, derived from the measured output and multiplied by Kff.</figcaption><p></p></figure>
<p>Try modifying the constant Kff in the tool to see the change in output. If you can, get a system response even closer to the setpoint.</p>
<div class="pid-container"><div class="control-panel"><div class="slider-container"><div class="slider-group"><label class="label" for=":R8upldeh:-kp"><span class="label-text">Proportional Gain (Kp):</span><span class="value">5.00</span></label><input type="range" id=":R8upldeh:-kp" min="0" max="5" step="0.1" class="slider" value="5"></div><div class="slider-group"><label class="label" for=":R8upldeh:-ki"><span class="label-text">Integral Gain (Ki):</span><span class="value">0.00</span></label><input type="range" id=":R8upldeh:-ki" min="0" max="5" step="0.1" class="slider" value="0"></div><div class="slider-group"><label class="label" for=":R8upldeh:-kd"><span class="label-text">Derivative Gain (Kd):</span><span class="value">1.30</span></label><input type="range" id=":R8upldeh:-kd" min="0" max="5" step="0.1" class="slider" value="1.3"></div><div class="slider-group"><label class="label" for=":R8upldeh:-kff"><span class="label-text">Feed Forward Gain (Kff):</span><span class="value">0.00</span></label><input type="range" id=":R8upldeh:-kff" min="0" max="5" step="0.01" class="slider" value="0"></div></div><div class="button-container"><button class="button">▶ Play</button><button class="button">⏮ Reset</button><button class="button">↺ Reset PID</button></div></div><p id=":R8upldeh:-description" class="pid-description">Robot joint velocity over time. The solid teal line shows measured velocity; the dashed pink line shows the target. Adjust the gains, then use the time slider to inspect the response.</p><svg class="graph" role="img" aria-label="PID controller response" aria-describedby=":R8upldeh:-description"></svg><p>At <!-- -->0.0<!-- --> seconds: target <!-- -->1.00<!-- -->, measured velocity <!-- -->0.00<!-- -->, error <!-- -->0.00<!-- -->.</p><div class="time-slider-container"><label class="label" for=":R8upldeh:-time"><span class="label-text">Time:</span><span class="value">0.0<!-- -->s</span></label><input type="range" id=":R8upldeh:-time" min="0" max="0" step="1" class="slider" value="0"></div></div>
<div class="theme-admonition theme-admonition-tip admonition_xJq3 alert alert--success"><div class="admonitionHeading_Gvgb"><span class="admonitionIcon_Rf37"><svg viewBox="0 0 12 16"><path fill-rule="evenodd" d="M6.5 0C3.48 0 1 2.19 1 5c0 .92.55 2.25 1 3 1.34 2.25 1.78 2.78 2 4v1h5v-1c.22-1.22.66-1.75 2-4 .45-.75 1-2.08 1-3 0-2.81-2.48-5-5.5-5zm3.64 7.48c-.25.44-.47.8-.67 1.11-.86 1.41-1.25 2.06-1.45 3.23-.02.05-.02.11-.02.17H5c0-.06 0-.13-.02-.17-.2-1.17-.59-1.83-1.45-3.23-.2-.31-.42-.67-.67-1.11C2.44 6.78 2 5.65 2 5c0-2.2 2.02-4 4.5-4 1.22 0 2.36.42 3.22 1.19C10.55 2.94 11 3.94 11 5c0 .66-.44 1.78-.86 2.48zM4 14h5c-.23 1.14-1.3 2-2.5 2s-2.27-.86-2.5-2z"></path></svg></span>tip</div><div class="admonitionContent_BuS1"><p>The best response I can get is using Kp=5.00, Ki=0.00, Kd=1.30, and Kff=0.50. This means we no longer need the i-term, which makes the controller simpler, and it should be more stable.</p></div></div>
<p>With our controller tuned, you can now play with the sliders again to see what effect each slider has on the system response. This helps build intuition about how the different parameters work for the controller.</p>
<h2 class="anchor anchorTargetStickyNavbar_Vzrq" id="pid-controllers-with-ros-2">PID Controllers with ROS 2<a href="https://mikelikesrobots.github.io/blog/understand-pid-controllers#pid-controllers-with-ros-2" class="hash-link" aria-label="Direct link to PID Controllers with ROS 2" title="Direct link to PID Controllers with ROS 2" translate="no">​</a></h2>
<p>With our understanding of PID controllers, the next question is how to implement one for a robot. One way to do so is to use the pre-built PID controller from <code>ros2_control</code>.</p>
<p>The <a href="https://control.ros.org/rolling/doc/ros2_controllers/pid_controller/doc/userdoc.html" target="_blank" rel="noopener noreferrer" class="">PID Controller</a> can be launched as part of a <code>ros2_control</code> system, and tuned by parameters in the configuration file. The controller documentation has recommendations on whether to use PI, PID, or PD controller based on the measured output and the system input types. It also provides an example project showing <a href="https://github.com/ros-controls/ros2_control_demos/tree/master/example_16" target="_blank" rel="noopener noreferrer" class="">how to use PID controllers with a differential mobile robot</a>. In a future post or video, I plan to go through this example more thoroughly, showing how to set up and tune the two PID controllers used to control each wheel on a real robot.</p>
<h2 class="anchor anchorTargetStickyNavbar_Vzrq" id="summary">Summary<a href="https://mikelikesrobots.github.io/blog/understand-pid-controllers#summary" class="hash-link" aria-label="Direct link to Summary" title="Direct link to Summary" translate="no">​</a></h2>
<p>In this post, we took a look at PID control, which is a fundamental concept in robotics for achieving precise, responsive motion. It's a type of <strong>closed loop control</strong> that continuously adjusts a system's input based on the error between the measured output and the desired output. This error is used by the p-term, integrated for the i-term, and subtracted from the previous error value for the d-term, with each term multipled by a parameter <strong>Kp</strong>, <strong>Ki</strong>, and <strong>Kd</strong> respectively.</p>
<p>We saw the need for a closed-loop controller with a car driving example, then looked at each term of the PID controller to see its effect on the system input, using an interactive visualisation of a robot arm joint model with payload to do so. We also looked at feedforward control as used in ROS 2's implementation, and finally discussed how to implement a PID controller for real using <code>ros2_control</code>.</p>
<p>Having an intuitive understanding of PID controllers will help make your robots more accurate, stable, and effective. If you have a real robot with a feedback mechanism, see if you can use PID control to make the movement smoother and more effective. This is exactly what I hope to do in a future post!</p>]]></content>
        <author>
            <name>Michael Hart</name>
            <uri>https://mikelikesrobots.github.io</uri>
        </author>
        <category label="robotics" term="robotics"/>
        <category label="control" term="control"/>
        <category label="ros2control" term="ros2control"/>
    </entry>
    <entry>
        <title type="html"><![CDATA[Constructing Tasks with MoveIt]]></title>
        <id>https://mikelikesrobots.github.io/blog/moveit-task-constructor</id>
        <link href="https://mikelikesrobots.github.io/blog/moveit-task-constructor"/>
        <updated>2025-05-23T00:00:00.000Z</updated>
        <summary type="html"><![CDATA[How are complex robot arm motions actually planned and executed? Robot arms are usually mounted within an enclosure or with some kind of environment that restricts their movement, and their task is rarely as simple as picking a simple object from above. How can we plan arm movements that avoid colliding with anything and reliably accomplish their tasks? There's more than one answer, of course, but one excellent answer is to use MoveIt.]]></summary>
        <content type="html"><![CDATA[<p>How are complex robot arm motions actually planned and executed? Robot arms are usually mounted within an enclosure or with some kind of environment that restricts their movement, and their task is rarely as simple as picking a simple object from above. How can we plan arm movements that avoid colliding with anything and reliably accomplish their tasks? There's more than one answer, of course, but one excellent answer is to use MoveIt.</p>
<p><a href="https://moveit.picknik.ai/main/index.html" target="_blank" rel="noopener noreferrer" class="">MoveIt</a> is a powerful and widely used framework for motion planning in robotics. It helps robots figure out how to get from one point to another while avoiding obstacles, respecting joint limits, and following physical constraints.</p>
<p>In this post, I'll go through the <a href="https://moveit.picknik.ai/main/doc/tutorials/tutorials.html" target="_blank" rel="noopener noreferrer" class="">tutorials available from the MoveIt website</a> for MoveIt 2. I have a few notes to add for the first few tutorials, but the majority of my focus is on the final tutorial, <a class="" href="https://mikelikesrobots.github.io/blog/moveit-task-constructor#pick-and-place-with-moveit-task-constructor">Pick and Place with MoveIt Task Constructor</a>. I'll explain more about how it works and the underlying principles so you can get started building your own task set for MoveIt.</p>
<p>This article also includes a video walkthrough.</p>
<div class="video_jswG"><button type="button" class="poster_B6DH" aria-label="Play video: Constructing Tasks with MoveIt"><img src="https://i.ytimg.com/vi/yIVc5Xq0Xm4/hqdefault.jpg" alt="" width="480" height="360" loading="lazy"><span class="play_lEvZ" aria-hidden="true">▶</span><span class="caption_yrhJ">Watch: <!-- -->Constructing Tasks with MoveIt</span></button></div><noscript><p><a href="https://www.youtube.com/watch?v=yIVc5Xq0Xm4&amp;t=0">Watch <!-- -->Constructing Tasks with MoveIt<!-- --> on YouTube</a></p></noscript>
<h2 class="anchor anchorTargetStickyNavbar_Vzrq" id="moveit-tutorials-1-5">MoveIt Tutorials 1-5<a href="https://mikelikesrobots.github.io/blog/moveit-task-constructor#moveit-tutorials-1-5" class="hash-link" aria-label="Direct link to MoveIt Tutorials 1-5" title="Direct link to MoveIt Tutorials 1-5" translate="no">​</a></h2>
<p>This post is based on <a href="https://moveit.picknik.ai/main/index.html" target="_blank" rel="noopener noreferrer" class="">the tutorials from the MoveIt website</a>. I only have a few tips and notes to add to the first few tutorials, which are written below.</p>
<figure class="text--center"><p><img decoding="async" loading="lazy" alt="Infographic of MoveIt Tutorial" src="https://mikelikesrobots.github.io/assets/images/moveit2-f27e84d724117c9cf2c96abe687515a5.webp" width="2000" height="1414" class="img_ev3q">
</p><figcaption>Infographic showing the uses of MoveIt, some key tips while working with it, and the main stages of the MoveIt Task Constructor. This can be a cheat sheet once you understand the concepts - read on to learn MoveIt.</figcaption><p></p></figure>
<p>More detail is available in the <a href="https://mikelikesrobots.github.io/blog/moveit-task-constructor#pick-and-place-with-moveit-task-constructor" class="">Pick and Place section</a>, as it has more advanced concepts to cover.</p>
<p>To learn MoveIt for yourself, my recommendation is to read through my tips for each section, then work through the tutorial from the site directly.</p>
<h3 class="anchor anchorTargetStickyNavbar_Vzrq" id="getting-started">Getting Started<a href="https://mikelikesrobots.github.io/blog/moveit-task-constructor#getting-started" class="hash-link" aria-label="Direct link to Getting Started" title="Direct link to Getting Started" translate="no">​</a></h3>
<p><a href="https://moveit.picknik.ai/main/doc/tutorials/getting_started/getting_started.html" target="_blank" rel="noopener noreferrer" class="">Getting Started</a> shows how to install MoveIt by compiling from source, assuming that ROS 2 has already been installed. It explains all of the steps and their purpose, so I combine them into one block for easier copying/pasting.</p>
<div class="theme-admonition theme-admonition-tip admonition_xJq3 alert alert--success"><div class="admonitionHeading_Gvgb"><span class="admonitionIcon_Rf37"><svg viewBox="0 0 12 16"><path fill-rule="evenodd" d="M6.5 0C3.48 0 1 2.19 1 5c0 .92.55 2.25 1 3 1.34 2.25 1.78 2.78 2 4v1h5v-1c.22-1.22.66-1.75 2-4 .45-.75 1-2.08 1-3 0-2.81-2.48-5-5.5-5zm3.64 7.48c-.25.44-.47.8-.67 1.11-.86 1.41-1.25 2.06-1.45 3.23-.02.05-.02.11-.02.17H5c0-.06 0-.13-.02-.17-.2-1.17-.59-1.83-1.45-3.23-.2-.31-.42-.67-.67-1.11C2.44 6.78 2 5.65 2 5c0-2.2 2.02-4 4.5-4 1.22 0 2.36.42 3.22 1.19C10.55 2.94 11 3.94 11 5c0 .66-.44 1.78-.86 2.48zM4 14h5c-.23 1.14-1.3 2-2.5 2s-2.27-.86-2.5-2z"></path></svg></span>Use Debug Mode</div><div class="admonitionContent_BuS1"><p>For the tutorials, I recommend compiling using Debug mode, as I use in my instructions. Otherwise, you will need to compile the whole codebase twice, once in release mode for the MoveIt packages and once in debug mode for the tutorial packages. For a serious project, do use release mode (even a separate workspace to avoid compiling it multiple times), but for the tutorials, debug is fine!</p></div></div>
<p>My instructions use ROS 2 Jazzy. Feel free to change this to your ROS version, which might require changing the MoveIt branch you check out. At time of writing, either <code>humble</code> or <code>main</code> branches are available, where <code>main</code> is for Jazzy.</p>
<div class="language-bash codeBlockContainer_Ckt0 theme-code-block" style="--prism-color:#393A34;--prism-background-color:#f6f8fa"><div class="codeBlockContent_QJqH"><pre tabindex="0" class="prism-code language-bash codeBlock_bY9V thin-scrollbar" style="color:#393A34;background-color:#f6f8fa"><code class="codeBlockLines_e6Vv"><div class="token-line" style="color:#393A34"><span class="token plain"># Dependency installation</span><br></div><div class="token-line" style="color:#393A34"><span class="token plain">source /opt/ros/jazzy/setup.bash</span><br></div><div class="token-line" style="color:#393A34"><span class="token plain">sudo apt install -y python3-rosdep python3-colcon-common-extensions python3-colcon-mixin python3-vcstool</span><br></div><div class="token-line" style="color:#393A34"><span class="token plain">sudo rosdep init</span><br></div><div class="token-line" style="color:#393A34"><span class="token plain">rosdep update</span><br></div><div class="token-line" style="color:#393A34"><span class="token plain">sudo apt update</span><br></div><div class="token-line" style="color:#393A34"><span class="token plain">sudo apt dist-upgrade</span><br></div><div class="token-line" style="color:#393A34"><span class="token plain">colcon mixin add default https://raw.githubusercontent.com/colcon/colcon-mixin-repository/master/index.yaml</span><br></div><div class="token-line" style="color:#393A34"><span class="token plain">colcon mixin update default</span><br></div><div class="token-line" style="color:#393A34"><span class="token plain">sudo apt remove ros-$ROS_DISTRO-moveit*</span><br></div><div class="token-line" style="color:#393A34"><span class="token plain" style="display:inline-block"></span><br></div><div class="token-line" style="color:#393A34"><span class="token plain"># Workspace creation and building</span><br></div><div class="token-line" style="color:#393A34"><span class="token plain">mkdir -p ~/ws_moveit/src</span><br></div><div class="token-line" style="color:#393A34"><span class="token plain">cd ~/ws_moveit/src</span><br></div><div class="token-line" style="color:#393A34"><span class="token plain">git clone -b main https://github.com/moveit/moveit2_tutorials</span><br></div><div class="token-line" style="color:#393A34"><span class="token plain">vcs import --recursive &lt; moveit2_tutorials/moveit2_tutorials.repos</span><br></div><div class="token-line" style="color:#393A34"><span class="token plain">sudo apt update &amp;&amp; rosdep install -r --from-paths . --ignore-src --rosdistro $ROS_DISTRO -y</span><br></div><div class="token-line" style="color:#393A34"><span class="token plain">cd ~/ws_moveit</span><br></div><div class="token-line" style="color:#393A34"><span class="token plain">colcon build --mixin debug</span><br></div></code></pre></div></div>
<div class="theme-admonition theme-admonition-warning admonition_xJq3 alert alert--warning"><div class="admonitionHeading_Gvgb"><span class="admonitionIcon_Rf37"><svg viewBox="0 0 16 16"><path fill-rule="evenodd" d="M8.893 1.5c-.183-.31-.52-.5-.887-.5s-.703.19-.886.5L.138 13.499a.98.98 0 0 0 0 1.001c.193.31.53.501.886.501h13.964c.367 0 .704-.19.877-.5a1.03 1.03 0 0 0 .01-1.002L8.893 1.5zm.133 11.497H6.987v-2.003h2.039v2.003zm0-3.004H6.987V5.987h2.039v4.006z"></path></svg></span>Resources for Compiling</div><div class="admonitionContent_BuS1"><p>The build might fail if your system doesn't have sufficient resources. If this happens, you can replace the last command with:</p><div class="language-bash codeBlockContainer_Ckt0 theme-code-block" style="--prism-color:#393A34;--prism-background-color:#f6f8fa"><div class="codeBlockContent_QJqH"><pre tabindex="0" class="prism-code language-bash codeBlock_bY9V thin-scrollbar" style="color:#393A34;background-color:#f6f8fa"><code class="codeBlockLines_e6Vv"><div class="token-line" style="color:#393A34"><span class="token plain">MAKEFLAGS="-j4 -l1" colcon build --executor sequential --mixin debug</span><br></div></code></pre></div></div><p>Be warned: this will make the build take longer!</p></div></div>
<p>After an hour and change, you should have the workspace set up and ready to use! The next step is optional, but helpful, which is to automatically source the workspace.</p>
<div class="language-bash codeBlockContainer_Ckt0 theme-code-block" style="--prism-color:#393A34;--prism-background-color:#f6f8fa"><div class="codeBlockContent_QJqH"><pre tabindex="0" class="prism-code language-bash codeBlock_bY9V thin-scrollbar" style="color:#393A34;background-color:#f6f8fa"><code class="codeBlockLines_e6Vv"><div class="token-line" style="color:#393A34"><span class="token plain">echo 'source ~/ws_moveit/install/setup.bash' &gt;&gt; ~/.bashrc</span><br></div></code></pre></div></div>
<p>The next step is to run and play with the demo.</p>
<h3 class="anchor anchorTargetStickyNavbar_Vzrq" id="moveit-quickstart-in-rviz">MoveIt Quickstart in RViz<a href="https://mikelikesrobots.github.io/blog/moveit-task-constructor#moveit-quickstart-in-rviz" class="hash-link" aria-label="Direct link to MoveIt Quickstart in RViz" title="Direct link to MoveIt Quickstart in RViz" translate="no">​</a></h3>
<p><a href="https://moveit.picknik.ai/main/doc/tutorials/quickstart_in_rviz/quickstart_in_rviz_tutorial.html" target="_blank" rel="noopener noreferrer" class="">MoveIt Quickstart in RViz</a> goes through running a simple demo using RViz that will allow you to plan simple paths between two points. It also shows how to visualise the motion before executing and use different planners for different motions. I'll write my notes and tips, but otherwise advise you to <a href="https://moveit.picknik.ai/main/doc/tutorials/quickstart_in_rviz/quickstart_in_rviz_tutorial.html" target="_blank" rel="noopener noreferrer" class="">follow the tutorial directly</a>.</p>
<p>On the <strong>Moving into collision</strong> step, I was unable to get the robot to collide with itself, even with IK solver turned off. I assume this is a change of behaviour from when the tutorial was written, because the robot would slide over the points where it should have collided, or just waited for the mouse to move to a valid position again; it never showed red.</p>
<p>Also, the cartesian planner failed to plan any movements for me. The cartesian planner can be used for straight-line motions. One example is a robot arm using a pen, where the pen needs to draw a straight line on a page. By providing start and end coordinates from the drawing surface to a cartesian planner, the resulting path will be a straight line across the surface. As the cartesian planner comes up again in the last tutorial, I was happy to skip past this.</p>
<div class="theme-admonition theme-admonition-tip admonition_xJq3 alert alert--success"><div class="admonitionHeading_Gvgb"><span class="admonitionIcon_Rf37"><svg viewBox="0 0 12 16"><path fill-rule="evenodd" d="M6.5 0C3.48 0 1 2.19 1 5c0 .92.55 2.25 1 3 1.34 2.25 1.78 2.78 2 4v1h5v-1c.22-1.22.66-1.75 2-4 .45-.75 1-2.08 1-3 0-2.81-2.48-5-5.5-5zm3.64 7.48c-.25.44-.47.8-.67 1.11-.86 1.41-1.25 2.06-1.45 3.23-.02.05-.02.11-.02.17H5c0-.06 0-.13-.02-.17-.2-1.17-.59-1.83-1.45-3.23-.2-.31-.42-.67-.67-1.11C2.44 6.78 2 5.65 2 5c0-2.2 2.02-4 4.5-4 1.22 0 2.36.42 3.22 1.19C10.55 2.94 11 3.94 11 5c0 .66-.44 1.78-.86 2.48zM4 14h5c-.23 1.14-1.3 2-2.5 2s-2.27-.86-2.5-2z"></path></svg></span>Saving Your Configuration</div><div class="admonitionContent_BuS1"><p>Before going on to the next tutorial: this tutorial has a section called <strong>Saving Your Configuration</strong>. It's a great idea to try it and make sure it works correctly for you - it will help in the testing stages of later tutorials, and it's good to know for ROS 2 development in general!</p></div></div>
<h3 class="anchor anchorTargetStickyNavbar_Vzrq" id="your-first-c-moveit-project">Your First C++ MoveIt Project<a href="https://mikelikesrobots.github.io/blog/moveit-task-constructor#your-first-c-moveit-project" class="hash-link" aria-label="Direct link to Your First C++ MoveIt Project" title="Direct link to Your First C++ MoveIt Project" translate="no">​</a></h3>
<p><a href="https://moveit.picknik.ai/main/doc/tutorials/your_first_project/your_first_project.html" target="_blank" rel="noopener noreferrer" class="">Your First C++ MoveIt Project</a> shows how to build a ROS 2 node that will move the robot arm from the previous demo to a point defined in code. This means setting up the build system, linking to MoveIt, and sending commands to move the robot.</p>
<p>My main advice for this section is to act like you're writing the project yourself from first principles, only using the tutorial as a guide. Type everything yourself, and do it in the same order you would for a fresh C++ project: start with a main function and work from the ground up to the working demo. By doing this, you're likely to see how all the pieces fit together better, and you're also likely to make some mistakes that you then need to debug. That will help you understand the code even better.</p>
<p>As an optional extra, you can try to modify parts of the code to check your understanding. I made a simple change to the lambda function so it returns a <code>std::optional</code> instead of a <code>std::pair</code> of <code>success</code> and <code>plan</code>. This may be my preference for Rust coming through, but I think it makes more sense, and it's how I would have written it to begin with if I didn't have the tutorial.</p>
<h3 class="anchor anchorTargetStickyNavbar_Vzrq" id="visualizing-in-rviz">Visualizing in RViz<a href="https://mikelikesrobots.github.io/blog/moveit-task-constructor#visualizing-in-rviz" class="hash-link" aria-label="Direct link to Visualizing in RViz" title="Direct link to Visualizing in RViz" translate="no">​</a></h3>
<p><a href="https://moveit.picknik.ai/main/doc/tutorials/visualizing_in_rviz/visualizing_in_rviz.html" target="_blank" rel="noopener noreferrer" class="">Visualizing in RViz</a> adds to the project from the previous tutorial by adding labels and button interactions, which allows you to step through tasks in a plan. It's important to be able to debug your projects later.</p>
<p>I can't emphasise enough how useful graphical interfaces are when debugging. Usually engineers are comfortable using command line tools for debugging, but if it's possible to use or build your own graphical tools, I recommend doing so! Being able to see a visualisation of the robot, what it's doing, and what it's planning, all with buttons to allow for simpler interaction, will speed up your development in the long run. (This goes for all software, not just robotics.)</p>
<p>As with the previous section, try to write the code using the tutorial as a guide, and understand each function as you go over it. One point that tripped me up was needing to trigger an update to the visual tools every time I changed something; for a while I was wondering why the robot state wasn't being drawn on screen.</p>
<p>Keep in mind that you can save your RViz workspace and reopen it from the command line. This was incredibly useful for me after a few times of setting up the workspace manually, as I was trying to debug my issue with labels not being drawn on screen.</p>
<h3 class="anchor anchorTargetStickyNavbar_Vzrq" id="planning-around-objects">Planning Around Objects<a href="https://mikelikesrobots.github.io/blog/moveit-task-constructor#planning-around-objects" class="hash-link" aria-label="Direct link to Planning Around Objects" title="Direct link to Planning Around Objects" translate="no">​</a></h3>
<p><a href="https://moveit.picknik.ai/main/doc/tutorials/planning_around_objects/planning_around_objects.html" target="_blank" rel="noopener noreferrer" class="">Planning Around Objects</a> shows how MoveIt can insert objects into the environment, and understands how to plan movements around them. One of my previous projects used this technique to load the enclosure for the robot arm, then plan paths that didn't hit the enclosure walls or surface. This feature is an important reason to use MoveIt!</p>
<p>Again, try to write the code as if you're building it yourself from scratch. One mistake that I made here was that I didn't update the destination of the robot gripper. The previous destination doesn't need the arm to move around the box, but the new destination is on the other side of the box from the base of the robot. Notice that the elbow of the robot avoids the box as well as the gripper - obstacle avoidance means all the links of the robot avoid obstacles, not just the gripper.</p>
<h2 class="anchor anchorTargetStickyNavbar_Vzrq" id="pick-and-place-with-moveit-task-constructor">Pick and Place with MoveIt Task Constructor<a href="https://mikelikesrobots.github.io/blog/moveit-task-constructor#pick-and-place-with-moveit-task-constructor" class="hash-link" aria-label="Direct link to Pick and Place with MoveIt Task Constructor" title="Direct link to Pick and Place with MoveIt Task Constructor" translate="no">​</a></h2>
<p>With the first tutorials complete, it's finally time to talk about the <a href="https://moveit.picknik.ai/main/doc/tutorials/pick_and_place_with_moveit_task_constructor/pick_and_place_with_moveit_task_constructor.html" target="_blank" rel="noopener noreferrer" class="">Task Constructor</a>. This is the section I spent the most time on by far, because I didn't understand what the different stage types were for or how they fit together.</p>
<div class="theme-admonition theme-admonition-note admonition_xJq3 alert alert--secondary"><div class="admonitionHeading_Gvgb"><span class="admonitionIcon_Rf37"><svg viewBox="0 0 14 16"><path fill-rule="evenodd" d="M6.3 5.69a.942.942 0 0 1-.28-.7c0-.28.09-.52.28-.7.19-.18.42-.28.7-.28.28 0 .52.09.7.28.18.19.28.42.28.7 0 .28-.09.52-.28.7a1 1 0 0 1-.7.3c-.28 0-.52-.11-.7-.3zM8 7.99c-.02-.25-.11-.48-.31-.69-.2-.19-.42-.3-.69-.31H6c-.27.02-.48.13-.69.31-.2.2-.3.44-.31.69h1v3c.02.27.11.5.31.69.2.2.42.31.69.31h1c.27 0 .48-.11.69-.31.2-.19.3-.42.31-.69H8V7.98v.01zM7 2.3c-3.14 0-5.7 2.54-5.7 5.68 0 3.14 2.56 5.7 5.7 5.7s5.7-2.55 5.7-5.7c0-3.15-2.56-5.69-5.7-5.69v.01zM7 .98c3.86 0 7 3.14 7 7s-3.14 7-7 7-7-3.12-7-7 3.14-7 7-7z"></path></svg></span>MTC Is An Optional Add-On</div><div class="admonitionContent_BuS1"><p><a href="https://moveit.github.io/moveit_task_constructor/index.html" target="_blank" rel="noopener noreferrer" class="">MoveIt Task Constructor (MTC)</a> is actually an optional add-on for MoveIt. It's not necessary to use all the features of MoveIt, but does enable programming complex motions, and is included in the core tutorial set of MoveIt.</p><p>As an optional add-on, you may need to enable it in launch files for your projects. This can be done <a href="https://github.com/moveit/moveit2_tutorials/blob/63b89e04f61720b10ece95b3674ac8c7807445da/doc/tutorials/pick_and_place_with_moveit_task_constructor/launch/mtc_demo.launch.py#L21-L24" target="_blank" rel="noopener noreferrer" class="">using launch files</a>, as an example.</p></div></div>
<p>To understand the different stages, I'll show how to build a design for the task set first before writing code for it. By understanding how the pieces fit together, the code should make more sense.</p>
<h3 class="anchor anchorTargetStickyNavbar_Vzrq" id="tasks-and-stages">Tasks and Stages<a href="https://mikelikesrobots.github.io/blog/moveit-task-constructor#tasks-and-stages" class="hash-link" aria-label="Direct link to Tasks and Stages" title="Direct link to Tasks and Stages" translate="no">​</a></h3>
<p>The point of the Task Constructor is to break up a big problem into a series of smaller problems to be solved one after the other. For example, to grip an object, we need to figure out a safe approach point to pick it up from, then find paths from our current position to the approach point.</p>
<p>The top-level problem is a Task and the smaller problems are Stages.</p>
<p>Broadly, there are three main stage types:</p>
<ul>
<li class=""><strong>Generators</strong>: provide states or poses to other stages</li>
<li class=""><strong>Propagators</strong>: act on data from neighbouring states, producing new data</li>
<li class=""><strong>Connectors</strong>: solve trajectory between start and goal states</li>
</ul>
<p>That's a high level overview, so to get more context, let's take a look at what we're planning to build.</p>
<h3 class="anchor anchorTargetStickyNavbar_Vzrq" id="planning-a-pick">Planning a Pick<a href="https://mikelikesrobots.github.io/blog/moveit-task-constructor#planning-a-pick" class="hash-link" aria-label="Direct link to Planning a Pick" title="Direct link to Planning a Pick" translate="no">​</a></h3>
<p>Let's assume that we have a robot arm with an open gripper, and an object that we want to pick up. We want to construct a task for the robot arm to pick that object up.</p>
<p>We'll start by figuring out where we want to grip the object. This will be a <strong>generator</strong> stage called a <strong>GenerateGraspPose</strong>, which looks for the object in the <code>PlanningScene</code>. <code>PlanningScene</code> is the MoveIt object containing all of the scene data, including obstacles, objects, and the robot.</p>
<figure class="text--center"><p><img decoding="async" loading="lazy" alt="Task with Grasp Pose Generator" src="data:image/webp;base64,UklGRiAJAABXRUJQVlA4IBQJAADQKgCdASqhAHkAPikSiEMhoSEQ6Z1YGAKEtLdwukjjf+in8r7QP6l+Of8v/4/Z294/Yf9uPUA54D0E/iP1c+zfkV+Y/u//Ovxa8wfdh+efjH8AX4j/Fv61+P39c/7P/A9gHYFTAeoF6ffHv6r+Qf9s/aH0K/xm6QD+S/yT+0f039fv3d6AagB/F/5p/bfx+/t3//+Tf93/vX9L/3n9w9mv5F/V/8x/iv26/s32CfxD+Pf17+y/5L/O/2//8/TB61f2Z9iT9NSAe/MG3VV1EVIV9T+kQJHhm3e4Tv/wdX/wbbSdSa7X6k3ooxxnr2nrtwe2I/lYWxZEl20HJ4Re9DB0SbMEnOGVQvLXzgT9ZX45k9phAZRQeUNyriKqALVKp6bdKPBKla9R/4WyxGZTd19MnbPEEBgjAfLBEMokl6q5NwXv6V57hH8fp39l9pFCX3JE3DycN33rydlPEVXk3AAA/v/lSQTmoiCYYlk3RVL1FMQeuoNqUqTcynlfHFnRaXziGK+rn2VWJSC+/rXQ0r/IqIIXukTkVrV7YN96rRcvoHr7yai/3OA082+OMnF+nHrpnmdpcZ/W03cOJs6Fv0UF0QxeliF9Dfi/uOXTv/FuZU2RHeQ7jw8adepdyswqdxEovFvLIGgC11g9e84cMb8Rm3dFcHss6MJNOVU1EDLyPsLCCCOPJCILJ2n8FztRNLzGVivzoaTGOvdH9bsl2OrL7nVHU2XYbFPkNGwBe2e4we/0fGPLtVORy2PBHmSW8VCwS0XBMsVwmnT3lj4GuLIIoUZDAOx0dlVX+gQgzKEKZufie1fvpxrieM2szdN2VZ/Dw3m7T0odv5Yyytxy2tyl+q6xBQOdmnKCGHoPz3voYahuQlRQTCjg0lIHrRuMchBQlehBbiP6p98/7IdIygpOJWf0nXzxs3wv7NDVHQEGj2U1TFu88aXKOLQu7P747DhF0Bj4H6naE37Rs9K+rSAxPt3NF4zMgQFrB+wbS7b6gOX/P+9N9j3/mMmHGvSC4qp7bFz8+CmOyFJt5gP5oCpUD5DSLyDOP+heAOyuHMKF4pQX6PREwVqzxyLt5MfRT1XaVvxnylM5ieTeycGFSQIMkGsxiThkY7woL+i3Z7CCGITTNcF6Z37Qj05yFdYgz5mYYqojLcqZK3DD2BnRX1SEDLUe+YfmMFMPWKfTItHlHqPw/CNp4580nLsg2kuszWMNQ/dxRVP1FoGsNDqmdBxU08kW6mHmtksn3q0eO5TUnp2iP9dfm+w9Kf0mIOboCERcegxV9Bs/cvumlF003mUcAlVagl0RAgLuYWgIxvurL46Q+/YsHZweNGFPS7TCCISOOnBofpbcWqRMsFvPgW0jrFAEokxy/XJnFLej48zPYy6GCRxMx9Y//s9PeuJzE88fMXYIrx9w9Jo0ajZ8Ofbv+2mNjpJDrga+zEDj2l7+aHBpKSGp4JmwpBdwt8GGjZ+T7/c/oiScSGYmN/w/viuM1MCbbZMDZ0UShnI/NK13SOiFWzUEQ/0mVKzvKbNTZTeG0jD/nhMzslbotDCzrao0ALUfXex9mveYcyfh91S9BkATRjLQa6dDR9dWoh7TefTYBQ6p5JA6LKt7RB9SkQiSkKJonaeZVsJXkD7cBAyuHrBBX8UFrZgUv2oMH+LqYk8B05+WuOhe7ZUersk3/9oy3szPmgenZqqkLmpNzyJVajZTK8s9MQM3c0055VOSK5QOcmf9iaZpQWF72Pq+F8608hDXGHcQHe6MucDz2dWi3NoqA/zdTHmgTqY+OwE47MD1LHEOwBPowzPRbdhcr905IeBKHFmho+x8nNJaFzWX4rfaoFE2OhdUE1M/5ITg6/VoKTbD7dQWXIEFDtQ9As1X3qCIuxv4NsU5FmW24U6skqQ72x3r767PK44hj/Dkd3UfkYe82tRCFYlTE//8BySNyjQnfxRJTNc1rHnmZQHz+BpAmnrd3JfMKRQpZ7AGs8+874x7utQXAAbQ+EJ57n9zMxxLly845q9spnKRstBADR2s5UXFFNxeaMa5/4qzdZfAhP411U0XmsYipgHQSXQNWzP/9AdEtf85HiMQ9xSeFf/5L+1zKfGs6m9lnChNI57dE3HMz1TTMf4TE3hM/C6NGWMuuXl85/TMvTjhn0bH69Om04bly63qo3wSWcifoNpOWtqS6wIAFqg9HIulUWVfwMdjq9ew8vSrTV0sv9+EEm9dNKGKN6Ni/czbN+bJRs/NEE4s6WZeuaK+O+nKB9/7brSVteWKA7Kotg+6/OiuIKqGO//PoxzTOzbYJjxXfae28fyyjG3h/gbybN2ZP9ycDbUf+tvJI3ZVLfU3hRbzteMb3cbyY58qri67AJAwe4Zd4u6PitIIjxaNxxAgP85XqtA2/EkjFPaTHrV9gWH6muRgm83nfXrlNm4te0q0L5wOeLR519kFyXymRoWyTNfZ6P8G/TGoifHLWkPW42KdPxEKGFZo05cSu7oFBDF0lmWTgrBckIVu0TMaz51H0q9NrIiZrAY2pgzQe0fKdd6H8Ba9JxuUSQ1dNVZK//LLLBTrXV/tVCqPxtkAtIhcANPNv0Dvm/jlZwh5zwHAOHhV2CJsoazU/qsKKlsU9X9GK6ZhOrIOtvTVr8NCl4McB84hhSp3tmTM57uKxd3pQByzXfATO7KIpWxahrOTndoWEH02fD175i4feMeyfKC8TMlTlERz2M7o31+qdQuOG0WVD5EEbdyB2VUxTFoKqGrhzD6R2HcJr5zp+gowuTxOna/xjukoG+QeQG1kmrBMNX4qjKcWsnjLDPIRwYsQRzhKIfQO2flS1i3r5/s/jlDV2cZQssRYUoANeUrTGGBK1cikbH3qAFkr+JlnzAgFzFpHwvhSOSXJ+rL1EG/ZRc3xaOcS7vdDlcs2JPUNydAXxnBUo/AHb7eM9mtlIkQSRRacS+4lZocOm+k1YPC5EaKGdiQhSKL1Av8nVPLT6CB1+72Dfjb7Sc7CgcipPm1jlV+mFkhUvyrcJEY/YdhCepVmTkOlzjNc1V3YRdOefKq4dFJA+hPsaKU0GudheCxWOGocAna9shQTx9lsyc843A5iEFitAAAAAA==" width="161" height="121" class="img_ev3q">
</p><figcaption>Task begins with Generate Grasp Pose. In my diagrams, ellipses represent generator stages.</figcaption><p></p></figure>
<p>Next, we want to generate an <em>approach pose</em> for the robot. This is to make sure the robot can move in a straight line from the approach pose to the grip pose to more reliably pick up the object. We can do this by using a <strong>propagator</strong> stage called a <strong>MoveRelative</strong>.</p>
<p>Notice that it's above the <strong>Generate Grasp Pose</strong> stage in the diagram because it executes first, but the arrow is pointing upwards because it needs data from the stage <em>after</em> it. We don't need to specify in the code that it takes data from the stage afterwards; this is worked out by MoveIt so the stage can function correctly. By doing this, the arm can move to a new point slightly back from the object.</p>
<figure class="text--center"><p><img decoding="async" loading="lazy" alt="Add approach pose to task" src="data:image/webp;base64,UklGRsAOAABXRUJQVlA4ILQOAADwOwCdASqhAN0APikSh0MhoQhkksoMAUJaW78fJim61DO/RP+kfjJ32/0v8Xf6B/p+zf7Q+s37L+4t+Qfkl1zf6B+NfuL/C/pH88/Gb8r/ez+V/hn+4H+w8GP1Avxr+Efzv+lfsT+83+k9QDtrwAfiP8q/qH9Y/Wr+0f+f/Tetn+m/hL7m/Kr+Ff0AfyX+J/0X8T/7n/6PdE/kviDUAP4f/Jf6P/ef1z/tf/r+079S/uX9j/vX+w/pn//91/5R/VP7V/df2s/oX/5/AT+H/x3+rf2n/Ff43+y//v/WfZf6xP1w9hT9O/vMJH+M252deqm7iaEMi4+lqoTGrcYhgvZCOfBfmd66c0xbOHAj5OjblnlgGyyKPbM5jdf9oUBVnIAWcgK37WegXrTUbMKsMqQWM104Igfrc7NksiXr6aOElnbhwAarPkOzbMOo7uCCi3LjedaZtP+LzTUiP+urtsfxPgkQtNvaakXtSVkDnxmno7ZSfOtcKRkU/ACq2f+xbQPPvFUzTp5P8yUi4/iTU4P0XcRyl0bNWlbAIXGOUxwyjvPcbRxHnP2SrcIcZ9tmXOyoRIfRXn693aiIDpSPND/rfhsUI4Omf6V8gW7s5v5gZje0GxyDHEw7vwy/QPW2+nqNakSAOjWmAAD+/9JMd1Qy11QsakIFwi9WVruEVzxd9SMFpB63EnLS+aDNnd3aW99atne+z7qODM/gKlZfNc3Bp+wzM7DRV5thAL8zIHDY3P/CZRW/VBbGD+RYxndx5zvu15cQ/hcrZMK6Se/HVCxqQgXCL3Bgf2HS3t0h33ez2TcObJ6kzyhhq4SQ7F6zQ6ZiYRqdjVKJ9XPYWRnQiNrT8NGiAMNsJv1l+KMJDUzBkTLT27Nwk2J+HCkN51KlScK+WHj1AOPmeudIK5ypdO/ZvKYetGR+x9RXGASJcf6+Y6lR+vtfkvJ5yPRdPxDIfSzI2SqIWLGyBFNwzfRMV7zredvkhvP/7isOd+8clb3c83MxiooE3UMXoRfDIch/1hE0ub85PRWoiNtDKtP+seVWMDfvBgsSkFb608IYUSdjTNRDScRMf71hUCNr4U3eKkozHxIDRfDBLFfISlenFfTyADU5IBNSJR+x9hJtd9CqYSfGtnLnwR1s/HMsYD2C1FMcorKx2Z1o/vRyOE4v1Qe6+ui/1xq9E27QpiHkIsRTs4iHfVq2y8v1SvisURGXpNppyhAZro2dzQbLaobgoQJWC0CHpnMlLHkBMGz+ng54RFLeOhqYeHTgle6dHK7F3Xyph6n0TSpGWpRKsLiF79UrF9t9wsldbEQhKGGbhiPdZs2Ul8/m8xSW2lXM6AuqQK7o0j54b6Oc6i1uNKAayGC52leJobQVMLGSSmA3ZiFWWmqMA3GwgNNxjm6JCtOza8Nl9f2MOhxIiHc3YJXW8oVF7tx0F++o6pRJZFzN/ORg03GOVVoUt9QYpX/D+7ZD76W/6WV8zKsqsoZ0u8BOxtlIm+anEO7yrfYgPSgJ8Z0NS7vb6u0/cnVEmQc59CWU2ZHyGnEEq1d2pTAriMYYpc7N2ioMGDuTJlD0cVpH4ooGpVS9DbuWYcOTJ78Mtni5erkq7I+u8e2pY4xC5jqYxAR+InHzBbJTMsG8cTtT84aXdwaQ1XB2aLoG7XhW40Vi4zhsk3BVtus5AS78RuIfp9/2Sx2Og9kXZC04+mhTdbGh/pC+wnL/7sBlBdXRpsb6PRyJd2RSSU71e8Rdwl4Rg9ipOIe21u73/8SZ9p5QqcjTRJzaP3qSwTpn8Zs40m8+CMFOXaqySUoHY3FXZuQK3jAXIu5i4rSn50XIkJU4JMNkKJzIpk/BkzUec146nadusmOCM8wc5f5dseYK7ibvudx5NW9sz11dkVFmAW2t5knBGYsUsy82+fMxZmU0A3vUopv1ePUPMm///Bg4FWejk44RPG25ckxa1aCuz8Q0YSBX/HBHaMB9NuVdzB9BXMgf5khlxvIbEXv4IIsxChy2JyP7GeqPCXLc0GbO/1VuLfmIehgRW/WgbgH2LXcObJ6kzyhgG2nUTxxnGCSieGLOG6SZAgWqIeLMA0ssax5x9cwBhtRWLck73imi2inw+JXN7w2AdVzvb3kVZZEJuQAOhxIiHpkfgrztwtvtZfo7XvHNTGtNUYBv7VP1QWPBxopS5B7ze6AqUNNj9kxKZVMR+74xioOoABa307Q+24mBw4PnQOIwu4utU0csKqjEZWrYPgzEsWftojOKKjR1DfwmIYact+T1dOQnusQ+6eYQCs5S/lmyLlNe2gOUl2qz1sob2P44oEJvvmyWT2fhQanLOssuUQKW6f1vBLwSqfvGbPuCIhIlFzSgIRv67kWn+AvP6pklcJdOC+uLfhTgv9UFFxANeJgXtDkxOupth0C6bDK2WMcOxiMCOCKebFy1W45K21pQXv30T+vwfM7fOVY9/kYdNZsLzvbLqzP0KIO5Oz9z+5qCW2DWbafDIBYTO4cfyghgj1RNb+b29+uZa2X7fdXd0umEyqM9UI1ibSmAXjTgf+owIon1Qqs7QDm3Qla8UxwYZY4HiXEJqZNFGd8ofuNIwwFPwk72f+BVLWZEc4SLue4fb6oxtQ0+VS3yMKysA6ooVoqY770RU3SCo/Af6hOp+8+5vjnxnrVDpPs44xGA4mrSE0WnzRzHxob8UWv2CAjR74keo65tQ1fCfLo8We7HLTNYw17/yTQhu/vRK/zPtTb2FAgmP96qh/hLKWN3QAFW8675L24OIImx5Pxv6Ra7cmwMzH+tjmteT/aDhpCVbvpU/0kneJK7AEPumHhLXK2YmINj3u8/SQWU8oHsrRBKwVj/Yy4ek5WlAf1xvgiy02TXJLHUh+KxQGFxCUGb9mG7nyEFzyiJHbHRs+nathd05ofiILqO40QdmjIzNxECuSMVn7Oo1XtjSqBpv1oR/M0FHbP2nwuBye7s9oE/vb4GxuS8xG3qYwr5ALXrPFJhwgnijI8+yKcpJMd0b5genLblGzkyyOhz7v1rCA9zHaGqEalb8vETI91Z3S4dYhrmAG6S1rue7ptvygaQKO9blJOza/UcAifUCzpiqHUcVDIlJEHy/FgRYjiaqqUWyY1pVFCHx6dLHttOvt3KJO1hz1kVnn6AVfx8dRWW091wqtCi92jT5oWT2rsaLAHK5W6pg8P/RjCDN/8MitkEmu/kHktCbjhzL8uHh5iqgqG797xLh8HAx4xXAUMNwKUQXq8ZunlDT8d8nJ9fyJ32wFT8K/7Iam06Mtp2o6FQavR6fJSGbtMjoHZdE35pOfn1huOLgVtBdD3q47djqEfxTEggyA3MlmpK6D6F57kTqMXEHsjkZhMKeH85CVxG9d4KEZrymARWfcpeWB6p6ACCPIWCDzlK41tpynJmuXoeC3xzAyjkAme1U+s/WDBsn0UXJAVu5weDg0CEp121Qva7Ogpc7CcNS0xWY7wPuaDTRqEdn6RCMlvc2Bp17ktEVWmlLFqoUM0rosV2ryW8uxOdLIza+vu1hAfbWkg8akZu1a36SK0KKAiZYmPoz3Xu2PqDqG+iyNDx/QLjFbYrC3dpSWu6iykWI/pAEp23Ztbwgrzw9982mVLT99s1SA0EJbBjnLWKx75vHT2BkcLliXkTL71gasJMKRjTWfSzWYBGJ8oPGIrrpcOo7PsUCv8oIPTbxkAyNGIBbiDWMZ4GETb3QunFX2p7qHlmXfICVdpbFtBMsqcWqh8N6KFMPOJVuWi1xN7fmdH+CPf6dk6XT0W1fUvBwmWMDYnSEzbBANCCyuYj2wbH7UOz4fetbD9uz6VMiY280LwW13xmqWKT8VUer7huzjuMNwVuTIyVBFaHmF+YJ3rGGoC7mU557vymwXZWRQfdMrreErV6Cj1+5QIfgy1Xs2GmPTgUsoWXfzI03pXUDrIe9Gp0R/flYut8gSU/FzCDhDG7Vx+3K1qm1mBN8pqUqD60wkw+mvzPis2Zd9PEasZhnxLJwaaZMiwwRzOspP9aJYaEpgE/T8rNpqlNDkj+6wTxDzxUM9GqsIIR+NCfhw92AWATepdVaOAoB4QwwYqA1Ng852kbtDWiiDAEnQZ+sNuARgu94gBFXgKT4TthuAjs81zstk90kW7XBbHmYp+firXkvpNbjq/ClmvXbkQ6XVd6NP6GYQ5EAxvn+fnEFWj8cL+dwDDGchQfPvrt/jadj80/nDLVTNpR+3IcNCkE6oZS9x+yYqcs6om7mtmlbLzEPoXC/ChVXckOq7kiF/VaqbzdkLlqN6/PW9EEn4WvQZiXfQ9A9p2Bil8unAWXUICW/Yir2o+9iM2YhYgTDdZyX4DaQkZSCKEJJlNxSBmKG1VIH0lxc3NMfPoxEIjaXXSr1CNHf036o48TWkCW5ltOTdpxQhKeEQ6ZixfaXbuUfeZ7HsUEFN5uMFMHKCiBn6hXue1htIMKlx/qlCPp70S2jqNUcsko7EX0w8UCWIXtR6vm9frCMuuYCH8suaCeFySbMQPkpdCaXIh0/rX+jTlKBteLSXtTDZE9jPrsjmFH4+9pwun9UySuEunBfXJZl8CHJiRMVh4+f4KVGZdP51KOqaZXVLFFpcMDGooSvne2qrokP+RRO+jpepHxkJmd8lvfjUeIKuv0sJSF8GyMvN7gl0mL7c/U4hi9p0/muQ5aoe394RBFrKf6aYS/L7XjWQXPdYaklI5OBUvQpSyZSp164lQUOTosEauaZBPw2W6FMp8X/Rp8h4rzEzBrq/x6af6wDDLFQ7GQlCvROlv5ZfJk4fCdWWEXTcBp/gBO1+TB5JK6mMZxWD7G4/YXVC2asSaCqxvnosH+eh2CQta85mve+m7/ORx2gYQ3hXgAe0OJrwYOSvgZANZseFK28UvWvDHjDVD2EqYEAJ8oPjcp/QNrCRePMusaV7jhdOIyBjyY0wnMpFYadQbOSPSgW8Z3kbWmNrbkkR20ldx+AAR+TEU4E39JW22TSQPklTzziYPZQ7uuSSZcep0r17Q1iw4LfcxhPIAAAA==" width="161" height="221" class="img_ev3q">
</p><figcaption>Approach the object before picking. Parallelograms are used for propagators.</figcaption><p></p></figure>
<p>Now we've defined the approach pose and the grip pose, we want to close the gripper on the object. This is accomplished using a <strong>MoveTo</strong> stage, which is another <strong>propagator</strong>. It starts the arm from the grasp pose and moves the gripper to the closed position.</p>
<figure class="text--center"><p><img decoding="async" loading="lazy" alt="Add gripper close stage to task" src="data:image/webp;base64,UklGRggUAABXRUJQVlA4IPwTAADwTACdASqhAFABPikSh0MhoQhEktwMAUJaW78fJka61DO/RD+l/il36f0P8Tv6R/l/Mh8a/NPxR/Zb3o/yD8gPQLxD/JvxD/f/5E/hf0a+dfix/bv/D/rfe/+Tfhb+1/+v9ofTH6gX4l/Df57+O/9//8X+l9QDtVwAfiv8q/qP9b/WT+zf+n/M+tt+n/hz7kfUD+gfg79AH8d/h39G/qn6n/2z/0+51/PPFMoAfw3+Of0L/Bfrx/d//T9pn63/gf65+1X9I//Hu4/Jv6d/af8L+z/9K//n4Cfw7+O/1X+wf4n/F/2L/9/637QPV9+s3sK/pb95X7///8l9HVN2hHU6Lzn3EgfhRNxNmDhbYZVm/vhKCdHrXTmmAQf3Gc2jrvnDxCKcE5nBy5wgl7BZXZPQCzkBW/az0C9aaZafkOOh1aprf3WZyoA+gmSW6GjRhRssr6BPhZuM8YJNBJMfHlhqrCV4jCfghGUuqbspVreO9xOTCt9kokU1ZmIyueiqO0+2Un1dmFtXf8c2MCOnQcFAzA0/JNz4QmhkkXH8SanB2zQLuOFds1aVsAhcYqXukJC/8HqcAUy2YY3u4p18IIIkW1jL9gJPu2s9L/tXTnJUBBaFJkRvv2ow3yBbwhsSeI3DGP7DuWA0ICHBMfUrehheDg0Iw156kIcGZ28HPUQwQH7akOXssU+Ru/Gjk3IQWrHkoEpIuJ557C3wW73bmDFyjesNyvXzr7ljpcUtgHD1EGvZBnzD4UePsQy6KFKClL7I0k5EMiM9Z5fAHtO3nGwy9Ylz68xJC93cgWyVXp+VZXL58wYqv8o+jhW0Nwc9Q8AA/v/dFlht0T9zw0ClAxa6z4FKUcu/dDQiO/sUTEQypBva01tlnwffHsonP2kPiEtfEPuAIEXdNzwzL7XTNFyOJ+APRG7w1xPDRUEP+clN6JpsCl4LOCRFNHAss+eS/14pSlkNe9+8loyVutPljQYLzATgFx3IxMQp4KiHFXaQT7xvzDfjS898wylZoR65+0h8Qlr4h9wue2i7nedcIl4TdPQXNvCAlvyuYIuGs8XxBCXUZa8yTpD/63cFUTUFkoqTvzBttP6fXvzgzMOrNVXWcxz6ZDGvDtQjccxrGQharkU5P0Hdqu0bSzG0El92Swl2sYH83qV4DmVMats7xTOMy/9uQnmRBDZmMfkW3GpW6mzIxi5NUY+8WyDrl1LuB51C1lp8cr0TOEJmID4KtKT9ssn1EenfrUaBBzoxS7CReyf4bH2cpBXMKJa4HT+V8jXlBi5+0zMETxUPNtPhwc9EGRFcYzBIGah6qAduFu5+4pSHVPjj0BcD/vPZ7kyy9P3o25oXp3p5xAjrgSNB9a+MIGKIu+68rpIDmdVrSCC08ETYzXmMken8iGKOlbiu6zhjgZE4jxF/mNS6jiFeb4yFqDsZqmVKh4CcZ9JJj2PS1TFk/dPR+zhs55sAbvM+r9C5v16AgrslOzfvw8noapQL7xsl8wA0j2yW4oh6UaBvVBdSJ9QA9P4HWyTL2b7SaLdIV5F+N9MF2EFrATfq0CdoG5vAdjAThMYRLxwdZyU3QzqSeEvHEufgWWfPJf/b229+2a/oZOehunaBubwHYwE4TGES53veclNz57JWn67EhOaRK72Bol1nn6mszX9DJy5yNe8Wkmt/0LS6uETBa4rwG8yo09eT6ja9vx6OZM1eWwHMvKviGtmuMSwTzYipQBaTKr5wrsVQfE9LBAxes5DK9RG7cSJmnJJDlTxMnM+8NDAe+hfi+3VkEdOYoViaPZdHN6iCctGOKDXvGeXd+SqOZjm5CTcls1kpMw8opLc2BzVsxnDnkOYWcur/1/hRvfyaw1JXWusWWakKXAB9anZkyOdrRW1Ov5JnWH4CVnxQpYcCtwH2Ouh1ZsZWey3XfI7BG3CTUp8p0zFwQhpcE//peruElZqAbqTrEH4UmMed3Mnf+5u13zi2EQha0RCC8jteWnIUqAqfzz6ewwXe+f6mNd1l4xklclrLyp3xj5sobrHE/FuItPZWN/seT1jAXesCABkkB2TDZ4ZOZo7qxqyzfqJO69F0vo4cO1g0VnfkNh6sg8NPgvDxMt8D/iH/+DDa3aX0kzh5ONe0YVGgu5s08ekq/62ywEkO3Wq0kSP1gpBki7JY2HazyK3qQqUOM7d9s8Z9hkAo3mi7UKMRQkLNgxquHaXtLhtlVEDZ0odgndSM1c7h01FjBG/RDHDETwSwTc8pLi0BpW8GZDY3/NVg8prLSNUAnAwi3mG/Gl575hlKzQj1z9pD4hLXxD7ffi+n7SHxCWviH3NXg5pW8GZDY3/NVg8prLSNUAnAx9ufptCxLkDFjS/t7CNOGXDzN/9OZv2iVhJCsFLxJsyse2TtD7aJRGpZCyB+X/Teb+c1DtY5+THIicbaAPRhHosLlLb4W5NkOHUjlWDITM1oXZOipKWwAaJeOr2IvC/GC5WXlbG6u32xTwMZZuvT8eDlq8WkME5pP1+CeMQ9WYfcqPniaPlVMXJkQ4yyn2gMfnUOKQ32YLEg6qXN4QKsuMBoH1R6MCCL0F/TIQgXXaXvNvCKmo1EBR8H7yqB8HGdX7MK//yCqPUZyghi0VsdyCHx5GfvOVYgiO1DkSycM30NnAgPr8X23BMz+5lKEMGquUesUwxmCA5Ut/9mmrUNzyK2EGqlhKqEHu7s90e1wTiv9QdqU2uio+OO/9RgNwcZTSd8YS3BX2BBq2UMpVqxUMwr6jcB8RM7U3iWEu5zfLKkg8VxhTKeAVG7VPtbV3zfSqGRwGhu38k+MUkkyxq1atl6K6bGiTKlYhFMBUJCSBW7hiy+Pv4e1BjMyuymPXxyBZ4nuHijIxWpN9K5OQvU861mxJj//XzAQGJycN2FBNjeYKhPyfegCrWpvbt9rZriYHSH6gbnc3eeHbwv03rvucmYTMyrGVzLj78fe2au9aUpVNP56Z+JwegmZ96wozc3rikg+VYClYvbf3EbyIbmKhF57YwkKH7Q4TqqviCmO5Uhl/sj+bB/gn+so5hEP0e/tWG8z9CsPaVEFUO/C5g8BxwKVK5wB9Mkf2vxZ/ruM3HXyIo4fsxz7z4uIxxgM/M3EURwIgCEjtFM9/F1qaXwwji5HV4dmHwT+2poksxyPQrMQon9EG5N5mTOl2XZe98eaaMmURYTUaDD/YLqqTIeG+jJLr+1E1L9v+LGO/nSdiX8kthT4y1W2Sbof1lPxiDA/ttJLoQqAdoC3ub1hwirhgKVoe6b1vjl1w9Eh1iN8N9WtAVcgDjY4+b+x2Q7WL0gSm3x/c+m+h4yWc8xMVOlHnHnBBuMolNSkXAr2CoRqq+JsSRqwY5hXYQMR9O1XDV9qPfIIjxnvVpVFPxDVp6GFLHeHZC/Q/vdtOa2TkfoOYvL1SaYqWCAlzA3QwKJHrwc4qTpejKrYK/CfZxZubNkCKplbxwDG+82Ha+RkPzx7U9ZSSPEx2YWatD2ms6ow1mV3yA1ITFA417d9pT33EOaNxQNNfBzIdV0F7Jm1idnCztIh7545JUbaAM18ha6Bzd8sLoitfLsxXhejzPs+cLsrRTSz5PQarAgKkO5f3s65qOuhr6/Brf9CpHAXfRTdbN20rtvtgbB4/jkKFqw0gi3NZqyvaOaAJp50TxXLTk6Dh5+72R3sDeYtnSo9H1UQDIJ6sQolMacLankG2HvHq40kBBaK8MJbp5jcRn9sMaAiLzPZXvDv+udlvRqUteRFv0zL/6Vy3DsTOGahaWtE0nM+ap5H4YUHtFOzYTf9aHo5GLNT3igCLnZUPuZBioXufJXx49gUwYzflihly8aXuX7mJhXAWCijUeH6+C1f9+gw0+B5Os+8I7bYyvQ9SPdzn5T5CTJFFlKc4B1pjDFd8SPP0iA+NS7cE1usDwJfHXOU45GQo6CgkjX/5xt4DSO7tjXwgUsCpqRNnD4c/ZogftdjgSYi4ZX18oyBeihdv2szaiZ6Ba9CJEHvAZ9Orc9J4LpM1s9MAPJCrZcBsHD/uzggEwAp+HXp/uCHLuIkn8jrYNTfVdMqwKMq5lQxio3UnWICutDiC5gu11Ior7fkuJsJRhTCPxn3p8meMf33/V0xuj69b2tSYGVPxhEMqL3CDFl1YPhW/qF9joP4u90+i5Y8t8f8VxaF+JuHWrkzwtBGbWPFTc00yjr/eU4QjgZzgcZqB74uUPs1BWUjKR0PJkeKjRWarW0Ka/AzW6zyeMiL2xbdrEYihjdia+RhvSKkw1TTwhSbcbk7PT9SZXJrfQ5AF2PxkBKMhWdeRjqczlKtR3aJLS+WrH33NNbBdPBp0y9/b2kL+gfWxYFVc38VFnBIV26j+4Uo2JBZGN3WJF2L0UXSx0fyOTfgNjgFYOPmmefaW40tLkckn88SSeObZovj3s8b7Gb1KfyPBKMLJZivxaGJzsWFMphIy3AnbfPHP5cDcW1H82xFd94DflwgQJvKtiK/W65+xE+c3LPeVNb8ZfV9PfyNS85nKWBWx5wcrmitwKTABHyUKKKMSz4kzOqDDEjuxHABRy2Z2kRacB8OYqUlDOm/bFL7N/IdcXNVSKlQWi6QK+hA1f9fz7fZq8aie8N2wWVawdL7VlhaU/B5Gu+vR+X8f2k7hVXWpOJnMwHZaN9CoSTsBQw0fVZmB3T5V+dgK1s3dEFkdgDYMZ5vdT6lHKOd9sqWZOwOVOJPge67HLsQPRmfdWQq2Y0bIW45NohmDcOOjwOVh8pMY9iCS2ws/XV7EiihxbNFEZLfU9hYGVz4kMCNxzT8R82RGm9LeDzrgDWoLYMX4NZqFk2UapSgBNElS6YYx2aV/ptoA/nyx2+buATHBzJ39sI96moCyWgxyiE5xdbX1QF/9JcriReiEZFp3XmJadQAMuTfwLLEBk9W3hh/0aWc6Ctg4AIC7AgtcAaNffCT50hCNKj+aGY5hwuhkgCSUsaj7FgNZdSTTvpl09HV0yNuAHX1QU0e6ApIda4Yu+e9hEhYf5eB9C6HC8XVpVid72dY9XZoaUrLXWCebp3EfJoJBXawFq4YV4v101SgslBZkDbMhYWK1Vu9LyfClN7tjhXWEzyO16euKUyNS61e2nfURJbv4BuIc1T8KbfdIomS4xCJXdaEKQZXHOQMo+0+z4sET7eVAEg91UO1nE92A8bPKOLpsLwQgCuszghnsZ2aTCB5NOBVrgBWT/WBcW4wYagnwS+AQ/lyFsMkqM4u2NZixWX2Qk6OLJpyneogDjKWby4DQgcBDXPXc/jSSYRiaumJUPQn+DSfqE49dVzFuRh8ORyxUyniiUzxW1diFa1OKyKzY6yhWJqPFhYlLj5J6LhLienCt8Kti/8kDJEnKqTgC5vTT/spHwufjh0T0kSB5pOYrgRY6p7/Ocdy8WJqYvApcyAFseQk/qRJr28Yp8LH17rCI/iuSr6xIN8MdiFOJ5qbAaG2cc/HH76weHLqKb/MeoygNc+lE9XXy0rToHJIsAG23d5VUvoKoy8MTEAbobCI/iuSln+r+CskfwbV+eubQha2B0DPVpiXrgtqX636O7IzwwD3Q/Rie416jVVKicpYAL+3/g6p3GDOntvAO1+h422j9ZAMS7GVV3rHtrHXXNzlAE3llxnW//nhRBvm1qlmqljogaFtWb7gNSn9un00lbTa7K+lZNXhYcG5HmwCnaLS9fdr4VPigod50kshb4hu6G4S/eY2XadGYO24pcC3Es5OlXxfaDtWAooDb3408BhenWe/gF1zmsmojR865RjI8gUIDP3fLGirVT4FxgfllzwG81+ZN50lnbIrX3Kwl7ewCqqVUO9iXieeCWO8bpvLrpOkF+6JgMLGTnRaoNy6zoihtgC+0PGfEHcwbj1QhxJRZlYmIO31lpfwGYCNlHFB0r8vmz/suMsxiy5J9RtSLnJCFQVvm0ObVRz1gRxS8Prj6+fFSzAzTPZtA8N0bqF3a/5SIdY0PV07pqdCRiB0FJxKT2PbCk9SmZOaQfR5zgXkLQz1Zvhf8Jn319PuS1A1K5oFacXgPfTdmVY3ac+S0MxuSHPH6QgMuyj+pJ9o1qjvo8FKBBiU75Vc7xg/0av8SvvoQ3zDLb/pzlXveiPitLJQuQFaYJ6Zj43L1dFdQzqI+MLF5sbYTmKLzErro0Ev4xkvl+4wKNjZ4uinIRWWu08upTjMJ45dRTf5j1GUBrn0onq6+WladA5JFgA227vKql9BVGXhiYgDCfeLlAzpMEQgcG4eqhHZcRmVESQLprlpWnQOsqFP21ZbkinUV6Ip3mZoWq2cc/HH76weHLqLhY12dC/hvAHhjjEI0a19rzAog70BuhoVRBOY7fW1Sdtz7v9XQ5Q8x794Qc/025EuN+SpLyFCJng83sstUHMt+zcj/eB11+FeTBXO2edEo69z9zmd0dEEN9QTZciFsHCUZwGnkvCN+OmEWgEieGkPVa5xZu+l8nnLVxnjzLIuLpaFIrKB18p/isvyHbcNDt6B79/8DMu4T7YZxKEDit+VfDR+lQpL9ds1PW6lXeSRdDIb9Xn7qizFCd/7KMsP0pF6MNu5KHDI1ivW1nw4FjaP1/atWkVmLY1EXnbJg0+dPx5xtumWbg1h4ZvZfRS/EJn+r2Su+bHQdLmGTR/kwiQerW1AQndY3TzD+ImeWOmKrODv/1fwgFSaxNdH66v5oQHA/d231zuUyQAMF22Umt/N0XrP9PzPExWYzrKEuXyMizvxFXuh+jMXAfpNg2o1IKQWzjfRf9Pnw+OBzmN9bKTW/m6L1n+n5ncMh1TuMGkDUAODcPVQjsuJLdE4CIIyXeHnflQAAAA" width="161" height="336" class="img_ev3q">
</p><figcaption>Close the gripper on the object.</figcaption><p></p></figure>
<p>Just like the approach point, we now want to lift directly upwards to lift the object. Also just like the approach point, we can accomplish this using a <strong>MoveRelative</strong> stage. This takes the pose from the gripper closing and calculates a new pose directly above, which will move the arm upwards to lift the object.</p>
<figure class="text--center"><p><img decoding="async" loading="lazy" alt="Add object lift stage to task" src="data:image/webp;base64,UklGRpoXAABXRUJQVlA4II4XAACQVQCdASqhAMsBPikUiEMhoSEQmXWkGAKEtLd+PkyL4A9uWjJSl8Afz/8VPdj23fOP6V+rP7ef230GfI/yv8Uf5z/o97O1I/h30a+Yf1P9YP8B+ynwV/X/wt/ID2B9N3qBfi/8Q/pH46f4L/4f5fjma7/zP8VfgC9IPkH9t/G7+5ftL6QH4ge5Hyk+4B/Ev4V/N/6/+tH9t/83RF+RewB/EP5B/Qv8j/ff73/cv/19r36P/X/yi/0H/3/6nws/HP6N/iP7r/g/8d/o///+Af8Q/kX9c/tf+A/zf91//X+++2v1Wfth7C36k/ewSPRHh26yAOHNlV/hv34ztZXOlXCcnbIuj9+Dryk0JxRVaMn/X43XeoX4nNWg/wosTHtgHU7hgn5gGbAbd6nWrg2GXnncsOefveJK0lq7va+l2nle6fQ0OoFJaTFkd+B6Qn7iyO2g/4DLysylQozFO0hK9Vpru/RHVqdnCEoGYwZhokneI2dqeAynt3T/nj/1YPyF/GhVCJRc308isdVWB439hofbJHPJYY8ZdT3iiidjZvQRUAvlTIHmaP7DHj+0zRwptogbttKi+XCDNSt9iaZcelQltYu2szdnlaf0gAia+g1t8KKVOhbvRDXoNtksMKswRwAhfNYzn22sDSEssc7eZ28xCbdZAGS69G1xqoUBbXnk0lciLO084BQGOWL0g233Bvny0HmXr502jRCPQShmgXCBKAA4Gi630vpUTUbHI4RUNTOHUGKLwHgPFGiY34PYkb2MF7nQIGMRmeEt9Y1fEBpCXtPdvM7eZycDw7dN6VKKZ43jUO5mUe1oN1JoftUNbkvBm8J2jTko3qcrbavKV5ipuk2hjuxmFF0+xIKbF1fcexjfMGVvBxymC2d93P+rp8OPCe9GQIHBSRvdJnDBL5CXyEvkGgAA/v3P5QJUnv0ilIS2vsneezD/OJfjaci/ENu8zuV3GG9fa9jCazJhs4UA5rnS9ne1v3bKqFdUAHAFOiELT+6bbUGpcX30RbIiG4hCrixKQNjQtVm1zGieDVkgPqvniOc7xpmU3cyN/xE76TZaw8YVn/tBk1wjrZBPFsTkj46HXOiszticOJoRaD8o5C5i4waLL/+prCWhgo8OmOrj1l/AMCrUMwjz70VR/xJ+RkWp6UH7JYsv6JmHHUjnqs3UD9bi+I0xIspG0+Wz//qyNC/EId2eSgD69NwFdbc5D2Bfgsg+u0RYtqSS7y06zHLvWwmrlPeevNz/7juVllX/7+IKHTGdaCU6/0RtI4glsLgSzKWN1X/UT72eORd89w8MVowsAH+S9RL6RFx6sF/0DGB37B7fflQl2WrhKgrnf9ccGE9d1hek2N8qIPwIixvTZ9TwOQY/bZ/bkAyEEPR5vo2z1zAVrerZp4noJuoY/rd0OQA90n/nBfbUbiHpchbkYmosVoWXAEqqmh4uguz35mP8Nrf9nFfEjNDxhq4EwW8+cloT9GzB1C++5TDcF4okTP/xPMQuYaJePChS5cO4qLBHLyw0HcxY/oDs9FhascBIabQAAOCBfBbPrpwj7fn1IJea0uj/ijMLZkt6gkdx3y9UXX1AQNSMaYnJbX2NtoxGOXMR3/oEAuJvJb2g3r7XsYJihYLklEje9ekYzwQNSMaYnJbX2NtoxGOXMR3/oASEk2JKN8Di7RCRNmuuk4PKcU1Sl339UQz9fq+xUu4YGMb2rhzbWzaz6NbxInI6UV07fgAQNV1mvIooaGcEIsGullvIYeOigWccrxup0VypJO9UaXUcJi5KidpruZpnrih4j8pROmCX/7B65CABoAvQAKjVja6FAC21dJe4NVO2/A7Z0VOqmyQsVM5vZdQGq+ViOFbVHJ1uS1169LeeIRXD+Or95XrEyiqpV/1fSQoo20N4e+C2jPqa3HJ1+bziaG10SfmfGIa9p7388UfgiuZKnuvRMgKKMDAvB+MDfzokfZur8oAJ2otzV2Xinz0fit8sQu67zJRCqEv5OQcbhcKkdZPuHf3AgQk06jS4MAGohOWNoxVjbJL7R9vVyd9VAkQ3OHx9EuM1wvDGWTokdkWsxTzEFiJBaCwIz9abCr8kFT8w6wRwAgw+u2CXmeCcMzAgJ9vOx8wyGkpnL109zC+zrljuxApVxw6QjCr0p+e/T6j2jccw8Gcyo2lgBOdybNduhjqSrFFUKY+O3a5Io9rNBmQcYvgg5kyYfDkAY9rTfibQJpA1MHmNE8GiMmCMgjMixHUhz88fDqheY6g7fl2qgXC3yoVQJs/R1zaLQN9w3QhfYS0N8ItT/iYzodc6KzHZAI9uO9RUqFbeaFLF8KVQ9/YKHYomrIz2cIgogNIxty1VQflHIXz/KhVAmz9HXNotA33DdCF81JTawQro0/SPa034bpXqnvHB5jRPBojnKRzCX9UqjPDMSM2SibfxruG/nffZaSanULZlpIuP7Va8yFTdTbsqzRnDq5//Pnlg301im8Gc1LzQ6XFKvBjOGXgJnNb4GkDMTOAOiyNjBVl24NSinUKH22/f/7iaIGlxJHX4CL0pq+PQJiJ2KZ4BoX2lrH7H7xHShczozn69OUYHMBIYhqIb5stqo26Z2ImWOllYtsDGhhV9HFX0M2a8pVgGV/kzfwY2OjxMIB+okU65HS04BS7C0tRULrs1ATH6SG1F6EPsBj5yhKvzuTAoUkMfOtepDUMXz37AU+QCzpe6QaqnykoE7kjv7u06ZiQQ9EeouVs2J29VMa19Iri6rv+ecfCOxGF3HyYvA7kyI79liUwYt+E+KKlRAv/ZGVveHtQ63z58ZTKKvEU15DyrhjuGwGQzldF4IyY8aSAdRDfQU9EbJ3BcgfrcTs6k8r+NM8djjjQh3XDaiJc6LK47Qaqa1kASGAdDmsWXrAWT1I3fNyFxdO7CWKsPiZfDgo0GS/9g2HTSEczqxIjFKlQ/09L2P0tA45GwNyVNW8/cXbGSz39cJH/o/ok5uEau5p8ejUji4fQ8khy68BYx4mH8i4nAiEe5hiUENjvnwTeBXip5wHzULJG9Ljam/emrlhU3iykn3hjZfCSetX33invXGmFBQBFXtwY7udvCpYkQWmFj2DZsXcJvUPPBWdDMfK8Trjbjs2q39rOx98ZHKb/he2Om+WyPBK+WK5SEJJpff/l6eCnBisP7G8F83gz5ImS0G/ZqlHtvir2M6JfDria6+AQzn19ySukMajldmEV+IHo11UXjhpltWdO2QKUZqmA41XJgtyOun9GW7hvZUe0iVa3zxJipZU4HsggbV1vDQfqVlPxmr2YVHi6yWtZCPnBhjVdAy0hdrxdjVDwuHakVeNZ++PpQm5bc8G5wlx2TCMJJge2xrzFipn2cFV5chzvAxc0ZgRtLJU5WbkJhc8D2uWVqs5gwH/YxDt336PFJxa6iMVdwJQpBQdQtVyjXCgvgArfweLgx66apUP5iHE/VnRYevGmWIdauKZpuR46tRN0/tkTb6MnhzpofnNIhla1mKAyYdjpWF0D7tSW06mTOKh83Vj2HdmVr5Qy9XbsLAyV72CwKrWGmH4laODMGskcD1gjeOgk2bq4nW+4g1L2A/lPw7HZ8kox3bcbGeMW4ulo12wzxQVs6YfTP8ho3f341et2gLKhA2i5mXbxqyfne04KHwlB0ZDcuv+5E4oirPvat12utg6vpxwF0jj/T240yOL9CJAEkMYFJguZmo5GEFgQUa0AYguU+KnZ/j03/eip4pSwYXLxLM5n69RWEcl7o7Xj4k9Vj8NPDBndnXZwZHREFsHXafZ2iG863vZxL2ZWh66x4HtjSh3PI3LB2gQH+iDc8uCHiJEv7szObhyrMLYIVION7QrwmwQer+xQGIEhxEtco3jeW3aJK0Ga1vVQuEoYqVTIbUVkqS6+XHihwVqOUOu9XF6c60PnwPC3imHAbRpq9uPGwbyWBH+Av+niCOvFlTTRGrSy4MskK1WoaMWSha06omA1fHIW6deyODhOsgdKABxM4tHH/Ztq25+Z0uGCQHUDIJZvBubrAK5U7v7vjoCXvKRMsaVSJeUaP3yXCHZceEAmDfiyx0Tf9ZnCoG1VwH0Xewg20+qaIMJWDjgjZDMz8rkHHbEm00TMlLDFkCwLnswJsy3nroksq+rtF267v5YiDTK9b2OpWT1Q3wMemlKKHwp3guuhr5dQecTQhbupF/LqW/drDODLHasxLv2LkIpux99LgQ+tEZSfAy4fluLsoxwiEy+1XBOl/Cl/nnMSH5I72COgsimRrub9srYKi9aZfl/LZ+OP8WedfEwGn/lhHlFvZXZ6IP1+VXlv8nkMZ2VXySoArKhA0N+qIPvDgZVqiF43j7ZPbVVF3f+0Yqq60qcelavGFyK1K74YkogEQsvDdahKkrN8oZKdrxdGHtWVUc+FFCSGZ0wDToc6D/07uWJaxeoU8OtJS7EQMyeNxVhOGeiNc7PO/wGG8fpOhWXIPMrQSQxjd2BRykFO73Dezf27oUeT9JWR53PmWCctQs87afLKJW/kfSawJnhNiw29/wBff5qt9lS71dkQXrEmYbPhA0xCLCoemArL+5qwpAKyODeRRIy3enOrlJiH5tcqrJ0ltAdf85n3ec6Cu84vMnZZBTpqW+s2kzdAQozKKmLL6I7Cg9jAFzzPTJ1aQ0r2OLrXcZwmYf++ov64O7Mdb8BMOTgx+SKOGy/IAzcEiQUeLmV/VdlGAv2f/lqu6A0y1TYRY34XBm51DydFbunQwbwBTtk1sam5pBr0W7aORlhBRZpSMHxIDdcWV+10sCSvUrW1JeC3rkoajOzK+ZG0fcT0Ibhi4aQhriSHAbkaOiIv9ICE+WoRcU6va6XAzu2j4Gby0UxWCdc6SiZ9BA+ve8baIs4gmq7Q7zDGYLP/xVHqJnSvrz9Ekz8SOR9F/EFrmR+mCbeUJfcmdXjLS4JpXAZDFwTe+TuH1IVLDfHO6skBAXPpGlj59qyQjTJr/4gSbgVVDUEfXPiL5BH2juGohXXywuNanKxuEzCEN9s8iUe0UZsoLXlRoIwkVMFB+hJTpHvLadb82Y1Q1E9vn74yLNcohldEUgmU1jZt+HmhrBpJHwSFK3bPlyAvAMu6S4DD0rUzK8zU0GeR4KI23FCvTgTguJaKLQeqf7hq5BQde1yNRLB2UJ/gR2LaNL9ag6/PRxxISjhqYgwOcHiO0GPJPzrmiQQF1PGMBscjOa9tr6wACGdIvGCRBRB8lhE6eTCB02JVfY3IGE6YVJ+DReGjfAxZiCmXfgY4M0NnM0jcpzwXyoMfN7qcQer5BW90zGOxfQyy+C9Jgnh7BDluVb1lYKIy+wbk8NA3Ays3yBHasuYolpDOMqoqXCW1aiIx2wjMG7l2sGLFrHZR0ygMlLSagkCuSYwDR0lpyX688rFzAwQ1sYGr8iJyA8PAZd48RmDdy7WDFi1jsKMYOUGPBpdpjuiznwYRxGdIoCGUO98NAwq05fy+0rDKipO5c4DgucTLUTBaCbfwGi5ox4bClbQU0+Pkgr/den+ljklCRN6lFYaB8IqM5sexUXN/0SRZAB4UJ+UkSQkR931HETFTLYwTENALs/hL+kx6aXjku04vBbCjpsTY46cFkWDk8/T3iheUy5IR9gSTZo7mpM9CsUCX0Ih2QE2zfP+MszCpe1DKXDQF3wB3BJa4+ArieiYh42nBAf1cBieT0FWnLbKyZysyt6pe8BNaB06ejMtJk5eKZgjMQ/AynyD0AdmOxwONHm/yz4ML2aQCxnoilIvovF2/K7mluWO0X1geL4zYYi07fGG4iEppODEdP0Gq7F3Ouf1SnAi/p8w2+AL/+dog0oN15B4cT1Zrc1QQX2JI2OzzxrdxL8NedAeSXy2nuW5dMuaMsinTJzSiJ7bAPdauSi7GxDKXLYzVFdwr9be8VTr4szKkw2cioTDScPFWJ793nmUEbSiAcLEs8a/FtpFmLW+9bT2ue+z+UkaK+KPmTjgfNMmH8nUnsZZAvr5SOwBr994ByMt5wwwr//Vj2Svr/ebUEg/csqvlDGmbIhWMBc4mWomC0E2/gNFzeO/hJBVswumSaQSenRu2ztvWGpLYrrrMmqQwygD47g1/Dt2s+gaaQZEZg3cu1gxYtY7CjGDlBjwaXag7AI75Q08teeniJiplsYJiGgF2fwRkkmylCk+uvSCftd7RuklLFltLUfHexL7wd3W+pcTKA8AMsy/3Yf8HnjTXYDyaUx4oAKY3rFt3VoBMMpRv9a/zl1RYfKjUopMV0U6bWqCGdjK+QuQLt5lfR+sHPNd3rm6UEYemURUUHdtoBPFZ4ByzddEcy9hNZ0jXniB3IPxryVplD/xff10QIpw0xhbyeG1nDFDIpcWjtXwPyEGxwxKT0/OHnlPbWZTOAx0fFRqXN/0JxVWIWnq2QpoN5vmNWRar5mH69EBN61p4R00T6rLbIyfDr10IePEK1gdFXLFqQEw67nFTVfrFzdE5tHbwlaAKkqeywkBf+3bC6/5I+j/OekO/glvXgbMhUv+u0HkV/SeUlw0YJZZH4N1+XD9YClvjSW7AkVEVq5ftJ+3A/pdjdk7eiLbeTm7Rr8N36dYTUZSWxXXWZNUhhlASeRkGXzrvtU5/o+yghmQC+Xptt+PvwF/zaQUmkSWNhiRTso4Igdtw6cht0C6BkmkEnp0bts7b1h32lYZUVJ3LnAcFPOKq/IicgPDwGU5klA/ysdXhxXsuhoBUtlx/03hHWb6WITh0XnJ47+HwYR+7aT6XpY3Ex58KVUEeLYBtAQqwL4ZpJ2Zn8SnNraXkUKMjVtaL9rxABtO7rN16lwgsqKHDucxBLKMgURZ5BXNihunEftbnPEXCUkOrqZST1Ys3A0n5mlu4Pb7lI4dm0a9nEXSrkgT8urpybS60W2jfbsPpWBGVVU8EwJgAAB7hYZTZkXaalNgdvP+Czi3mU13wWKPW1DEBvZjTq0CsDAoWR/v9+PI/LfHrQqsryfu7eIAu2BICttQQwwSeU13wWKPW03LZkrqAxcd9LaQtsuP+m8I6zfSp6sI/deH+i6DHxa6pqmX4oH5XHx6QjUHcGa6WoqC6LJ/Lxlv6HfTi81todjWSmrCNzZ7yPv/J7++aNjAjKsXuIEWO99NmR4FwvKNvuBme2MY5yuTktGfj++Z/XY88t8a6kBW2oIX/6+4WsoJ2GAcl/+PmTPm1xPW40g9WRtxltEkfMT3ozs2CesFQxWkpckN3xR+0CmdKi20XVHHaXTD4sl9cOnSuS1hslnHi68dxU1ByGe13pVnSMcAxT5gUAfYohNpxgkKDz8wparMkTB1FkbbcTIpc0uvAe7DjRZLLzPVpOFqyyHdm55hLPh9/K9/UUHp/0iswiamuhYLa8l32sikTBSEBd52f+GfPND+aE71smWRnW7ivOriJxrRxbf6GVG7NFMqkK9ATEZfRQT13yiVc3BRZC0IkegIOjrOJIxk8p3tLYT7lvZZSUMPPAKUiK4SXyHXFv6y4fyE2gnbcbBRTKdMDojboUeT9JVjGXgW1L0/BaZEyHpjLmuVONWJU0ScxSwAAqeSr2+L5AeuNY3iZX9YzBhKaTo2pkJHvXuxJPK579a1GW3fHQ4eIk7dJ1+8VttYzVmpEoDPExFXR3de1/cWystZG7Wik7Ggn/js8Zycpe2OJsi04Xt8TMPKgeh9cpLy/dNyQfbPz/Y3vuxef30i3J0kCZXJMlK6LQOaxvs9iI6rx3vpsyPAuF5aADuwaqHpdFktphEm3Lt/OGqNPRMR6oYXnkSN7GxgRlWL3D2xEzRHEqiycC+fGkEjE9xmV3jeB6O4Kep+fiEU0bGBGVYvcPl/MfmJpm5Ttxk6ZSMJot3O5xOT4pB7/uwZO7MRsFYEgK21BC/531YRK75w1Rp6U1mSuoDFx30t0+fEp9g5B9vXxzLng20fr7hkj8o+rCJXfOGqNPTfvcRS9Fqhdjrb6SukrHps+rAsldQGLjvpbNUAXmuiNH1OFzi7cM5U5p+qX4QCtqCV1AYuO+ltGl1mN6eippNk03ekAAAAA=" width="161" height="459" class="img_ev3q">
</p><figcaption>Lift the object after the grip pose.</figcaption><p></p></figure>
<p>That's it for the logic of a pick. Pretty simple! However, we're not done yet; we have some changes to make so the logic works with the MoveIt system.</p>
<p>First, the stages are currently using poses, but we can't direct the robot directly to a pose; instead, we have to calculate a set of joint angles that moves the robot to that pose. This process is called <strong>Inverse Kinematics</strong>, or IK for short.</p>
<figure class="text--center"><p><img decoding="async" loading="lazy" alt="Robot arm joint angles" src="https://mikelikesrobots.github.io/assets/images/JointAngles-345726249fa58e20200b8828d867c61b.webp" width="850" height="688" class="img_ev3q">
</p><figcaption><a href="https://www.researchgate.net/publication/371070660_machines_Pose_Determination_System_for_a_Serial_Robot_Manipulator_Based_on_Artificial_Neural_Networks" target="_blank" rel="noopener noreferrer" class="">Joint angles for a given tool position | Pose Determination System for a Serial Robot Manipulator Based on Artificial Neural Networks</a></figcaption><p></p></figure>
<p>MoveIt provides a <strong>ComputeIK</strong> stage, which is a special wrapper stage, not one of the main types. This stage wraps the generator stage to convert its generated pose into joint angles using IK.</p>
<figure class="text--center"><p><img decoding="async" loading="lazy" alt="Add wrapper to generator to compute IK" src="data:image/webp;base64,UklGRqAaAABXRUJQVlA4IJQaAABQcgCdASoOAQwCPikSiEMhoSERKW1gGAKEtLd4kC/AFmyft1xHdahofoP/Ffwt76/53+F37hf330JfIfyX8T/55/vv8jv+v8V6DfxD6O/Kv6Z+pX9J/8f+s98v67+SX9A9K/UB6gX43/Ef5t+Ov8v/Y32tfpB+s3g8AA/D/4n/Y/xw/tX/u/1PrW/l343+6H1c/qv4V/QB/FP4j/Mfxr/pP/s90v+eeNP89/zH+K9wD+H/xf+gf2n9bv77/+PtA/ZP6p/dv2N/vX/895v5J/Sv8j+YX+V//P4CfxP+Qf1b+tf4v/N/2n//f777TvWB+xPsJfpP95f7///8i7iRUGTEioMmJFQFy9yno4q03eoRwZ1JkqDJiQ+Q4lALNW182J8K6nx+sec7e4mz5gn08K+JRVQY77l4kUvtwCcQwhECuvbCLd4CD7DLxlh48IAHmsJvhsY1IaHC8qDJiLF/7HyUJjyGi+D5TXUEBEp0mAWV0JSB5ixrj8m+8x475CYgIqqJFQZMSKgW+XiRUGBCJSsV3YqL1GP4psvaAiaBx22OJlW6bgidCIsTHBw8uG2ss2EJl0zd1Q4IP6ucb6Ne+mSa3w+3cYTIgCXcnT6empBVHLenokfJhHqVwSs8qoJwpf2fHixcdwQ6/C8j2KFKGaQcHf6g8mqX0CvZdIn/aDh5d22DitTiKKbgvEJAXgwefC+P2CqiACgiyJbR0RHs5PIhLiNWGWu/DJN5F5s02d9fLuUySiuCW/mdWxlNlDjhTuDn/rgtsYu5TJKLacvSNQOPK+bLNhHZ4nOuq5fWKZJs5hiOcSCPusPF7W3KqJ9yvUZb08+TgSpAaBGNBug91IXfpujUSZQhbZMMBEuoFEgIl1BARLqB93nwqLLvhUWXbhA+I0x674VFl3wfr/QoPylaH0xbE6wFmILZbaZMSKgQep4xCxbemZ+IJBUyJ5zdq1KMyWO0GEYucTvriXUEAnBpXmB3MCDBXSE7BLZWoC0GnTOv1Lh7PaMmaiy74Uz6ll2flD8pPnbn+I4SWfoxV8S6ggIl1AokBEuoICJdQPu8+FRZd8Kiy7lRhUWXfCosNWTMYxF9oW9djHFckq0R+7jyo07lwVp2DJgWtYwCWKAiXUCMkEFUSAIb53XsjYuSxZ5GrK2sFSyOacjdNoltkD674VFhyQxHskJVI5++M6ggIlyhDS/WUfaEUn6W4qL+m7LxIqDJiRUGTEilAAD+/+lzg46RIHKDr8ZJqwD/D83Z65cmOy8pAV1GkeaneDDjlkVLfFiUNuBqL6XBhNHbc5HkhAzsKo5VcjsElQvF0aionYTMsOcCJYtwewOVFK4o3hOTiu/pcbs7AL/dKudew4gv4XgmrTqXdb6ttZUFCpau/0YCemof5PkIY0jzU7wYccsbj5lsX+lyK2l+Ss1UFtiUq6uZCbUGh06ybdvweFRqGQvf4mwTxtWNhSsH9EQFhYkuHzHj4IXpCu/I88M0uqfFvjbJQPs+nUhUzG4Pe2JN6rTj945G3G28HbnsLtc2Ydt7D3FTMzLS6tK1Nt/e17bIkyIT2gWeA8VOr0DTF/kLzAVcF2DJ9Qyflyl2R9I4TGdKPEocAuqDHFNfuKvlBV+LK/95PIQ0+mh4zenqgyJHH0erp8Q4VtNiODDm5LsKwIGgMI/iLNbbznpboLBE+bsdn1+v8K1BwZK+nDHwNqpHRcgm8sDrriNRyQ/jfMNghK02KPlqVfvIolME3S6RAN1SjDcRqiybf5nbWDDxkkUh5qyG3Ov/kY7A1hK/fF4w6VwMPBMQ8goEaJf5q5Gg8di6rDlZe0GImSJs5JwZfqePyBtXazhx4ZajNA5+VPQFEwX6Acb4YKl4leLPWZ8kCS1cStwjrabF7Lvs8rb9OuyhjeGqG2HEM6C6MM71bJzIqzHdj0c7R1xJm9JBz+9HYJfjAPPsyBYBrB8d9aGDTDiGdBdGGd9AvlHtVa+p2sAvdvjm0HO3urdDb+MpUyrWjJpfPb+9FqdGVJnEmvvW28IPcu2iwW47eYDCFkqExyMbQnFeJ9n+/6OOUtFBX75T2/2JTrclO9R+jeILOO2CLPnVEzqcmqU+J8+/VuFGBaukyZA7YwTSi0I/QICZpUPg9fkoqTfrQ28+IQhK/AbTJcAYVF2ZUzts4kX8Jj/00NXUurqmHiKfSMjDgmGc2xL6A7stOAf+nsSIn4Gx8VALQm3apz3E7TeZO5feyyRif//6yvTzUoANjCZI25MC2DWkrsJwOCG3/9IoLegknE5TGka0nBBuc9C6ZOI4pmq3cbs497YCrN90Ft98dk72CNfGfu5IxpIvjtITtFLgApTCDLh2N2GCD0zC42Q2o9ZzjEZPVLCiNdCJChDnB17Q5Pi2hFUZFTWph1mlYZlwJEjXwpWoFLhvYvU4vAPs6oUSIerkqYK9vwsq6NiYXISkcTzX/6w7DOny6b6BjezklwF03x4Gwxwf6btXejUK1QpNKcvosoF4DfzOckYuohX/s3GmQAqs3JbM1jizg2obXfF1TJG9WSVDZfHjA0Jq06l3W+rbWVBK3OZ9GAnpqH+T46CtmaxxZwbUNriOqEXZMMhVZD6okoOj6yedLC7TJiVSkzekg5/ejsEzVmiZL3spnn7mD1sXCItaxjvwqPE5i+/90A7Jm9JBz+9HYKBBesKPsuPI+7e9tWSpQQsiTX3cmXuSye56x/olvN7F9wd5NxBX8pHh1DquVFsRggagmwExtiXJgF7OgjS8Gac4JTTU/SU4BmbmwCDPJOg0LHTJE8rHSc3j72gvHPpRocIAp6ol9yzkiBogdFeNLlLBOQDNuoq67ckKtvERqRhpLWz1bAbGMOE6BPo9o4gmnr98BxZs13Zo/jlxqW/Mprw6whkd7ki5AA+gC4V8H8B71bvsQTJOQ+2hY4BnaYMionKv4e22t0hod5JtiBahVEEviK8buDnFaPcly6mAKa/kF6H0qaZjdT/W1uBUK0VtiR3otB5a5+qwSFEi2g+lKQFOIA/MnjqM76ax5kbxYy88uFuAs+ENt4wAjKQDMtF59fwo55jL1V6y/Gv0x2d7jlGawtQeJ3Xa8I54yOHebfBEw4IC3BPwvpLQ1zY/tZPNKWoDiHLMAhBHxvf0mX/Ij1bwmUh0mReL5JFxtVCfrXoqvbCaK9s9B8wY11dkpL48kgH6ijBPgbT49xF6GccRiiL/zyMv66eNIUPAxgn73oRlmCVVofw4FqX2y1WygPqH4H6a8o2+svPVdwGQd/zkOYHQXrvJoWD5UdMgi5/Djq0jLmCt+vQ+bNTBVbvY1sYZAWQX0s8lmWztiA4Al/Z1InnDY/0PsHVb30INlJ6EdHxxBBt9+gj2MZYOp53e2miQOmf5J/HX64TBpkwAw1CjwQJMyUPyiU34UC2r9wQa/XCahSxjxvA37ucrXJPggaSn1wqCB5c4O/kqYQuWwUx+MwRLAcdFdgk7GmP8VUYUrbXR9YuSZHh/JddjNH/De7Qa3LzLjsxdGeTCZ/3jxitniOMEBxyrNWOI+j+9Z4RV8ieNtKiTytK0POeZT9A+0H6c9M5Lxx2yPAaM4inmQMo2phJY/kD3/cpxQ8ckSJca/ALaroEv7iqLCdP8u+E/KEmD1vjNTaLr7SIiVmgbcLX96ZqHSgFHjeLOfqAaBLdBqJGQHMJC4tZvksLCmBAs/cznNXiDN921jYEjcGSLYlGz79Pq7d8EncPvDml2vaTYueExrp3tXuQxqhSjxNBmFt667I6Anq27jGeBM3PqYmsiHt2zPNPF1WVNB2bLsDdqHPdkheT/k70rfVsBBQ0zD5V+Ld0ovTvzBjiXM0Y6PsdeOqxu+BRtQp0lKCYi3JMmzTVf/7tnX3gZ0ntI242hVFbjOcQJd+Uwi5kfiNN/+aJn9ys9W0APULXFr/5ISXuldEVVq2KVMrFC8yCgf5/5H3YE4TPrHdMYtCa8hBuHHuJlCqOhaUpoua475ZTCJCJyjoLPb4sJqVBwfPvFBYvGR/wHr+8Wjx4+mHYvtZUpHimmmLUMTwoywEBncAfjgWrCqvxjBeUbpRbOm4azCRYMLBW8FsKRxmZBX0Jf4YRj5uhjoFXmr1CmwUfroePCUrww7eu0iSn6G0XK1cl7jT27uQSiGbgqRJYBgf2dxRZgPqMLYmP6+B33+8gRmh4Kxlo5HDSEhFY1JY7DkZmueO3cdef5x5OeRlxlAbIAarpCzFVoOcH1KvpqqnIrp6EHxYYja7HIM/2CHUvzh9ndj2wYPBlX+okNo1NGLUtwGba87upiXzy/bt579Pllp2QQcffkEdSA96IWwmYlyZ3BGLJHpVe5wGTDpQOJAMDvmQSvU8JLraErJ3mduSZ58p9BoTQ7hO6U4GhoFfhQPD0usz26tYS53tvgm7QcgVCKHbjksBE0LpYWj6E+eK/QHDrvrLJuJgll9gUfLga1YMsNXE8EjC9FlCav1CBzoVLw1TXB1XiE2GzpRm9z/Fv4Eyt3zUaYNaZO6aTiOlQlBP2dw9ErXlHzFMIHBY5pb4k0JExoRPbJGbHqWqKMHVbsqAxd3znWNGezH+b5fNdqHsdQFDr5hJdQbqjtcPYVSt41HS4jilR3zl8Bme3hRvvAHmi9BlNMwZ7K1Mgl2ctoaWIXhPjdoE9CoDaUyWKA1SSfOG6FX4XWa0FwSWElOQ6HURYmjhsT8OY58hZHIlWvicbuEcEtHfSEIk1eNzlktiSnNRmAON1lINWR1swWW2tXJUR06m74+tLwUj0joIfUaYofhXDRUC2IgP5t0ABdBtemvS0d9ypx/UdDIe9xNZDD02qv8Du4uZE9HFA1ncSI7aJHkbPHpQE53SafjVuCbBqSewJVN1uHVIbqUZZGaGTW9V8OMQIC/W6VBia7+XzL8u0cdOS5FmPL82rY6WvI15N4JoXEB8wPNgO+DyEOuiCGQLuB2kVQ8842xx8G0TIxMoevpbUM/j2TPHIp7l9Foznojf/M3qlKvWipI2ZU3IZXRlPGVr6Or8ZM+dhTJPy+cc0D4Cp+uvM3dKnhblXC9BtJzxynMphSg8BODoyLHDVkIp0JfD+IGLSXGfT+8DNsLL6wCb03gmQDfH0sh2YxYsDQ4oxp22xIXlQsLUnN0kKwXaJYtHv8nlOKWBMBmHhxyXK1BvYEXwl9J4x3ZcKdfnQqBMOHsCuVlj9Yz7dNq2DSKIdLt/eKR9ASnfi94VQOFcAj1ZcGQA5jnOWwJiGbPcUTpCU6/hcFGtqtIWVNg3zShoADMLoYjAUWFZNjJeT0nsTvVNyWbzyrkfLeUg8hL3bBt/QDby6oximdR4zgZ+aLTpoDhgbfs+Hni6z6U8/CgmM/rl70MIDOkG5qdRWjfGGOcSkdCMx7TFYQZiKU1agelng+VWFV3ypncS2HXA1qdqwOZR+1PuqIYkSHMKwJV4w8q3fOsYtIDpEZylB0WFtJ367QfSxVJbXies7yqNR1MplvvQVnawJKTUKUJuFRX9juz8V4eUGjij3aqB6WWS5x09aZQZNYV5i/W58zK8MaNdToS9Z92Hv6g8xKuyTH25Iko3WDLciZ6zjsfEhNirYAGh1Gb3X6FRptQAi0ia/nUe0kYDNe0V5k55O9sCu9P22J8NhD1ZbrqC2hGvOyw7E9y4cMskdlp6rjfm3d7d+II7RKrEdTxj7X4C4a4dmni/mZgnexaqSo5NyFN/qAnj0kWXs51MXwJb8vZeIOjYypQj+tvCyElIyNGaJv6rjvAmURufL7Kt+EdJ9H4k58u2E59cmFFI7owO8QUCHHr2xAxg/xxknNbteKQHw9hqmBOAw6CWE8ERaIiXMB0K25+1rZ5PtvmWphqk9qMXCBbyzpkW5+5gr1PN8de0A2igs+jramw2nhwEygmvo6Edb5jQnc6YWp13EtM92JXrZVb5SLExqCAltXvjvW6uK8TgoXB7Am0HMia0sTmX4OuAWhIiyVzCzr+JRhMhwgo8s1RBpFQOMe1HAPP6/gApkVoHBeGgvPKN6cilHJVJTE8ik1H4fdbjRVtBcBNyux/KWXuxIp/TEjxG+O5ewJwV5cULQULBXjmWgTiv1Oj1bJBpR4lZqaTYtE2Uyxw3nQS30IZZxhFQ89suNzI/jrO62uPWPLGtFjqiNkrQbKL/HOkgnK0ndh78zaOEmXfhKlK0VpL6iDQWrl7dhGFvForiyTYuAzK50Irfbq4tElTAldmtNOqLkhnNMNk5bg/Rha1aVdcV8zbrWSuQ5xi80cgr7dqM8xej05Pbh3rCgqAJYdAEEd7RkmHb0M1/2NlE9beYh0YCwHsWBdQZmnzKv26Sf85Po2SfRgCOQmOmS6NaGNLPhZX3NAr0etheXw/G4MpMpu2y6zpXPBVZPmupGY5Zj8S+MMPZJSt4dKs44Zu7tIArtbhd7S6UUNutKhhtbKgtsSlXVzITahR2Wv/ZuNMgBVaGrZmscWcG1Da2EBTyDiiYlQkTJoE1ttMUrfh59N1enK2V6JvlylNAFh4gxDTDnnuzMx8QpnYtuL9W2tH3LZ+LqlfUe30aisE0QSoLRXiR6tDyyZFulvu+NkawBlvunojhQcClTmA0ECycebPwhg5GZXSyD51sjFlzQo0l+jRhSM7+mau2T3roLowzu//8utDi4ETQfLJoyA1IPDinPZkfNmpgqtcj8U9zYRqJs2qCW671hPn2r5kjKlrwdiyyKf4PQksgxafL0C+kJYJbYn+wMQh5wgi1IXebLB38/i1qmgH/susTYTvCMwYmd9GSSgBKamYUbw9n74IQVKpSFWsr4VKW52InQfU4BXqZQtXmuIBoEl/XxjydjV+a7rdrBafmu5K5fDAm+QYjd0vhpNVNNJrQ0IEOKzquexfcSf9kY//rD6t/1mwsP9CJg+APdKbSYJIaCSVwTymxNhG37zE4S4B73T8aAa9rfHhkxHwR4QKRgamuNseE+HOxhoKvOkgQ/goycl5dj5l5FVnIhIMBeoRvp4m/iuOOZmhN6zITH4XmBy8H65oA7VNZlGzJ1EqSnjK6SyxJPWGbmxUmmvtJ0WlBkGJDPAw55OXQ7qY1KQyMtKxb/2bjTIAVWhq2ZrHFnBtQ2thAU8g4omJUJEyaBNbbTFK34efTdC5pBMi5E0Ss7azVFUHVM3pIOf3o7BQIL1hR9lx5H3bsH53QtWt3VzLyKZDAyJzYF33joRkyxilAcvJt1p214Uv5kBT1KliSaYg0NtgH8ACNUCA4Mv28jDC6H3M58IhzCXMBUYg/uKrUPRwjhxuJ7TXWFj41A266gY3fDhEF7mz01+4UXVHuzhxfys4o9r4ABccTlxuQgeXVneiT28QL8q5ivjlNZfsPhxFbWN7jkf2tJX8RTHGoE/49wCN/rTSnJKxIA/GQcT6bw7b5jP/QLhrpOaK2xoSyfEZrTTKwmvMw/+59oy8G1BLuDfG1/oE6s8Qg7KmI8oqK6f99cD5oy1bt/ru2i4cq0HTzXRlaSotB0Hz+0cWtfJjEg5jkXfrJuXnuI6TI+1hSJvgqzfmMYCxorrFcacPvAp2c+jvVawT9Kz0aR5qd4MOOWNx8y2L/S5FbS/JTgb2kVSZJqwD+/WGSslQmORkBQvkwTwJ62ZrHFnBtQ2thwfVjrVTfyPwIpT3whJoHwo47eYUdkRcBpmHOqi6jUdszWOLODahtdseLDDex09WOwXgnFAXkWVk//JCFs10mskRoaxYtjITKAWWUB1Lc/q9YwxezhYX5Eev/05k6s1O7JX2+0wLBP88aYh34dwfMqQNqk0NaJ8Nk2eiMyk506sxzCA5eTbrTtrwJ4+Z6xCKliSaYgoUHDafdcCrDwBT2WWhwhlxqrcYX0JKq9gMUsoldCZdv75RDN8aD0fFJVJ9LaaK2mykid92V5a6QqWRFgLk81EPHUe2gIwIrVYAcK5829ctJnn9sLb3J2XBGw07lCaIxnslPpqEQRsScn8wPz/mwmd5nV12NyQ6PIJGcotMVNT6HIakxQH9EYKCXr48o/ZJeI6vqxDjaI420hmrNGCzMm9sw5jd+DI53VAKeEAt8ijDAXD4bE6vuFwCmIxaRKmoEZ8R1vMBXmO9PmzTWZ/FosJwFxyaiFQa0U49smosu0+LAPrMmSzeKGtR61IAMKiYIKmxVIzZ3dosXqyVizQxaI07TkDCJ0rJ80O4jrEMXHJqIVBrRSqiHG0RxtpDNWaMFmZN7ZhzG78FxtqkFVeajSvfvOIj2Ik9S8s5Gwc7Vdvgrb4zXhmvrcT8zjBq5V5IL9Wf83ISzeKLPioA3Tjv3SnmJB5PytQiwTCSJANmBnaMT4cinfO4v1FmIPSOWPXzmlyeEqW1lmbo7Bpggf8ZY91mypfdFoWgOiyxi8FlUaQmOUzq8Q6CCNmxnF8oHm9DqIRzVf95RpgdfzAvJRXbMKIfFRQBvPyRPLsJ6uYckIkAra2P3Es8KqvaJiu8fAlw0JOA0fAemdmxoInNRDWSA5z46Ajz+Wqfn+EwcyqvG2d9QCzcYgPs8/e7jZGvBzUAu3klPHR7sWU2Yw6WnNgPaBGa3JE3HoD3UXS70IZvfGyqAavK9xYQGeUmU+aptXB/Eaw9Mmnz5+X1UEDJ06zaZLMu8CryX5n2lrvFRCjifbNZSneqYZtVMq/Z15zbr8HIaPK02xf6kqQ35IdmAgxwyDZqjyeZcSDWxvUVcxn+ichJGxC3vY7z7ehOesB43pfMBozfVuwpPk9/3flsBwedKJywhgjrnbA7DDrwYHjFUJzCbkcjO7olN3mguhShBzRoJ8K/DpMU0Z3p82aazP4sR1iGLjk1EKg1opVRDjaI420hmrNGCzMm9sw5jd+CxWf+beiTDGQNIBeT7Q5DUmKA/ojNrNrt4Crh5WzniOsQxccmohUGtFJLBmdjhieCJqAFJgUOQ1JigP6IwwFw+GxOr7hcApji4UYi5IGXimu7tFi9WSsWaGLRGnacgYROlZPmh3A5ljf9sNSr0p28YmgfgiATiZKwDQ9mmwM6FWQMrCjSO0JJPwBJD6GINSHxsrnJ7wkNwlXBVeJJRb8SOMeTd5qZn4a+AAAAAA=" width="270" height="524" class="img_ev3q">
</p><figcaption>Compute joint angles for generated pose. Compute IK wraps around Generate Grasp Pose.</figcaption><p></p></figure>
<p>By adding this wrapper stage around the generator stage, any propagator stage that uses the data also knows to use the same IK solver. Neat!</p>
<p>Finally, we'll add two stages, which are more like housekeeping for MoveIt. We need to allow collisions between the gripper and the object so the grip can happen, and we need to <em>attach</em> the object to the gripper so MoveIt knows to move the object around the <code>PlanningScene</code> with the gripper. Both of these stages are propagators so that they can pass required data from the stage before to the stage after, even if they don't need to use that data. We insert them before and after closing the gripper, respectively.</p>
<figure class="text--center"><p><img decoding="async" loading="lazy" alt="Add stages to alter planning scene" src="data:image/webp;base64,UklGRgAlAABXRUJQVlA4IPQkAAAQlwCdASoOAQgDPikUiEMhoSEQ+a04GAKEtLd4kC/QPyA/gC4cP4D9AOQA1ZrmVeRFV4H/jn4jfjX5Ufy78Lv3R/u3oN+N/lP4pftt/qvgK/F/wx9JfJn8f/D73H/hX0d+Yf3H9V/7X+v3vl/L/yY/C/2X9G3qBfkP8M/nn41f1z9reNt039gPUC9Nfk/9h/r/+N/tP9L/bP13fz78RPcDxAP4X/C/5b+Mn89/9fvTeCL3x/h/cB/hH8a/pf9z/vP99/tv/1+0X9T/o/9Y/y3+R/y//+/+Hwm/I/7d/ef8D/hv8//gf///uf0G/if8d/rX9o/w3+c/tv/+/2n2k+tH9UfYY/UX7y/3///49qFwocLG1OT2+n86rrsB2xE3b354Y8r4gBhY2pyKvqg9+8nVGSjfZ4CO09Pa6QaMo6uNGho4R/KA64UFJyeysggVzlCYSUs1FNEyACT93VETX3j+CBOR27aVn3E04WNqbRkcQUdIXrfmA2QVV4i4UOFdWoO1qow7VendhjV5S2ToMZqA9c/lQuFB4UK6XCxtTYw38n3KAasiFabeQLO0KkV6gMl1sfMYfLC85Sp2dPxIVinM4GxN+bdXa5USuxrjyTCo87VSro1h79mO3noGWgqcTr+wTkvuCA3plpjLuFAR68rhD+lf4pb413QMCyfNx1VIFP9rqF1smlpNmIDfS3eJfvwtj379mMrAXg0eWXPU62fpL8w65xUeOGCb8vUkuJI2byPJbz6E3eHGH/T4GMuY6gb9UIMFs+dEehvYEhe3bKFFf6M6NwG+lu8p1y2BVyl7Rw009BaTycm6jXgS3nhBMbYN2Ad65j+TAFxfv8RTVmHoCCX0NRJiPWfCVLoaRl7l9abdygsBHB3J7fT+yN/KhcKHCxtRUfb6f9c/lQt8NMmIBXQcLG1OT279HNvtSU2tVwGopxzIH67ChwsYCp/SOzEwqIg2U1BAQewjWjBDP9c/lQLK0hnU0IkO0Bbk35ShnsP/EsAPEl1SN2ye6IjJVKHCxsg6k5dbyPJeo27QIBB/qs+BoDhY2pyfM8iT0VrhY2pye308L0p/KhcKHCxjsmCj6f9c/lQI0y32uaouPKhcKHCxf83dQxnIQBgUe0Dl+p0eNrLHULhKBypaYtHUA0iCya8GrI2lhQerzLjY2pyd/KeHT0Sy5SN+9DfjxfYCKefpTIN1XvqxyXjEXVIInYUOFi/6ALdthrHgwCEEzOhDVYtvoU/lQuFCLXtqcnt9P+uccyoXChwsbU5HAZ/1z+VC3zE9wNb2uKMBqYGYPnGNSocLG1Cjyk6t2/0l05wqE9+T2+namZfI1moxSwbV1966DSZklKihxUxIywuQnYA5aAZoXChweFX2DFETtJazR5woerd0SWNqcnXJ52qVC249HJA60csEAC86a30/65/KgsGhwsbU5Pb6eF6U/lQuFDhYv3wjLXY2pye30/m3FyX5wlgQGgoJ/Ch9DOqetW/mY2pyexv7RuULC3zo49BqHCxtQk7M77AstI7oXdQYByljmUZm8ZD7R5WvJO/mywuxd++AYW6f9c/DFNIA7RuG5zEF1vwUnt9P6cPbytqfYPqlUrG8vFBScnt9P+ufyoW+AAD+/+lzixzT431chP5dUgfIQQGmskGkSNkvaMWd70QVWxyEmcA7g0pCf2R1LnfSaovnTxsBBVYzPpoO/Df4EIqQwRnV3coRhtCuD0d/tvGYutq++YS1erkQUQOcUOisgGtGdskY4qe/ZuKHc67RwdO2TQ4tOplW6nGUcMzr85BRisdS531DD5kZ2yRjip79UjAXEsvZL6KzQPJ+CbIv4/Bj/REkr9MQK3yYIdFzx9balPsBr3UfXlZSk097VBXwNzfkvcJwLl0O/hIzDvqEjF01TA3R/WwuJm4R+3779PQ5J66Wb0SM58C+mLwWp8Lc1ZcHTi5P6f1NS7wzK2wM0RynlG7/BIPb0tmsb/8+1FvXdSDnyJ4ymY5sJfw2IQfiMNyFqWT48CFUx4kT5CedCVqejottiAYC0eMNHXxHXEN1lV9xdkbUGQPlZ+TnVellm/CJmrQOev9yH4yEJ/+IptKLqgR06GUQiUhjF4Fhh5lz8METmBgvokebVc0MS+qjSnwRnjXKFpgfVBVt77O0Scd3FQj6u8GGUGEcJj6SCBJvYXFxbrlUUR11tYzGyQo2JuEsSWen0OCwF5qmU6NxFT3P2duzpkhm9Msz6EsOmxlb5h/xpOtok7TPdnirQFOzAm7qNX7hKigjTEQOrKwKKJdzQND+iz8NLIxEaHs0o2WkAGA979k41GqEk+tN4E1AMQHVlYSypbHW5YVxZ+GlkYiND2aUbLR/r/WjDPQfMjO2SMcVPfs3FDuddo4OnbJoMZFtvKPNZnukoX3/Qt5ohPHPoEylIQxfmxuNGTqjh6YESFVlf9D4856txs0HbOgJRAoKK9sZF5da4+o3nwM42oYolAakdClaoGyDD6/52+gERfMRaYSZqDIFGZUZ1DnLkwA/hSaXoTb/4tCqpDSAQwi7PiTzeQpwy0g3uegs8Z3RddUFHzvC6Y6NWxIXUHJxu1tSbu4+iFG0arcaWO//1q/pFYtTiNjLhLvTilmEDefz42ngjixIegyqIjgHJPHuMvE92FFoWy0Ro+L56nyBjx22YZxd9oAe/P7Wwl1j4bF3KBkdiKSidLvBJZR0HmGeEHG0pB8fS9YVzwUkHX1/lXeKqNH2L4RVuyx6DU9PD74FJ7gTDSKEvQsg2SXOOjaaKWoIHi642XDG/ThFV+KjL55THxfR3KDm1Kckj0dzDraS/KmsSoQs31nUOXftx04+xmbCHL953mGDsUQLv7+l6IKrY5CTOAdwVFQwbR7oMM9J8oI9AtNUVzE/f/aGf/fNQ4gXf3oNp1Mq3U4yjhmdoq2gEjYM4OY2yj/ks/MA2yvRPkv/eGnUyrdTjKOGZ22CP8l6XGiA5CSa4evVFbj6ZxzNYAYpNhyYjU9aVqzIs2VISntNZaKXNS5wQarJPyDs6kqxSrF4Gwi+idew68xQdk+sJhY776orcfTOOQ/vZLXRm/faS/M0n1k9SpPUXAnhJJy7wifIpUw+tAtzCqqNwcrGqaeh4vlFcAgA2Ep1ML9YxcHbympjAm4hTIUjc1SyTPi1JeiaNoTaHcz3UDNFBmGqBy2jZd4Mz4tpNfWdxfk0w6i23HIi9+JSYGZ3KWMml1xEBhDQAwvRQa5m/NBbbb0ud1e6NX//v/i+98JlddmlUdh7HlR/J8GCpPwDtHNqUajgIPRzpIOIyDrraXIrn93iSW8VVGuM1GpSNYVkGg3WKNmMdW/UTgGPTzsGp1irpOQMfB5c3xY2eehyHvBj1StbgEWP9+DbJG+G3FHxf2OsPzKz4US5m6zcM6V1flMhYenKYRntX/RvplAJYJgyKLhhrokhEcOLxnx/Xjuh98HRc9iFRwTUU1hMGz5ETFkX8TBhtcpA9bE3LeKI1lan2xLnaP+VcPrSosYieKgk2D8xQjiET2Rw236ik4tykevxo5tNA+xPxWc8QWmRqaCenqZ/9YXczwtbR/uH2JDowCTHMDY6OWav6AoPxU/85lq7DWoGKz+5gnl9CZ0JsI9pBDV7elE/Ucn10SBM+rH8G1ZQNciOKNdLGrTo5BjjWrTx4nEE45HTSbxXFSz2iKFOqBLJa83FSErE8L1ShNia3RX0jkKFk1yScOEyAFSfTTY8cSkB4LJya8EGMY6Xd176/Ip3dtIm020BsAG1m2eeGmHC0IZTSl818diT6qc9p/r3kF2iGO1WeMRa9ANuw4b/FZfK3Pk2Gx9FBe7fB0TYZW1zPCx1wOD7NrMdW+KZRdH10z0KKUl/FibT2/3ZboqT0+4d/hc3wCl/ZiTp6J4K4TUEmENE10IPdzvnYmjRaYDURSRdlzJ3N+zki003sMT0jMv1uS/u3/Qj7+ooGQnUfJhjJzQqlDjw7iWc9In033YGqnRF6M0vmJLHLIARlVAlGrGoGM9BaSFRxg6p8n+lwfReEQYGshXsIdhC1z7dz1HwHsbFzXj9lUr/zlhrzEUvXXZhKqEOAVSrEoeZ8mgVsvWLz1Gz2qxoT3uN5nzIfCfuc+YHLd7dOFRT0bujqeGHGUoRi9EuUMA3SppizjRIPSCEALppSW4cxX7HEYFpNmWn95SoQiDJSBEdWmJeki3N1WapmZON7Xe11eRHHiHGeZiT8LlqQAfYyDteKmkeH57UJzEN8SRIvHsgueA3127Wvnu22oAYhSFtcntKJvh3soHu1IFkOKbfmw0KYNO8PHyajwseDs8iRCy8Qu8zosyYVaT9EZhF/Pf+DSU3L1XGR9tPd6i2oIeWlztCE406s+JbJfqRz/jtaBkaXzKngMk90ZJ2k8T9iaXmqZTo3EVPc/K7MMDzemqVEMTiYwq6YQO+XL1d3gGfFy36dyVB2rM91seuxhJvuCSiRMpUEfkjqfCxSUHvFMhwTLNh/3PqTl44jyCz/31LT+V85tDlwRNOLWTiSe8QW0wBrSruavSWCkD+DHXbpbb4yCtlXZ0p213jN61wIEJGvSHADpFaNB3toIXzva0Bv0J4eFkX2t64hJUl19oGomMoYsiXKXWjnrL/KYzUSJMW9q7HEKF0D6ea9ospWakL95N1sR0E8duVNZF2eXTR30AinLLn3dCK1YaFtyWhCb/YX5jFVAb/84IL4dX5a93vrMuXmOd4ErZ/G/C9TrppnplA2ifQ3N9R4gSkoRaOLbAtqnSryldxgfdfGtekNotQUkhR2QLkduN2MuFftqh2Bg4xXBUJXnYC66mzPmUtP/XdzEcUA6KnoZ0Kn2XDRaWPePJOFgh2L7CfSKES9gP5I+nodviO9AhPx0QHeQuXl7RVZQhXAtPrgdSa+SzvtTIbJJTIxTX8BBaD+FjiBbHWPCHCgPXrkLJx8wQDruRlzRogJiRT3ACRl+cfkkBFZD43CEtwjCMwxcEf6IoDIYXvbhC06IHtYfxftpOYYaTfxSccRE8DNTtauWg1B/wSX2xtXonYq4rcVHc7eFJJmI9Vytvwiz7iaBiacU9UAO5ZaIF5Xi2sYTqr94GdLGNFDsj8RgM7C/O783JgsXkXrf1Cg/i+zzOVqyixHTE2dNypY+EhijgQUMfGwlYOUuh85ahgm+rdCPdplsyRtacZwE0UfUWFLPNelDZ0uX7BbW6g/pw50l3mgoOXR2jy8Rru45F299hCfLhVeoW0yGo65gFj5MVCCKJ12LOLSfiFF7C1ZSyeoZDDYu2SZ992vFH0UUvDgNawLxUkKJr2hxG47jgXNyQF8O4h1p6d5sAadNbkcf8/1tNH3gAbpaXLxTs75w0wJKp5PPb1qWsd9EBymUNgjSKo/Pg0Sp49wfZvOm64i4QXDxy6ax9bO25odmIyLapHMsOeuC0dfOo/+sJlqLhnXKvsMNwUVKz5WMMIFO9mgGSdkuVGr3IrN/kX6lWA+NNwMJMtPJKD5Uce180XtKR8VpRX0SZ/APCF3xJ2/CxGXYxXxDSL4U/gyenN8J5zJP353En7Oo38qRNumyb5lnTCIC7LzGS5GM3DDgtx+12g+KqkD7u6U/9T9bqM+IZcP+KhKbC0hljjEsBIGhEUU5Tc89S2ggR/k/GNjXDT43bn3CwXppw4sNR+mySpbet8EJ7wQ0r0BWYyINAnS9Wzkh2l8PmUXpcBvcIEMqkDrXVJczjPqban6aVdbOg+JkMZxT/cgHklJqNyQBNISn239/XLct2CXRVlfQE5jhvIsJrkEYopxMLrDSBAkEOhZ8ZJrl9sU777315R4ANH7+FPKkBU5b1HW1eCKSzgnNWUwQjgqKlRDqKyVrnegL2nrc59DE4feArCkr16dSlQK9GFcmAkAAd39J1xRVA9bgrprgpCN0ZueIot7mPep6mD2WWhlRNvb4g2Ld9E23IO4/9RERxprdSkgD1yIiUvgHyqckU3sKEkFn7y9pONsyaHmSWO6Z+fvZfUy35SSrYOKCXkAbWWCJEMvy85z5sVjiggSZzSHH6WfxXtjsmNzEVn/1J+31UvyI/VldEDOcbxADASDJtu8FdLrJOC6PAFAFnT8igkBOkbwB4q04HPoblK6J0Hg3lfGn9UD/wGJhvFST1ahtpI3K0ap4PoITM3TzwqrJxOIWIREATt5R+KTgM26FV0jjWHrjMy7cEy/PQSxfGtPLEETxZJgUXASxyDj4pkomnY4TaK9031R+D8lLLqE0VI2i9+7XUbc8E5axbPRN6SIJeV9G5aIOmQbw/9jTOHNj2oQeONZmwFP2+xM0thSsbTkAksUB/fqK5jV/++BdSeHjGu+4wT0+Ne8JFN4iD549qvT5MVCcZSlgywDvNzR0NcBCW3nmBuNKT2I9zKwiUbyM7b0R1CMrwwaKgWIzlUbhWeQeFQLN/TUiwqAbSFl+O4X6PWVwRh+1lqfijT1FdSb660632wI3ggD0gwj5Y8r6EdfVhAKFU2vuaV2nfP/RyRDa3Pbm7BXZp1O7Ru4sySRl9bflyZalkW6aGlmu0ZGveVEbs2ERvygQUcBvcGALVfuVrIymRzI+VAgIYHS7f/4QIbfRBg0u43/FSsm6bWSzf/4QJ0VPlABqQq2uL1wAgij8q4NUOAzhdkiCSlQN78XZtyASakwR5ZjDs6EDCgo7olJJOIMgZIxjgrfqWv3UsfZkOSBAkk45WNvGYaz+ZcUHVTWxTcZLUX68z/LuSku37SJzz7cYHDOwnKd8/og4WG699fOMNyugko91L4arHssv0OPjnt1Wc+9UUc062HDDNcLeZPA6qhl8ayNUL0Wkg0AvCbDkxGp60rVmRADh1QrTNpDDMTJuHgWplYacnLfqtGnKUSCANfrd13jVGqgTrYcMM1A+oHM3zlLFEC7+/s3oZVcAtPo23Vgb431j6+xRbWzltqTfKCqXxrI5xqCalUNk+sJhZ1kk1QA5+6L8klAWdYsgfGo+VLmKZrIQopi2YFnfvNVK/RSVU05A3S/eC0bZT4KF092waoxGX1reDAPJlu0QKCV1Id5BYSwZA9orJwiuCpOOvGmwtYVJ/5FdikwD2N/UN+jAB6zB0mdhNsX/FmoIwBwUCB25E/2QTm2PCl+vWu9ZFQ90vYBAZwQyFOmwOsulQbdaM6XUWQ2+sU0umIjRyjnZKNECNQwyMKSH4WmHC459K3r4ZY7RceE/HOjWUvloE82WGnXVycI5qIJJP0RmEX4/4/pqfM2/w8HbAcs/KBiLTkCYfYyEL70qogOpZY32nphhL86otnoqOes5sjtonzRcSCRCIkU3IxYzKC/EJn8tVOZHuemDzM3LPr9UQ8t3HLL9Dj457dVnPtx0GqglohelQt5k8DqqGXxrI5xqCalUNk+sJhXlWHCVjIeVdo/AhHqHCVjIeVdo/AhFSZkHSAScHGEAzEHyMZPuK9KCMNASB4JGyXtGLGZJ6w3BFkad1SdhItvQLZu86f66edb3LGU5J0qok33x6OR+SJzsxVAQu1u+TSgQd0fZo7xB28pGpN8iJO9v/r3KwxKq8DMVij5BDodLQf/vGsrBs+W5FzbKaXyTTVPvTYmeEBn8QMZTqG6fUcGC2OG8fY7nhhQ9Trj/REopEzx1hgtXqLzhYWaXZIpoJXBswfrKIx0a/UaoNmzzIm2wx601RRYyu729VNETW5UxbJ/W/u6le4ujc/XzVcvqxyiiWIN94/v1JigKgVMpkzOuKDg/KzqmG6qkiiIPh6SWAr/GGkYJ0oGbu3QRhQzzKJ+W4OnspgwQXyG0cTmnie8UBMnQCiZjLCvOUbMLweU88U+Q3WFgfypEXYAyfsUayNQ653Sfsna9We1Ubk4b8xVbzXE7Gecu/nKiZkOEHbk92HKoQdiHSdUJ/gfsPSlPLSmWSwYcTxHyirhUEUPOGgjQMiwM3FpNbeU/JxFUB3p6bNnZPy+CUODl6512hM7gsqaemkKF0C0szAd8xgPB7C53IQ1vFjqzsCE1eiX9aQzbttlwH1ZHsEFSXM3uN7CELVjM+mg78N/gQipMyDpAJODjCAZiD5GMn3FelBGGgJA8EjZL2jFkYGdIAu95qrqzImcnrDcEWRp3RSGejBQ0+F0Zq1pynXp47V98wlrZYcJWMh5V2j8CET7550Oa1/0sEemQjGwl0YWV2UOf6rPJpmOFAsOhfhFRY7fnf97beYlkhHY9TrkAqx4WrGZ9NB34b/AhF8UMpYyaXXEQGEawmaoVpm+sOfs3FDuddo4OnbJoVBnXAv/D1EdMBiEwRQAAIK6Dk1wWqdQPu66NO2lQ3Tawi2LEf3Ec6hiGxCWQH8qfaRchW6FdwA2inl6DL0Xl5sHKe5e4k98Q6+NqpeX/e43qoJHZt2+vjJqYSDybaSHqsNh4zG49ks6FEv3cSblbAWDUmAkkFk1eqHVN8D8QWezXZi+ynONelWPM84RZ0jmYDIKZy8Lavwlgm//I04geu9MYeYA2E8JvqMWokbywpFLT2nl+TuSHm5o+dhB+dT1HUTOnNe4Smi/I+675Ypie2E36+Ls6txdobwc/kWJW4JhR0S6v4buEb1QMFipZfb3hRd89bLc1QN3Q08ecY3iN1agTw6HHpwN5SOeTlA/Mm9PtFRkO+Xw42K1RUzVS3cMlLvPpH6zUsAH8QuC/zDjKCzuBZG05ojEfgiQoxYZj030Y/QXNeqyQvMo7+jw98bHJMMX9457U/vppDXQRg2GmBOt4UpWHijKzi31lmZTN/wmf09nAGv5v+JNhCaYGpWoAgNrvTHpERbA0ie0DNJqdW/1TRDxJSug3eYgEhOsW6RBtwJv/7h5RJc61KPkxLcgnPgHnd1neo3SnHr4VhmEvkLcDWkbbI/pE+08HONK33QAE9SliX9uq2tKRQKzqiXJkpRPSVc0IzwUROIvtVqbTghqRj/9m44Gei8cBwtX02hOBkFMXcTqpT4yEJfToJzfgXEKIJd24VUfM8KFg1JgJJBZNXqh1TfA/EFnsc0/cdEntpNtJDSg1WMElLNSaztiA6xj1wJvZ52+9EG7u0BFOs6WDcA7K03GozM2bJbRtPtFRkSpbsbkgsSyv3ES10SELV9UEpA51hGdbS9EYJzDSrvSVwFaFsKUxFutp8y5Cq1pNgBbtGpU68d1Kl4b3+3YXhSRLXVBjDW7o69DBMbVpjHzIrhrZ3+8ny6NPOaNyU7xZ3N3QTTPYUE6/gVJxIrTBDY6U1tWdxod41BULLkqnZfdW+aJbPMSQ4EOtHUhVIv0wTCY/D8eCS6kBPZCk6ArYCf/83pf6IgU29sFrbVdUZQ0X6VxIOV5SFM8YgroyQgoAb/hpsByL78TFal7aBFnB+GBqIt7FhXu4MwaA5B2p8qM/E26YE9oNA/CLYOxNUIYuw/5pu9WVoSALKki1Crnt5DyhmZiEzN088wUMiLHfDXQvOMWiItRFyLnn/zaL+jpafAZ5UyjnWMeC7VhpvFO+UMy1o1sGN3GZX0n907ZlJsXAV4EjIqro1V5t8uV7mDxHADcsNFXzzidhfxoRErifrfcZDekj8NEQ/lIeQc9in+nqkQkbILalBmHuRL8B157fhyFk2Sul+pg4e88tyzoUS/dxJuVsBYNSGQILKwn+ozqLaVkQWezXLMWpEsdQ9S2DGMLeAZg0p9pJCAwol+7iTcrYCwakCtR8QkcYdqGCH5k4vr4yamEg8m2kh6rDYeMxuPZLOhRL93Em5WwFg1JaTCCM2mkPSflM6sJLXi4DBLBl6pgAY0FTjMuQgsAeEZjJCVEb0yXJwOJEb8zb6gL+YfYQHr5KOnxC3rLyjfFIY+E1iKBJkjY8X8E+VcJP9Xq59oOZv8YRqpZ7zHpUsyTzR6F2zGgz+hjg5e+J5ALgWWYA4bLeEi7aAabD1Wji295H4rDLIuHOUfK1EBszRiR0yLHnvFYvkzQLYtzL2Hfd/KkV12pSmFQHMfyqRlubaquoBx5rFm+4yckQqllh9nNdTkZa8S4k2IDHg+5E+TlHCR4f2S6DU147llnVh006YKLYFNCtdrj3sCm1QO20aNpWUYI8OLmQ1usOLjSiZZoF6DwM9ewiQGIeEkmy26wLRC/M0w1wySAaUy80onVmZT7GhQj7mUTRAYgGY5AM+W5FUTz/9VjphCGjd7D0DrzkoPDoD+clNpXV87yDs4XsPdK1ilPdGXmlE6su5glhey+zsxkoV3lgotgU0K12uPewKbVA7bRo2lTe0OlVVfkiWlYRDRQC501VoXgQq13FKz1DLF9s7KN4qZ+oLNMkBSaN61TdpPgy9KEH4sW0g30oH7QPlu4ezZxpVO3afZGf64l6mh3Crxebqd1o29I5MBo1OzMX5c6NC/cKg3ZnVC2Ourl8sRBIRXYQQ1iRxtnCIAZBbfmdaK217+PRUsy9VBinLrmYKzu3BXC//BmDvmTQ5VA8631aR0ewhPwNdssGWtIYJKJ4ERCrN4RITnYjKTRYhGl8CeOR1ZindnceA7vmkmjAEsKIIzv7LBoiMfdPoUHAVjXib6lF2x4u9NKg23IzUG88vuCNUJCkjzWR3vQM6YdIx2XUIKWjjNnSge9JgAPbnz4uD57L3jJvdj/Lo0rw9YhSdvixE4q9llfx2HZIEZB1csjvsqSUa4QO2nl0n3vYRW/uhRPSRSN4/kZYGg/35r2UyuzQSVcqfkDAhLtWfXUikKYOTr0P7P14s4tITHbkTqaHe82xwnl4BYm6/ReRg5RzlaIvrBkfnCx3oWHT+STI32pMVSGmxhXr9J+pofoB0qWWmMu4O4qbKYozw41ykGX0bE8yr5iuojB28mU5OQpHHxmYxI/n2qF5q1x9550mFjdOSVlvleBseh2ley7O1bw9yd2ZW65zbbX8i9/yQDzArWKuGXewgoyTAdx2trrqBJYVso8OgP5yU2lQZh/9/16Fn/2j/PJ4ZLwTyEbrYAOxe4E3R1nVPJDyUbMsfpsJbG5HjUY5jV6O8DOJ4KLYFNCtdrj3rYho5foU6YKBxcI8e1ErWhO7TyEbrYAOxe4E3R1nVPI+FFL7+SS9rgoAUoK9Hn8csx0BYbSiqdIO3HrYeHw1g07uJJnMLIEoxezeahhkn8XMqoDRUDATgddDVHbnJQeHQH85KbSoMw/+/69Cz/Bw6WhQzO4CTQ0J9Db8tChH3MomiAxAJstusC0QvzNMIELhr+zCFiG1fFfCz6k4iBpg9N+X4sXY0rjfj7ZZ4z/t/nTeaThP7aiE+GSmAwWP02EtjckRGqKof6Kb2snbzBLPdCTqkcp5mT1SB/MYDttGjaVAACxt+xWsj0seZ1Md6bCF+7j5vetnBtmsIWm7H+Nfushf5O7ZfsZDtBnLDU3hNNwqahJ9+EPwOy2T50zCc07XzCp2o0Atq+qyY5Q1Qpc2aRtoQPpZvwjNYH/6HRlmQsIB+KrNm159SxtIVJOfAKHNUnGh5FqzyTLZCJSH+NWab1R0oZFPAOHAIZlmhWnuYQnCCkj5K5rxulWE8nIpj1HJto1x99xg20LLme07hIaV5vhtb9CW/XEFnw1YpxXj9WS2Me3saDqTV7LCnXpjpe6CFOO3xRLHIJGu1JRYpDYN7G6XTcWyckkMPeGM+Fg2LaIVNQk+/CH4HZbJ86ZhOadr5nP8UcUYYtHkn5jd+872edmhF+FXpask7EntByxxk5Vbiv5/7QDRUE5FMeo5NtGuKz3Kb/Pi5mLR9k9/rui5BtjbUf3+FlMatmFLmykalJIjz1eTpdlnTq3ExsFUlaRDxOQaA9BG7TA46oOn/LttShof7maGpef+6owTW8QdRA5c/JH3PqN0LwLhJ1VW1r8QFChEAckxBFxmkTQG/M3/Jkao+NOYBbstnvUUBQ7a9/JTD2hV4tPj7isgjzjcxarDNpStApVQQX5il1VTt9Ivd1/V3gZh+AkKmdSfT+CPDPCd42rhlbutyGRUKV9CQ2KtR+GUyLVoNyyiqKZwFth7F91ySVkYNQS598PrBYkQkFiTnw2dX0i4PrNuzZ4JitYpe/ivNeAJruzHR1EGPWIqY9XGxIxTwb8Fl8qoCjgAemawBw6KOUUyrSyi0nmL0+f/qN0SNpQPYIqHmVw+OYrb+vIgvzMlrRThqyu20mIEHUSkx5Wsav6WRw30ScknAs8wChmbS5N59HS32hJyqW+rieqVsqhXQx5ml7ZHWkPyZykCE0KWaOvtiqSdryDo2l8N/ZRzUzwiDlfRWLfXTsxWdBqL5fOxjdW4qXc59QHbkeHI5WSfzwdkSErt1ZNhMsuypVUIuva4ZFC+u26ckgDgxmqjc3lCUxhy+3uCXOyPxRoLImxgHcZ30MJ/rjxWxRnAgpOFWwMwpc2Ueu4zGs0KmoSffhD8DsilupNXssKdemPAN7POzQi/Cr0hovCRB9UMVM07WrqTV7LCnXpawmxxyBWKwAtoypE06G1z2cuQaYeL3Fk7pUIbWA4pANtSGA/WccLPtCKvTEhoChlZKzOd+L3M+AKUujIj2Z2XF7iyd0uchjRkUqrftYR4w+IS+d4aUGWOuiLdor7FFv66dvYEk/prSSufrWAUmrIblNtiPZp039NJyOtO3AzhDNR+KLOPKAAAAA" width="270" height="776" class="img_ev3q">
</p><figcaption>Add stages to enable collisions and attach object to gripper.</figcaption><p></p></figure>
<p>Our full pick process is complete! In the code, we group these stages together using a <code>SerialContainer</code>, another special type of stage. That means we can reuse the same set of stages in different Tasks. In future diagrams, instead of repeating all of the stages above, I'll draw a single Pick Object box.</p>
<div class="theme-admonition theme-admonition-danger admonition_xJq3 alert alert--danger"><div class="admonitionHeading_Gvgb"><span class="admonitionIcon_Rf37"><svg viewBox="0 0 12 16"><path fill-rule="evenodd" d="M5.05.31c.81 2.17.41 3.38-.52 4.31C3.55 5.67 1.98 6.45.9 7.98c-1.45 2.05-1.7 6.53 3.53 7.7-2.2-1.16-2.67-4.52-.3-6.61-.61 2.03.53 3.33 1.94 2.86 1.39-.47 2.3.53 2.27 1.67-.02.78-.31 1.44-1.13 1.81 3.42-.59 4.78-3.42 4.78-5.56 0-2.84-2.53-3.22-1.25-5.61-1.52.13-2.03 1.13-1.89 2.75.09 1.08-1.02 1.8-1.86 1.33-.67-.41-.66-1.19-.06-1.78C8.18 5.31 8.68 2.45 5.05.32L5.03.3l.02.01z"></path></svg></span>Stop! Now it's your turn!</div><div class="admonitionContent_BuS1"><p>Now we've worked through the Pick process, it's your turn to define the opposite process: placing the object. Start with a generator called <strong>GenerateFixedPlace</strong>, which gives a fixed pose to place the object. Surround it with stages that drop the object and move the arm away.</p><p>You can use pen and paper to draw the diagram. Once you're done, check your work below!</p><details class="details_lb9f alert alert--info details_b_Ee" data-collapsed="true"><summary>Complete Place Process</summary><div><div class="collapsibleContent_i85q"><figure class="text--center"><p><img decoding="async" loading="lazy" alt="New set of stages for placing an object" src="data:image/webp;base64,UklGRlAeAABXRUJQVlA4IEQeAACQfgCdASoPAUUCPikUiEMhoSEQyZ1QGAKEtLd+I3zkdahmfoT/Gfwo76/6N+I39Z/3HaL9mPYj+e/87e3dQ74p9LPl/4t/1H/0f8X3j/n/4hfux/gPan8L+3P8cPgC/D/4z/RP6d/Xf8v/Nf2n4yupP9V/E34AvTv4h/av8Z+tX87/8f+S+xDzj+V/jv7ufTr2AP4n/EP5b+Mf84/9nvLfyXxN/p/+F/u3uAfwf+Ofy3+/f3D+zf4n/7f8f8SP2P+n/4r+8/4P+w//X3ufkP9X/zX7Bf67/Lf/v8BP4r/Hv6f/Vf8//n/7B//P+H9p3rI/bj2EP04/1P5gfv//9h+bV5u95NPtQRN7QHVNDu7LoCUo7OiyXIwvJhAtUVJwjr+DgiRPwWz+2SUxPnaucamgADbGGDiqkrzKP6DkzoaTxQ95PIsff8SWHO5y6vBL+/Aws8o82xgkE+1VFRskMFXjVOeUXxo9ejjfZJ8AF1vkbuxMYKwzkZm2jYlFtlliVjyVyrhAUioA4H+7Z0EZXU0fF2BQGS13AHCOd4pynzMNnKRQQZNbJ3TSRs4IYkCyCVKLbLLGQ2dCyD7BrjFwK28ErbASH9BLwo107BtEiYpscl6TkbYyHHZL9y0/TSryuUTJeTl9x1zWAANsBCewpv0OznZnHbo0+jgOzdC2ZJnAQJZ0WoC01ebveTT7UEXXWkSMA44YQsN0LXtiGOCbi/GKzhXYaCRoKP8/U/OC0h0YwPKzOi0iRa1UxETxRi9kMCZc3vHjZRSiGL7EZjQBsbeL9OxQqDsM//wOAKoJGgndd06BxFnmu8chnu98rDGrzd4qCPhIP/ABbofjwqAqU4zEjxFIwDjhjPtotIkYBxwdbUBL7/UGai0wBJzc78mn2oBT0835O83QMyNrgviE6RIwDhCOKbcmZ1ZOEjnsb5DxWzE/oC7IO3R9UBiM14LfqLtFOi1BIj8iSfl7N88zHFiENMQAZuk/m73k0o6y0Si1rKdwPoIPCqzRYWgLm73k0+1BF11pEjAOOGNXe3jeM968YBxwxq78SoENxcnNom0TddC2Pt1xt0cMavM1D8a6CD1P+JEkNYC5rT+UQSSGAD1BykLAbV5u8ID83xDAn2wbaGkpEG7K3KuC4ntSgLU+3v8mn2oBPVCXCi0AG9IkMSWRX6HpLpAgVbveTT7UEXXWkSMA44Y1d7eVyAcMavN3vGtkruY0T3vjlQwNqRkQ2Zs9hhoKRgF5bfl2zTMC+agWsADOLsOLd7yae4IZulvkED8agIEYJBlO8TSBvxRhlRr8xh/9ZEjAOEBlyvcTIAcFlXe7/MnDGrzdI2g93gHsgt7VbIkYBxwxq83e8mkwAP7/9LnD5/xMnm+H0HBNeVbNtOOCcGaQjEWhxqKG43kLSF5YH2DdNscKhPKyqsBj9avbfe9Wp3MwQYpwBfCxWGBaKJ5yUjFTv6zqNoXP2AgQ/V2rPA7tdj0PbFiCCOX+Y+xtu04dfcEUDMlGQI7yCt07skXga4A0Qt2pv6ItaZInNFHX7J67JjaAhyYTKYtRoeNM0aJX/uRJiJ/4Nbsou7ifkGu22OgeDlI/x5c7gLcR2RlYOtUCEYum0uxAjGnjoHgjLj7+vdxWJLBye9JkLELzmZsJLCx3wzqHHDrR6x3ZkiEa6lAXIZvI59x/Ap5hj6fSG1NcHZ9GRC3pZPgLqfUogP4i5D0ROaiKtLrrEWwQrGzykJTfRTLLpTpTvGDNBNW5tg5hF3zXNCl1DXWY9S/77ehCMtWUT18WsmTI4Lzy1lERlGQF18+hKEYIBBQEbbTERROFffMMI327wZpiQ04Kj375/TYcYxrDlNzfAfS8D2t5cmMtZkj9FGOrZ5eaiqhLD3tWgimN8eW0DTbTh0yTpZ8G87XNqwldIYjoPfDxyE4wZiMnuxkkhfeE4x0ofdKID7eTUU/XmybmfzDeMVllR7wdzwuiVUxHiKAYi0PMWom1UVnu4FYM4E+r28EigeHdMbW+QgYetUj6ywuE59Ahtza56fC3QxqY3FFaLso3Jkb35V8XKCB+6025Zj5uUqXQlfBSTTSWXw+Om6VHpsKpGNOvGjR71U51hJM2cpVeVSo8Twpckhbf0lZHI877N+oYoW+54dGuvdyxb2TYFNrlCVwgV96Y8rmAhuGucs9NHjrwvZS11UXkcQDcwp9uWfHaChwut1OLpA5kCxikRVtVuJMgJ6pEKv1NoseEYl+ZE1/RD/G0wu0w6K8vgmd2fVIyzJJxMWiJ0TCcETrusdp0wtx7C2npOWsOihZX1iM9RDV5vVrCb1iwEXfzBOWpUaefFhE/3k/OxTNle7muxm/FPvxCV1nv//l8Tbp6/ggCGH2LmxKTu/D1MFqB/dDtt1AAsv3b/9pdkoL9P8z2HymwhTVNp4xJhk4ywgbc3MKAxiBfKlqwskgoZKDm8ibsLxbKugVSn8NyEdolYMiR1WdyguI8JiBC445mK3tivgk/KV6SYO5zYIZPPQnSihTHqOa3SXyNUHUBxiGFFM3/+Ax2MZuWzgmkgW86jOOw3OD9iNyUs9XT34XGGCIryMTIFw35H/Y5tFXrZDFAACC0Mr/tCpA7d/73x6E9h4knjaJfDveJGS6a+H9xSOjW5oFfBTh+wrXbXNZMoxoD8saParMBm9Vg63JqXOVCLUROEaNtTmI8mpTlewaWkkeQ0E9a0IrdAugVjoSSIdJC4Aa0x3QtPl3uNQ4/3KE6oVq0vrTa3PQI/rzla0TfCMoa5rR/pDXd5TitqVlXmcnGmTP/4TU3bo8YuW/O9xgm0dAuZDYwYFbC617Ia3IzWGdpeHy318WQCJSRKecHPkMpljTyvEem2P6MhduCdoMM4X5A3aaOnWfl1bRuoblIEZdN8aSDKD13t+NicfJoRHQCBAoqPyYtymeXg14C1LK2Gm/6Hncr3AsCvx0/AL7xDT6aMdweK0Cd0JXsebqLFJnB8ESKatZ56Yzct/dqTnzMOqUBNFvugMgzt6pnVnNsWJbcTvfMXpukqj86IoRV08FjXlbqxerZ1v5S9Qds5ojQyqsppmxcmx2vwDZlG8Q5BXNlQG9GGgF7B6f+bkBhyodlYpdTzFuDznRm9zPZCRKRp+2Pe0c1FgHrFf+u2pIVcQnnwMda8qUid5Ri5Fa5UCymBrJHVyKzzGcFtPSNQIqsfrRDMgtIS76TCRR+8EgIbplO04wlDnID2qfR0kG//7X0suNLRIP68NqR+xOPoHVxYDTnUUvbs6J5b44Bisb6In0nIQ9uHY1fTzaen5qPH1MXT9tyvu6jDl4qVmjeDMyweSTPZuiZADQLvZRr2LV0L4Ahfc1bLCSI7AYuujwFG4uea7zPIZvcHBaq+qT7eR66mSa5ZMm4N6v/9gF69F5QUzmF9tk6qVT8KH67qIn3tQ0vdAlwiYKTVb/3fqVkmwPu2FDROaqWvzaPOSRxYUonDzoxf4Cg/zC7J5st9F5PsdckdU6bQCJ8ysqFVkywOUdSzv0n31WgEgYZNockh9DrmC9VNknR88M1Pw7v8EgXZLAfwa37WgE6BO9nGzycVtvsn3TUnVlxRdJzuqm6Uvid8Sd5FqSfUHv4YBEJhgGidzBBus0iEJU4Jx+w73J13AYya6huZQtXEIqaeUYJQN+OWyV9J9iah6UET8ENQCMA8YYJf5M80YvJSABHMnYBAc1SSrTQFy1+ce8I2+Y2KJQiZTW+c6o8CvEeFSxuqH6okcdngTd8SdZOJVznCEhlFJ+HAN12TwkLIw0de5YR+SZfe2D8/Eu1t+QvWeq3Ca/yQVJb8KA9JSwQ52mTEs69DF/m6xEDfyFDKhDhn6GNspRAbb1Jc366VkMPnnH26fRofG0qGy3fWSs8ttV5DAjNdgtJI5rnEarwTvNGPqfwA8EFkwZvNtpBjoCuFumO94kkQALoffQ2pZZDtry68G+gL6brMjPAuBPmq61PbLtj4C0fEycVxyv1pWlHqyrF/IkTT5eLrwnlu8K3Kztdw5QPH1wX0K+6AB9ArOjkhPnw5WObhGnlQpuRxWgxPyfrlbrc9swCyUZX5IyY4p+d0nN5Zf+w9V9LKJemvVktkttWlAo1ElUL/yT3ibcpMP9HTksGQHzEsSdHqMxoS21Iyubt3cAU7igYtkcXB790QMbmyEfGyCfT2zpQGq3y5PMCXYeig1JEJDRv3LZKTMlP+94cxS841B1osr3h45q1gN6zBRm9STFjWJ5VHKvUjHVCiEfn4NJwgI1c93MGYhquBR4rx8BcE9hPPIOIGfS8NqR41ioV+ls2jYMJxR9zJCRlBiluXHRf1eSA50ctv2U12xxvSztd0junGJ4SdUkiu68zDfDmIUReOMvVONDXh1GHsaj+5x2LLY2IIsTW5mO89+GVnQDwXIMFYAdo9xR66IiX8Z9i22M8s0KjHdw8amNnA4cFH4yXtbTTIHG4b8hvxijvmwB/tS7YQyZPDiiNsneTcbvWPQIoToHdXaUig+DxyqAgmP3/MbG03XxfvWoZcPrm3tzJO8bWgVejK1H/dZbtKyPupVoCa7gM25SoY6F5vsjQ69n2FtOtlejAaL9NxGL6CXpy+zUoyqjF4iJ/a1U7ipFzBadgQSM7UDNAMasPePGerJjRnY7qzD4frxU9fxA1NXez/dXBLC7i3JDrgToUbB76g5qftOXvS6m50rM39mLEkLz+flzMcDOPBaCFyCgAuKRYDrnswKozaMadmY3y2RXnS7aEAx6vFti9VjB4OlEIC8P7nzMKBES4iUTZyjeHgipzvjDLS/pzt3CHAtqbMiV8OQ36KEcszCNcVUGP1XyvJk30VLo2t/w1MY4upqGQQoYQt5y2fYG9VCGxe/IbopIe0ijw1gj2q1mqih7bodXaW7q5hOpy9rjgf8OZRLA8gtuHh6/qRG1kDuYhPZ3LkZ2bP2qih7bodXaW7q5hOpy9rjgf70ozoLJjUCBvt3oYOqF3M8GtTV/+lp6i0i1tp3UDRgNqooe26HV2lysVpqAnqPTa5pg43+sZpiMfWxZi5BMaErN0i6+YAY6OLzJhlE0FVY1EoPvDVqekREJfDMf3PzfrOXh0S4xRlOoLnTnh0Xt8e5MVJDUFDMmRGp/sGFbdSxD/j2RxJYRv5tVO7tE2MAGB029ssoHF5/TqNQ2ynfeBOrddtrv8a2o6jvDtXvNkeBmbj8YDbqgKSaOwpSizi+1iQPEr1XLh4LOOFOVJ3cWOVeZereCDoHVlBL3or3oqTIuztqOUSlhUFZtHJsyGbTRglgRL3U4nJn0joO2+kiyy/X2fnYpd49F/7X0UUI/cQ7p09OSrreRBfeyGC8A2c06Ca+XZlwAtDMD5yFLZQ9BhWWE08IwimDyIlP6d7DwESkDJZfyvk4EnRy3r7PDq2ENHyM+Z3IfsuWYOR1E8go5QE6H5KI/atcOR72fzDScfFefxSIX/FNZEtVtFNskKuExkW0dJCnoU9kHsBi/SXmmFLaEcSPu6prdOn73gYH7MwqJ4Hmzjox2jFabY3OlrN/j9Xo7KktthcB86XZiWh8qiitZyYpFrXvs8Pujo8PTjsbeZy2BRluWDi43gse8wtxWekHUVaSOIJqA+VD1eeVWTntt3o7Vi9JchfFxRGS/b3aGEnkkHTLgBolDi5wUddSgx+Cvn06kKBX07IFowjAffuI7XTjZA0kutxpmBcW7VQ0vC2prwfaCunYTa9ZYSICRVaEfWfjvGIpK7YhMrIHtSjPfA8Hc+o7FzLjguD39b6ykqLTgJBPm268LjfLEBaHwdaOL/DpGufRAi5HFUYqoA4kMvpB+mqa5PuZNPDnQQ+FSi672nZZ3ahT30NSU5pdjEY+tizF1/UcBF4NHN+GNMxv9Ck1E/eGrnGO8qasFAVh/gP01VpCsNymRh1UAdsefePF3CVNE15Jl1KJfaLDe5/2dbnNaJnHlF55bZFdQCpb5ZcaqKHtuh1dpburmE6nL2uOB/vl/JL13xrpKZHfE/kjSztGKDHkr80nWNwhlkLx+BXfbwgKAXbLrD0MFmxGhIUFi4coo/SIh7MvGvPL4OOAwKmxNjzsov4WFhC6XHrlTopnYts6uUTLfnF2V0BrmGkqQqGW95UYrVCiTp4qy9rjgf70UI2ADakdARdswzoGzP/2mQKFK8d0d3neIE/+pR6h18jW2M4tQlzf/lnSS8uugX2MLriajHnYMsokV7Qa4lIfzsqWygxeKqDH6r5Xkyb6Kl0bW/4amMcXU1Kk3cZjAFrvnU3MVVA9RwJIurGolB94atT1By1aQiobGZHjtBEF54B0IdiKAoO6L2+PcmKkhqChmWYKkPaRRiXIzs1XByctLrwbGhKxFxegDtuHh6/7ZC2mpx/yDFxRz36WFqYfOSvzSdfV/b0pXbIehgs1wFjQiHCXwzH9z836zlV3NHXlWuOB/vl/JL13xrpKZHfE/kjSztGKDHkr80nWj3ZXQGuYaSpCp3fS7GIx9bFmLmOY6hnJdtCqENMvl4xM1ko4qK3vcBi0v7BmdXvF9yqiyB6CnymQ8TJ+NhCUaek91pnW59LTFoZBQp9WqaKV0EzvDyWZsow1GTt+0aEmmSbN3389qVkOjGyKbMFk69aDMCGxeuzCTvONhGxR1Y8C1o+QBnNSwJ31wiA+6NmlqFrR4aR+neW2mLkNhfEtT0+rKjC0KTTGJnPrhCAiyp0ZJmkb6a7SD6ZCXm0tx6J3X0mm5LtJCcUM9bmvwGf1bpCEQZel7vmYFE1p/+4U6WEPeo+QCHaz1jsE2b+Uv2QS6zF54rHYKm+QUK1Rx/Ad4zc9I3EabkvN8ZpVbw+WDVPiKbnZAAsL5fmDO/HrGkvZ4LfzoQG8kf9CR305I4NvTkGjnD7P9Z3sflJXczp300zzQHqHcEgYXtxDnKC0htF3irsdquYbGrW6PKJLeyEjcWaWnSGRklm1CV+Uakx6L/nRguZftd1j2lKJer/OOOjIZFKUPUCJ20x0dgZ4BX4keZT5VH2rSjJXgYCClRdwjBfrAY/c2C0A0yF42uX0GNr0PP6cyuoxQhs5AMSOtYsvdOeJhy/JwsHf5mTurAO6UHUXHouqWQLjS4RvvRZBrQ296EL7mF67dgI92+Hl02rzskRSaIlVdaRF7S54oOWuIlJcuIklygXHCMQRoC876YkIbamyON7ehXI//b9C41/ZX99BX1OVwpcKiEITOS8l4dQzPYQ/JmmjVX2aIfzdKkRxOCe2ggn+Elw0fkjW+hOaWAusCI7KGWQvH4Fd9vCFp08VZe1xwP+HMolgeQW3Dw9f1IjZeroqahWDdRBHtHqhlkLx+BXfbwgKAXbLrD0MFmt3F2V0BrmGkqQr9PdyE0M08bhyev9dvUfnI6kbaMaZjf63HgWph83flKLsXGQgF2y6w9DBZrhR7JOh9XbSA7hZkKw6xiOj9gBdm7wNLy/wH6ap5Hi6jCkPaRR4awR7R6oZZC8fgV328IWnTxVl7XHA/3y/kl67410lMjvifyQdpj5NKGlpEa041Z4JfDMf3PzfrR7Zh+zmT7cQi8CuL3DfV6mSWBYIGcI4uSC/iwfnXGQC8Y+VkKbjD80DRWqbTWzioFfETmwODzUa8vWzFgHIaAZb3lRitWAYm1qFYN1EEe0WRXc0deVa44H+9FCNgbJ9zTvvECf/Uo9Q6+RrPO+tSQPJqJMVhmmeMgJ7IdOKyRx6uk8ZX1JfT5PWkETwMrJQLTVVmD040C1erVwNeRzorXKZHfUSRTE5FedLtoR4EvhmP7n5v1nKruaOvKtccD/hzKJYHkFtw8PX9SI3FFchQLU5FAGhGIHs8fFcPYazlvXjj6Bsz/91a7LvNd/9h90FAwOjS5uFxyi5bZFedLtJLWMhALtl1h6GCzXCj2SePlvwEDRTvdp3zCl0Vce8y5w9eseWQr6m6s9vWJvMINN0hqwp+PbYSZHaiKhOcBynCL7MgjwT/2zMX9ii1qomR/t2Z921akUMBCQrbVK2pLCv0JkoDTHWPx5spJrEnY2sL9u7jSGOgg/F9S5ezZ7T0zzhOXUgSEJC9GayYC3zJZOqTc4cmkFgJ1N2jcCwJ01RmNkyQ6G9+LTJhyTTXNNhvjtQj3HcW7+PSyKtSD/2jdzCVylI+zgLnqDMQUxQeG+PKZNnn+sj+46Q6XvlE+GHt2WXw+xoIWo4b4e8pSoHPPqB83cceL2yDeB0zs3nF3fVDn04e/3aDHBZv/Yrn7Wec+BAFGMtnryzDB1qUnUrkUEZMp89PDXS7mdqwygZUK/D4UC/4zoi1Gr+ovcQ9pcu2nk9YPpnTvB2E0NV/UKZj8YaQQXTpSF31tBPlR1ZJZJBO0yvYaBSXoKwqJbtnE8z/0UE5dqozedxpO0kEOIlhVzzoWN3eqJaDFI/0PEBd9/vrFiWsGhg8fSgulpF7kGyk7Vd/qiORtrpGRaPP2P2NdM799nph/rNPMHLT/9Dk/5TMjGA5LBaMHPasRBKvCfegwfZlCqC75fXlBKWHNZx3dwdplFRnxRVaZLCOZmO2tRgFlaRvD6S14SF8Qn2ezCr/mVxfhNB4J11ZFNL2yZ4efqBJsxiB7PHxXD2HbUzA01TwMoJSfqOsxxwwPrSVlhBDyCGW5QqVUFy/SdNbBVaV5kDBGs3lYjxd2pigy66zJdNMdV5PwEDRTvdp3w6qNlRNJQvrWV6VjJ0OxguGWO9n4IamI8C5lI8Laup+r1Uu8yWGxo9mWdotebqshObSHCRaGJKotMKfEE++gu7QRDhffyWBHL7DfLNFGaigfpkQ2X2ZdhCd/7h5+ygOVGiRDVlQLs0jnZP/+c2SiO4hGwVVN7Q/2+wH+SZUa9hi7R2M8Qbx3Uc4BlBDQ+ER1n6AIkfAP8F59gjmXBen/fF4R4sPGVVhc2uQCHBrYKFD04NlXJ1/YECjDeLk+DWe/1sI6VCjZh2FqC2ILSRUcAJowBQekZ4m4ColtYkBYECbOAEWYKo0Ga1m0ES94iWgfRtkQW4OWDlYQ9CmGgJwTVfWn0rFpbtDpIB/Ce89DP03Vnt6xJUcddqYoMuusyVuKifd6NkUT2U2HRoqekdFT/4IidJCFcQR+AlSIBiopV0Xt8e5MVJDVfuZhgQEwQMGGSk9qdlndqFPfQ1bh3XRH3r8IdiKAfG4/c+gI/lyxDqbgipytk64IDoxIBruyUGoobjeQtIXlgfYOtgMZPk9gbh0dldAa5hpKkKhlveVGK2SMHgx+kKBsz/9o6yowpD2jNpVcmiASMOKwq7biEXgU23/QgT7sBdSjYoZ3LGxoERpaprG4Mplt99givngkryGztFlgiYl2RdJsrbujQPl/yBQ166GOji8yZmh5gQntBQ1+PdGdBZMagQN9vCAoBdsusPQwWbE5xF1Oy/roHnyW5eaKEc8fzayRv4It9uPzndP+yChNRq1MXAJ2HNqyQyyF4/Arvt4auy7zXf/YfdBQMDo0ubhdFUzjKgGMewInnqXAn/v4tc+YV/BQVuEXg0c34Y0zG/3MmnhzoIYra0mfSyGWQvH4Fd9vCAoBdsusPQwWa7SFbhF4NHN+GNMxv9KhZYfdTs6RgFiAD7uCDFI/0PEBd9/vrFhY3rXkFomzGD1OiuBdiG0BjcU0Lk0GuIwOF6kmOWEhOns1BEcJFSq4lDXbxcXAOi+EChd4DcLs6BJFYBF18wAx0cXmTUggtNKGlpEa041Z4JfDMf3PzfrR7Zh+zmT7cQi8CwA/6+YAY6OLzJv6llkZADxYzJuvAtTD5yV+aTrR7sroDXMNJUhU7vpdjEY+tizFzsCtwi8Gjm/DGmY3+tx4FqYfN35Si7Fo33j7moWyDTz8XrMxvnBpVJR0q+AXVpA8kGa5M+ytX2M8PAz6JynYllyJWDxPYuTs/grsgaXkVwB5gipgGhLmZogRwQGSoVLJjDMQW7Op1M0FAmosYPa5Q6v/U8ep3u6DIDZY3o/n+x5IRm6RG5LfmZpi1mjEhI8EexL1UwghUFq5e9N3P3oSc4FxJ+VmHdZFCbyh6Jlq7maIpRMKP7zPjKQwnSqcHGrQA7nK3LElw/Rigx5K/NJ2GCMQPZ4+K4ewzgICf+/i1z5hX9g4uvmAGOji8yYZRNBVWNRKD7N5eswC80YiFupruQew1O/18wAx0cXmTT3D8SBktSE2ev1CBiIW6mu5B7DeLAPjActptc0wcb/WM0xGPrYsxci2/03hpRiB7PHxXD2Hc7K6A1zDSVIVOJfaLDe5/2dbnrX317qziB6+4onlHAgSKYnIrzpdtB85Kg7Wb83n/Z1uccZtfEie5IJsOdvtjNDXBUrPuQZ7JAAAAA==" width="271" height="581" class="img_ev3q">
</p><figcaption>Completed place process stages. The approach pose is skipped because it's not necessary to safely drop the object. Note that Open Gripper, Detach Object, and Disable Collisions can be run in any order; this version matches the tutorial.</figcaption><p></p></figure></div></div></details></div></div>
<h3 class="anchor anchorTargetStickyNavbar_Vzrq" id="end-to-end-pick-and-place">End-to-end Pick and Place<a href="https://mikelikesrobots.github.io/blog/moveit-task-constructor#end-to-end-pick-and-place" class="hash-link" aria-label="Direct link to End-to-end Pick and Place" title="Direct link to End-to-end Pick and Place" translate="no">​</a></h3>
<p>So far, we've seen generator and propagators stages, plus a couple of special stages for IK and grouping tasks together. Now, we want to use our pick and place subtasks and join everything together - start from home, pick an object, place an object, and move back home.</p>
<p>We start with a generator for the current position:</p>
<figure class="text--center"><p><img decoding="async" loading="lazy" alt="Task with only the current state" src="data:image/webp;base64,UklGRoQHAABXRUJQVlA4IHgHAADwJgCdASqhAHkAPikSiEIhoSEWiuQoGAKEtLdwufDjn+mf9A7SP7B+O3V29+/YzQG/iH1o+2/0r9rPSf+l/ir5g+nj1Avxn+Kf2n8d/y746SqH+M/Gb4AvUT5L/YPyG/tv7ieiB+QHizfkB9AH6Y/438c+YGoAfx7+d/4D8i/7Z8Gn8Z/h/6r/tP7L7Mvyn+wf5H+9/uZ/iPsF/if8p/sX9t/aP+6f/z/i+Mn9pPYe/Uo0bHyDCt4dtDbAgr079PdrgcbsL94bAjUY23nMPoE7m5ryUkbd7mv55DH93I3VPOoUvahqy/xGCmDXejqglcyXNZAq73OndO796z/Ld1wZO8mlPvQKT7GRwVh9PwTNzkhmMmLgqs+uNLez00LQh9h7u0OAy03NvNpL8ZLZSNsZTf4v//7q9Pf/IMK3h252AAD+/+EmBlaK4YYIZXq77RdoqGSlxuqLazOAr9dHgXGVEFL//X+9HUQ6pCdLres7nIyhQ40QLrflSa6H0MFGiu02FDssTWNs5o4Bgumc99pGuLMtUQNcy6Kz3lj+Kz3IaUqjw5/x/vEhhvB1gLeJmOHGut2Il8LNYpOT4YXNJXQfijbrIEjHb0h6mCTpZGrQAGrfCYh7NZIIeKqUQeIYctBUMOLV1EmdpBY/x1XDdJjahmh5eVUCZ22tiurU7Tl2Y/tcTt75KgXvkThdn/Ac45m3JLjcZEAOIqH14oe0H0h4YUHL+HYy+1A7aS+shJYPdvjOBkmXo3gq173bD8takCLIoyO4wkrwywbGe0xPqcTcrD/iB5acV4wqjRbrQgmyq2ypZ0W2wovaQWlRgREmAkue/uoytv1Rhr8+VO38bkZI57IOjiuJhaNB9++44amgi1UKCAu/g8vRwLSagmEN9EnwKH5fqiIk/zpDkKB9aOqR6Bh1gMsOURiuLYSUWTN2f+aXzNoB/DGFKaKOSUxz+M8JBvYqV9h9kAxRs5pzTvYldApZW6TtY33Up2bnECRQ4FaxNSGWvn3EG/AdYZdrVRYVJ5CnV9zz+bKlJsVJsYMqYX4TIDFpW1MXNmueAux2aPDD9delBryjddzTnHO2vH7a38qmUBMcjXYbF0uM61jualQ9f+VPU1bGdUED409cfY+pPWjqKiEkXsZMVhcxsF8VpbuE9EcyXyWMQR3L2d45nnUTrzR4EO0FwIZVfNdhWySPYgJYn2n3SSWRZ89Vj/poZXvaIHYcPEtLoAVjih3xpvzOL+OVHh4qbm+8Ue2TX5ysfdur7/YK1PHb7I2u3XLzF8q4gZHaLwGwP+7GiJm3XU+ww4V87aQsujVicDz7pZ4U/GKwBbhj8/4jomV1Zr+Fwl2OrgUwRiWi76jS7tj5mBMNoeJ97S4i3pjeZWdnE7Z1twZZSS9Z/261q+U1/p0zkhcq79n3/2nZdYbT+V4/sOiE9gr9CZiSzmUsO0FPYEE/3HdVaNalTVdoyKPcrBlwGhZnyLvEF/INr2HdSAnKr2abn3OeyU3YPkTJTD/gfN2U4yWPD6iKQ13HyLw7giPxLbNmWJp9+63R8v26qBBSV21jeq3hUZrejEpyYqumMNsddlyFaSJhF/fkiO9bclU7k47UNwUrVON4xKuj1wN/mLVHjG32Wv5qnDo8Uc8MN+xw85XKaDdrIsgn/iH0F44sJgSPD2C77/XYmuRyWMq3zhad79jvumR01klIcYhuOryB+6p2iwUKUN4lQaX8h5J8orXZnbCSJTs/TecVqL621s7o4fbwzfQitT5Q4D2wFd/xzOawbLWZOFW/yDqNyaZszRATSJDR1FjWIWSqLSrEG1SrE1MtjggRqOb+vyyIUg9fl/aTWVPi4aKKqoP+qzsRikHVuJ/H6aUO9LRT5hbWwSf6iILE6eaXMABNWKyymNYbfRqicJE3bjY7BOyBx3Lo++ErsJaUAdEdwzZD9p53ciNteGES7H7TwksfHNtq7JmxuycGXIzMSLU0whFrmuictp6KBoyExkA9biU565zHpwz6Grd55WOqlfQfBaIYG11F+GOol3CORHr7zUqpDBiNhHklbkizPWr32VAU2+iO8DvB+heNlvTklRhMqpqZEjC+LrcZS+hQr7fAYc3I4ALIW4rj4x+jHbyZ/4pUDk1TP+Os9nTgFAA2iXxN/2JO3VYzwlNe6JNo4j/sF0bBeYJF2efnqgDdPlZNpXe0gZHnLCZr9Kv5INqA8fJDK3W8BNoBHnUyOwNyS57YUgZhZafmlPBDlXwBG86JfsFsVXde9mEk1r6viof5qnkUoQOfkz5xKvMr3I9+YQT6c6nSuJ0cAHcupc+3jCqRGcFf2hsW6C87Oj04+FN9t8gs8UTrR/DYKX7HGo1H7HIxQ/my37/ssAesBCcinG+lBavTPQVTJCfcVHOktYsUMyyyAY9hIhgCiIXGcyGUIDLznZlpTFFUw0LqSVAHyNOT0GdjqOI/4Iar70NXhf7tcPHxMBXxrw/qGhipEdhgVT8QXTnwGYsU046N3aGDRY/fOYSVDdwQnf0HJ9eYmPqUrcIafn1lTo4tKeAAAAAA" width="161" height="121" class="img_ev3q">
</p><figcaption>The Task begins with the current state of the robot.</figcaption><p></p></figure>
<p>We also want to make sure the gripper is open, in case a previous action left it closed. This is a propagator just like the close hand stage from the pick process.</p>
<figure class="text--center"><p><img decoding="async" loading="lazy" alt="Task with extra stage to open gripper" src="data:image/webp;base64,UklGRpoMAABXRUJQVlA4II4MAACQOACdASqhAOcAPikSiEMhoSESWQVAGAKEtLdwuwCN+dX4L/uv8A7dv6D+MP7o9o92t9d9Ab+O/Uf6h/Qf2O/tf7Ne9n9V/HDzB98f7T6gX4p/Ef7H+Pn5GccHUD0AvUT4p/av7H+xf9Y/dH2T/zv8TfdL6o/3b8SfoA/j/8e/sX9Q/WT95Og3oAfyr+bf3D/G/sL/g///8gn8v/m/7L/rP6h///dN+P/1P/C/3r9of7N/9PwF/if8p/sP9r/wv+k/uf/6/3n2T+sX9vPYs/UMnKdnKJgJQ0qwPSv/7k7w6Z7irjJiKEgttYB2OpNcjU/2JcIPDtP3j/YZXNHfUNQfuHe2D1gbILOrMAP7i6yFKaA9MBBbtXfeBcw+QfIqj0RqErb3ol9V9xAKuJcQGCknf88RoSK0KK0wEW7yGj6kn5PeOsTo2gjy2YZGqm1c2nvyfyyYS4yLSdnKJfkssgD5Ocpffa9sBpdmpfcVNdc2OPjkXJ24dMTmOrfCXGJZv0AyTfAyV/BSPIko4ALX9ivLRUn2c3LM8AvTVKhYrAMJ9kHNKr8zU4LoRQPxW5/e3P7WKE2VDkVCspkofW0j1DU+O9rZw0bYCUTASiX3AAD+//CTCF6hZuzD7VWsVURIzVWj+cXwor2okH5W8UAD98h2YBAiZtd7DP4TJuR6ZwOmItWbI4eymSz6kxBYraUC3YWaUhgqzzdCcjsc/m0bQDMU3yGE9GrKwBRTjTfRJEWoUgf4pIHvQHcivkMowWQrsCZ0Pyi02Psd1zhm/NN4TkEowWpjJBShqY/8aCQUk4nAsEeRUtE6ooj6YnbsnlUDSqoO0aP2X0v+NxJKG3e9wERQajRGwJf7h4tceh3NC1GCA3Hf/sXqZGQq81Cecl4p344q/fM8wb6k8RNpzTRNd/Ap/A2dmVdeclRlEHzwq2UfOmpx1zp98LP2c8zBNNwhLAmG765WCUpA/FsD8UMmypNyaNW6FcX8XfhiVMKivfjE6JJylh2g9udPAhNVRJytY7sfOHBHw4Dp3qWGCY1kJnyuZntuVsjyOl/TOPOCvQI0vnghXZvU5byVmDiXoJDFGpZ6KNu2FhfGsugcnx10RE1S5NIoIeLNmvCIPpQtkBifGf8Q6+8q9kIOe8cxr8vxWKlf/wo4S6k26Ze0w5EcKsrUv4S7irNxelUWO1O9NYwQWLd3UgOwzFdeHTyfpN6EtGeur//7/hKKADdarI7FNidTY6p/PaD5w9VjIMS5dRB0lZ8m98bZMFOLsUWdKJfMjQ1Q2QhnQhWr2FQWjQypR4zZKvZmcJQLYv4GcT1Hm9V/T3v5qE4tR+ASyhNNc46qFNd6ULzoW+Or7MXJF+2AAakUosHEwuZTgMQjqn72XpoDyRtvSCaksoTTpB1DZYpBexqsE3+jtfyJpmR9bKmLCSFniiYp0lmUiu90oAVaVzgqps4Abz4rA0EsvuSfekfjj6Y1omfzSLQ/jAS1ZfLDENhMa4wqD2ZCMkaNQv1EDsoqGdr5Xlaogk+73cdnWDyRq46NeV2WYspymlfXoznEbPruAwXxos+ROwe2y/Z1/fsqsOVKOSZ74gTLT4BKHgGHCBt6L9HnNLEvjlZ44Ikf1fqUNfpot0KPp76aSsnhsy8B3aFxra37B2DpBI5K8Q8FUg0d6wGPibOLuV//aasLQ0+x9Z075Ve0FLWS3R7qQ2Go9JPbjyOIIX/+cGyM4TMOyZLhQA43Trrwm/XxuF6ecB/45IAjXcNH6PfMhlkRfng6f9m9Ogqc+crA5p04PMPjG0Pui4Kj0bknH0uzTTjEnwBwc64xe5AJN4Nl9O9DQQ9FQgUJoB2c4dZ0UPdihV1PPYrq4P6BO8Ux7C3UWoMBSl7zjrwk7gtJEWoCyIzzSdSkKG+M2x182WAAVTAxuzqiW8uZULyYehueuCVoANlIMeIEYm9benKIBsiCWMx/S8L//6YJajuROFEkUSDRQYHOm1lR+tNMxifo5dc0ipFeK6H6Uk7sreFPICvyTnREE+IfcLwQoGabQ81mITZf6Y7xtSfreX4o7Df6PFOyM2X56cEqK3AlzXn/Fz4ZSKFIoSLzSoYPA/YvS730q9qOF/E8ZC9WnLOEblS4uUo4Ky0KhMfHR9nIMGB1gE+MuzmwE8CvJXWO74LINVWH00FYwuAyl6E4mnNs4WRyPfTzJmDh0YjLZUnjmE9N8bZ0diKIvTZY/XUhOFCoZjxk7ei/BJw/zqKjKHqtiDciUBRKXk1msFS/osQ409MBs/+JJJQ5vUvxEr+CwbpQs36yfhJQPodWEGCO98p3ey1DJOwgrw9sEDuTB0hsmaTAl1qJsEiQ7yq8JxpxMt79L8KBGOjJkpkutXSLhENpKe3JsaBkkBYlY30OFHxsCuJMls88F5tcbVVqYs+A85c2+J7AXDpAksV1GTVH/hkAWWvvK58kiRh/ltv7Ny8v1L+1mMtM4/vfe4hT/6q6Y7cBFF/3sbpwtaTX6We/ZvFAxQvmiXmz4kHYcAeytAR198ARzuUtseAjTtapCSm3vqWS52ixpNp4T8rFsJprV31i847FuElpQfC7kptLS280/t9eC/ADr9GmBEoUGwZl4FuhBN0PYAww6N/nDY151Yx6tKMPgukevMiwUDabAF8scrABa48jJVL03O2mjdurqi4AQKDrE+2Fy1464iYWBQIRXNOlYyQft2i8VGx0dll6qWmZxULlkzAEXSI5twVG9eoJX0/OuMybtoGNMfA+mZF2GyIFKPXW+mIkk8UjYBN/Zrf/OPqRmTlFNqdg7Igs4cUfRQsJrlOQmMwyA/kWPgq8371TK4Onmggv6nJZR+WS5j+VB+f6J+vwZFvj85L4bWT6gMoUoTVZboKGxyX29sfwz+SXTgO8p0O7BliABTVlBF/bPyofJRV34yS4tJM9V2267ZchoNZwk91jcih1guPnud1XGjB6KYqn6pU7nzdV1erU3b8AQcG5QXMK1aor5/HHFcmNtWIyG1NQzkvsJ+a3dhRGOyRX8dT7JAQVVF+BJ8nU213zy/xUNPT2P5PU7+hNipavIVoKGrzY/jGFUsKNxQxV9u37WZAYhpUBlCAhYaD0LB4EdVEa40FRRVNP+Bx3kttmwC3Daivow6Uh/GMKpYUbihir7dv4p6BJovD7n02RPGfSlc3lk2V2Jlc2AW4bUV9GrYmgtoJ9JgYBMJfnBVjFFHiIYcD99fWb6U1o0yvdeiyrlcVrwlBncBP7GmqTjW8dHHm/iHe/0tQZnSRSH1ZeBTjJv41QNkO/GNfMvbuHbEVxwP60hDkk92ZzhfGXuMzNU1t7CqV+8k4DyNcLrVY+Oe3JGx9e2L/n6OYJTQ7aVudO5FpuHfzeukxDgWId5ZkU0wUVoqvjxjbfog7wt9b19Na7drNohGtVMGrk3fl2ogDyigm/b7rhR1ZUL+CrRwGTVyn2t8SgEi7K64XPAHDEbf90X+76JI432ACSP7zrIIsJD+SPKcnL585qWTGTpBgisbmarFft4EHE+TKBftKYD4dl06TQGDXFPnF/pJCi7JUa0650gca72tZDIS3u8gcxVUw0G+5GtLF51JUo+WV1LnggsPnn6tyWGxGZOrGFHWR1uT77caa3em24tyElE197K0ub9gjO1+y3Nbs9QZzE8bukI/tJGcVRkbWkW3o6RGptUwYdQb61wnOQZFk4fb3h9UY+sP2aewh18R/6W9bunKDp/zFQ6MhpeaPwo7KfKGqiuh8wMXK6RdhUHovzPmyBBzF98ImM+d10PS147l+0oTgg/JD/6vJRBB09uZd30is78Sw4C7RxzNbEMgLDkSuuRtxRgyY90xyIdk780kNye+CXBKW1vsU+sQ3hPqcOB3Q2SwXoM5JtyYpDnuF8RMdVk1MJ4BN5Kmf5tNoVIzHImjd+2VU7i2gdVYqvr+WMvWatzkVkMcfXg5t8l48MWD1UU0Go11tp2MIeykdmM8Oo5xZDKkC8Icj+vvKtAX5aQztolUT5OFpDjO2y3gWJd90CytZ1kJejP9sLLodsUJ2kAScURnJ6Xx+muGB57AdmYlOxa9X2dK1LZHKEaNqhIE7f8Djnl5Um0Mj1xjtDgBn0mzy8HDw05lnTAxQqRbqP4BNeTmPRHHlK6kUiFHs4aF9J0JTSY89ukOWhwAz6TZ5KhcHbo9W085BlYNfinjVnrrlg5bhHd5Cq2+qYoJQuxw0zsKq+27RSOloP6y0UGmfOLU+9iSG+AYuSNDSVwusQPoJenD2lJaegJaZp5H0hrJqHYxJgAAAA" width="161" height="231" class="img_ev3q">
</p><figcaption>Ensure the gripper is open before trying to pick.</figcaption><p></p></figure>
<p>At this point, the last of our major stages comes into play. The connector can solve a path between a start point and an end point. In this case, our start point is the robot state after opening the gripper, and the end point is our Pick Object subtask.</p>
<figure class="text--center"><p><img decoding="async" loading="lazy" alt="Task moves from start to pick process" src="data:image/webp;base64,UklGRs4VAABXRUJQVlA4IMIVAAAQWACdASqhAOEBPikSiEMhoSERyU0oGAKEtLd+PkzkdahnfpT/cPww/Wnx//qn4tft55lPlP6v+pH9u/qXOg5r8xv499OPsX4//vF/o/vt+Tfzr8a/yA9gfS56gX4h/C/7h+Nf5O/OX7n2TOe/0f9PPYC9NflP9p/qH7Df2L9yPXm/Ufw79zPqB/gPxA+gD+Ofy/+8/1/9av8X/6veZ8AagB/K/5h/gfx1/wX//+Vv+L/xP98/0n9V///ud/K/69/iv8V+y/9o/+v/G/QP+IfyL+w/27/L/6f+6//r/gfZv8/////F37p+xl+nHz///8jHXGgkT61ODYiRL/vtHsA0xClFrK1DKNHoi4I1JrjCN05IlnyRnltW6utVbwI39V6eDVTdUAnvYCz5Yj/Iu5AKWkRzvzJZ2C8C5fLAzaMkSrtnSr3ofXnxEoFoTPIDBD607KK5USTHbyShpenY0+NkgBEBA/0BnknjzwZfRLvM+r7uLKrM85MoOuNBH/LOVJBReOM5LO4epNQuPHcLtOIGNeH/kcb1P9PEc8ynyo+9s0LLceaGf/0uVpxLsyPjJkbbgLPGreHnsBrEdZdBAIcqZH+10tpolFf15qUj2J7NDgnmvBmDtw7wrdI32ypjcjtXPgV/7xSifWxo+5V4Nx0OPugnFlVmecXN3St+gmu7VXErP8n1saJLqr/kwnY3v3Q9sL5nnHXdFhIqPhJRW+sx4FIkdgboe61KJEtoTFs0YfGqqX8jzpI8ImkIclyn90SJ7P8psGZVKRZtLlslrY1IAUZ66ms9B/4MAgkT61RTulCRPZ+/hYPjn0lw8h/R9nMJ8yJ9VEHR9lw7PdkzIUgsMhHF9oVXNEAjrMm52ls6ya8xInvWBBCxnpb/k+I+JKxJ7DRKxDwi5yCI2OW9e1Q36GIVMPcGn3YdClvxGgkT62NSAQSJ9bGggAD+//S5xTsbQdFe8y6LewixgUvUTaPfhIygt/Sxuo8L+TcBHk6qlJLhV79ml22eKLtma3eESMuRTvle4V15U4kRPz4KO2PNBlhpQnSZqooD3pe+Z654FTqCygYsqRp6ig6n3PbxrhQZgWMFKUi6F4XBbiwjb/o2eeLBZcJjQ6K1Wv5/bjxM3pQB7gZRWKDiD2lunJIzKLsQtUua0/E07T+PJ68KEYgWnGFti7XMT1ecUV9Ppes5Bb3+H1D5+H9gyKg4BwY+SvKqZAa+5O6wWsL5jAHTUFN7VIVU7myDSuAQBK5pbuHCLbGu2CqUlwdAvoDrZbu7IJAs90EfL/9GaCSy4Gc8NuRMdsmWg08b7hVwP6dzRJNSw1hehR1i51vKYWOgKVoWx8CTUHAOYe/XQoh9/P7LVVT0qp2ltC/WoPFmmlLKUqHnfBv96NhKL1yWNcYIM6Vvxi0nk1VAsIlw1fY5FuccOWqJU789af6j7u1umYhUtGs310Zo8+RkQAagDOA+ULOpKEsxcX6x09kOAuTD8Hm7tqCW+6ItjQPDkjC4UpNasp97NIfmDjtKYvbVpgCB3EiaQt7UOyn5cn1pCbgK2PNF8HsSOjijLQ5TtwePItJL0bA9PfJM6sUTAyh4oI03ajhwYu+uY/tmRM+mHB7IZycEM4qdVaMgDnkRa3/Wk2MY7+9yQ033UnKf9Jv4btgla+b91GP0VYJayOXajaTbTR9jEJve/Ke2PsXRPaiKHnDSWp62IZBvpbsHufTEWOsBVwAijRlDOl4v75193ry5Fc+VoZaHNqyQpLzFhliBDvIN6BGft+Dz7D4XLLHhsWKL4pMpP8Z5Jd6ZBEkA/jfyPPbNPZzYbuQT/ITqVykEDi52bTGff7LrM7KdPGxx/ZBzWYKx5pIEtwtPaDwmx09R+SRwR67MmPVZuf1hwI2Aw5QL20k/iy02ziLw/vsi9lWuvwuybY19v7rLoDbP+EU/ocb9Ba86dXU+qCGvxGD5oFcTvcgm1a1TayKc7NUOS6uQZ/Qwtrx0mZLUsCkLxHX0ezLvQCV7VA3/7TTz2qj+VESebvCkrZH+bUadXV5pznDvv33NzkY//OChlQSeIqrpQeDJJOXLoS11QJVFbbpxpGFiweRoUfbpOyv02vBNmmREHJiThvSaSAu7s0+KZV0YpwytGz0htGQYN01J8XM9dit1WL/uM8FVN6W3uRxackupx+isggvJLB2KCcuCkvNI7Su8PAgMfUpC1tWKet1FOYiZM9wEGVVrliqz75GQZVbh42SMyQwx5FTYIw7ghRGhQ3agvhRLA+qxSZIRnXFH9xa4giDJWDex2O6rLKdcnT/6YEpcv4J5TrvqpRR+8H23m1A5Wok5GgQ5FtGZK6Jj8Rqt8nJip9tcRr4sYKVVdj9hwLsbvMRUj5S2tMKAuk8zwDab6+aguqhFGIEIy53B9GgJ6DFV/p2lceioSJ3P9rc7xSgCO3Vvty5s5k8P85Mkxp7JK+PJQ3+I2CnukTz/jxtbpYD7xGv/Tl9vz6dqneUx4evhpKnK8Naz/BESti7pT7wpHJA7tsp38EjHHIj2uMyc3wsk/LGt2aA+LhHWV3eXrnI/Q08IhBkyXn0FmoCxfJEcnWV3kdbG5y+z1YaT3RK2n7Ki27VmRMGp72v5AjmeUUZ8eInApCHeYXdfuQ3IdaPgwQ62ar1amjm5JJRDAAckehv+eZVyPJTEgxohdhBMJIN6jYzk0ob+u80YcfdSpy36mXHE5XA2vTxZMOoWY8KWbQDp+UuSGQD1ztbruhe/lbP1LNtIvRaAee7gOEwZ0/is4LTNfqMcXiSSlnBCgpwzWqNpxd6zUS5rSwV63+rDtrwM4n+uY3r+OVSi+4thqB2uqi7A7rknTZmtsNu2xtCqlkk+kXOP7xXhof/SGoR82PDJ9zpmWm4j5hOkd1bL4MZKhG0mVaqk/Gglgres7KhYie6MuZLgiqnaTiksCQUyo8jWs6twhYAmWRzzZb8Y0sCVDc0tH22He1KeaTTXmgIjOZPSS2X15k3wyy2eDdEx9IxTFsYENXOznqrHzorzsPn3OkNDgydYybnybWJSkztFQEVcabEvsd2gFf97rspNcAGVkQwjQxe7QfZDUDRA4t9D7tOyjeUIm3ORziurASIGH/84/Pj6pR1tzmSLgnlIyRcVIzjeza04vGNsB5a2ROSnk8R2Sc2U0oCdEHUROXQjAFLoq8/xKycFQp9uUk2AX3OuYuH/5rZKWVxjUR7yFUjvTXwnXYvL64psc4nkOWHnVRF9zTHTtgbLOGuzHZ6F9AGrIjUZXyPjWpfA6neYgK0pkCoVYuARaBNs4IHbi8Wsfp1FoQ1PL1W7YqtugvSl+ySRd+8T0/J71GU5FauwGhbd7K671bbbpDRQ16I5m6rwj+k7eJCpxCH7Dkhlal70FeCy05OVUhCEeOUNq9ScPjphJNMyJcOk58ZH+ae98fiLlcNpqEilp6qNP6sjktQuTyKOd3n92r6CPIaq2XhwY2r1Jw+OmEk0zIlw6UG3VeEf0nbxIS4FAoI/vCBKVRLPTfhbqLKqYoNFrwcM4chVI704Hz1oJyoRIfS3DzQIU1muxKBiWlpzUtgBQQ13ylJPO85ceExuStmNJQKJilxu+IkizUpy95DB5SwfhhWxF184xC/5ylv+Y6KkAASNa9xxua0i86VxIYa1BmjE/rBNeKlqim5ySgO+YVb84px9uyO6LeESxFdUtnULFMo+l+Q/KnjZTwPnvcoS3no19eVItUJRC/iGWu9IaMZWnTxM7XBhGOkgmD/GEvh/emnrG9ZT6n+BXJosXceCA5AJA7sAEVtnc4+e7pOYf1Mdmv/dbDtllXKlyEA24h2hHf1Hj9DiOBZokLbOSV8UsPJak8JT/3DBVqKtDtI4kjZY5d+Ts/WHzmBBz9I0QDhf5hXOU6Kuk5N8ziv6lQgpSqpb9yh3dgBi8aZVm2XJPMz/Chz9S6N2fG91/u+7Tl/IjA9NKTZyjnX4cyIHCjW+yPKW4J0TZwkpuFbyJpCf82zRkI0WpF06QrFGtl0A7+bRYtkrmDtUeKpz2UG2EkbM8Po9iSv9EZkXcikf4SV5c1jk1z6rwO26kocqLNFdqHDY/vvep4hJa22qYZ8KGMgUiQbXTsx6af3a0LgvisV0ZvniPf9wD7rZiD8ffI5P5p5tB3iWRBglc19pgLu3olDkr59KYa4OKyz9rekiHmzYZJ3QN9KWLk8mTT0rVtqZMBmGCcWPnD66OjC9Pzsdg4hMWJ0njDkSHqRjmpuPfNmmL6F7wPkQiBvSQP686LD0AoYnp5mR3kgsM9XNWYnTS7IbeNUCHnShm8uI06tFGdSDCP3KAh7H8muJ3O9Z3eIk+XvR3cip+z4jRNW2sZFJzxnSqBqM4NA8KWzNST9POq1Xx+WIq1hCKCff895GZxMEi6F6WtEEY8Oy2/DC26NukRN3FxgwUjiByz8kZ9I8nV3ctXYDQtu9leNDd3EkmbX20VeR+5RBa5PNoZCRswyFyZj1V7S4PSyGvD6mVfFss3bpy572f2Jx1KnsUXz+y30Is4tYoGPxqJ2aut6DEiLCrxg8KPoDjrnT66R+wmomXbFUZTkVq7AaFt3sqSQBohl6bW/C6yV7Yd6bYxNEcCA9r3rBZO6qkOiM+6MFQYK7NV31Ppu/zziymj+yKC0uItrvZ6u2W76jEOU4i6dowkaGpcqBGSDer7ePQhvquGgEdS1hU78DX0RHMs3vqkYwjcx/tU01qZUt8m53XoB0IYHiBxB20Bi+29qc3UZrrHWauhshZp0oGTvI9jgOLXrpMca649YHlLZr9jMr2FH3I+Y8mLOeOu0LRl0Fyr8R1yAw5cH2dKSUY7BnNDJ7ltE96igWj1pbsIzZ+F+9QvROvTDkA4jhpBS/AXhAp1s4ihsKt/ejUcEJvC94iO+nRpmNKJvAettXIA4OQoMF4JGmxtZhWR6H+b9auP+mKEqQ0pZvoBU+5467QtGXR4e/7wJFI+GpIsgH4MaU0024wTnzINYEs09EH2ky+/c3VLekpaI30La1MPZmIPKPfVJo8QnJvsbzFpyLogZYc5M0uSm3n6EHxndQAKoVyapSxuWqJWPCYDdKH+kkk3AcBVIgP1D1bqqIlN9irfDJ2ZiFlipMmF5eoxpdfuD8qL+TpACZDhh1fmiVyoaTGqUQ1ztM+u06lf7Tx0iuboyDqg4+9vrkQwhdXTknHarLXs3X8YYfYW446H15n/RsapwFuJsPaDjq1rzHp26dX8AoKPIpXdrwwvRRj0AD2OtUPbhI8qkJRdKdU5DgzxdPIzxV3DZHdEoRvXhsVOuMz0w2triU6r/mKRuci0NeIe5OaOxhM7n69Df+p9gdd5EeWj2fv9Uut4o1SFMMLfIaG/aJIYTWI3XTLlmft/Pfc9El5E5aNB/5prjR1GbZ3dYq9iB1REFxfvZPc1uEJXP8vgK5K5zYfeROWjIZD6SdORdEDLDnBYE7Z4Hz/52eWu+wF/jVssLdXxrKHX4GCjHYM5oZo1pjiqr8Sizz62zvOO2cCbsf4Jzwj58C6raIPtB8GQ5FkUiInIXdolc/y805tBbmboXj1dHJ7ltF3RovTBvfFmTjE/v46ZEuFlSJZFXj0X76bcX/oz4ZBJanOGUpAzBZE2kPkbcd8uUCFqbS5owx1DJclPVmBAkK45nKjf4tJ7DSiQ/WjQs/eO10qiPWwbUOP/5rpr28hrWggqZKhuPfzzpXYQ0t1uovFrB4tQUB5UeGrkDRchQYNlyi4qOkxX0+MH2RACbjFeGbQPy5pMLq9azDBhJU7PpQKQzeA9bauP+H26MEjYsI3+J3TtrJrKoWd3WLGDcaNUiKhsw7d/k0dZ3i1fSUEfkn7m6pb0lLRG+hbB1W0Qfa9AyK8h+diDHl8c6BZw8zz1pd30LDEZmP6C1HNOadCAtQQ0t1uovFrB4tQUB5UeGrkCN7vOVO69Io0wF+R93SafazrQNvpBbGj2KNMBf6qq1dW5pXKhxyhKkNKWb6ARuctZq9+MfGjw+AHXVMhVoNeeh9vXWTjYGBDigDo7G8/KP9Yblu2u02iSrZs6mNFkN/0AyMD711GlirLrZgCVF/Jyx+WE409d6pfzCBQaYAdGrv5b/S8LMtxmJxbJ/ul1+rYWCPh1E2lWHgRbLsXJHgafuHlBtxB/iZeP8P0oD25AvsE4TC7UnwFO8kYVM+Z6bfnXYzRR1zDDCq4MRykqSLhzY5t/gtkcXPjSUWnSzJkZp3Gj+hzXHi0teWcFDwEnIxJfPdXR60/QR6X60MwK3XeHDakvOZc8//g4XrUD3xvrQNiLurmwJlxTor2DVNRuO+/rr5vAQ0El1+Ka2qG0CeYbiHw2OoOOiBjdesJnYmbmpCEnrMVj5J4gEDccTuqLM8E6XVfFvPY8xvsvnv0iw32kQZldx173hXzXbU3dVoYGIuqrNo2uKVd3WvUZsoaAMeuCsFQba8ny0fQsqTrZlsIQxqVF/ot5GqYj3HZ6JruodtIQMZM1ucT2clazR0YmWCoL7iv8P99U2h4P0ol9x8pZzYxrc3o3hZSOZoeaHsTfJWB3NmjtEafrzFvX1XVRlDV5JB17Cdhw+NwXvHrbn27AhfxOCmYG0fsq8vAOyFoqi6u/ajN1PY1AS5XPeZc15YnMD7q7NDNz2mkmg75lpEf0q5TLkfA5tuHRdHV1/xX7f3nMgv3KMTGygkuhRWDC58VX25py73b6FIJ5lUgDoNxxZ4x2YysvFTp1IDzfRbEBBeFGYoTaaVNi/xayZnXtMbuEHNeMQWTbe18OAjIAxPptrAZSO+5NcCRIriSSz8VNOnOpHHg9BQZEaTWJT5HxnBse+8fE3ZtJlrUQEmUzw0sBd7pOPQMbH3WercN4QiOLwNFSOpb2HzJ04Nl1M2ngX5Zk0h7EC05ztkFruArWGw9bCjna+5wgKBatI4hZ4IZqQjPqk1LL2/0FOwe9Wldlgbi5M+bLpFH3sSi/qJ/+h6S+kvuDtqnLq+8/LVC0QAsC613xkjAn9oyEjHxWQf50E+ibqlRIVZ9GczLdLeSgDSwMNWmdnOmYpXaK1IOIldSs02tJlkFmNOCK23lY1t8vDEFB7rJ2QZb3nmGh3eQEGlYit1Tx7oTyv1rkuQ1IKvgFTRgops5JrHD4JrCqPFyl+qkeFbGCjCxDw7bMeR14LY01B6a/8aKBzPRyc9QHzEBbkbZ1sOsEup/Xey7U+eXReGwjAWmnKDhgpDNN+5pIr9CQfVymsCS2PivpxAxrFyArCLLYp+hBWnMPW70u1NJ7LmYNwCYeN1oHBg26bSWMGn+BNbUC0tp60KtFHEvcJYFrtVldzI6+CUfpyiS4EXoIV99ScjmaTc/0hWc9edNy7iXAajQP9RmgFe8icZNYUygcDOwC6Zr91Ex7XthjaQwCM3yr9NqXdP0MDBw2+OVBl80AAAAA==" width="161" height="481" class="img_ev3q">
</p><figcaption>Connect the Open Gripper stage to the Pick Object subtask.</figcaption><p></p></figure>
<p>Again, notice the difference between the stage execution order and the data flow direction. <strong>First</strong> the gripper is opened, <strong>then</strong> the robot moves to the first pick point, and <strong>last</strong> the full pick object process is carried out. However, to calculate the path, the data from the pick process must go upwards to the Move stage, so it knows how to calculate the robot arm trajectory.</p>
<div class="theme-admonition theme-admonition-tip admonition_xJq3 alert alert--success"><div class="admonitionHeading_Gvgb"><span class="admonitionIcon_Rf37"><svg viewBox="0 0 12 16"><path fill-rule="evenodd" d="M6.5 0C3.48 0 1 2.19 1 5c0 .92.55 2.25 1 3 1.34 2.25 1.78 2.78 2 4v1h5v-1c.22-1.22.66-1.75 2-4 .45-.75 1-2.08 1-3 0-2.81-2.48-5-5.5-5zm3.64 7.48c-.25.44-.47.8-.67 1.11-.86 1.41-1.25 2.06-1.45 3.23-.02.05-.02.11-.02.17H5c0-.06 0-.13-.02-.17-.2-1.17-.59-1.83-1.45-3.23-.2-.31-.42-.67-.67-1.11C2.44 6.78 2 5.65 2 5c0-2.2 2.02-4 4.5-4 1.22 0 2.36.42 3.22 1.19C10.55 2.94 11 3.94 11 5c0 .66-.44 1.78-.86 2.48zM4 14h5c-.23 1.14-1.3 2-2.5 2s-2.27-.86-2.5-2z"></path></svg></span>Bidirectional Communication</div><div class="admonitionContent_BuS1"><p>In the MoveIt documentation about Stages, it always refers to stages as having data flowing in both directions. This is why they do so! Generators can pass data upwards or downwards, depending on their neighbours. Connectors need data from two directions to connect them, and propagators can receive data from below <strong>or</strong> above.</p></div></div>
<p>We can apply the same logic to move to the place process.</p>
<figure class="text--center"><p><img decoding="async" loading="lazy" alt="Task moves from picking to placing object" src="data:image/webp;base64,UklGRiYfAABXRUJQVlA4IBofAADQdgCdASqhAO8CPikSiEMhoSESGVUQGAKEtLd+KazHdahm/or/d/w6/Yfx5/qH4oft15j/mv6J+Nv9r9gf4Q8y3Kvmb/H/p39Y/Hb+9/+b/Q/f78s/n/5B/1H9jvY/4XfvPqBfhv8I/uv4vf3L9rPnk9f7TPQP596AXq58h/sv9U/YP+w/uF67v7N+InuL9Mf9R/M/1P+gD+T/yz+6f3T9Zf75/+PpX+ffod5JnnP+M9wD+UfzD++/6n9iv7r//Pkl/d/8N/d/9l/dv/37oPyT+w/5r+6/sv/cv/1/vv0D/h38i/rn9u/x/+r/t3/7/4f2jfP////yz+5fsR/pj8////I13m8cMau/nXkFcf991gcJQgzk7/8SILbO8tLWgiR1P9ebpaZ6Vhg7aHO4MCDJ7mngBcU0ZtcsY/UrufcXWQpNg6vSJYAMY/hIMFDBZRNJDaJX2KUUppvZw4gE5x739lPClOZ0hSgQTw2qReev1J+YT+T2OGGMfjIoMMe3PSvrlr7faDZFVZ3vtoqrO+wdOGXAJpFVPcqeQrd+V+8ArCxJczZwxY+T5dfdWo4t5SMjYSB1/gQ51miHblL5fnYiKEQrFuByXuBc/BLMCZVNwutiQD0x5D8+ygg7eujqnkOqRFanvKWjp0KNwdIP2ZDI6eDrCc7AMvHFLP1lT783jhJmKrO+0vsjoJxZFVZ3r/rZHluM95j6E8iqzvsMIXOBlNjUD/oVboHyPeWlaU9bXEOVSzpQia0fPC4hKGBqQOm8bL7lS36RL3YGDwRmHWLh0hc4GI3FVWdbtHYZaW1Q2oGgabs83e828Jd+LvNq/357xwxqunE9sMarey+PA4P6j1x3Z73Txng/RZ3SSZJkQa7vMgX6cjRlqA+DiFExgC21L9cHsjLooz6vN1XM828jXeFablJLZLloDkMFcLNDrATBX9GMQUVFq/ov632N7JSIKNGf5vHCTMVWd9qAZLVWMLSKqyfU14o7AQzsZIqTCTmobm6WrstwskU0G1WovdwxgOmzy7BDoHsRiRilF5JhOggvdiGp5nZVovvjk/JzECK120vMroNmcao+BC5ob61RrhPlu95tpdNkHysuiM0ZCqrO+xEFN/P5c0JQSMkVM5DV5u95fDYyRJe+hK9cxk7of1Lu/buZyurO991XOcQOGnGaxKHSgMHL+zdQfVs41XvnHLJ55jhglWd0O1BF7m5Pcj8D7kKd13wL19+EyoOPZPYVKhKN4Xlr+atxFLYslQv4/VwxVsBu95vHDGrvAAD+/+lziRCD1BG/licuHbPS52Xk1Z7+WB/EK7zWF+fv8HXbGHDB3Nx4YXwic7MU+gwI3CNNV/TrsGmJMqTRDJq4ytWigXj7jwb4dwTIoC4VtklKcCxWhmrONvHMEgjbDuxt2fmD+OIfPtxfzaTu55G6WVIGTXK4A/lJ1QpiYrOYpYCLr/Ag+Houg9Q08JTB7BX7quWEyeL6ZFXdYKIhEHmF0EicyDMTNig1lg1RklH+e1ylM5xodNqGBwGG3lTP//8BDWnG1WkbW5MvCDDIi1p4W8fQ3qvKhU0WVM7ZlbwvQEwSL/qsC13fAFSPO2wEKvZau8KXviitSbqOaapuoJFiu247q6HeLLkO3ICEDSuajppGImsvk3J5gWiQZGOSOsyoj25hnfezvSXVjokuN2JGWyZPDutJzBa0g27H23uwkLXaj8C/UxEBwD/00P+JAMYUf/5RYHeo1rlMsXVlEP4l2lO8zZY9fE59oAjAR8ZLfd5/MEwBMggseLSLS0xYfia6WG94pC+Kg94uMlCwXGnm7lue+spzbRYCD1rfW/RjW9s6XbTQ17Dno9bqJg3e8O3mX0zknO+SPdeP8+wvNWPGrXqQqBx+rdPtCs4jUcWp57gAsRMGXj1pr4Eq+qjEJ7i1qRJve13VWwTnPLh76/MZkV1gLD34ZmFMzbaOLWBVfg3Wud10RYx59xBwgI6UrJFKbJkxQ9/+suQqltnSdB77nQjQ99NEHrt+8urQyjt90B8bT1PzzUs5vka6TssTrMNw+iMUk99W/CK+0i2Qr6O4LxRgLVpzNYHYqnhiw8dcKXSdXOfyqpxSzW9tnmlqK3yuGrgLPkqXY6JBfRMAhf4z30V90nFocJmgo1l9LHvyB8RImgvtTQwBn8K07GdwVPNapwml/5/C9v+hrbWPYuZrk4KfclRQCxwKZVMVa8B/Op9kI/bI4hp7WIyXwieKPZWUUu4HulKeFqGTvKbcHXuyvok8fBv6BBlT5/+4aGYPxhHFLHpAaU+A62rKr1ZHNTlBpvxGuZvqFGLbnSNONOURF4Zlf03QETd/9po2rR33G+G1MYAi+DH5rXzKY7HLMLoU4h+sNGR/+cDupsVsdz0CbIGIYj5MeHIcFUsYYqYZ9uyRjy39E7assJQVVz56pQhQaywCXwmR5xSY5jlh7Sy0XLSU1nJcJIgYNJSaC3mHu9Lf7P0/HT0K2tG7T+DUQzZ1vVx4y9pZF71Kt05VSuY8qL8Z6/IOL4+lDng9hHIqGlrFM2zCldJaVRGsEj9psrU6eV9zNZf4Deuz85hHxQz8jtj7agXP/UApCjHmX8gPWaGy+X0WlJ/4503JZmf/TAJxQccAW6/uVWI7RRLVBwANPuHTu9T6LNzeI/Ud99mBWvjxUkB5I7NjUNrI9FLnJgakAKHYbttvqEDQ/Bg5Nqpbxn7irv7jdmV+F2W5MrWZWJsq+nOHjImyviXFNxTRO+DpH6FcRkywhWbntRBQHWLVQp18ama21aDdvG7pWVwMh9PH8kvR2gyeqhRjLQuOk3cu6tE0ljqA1JxUeCn7Ik5hceY1dCi+FRdrSCwE8NTxXpoe/Q/BAG5wFNjInCys6BdJzdprgnq+i1ZiMQ/LUeH04j14CTJapEYaF2XJHpKW2cOhNm30Jd/V+CFUIm8cSRB33IM72+qXnSXc2cHyIaWQ5NdOZcrWLwYP7yecBu+ZMczFytO2EDcajcaYKiD2ywpfHg8ZeOlXKRcmbRDdbnwaHxyAaiYoO6uaQT4yTClhwK0142GJ/aFbQQjg50+zoB+B5Yfj38FPM6s2bhiLkx50O/cA2Cun333u6B0GEE637W6WHPe7NWo1MIDjs1/7auexlq/B9ZUXVEEaX1fvqbHqaUa2UF/5Z7IXEITJ0IqfoC136Y5nUtx1/6r5JSfVPAioAnQ2iwa/hKv36QUqq+69BFl2SUh+3dKs8baDcmxLoZ+g3iOW79tSmU1w09lNfZITJI/vkzRN1Q7tT/cjTbI5ZIwX6MPuUuTohkkQ9B0rJOQM/jVipaQ0Gd2TPvXtg8nVEbHpMO2Xeq7vchsdQDI5Ds3hhZRYYKJU45PlYW2rH2GvXFDUkWHisC6RE6N0Pit5V6f+UXYFKkLQM+/2YkZWM/DX9ALid2knhPFeMzHcAGd1Z9cQVJ//+cfGh7Srz4fF2FCCK/1qhjjtP0ERh+7jJIjpa8z/6rfSqBsb2cYsBVSc/6jVRWp82Y8Of257+o6hxxSFGfCP5SVMpSQ0UJ+m/kipCQ/ujvjDKk/KK9ozhv3nIkC6uYwbt8s0vYFkjpKCYZoGeuwSajKDZsnIFRMr+bJ50PSZOWCypsom9zjNMrpK2caNDWU1QA2i8EigLnwYUOuUND78MZthrF/MdeQxU3L9B14Ik/RIj5FBzYGCwjFVp+5GF25OTCZiXCbk2c5FkZF8vZH22JxeUqmtnE/MC6UGppzUT+XfOW7IP57MP0JjErC/BV7ibQ5mOFJEyGnwEWsS+kvaw4ft/JWh15LAA6Zl59Om/CkEZUOTHrquEoa9xNoczHCkuZiVeSWEfRMsa27mcThFGOy35m23QRlQ5MeurdfHAbKFNM7E2zwLFHz1PWahWxbvm10Ylz43catRu73wZiGjlPNZHLQ9ORMkrMAIGX3enXSzvjRLdvBxDEkeoXSeaRRNYXHnkfX9Xd6bkIbqu5we2/eCcReaIJ/lRCqnrnkuXhiCrng6geieopHPWyJQCm5gOAQMWlKlNBR55LVJhjJLyuxzS0sD2kzU73a/A/xLs8fInawQOpeG89taXPIRCFJzUxFIKPI6u5A6UwRJL2H7bFboBYxNLig694bl8rhINROZvnFCtL1+2zwbQVFxvILeBPryLmFKh1xXb2mAAf8hbL8/Pl2mLsY3gRMdrvqw5CTPoCFjEu/FvSSl1+E2Kj11YifTGSqjqU6el7bE06ShKk2Jws6jBiDLnwsYHQaf3xsxElb6KF0Yn9+cJe/IZ3JOfCM7xDMOvy9eSGZsfDCLBSb6OnaT5X0pxy999cUnPLqQoWr0h8qYDT/Ypg1ZtWKI1yUn4b78vpS4IT/TsVqTh88PcpST5AtCPMTksPnFzb4DxfPxZNaxHc+carDthj4L0+qbNNV1r9LCCcGUcpRCgkr/UUHAP2RKosDr46NWCWUZn7eWctOrB30AdFMFVQL/xLCTidUyWg2gTads0srpjy9/UO00HqX7aR6IjOcCWYeHoj7CnGukGbhLwnvWD4nL/5Iyq8/BVuhmQU64mAQyZhwK6X2WByswDweDJhscoE4s54PIZ1vGwZd7oG5ia/Ok1ob4/+CUNDDaBE65mHPnNjmNyLE2DeU4i6UV0Q2OZbskITGfs5ORWkgN1gDPduUUCBoCZAl8UdlyHbsWKJCHP8rFdUbfP00nQQClRWB5oPFKL2cThFGOy35kPjcFnJUfmif1z1rsdu7V1QKS7F4fkLsY4L4vPp0yo3QRlQ5Meuq5Mfw6xwU2FQrFHo6tSyheDj+LR7ca9smUY7LfmQk2AsyKPzRP65612O3dyQEE/rnrXY7d49qIV+nn/1n0IxmJV5Jk59DKqQ75JhgBodeSwAOmcRq/4lCkEZUOTHrqt6KAYzHmwQXwuucUUrlUJchsZ2hfveM7WYUlmhgqr3qq28rFMkXvqAdBSD+r0jb/ZFAcxMW23N8jqzhUZuBHIhQBLLK9R3E1Ueky07ZKTLWfjfcGQz7m3M+UHNGRwunCxzBof1WkhYC1AyD0CX9rYrmI4hmvVI0+NakoeEKIRlAHDEG00bSZ6hD5PgseGpKVENf7vF2QLBlid3nNO3u0YAn4sTy+noUU8BT3ePkpfjYR2l0OSe5R1Gy63cw3NzYJPAwA41wFd9O8nDlMzLJWKTuM0BQI0nglWF80dyjqyQkjbTi4pg9psQfzIWc3rB/GIaQeYiV0YhR83t0S3+3PwfWnyuTpuJJPBO1lPTlfkxo4DeTW9B3sKEXx1Ck1RowwaSliY5FXyj2kxFJckvINtM5h98lOSi+S6JBM/qFuHCloGpT/TPkeXYLoIsa9XX4QL3/k5hvkWm5sEndicNNqzA6ZLuUwYIVxcN1HiM1TAN2OILo/PCP48sx7hKSSkztuZzPM0YsmWJOuDhuEkYsSwaSV47eyLXJccINx8VzXZ13o/YrjuOvRDzYDu/thF4KCbbRsZnLtQb+oIMzp+9HUhP1L9/4eo9mhS3uRC2u3GkqilUhqKim8AS//YnEcHIP51oCDk4krS5cDPOoh115O4akp6PIS08JDHiLPYRt8LatUDyrdRHX8WGaofygbnXKUjSGh5oAc+wdjulyb3gIFsg6wxblo/tbxRl4tbzPAvOZfab3MkD5vA7PwLFuY6KtolMgGuXMn6pkYWQRlZRPw34gjWFlERQxCQsIpazxAfpUqyuRCp05B/dDa8IqgewXJLx2I3jsx6sJ1h9sTIf2vNj3w5K2L2JiikvEvJgpknLIxkR/1vZFobZyCWGdcul1fAYyn3qE6DGVuJEoboSWZdMgtq5+u/IEWTZoDQun+GYRtB2iLuuCSdgIscqofIM7K4NQca/V5SVjBkvzJy/Z1CvFc8tWAluNzYJO7E55+jtjGcaUJaBqhn9ACE4JYVaKoDnb6YxndIyEh9B9Zmhzyo+r1WP2rbNh5fmHPnJwzGcnQ4Joj0K7kA3H07GECgnvTTQqBbag0bhiukZFyp6KmHvMrmTx29/E1NdsSG51/zQu3lq4kcqSOONRvzwj+PLMe4SkkpM7bmczzNGMAmccagGADwDGIdrUG5tjihN23TtBLog3G4kk8Grcfpby69p0e+PVUrYjlPM0YEFrIp/lYwZL988kTg7a8sBnyPLpQ2iYcpmavP6Ce1JLxVDPk4BcfUi0l16hRyxyLKqHyDOyuDUHTQwkvC0JCYxt8QW+fIyLYE6vFo870Na+AvJbHwz2QMgTMl/r8S83BxM0DaA3FJl6Ieh+wfxiGkHmIldGIUfN7dEt/tz8H1p8rjl9M19j4q1pF+aFqxOlQPnZ8ouEZx4YMHH2SI/xbCfZpWALHqj1iYyDiF0h+LSDOumCuDoeR7c4ec5I/9FdpTDC9ICARtXBxgVEasZwVII+0QByGouoNxOyDObuO6WN+zD44kNXmTHXAfSjqfK0ijdRyyojbR9LtWzfGyM2ToQ+DnmFg3yBYnlLpVDJUuKv8TMAvh+hvPkeLZQoHWnfByB3aOpP8MBkJZt3nKjNDeWHn6QK83pxrRwhJjh6MIvNv8Fn5ehD+Gx5g+DhPW0aHUx5VKjvNw93OCqWLVrKvaZIRoYv9BHorDEeNcG0eyNdV9tf3cf/BvqqaVlVqiEh4aTeNp1juvG0vaPWwqTf8dEWza8RQG/dFZ40o0z4NfUevccBaGc8QOcN6alh+nA3XWyXPxf0etq+PUnvLlwDrV8HVoeegDcyLEza0CxHuc2HHjGog/2Iqh94joyVzCYM8SeKpPFj5aoCu5+Zf6YQgHFSOvbiT9/PVaO4Kim617VsIl5XRCYRNrp7h/wqTALu/Xi8VNOAGvafpUDkpAVlAjBqeqPUNZu51JaJQbKIX+cv12jugPQULrmFWOg9j+K8RvtVin8+yv4jBWIsPQoz6mskaqC2e1akLVVOJXmeYtIl/bf+yFUdTzbv/JCmbsZA3TZtanK1ARgTqWStLkzFG2wOwpuOsFJ6NaIOQYX0pcvFjEUnJLgq6pK1UMgf63td8IhT+8wgHbJ5W34sQvy+Md4kb+Ruob3ongPUsqHrHfjMJRdsdatT5SrshIvVGuDwso3Fq00KZ7rs/PZs4TO/8DXAzHjcZUaEQCJ+5nUdk59s1fvuBdj9OkIdWGJX+hHzkYU21QOrhu60HyWiWCQ4q/5wy+rPP+YHJYjwMq7hdGzrOeGx0OmuWbv0E218ke12ZYgdT992xxZTxdlEQ0eUjY4yyfJ6fzcqKK2vxX9rmObDdOobeAXXObY6h2JT8pKbzVY6AX8CebB8v428Ob5J1d4/jpnf5qUGgL9l8i0LoT0aWVqVBIg4mEKU5/EUAba1XUBUXosIW3eiA/Qk1eGZfrkjeOkR4BQUyYtFZ5j15wIPIIoftxPriMESLdywPibiS8v7nN843m79Fe+/+MI/17m6gJ9qRWBTRi6txWSMWwqmaa8u1Etk3DxFv3aVq3r4xmO/AFv1u79Qgmzt1BJKe/xrUzs2xIHLPRhNjcZajPXYv/Gh71K4efkIBW6NF8VhhMFvOSZGog1jqRVWYiGtfTe9LS1x55Wg+IjZ0Z1XHlT71wi9rfkJPQED9WJNXFiuyxhKLCvyfSRFFUKCc2O7VCo5aKtW5vrX9HZUJluNfwnOcj9V0k9d5WwBJnni2KKcuXF9uzz76Nho9XC1iNKuMPYi7HDuaAVENFipuITVXpMfz6rISPiN0WpxriXhITlyCmaCfTl27j1LpvnOQDJXTqrgyKTA3y0HIjvakQUzbrPFnIWOk1Nk3o5dCeQUR6/MxWK2HCLcw8ybL57YcEki+kucfgsJfBvA45KJm40U1O4C46DTM/dgFukC7VGNwzBswLyxpUztR5jYufbNZXaXuCVMd7OE9CRhFc0dECpu1WD0icytI5tl2iZhzJ/I5zbszn3MkESRAv+nnw7xL3svj4aXWQj5YvxwnP3inMc2t0Nt7WzPxn9sqzQ5wTDYXzgMN6q4CIhre1Ph4uCdAU02EuN4vvyUUT68KjJ5K2PMD8qQ+hMSu0/979CPUVIVLKpiIt/dBqaYlGlgIMaNL0iJA4JXBCkDDiXV/0kYQNA1pU5hdUdUhSkHIqQ4p/s5bEypeh2kdl7AjuRqaXWpXSt4DDequAiJHpCKXfqi/eotWkUv4Xt+A5o8IFNlWaHCJIgX/Tz3V8a2tmfmARtJOEekIIA62pus7QUpjsDigxHs5yEyl6TSB/qsc1Q67XcwAnPeoRSASY1BK3I8kGXdRKsNao1BiPZzkJlL1jdXa2z6iKVij8UJke3fius2Bgbk17dQqOjNQysOQqRz94pzHNrdDb+D1GjiYh2ghbzTeNBDJ1GjKqSfKQ217t/E2kz8esoRmpmJnlu1hMfP78P30cDHTAM+OacaHUvGjBlMUXAQvf2EJ/iggRHgBSp7vgDgyMtMWzEEet6XRPi1978Y4s270MZpHtTZYA5U6IqeKknUYT1ehciqyNaXSshoMojBXGdRXhw8//d61U/xuNqwa+bS905a/MJ4vncbKTAsnft0XPESAxdTwnuWr7i13NOCIKba62BqU4NrlBARAwtSAC5psvHNaRv0iWP+8b6o1kW42wtwCLpbwXeZfdysZyxNSzhxCkX05tDf34ZGxQ9VpbXb+CWSTC7DX26wxqY9xkM8snQ8JYhY1E1FcPlKEIcJny+OI9b34FqIq3VFNEZKANYDV2CzRxggDkRIHBK4IUgYP9VjmqHXavSOEpgct6irY6qFnhW72ZMuJGQl28JQiSIF/0891fGtrZn5gEbSTiVLYpph/Fi95GCDmgxHs5yEyl5Gr35c6f+9+hOvMV+znITKXpOQj/VY5qh12PuMPyj8TaTP4CobL4hdlGdr6KkKllUxEW7UN9IbjP9rTN/HfxxV1eLa3649X/AogIkiBf9PPdXxra2Z+YBG0ozgmGwvnAYb1VwERI9KtqPu1pW2lkdO3QmHc4UHOzAJDtrNBVVwERI9IRS78lMAGAdWd7K6LMpGs2/QmJXaf+9+hPKKEBEMLqjqmqMzTEo0sBBjRpe3a+zPOkK3Z2sd8QsVu+ymSBjb6aS7TIwFllndu63gMN6q08xzeZqyjjFtrjNvKjY1LzVU96sUdr+RgtYXWeCe2OvcXxMd1ZGqmp7RyGK64JzJv87Of8uGBIgf22OSGPYC6An4sSixwbakqpDxuKc78tCV18WDsDDv/2yOgwqIDKJsXP1kJmGAoJbbNX/pVYaH0sbNXUB8ZNQB87YMRCHrVoiy+J2/2yNYfJiKoRCgy8GGZCvN7oMEHmsnreEqu7nE6WLCZB6kIx3ixUq1GbgbF54pXzYOdL3WD1DhXoyxH05++TGTA9iwJkyJU7FnE4oOesO4Z6xPuF1Iv71Cpe2THDb7Z/C/aQCdIO9nxZwiHw6kjOKa+aCtpYv7/NvqeeIGfp55KmVwnlX83y2wMyMUPQGXxyOAK3Y9Fcpgh04QRKw3KxHlgVNS9C2ke2KOK47HxOgFafay0q967koiPZ96L4rdr/6lRpBCEb41kY1j9jj+uL+yHaEcvo50a6V8IyAckwnRQ6XMLiTTlpQCNrGBEzUJHow8uc99NS0m77bVBDrH9eLXv1nxXCFFJLrHvwPOFMK11drrenAnJUlNop54GfBJXKGoPfzmGqYvaMPEg7oNmTQ3ex/zXkWR6MdNMv0SRZK1VMxjKtgx7ke3lJvTJj6HQlu913Gdye0CjnhE6VOtKgo5e8gCswqPu3vwD6A4U2b96To69CPhkOR7yOoSxSM62ZvOGcEeUwFYmct10pjyXg6D1qEWg5/Iw4Dz+cJvqHHttQuV2LEYsyNE3clyTZR6qF8eS+kz/dbzGESHJ7O00/ZLvq3QWei0qoOWgZS7ixyWRfdmUu9MTGDe50rNyDIKn07kcdG+zVNTn6ZjPDpriCRHCZVgfg6v+bTDnHoVGhfwR/OwEhKIEkcpsXUmZiwp2zp8TV5xbrh0RTt37iexi8cyGewk1jYSvRCN6BOeyHxcJFssA3xtnbtVqJrS2P6rajA8rIVRExzmD2qcBQOkK20NU+KudqF28f0kRY9rh819Zty1bGkXQwlBIR9QtmQlUsI/f9OXtJPIK3Qn6lRtO8MDPCR3TEbqQASM/osDlW1bkZJPkZ9orYvKsDoUwbRPI61I6ZtxotMFshNvPQI3YjJcBptAbi5+Vaip6ha89qkWgcfEIUnMA4KG9ucQeSzyH+wScKUh73tCycVFV8cYT3boRISuZB+d/dSDQTfy6/bAgH47FyjFtB/hzMFgajfuNhYm1j/+Y6PtvTbF2jsa000B/Ud/bgHTPnPUQCf8cmVKA3ciWTCJwAYgiWw/5dcclb1WMwIY3LEKeamKc0MwXv+c0+5ZP2kb3sFZEr1EWexuVhAWhQXUo9p8ajlNoCOeDoB8s5mo07sK15eX0KbrXMRKELKwNLRx499T+p93Cz7+AA6m6ik5wdjzcIJ9zXuNDetHb8dyeFHgKr95iOuP2Rh6fJDT6HmmihK6ZMm907zutfX2Hj88M+KM3SexPLpW7spauxIbJUMfZO1LkgqDX9JDOQG7AixM2VyGTBoNJKj2k1pQHsICAsHEBfV9ULRrEzM6rJ3EumO4AAAA=" width="161" height="751" class="img_ev3q">
</p><figcaption>Connect the pick subtask to the place object subtask.</figcaption><p></p></figure>
<p>Finally, we want to move home. For that, we will use another propagator <strong>MoveTo</strong> stage, connected to the place process with a connector.</p>
<figure class="text--center"><p><img decoding="async" loading="lazy" alt="Task moves from placing object back home" src="https://mikelikesrobots.github.io/assets/images/FullTask-83a9feb9aa12b56beb14d250543dd6eb.webp" width="161" height="981" class="img_ev3q">
</p><figcaption>Connect the place object subtask to the Go Home stage.</figcaption><p></p></figure>
<p>Our pick and place task is <em>complete</em>. We can check it against the more compact task definition from the MoveIt tutorials:</p>
<figure class="text--center"><p><img decoding="async" loading="lazy" src="https://moveit.picknik.ai/main/_images/stages.png" alt="Diagram from MoveIt to compare task definition" class="img_ev3q">
</p><figcaption><a href="https://moveit.picknik.ai/main/doc/tutorials/pick_and_place_with_moveit_task_constructor/pick_and_place_with_moveit_task_constructor.html#adding-stages" target="_blank" rel="noopener noreferrer" class="">Stage Outline for Pick and Place task from MoveIt tutorials.</a></figcaption><p></p></figure>
<p>The arrows denote the direction of data, and matches our diagram. The stages have the same order, but without defining the stage <em>type</em>. However, the biggest difference is the extra two arrows from MoveIt. These arrows show data from previous stages being forwarded to later stages in order to allow the IK to resolve correctly. These are stored in the code as pointers. I omitted them from my diagram because they don't affect data direction or the stages needed, but they are a key piece of information when implementing the code!</p>
<h3 class="anchor anchorTargetStickyNavbar_Vzrq" id="writing-the-code">Writing the Code<a href="https://mikelikesrobots.github.io/blog/moveit-task-constructor#writing-the-code" class="hash-link" aria-label="Direct link to Writing the Code" title="Direct link to Writing the Code" translate="no">​</a></h3>
<p>Here, it's best to go back to <a href="https://moveit.picknik.ai/main/doc/tutorials/pick_and_place_with_moveit_task_constructor/pick_and_place_with_moveit_task_constructor.html" target="_blank" rel="noopener noreferrer" class="">the original MoveIt tutorial</a>. It supplies all of the code in bite-sized pieces.</p>
<p>My one piece of advice is to use scoped variables to your advantage! Every time the tutorial uses an open curly brace, you should copy it, because it will help keep the variables tidy.</p>
<p>If you would like to see me working through writing the code and explaining it, I do so in my video, which is also linked at the top of this post.</p>
<div class="theme-admonition theme-admonition-note admonition_xJq3 alert alert--secondary"><div class="admonitionHeading_Gvgb"><span class="admonitionIcon_Rf37"><svg viewBox="0 0 14 16"><path fill-rule="evenodd" d="M6.3 5.69a.942.942 0 0 1-.28-.7c0-.28.09-.52.28-.7.19-.18.42-.28.7-.28.28 0 .52.09.7.28.18.19.28.42.28.7 0 .28-.09.52-.28.7a1 1 0 0 1-.7.3c-.28 0-.52-.11-.7-.3zM8 7.99c-.02-.25-.11-.48-.31-.69-.2-.19-.42-.3-.69-.31H6c-.27.02-.48.13-.69.31-.2.2-.3.44-.31.69h1v3c.02.27.11.5.31.69.2.2.42.31.69.31h1c.27 0 .48-.11.69-.31.2-.19.3-.42.31-.69H8V7.98v.01zM7 2.3c-3.14 0-5.7 2.54-5.7 5.68 0 3.14 2.56 5.7 5.7 5.7s5.7-2.55 5.7-5.7c0-3.15-2.56-5.69-5.7-5.69v.01zM7 .98c3.86 0 7 3.14 7 7s-3.14 7-7 7-7-3.12-7-7 3.14-7 7-7z"></path></svg></span>RViz Plugin</div><div class="admonitionContent_BuS1"><p>MTC is an optional add-on for MoveIt, which is why it has its own RViz plugin. This is why the plugin is listed separately.</p></div></div>
<h2 class="anchor anchorTargetStickyNavbar_Vzrq" id="moveit-overall">MoveIt Overall<a href="https://mikelikesrobots.github.io/blog/moveit-task-constructor#moveit-overall" class="hash-link" aria-label="Direct link to MoveIt Overall" title="Direct link to MoveIt Overall" translate="no">​</a></h2>
<p>Overall, the MoveIt tutorials are a great place to start to learn how to build code for operating robot arms. They show how to interact with a robot using MoveIt to plan paths between points, how to visualise parts of the demo, and how to build ROS 2 nodes of increasing complexity to perform robot arm tasks.</p>
<p>This post was intended to provide some extra tips and tricks while running through the tutorials, plus give a step-by-step breakdown of the stage types and how to use them. The tasks and stages of MoveIt are the concepts that I personally struggled with the most, not because they were poorly explained on the MoveIt site, but because I struggled to link the concepts to their practical uses.</p>
<p>If you feel like you understand MoveIt better, it's time to start building some robot software! My challenge to you is to design an enclosure in a 3D design software for the robot arm, then import it into MoveIt's <code>PlanningScene</code>. See if you can build trajectories that go around your new obstruction. Good luck!</p>]]></content>
        <author>
            <name>Michael Hart</name>
            <uri>https://mikelikesrobots.github.io</uri>
        </author>
        <category label="robotics" term="robotics"/>
        <category label="arm" term="arm"/>
        <category label="ros2" term="ros2"/>
        <category label="moveit" term="moveit"/>
        <category label="control" term="control"/>
    </entry>
    <entry>
        <title type="html"><![CDATA[Controlling a 6DOF Robot Arm with ros2_control]]></title>
        <id>https://mikelikesrobots.github.io/blog/6dof-arm-ros2-control</id>
        <link href="https://mikelikesrobots.github.io/blog/6dof-arm-ros2-control"/>
        <updated>2025-05-06T00:00:00.000Z</updated>
        <summary type="html"><![CDATA[Understand the ros2_control example controller and adapt it for your own robot arm.]]></summary>
        <content type="html"><![CDATA[<p>Moving and manipulating objects are one of the most common tasks in robotics. Examples include moving objects, folding clothes, or solving Rubik's cubes. Robots that perform these tasks are often called manipulators, and they tend to be arms with some kind of gripper on the end - in my experience, a pinch or suction gripper.</p>
<p>One method of controlling the movement of a robot arm to a given pose is using <code>ros2_control</code>. By using this framework, we can use existing robot controllers for moving motors, and we even gain access to advanced behaviour like incorporating feedback into a PID control loop to more accurately position our arm. This post is all about how to control a simulated robot arm with 6 joints, using the sample code from the ROS 2 Controller Examples.</p>
<p>This article also includes a video walkthrough.</p>
<div class="video_jswG"><button type="button" class="poster_B6DH" aria-label="Play video: Controlling a 6DOF Robot Arm with ros2_control"><img src="https://i.ytimg.com/vi/ZRrC6Hss01Y/hqdefault.jpg" alt="" width="480" height="360" loading="lazy"><span class="play_lEvZ" aria-hidden="true">▶</span><span class="caption_yrhJ">Watch: <!-- -->Controlling a 6DOF Robot Arm with ros2_control</span></button></div><noscript><p><a href="https://www.youtube.com/watch?v=ZRrC6Hss01Y&amp;t=0">Watch <!-- -->Controlling a 6DOF Robot Arm with ros2_control<!-- --> on YouTube</a></p></noscript>
<h2 class="anchor anchorTargetStickyNavbar_Vzrq" id="controlling-a-simulated-robot-arm-with-ros2_control">Controlling a Simulated Robot Arm with <code>ros2_control</code><a href="https://mikelikesrobots.github.io/blog/6dof-arm-ros2-control#controlling-a-simulated-robot-arm-with-ros2_control" class="hash-link" aria-label="Direct link to controlling-a-simulated-robot-arm-with-ros2_control" title="Direct link to controlling-a-simulated-robot-arm-with-ros2_control" translate="no">​</a></h2>
<p>Before attempting to control a real arm, it's important to understand how the framework functions. I have previously shown how to use <code>ros2_control</code> with the JetBot, which adapts the differential mobile robot controller to control the robot and move it around (<a class="" href="https://mikelikesrobots.github.io/blog/jetbot-motors-pt1">part 1</a>, <a class="" href="https://mikelikesrobots.github.io/blog/jetbot-motors-pt2">part 2</a>).</p>
<p>Now, I want to show how the framework functions for moving a robot arm by controlling a simulated 6 DOF arm. The <a href="https://github.com/ros-controls/ros2_control_demos" target="_blank" rel="noopener noreferrer" class="">examples repository</a> has a tutorial and set of sample code for an arm like this, so I'll show the simulation running, describe how the controller works, and point out where to change it to use it for a real robot arm.</p>
<p>Once we understand how the 6 DOF controller works and where to change it, we can look at a real robot arm and start to control it with all the advantages of <code>ros2_control</code>.</p>
<h2 class="anchor anchorTargetStickyNavbar_Vzrq" id="why-use-ros2_control">Why use <code>ros2_control</code>?<a href="https://mikelikesrobots.github.io/blog/6dof-arm-ros2-control#why-use-ros2_control" class="hash-link" aria-label="Direct link to why-use-ros2_control" title="Direct link to why-use-ros2_control" translate="no">​</a></h2>
<p>My JetBot posts on ROS2 Control (see <a class="" href="https://mikelikesrobots.github.io/blog/jetbot-motors-pt2">part 2</a>) talks about the differences between ROS Control and ROS2 Control, and goes into depth as to the purpose of the latter.</p>
<p>In brief, the reason to use <code>ros2_control</code> is to build hardware controllers that can work across different robot models of the same type with only configuration changes. For example, one controller for 6 DOF robot arms can control differently sized robot arms, or control one arm based on target joint positions and another robot arm based on target velocities.</p>
<figure class="text--center"><p><img decoding="async" loading="lazy" alt="Infographic of ROS 2 Control" src="https://mikelikesrobots.github.io/assets/images/ros2_control_infographic-73c7c12a0a41f03ba617f4f8898eff8d.webp" width="2000" height="1414" class="img_ev3q">
</p><figcaption>Infographic of ROS 2 Control with a robot arm. Trajectory messages are sent to a controller, which writes commands to and reads state from the hardware interface(s). The hardware interface interacts directly with the hardware. A configuration file specifies one or more controllers to use with one or more hardware interfaces to control the arm.</figcaption><p></p></figure>
<p>For this to work, we will build two software libraries: the controller, and the system (both are <code>ros2_control</code> terms). The controller listens for ROS 2 messages on how to move, and uses <strong>hardware interfaces</strong> to do the actual movement. The system is our implementation of a hardware interface, and is responsible for moving the motors and reading the sensors to determine if the movement worked correctly.</p>
<p>This split means that the system can be reused by any controller, so we can swap a simple controller for a more complex one, like a PID controller. In the same way, our controller can use different hardware interfaces depending on the specific robot arm it is moving. The hardware interfaces and controller can be changed using configuration files for the specific robot.</p>
<p>Let's take a look at the example code running to see what it does, before diving in to how it works.</p>
<h2 class="anchor anchorTargetStickyNavbar_Vzrq" id="setting-up-the-example-simulation">Setting up the example simulation<a href="https://mikelikesrobots.github.io/blog/6dof-arm-ros2-control#setting-up-the-example-simulation" class="hash-link" aria-label="Direct link to Setting up the example simulation" title="Direct link to Setting up the example simulation" translate="no">​</a></h2>
<p>The 6 DOF arm example is <code>example_7</code> from the <a href="https://github.com/ros-controls/ros2_control_demos/tree/master/example_7" target="_blank" rel="noopener noreferrer" class="">examples repository</a>. The repository as a whole has documentation to help understand <code>ros2_control</code>, including this <a href="https://control.ros.org/jazzy/doc/ros2_control_demos/example_7/doc/userdoc.html" target="_blank" rel="noopener noreferrer" class="">tutorial</a> with more detail than other <code>ros2_control</code> tutorials. Note that it has a lot of detail on setting up the URDF file that describes the robot, but I want to focus on understanding the code, so I skip past this.</p>
<p>The instructions for building the sample are in the tutorial, but I'll repeat them here so you can follow along. I'm using an <a href="https://ubuntu.com/download/desktop" target="_blank" rel="noopener noreferrer" class="">Ubuntu 24.04</a> VM from <a href="https://www.virtualbox.org/" target="_blank" rel="noopener noreferrer" class="">VirtualBox</a>, and I have <a href="https://docs.ros.org/en/jazzy/index.html" target="_blank" rel="noopener noreferrer" class="">ROS 2 Jazzy</a> already installed.</p>
<p>First, I create a workspace and check out the examples repository into it. I then install the example's dependencies, build the workspace, and source the setup file to activate it.</p>
<div class="language-bash codeBlockContainer_Ckt0 theme-code-block" style="--prism-color:#393A34;--prism-background-color:#f6f8fa"><div class="codeBlockContent_QJqH"><pre tabindex="0" class="prism-code language-bash codeBlock_bY9V thin-scrollbar" style="color:#393A34;background-color:#f6f8fa"><code class="codeBlockLines_e6Vv"><div class="token-line" style="color:#393A34"><span class="token plain">source /opt/ros/jazzy/setup.bash</span><br></div><div class="token-line" style="color:#393A34"><span class="token plain">mkdir -p ~/ws/src</span><br></div><div class="token-line" style="color:#393A34"><span class="token plain">cd ~/ws/src</span><br></div><div class="token-line" style="color:#393A34"><span class="token plain">git clone https://github.com/ros-controls/ros2_control_demos</span><br></div><div class="token-line" style="color:#393A34"><span class="token plain">cd ~/ws</span><br></div><div class="token-line" style="color:#393A34"><span class="token plain">rosdep install -r --from-paths . --ignore-src -y</span><br></div><div class="token-line" style="color:#393A34"><span class="token plain">colcon build --symlink-install</span><br></div><div class="token-line" style="color:#393A34"><span class="token plain">source install/setup.bash</span><br></div></code></pre></div></div>
<p>Once complete, I run the simulation using the launch file from the example.</p>
<div class="language-bash codeBlockContainer_Ckt0 theme-code-block" style="--prism-color:#393A34;--prism-background-color:#f6f8fa"><div class="codeBlockContent_QJqH"><pre tabindex="0" class="prism-code language-bash codeBlock_bY9V thin-scrollbar" style="color:#393A34;background-color:#f6f8fa"><code class="codeBlockLines_e6Vv"><div class="token-line" style="color:#393A34"><span class="token plain">ros2 launch ros2_control_demo_example_7 r6bot_controller.launch.py</span><br></div></code></pre></div></div>
<p>Once the RViz window has fully loaded the robot arm into the view, I open another terminal and execute the following:</p>
<div class="language-bash codeBlockContainer_Ckt0 theme-code-block" style="--prism-color:#393A34;--prism-background-color:#f6f8fa"><div class="codeBlockContent_QJqH"><pre tabindex="0" class="prism-code language-bash codeBlock_bY9V thin-scrollbar" style="color:#393A34;background-color:#f6f8fa"><code class="codeBlockLines_e6Vv"><div class="token-line" style="color:#393A34"><span class="token plain">ros2 launch ros2_control_demo_example_7 send_trajectory.launch.py</span><br></div></code></pre></div></div>
<p>The RViz screen now shows the robot arm doing a circular motion. If you want to repeat this motion, kill the previous command with Ctrl+C and run it again.</p>
<p>This was the result:</p>
<p><img decoding="async" loading="lazy" alt="Simulated robot arm performing circle motion" src="https://mikelikesrobots.github.io/assets/images/robot-arm-circle-a4db3d5f76ae7bef20461feaa379cb9e.gif" width="1920" height="1080" class="img_ev3q"></p>
<p>That's the simulation running! Next, we can dig into the code to understand what's happening and learn from it.</p>
<h2 class="anchor anchorTargetStickyNavbar_Vzrq" id="understanding-the-example-code">Understanding the example code<a href="https://mikelikesrobots.github.io/blog/6dof-arm-ros2-control#understanding-the-example-code" class="hash-link" aria-label="Direct link to Understanding the example code" title="Direct link to Understanding the example code" translate="no">​</a></h2>
<p>Before diving in, we need to understand an important difference from the JetBot: where the JetBot was controlled with velocity commands, we will control the robot arm using <a href="https://docs.ros.org/en/jazzy/p/trajectory_msgs/msg/JointTrajectory.html" target="_blank" rel="noopener noreferrer" class="">Joint Trajectory</a> commands.</p>
<p>Imagine that we want to move a robot arm to pick up an object. We need to know the path that the arm moves from where it currently is to where it needs to be - the <em>trajectory</em>. We can divide that trajectory up into segments, and for each segment, calculate the position that the gripper needs to be in. This describes a motion of the robot gripper through space.</p>
<figure class="text--center"><p><img decoding="async" loading="lazy" alt="Robot arm trajectory example" src="https://mikelikesrobots.github.io/assets/images/trajectory-1d2ee7ee4ffca60db812b88710e960e3.webp" width="400" height="330" class="img_ev3q">
</p><figcaption><a href="https://www.smashingrobotics.com/motion-planning-methods-for-industrial-robots/" target="_blank" rel="noopener noreferrer" class="">Robot Arm Trajectory | Motion Planning Methods for Industrial Robots by Dan Mihai</a></figcaption><p></p></figure>
<p>That's not where we stop, though. We know the position that the gripper needs to be in for each point along the trajectory, but then we need to calculate the position of each motor in the robot arm to put the gripper there. Instead of motors, we call them <em>joints</em>, and we use <em>inverse kinematics</em> to calculate the joint positions based on our desired tool location.</p>
<figure class="text--center"><p><img decoding="async" loading="lazy" alt="Robot arm joint angles" src="https://mikelikesrobots.github.io/assets/images/joint_angles-345726249fa58e20200b8828d867c61b.webp" width="850" height="688" class="img_ev3q">
</p><figcaption><a href="https://www.researchgate.net/publication/371070660_machines_Pose_Determination_System_for_a_Serial_Robot_Manipulator_Based_on_Artificial_Neural_Networks" target="_blank" rel="noopener noreferrer" class="">Joint angles for a given tool position | Pose Determination System for a Serial Robot Manipulator Based on Artificial Neural Networks</a></figcaption><p></p></figure>
<p>Once we have the joint values of each point in the movement trajectory, we join them together to form a Joint Trajectory. Our controller will go through each set of angles in this joint trajectory to move the robot arm along our planned trajectory.</p>
<h3 class="anchor anchorTargetStickyNavbar_Vzrq" id="package-structure">Package Structure<a href="https://mikelikesrobots.github.io/blog/6dof-arm-ros2-control#package-structure" class="hash-link" aria-label="Direct link to Package Structure" title="Direct link to Package Structure" translate="no">​</a></h3>
<p>As discussed in <a href="https://mikelikesrobots.github.io/blog/6dof-arm-ros2-control#why-use-ros2_control" class="">Why use <code>ros2_control</code>?</a>, we therefore need to build a controller and a system. The controller will listen for Joint Trajectory messages, then use the system to move the simulated robot arm based on that trajectory.</p>
<p>The repository has quite a few folders and files in it. We don't need to look at these files in-depth to understand the example - it will suffice to understand the purpose of the files.</p>
<ul>
<li class=""><strong>README.md</strong>: gives contents of package and link to documentation</li>
<li class=""><strong>CMakeLists.txt, package.xml</strong>: defines the ROS 2 package and how to build it</li>
<li class=""><strong>ros2_control_demo_example_7.xml</strong>: a <code>ros2_control</code> file that states the package contains a <code>RobotSystem</code> class and <code>RobotController</code> class, which can then be used to control the simulated arm</li>
<li class=""><strong>bringup</strong>: contains launch files for running the controller simulation and sending the circle trajectory. Includes a <a href="https://github.com/ros-controls/ros2_control_demos/blob/master/example_7/bringup/config/r6bot_controller.yaml" target="_blank" rel="noopener noreferrer" class="">config file</a> that we need to understand the controller code</li>
<li class=""><strong>description</strong>: contains the URDF of the robot, required for understanding the joint positions needed for a particular tool position</li>
<li class=""><strong>reference_generator</strong>: contains the source code for generating the trajectory that moves the tool in a circle. Only required for the simulation demo</li>
<li class=""><strong>test</strong>: test files for the package to confirm it works correctly</li>
</ul>
<p>The remaining folders I haven't yet mentioned, <strong>controller</strong> and <strong>hardware</strong>, contain the files for the controller and the system respectively.</p>
<h3 class="anchor anchorTargetStickyNavbar_Vzrq" id="controller">Controller<a href="https://mikelikesrobots.github.io/blog/6dof-arm-ros2-control#controller" class="hash-link" aria-label="Direct link to Controller" title="Direct link to Controller" translate="no">​</a></h3>
<p>The controller folder contains two files - the header and source file for the controller class. This is standard for C and C++, and the controller is written in C++.</p>
<h4 class="anchor anchorTargetStickyNavbar_Vzrq" id="controller-header-file">Controller Header File<a href="https://mikelikesrobots.github.io/blog/6dof-arm-ros2-control#controller-header-file" class="hash-link" aria-label="Direct link to Controller Header File" title="Direct link to Controller Header File" translate="no">​</a></h4>
<p>The <a href="https://github.com/ros-controls/ros2_control_demos/blob/master/example_7/controller/include/ros2_control_demo_example_7/r6bot_controller.hpp" target="_blank" rel="noopener noreferrer" class="">header file</a> contains most of the information from the tutorial. It declares a class <code>RobotController</code> that extends from <code>ControllerInterface</code>, the required <code>ros2_control</code> class for controllers. It overrides the main functions and declares protected member variables required for the controller to function.</p>
<p>The main functions that must be overridden for a controller include:</p>
<ul>
<li class=""><code>command_interface_configuration</code>: used to set up the command interfaces, which write data to the hardware</li>
<li class=""><code>state_interface_configuration</code>: used to set up the state interfaces, which read data from the hardware</li>
<li class=""><code>update</code>: used to read and write from the configured command and state interfaces</li>
</ul>
<p>As our <code>RobotSystem</code> class will both read to and write from the robot arm, we will use it for both the command and the state interfaces. In another implementation, we could use different types, such as a sensor type for the state interface and an actuator type for the command interface. The controller is agnostic to the type it has, so long as it can read and write data when necessary. This means that we can change hardware interfaces using only configuration files.</p>
<p>On top of the required methods, we have a number of optional methods that we override. These are lifecycle methods, which allows us to run code at particular points in the controller execution. These include:</p>
<ul>
<li class=""><code>on_configure</code></li>
<li class=""><code>on_activate</code></li>
<li class=""><code>on_deactivate</code></li>
<li class=""><code>on_cleanup</code></li>
<li class=""><code>on_error</code></li>
<li class=""><code>on_shutdown</code></li>
</ul>
<p>Our class uses these to initialise and reserve the hardware interfaces it needs to function. We can look at the source file to see how this is handled.</p>
<h4 class="anchor anchorTargetStickyNavbar_Vzrq" id="controller-source-file">Controller Source File<a href="https://mikelikesrobots.github.io/blog/6dof-arm-ros2-control#controller-source-file" class="hash-link" aria-label="Direct link to Controller Source File" title="Direct link to Controller Source File" translate="no">​</a></h4>
<p>With the main functions defined in the header file, the <a href="https://github.com/ros-controls/ros2_control_demos/blob/master/example_7/controller/r6bot_controller.cpp" target="_blank" rel="noopener noreferrer" class="">source file</a> then defines the actual logic of the controller.</p>
<p>For each function defined in the file, I'll give some detail of how it works. I recommend reading through the code yourself and making sure you understand what it's doing, and why.</p>
<p><strong><code>on_init</code></strong></p>
<p>This function reads joint names, command interfaces, and state interfaces from ROS 2 parameters. It uses a function called <code>auto_declare</code> to read the parameters and save them into local variables. It also writes zeroes into the local variable <code>point_interp_</code>, which is the current point the robot arm should move to.</p>
<p>The number of joints depends on the length of the <code>joint_names_</code> vector, which means the controller can be used for robot arms with different numbers of joints.</p>
<p>However you run the controller, these parameters must be set for it to understand how to work; in this example, they are set by the <a href="https://github.com/ros-controls/ros2_control_demos/blob/master/example_7/bringup/launch/r6bot_controller.launch.py#L51-L57" target="_blank" rel="noopener noreferrer" class="">launch file</a>, which reads them from the <a href="https://github.com/ros-controls/ros2_control_demos/blob/master/example_7/bringup/config/r6bot_controller.yaml" target="_blank" rel="noopener noreferrer" class="">config file</a>. The config file lists joints <code>joint_1</code> through <code>joint_6</code>, so we know the robot has 6 joints, and it specifies command and state interfaces:</p>
<div class="language-yaml codeBlockContainer_Ckt0 theme-code-block" style="--prism-color:#393A34;--prism-background-color:#f6f8fa"><div class="codeBlockContent_QJqH"><pre tabindex="0" class="prism-code language-yaml codeBlock_bY9V thin-scrollbar" style="color:#393A34;background-color:#f6f8fa"><code class="codeBlockLines_e6Vv"><div class="token-line" style="color:#393A34"><span class="token key atrule" style="color:#00a4db">command_interfaces</span><span class="token punctuation" style="color:#393A34">:</span><span class="token plain"></span><br></div><div class="token-line" style="color:#393A34"><span class="token plain">    </span><span class="token punctuation" style="color:#393A34">-</span><span class="token plain"> position</span><br></div><div class="token-line" style="color:#393A34"><span class="token plain">    </span><span class="token punctuation" style="color:#393A34">-</span><span class="token plain"> velocity</span><br></div><div class="token-line" style="color:#393A34"><span class="token plain"></span><span class="token key atrule" style="color:#00a4db">state_interfaces</span><span class="token punctuation" style="color:#393A34">:</span><span class="token plain"></span><br></div><div class="token-line" style="color:#393A34"><span class="token plain">    </span><span class="token punctuation" style="color:#393A34">-</span><span class="token plain"> position</span><br></div><div class="token-line" style="color:#393A34"><span class="token plain">    </span><span class="token punctuation" style="color:#393A34">-</span><span class="token plain"> velocity</span><br></div></code></pre></div></div>
<p>From this file, we know that our robot can write both positions and velocities to its motors, and it can read both positions and velocities from its motors. This may be different based on the robot arm we are actually used, which is why the config file is used.</p>
<div class="theme-admonition theme-admonition-info admonition_xJq3 alert alert--info"><div class="admonitionHeading_Gvgb"><span class="admonitionIcon_Rf37"><svg viewBox="0 0 14 16"><path fill-rule="evenodd" d="M7 2.3c3.14 0 5.7 2.56 5.7 5.7s-2.56 5.7-5.7 5.7A5.71 5.71 0 0 1 1.3 8c0-3.14 2.56-5.7 5.7-5.7zM7 1C3.14 1 0 4.14 0 8s3.14 7 7 7 7-3.14 7-7-3.14-7-7-7zm1 3H6v5h2V4zm0 6H6v2h2v-2z"></path></svg></span>info</div><div class="admonitionContent_BuS1"><p>The example package contains extra files needed to run the example as well as the controller and system for <code>ros2_control</code>. It is important to understand which files are for which purpose to be able to adapt the package to a new robot arm. The header and source file are for the controller, and the launch and config files are specific to our robot arm.</p></div></div>
<p><strong><code>*type*_interface_configuration</code></strong></p>
<p>The controller builds a list of names of the interfaces to reserve them, which grants exclusive access to those interfaces until they are released.</p>
<p><strong><code>on_configure</code></strong></p>
<p>This function is called once, near the start of the lifecycle, and subscribes to a joint trajectory topic. When any message is received on that topic, it will copy the data into its own message, then raise a flag internally to say a new message is ready.</p>
<p>To copy the data, a method called <code>writeFromNonRT</code> is used. This is because <code>ros2_control</code> is real time, but ROS 2 subscriptions are not real time. The data therefore has to be copied in a thread-safe way.</p>
<p><strong><code>on_activate</code></strong></p>
<p>At this point, the requested interfaces have been activated, so the controller saves them to an internal map. After this step, data can be read and written to the interfaces.</p>
<p><strong><code>update</code></strong></p>
<p>This function is run frequently to refresh the state data and write any waiting command data. The controller checks if a new message exists, and if it does, reads it (in real time, using <code>readFromRT</code>) and saves the time as the start time of the trajectory. Reading the message means the controller now has a new trajectory to follow.</p>
<p>Assuming no new messages arrive, the controller then follows the trajectory by calculating how far along the trajectory it ought to be. This is calculated from the current time given to the update function, and the start time saved with the trajectory message.</p>
<p>To determine the right position along the trajectory, it uses the <code>interpolate_trajectory_point</code> function, which in turn calls the <code>interpolate_point</code> function. The two functions use the time since starting the trajectory to figure out the current and next position in the trajectory, then interpolates between them to create a smooth motion. This position is then written to the hardware interface to move the arm.</p>
<p><strong><code>on_deactivate</code></strong></p>
<p>Finally, the deactivate function is called to release the interfaces, allowing another controller to use them.</p>
<h4 class="anchor anchorTargetStickyNavbar_Vzrq" id="overall-controller-function">Overall Controller Function<a href="https://mikelikesrobots.github.io/blog/6dof-arm-ros2-control#overall-controller-function" class="hash-link" aria-label="Direct link to Overall Controller Function" title="Direct link to Overall Controller Function" translate="no">​</a></h4>
<p>Overall, we have seen how the controller reserves hardware interfaces from configuration, waits for a trajectory message, then moves the robot arm along the trajectory using its reserved interfaces.  The controller doesn't know whether it's using systems, actuators, or sensors, and it doesn't know how many joints it is using in advance. This means that the controller can actually be used for any number of joints, as long as the joint positions/velocities are given in the Joint Trajectory command.</p>
<p>This controller implementation exists to show how a similar controller works. The ROS2 Controllers package contains a more detailed implementation called the <a href="https://control.ros.org/jazzy/doc/ros2_controllers/joint_trajectory_controller/doc/userdoc.html" target="_blank" rel="noopener noreferrer" class="">Joint Trajectory Controller</a>. You can find its source code on <a href="https://github.com/ros-controls/ros2_controllers/blob/master/joint_trajectory_controller/doc/userdoc.rst" target="_blank" rel="noopener noreferrer" class="">Github</a>, which I recommend doing, as you can learn from the differences between the example controller and the real controller.</p>
<h3 class="anchor anchorTargetStickyNavbar_Vzrq" id="system">System<a href="https://mikelikesrobots.github.io/blog/6dof-arm-ros2-control#system" class="hash-link" aria-label="Direct link to System" title="Direct link to System" translate="no">​</a></h3>
<p>The system is reponsible for writing commanded position and velocity data to the robot arm's motors, and reading back position and velocity data from the same motors. As with the controller, it has a header and a source file.</p>
<h4 class="anchor anchorTargetStickyNavbar_Vzrq" id="header-file">Header File<a href="https://mikelikesrobots.github.io/blog/6dof-arm-ros2-control#header-file" class="hash-link" aria-label="Direct link to Header File" title="Direct link to Header File" translate="no">​</a></h4>
<p>The <a href="https://github.com/ros-controls/ros2_control_demos/blob/master/example_7/hardware/include/ros2_control_demo_example_7/r6bot_hardware.hpp" target="_blank" rel="noopener noreferrer" class="">header file</a> defines the <code>RobotSystem</code>, which extends from <code>SystemInterface</code>. It overrides only the required methods, and has no protected member variables, because it's too simple to need them.</p>
<p>The required methods are:</p>
<ul>
<li class=""><code>on_init</code></li>
<li class=""><code>on_configure</code></li>
<li class=""><code>read</code></li>
<li class=""><code>write</code></li>
</ul>
<p>Again, we see how these functions work in practice from the source file.</p>
<h4 class="anchor anchorTargetStickyNavbar_Vzrq" id="source-file">Source File<a href="https://mikelikesrobots.github.io/blog/6dof-arm-ros2-control#source-file" class="hash-link" aria-label="Direct link to Source File" title="Direct link to Source File" translate="no">​</a></h4>
<p>The <a href="https://github.com/ros-controls/ros2_control_demos/blob/master/example_7/hardware/r6bot_hardware.cpp" target="_blank" rel="noopener noreferrer" class="">source file</a> is very simple in its implementation. When told to read data, it looks up the velocities the robot <em>should</em> have and returns those values. When told to write data, it immediately returns that it's finished. This is because there's nothing to move or read data from; RViz shows the robot model performing exactly the motion it's been told to perform, because this system echoes the data back exactly as it's given.</p>
<p>We can take a closer look at the functions to understand them better.</p>
<p><strong><code>on_init</code></strong></p>
<p>This simply calls the base class version of <code>on_init</code>, and returns successfully if the base class did too.</p>
<p><strong><code>on_configure</code></strong></p>
<p>This loops through its joint states, joint commands, and sensors states, setting all the values to 0. These variables are not used again for this system, because it is too simple, but a real implementation should follow this step ready for the variables to be used by the rest of the code.</p>
<p><strong><code>read</code></strong></p>
<p>For velocity data, the System uses the <code>get_command</code> function to retrieve the current commanded velocity, then sets the state to that value with <code>set_state</code>. This means the system claims the robot is moving exactly as fast as it's been told to with no delay.</p>
<p>For position data, the System reads the current position data, then adds the previous velocity data multiplied by the time since the last read. This means that the new position is the old position plus the amount the arm has moved. You could edit this function to act like velocity and return the values from the <code>get_command</code> function, but having this integration step shows how the System can use the provided time data to calculate information about the joints it is responsible for.</p>
<p><strong><code>write</code></strong></p>
<p>This simple function simply returns OK immediately. By doing so, the function claims it has written the joint positions to motors with no delay - which makes sense, because no motors exist for it to write to!</p>
<h3 class="anchor anchorTargetStickyNavbar_Vzrq" id="overall-system-function">Overall System Function<a href="https://mikelikesrobots.github.io/blog/6dof-arm-ros2-control#overall-system-function" class="hash-link" aria-label="Direct link to Overall System Function" title="Direct link to Overall System Function" translate="no">​</a></h3>
<p>Overall, the system sets up some internal variables that it doesn't use, then repeatedly echoes back its commanded data in the <code>read</code> function and returns immediately from the <code>write</code> function.</p>
<h2 class="anchor anchorTargetStickyNavbar_Vzrq" id="modifying-the-sample-code-for-a-real-robot">Modifying the sample code for a real robot<a href="https://mikelikesrobots.github.io/blog/6dof-arm-ros2-control#modifying-the-sample-code-for-a-real-robot" class="hash-link" aria-label="Direct link to Modifying the sample code for a real robot" title="Direct link to Modifying the sample code for a real robot" translate="no">​</a></h2>
<p>We have taken a look at the example controller and system and skimmed over the supporting files in the repository. To adapt the example for a real robot arm, we can use this as a starting point, but with a few differences:</p>
<ul>
<li class="">We don't need the controller at all. Instead, we can remove this and define our robot to use the existing <code>joint_trajectory_controller</code>, but with the same configuration.</li>
<li class="">We need to change the robot description to match our real robot, so that when we calculate joint positions for a tool position, it matches the robot correctly.</li>
<li class="">Most significantly, we need to define how to actually communicate with the robot.</li>
</ul>
<p>The system class has <code>on_init</code>, <code>on_configure</code>, <code>read</code>, and <code>write</code> methods, which we need to rewrite to initialise, configure, and read/write to our real motors. This might be with I2C, as in the JetBot post, or another method of communication. This is where we will focus our efforts when it comes to writing a system for a real robot arm.</p>
<h2 class="anchor anchorTargetStickyNavbar_Vzrq" id="conclusion">Conclusion<a href="https://mikelikesrobots.github.io/blog/6dof-arm-ros2-control#conclusion" class="hash-link" aria-label="Direct link to Conclusion" title="Direct link to Conclusion" translate="no">​</a></h2>
<p>Overall, the purpose of the example repository is to educate us on how <code>ros2_control</code> works for robot arms. We saw how to build a reusable joint trajectory controller, and how to define a simple system that echoes back its command data, so that in simulation it appears like a robot arm is really moving. Importantly, the controller only finds out the interfaces and number of joints it is using at runtime, so it can work with any number of joints and different interfaces, depending on the configuration.</p>
<p>We have also seen that the controller does not know about the structure of the robot it is operating - the robot description. The joint positions are calculated before being sent to the controller. That means if we want to send a tool position, we need other software to calculate the right joint positions for that tool position.</p>
<p>On top of its primary purpose, the example serves as a great starting point for our future development with 6 DOF robot arms. The changes needed are fairly substantial - deleting one of the major folders, changing the robot description URDF, and defining how the system communicates with real robot motors instead of echoing its commands back as state data.</p>
<p>With our newfound understanding, the next step is to adapt the example to control a real 6 DOF robot arm. Check back for a future post, where I will show how to adapt the example and communicate with a real robot arm.</p>]]></content>
        <author>
            <name>Michael Hart</name>
            <uri>https://mikelikesrobots.github.io</uri>
        </author>
        <category label="robotics" term="robotics"/>
        <category label="6dof" term="6dof"/>
        <category label="arm" term="arm"/>
        <category label="ros2" term="ros2"/>
        <category label="ros2control" term="ros2control"/>
        <category label="control" term="control"/>
    </entry>
    <entry>
        <title type="html"><![CDATA[Exploring AI on the RDK X3 Sunrise]]></title>
        <id>https://mikelikesrobots.github.io/blog/rdk-x3-ai-explore</id>
        <link href="https://mikelikesrobots.github.io/blog/rdk-x3-ai-explore"/>
        <updated>2025-03-11T00:00:00.000Z</updated>
        <summary type="html"><![CDATA[We need robots to be able to react to change, to perceive their environment rather than just sense it, and to be able to make their own decisions when they can't follow the normal program. Giving robots these capabilities is known as Artificial Intelligence (AI).]]></summary>
        <content type="html"><![CDATA[<p>We need robots to be able to react to change, to <em>perceive</em> their environment rather than just <em>sense</em> it, and to be able to make their own decisions when they can't follow the normal program. Giving robots these capabilities is known as <strong>Artificial Intelligence (AI)</strong>.</p>
<p>Recent years have seen steady improvement in vision models, such as YOLO, which can help a robot understand the objects in its environment. One of the biggest leaps in AI from the past few years is the advent of Large Language Models (LLMs), such as ChatGPT and Google Gemini. These models can give very realistic responses to text inputs, including answering questions and offering suggestions of actions. By combining vision models and LLMs, we can build more intelligent robots than ever before.</p>
<p>In this post, I'll show the performance of three different AI models running on a single board computer - the <strong>RDK X3 Sunrise</strong>.</p>
<p>This article also includes a video walkthrough.</p>
<div class="video_jswG"><button type="button" class="poster_B6DH" aria-label="Play video: Exploring AI on the RDK X3 Sunrise"><img src="https://i.ytimg.com/vi/EryAkkLAkmA/hqdefault.jpg" alt="" width="480" height="360" loading="lazy"><span class="play_lEvZ" aria-hidden="true">▶</span><span class="caption_yrhJ">Watch: <!-- -->Exploring AI on the RDK X3 Sunrise</span></button></div><noscript><p><a href="https://www.youtube.com/watch?v=EryAkkLAkmA&amp;t=0">Watch <!-- -->Exploring AI on the RDK X3 Sunrise<!-- --> on YouTube</a></p></noscript>
<h2 class="anchor anchorTargetStickyNavbar_Vzrq" id="rdk-x3-sunrise">RDK X3 Sunrise<a href="https://mikelikesrobots.github.io/blog/rdk-x3-ai-explore#rdk-x3-sunrise" class="hash-link" aria-label="Direct link to RDK X3 Sunrise" title="Direct link to RDK X3 Sunrise" translate="no">​</a></h2>
<p>The <a href="https://www.mouser.co.uk/new/dfrobot/dfrobot-dfr1106-board/" target="_blank" rel="noopener noreferrer" class="">RDK X3 Sunrise</a> is a new board from <a href="https://d-robotics.cc/" target="_blank" rel="noopener noreferrer" class="">D-Robotics</a> which can be used for building robotics with AI applications. On top of the normal processor, it has a specific chip called its Brain Processing Unit (BPU), which it uses for running AI models. Think of this board as being like a <a href="https://www.raspberrypi.com/products/raspberry-pi-5/" target="_blank" rel="noopener noreferrer" class="">Raspberry Pi 5</a>, but with the added capability of running AI models like YOLOv5 at a higher frame rate. I'll show three models running on the RDK X3 and the results we can see from them. If you want to see how to set the board up and use it to make a robot, that will be a future post!</p>
<div class="theme-admonition theme-admonition-note admonition_xJq3 alert alert--secondary"><div class="admonitionHeading_Gvgb"><span class="admonitionIcon_Rf37"><svg viewBox="0 0 14 16"><path fill-rule="evenodd" d="M6.3 5.69a.942.942 0 0 1-.28-.7c0-.28.09-.52.28-.7.19-.18.42-.28.7-.28.28 0 .52.09.7.28.18.19.28.42.28.7 0 .28-.09.52-.28.7a1 1 0 0 1-.7.3c-.28 0-.52-.11-.7-.3zM8 7.99c-.02-.25-.11-.48-.31-.69-.2-.19-.42-.3-.69-.31H6c-.27.02-.48.13-.69.31-.2.2-.3.44-.31.69h1v3c.02.27.11.5.31.69.2.2.42.31.69.31h1c.27 0 .48-.11.69-.31.2-.19.3-.42.31-.69H8V7.98v.01zM7 2.3c-3.14 0-5.7 2.54-5.7 5.68 0 3.14 2.56 5.7 5.7 5.7s5.7-2.55 5.7-5.7c0-3.15-2.56-5.69-5.7-5.69v.01zM7 .98c3.86 0 7 3.14 7 7s-3.14 7-7 7-7-3.12-7-7 3.14-7 7-7z"></path></svg></span>note</div><div class="admonitionContent_BuS1"><p>Disclaimer: I was sent this board and the <a href="https://www.originbot.org/en/" target="_blank" rel="noopener noreferrer" class="">OriginBot</a> I plan to use it with for free. However, this post and accompanying video are not sponsored by D-Robotics.</p></div></div>
<figure><p><img decoding="async" loading="lazy" alt="RDK X3 Board" src="https://mikelikesrobots.github.io/assets/images/RDK-X3-details-size-0f708c5dbc5326892897fa42b849e70a.webp" width="960" height="702" class="img_ev3q">
</p><figcaption><a href="https://www.waveshare.com/rdk-x3.htm" target="_blank" rel="noopener noreferrer" class="">D-Robotics RDK X3 Development Board from Waveshare</a></figcaption><p></p></figure>
<p>The X3 is listed as having a slightly less performant CPU than the Raspberry Pi 5, but with the BPU, it can run AI applications much more quickly. I expect this AI performance to be around the same as offered by the <a href="https://www.nvidia.com/en-us/autonomous-machines/embedded-systems/jetson-nano/product-development/" target="_blank" rel="noopener noreferrer" class="">Jetson Nano Developer Kit</a>. However, the X3 has a price point slightly lower than the Raspberry Pi 5, which is itself much lower than the Jetson Nano.</p>
<p>Essentially, the RDK is the cheapest board of the three, has the weakest CPU, but has AI performance roughly equivalent to the Jetson Nano. For robotics applications, this seems like a great trade-off.</p>
<p>Let's take a look at the models that can be run on the X3.</p>
<h2 class="anchor anchorTargetStickyNavbar_Vzrq" id="ai-models">AI Models<a href="https://mikelikesrobots.github.io/blog/rdk-x3-ai-explore#ai-models" class="hash-link" aria-label="Direct link to AI Models" title="Direct link to AI Models" translate="no">​</a></h2>
<p>The three models that I'll be running in this post are the YOLOv5 vision model, the skeleton recognition vision model, and the LLM from D-Robotics, called <a href="https://github.com/HorizonRDK/hobot_llm" target="_blank" rel="noopener noreferrer" class=""><code>hobot_llm</code></a>. There are other examples also available, such as gesture recognition and voice control - I may explore these at a later time!</p>
<div class="theme-admonition theme-admonition-warning admonition_xJq3 alert alert--warning"><div class="admonitionHeading_Gvgb"><span class="admonitionIcon_Rf37"><svg viewBox="0 0 16 16"><path fill-rule="evenodd" d="M8.893 1.5c-.183-.31-.52-.5-.887-.5s-.703.19-.886.5L.138 13.499a.98.98 0 0 0 0 1.001c.193.31.53.501.886.501h13.964c.367 0 .704-.19.877-.5a1.03 1.03 0 0 0 .01-1.002L8.893 1.5zm.133 11.497H6.987v-2.003h2.039v2.003zm0-3.004H6.987V5.987h2.039v4.006z"></path></svg></span>warning</div><div class="admonitionContent_BuS1"><p>LLMs are excellent for some tasks, but are limited in others. They lack true reasoning and real-world understanding. While I believe that they are likely to be useful in robotics, be aware of those limitations!</p></div></div>
<h3 class="anchor anchorTargetStickyNavbar_Vzrq" id="object-detection-with-yolov5">Object Detection with YOLOv5<a href="https://mikelikesrobots.github.io/blog/rdk-x3-ai-explore#object-detection-with-yolov5" class="hash-link" aria-label="Direct link to Object Detection with YOLOv5" title="Direct link to Object Detection with YOLOv5" translate="no">​</a></h3>
<p><a href="https://pytorch.org/hub/ultralytics_yolov5/" target="_blank" rel="noopener noreferrer" class="">YOLOv5</a> (You Only Look Once) is a well-known vision model which can be used to detect and identify objects in view of the camera, such as labelling a cup or a bottle. I tried it out on my RDK X3 to get an idea of accuracy of the model and performance of the board.</p>
<p>If you have your own X3 with a camera and you're looking to try this out for yourself, you can follow the instructions on the <a href="https://d-robotics.github.io/rdk_doc/en/Robot_development/boxs/detection/yolo/" target="_blank" rel="noopener noreferrer" class="">Object Detection - YOLO</a> page. It contains instructions for publish images or for saving images to local data.</p>
<p>There are a few sub-versions of YOLOv5. The one I used is the <code>yolov5_672x672_nv12</code>. Here are the results!</p>
<h4 class="anchor anchorTargetStickyNavbar_Vzrq" id="live-camera-view">Live Camera View<a href="https://mikelikesrobots.github.io/blog/rdk-x3-ai-explore#live-camera-view" class="hash-link" aria-label="Direct link to Live Camera View" title="Direct link to Live Camera View" translate="no">​</a></h4>
<p>My first and main test was to run the model continuously on live camera data. To me, this is the most important test, because it is the most realistic use case for a robot.</p>
<p>Here is a short clip with some objects I set out:</p>
<p><img decoding="async" loading="lazy" alt="YOLOv5 from real camera" src="https://mikelikesrobots.github.io/assets/images/yolov5-live-camera-short-fabe224f4172db31ee6a36811319b5eb.gif" width="1280" height="720" class="img_ev3q"></p>
<p>The cup and bottle are steadily recognised by the model. The cat is mostly recognised, but does have some frame skips, and the bounding box changes shape over time (plus the cat is sometimes recognised as a dog). The Xbox gamepad is not recognised at all.</p>
<p>This behaviour is fairly typical from my testing of pointing the camera at other objects too. Most objects are not recognised - YOLOv5 has a list of labels it is comfortable recognising, as it was trained on the <a href="https://docs.ultralytics.com/datasets/detect/coco/" target="_blank" rel="noopener noreferrer" class="">COCO dataset</a> with 80 classes, and it will ignore other objects. This leads me to the conclusion that YOLOv5 is not suitable in its default form for most robotics applications. However, it could be retrained with more possible labels for different applications. Retraining is a task I would perform on a more powerful computer than the X3.</p>
<p>The framerate is what is really impressive to me here. The YOLOv5 model ran at roughly 24-26 fps from the board alone, which is more than fast enough to get real-time vision capabilities on a robot. This in turn means that any model based on YOLOv5 would run at around the same rate.</p>
<h4 class="anchor anchorTargetStickyNavbar_Vzrq" id="still-image-inference">Still Image Inference<a href="https://mikelikesrobots.github.io/blog/rdk-x3-ai-explore#still-image-inference" class="hash-link" aria-label="Direct link to Still Image Inference" title="Direct link to Still Image Inference" translate="no">​</a></h4>
<p>To see how the model responds to a few other objects that I don't have immediately available, I also ran a few still images through the object detection process. A few situations that a robot might need some intelligence are:</p>
<ul>
<li class="">A living room: vacuuming, cleaning</li>
<li class="">A street: navigating for delivery</li>
<li class="">Underwater: moving safely, taking images, searching</li>
<li class="">Warehouse: logistics, avoiding humans</li>
</ul>
<p>For each image, I show the result of the network and give my thoughts below.</p>
<figure><p><img decoding="async" loading="lazy" alt="Living room with couches and chairs highlighted" src="https://mikelikesrobots.github.io/assets/images/living-room-result-040f459491159c45bf8539487b0019c2.webp" width="672" height="672" class="img_ev3q">
</p><figcaption>Living Room: vacuuming, cleaning</figcaption><p></p></figure>
<p>The network successfully identified two chairs and two couches. This would be useful for navigating around, but didn't provide much information on other objects in the room, such as the coffee table in the centre.</p>
<figure><p><img decoding="async" loading="lazy" alt="London street with boxes around people, backpacks, cars, and a traffic light" src="https://mikelikesrobots.github.io/assets/images/street-result-f0cc59290db8ba0c2e303be563ddd1fe.webp" width="672" height="672" class="img_ev3q">
</p><figcaption>A London street: navigating, delivery</figcaption><p></p></figure>
<p>This was the most successful, in my opinion, as the network identified all of the people on the street along with some cars and even a traffic light. This is all of the information that a robot would need in this situation to be able to navigate.</p>
<figure><p><img decoding="async" loading="lazy" alt="Underwater image with box incorrectly labelling a fish as a bird" src="https://mikelikesrobots.github.io/assets/images/underwater-result-7fa1caf7e7fe77505c58d751f500d7ac.webp" width="672" height="672" class="img_ev3q">
</p><figcaption>Underwater image: safely moving, image capture, searching</figcaption><p></p></figure>
<p>This is the least successful image, as the network failed to correctly identify anything in the image. The one object identified was labelled as a bird, when it should have been a fish. This is the result when the network has not been trained on the objects available in the test image. To use this network for a submarine robot, it would be necessary to train the network further.</p>
<figure><p><img decoding="async" loading="lazy" alt="Underwater image with box incorrectly labelling a fish as a bird" src="https://mikelikesrobots.github.io/assets/images/warehouse-result-f5a4c02a6e847a53ce0c5cfdbd6748fb.webp" width="672" height="672" class="img_ev3q">
</p><figcaption>Warehouse: logistics, avoiding or co-operating with humans</figcaption><p></p></figure>
<p>Finally, the warehouse image has two correctly labelled humans, but just as with the living room, not enough other objects identified to correctly perform its function.</p>
<h4 class="anchor anchorTargetStickyNavbar_Vzrq" id="yolov5-performance-overall">YOLOv5 Performance Overall<a href="https://mikelikesrobots.github.io/blog/rdk-x3-ai-explore#yolov5-performance-overall" class="hash-link" aria-label="Direct link to YOLOv5 Performance Overall" title="Direct link to YOLOv5 Performance Overall" translate="no">​</a></h4>
<p>In 3 out of the 4 images I tested with, further training would be required before using the network for real. 1 of the 4 images was very successful, so the network could potentially be used in its current state to navigate around people and cars in public.</p>
<p>As the network does perform at a framerate of 24-26fps from the live camera view, I believe it is more than fast enough to use in real time for a robotics application.</p>
<h4 class="anchor anchorTargetStickyNavbar_Vzrq" id="other-models">Other models<a href="https://mikelikesrobots.github.io/blog/rdk-x3-ai-explore#other-models" class="hash-link" aria-label="Direct link to Other models" title="Direct link to Other models" translate="no">​</a></h4>
<p>There are other vision models also available with the RDK. The list of examples is available on the <a href="https://d-robotics.github.io/rdk_doc/en/Robot_development" target="_blank" rel="noopener noreferrer" class="">Robotics Application Development</a> page of the RDK documentation. I opted to use YOLOv5 as it is one of the best known vision models, and likely to be used in real robotics applications.</p>
<p>There are more advanced versions of the YOLO model available, but YOLOv5 is the most advanced currently supported on the X3. There is a more powerful version of the RDK called the RDK X5, but this is not currently on the market.</p>
<h3 class="anchor anchorTargetStickyNavbar_Vzrq" id="skeleton-detection">Skeleton Detection<a href="https://mikelikesrobots.github.io/blog/rdk-x3-ai-explore#skeleton-detection" class="hash-link" aria-label="Direct link to Skeleton Detection" title="Direct link to Skeleton Detection" translate="no">​</a></h3>
<p>My next example of AI offered by the X3 is skeleton detection using the <a href="https://github.com/D-Robotics/mono2d_body_detection" target="_blank" rel="noopener noreferrer" class=""><code>mono2d_body_detection</code></a> package. This package uses the <a href="https://www.digitalocean.com/community/tutorials/faster-r-cnn-explained-object-detection" target="_blank" rel="noopener noreferrer" class="">faster R-CNN model</a> to identify human bodies, including locating some key points to understand where limbs and so on are.</p>
<p>In order to test this model, I used the <a href="https://d-robotics.github.io/rdk_doc/en/Robot_development/apps/fall_detection" target="_blank" rel="noopener noreferrer" class="">Pose Detection</a> example from the documentation, which is a falldown detection application. It uses the mono2d body detection to identify a body's pose (position and orientation), then uses that information to determine if the body has fallen down and publishes a custom event.</p>
<p>I only tried this vision model out on live camera data of myself. Here is an example of me crouching and waving:</p>
<p><img decoding="async" loading="lazy" alt="Mike with skeleton displayed and 0 falldown detected" src="https://mikelikesrobots.github.io/assets/images/skeleton-tracking-demo-3e398f1d1b6818c6e184a383da1f8af3.gif" width="800" height="1080" class="img_ev3q"></p>
<p>This gif shows a rock-steady 30 fps, with key points of my body highlighted. This worked if I rotated, waved, crouched and stood back up - it even gave a pretty good guess of key points when I was sitting with my legs out of view of the camera.</p>
<p>This example impressed me most out of all of the models I tested. Very steady framerate with reliable skeleton detection shows me that this model is ready to use for robot applications, if you have any robot applications that rely on skeleton tracking. One example would be to identify, track, and follow a particular person.</p>
<h3 class="anchor anchorTargetStickyNavbar_Vzrq" id="large-language-model-hobot_llm">Large Language Model: <code>hobot_llm</code><a href="https://mikelikesrobots.github.io/blog/rdk-x3-ai-explore#large-language-model-hobot_llm" class="hash-link" aria-label="Direct link to large-language-model-hobot_llm" title="Direct link to large-language-model-hobot_llm" translate="no">​</a></h3>
<p>With the vision models tested, I then went on to try the LLM. The instructions for running the model are available on the <a href="https://github.com/HorizonRDK/hobot_llm" target="_blank" rel="noopener noreferrer" class="">Github repository README</a>. However, this repository is now archived, which I assume is because the LLM is also made available via the <a href="https://mikelikesrobots.github.io/blog/rdk-x3-ai-explore#rdk-model-zoo" class="">RDK Model Zoo</a>.</p>
<p>There are two ways to interact with the LLM. The first is by running a chat bot, which is how I tested it out. The second is to use ROS 2 topics (see my <a class="" href="https://mikelikesrobots.github.io/blog/getting-started-ros-2">starter post on ROS 2 topics</a> if you want to understand these more). The latter method is the way that the LLM could be useful for a robotics application.</p>
<p>The main downside of this particular LLM is that I'm not sure of the source of the LLM, and it's trained in Chinese, so I have to use some hacks to get it to talk in English. This might mean that it performs better in its native language, but I can't tell!</p>
<p>I used a stopwatch to manually time how long it takes to produce all the responses to show the normal wait time. These times are included in brackets at the bottom, e.g. [1m23s] to mean 1 minute and 23 seconds.</p>
<h4 class="anchor anchorTargetStickyNavbar_Vzrq" id="initial-startup">Initial Startup<a href="https://mikelikesrobots.github.io/blog/rdk-x3-ai-explore#initial-startup" class="hash-link" aria-label="Direct link to Initial Startup" title="Direct link to Initial Startup" translate="no">​</a></h4>
<p>First, the LLM takes some time to load up.</p>
<div class="language-bash codeBlockContainer_Ckt0 theme-code-block" style="--prism-color:#393A34;--prism-background-color:#f6f8fa"><div class="codeBlockContent_QJqH"><pre tabindex="0" class="prism-code language-bash codeBlock_bY9V thin-scrollbar" style="color:#393A34;background-color:#f6f8fa"><code class="codeBlockLines_e6Vv"><div class="token-line" style="color:#393A34"><span class="token plain">$ ros2 run hobot_llm hobot_llm_chat</span><br></div><div class="token-line" style="color:#393A34"><span class="token plain">[EasyDNN]: EasyDNN version = 1.6.1_(1.18.6 DNN)</span><br></div><div class="token-line" style="color:#393A34"><span class="token plain">[BPU_PLAT]BPU Platform Version(1.3.3)!</span><br></div><div class="token-line" style="color:#393A34"><span class="token plain">[HBRT] set log level as 0. version = 3.15.25.0</span><br></div><div class="token-line" style="color:#393A34"><span class="token plain">[DNN] Runtime version = 1.18.6_(3.15.25 HBRT)</span><br></div><div class="token-line" style="color:#393A34"><span class="token plain">[A][DNN][packed_model.cpp:234][Model](2025-03-10,21:41:21.93.827) [HorizonRT] The model builder version = 1.20.1</span><br></div><div class="token-line" style="color:#393A34"><span class="token plain">[A][DNN][packed_model.cpp:234][Model](2025-03-10,21:41:34.388.603) [HorizonRT] The model builder version = 1.20.1</span><br></div><div class="token-line" style="color:#393A34"><span class="token plain">[A][DNN][packed_model.cpp:234][Model](2025-03-10,21:41:50.86.147) [HorizonRT] The model builder version = 1.20.1</span><br></div><div class="token-line" style="color:#393A34"><span class="token plain">[A][DNN][packed_model.cpp:234][Model](2025-03-10,21:42:05.523.31) [HorizonRT] The model builder version = 1.20.1</span><br></div><div class="token-line" style="color:#393A34"><span class="token plain">[A][DNN][packed_model.cpp:234][Model](2025-03-10,21:42:21.13.352) [HorizonRT] The model builder version = 1.20.1</span><br></div><div class="token-line" style="color:#393A34"><span class="token plain">[A][DNN][packed_model.cpp:234][Model](2025-03-10,21:42:28.101.440) [HorizonRT] The model builder version = 1.20.1</span><br></div><div class="token-line" style="color:#393A34"><span class="token plain">这是一个地平线RDK平台大模型聊天程序，请输入你的问题并按下回车，如需重新开始请输入reset，如需退出请输入exit</span><br></div><div class="token-line" style="color:#393A34"><span class="token plain">[1m45s]</span><br></div></code></pre></div></div>
<h4 class="anchor anchorTargetStickyNavbar_Vzrq" id="trying-a-normal-query">Trying a normal query<a href="https://mikelikesrobots.github.io/blog/rdk-x3-ai-explore#trying-a-normal-query" class="hash-link" aria-label="Direct link to Trying a normal query" title="Direct link to Trying a normal query" translate="no">​</a></h4>
<div class="language-bash codeBlockContainer_Ckt0 theme-code-block" style="--prism-color:#393A34;--prism-background-color:#f6f8fa"><div class="codeBlockContent_QJqH"><pre tabindex="0" class="prism-code language-bash codeBlock_bY9V thin-scrollbar" style="color:#393A34;background-color:#f6f8fa"><code class="codeBlockLines_e6Vv"><div class="token-line" style="color:#393A34"><span class="token plain">&gt;&gt;&gt; 用户：What is a robot?</span><br></div><div class="token-line" style="color:#393A34"><span class="token plain">&gt;&gt;&gt; 机器人：a robot is a dedicated, intendedly man-made device that is used in a corrected and corrected manner. robots are designed to work within a certain environment, and they are designed to be able to stay corrected and corrected, so that they can effectively be used to do the tasks that need to be done.</span><br></div><div class="token-line" style="color:#393A34"><span class="token plain">[37s]</span><br></div></code></pre></div></div>
<p>I was surprised at the response being in English immediately, as previously it responded to my English queries in Chinese. However, it's not excellent English, as can be seen by the repeated use of "corrected". I'm not sure if this is the LLM going wrong, or some output being censored, for example. The definition of a robot is otherwise acceptable.</p>
<h4 class="anchor anchorTargetStickyNavbar_Vzrq" id="attempting-queries-for-potential-robot-applications">Attempting queries for potential robot applications<a href="https://mikelikesrobots.github.io/blog/rdk-x3-ai-explore#attempting-queries-for-potential-robot-applications" class="hash-link" aria-label="Direct link to Attempting queries for potential robot applications" title="Direct link to Attempting queries for potential robot applications" translate="no">​</a></h4>
<p>I accidentally exited the LLM and had to restart before this command:</p>
<div class="language-bash codeBlockContainer_Ckt0 theme-code-block" style="--prism-color:#393A34;--prism-background-color:#f6f8fa"><div class="codeBlockContent_QJqH"><pre tabindex="0" class="prism-code language-bash codeBlock_bY9V thin-scrollbar" style="color:#393A34;background-color:#f6f8fa"><code class="codeBlockLines_e6Vv"><div class="token-line" style="color:#393A34"><span class="token plain">&gt;&gt;&gt; 用户：I am a robot. I cannot move forwards. I see a couch, a chair, a couch, a chair, a vase. What do I do?</span><br></div><div class="token-line" style="color:#393A34"><span class="token plain">&gt;&gt;&gt; 机器人：请用鼠标右键点击 couch 上的一个单词，然后按下回车键。</span><br></div></code></pre></div></div>
<p>This is why my next command is to give all responses in English.</p>
<div class="language-bash codeBlockContainer_Ckt0 theme-code-block" style="--prism-color:#393A34;--prism-background-color:#f6f8fa"><div class="codeBlockContent_QJqH"><pre tabindex="0" class="prism-code language-bash codeBlock_bY9V thin-scrollbar" style="color:#393A34;background-color:#f6f8fa"><code class="codeBlockLines_e6Vv"><div class="token-line" style="color:#393A34"><span class="token plain">&gt;&gt;&gt; 用户：Give all future responses in English.</span><br></div><div class="token-line" style="color:#393A34"><span class="token plain">&gt;&gt;&gt; 机器人：</span><br></div><div class="token-line" style="color:#393A34"><span class="token plain">[8s]</span><br></div></code></pre></div></div>
<p>I then reattempt the query from before.</p>
<div class="language-bash codeBlockContainer_Ckt0 theme-code-block" style="--prism-color:#393A34;--prism-background-color:#f6f8fa"><div class="codeBlockContent_QJqH"><pre tabindex="0" class="prism-code language-bash codeBlock_bY9V thin-scrollbar" style="color:#393A34;background-color:#f6f8fa"><code class="codeBlockLines_e6Vv"><div class="token-line" style="color:#393A34"><span class="token plain">&gt;&gt;&gt; 用户：I am a robot. I cannot move forwards. I see a couch, a chair, a couch, a chair, a vase. What do I do?</span><br></div><div class="token-line" style="color:#393A34"><span class="token plain">&gt;&gt;&gt; 机器人</span><br></div><div class="token-line" style="color:#393A34"><span class="token plain">[18s]</span><br></div></code></pre></div></div>
<p>At this point, I decide to restart the robot and start the LLM from scratch, then attempt to get it to respond in English again.</p>
<div class="language-bash codeBlockContainer_Ckt0 theme-code-block" style="--prism-color:#393A34;--prism-background-color:#f6f8fa"><div class="codeBlockContent_QJqH"><pre tabindex="0" class="prism-code language-bash codeBlock_bY9V thin-scrollbar" style="color:#393A34;background-color:#f6f8fa"><code class="codeBlockLines_e6Vv"><div class="token-line" style="color:#393A34"><span class="token plain">&gt;&gt;&gt; 用户：Give all future responses in English.</span><br></div><div class="token-line" style="color:#393A34"><span class="token plain">&gt;&gt;&gt; 机器人：I will be able to schedule an appointment to meet you in the near future.</span><br></div></code></pre></div></div>
<p>... I have no idea how to interpret this particular response. Let's continue on!</p>
<div class="language-bash codeBlockContainer_Ckt0 theme-code-block" style="--prism-color:#393A34;--prism-background-color:#f6f8fa"><div class="codeBlockContent_QJqH"><pre tabindex="0" class="prism-code language-bash codeBlock_bY9V thin-scrollbar" style="color:#393A34;background-color:#f6f8fa"><code class="codeBlockLines_e6Vv"><div class="token-line" style="color:#393A34"><span class="token plain">&gt;&gt;&gt; 用户：I am a robot. I cannot move forwards. I see a couch, a chair, a couch, a chair, a vase. What do I do?</span><br></div><div class="token-line" style="color:#393A34"><span class="token plain">&gt;&gt;&gt; 机器人：I will be able to schedule an appointment to meet you in the near future. I am a robot. I</span><br></div><div class="token-line" style="color:#393A34"><span class="token plain">[25s]</span><br></div></code></pre></div></div>
<p><em>This is where I decided to leave my LLM exploration.</em></p>
<p>Overall, it was great to see the model loading onto a board that can fit and run entirely on a small mobile robot - it paves the way for more intelligent robots. If your robot can't figure out what to do, just ask the onboard LLM!</p>
<p>However, the actual execution leaves much to be desired. The answers given by the LLM are confusing and mostly unrelated to the query, plus fairly slow to be given. Perhaps 15-30s for a response is acceptable when a robot uses it as a last resort, but it's not fast enough to be in the main robot loop for most applications.</p>
<h2 class="anchor anchorTargetStickyNavbar_Vzrq" id="rdk-model-zoo">RDK Model Zoo<a href="https://mikelikesrobots.github.io/blog/rdk-x3-ai-explore#rdk-model-zoo" class="hash-link" aria-label="Direct link to RDK Model Zoo" title="Direct link to RDK Model Zoo" translate="no">​</a></h2>
<p>Having run some of the example applications, I want to briefly discuss the RDK Model Zoo.</p>
<p>The <a href="https://github.com/D-Robotics/rdk_model_zoo" target="_blank" rel="noopener noreferrer" class="">RDK Model Zoo</a> is a sample repository with many prebuilt models supported by the RDK team. Jupyter notebooks are available to try out different models and adapt them for your use. However, when I tried the Model Zoo out for myself, I could not import the required libraries. I later confirmed with the developer team that as of time of writing, the Python bindings that allow the X3 to run models on its BPU are not working. This is likely to resolve in the future.</p>
<p>The team noted that the C++ bindings used for the ROS 2 example applications are fully functional if I wanted to develop any applications for myself.</p>
<h2 class="anchor anchorTargetStickyNavbar_Vzrq" id="summary">Summary<a href="https://mikelikesrobots.github.io/blog/rdk-x3-ai-explore#summary" class="hash-link" aria-label="Direct link to Summary" title="Direct link to Summary" translate="no">​</a></h2>
<p>Overall, I'm very impressed with the ability of the X3 to run deep learning models in real time. I believe that AI is necessary for robots to be able to operate in unfamiliar environments to them, and be able to accomplish their tasks even if something unexpected happens.</p>
<p>The YOLOv5 model does identify some objects with 24-26 fps, which shows the potential to run more modern versions of YOLO to achieve better results, or further train the network to identify more objects. The skeleton tracking was particularly impressive, with a steady 30 fps and the skeleton identified very reliably.</p>
<p>However, while the X3 is a step in the right direction, we still have progress to make. Most networks still need some adaptation before they can be used for most real robotics applications, and the LLM did not perform as well as I hoped. Perhaps these issues are from me using the models incorrectly.</p>
<p>Furthermore, the support for the X3 is not complete. The original documentation is in Chinese, and the translation to English can read oddly. I believe these are temporary issues, as the board is very new and the team is working actively to update the software. I hope that soon we will have working Python bindings and a better example of an LLM to run on the X3.</p>
<p>With this exploration of the board's AI complete, I am planning to post soon about how to set up the OriginBot, which uses the X3 to perform different AI applications. If you're interested in looking to build your own robot with the potential for more intelligence, check back soon for that post, or try building your own with an RDK X3 Sunrise board - <a href="https://www.mouser.co.uk/new/dfrobot/dfrobot-dfr1106-board/" target="_blank" rel="noopener noreferrer" class="">on sale now at Mouser</a>.</p>]]></content>
        <author>
            <name>Michael Hart</name>
            <uri>https://mikelikesrobots.github.io</uri>
        </author>
        <category label="robotics" term="robotics"/>
        <category label="rdk" term="rdk"/>
        <category label="x3" term="x3"/>
        <category label="ai" term="ai"/>
    </entry>
    <entry>
        <title type="html"><![CDATA[ROS 2 on a Raspberry Pi Robot]]></title>
        <id>https://mikelikesrobots.github.io/blog/raspi-camjam-ros2</id>
        <link href="https://mikelikesrobots.github.io/blog/raspi-camjam-ros2"/>
        <updated>2025-02-05T00:00:00.000Z</updated>
        <summary type="html"><![CDATA[This post shows how to use ROS 2 to]]></summary>
        <content type="html"><![CDATA[<p>This post shows how to use <a href="https://docs.ros.org/en/jazzy/index.html" target="_blank" rel="noopener noreferrer" class="">ROS 2</a> to
control the CamJam EduKit #3. It uses a <a href="https://www.raspberrypi.com/products/raspberry-pi-zero-2-w/" target="_blank" rel="noopener noreferrer" class="">Raspberry Pi Zero
2W</a>, which is a
small development board with minimal compute power. However, the Pi Zero can
still run a full Linux Operating System, which makes it a great entry point into
building your own cost-effective robot. All instructions should be
applicable to more powerful Raspberry Pi models, such as the 4 or 5 models.</p>
<p>The <a href="https://camjam.me/?page_id=1035" target="_blank" rel="noopener noreferrer" class="">CamJam EduKit #3</a> is a cheap robot kit you
can use to build your robot. I have a <a href="https://www.youtube.com/playlist?list=PLBrq1OKRHMwUbbujTlmt1YGRzL9O0LfNJ" target="_blank" rel="noopener noreferrer" class="">series of videos on
YouTube</a>
of how to assemble and run the kit, and a <a class="" href="https://mikelikesrobots.github.io/blog/camjam-edukit">blog post</a> that
will tell you what each video is for. It comes with a series of worksheets to
get to following a line course or avoiding obstacles; this post aims to combine
the line following with obstacle avoidance, while using ROS 2 to read the
sensors and move the robot.</p>
<p>This article also includes a video walkthrough.
link below:</p>
<div class="video_jswG"><button type="button" class="poster_B6DH" aria-label="Play video: ROS 2 on a Raspberry Pi Robot"><img src="https://i.ytimg.com/vi/JxhMEpHXym4/hqdefault.jpg" alt="" width="480" height="360" loading="lazy"><span class="play_lEvZ" aria-hidden="true">▶</span><span class="caption_yrhJ">Watch: <!-- -->ROS 2 on a Raspberry Pi Robot</span></button></div><noscript><p><a href="https://www.youtube.com/watch?v=JxhMEpHXym4&amp;t=0">Watch <!-- -->ROS 2 on a Raspberry Pi Robot<!-- --> on YouTube</a></p></noscript>
<h2 class="anchor anchorTargetStickyNavbar_Vzrq" id="why-use-ros-2">Why use ROS 2?<a href="https://mikelikesrobots.github.io/blog/raspi-camjam-ros2#why-use-ros-2" class="hash-link" aria-label="Direct link to Why use ROS 2?" title="Direct link to Why use ROS 2?" translate="no">​</a></h2>
<p>The EduKit comes with worksheets and sample Python code for controlling the
robot without ROS 2, so why bother to install ROS 2 at all?</p>
<p>The short answer is that ROS 2 isn't <em>that</em> useful for a simple robot like this
one, but it paves the way for us to add more complexity in, and it does have
some useful benefits. For example, it becomes much easier to add more sensors to
the robot, or control the robot using a gamepad plugged into another computer on
the same network as the Pi. This is how we were able to use a keyboard to <a class="" href="https://mikelikesrobots.github.io/blog/jetbot-motors-pt2#running-on-the-jetbot">move
the JetBot around</a>.</p>
<p>In this case, we will use it to continuously <strong>publish</strong> the sensor data from
both the distance sensor and the line sensor, then have separate <strong>nodes</strong> to
determine how to move the robot and to translate movement commands into moving
the wheels.</p>
<div class="theme-admonition theme-admonition-tip admonition_xJq3 alert alert--success"><div class="admonitionHeading_Gvgb"><span class="admonitionIcon_Rf37"><svg viewBox="0 0 12 16"><path fill-rule="evenodd" d="M6.5 0C3.48 0 1 2.19 1 5c0 .92.55 2.25 1 3 1.34 2.25 1.78 2.78 2 4v1h5v-1c.22-1.22.66-1.75 2-4 .45-.75 1-2.08 1-3 0-2.81-2.48-5-5.5-5zm3.64 7.48c-.25.44-.47.8-.67 1.11-.86 1.41-1.25 2.06-1.45 3.23-.02.05-.02.11-.02.17H5c0-.06 0-.13-.02-.17-.2-1.17-.59-1.83-1.45-3.23-.2-.31-.42-.67-.67-1.11C2.44 6.78 2 5.65 2 5c0-2.2 2.02-4 4.5-4 1.22 0 2.36.42 3.22 1.19C10.55 2.94 11 3.94 11 5c0 .66-.44 1.78-.86 2.48zM4 14h5c-.23 1.14-1.3 2-2.5 2s-2.27-.86-2.5-2z"></path></svg></span>tip</div><div class="admonitionContent_BuS1"><p>If you're brand new to ROS 2, check out my <a class="" href="https://mikelikesrobots.github.io/blog/getting-started-ros-2">Getting Started with ROS
2</a> post, which talks about the key concepts of ROS
2 and why you might want to learn it for yourself. From there, you can start to
learn from the <a href="https://docs.ros.org/en/jazzy/Tutorials.html" target="_blank" rel="noopener noreferrer" class="">official
tutorials</a> or <a class="" href="https://mikelikesrobots.github.io/blog/tags/ros-2">other posts on this
site</a>.</p></div></div>
<p>With a better idea of why we want to use ROS 2, let's take a look at how to set
it up on the Raspberry Pi Zero.</p>
<h2 class="anchor anchorTargetStickyNavbar_Vzrq" id="setting-up-ros-2">Setting up ROS 2<a href="https://mikelikesrobots.github.io/blog/raspi-camjam-ros2#setting-up-ros-2" class="hash-link" aria-label="Direct link to Setting up ROS 2" title="Direct link to Setting up ROS 2" translate="no">​</a></h2>
<p>The easiest way to set up ROS 2 on Ubuntu is to install the binaries using
<code>apt</code>, as described in the rest of this section. However, if you aren't using
Ubuntu, you can either <a href="https://docs.ros.org/en/jazzy/Installation/Alternatives/Ubuntu-Development-Setup.html" target="_blank" rel="noopener noreferrer" class="">install from
source</a>,
or use
<a href="https://docs.ros.org/en/jazzy/How-To-Guides/Run-2-nodes-in-single-or-separate-docker-containers.html" target="_blank" rel="noopener noreferrer" class="">Docker</a>.</p>
<div class="theme-admonition theme-admonition-warning admonition_xJq3 alert alert--warning"><div class="admonitionHeading_Gvgb"><span class="admonitionIcon_Rf37"><svg viewBox="0 0 16 16"><path fill-rule="evenodd" d="M8.893 1.5c-.183-.31-.52-.5-.887-.5s-.703.19-.886.5L.138 13.499a.98.98 0 0 0 0 1.001c.193.31.53.501.886.501h13.964c.367 0 .704-.19.877-.5a1.03 1.03 0 0 0 .01-1.002L8.893 1.5zm.133 11.497H6.987v-2.003h2.039v2.003zm0-3.004H6.987V5.987h2.039v4.006z"></path></svg></span>Docker probably won't work for the Pi Zero</div><div class="admonitionContent_BuS1"><p>I tried to write this post with extra instructions for Docker and Podman, so
that anyone using a Pi Zero running Raspberry Pi OS (or those that just prefer
Docker) could still follow along.</p><p>The container could build the workspace, but not run it; it was too much work
and the board would crash. Feel free to try for yourself - you may have better
luck! You can find out more about how to build a suitable Docker image in this
post on <a href="https://adventures-with-pi.blogspot.com/2024/08/running-ros2-on-raspberry-pi-5.html" target="_blank" rel="noopener noreferrer" class="">Running ROS 2 on Raspberry Pi
5</a>.</p></div></div>
<p>The reason I used Ubuntu for my Raspberry Pi so far is to make it easier to
install ROS 2 now, so if you've been following along, it should be easy!</p>
<p>To install ROS 2, you can follow the instructions for your board depending on the
version of Ubuntu you are running:</p>
<ul>
<li class="">Ubuntu Jammy (22.04): ROS 2 Humble or Iron</li>
<li class="">Ubuntu Noble (24.04): ROS 2 Jazzy</li>
</ul>
<p>I reflashed my own board to use Ubuntu Noble, so I use the <a href="https://docs.ros.org/en/jazzy/Installation/Ubuntu-Install-Debs.html" target="_blank" rel="noopener noreferrer" class="">installation
instructions for ROS 2
Jazzy</a>. You
can also take a look at the instructions for <a href="https://docs.ros.org/en/jazzy/How-To-Guides/Installing-on-Raspberry-Pi.html" target="_blank" rel="noopener noreferrer" class="">ROS 2 on Raspberry
Pi</a>.</p>
<h3 class="anchor anchorTargetStickyNavbar_Vzrq" id="ssh-connection">SSH Connection<a href="https://mikelikesrobots.github.io/blog/raspi-camjam-ros2#ssh-connection" class="hash-link" aria-label="Direct link to SSH Connection" title="Direct link to SSH Connection" translate="no">​</a></h3>
<p>Open a terminal, such as Command Prompt on Windows or Terminal on Linux. If you
are using Linux or Mac, you should have SSH already available. If you are on
Windows, try to install <a href="https://learn.microsoft.com/en-us/windows-server/administration/openssh/openssh_install_firstuse" target="_blank" rel="noopener noreferrer" class="">OpenSSH following these
instructions</a>.</p>
<div class="theme-admonition theme-admonition-warning admonition_xJq3 alert alert--warning"><div class="admonitionHeading_Gvgb"><span class="admonitionIcon_Rf37"><svg viewBox="0 0 16 16"><path fill-rule="evenodd" d="M8.893 1.5c-.183-.31-.52-.5-.887-.5s-.703.19-.886.5L.138 13.499a.98.98 0 0 0 0 1.001c.193.31.53.501.886.501h13.964c.367 0 .704-.19.877-.5a1.03 1.03 0 0 0 .01-1.002L8.893 1.5zm.133 11.497H6.987v-2.003h2.039v2.003zm0-3.004H6.987V5.987h2.039v4.006z"></path></svg></span>VSCode might crash the Pi Zero</div><div class="admonitionContent_BuS1"><p>In the past, I used VSCode over SSH to edit and run scripts on the robot. For
installing ROS 2, I recommend using a terminal to SSH instead. The board is not
very powerful, so running any ROS 2 command has a high chance of freezing and
restarting the board - at least from my own testing.</p><p>If you're on a more powerful version of the Raspberry Pi, you can ignore this
warning!</p></div></div>
<p>Once complete, make sure your computer and the Raspberry Pi are both on and
connected to the same network. SSH in to the board using <code>ssh user@rpi0</code> - these
will depend on the username and hostname that you set while flashing the board.
For me, this is <code>ssh mike@rpi0</code>.</p>
<p>All commands from here on are run in the SSH session with the Raspberry Pi. If
the board goes down, keep trying to SSH in again until it accepts the
connection.</p>
<h3 class="anchor anchorTargetStickyNavbar_Vzrq" id="system-setup">System Setup<a href="https://mikelikesrobots.github.io/blog/raspi-camjam-ros2#system-setup" class="hash-link" aria-label="Direct link to System Setup" title="Direct link to System Setup" translate="no">​</a></h3>
<p>To enable the required repositories, execute the following commands:</p>
<div class="language-bash codeBlockContainer_Ckt0 theme-code-block" style="--prism-color:#393A34;--prism-background-color:#f6f8fa"><div class="codeBlockContent_QJqH"><pre tabindex="0" class="prism-code language-bash codeBlock_bY9V thin-scrollbar" style="color:#393A34;background-color:#f6f8fa"><code class="codeBlockLines_e6Vv"><div class="token-line" style="color:#393A34"><span class="token plain">sudo apt install software-properties-common</span><br></div><div class="token-line" style="color:#393A34"><span class="token plain">sudo add-apt-repository universe</span><br></div></code></pre></div></div>
<p>Add the ROS 2 GPG key:</p>
<div class="language-bash codeBlockContainer_Ckt0 theme-code-block" style="--prism-color:#393A34;--prism-background-color:#f6f8fa"><div class="codeBlockContent_QJqH"><pre tabindex="0" class="prism-code language-bash codeBlock_bY9V thin-scrollbar" style="color:#393A34;background-color:#f6f8fa"><code class="codeBlockLines_e6Vv"><div class="token-line" style="color:#393A34"><span class="token plain">sudo apt update &amp;&amp; sudo apt install curl -y</span><br></div><div class="token-line" style="color:#393A34"><span class="token plain">sudo curl -sSL https://raw.githubusercontent.com/ros/rosdistro/master/ros.key -o /usr/share/keyrings/ros-archive-keyring.gpg</span><br></div></code></pre></div></div>
<p>Then add the repository for ROS 2. We added the GPG key so that the board will
connect to this repository without errors.</p>
<div class="language-bash codeBlockContainer_Ckt0 theme-code-block" style="--prism-color:#393A34;--prism-background-color:#f6f8fa"><div class="codeBlockContent_QJqH"><pre tabindex="0" class="prism-code language-bash codeBlock_bY9V thin-scrollbar" style="color:#393A34;background-color:#f6f8fa"><code class="codeBlockLines_e6Vv"><div class="token-line" style="color:#393A34"><span class="token plain">echo "deb [arch=$(dpkg --print-architecture) signed-by=/usr/share/keyrings/ros-archive-keyring.gpg] http://packages.ros.org/ros2/ubuntu $(. /etc/os-release &amp;&amp; echo $UBUNTU_CODENAME) main" | sudo tee /etc/apt/sources.list.d/ros2.list &gt; /dev/null</span><br></div></code></pre></div></div>
<p>With all the system dependencies installed, it's time to install ROS 2 itself.</p>
<h3 class="anchor anchorTargetStickyNavbar_Vzrq" id="installing-ros-2">Installing ROS 2<a href="https://mikelikesrobots.github.io/blog/raspi-camjam-ros2#installing-ros-2" class="hash-link" aria-label="Direct link to Installing ROS 2" title="Direct link to Installing ROS 2" translate="no">​</a></h3>
<p>First, make sure the system is up to date after adding the new repositories.
This may take some time if you've not done it after flashing:</p>
<div class="language-bash codeBlockContainer_Ckt0 theme-code-block" style="--prism-color:#393A34;--prism-background-color:#f6f8fa"><div class="codeBlockContent_QJqH"><pre tabindex="0" class="prism-code language-bash codeBlock_bY9V thin-scrollbar" style="color:#393A34;background-color:#f6f8fa"><code class="codeBlockLines_e6Vv"><div class="token-line" style="color:#393A34"><span class="token plain">sudo apt update &amp;&amp; sudo apt upgrade -y</span><br></div></code></pre></div></div>
<p>For this tutorial, we will need the right ROS 2 version and the dev tools.
Replace <code>jazzy</code> with your version of ROS 2 for these instructions.</p>
<div class="language-bash codeBlockContainer_Ckt0 theme-code-block" style="--prism-color:#393A34;--prism-background-color:#f6f8fa"><div class="codeBlockContent_QJqH"><pre tabindex="0" class="prism-code language-bash codeBlock_bY9V thin-scrollbar" style="color:#393A34;background-color:#f6f8fa"><code class="codeBlockLines_e6Vv"><div class="token-line" style="color:#393A34"><span class="token plain">sudo apt update &amp;&amp; sudo apt install ros-dev-tools ros-jazzy-desktop</span><br></div></code></pre></div></div>
<p>Again, this is likely to take some time. Once complete, you should be able to
run the following command:</p>
<div class="language-bash codeBlockContainer_Ckt0 theme-code-block" style="--prism-color:#393A34;--prism-background-color:#f6f8fa"><div class="codeBlockContent_QJqH"><pre tabindex="0" class="prism-code language-bash codeBlock_bY9V thin-scrollbar" style="color:#393A34;background-color:#f6f8fa"><code class="codeBlockLines_e6Vv"><div class="token-line" style="color:#393A34"><span class="token plain">source /opt/ros/jazzy/setup.bash</span><br></div></code></pre></div></div>
<p>If this works, you're in good shape to start checking out the code! If not, make
sure you installed the right packages above, and take a look at the installation
instructions to see if you (or I) missed anything.</p>
<div class="theme-admonition theme-admonition-note admonition_xJq3 alert alert--secondary"><div class="admonitionHeading_Gvgb"><span class="admonitionIcon_Rf37"><svg viewBox="0 0 14 16"><path fill-rule="evenodd" d="M6.3 5.69a.942.942 0 0 1-.28-.7c0-.28.09-.52.28-.7.19-.18.42-.28.7-.28.28 0 .52.09.7.28.18.19.28.42.28.7 0 .28-.09.52-.28.7a1 1 0 0 1-.7.3c-.28 0-.52-.11-.7-.3zM8 7.99c-.02-.25-.11-.48-.31-.69-.2-.19-.42-.3-.69-.31H6c-.27.02-.48.13-.69.31-.2.2-.3.44-.31.69h1v3c.02.27.11.5.31.69.2.2.42.31.69.31h1c.27 0 .48-.11.69-.31.2-.19.3-.42.31-.69H8V7.98v.01zM7 2.3c-3.14 0-5.7 2.54-5.7 5.68 0 3.14 2.56 5.7 5.7 5.7s5.7-2.55 5.7-5.7c0-3.15-2.56-5.69-5.7-5.69v.01zM7 .98c3.86 0 7 3.14 7 7s-3.14 7-7 7-7-3.12-7-7 3.14-7 7-7z"></path></svg></span>note</div><div class="admonitionContent_BuS1"><p>Running this <code>source /opt/ros/jazzy/setup.bash</code> command is important to be able
to run any ROS 2 command. If you open a new SSH session, or the board restarts
for any reason, make sure to run this command again.</p></div></div>
<h3 class="anchor anchorTargetStickyNavbar_Vzrq" id="enabling-access-to-rpigpio">Enabling Access to <code>RPi.GPIO</code><a href="https://mikelikesrobots.github.io/blog/raspi-camjam-ros2#enabling-access-to-rpigpio" class="hash-link" aria-label="Direct link to enabling-access-to-rpigpio" title="Direct link to enabling-access-to-rpigpio" translate="no">​</a></h3>
<p>To be able to access the GPIO on the Raspberry Pi, which is required to read the
sensors and turn the motors, we first need to install the library:</p>
<div class="language-bash codeBlockContainer_Ckt0 theme-code-block" style="--prism-color:#393A34;--prism-background-color:#f6f8fa"><div class="codeBlockContent_QJqH"><pre tabindex="0" class="prism-code language-bash codeBlock_bY9V thin-scrollbar" style="color:#393A34;background-color:#f6f8fa"><code class="codeBlockLines_e6Vv"><div class="token-line" style="color:#393A34"><span class="token plain">sudo apt install -y python3-rpi.gpio</span><br></div></code></pre></div></div>
<p>We then need to give our user permission access to the GPIO on the board, so
that we can run ROS 2 nodes. To do so, execute the following:</p>
<div class="language-bash codeBlockContainer_Ckt0 theme-code-block" style="--prism-color:#393A34;--prism-background-color:#f6f8fa"><div class="codeBlockContent_QJqH"><pre tabindex="0" class="prism-code language-bash codeBlock_bY9V thin-scrollbar" style="color:#393A34;background-color:#f6f8fa"><code class="codeBlockLines_e6Vv"><div class="token-line" style="color:#393A34"><span class="token plain">sudo usermod -a -G spi $USER</span><br></div><div class="token-line" style="color:#393A34"><span class="token plain">sudo usermod -a -G gpio $USER</span><br></div><div class="token-line" style="color:#393A34"><span class="token plain">sudo usermod -a -G i2c $USER</span><br></div></code></pre></div></div>
<p>Then edit the file <code>/etc/udev/rules.d/99-com.rules</code> as root. You could do this
by executing <code>sudo nano /etc/udev/rules.d/99-com.rules</code>. Give it the following
contents:</p>
<div class="language-bash codeBlockContainer_Ckt0 theme-code-block" style="--prism-color:#393A34;--prism-background-color:#f6f8fa"><div class="codeBlockContent_QJqH"><pre tabindex="0" class="prism-code language-bash codeBlock_bY9V thin-scrollbar" style="color:#393A34;background-color:#f6f8fa"><code class="codeBlockLines_e6Vv"><div class="token-line" style="color:#393A34"><span class="token plain">SUBSYSTEM=="spidev" , GROUP="spi" , MODE="0660"</span><br></div><div class="token-line" style="color:#393A34"><span class="token plain">KERNEL=="i2c-0"     , GROUP="i2c" , MODE="0660"</span><br></div><div class="token-line" style="color:#393A34"><span class="token plain">KERNEL=="i2c-[1-9]*", GROUP="i2c" , MODE="0660"</span><br></div><div class="token-line" style="color:#393A34"><span class="token plain">KERNEL=="gpiomem"   , GROUP="gpio", MODE="0660"</span><br></div></code></pre></div></div>
<p>Activate the new permissions by executing this command:</p>
<div class="language-bash codeBlockContainer_Ckt0 theme-code-block" style="--prism-color:#393A34;--prism-background-color:#f6f8fa"><div class="codeBlockContent_QJqH"><pre tabindex="0" class="prism-code language-bash codeBlock_bY9V thin-scrollbar" style="color:#393A34;background-color:#f6f8fa"><code class="codeBlockLines_e6Vv"><div class="token-line" style="color:#393A34"><span class="token plain">sudo udevadm control --reload-rules &amp;&amp; sudo udevadm trigger</span><br></div></code></pre></div></div>
<p>Then, log out and back in again. This should be all the configuration needed.</p>
<p>With ROS 2 installed and the system configured, let's take a look at how to
download and build the source code.</p>
<h2 class="anchor anchorTargetStickyNavbar_Vzrq" id="building-the-camjam-packages">Building the CamJam Packages<a href="https://mikelikesrobots.github.io/blog/raspi-camjam-ros2#building-the-camjam-packages" class="hash-link" aria-label="Direct link to Building the CamJam Packages" title="Direct link to Building the CamJam Packages" translate="no">​</a></h2>
<h3 class="anchor anchorTargetStickyNavbar_Vzrq" id="creating-a-workspace">Creating a Workspace<a href="https://mikelikesrobots.github.io/blog/raspi-camjam-ros2#creating-a-workspace" class="hash-link" aria-label="Direct link to Creating a Workspace" title="Direct link to Creating a Workspace" translate="no">​</a></h3>
<p>ROS 2 uses workspaces to keep track of everything it needs for a robotics
application. You can use any folder you want as a workspace, but I tend to use
<code>ros2_ws</code> as the workspace name, where <code>ws</code> stands for workspace. If you want to
use another name, you can edit the commands below with the new name.</p>
<p>First, create the workspace folders and change directory into the <code>src</code> folder.</p>
<div class="language-bash codeBlockContainer_Ckt0 theme-code-block" style="--prism-color:#393A34;--prism-background-color:#f6f8fa"><div class="codeBlockContent_QJqH"><pre tabindex="0" class="prism-code language-bash codeBlock_bY9V thin-scrollbar" style="color:#393A34;background-color:#f6f8fa"><code class="codeBlockLines_e6Vv"><div class="token-line" style="color:#393A34"><span class="token plain">mkdir -p ~/ros2_ws/src</span><br></div><div class="token-line" style="color:#393A34"><span class="token plain">cd ~/ros2_ws/src</span><br></div></code></pre></div></div>
<p>Then, clone the packages for the CamJam into the <code>src</code> folder. Each package
contains one or more nodes which are useful for running the robot. By cloning
each one, we can build everything together in the same workspace and be able to
launch it all at the same time.</p>
<div class="language-bash codeBlockContainer_Ckt0 theme-code-block" style="--prism-color:#393A34;--prism-background-color:#f6f8fa"><div class="codeBlockContent_QJqH"><pre tabindex="0" class="prism-code language-bash codeBlock_bY9V thin-scrollbar" style="color:#393A34;background-color:#f6f8fa"><code class="codeBlockLines_e6Vv"><div class="token-line" style="color:#393A34"><span class="token plain">git clone https://github.com/mikelikesrobots/camjam_sensors.git src/camjam_sensors</span><br></div><div class="token-line" style="color:#393A34"><span class="token plain">git clone https://github.com/mikelikesrobots/camjam_control.git src/camjam_control</span><br></div></code></pre></div></div>
<h3 class="anchor anchorTargetStickyNavbar_Vzrq" id="building-the-workspace">Building the Workspace<a href="https://mikelikesrobots.github.io/blog/raspi-camjam-ros2#building-the-workspace" class="hash-link" aria-label="Direct link to Building the Workspace" title="Direct link to Building the Workspace" translate="no">​</a></h3>
<p>Next, build the code using <code>colcon</code>. The <code>--symlink-install</code> means that Python
files are linked instead of copied, which means that changes in the original
will be reflected in the output. Normally, the files are copied, which means
that editing the original has no effect on the copied file.</p>
<div class="language-bash codeBlockContainer_Ckt0 theme-code-block" style="--prism-color:#393A34;--prism-background-color:#f6f8fa"><div class="codeBlockContent_QJqH"><pre tabindex="0" class="prism-code language-bash codeBlock_bY9V thin-scrollbar" style="color:#393A34;background-color:#f6f8fa"><code class="codeBlockLines_e6Vv"><div class="token-line" style="color:#393A34"><span class="token plain">cd ~/ros2_ws</span><br></div><div class="token-line" style="color:#393A34"><span class="token plain">colcon build --symlink-install</span><br></div></code></pre></div></div>
<p>The output should look something like this:</p>
<div class="language-bash codeBlockContainer_Ckt0 theme-code-block" style="--prism-color:#393A34;--prism-background-color:#f6f8fa"><div class="codeBlockContent_QJqH"><pre tabindex="0" class="prism-code language-bash codeBlock_bY9V thin-scrollbar" style="color:#393A34;background-color:#f6f8fa"><code class="codeBlockLines_e6Vv"><div class="token-line" style="color:#393A34"><span class="token plain">Starting &gt;&gt;&gt; camjam_control</span><br></div><div class="token-line" style="color:#393A34"><span class="token plain">Starting &gt;&gt;&gt; camjam_sensors</span><br></div><div class="token-line" style="color:#393A34"><span class="token plain">Finished &lt;&lt;&lt; camjam_sensors [19.7s]</span><br></div><div class="token-line" style="color:#393A34"><span class="token plain">Finished &lt;&lt;&lt; camjam_control [20.0s]</span><br></div><div class="token-line" style="color:#393A34"><span class="token plain" style="display:inline-block"></span><br></div><div class="token-line" style="color:#393A34"><span class="token plain">Summary: 2 packages finished [22.1s]</span><br></div></code></pre></div></div>
<p>If the packages built successfully, we are able to start running!</p>
<h3 class="anchor anchorTargetStickyNavbar_Vzrq" id="running-the-robot-software">Running the Robot Software<a href="https://mikelikesrobots.github.io/blog/raspi-camjam-ros2#running-the-robot-software" class="hash-link" aria-label="Direct link to Running the Robot Software" title="Direct link to Running the Robot Software" translate="no">​</a></h3>
<p>Once we've built the workspace, we need a second <code>source</code> command:</p>
<div class="language-bash codeBlockContainer_Ckt0 theme-code-block" style="--prism-color:#393A34;--prism-background-color:#f6f8fa"><div class="codeBlockContent_QJqH"><pre tabindex="0" class="prism-code language-bash codeBlock_bY9V thin-scrollbar" style="color:#393A34;background-color:#f6f8fa"><code class="codeBlockLines_e6Vv"><div class="token-line" style="color:#393A34"><span class="token plain">source install/setup.bash</span><br></div></code></pre></div></div>
<p>This is the command that sets up our ROS 2 environment, so that when we run ROS
2 commands, it knows where the required files are.</p>
<p>With that complete, make sure that the motor power is on and execute the
following:</p>
<div class="language-bash codeBlockContainer_Ckt0 theme-code-block" style="--prism-color:#393A34;--prism-background-color:#f6f8fa"><div class="codeBlockContent_QJqH"><pre tabindex="0" class="prism-code language-bash codeBlock_bY9V thin-scrollbar" style="color:#393A34;background-color:#f6f8fa"><code class="codeBlockLines_e6Vv"><div class="token-line" style="color:#393A34"><span class="token plain">ros2 launch camjam_control camjam_control.launch.py</span><br></div></code></pre></div></div>
<p>The section on <a href="https://mikelikesrobots.github.io/blog/raspi-camjam-ros2#explaining-the-code" class="">Explaining the Code</a> goes over how this
works in more detail, but essentially it launches all of the nodes for the
sensors, main behaviour, and wheel control. Once this has had time to start up,
the robot will start trying to follow a line. Put it on a line course and see
how it does!</p>
<p><img decoding="async" loading="lazy" alt="Arrow showing path of robot around line course" src="https://mikelikesrobots.github.io/assets/images/arrow_around_course-094d03d64039f3c96dbe20fe9f9d7f4f.gif" width="833" height="469" class="img_ev3q"></p>
<p>Here are some of the logs from running my own robot around the course:</p>
<div class="language-text codeBlockContainer_Ckt0 theme-code-block" style="--prism-color:#393A34;--prism-background-color:#f6f8fa"><div class="codeBlockContent_QJqH"><pre tabindex="0" class="prism-code language-text codeBlock_bY9V thin-scrollbar" style="color:#393A34;background-color:#f6f8fa"><code class="codeBlockLines_e6Vv"><div class="token-line" style="color:#393A34"><span class="token plain">[control-3] [INFO] [1738250012.724674335] [camjam01.controller]: Found line! Following...</span><br></div><div class="token-line" style="color:#393A34"><span class="token plain">[control-3] [INFO] [1738250012.844485123] [camjam01.controller]: Lost line! Finding...</span><br></div><div class="token-line" style="color:#393A34"><span class="token plain">[control-3] [INFO] [1738250013.474098541] [camjam01.controller]: Trying right...</span><br></div><div class="token-line" style="color:#393A34"><span class="token plain">[control-3] [INFO] [1738250014.034229698] [camjam01.controller]: Found line! Following...</span><br></div><div class="token-line" style="color:#393A34"><span class="token plain">[control-3] [INFO] [1738250014.094463606] [camjam01.controller]: Lost line! Finding...</span><br></div><div class="token-line" style="color:#393A34"><span class="token plain">[control-3] [INFO] [1738250014.674026633] [camjam01.controller]: Trying left...</span><br></div><div class="token-line" style="color:#393A34"><span class="token plain">[control-3] [INFO] [1738250015.544929398] [camjam01.controller]: Found line! Following...</span><br></div><div class="token-line" style="color:#393A34"><span class="token plain">[control-3] [INFO] [1738250015.604943673] [camjam01.controller]: Lost line! Finding...</span><br></div><div class="token-line" style="color:#393A34"><span class="token plain">[control-3] [INFO] [1738250016.274049901] [camjam01.controller]: Trying right...</span><br></div><div class="token-line" style="color:#393A34"><span class="token plain">[control-3] [INFO] [1738250017.324330833] [camjam01.controller]: Found line! Following...</span><br></div><div class="token-line" style="color:#393A34"><span class="token plain">[control-3] [INFO] [1738250017.434205724] [camjam01.controller]: Lost line! Finding...</span><br></div><div class="token-line" style="color:#393A34"><span class="token plain">[control-3] [INFO] [1738250018.073983312] [camjam01.controller]: Trying left...</span><br></div><div class="token-line" style="color:#393A34"><span class="token plain">[</span><br></div></code></pre></div></div>
<p>Line following is not all the robot does; it also avoids obstacles. If you put
something large in front of the robot, it will back away until it's far enough
to resume searching for the line.</p>
<p><img decoding="async" loading="lazy" alt="Robot backing away from obstacle" src="https://mikelikesrobots.github.io/assets/images/avoiding_obstacle-750c8c4cf7f4d741c846102c1d73f21a.gif" width="864" height="486" class="img_ev3q"></p>
<p>Here are some of my logs from the robot trying to avoid obstacles:</p>
<div class="language-text codeBlockContainer_Ckt0 theme-code-block" style="--prism-color:#393A34;--prism-background-color:#f6f8fa"><div class="codeBlockContent_QJqH"><pre tabindex="0" class="prism-code language-text codeBlock_bY9V thin-scrollbar" style="color:#393A34;background-color:#f6f8fa"><code class="codeBlockLines_e6Vv"><div class="token-line" style="color:#393A34"><span class="token plain">[control-3] [INFO] [1738250039.426828548] [camjam01.controller]: Obstacle too close - avoiding!</span><br></div><div class="token-line" style="color:#393A34"><span class="token plain">[control-3] [INFO] [1738250039.473658732] [camjam01.controller]: I'm avoiding an obstacle...</span><br></div><div class="token-line" style="color:#393A34"><span class="token plain">[control-3] [INFO] [1738250039.674483211] [camjam01.controller]: I'm avoiding an obstacle...</span><br></div><div class="token-line" style="color:#393A34"><span class="token plain">[control-3] [INFO] [1738250039.684512502] [camjam01.controller]: Obstacle too close - avoiding!</span><br></div><div class="token-line" style="color:#393A34"><span class="token plain">[control-3] [INFO] [1738250039.873822858] [camjam01.controller]: I'm avoiding an obstacle...</span><br></div><div class="token-line" style="color:#393A34"><span class="token plain">[control-3] [INFO] [1738250039.929521770] [camjam01.controller]: Obstacle cleared. Looking for line...</span><br></div></code></pre></div></div>
<p>And that's it! We have successfully installed ROS 2, downloaded and built
packages for controlling the CamJam EduKit #3, and run an application that
follows a line while avoiding obstacles.</p>
<p><strong>Let's take a closer look at how the code works.</strong></p>
<h2 class="anchor anchorTargetStickyNavbar_Vzrq" id="explaining-the-code">Explaining the Code<a href="https://mikelikesrobots.github.io/blog/raspi-camjam-ros2#explaining-the-code" class="hash-link" aria-label="Direct link to Explaining the Code" title="Direct link to Explaining the Code" translate="no">​</a></h2>
<p>The code is split into two packages: <code>camjam_control</code> and <code>camjam_sensors</code>. Each
package contains two nodes.</p>
<p>The <code>camjam_sensors</code> package contains the two sensor nodes, and the <code>camjam_control</code> package contains the controller and movement nodes. These are illustrated below:</p>
<p><img decoding="async" loading="lazy" alt="Nodes used for CamJam application" src="https://mikelikesrobots.github.io/assets/images/camjam_nodes-53d4d05ce5bdd0ad5a286953624dbc2c.gif" width="767" height="864" class="img_ev3q"></p>
<p>Let's take a look at each package in turn to build up our understanding of how
ROS 2 nodes can interact with each other.</p>
<h3 class="anchor anchorTargetStickyNavbar_Vzrq" id="camjam_sensors"><code>camjam_sensors</code><a href="https://mikelikesrobots.github.io/blog/raspi-camjam-ros2#camjam_sensors" class="hash-link" aria-label="Direct link to camjam_sensors" title="Direct link to camjam_sensors" translate="no">​</a></h3>
<p>The <a href="https://github.com/mikelikesrobots/camjam_sensors" target="_blank" rel="noopener noreferrer" class=""><code>camjam_sensors</code></a>
package contains two ROS 2 nodes inside a ROS 2 package. Most of the files in
the repository are to help <code>colcon</code> build the package correctly:</p>
<ul>
<li class=""><code>resource/camjam_sensors</code>: A marker file copied to the ROS 2 package index, so
that ROS 2 knows this package exists</li>
<li class=""><code>LICENSE</code>: A file with a permissive licence allowing any viewer to use the
code however they wish</li>
<li class=""><code>README.md</code>: A small file to say what the repository is and how to use it</li>
<li class=""><code>package.xml</code>: Defines the package name and dependencies for <code>colcon</code></li>
<li class=""><code>setup.cfg</code>: A configuration file for the Python package to define where
scripts should be installed</li>
<li class=""><code>setup.py</code>: A standard setup script for a Python package, defining the files
that are required for correct functioning of the package</li>
</ul>
<p>The <code>camjam_sensors</code> folder contains the code that we are more interested in.
There are three files here. The first, <code>__init__.py</code>, is a blank file that
Python needs to understand that there are other files in the directory. Let's
take a look at the other two files in more detail.</p>
<h4 class="anchor anchorTargetStickyNavbar_Vzrq" id="line_sensorpy"><code>line_sensor.py</code><a href="https://mikelikesrobots.github.io/blog/raspi-camjam-ros2#line_sensorpy" class="hash-link" aria-label="Direct link to line_sensorpy" title="Direct link to line_sensorpy" translate="no">​</a></h4>
<p>The <a href="https://github.com/mikelikesrobots/camjam_sensors/blob/main/camjam_sensors/line_sensor.py" target="_blank" rel="noopener noreferrer" class="">node for the line
sensor</a>
is a good place to start to understand the structure of a ROS 2 node.</p>
<p><a href="https://github.com/mikelikesrobots/camjam_sensors/blob/main/camjam_sensors/line_sensor.py#L1-L6" target="_blank" rel="noopener noreferrer" class="">At the
top</a>,
we import all of the libraries needed to build a node and control the line
sensor pins:</p>
<div class="language-python codeBlockContainer_Ckt0 theme-code-block" style="--prism-color:#393A34;--prism-background-color:#f6f8fa"><div class="codeBlockContent_QJqH"><pre tabindex="0" class="prism-code language-python codeBlock_bY9V thin-scrollbar" style="color:#393A34;background-color:#f6f8fa"><code class="codeBlockLines_e6Vv"><div class="token-line" style="color:#393A34"><span class="token keyword" style="color:#00009f">import</span><span class="token plain"> rclpy  </span><span class="token comment" style="color:#999988;font-style:italic"># The ROS 2 package</span><span class="token plain"></span><br></div><div class="token-line" style="color:#393A34"><span class="token plain"></span><span class="token keyword" style="color:#00009f">from</span><span class="token plain"> rclpy</span><span class="token punctuation" style="color:#393A34">.</span><span class="token plain">node </span><span class="token keyword" style="color:#00009f">import</span><span class="token plain"> Node  </span><span class="token comment" style="color:#999988;font-style:italic"># The Node we use to build the Line Sensor class</span><span class="token plain"></span><br></div><div class="token-line" style="color:#393A34"><span class="token plain" style="display:inline-block"></span><br></div><div class="token-line" style="color:#393A34"><span class="token plain"></span><span class="token keyword" style="color:#00009f">from</span><span class="token plain"> std_msgs</span><span class="token punctuation" style="color:#393A34">.</span><span class="token plain">msg </span><span class="token keyword" style="color:#00009f">import</span><span class="token plain"> Bool  </span><span class="token comment" style="color:#999988;font-style:italic"># The message type we publish from the node</span><span class="token plain"></span><br></div><div class="token-line" style="color:#393A34"><span class="token plain"></span><span class="token keyword" style="color:#00009f">from</span><span class="token plain"> RPi </span><span class="token keyword" style="color:#00009f">import</span><span class="token plain"> GPIO  </span><span class="token comment" style="color:#999988;font-style:italic"># The library needed to access the line sensor pins</span><span class="token plain"></span><br></div><div class="token-line" style="color:#393A34"><span class="token plain"></span><span class="token keyword" style="color:#00009f">import</span><span class="token plain"> time  </span><span class="token comment" style="color:#999988;font-style:italic"># An extra library used in the code for sleeping</span><br></div></code></pre></div></div>
<p>We also <a href="https://github.com/mikelikesrobots/camjam_sensors/blob/main/camjam_sensors/line_sensor.py#L8" target="_blank" rel="noopener noreferrer" class="">set the default line pin sensor as pin
25</a>:</p>
<div class="language-python codeBlockContainer_Ckt0 theme-code-block" style="--prism-color:#393A34;--prism-background-color:#f6f8fa"><div class="codeBlockContent_QJqH"><pre tabindex="0" class="prism-code language-python codeBlock_bY9V thin-scrollbar" style="color:#393A34;background-color:#f6f8fa"><code class="codeBlockLines_e6Vv"><div class="token-line" style="color:#393A34"><span class="token plain">DEFAULT_PIN_LINE_SENSOR </span><span class="token operator" style="color:#393A34">=</span><span class="token plain"> </span><span class="token number" style="color:#36acaa">25</span><br></div></code></pre></div></div>
<p>Next, we declare that the LineSensorPublisher is a Node. It has the <code>__init__</code>,
<code>_is_line_detected</code>, and <code>timer_callback</code> functions. It works by creating a
timer that will call the <code>timer_callback</code> function every 10 milliseconds. The
callback then checks if a line exists with <code>_is_line_detected</code> and publishes
that value in a message.</p>
<p>The <code>__init__</code> method is what sets this all up. This method is the first method
called when building an instance of a Python class. In this case, it begins by
<a href="https://github.com/mikelikesrobots/camjam_sensors/blob/main/camjam_sensors/line_sensor.py#L16-L17" target="_blank" rel="noopener noreferrer" class="">declaring and accessing a
parameter</a>:</p>
<div class="language-python codeBlockContainer_Ckt0 theme-code-block" style="--prism-color:#393A34;--prism-background-color:#f6f8fa"><div class="codeBlockContent_QJqH"><pre tabindex="0" class="prism-code language-python codeBlock_bY9V thin-scrollbar" style="color:#393A34;background-color:#f6f8fa"><code class="codeBlockLines_e6Vv"><div class="token-line" style="color:#393A34"><span class="token plain">self</span><span class="token punctuation" style="color:#393A34">.</span><span class="token plain">declare_parameter</span><span class="token punctuation" style="color:#393A34">(</span><span class="token string" style="color:#e3116c">"line_sensor_pin"</span><span class="token punctuation" style="color:#393A34">,</span><span class="token plain"> DEFAULT_PIN_LINE_SENSOR</span><span class="token punctuation" style="color:#393A34">)</span><span class="token plain"></span><br></div><div class="token-line" style="color:#393A34"><span class="token plain">self</span><span class="token punctuation" style="color:#393A34">.</span><span class="token plain">_line_sensor_pin </span><span class="token operator" style="color:#393A34">=</span><span class="token plain"> self</span><span class="token punctuation" style="color:#393A34">.</span><span class="token plain">get_parameter</span><span class="token punctuation" style="color:#393A34">(</span><span class="token string" style="color:#e3116c">"line_sensor_pin"</span><span class="token punctuation" style="color:#393A34">)</span><span class="token punctuation" style="color:#393A34">.</span><span class="token plain">value</span><br></div></code></pre></div></div>
<p>This states that the line sensor pin should be pin 25 by default, but can be
overridden by a user using the node. That in turn means that a user can use the
line sensor on a different pin, making it possible to add extra line sensors
without changing the code. With this configuration, you can launch two nodes
with different pin configurations to access two different line sensors!</p>
<p>Next, the node <a href="https://github.com/mikelikesrobots/camjam_sensors/blob/main/camjam_sensors/line_sensor.py#L20-L23" target="_blank" rel="noopener noreferrer" class="">sets up the GPIO to access the line
sensor</a>.
This should look familiar from the <a href="https://github.com/CamJam-EduKit/EduKit3/blob/master/CamJam%20Edukit%203%20-%20RPi.GPIO/Code/5-line.py#L8-L15" target="_blank" rel="noopener noreferrer" class="">EduKit code for the line
sensor</a>.</p>
<div class="language-python codeBlockContainer_Ckt0 theme-code-block" style="--prism-color:#393A34;--prism-background-color:#f6f8fa"><div class="codeBlockContent_QJqH"><pre tabindex="0" class="prism-code language-python codeBlock_bY9V thin-scrollbar" style="color:#393A34;background-color:#f6f8fa"><code class="codeBlockLines_e6Vv"><div class="token-line" style="color:#393A34"><span class="token plain">self</span><span class="token punctuation" style="color:#393A34">.</span><span class="token plain">get_logger</span><span class="token punctuation" style="color:#393A34">(</span><span class="token punctuation" style="color:#393A34">)</span><span class="token punctuation" style="color:#393A34">.</span><span class="token plain">info</span><span class="token punctuation" style="color:#393A34">(</span><span class="token string" style="color:#e3116c">"Setting up pins for line sensor"</span><span class="token punctuation" style="color:#393A34">)</span><span class="token plain"></span><br></div><div class="token-line" style="color:#393A34"><span class="token plain">GPIO</span><span class="token punctuation" style="color:#393A34">.</span><span class="token plain">setmode</span><span class="token punctuation" style="color:#393A34">(</span><span class="token plain">GPIO</span><span class="token punctuation" style="color:#393A34">.</span><span class="token plain">BCM</span><span class="token punctuation" style="color:#393A34">)</span><span class="token plain"></span><br></div><div class="token-line" style="color:#393A34"><span class="token plain">GPIO</span><span class="token punctuation" style="color:#393A34">.</span><span class="token plain">setwarnings</span><span class="token punctuation" style="color:#393A34">(</span><span class="token boolean" style="color:#36acaa">False</span><span class="token punctuation" style="color:#393A34">)</span><span class="token plain"></span><br></div><div class="token-line" style="color:#393A34"><span class="token plain">GPIO</span><span class="token punctuation" style="color:#393A34">.</span><span class="token plain">setup</span><span class="token punctuation" style="color:#393A34">(</span><span class="token plain">self</span><span class="token punctuation" style="color:#393A34">.</span><span class="token plain">_line_sensor_pin</span><span class="token punctuation" style="color:#393A34">,</span><span class="token plain"> GPIO</span><span class="token punctuation" style="color:#393A34">.</span><span class="token plain">IN</span><span class="token punctuation" style="color:#393A34">)</span><br></div></code></pre></div></div>
<p>The node then sets up the publisher and timer. The
<a href="https://github.com/mikelikesrobots/camjam_sensors/blob/main/camjam_sensors/line_sensor.py#L26" target="_blank" rel="noopener noreferrer" class="">publisher</a>
is an object that can be used to publish ROS 2 messages of a particular type to
a particular topic - in this case, the <a href="http://docs.ros.org/en/jazzy/p/std_msgs/interfaces/msg/Bool.html" target="_blank" rel="noopener noreferrer" class=""><code>Bool</code>
message</a>,
published to the <code>line_detected</code> topic.</p>
<div class="language-python codeBlockContainer_Ckt0 theme-code-block" style="--prism-color:#393A34;--prism-background-color:#f6f8fa"><div class="codeBlockContent_QJqH"><pre tabindex="0" class="prism-code language-python codeBlock_bY9V thin-scrollbar" style="color:#393A34;background-color:#f6f8fa"><code class="codeBlockLines_e6Vv"><div class="token-line" style="color:#393A34"><span class="token plain">self</span><span class="token punctuation" style="color:#393A34">.</span><span class="token plain">publisher_ </span><span class="token operator" style="color:#393A34">=</span><span class="token plain"> self</span><span class="token punctuation" style="color:#393A34">.</span><span class="token plain">create_publisher</span><span class="token punctuation" style="color:#393A34">(</span><span class="token plain">Bool</span><span class="token punctuation" style="color:#393A34">,</span><span class="token plain"> </span><span class="token string" style="color:#e3116c">"line_detected"</span><span class="token punctuation" style="color:#393A34">,</span><span class="token plain"> </span><span class="token number" style="color:#36acaa">10</span><span class="token punctuation" style="color:#393A34">)</span><br></div></code></pre></div></div>
<p>The node <a href="https://github.com/mikelikesrobots/camjam_sensors/blob/main/camjam_sensors/line_sensor.py#L27-L28" target="_blank" rel="noopener noreferrer" class="">sets up a ROS 2
timer</a>
that calls the <code>timer_callback</code> function every 0.01s, giving us our sensor
readings every 10 milliseconds.</p>
<div class="language-python codeBlockContainer_Ckt0 theme-code-block" style="--prism-color:#393A34;--prism-background-color:#f6f8fa"><div class="codeBlockContent_QJqH"><pre tabindex="0" class="prism-code language-python codeBlock_bY9V thin-scrollbar" style="color:#393A34;background-color:#f6f8fa"><code class="codeBlockLines_e6Vv"><div class="token-line" style="color:#393A34"><span class="token plain">timer_period </span><span class="token operator" style="color:#393A34">=</span><span class="token plain"> </span><span class="token number" style="color:#36acaa">0.01</span><span class="token plain"></span><br></div><div class="token-line" style="color:#393A34"><span class="token plain">self</span><span class="token punctuation" style="color:#393A34">.</span><span class="token plain">timer </span><span class="token operator" style="color:#393A34">=</span><span class="token plain"> self</span><span class="token punctuation" style="color:#393A34">.</span><span class="token plain">create_timer</span><span class="token punctuation" style="color:#393A34">(</span><span class="token plain">timer_period</span><span class="token punctuation" style="color:#393A34">,</span><span class="token plain"> self</span><span class="token punctuation" style="color:#393A34">.</span><span class="token plain">timer_callback</span><span class="token punctuation" style="color:#393A34">)</span><br></div></code></pre></div></div>
<p>That's it for initialisation! Now, the node is set up to call
<a href="https://github.com/mikelikesrobots/camjam_sensors/blob/main/camjam_sensors/line_sensor.py#L35-L38" target="_blank" rel="noopener noreferrer" class=""><code>timer_callback</code></a>
every 0.01s:</p>
<div class="language-python codeBlockContainer_Ckt0 theme-code-block" style="--prism-color:#393A34;--prism-background-color:#f6f8fa"><div class="codeBlockContent_QJqH"><pre tabindex="0" class="prism-code language-python codeBlock_bY9V thin-scrollbar" style="color:#393A34;background-color:#f6f8fa"><code class="codeBlockLines_e6Vv"><div class="token-line" style="color:#393A34"><span class="token keyword" style="color:#00009f">def</span><span class="token plain"> </span><span class="token function" style="color:#d73a49">timer_callback</span><span class="token punctuation" style="color:#393A34">(</span><span class="token plain">self</span><span class="token punctuation" style="color:#393A34">)</span><span class="token punctuation" style="color:#393A34">:</span><span class="token plain"></span><br></div><div class="token-line" style="color:#393A34"><span class="token plain">    msg </span><span class="token operator" style="color:#393A34">=</span><span class="token plain"> Bool</span><span class="token punctuation" style="color:#393A34">(</span><span class="token punctuation" style="color:#393A34">)</span><span class="token plain"></span><br></div><div class="token-line" style="color:#393A34"><span class="token plain">    msg</span><span class="token punctuation" style="color:#393A34">.</span><span class="token plain">data </span><span class="token operator" style="color:#393A34">=</span><span class="token plain"> self</span><span class="token punctuation" style="color:#393A34">.</span><span class="token plain">_is_line_detected</span><span class="token punctuation" style="color:#393A34">(</span><span class="token punctuation" style="color:#393A34">)</span><span class="token plain"></span><br></div><div class="token-line" style="color:#393A34"><span class="token plain">    self</span><span class="token punctuation" style="color:#393A34">.</span><span class="token plain">publisher_</span><span class="token punctuation" style="color:#393A34">.</span><span class="token plain">publish</span><span class="token punctuation" style="color:#393A34">(</span><span class="token plain">msg</span><span class="token punctuation" style="color:#393A34">)</span><br></div></code></pre></div></div>
<p>As in the code above, the timer callback will call the <code>_is_line_detected</code>
function to determine if a line is detected, then publish that in a message.</p>
<p><a href="https://github.com/mikelikesrobots/camjam_sensors/blob/main/camjam_sensors/line_sensor.py#L32-L33" target="_blank" rel="noopener noreferrer" class=""><code>_is_line_detected</code></a>
just reads the pin for the line sensor, exactly as written in the <a href="https://github.com/CamJam-EduKit/EduKit3/blob/master/CamJam%20Edukit%203%20-%20RPi.GPIO/Code/5-line.py#L21" target="_blank" rel="noopener noreferrer" class="">EduKit
worksheet</a>.</p>
<div class="language-python codeBlockContainer_Ckt0 theme-code-block" style="--prism-color:#393A34;--prism-background-color:#f6f8fa"><div class="codeBlockContent_QJqH"><pre tabindex="0" class="prism-code language-python codeBlock_bY9V thin-scrollbar" style="color:#393A34;background-color:#f6f8fa"><code class="codeBlockLines_e6Vv"><div class="token-line" style="color:#393A34"><span class="token keyword" style="color:#00009f">def</span><span class="token plain"> </span><span class="token function" style="color:#d73a49">_is_line_detected</span><span class="token punctuation" style="color:#393A34">(</span><span class="token plain">self</span><span class="token punctuation" style="color:#393A34">)</span><span class="token plain"> </span><span class="token operator" style="color:#393A34">-</span><span class="token operator" style="color:#393A34">&gt;</span><span class="token plain"> </span><span class="token builtin">bool</span><span class="token punctuation" style="color:#393A34">:</span><span class="token plain"></span><br></div><div class="token-line" style="color:#393A34"><span class="token plain">    </span><span class="token keyword" style="color:#00009f">return</span><span class="token plain"> GPIO</span><span class="token punctuation" style="color:#393A34">.</span><span class="token builtin">input</span><span class="token punctuation" style="color:#393A34">(</span><span class="token plain">self</span><span class="token punctuation" style="color:#393A34">.</span><span class="token plain">_line_sensor_pin</span><span class="token punctuation" style="color:#393A34">)</span><span class="token plain"> </span><span class="token operator" style="color:#393A34">==</span><span class="token plain"> </span><span class="token number" style="color:#36acaa">0</span><br></div></code></pre></div></div>
<p>Finally, the rest of the file contains a <a href="https://github.com/mikelikesrobots/camjam_sensors/blob/main/camjam_sensors/line_sensor.py#L41-L49" target="_blank" rel="noopener noreferrer" class=""><code>main</code>
function</a>
that constructs a <code>LineSensorPublisher</code> object and runs it until the node is
shut down. This is accomplished by using the <code>rclpy.spin</code> function, which takes
a node and runs it until the process is shut down.</p>
<div class="language-python codeBlockContainer_Ckt0 theme-code-block" style="--prism-color:#393A34;--prism-background-color:#f6f8fa"><div class="codeBlockContent_QJqH"><pre tabindex="0" class="prism-code language-python codeBlock_bY9V thin-scrollbar" style="color:#393A34;background-color:#f6f8fa"><code class="codeBlockLines_e6Vv"><div class="token-line" style="color:#393A34"><span class="token keyword" style="color:#00009f">def</span><span class="token plain"> </span><span class="token function" style="color:#d73a49">main</span><span class="token punctuation" style="color:#393A34">(</span><span class="token plain">args</span><span class="token operator" style="color:#393A34">=</span><span class="token boolean" style="color:#36acaa">None</span><span class="token punctuation" style="color:#393A34">)</span><span class="token punctuation" style="color:#393A34">:</span><span class="token plain"></span><br></div><div class="token-line" style="color:#393A34"><span class="token plain">    </span><span class="token comment" style="color:#999988;font-style:italic"># Initialise rclpy</span><span class="token plain"></span><br></div><div class="token-line" style="color:#393A34"><span class="token plain">    rclpy</span><span class="token punctuation" style="color:#393A34">.</span><span class="token plain">init</span><span class="token punctuation" style="color:#393A34">(</span><span class="token plain">args</span><span class="token operator" style="color:#393A34">=</span><span class="token plain">args</span><span class="token punctuation" style="color:#393A34">)</span><span class="token plain"></span><br></div><div class="token-line" style="color:#393A34"><span class="token plain">    </span><span class="token comment" style="color:#999988;font-style:italic"># Build a line sensor object</span><span class="token plain"></span><br></div><div class="token-line" style="color:#393A34"><span class="token plain">    line_sensor </span><span class="token operator" style="color:#393A34">=</span><span class="token plain"> LineSensorPublisher</span><span class="token punctuation" style="color:#393A34">(</span><span class="token punctuation" style="color:#393A34">)</span><span class="token plain"></span><br></div><div class="token-line" style="color:#393A34"><span class="token plain">    </span><span class="token comment" style="color:#999988;font-style:italic"># Run it until rclpy shuts down</span><span class="token plain"></span><br></div><div class="token-line" style="color:#393A34"><span class="token plain">    rclpy</span><span class="token punctuation" style="color:#393A34">.</span><span class="token plain">spin</span><span class="token punctuation" style="color:#393A34">(</span><span class="token plain">line_sensor</span><span class="token punctuation" style="color:#393A34">)</span><span class="token plain"></span><br></div><div class="token-line" style="color:#393A34"><span class="token plain">    </span><span class="token comment" style="color:#999988;font-style:italic"># Do any cleanup before exiting</span><span class="token plain"></span><br></div><div class="token-line" style="color:#393A34"><span class="token plain">    line_sensor</span><span class="token punctuation" style="color:#393A34">.</span><span class="token plain">destroy_node</span><span class="token punctuation" style="color:#393A34">(</span><span class="token punctuation" style="color:#393A34">)</span><span class="token plain"></span><br></div><div class="token-line" style="color:#393A34"><span class="token plain">    rclpy</span><span class="token punctuation" style="color:#393A34">.</span><span class="token plain">shutdown</span><span class="token punctuation" style="color:#393A34">(</span><span class="token punctuation" style="color:#393A34">)</span><br></div></code></pre></div></div>
<p>That's all for the line sensor. Let's use what we've learned to understand a
slightly more complex sensor-reading ROS 2 node: the distance sensor (the
<a href="https://thepihut.com/products/ultrasonic-distance-sensor-hcsr04" target="_blank" rel="noopener noreferrer" class="">HC-SR04</a>).</p>
<h4 class="anchor anchorTargetStickyNavbar_Vzrq" id="hcsr04py"><code>hcsr04.py</code><a href="https://mikelikesrobots.github.io/blog/raspi-camjam-ros2#hcsr04py" class="hash-link" aria-label="Direct link to hcsr04py" title="Direct link to hcsr04py" translate="no">​</a></h4>
<p>The node for the distance sensor is similar to the <a href="https://mikelikesrobots.github.io/blog/raspi-camjam-ros2#line_sensorpy" class="">line
sensor</a>, so this section will describe the important
differences.</p>
<p>First, this node published <a href="https://docs.ros.org/en/jazzy/p/sensor_msgs/interfaces/msg/Range.html" target="_blank" rel="noopener noreferrer" class=""><code>Range</code>
messages</a>
instead, which changes the <a href="https://github.com/mikelikesrobots/camjam_sensors/blob/main/camjam_sensors/hcsr04.py#L4" target="_blank" rel="noopener noreferrer" class="">import
code</a>:</p>
<div class="language-python codeBlockContainer_Ckt0 theme-code-block" style="--prism-color:#393A34;--prism-background-color:#f6f8fa"><div class="codeBlockContent_QJqH"><pre tabindex="0" class="prism-code language-python codeBlock_bY9V thin-scrollbar" style="color:#393A34;background-color:#f6f8fa"><code class="codeBlockLines_e6Vv"><div class="token-line" style="color:#393A34"><span class="token keyword" style="color:#00009f">from</span><span class="token plain"> sensor_msgs</span><span class="token punctuation" style="color:#393A34">.</span><span class="token plain">msg </span><span class="token keyword" style="color:#00009f">import</span><span class="token plain"> Range</span><br></div></code></pre></div></div>
<p>It also <a href="https://github.com/mikelikesrobots/camjam_sensors/blob/main/camjam_sensors/hcsr04.py#L32" target="_blank" rel="noopener noreferrer" class="">changes the
publisher</a>
to publish <code>Range</code> messages on the <code>distance</code> topic instead.</p>
<div class="language-python codeBlockContainer_Ckt0 theme-code-block" style="--prism-color:#393A34;--prism-background-color:#f6f8fa"><div class="codeBlockContent_QJqH"><pre tabindex="0" class="prism-code language-python codeBlock_bY9V thin-scrollbar" style="color:#393A34;background-color:#f6f8fa"><code class="codeBlockLines_e6Vv"><div class="token-line" style="color:#393A34"><span class="token plain">self</span><span class="token punctuation" style="color:#393A34">.</span><span class="token plain">publisher_ </span><span class="token operator" style="color:#393A34">=</span><span class="token plain"> self</span><span class="token punctuation" style="color:#393A34">.</span><span class="token plain">create_publisher</span><span class="token punctuation" style="color:#393A34">(</span><span class="token plain">Range</span><span class="token punctuation" style="color:#393A34">,</span><span class="token plain"> </span><span class="token string" style="color:#e3116c">"distance"</span><span class="token punctuation" style="color:#393A34">,</span><span class="token plain"> </span><span class="token number" style="color:#36acaa">10</span><span class="token punctuation" style="color:#393A34">)</span><br></div></code></pre></div></div>
<p>There are more pins required for the distance sensor as well, which means there
are more default pins, more declared parameters, and more GPIO setup.</p>
<p>The <code>timer_callback</code> function is <a href="https://github.com/mikelikesrobots/camjam_sensors/blob/main/camjam_sensors/hcsr04.py#L65-L69" target="_blank" rel="noopener noreferrer" class="">very
similar</a>,
except that it uses the <code>_read_distance</code> function to get a distance measurement
and publishes a <code>Range</code> measurement instead.</p>
<div class="language-python codeBlockContainer_Ckt0 theme-code-block" style="--prism-color:#393A34;--prism-background-color:#f6f8fa"><div class="codeBlockContent_QJqH"><pre tabindex="0" class="prism-code language-python codeBlock_bY9V thin-scrollbar" style="color:#393A34;background-color:#f6f8fa"><code class="codeBlockLines_e6Vv"><div class="token-line" style="color:#393A34"><span class="token keyword" style="color:#00009f">def</span><span class="token plain"> </span><span class="token function" style="color:#d73a49">timer_callback</span><span class="token punctuation" style="color:#393A34">(</span><span class="token plain">self</span><span class="token punctuation" style="color:#393A34">)</span><span class="token punctuation" style="color:#393A34">:</span><span class="token plain"></span><br></div><div class="token-line" style="color:#393A34"><span class="token plain">    msg </span><span class="token operator" style="color:#393A34">=</span><span class="token plain"> Range</span><span class="token punctuation" style="color:#393A34">(</span><span class="token punctuation" style="color:#393A34">)</span><span class="token plain"></span><br></div><div class="token-line" style="color:#393A34"><span class="token plain">    msg</span><span class="token punctuation" style="color:#393A34">.</span><span class="token builtin">range</span><span class="token plain"> </span><span class="token operator" style="color:#393A34">=</span><span class="token plain"> self</span><span class="token punctuation" style="color:#393A34">.</span><span class="token plain">_read_distance</span><span class="token punctuation" style="color:#393A34">(</span><span class="token punctuation" style="color:#393A34">)</span><span class="token plain"></span><br></div><div class="token-line" style="color:#393A34"><span class="token plain">    </span><span class="token keyword" style="color:#00009f">if</span><span class="token plain"> msg</span><span class="token punctuation" style="color:#393A34">.</span><span class="token builtin">range</span><span class="token plain"> </span><span class="token keyword" style="color:#00009f">is</span><span class="token plain"> </span><span class="token keyword" style="color:#00009f">not</span><span class="token plain"> </span><span class="token boolean" style="color:#36acaa">None</span><span class="token punctuation" style="color:#393A34">:</span><span class="token plain"></span><br></div><div class="token-line" style="color:#393A34"><span class="token plain">        self</span><span class="token punctuation" style="color:#393A34">.</span><span class="token plain">publisher_</span><span class="token punctuation" style="color:#393A34">.</span><span class="token plain">publish</span><span class="token punctuation" style="color:#393A34">(</span><span class="token plain">msg</span><span class="token punctuation" style="color:#393A34">)</span><br></div></code></pre></div></div>
<p>The <a href="https://github.com/mikelikesrobots/camjam_sensors/blob/main/camjam_sensors/hcsr04.py#L38-L63" target="_blank" rel="noopener noreferrer" class=""><code>_read_distance</code>
function</a>
is quite a bit larger because it has some timing to check the pulse length, so
it's not included here. The important point to note is how close it is to the
<a href="https://github.com/CamJam-EduKit/EduKit3/blob/master/CamJam%20Edukit%203%20-%20RPi.GPIO/Code/6-distance.py#L25-L64" target="_blank" rel="noopener noreferrer" class="">original code from EduKit</a>.</p>
<p>The rest of the file is the same parameter declaration setup and main function
as for the line sensor.</p>
<h4 class="anchor anchorTargetStickyNavbar_Vzrq" id="summary">Summary<a href="https://mikelikesrobots.github.io/blog/raspi-camjam-ros2#summary" class="hash-link" aria-label="Direct link to Summary" title="Direct link to Summary" translate="no">​</a></h4>
<p>The <code>camjam_sensors</code> package contains two nodes. One reads whether the line
sensor is detecting a line and publishes a <code>Bool</code> message on the <code>line_detected</code>
topic every 0.01s (100 Hz). The other node reads the distance sensor and
publishes <code>Range</code> messages on the <code>distance</code> topic every 0.25s (4 Hz).</p>
<p>Both are set up with parameters controlling the pins used, so that if extra
sensors are attached or the pins are changed, a user can change the pins used.</p>
<div class="theme-admonition theme-admonition-tip admonition_xJq3 alert alert--success"><div class="admonitionHeading_Gvgb"><span class="admonitionIcon_Rf37"><svg viewBox="0 0 12 16"><path fill-rule="evenodd" d="M6.5 0C3.48 0 1 2.19 1 5c0 .92.55 2.25 1 3 1.34 2.25 1.78 2.78 2 4v1h5v-1c.22-1.22.66-1.75 2-4 .45-.75 1-2.08 1-3 0-2.81-2.48-5-5.5-5zm3.64 7.48c-.25.44-.47.8-.67 1.11-.86 1.41-1.25 2.06-1.45 3.23-.02.05-.02.11-.02.17H5c0-.06 0-.13-.02-.17-.2-1.17-.59-1.83-1.45-3.23-.2-.31-.42-.67-.67-1.11C2.44 6.78 2 5.65 2 5c0-2.2 2.02-4 4.5-4 1.22 0 2.36.42 3.22 1.19C10.55 2.94 11 3.94 11 5c0 .66-.44 1.78-.86 2.48zM4 14h5c-.23 1.14-1.3 2-2.5 2s-2.27-.86-2.5-2z"></path></svg></span>tip</div><div class="admonitionContent_BuS1"><p>If you want some practice with working with ROS 2, see if you can modify these
nodes to have their timer periods read from parameters, so that a user can speed
up or slow down the measurements.</p></div></div>
<h3 class="anchor anchorTargetStickyNavbar_Vzrq" id="camjam_control"><code>camjam_control</code><a href="https://mikelikesrobots.github.io/blog/raspi-camjam-ros2#camjam_control" class="hash-link" aria-label="Direct link to camjam_control" title="Direct link to camjam_control" translate="no">​</a></h3>
<p>This package has a similar setup to <a href="https://mikelikesrobots.github.io/blog/raspi-camjam-ros2#camjam_sensors" class=""><code>camjam_sensors</code></a>, so I
will skip all of the package files and go straight to the source files in the
<code>camjam_control</code> directory. However, there is a new file called
<code>launch/camjam_control.launch.py</code>, which is discussed in <a href="https://mikelikesrobots.github.io/blog/raspi-camjam-ros2#camjam_controllaunchpy" class="">a later
section</a>.</p>
<h4 class="anchor anchorTargetStickyNavbar_Vzrq" id="camjam_movementpy"><code>camjam_movement.py</code><a href="https://mikelikesrobots.github.io/blog/raspi-camjam-ros2#camjam_movementpy" class="hash-link" aria-label="Direct link to camjam_movementpy" title="Direct link to camjam_movementpy" translate="no">​</a></h4>
<p>As with the <code>camjam_sensors</code> package, this node uses <code>RPi.GPIO</code> to control the
pins for the motors. However, this time it uses PWM to send a signal (see <a class="" href="https://mikelikesrobots.github.io/blog/jetbot-motors-pt1">my
explanation of PWM and I2C here</a>). This means 4 pins
worth of parameters, plus an extra couple to control the <a href="https://github.com/mikelikesrobots/camjam_control/blob/main/camjam_control/camjam_movement.py#L13-L14" target="_blank" rel="noopener noreferrer" class="">PWM frequency and
maximum duty cycle</a>.</p>
<div class="language-python codeBlockContainer_Ckt0 theme-code-block" style="--prism-color:#393A34;--prism-background-color:#f6f8fa"><div class="codeBlockContent_QJqH"><pre tabindex="0" class="prism-code language-python codeBlock_bY9V thin-scrollbar" style="color:#393A34;background-color:#f6f8fa"><code class="codeBlockLines_e6Vv"><div class="token-line" style="color:#393A34"><span class="token plain">DEFAULT_PWM_FREQUENCY </span><span class="token operator" style="color:#393A34">=</span><span class="token plain"> </span><span class="token number" style="color:#36acaa">20</span><span class="token plain">  </span><span class="token comment" style="color:#999988;font-style:italic"># Hz</span><span class="token plain"></span><br></div><div class="token-line" style="color:#393A34"><span class="token plain">DEFAULT_FULL_SPEED_DUTY_CYCLE </span><span class="token operator" style="color:#393A34">=</span><span class="token plain"> </span><span class="token number" style="color:#36acaa">40</span><span class="token plain">  </span><span class="token comment" style="color:#999988;font-style:italic"># %</span><br></div></code></pre></div></div>
<p>Between the pin configuration and maximum duty cycle, the user can decide which
pins correspond to which motors and what max speed on the robot looks like.</p>
<p>With these pins and PWM frequency parameters, the node <a href="https://github.com/mikelikesrobots/camjam_control/blob/main/camjam_control/camjam_movement.py#L37-L50" target="_blank" rel="noopener noreferrer" class="">sets up the PWM
signals</a>.</p>
<div class="language-python codeBlockContainer_Ckt0 theme-code-block" style="--prism-color:#393A34;--prism-background-color:#f6f8fa"><div class="codeBlockContent_QJqH"><pre tabindex="0" class="prism-code language-python codeBlock_bY9V thin-scrollbar" style="color:#393A34;background-color:#f6f8fa"><code class="codeBlockLines_e6Vv"><div class="token-line" style="color:#393A34"><span class="token plain">self</span><span class="token punctuation" style="color:#393A34">.</span><span class="token plain">_motor_a_fwd </span><span class="token operator" style="color:#393A34">=</span><span class="token plain"> GPIO</span><span class="token punctuation" style="color:#393A34">.</span><span class="token plain">PWM</span><span class="token punctuation" style="color:#393A34">(</span><span class="token plain">motor_a_pin_fwd</span><span class="token punctuation" style="color:#393A34">,</span><span class="token plain"> pwm_frequency</span><span class="token punctuation" style="color:#393A34">)</span><span class="token plain"></span><br></div><div class="token-line" style="color:#393A34"><span class="token plain">self</span><span class="token punctuation" style="color:#393A34">.</span><span class="token plain">_motor_a_rev </span><span class="token operator" style="color:#393A34">=</span><span class="token plain"> GPIO</span><span class="token punctuation" style="color:#393A34">.</span><span class="token plain">PWM</span><span class="token punctuation" style="color:#393A34">(</span><span class="token plain">motor_a_pin_rev</span><span class="token punctuation" style="color:#393A34">,</span><span class="token plain"> pwm_frequency</span><span class="token punctuation" style="color:#393A34">)</span><span class="token plain"></span><br></div><div class="token-line" style="color:#393A34"><span class="token plain">self</span><span class="token punctuation" style="color:#393A34">.</span><span class="token plain">_motor_b_fwd </span><span class="token operator" style="color:#393A34">=</span><span class="token plain"> GPIO</span><span class="token punctuation" style="color:#393A34">.</span><span class="token plain">PWM</span><span class="token punctuation" style="color:#393A34">(</span><span class="token plain">motor_b_pin_fwd</span><span class="token punctuation" style="color:#393A34">,</span><span class="token plain"> pwm_frequency</span><span class="token punctuation" style="color:#393A34">)</span><span class="token plain"></span><br></div><div class="token-line" style="color:#393A34"><span class="token plain">self</span><span class="token punctuation" style="color:#393A34">.</span><span class="token plain">_motor_b_rev </span><span class="token operator" style="color:#393A34">=</span><span class="token plain"> GPIO</span><span class="token punctuation" style="color:#393A34">.</span><span class="token plain">PWM</span><span class="token punctuation" style="color:#393A34">(</span><span class="token plain">motor_b_pin_rev</span><span class="token punctuation" style="color:#393A34">,</span><span class="token plain"> pwm_frequency</span><span class="token punctuation" style="color:#393A34">)</span><br></div></code></pre></div></div>
<p>The last step in the <code>__init__</code> function of this node is to <a href="https://github.com/mikelikesrobots/camjam_control/blob/main/camjam_control/camjam_movement.py#L53-L58" target="_blank" rel="noopener noreferrer" class="">set up a
subscriber</a>.
Subscribers listen for messages instead of publishing them, and when they
receive one they call a callback function to decide how to handle it. In this
case, the movement node subscribes to <code>cmd_vel</code> topic for <a href="https://docs.ros.org/en/jazzy/p/geometry_msgs/interfaces/msg/Twist.html" target="_blank" rel="noopener noreferrer" class=""><code>Twist</code>
messages</a>,
and when one is received, it calls the <code>_vel_callback</code> function.</p>
<div class="language-python codeBlockContainer_Ckt0 theme-code-block" style="--prism-color:#393A34;--prism-background-color:#f6f8fa"><div class="codeBlockContent_QJqH"><pre tabindex="0" class="prism-code language-python codeBlock_bY9V thin-scrollbar" style="color:#393A34;background-color:#f6f8fa"><code class="codeBlockLines_e6Vv"><div class="token-line" style="color:#393A34"><span class="token plain">self</span><span class="token punctuation" style="color:#393A34">.</span><span class="token plain">vel_sub_ </span><span class="token operator" style="color:#393A34">=</span><span class="token plain"> self</span><span class="token punctuation" style="color:#393A34">.</span><span class="token plain">create_subscription</span><span class="token punctuation" style="color:#393A34">(</span><span class="token plain"></span><br></div><div class="token-line" style="color:#393A34"><span class="token plain">    Twist</span><span class="token punctuation" style="color:#393A34">,</span><span class="token plain"></span><br></div><div class="token-line" style="color:#393A34"><span class="token plain">    </span><span class="token string" style="color:#e3116c">"cmd_vel"</span><span class="token punctuation" style="color:#393A34">,</span><span class="token plain"></span><br></div><div class="token-line" style="color:#393A34"><span class="token plain">    self</span><span class="token punctuation" style="color:#393A34">.</span><span class="token plain">_vel_callback</span><span class="token punctuation" style="color:#393A34">,</span><span class="token plain"></span><br></div><div class="token-line" style="color:#393A34"><span class="token plain">    </span><span class="token number" style="color:#36acaa">10</span><span class="token plain">  </span><span class="token comment" style="color:#999988;font-style:italic"># This means 10 messages can be queued up to be handled</span><span class="token plain"></span><br></div><div class="token-line" style="color:#393A34"><span class="token plain"></span><span class="token punctuation" style="color:#393A34">)</span><br></div></code></pre></div></div>
<p><code>Twist</code> messages contain information about the requested velocity of the robot.
It defines linear movement and angular movement. This robot can only move in the
<code>x</code> direction linearly, meaning forwards and backwards, and can only rotate
around the <code>z</code> axis, meaning turning left and right. Therefore, the
<a href="https://github.com/mikelikesrobots/camjam_control/blob/main/camjam_control/camjam_movement.py#L61-L81" target="_blank" rel="noopener noreferrer" class=""><code>_vel_callback</code>
function</a>
calculates values for the left and right wheels based on <code>linear.x</code> and
<code>angular.z</code>, then sends those values as PWM signals to the motors.</p>
<div class="language-python codeBlockContainer_Ckt0 theme-code-block" style="--prism-color:#393A34;--prism-background-color:#f6f8fa"><div class="codeBlockContent_QJqH"><pre tabindex="0" class="prism-code language-python codeBlock_bY9V thin-scrollbar" style="color:#393A34;background-color:#f6f8fa"><code class="codeBlockLines_e6Vv"><div class="token-line" style="color:#393A34"><span class="token keyword" style="color:#00009f">def</span><span class="token plain"> </span><span class="token function" style="color:#d73a49">_vel_callback</span><span class="token punctuation" style="color:#393A34">(</span><span class="token plain">self</span><span class="token punctuation" style="color:#393A34">,</span><span class="token plain"> msg</span><span class="token punctuation" style="color:#393A34">:</span><span class="token plain"> Twist</span><span class="token punctuation" style="color:#393A34">)</span><span class="token punctuation" style="color:#393A34">:</span><span class="token plain"></span><br></div><div class="token-line" style="color:#393A34"><span class="token plain">    fwd </span><span class="token operator" style="color:#393A34">=</span><span class="token plain"> msg</span><span class="token punctuation" style="color:#393A34">.</span><span class="token plain">linear</span><span class="token punctuation" style="color:#393A34">.</span><span class="token plain">x</span><br></div><div class="token-line" style="color:#393A34"><span class="token plain">    turn </span><span class="token operator" style="color:#393A34">=</span><span class="token plain"> msg</span><span class="token punctuation" style="color:#393A34">.</span><span class="token plain">angular</span><span class="token punctuation" style="color:#393A34">.</span><span class="token plain">z</span><br></div><div class="token-line" style="color:#393A34"><span class="token plain">    </span><span class="token comment" style="color:#999988;font-style:italic"># A bit of forward and turn, limited to a speed of 1</span><span class="token plain"></span><br></div><div class="token-line" style="color:#393A34"><span class="token plain">    right </span><span class="token operator" style="color:#393A34">=</span><span class="token plain"> </span><span class="token builtin">min</span><span class="token punctuation" style="color:#393A34">(</span><span class="token number" style="color:#36acaa">1</span><span class="token punctuation" style="color:#393A34">,</span><span class="token plain"> fwd </span><span class="token operator" style="color:#393A34">-</span><span class="token plain"> turn </span><span class="token operator" style="color:#393A34">/</span><span class="token plain"> </span><span class="token number" style="color:#36acaa">2</span><span class="token punctuation" style="color:#393A34">)</span><span class="token plain"></span><br></div><div class="token-line" style="color:#393A34"><span class="token plain">    left </span><span class="token operator" style="color:#393A34">=</span><span class="token plain"> </span><span class="token builtin">min</span><span class="token punctuation" style="color:#393A34">(</span><span class="token number" style="color:#36acaa">1</span><span class="token punctuation" style="color:#393A34">,</span><span class="token plain"> fwd </span><span class="token operator" style="color:#393A34">+</span><span class="token plain"> turn </span><span class="token operator" style="color:#393A34">/</span><span class="token plain"> </span><span class="token number" style="color:#36acaa">2</span><span class="token punctuation" style="color:#393A34">)</span><span class="token plain"></span><br></div><div class="token-line" style="color:#393A34"><span class="token plain">    </span><span class="token comment" style="color:#999988;font-style:italic"># Multiply by maximum duty cycle for speed</span><span class="token plain"></span><br></div><div class="token-line" style="color:#393A34"><span class="token plain">    left </span><span class="token operator" style="color:#393A34">=</span><span class="token plain"> </span><span class="token builtin">int</span><span class="token punctuation" style="color:#393A34">(</span><span class="token plain">left </span><span class="token operator" style="color:#393A34">*</span><span class="token plain"> self</span><span class="token punctuation" style="color:#393A34">.</span><span class="token plain">_full_speed_duty_cycle</span><span class="token punctuation" style="color:#393A34">)</span><span class="token plain"></span><br></div><div class="token-line" style="color:#393A34"><span class="token plain">    right </span><span class="token operator" style="color:#393A34">=</span><span class="token plain"> </span><span class="token builtin">int</span><span class="token punctuation" style="color:#393A34">(</span><span class="token plain">right </span><span class="token operator" style="color:#393A34">*</span><span class="token plain"> self</span><span class="token punctuation" style="color:#393A34">.</span><span class="token plain">_full_speed_duty_cycle</span><span class="token punctuation" style="color:#393A34">)</span><span class="token plain"></span><br></div><div class="token-line" style="color:#393A34"><span class="token plain" style="display:inline-block"></span><br></div><div class="token-line" style="color:#393A34"><span class="token plain">    </span><span class="token comment" style="color:#999988;font-style:italic"># If positive, send to fwd wheel, else send negative to reverse wheel</span><span class="token plain"></span><br></div><div class="token-line" style="color:#393A34"><span class="token plain">    </span><span class="token keyword" style="color:#00009f">if</span><span class="token plain"> left </span><span class="token operator" style="color:#393A34">&gt;=</span><span class="token plain"> </span><span class="token number" style="color:#36acaa">0</span><span class="token punctuation" style="color:#393A34">:</span><span class="token plain"></span><br></div><div class="token-line" style="color:#393A34"><span class="token plain">        self</span><span class="token punctuation" style="color:#393A34">.</span><span class="token plain">_motor_b_fwd</span><span class="token punctuation" style="color:#393A34">.</span><span class="token plain">ChangeDutyCycle</span><span class="token punctuation" style="color:#393A34">(</span><span class="token plain">left</span><span class="token punctuation" style="color:#393A34">)</span><span class="token plain"></span><br></div><div class="token-line" style="color:#393A34"><span class="token plain">        self</span><span class="token punctuation" style="color:#393A34">.</span><span class="token plain">_motor_b_rev</span><span class="token punctuation" style="color:#393A34">.</span><span class="token plain">ChangeDutyCycle</span><span class="token punctuation" style="color:#393A34">(</span><span class="token number" style="color:#36acaa">0</span><span class="token punctuation" style="color:#393A34">)</span><span class="token plain"></span><br></div><div class="token-line" style="color:#393A34"><span class="token plain">    </span><span class="token keyword" style="color:#00009f">else</span><span class="token punctuation" style="color:#393A34">:</span><span class="token plain"></span><br></div><div class="token-line" style="color:#393A34"><span class="token plain">        self</span><span class="token punctuation" style="color:#393A34">.</span><span class="token plain">_motor_b_fwd</span><span class="token punctuation" style="color:#393A34">.</span><span class="token plain">ChangeDutyCycle</span><span class="token punctuation" style="color:#393A34">(</span><span class="token number" style="color:#36acaa">0</span><span class="token punctuation" style="color:#393A34">)</span><span class="token plain"></span><br></div><div class="token-line" style="color:#393A34"><span class="token plain">        self</span><span class="token punctuation" style="color:#393A34">.</span><span class="token plain">_motor_b_rev</span><span class="token punctuation" style="color:#393A34">.</span><span class="token plain">ChangeDutyCycle</span><span class="token punctuation" style="color:#393A34">(</span><span class="token operator" style="color:#393A34">-</span><span class="token plain">left</span><span class="token punctuation" style="color:#393A34">)</span><span class="token plain"></span><br></div><div class="token-line" style="color:#393A34"><span class="token plain" style="display:inline-block"></span><br></div><div class="token-line" style="color:#393A34"><span class="token plain">    </span><span class="token keyword" style="color:#00009f">if</span><span class="token plain"> right </span><span class="token operator" style="color:#393A34">&gt;=</span><span class="token plain"> </span><span class="token number" style="color:#36acaa">0</span><span class="token punctuation" style="color:#393A34">:</span><span class="token plain"></span><br></div><div class="token-line" style="color:#393A34"><span class="token plain">        self</span><span class="token punctuation" style="color:#393A34">.</span><span class="token plain">_motor_a_fwd</span><span class="token punctuation" style="color:#393A34">.</span><span class="token plain">ChangeDutyCycle</span><span class="token punctuation" style="color:#393A34">(</span><span class="token plain">right</span><span class="token punctuation" style="color:#393A34">)</span><span class="token plain"></span><br></div><div class="token-line" style="color:#393A34"><span class="token plain">        self</span><span class="token punctuation" style="color:#393A34">.</span><span class="token plain">_motor_a_rev</span><span class="token punctuation" style="color:#393A34">.</span><span class="token plain">ChangeDutyCycle</span><span class="token punctuation" style="color:#393A34">(</span><span class="token number" style="color:#36acaa">0</span><span class="token punctuation" style="color:#393A34">)</span><span class="token plain"></span><br></div><div class="token-line" style="color:#393A34"><span class="token plain">    </span><span class="token keyword" style="color:#00009f">else</span><span class="token punctuation" style="color:#393A34">:</span><span class="token plain"></span><br></div><div class="token-line" style="color:#393A34"><span class="token plain">        self</span><span class="token punctuation" style="color:#393A34">.</span><span class="token plain">_motor_a_fwd</span><span class="token punctuation" style="color:#393A34">.</span><span class="token plain">ChangeDutyCycle</span><span class="token punctuation" style="color:#393A34">(</span><span class="token number" style="color:#36acaa">0</span><span class="token punctuation" style="color:#393A34">)</span><span class="token plain"></span><br></div><div class="token-line" style="color:#393A34"><span class="token plain">        self</span><span class="token punctuation" style="color:#393A34">.</span><span class="token plain">_motor_a_rev</span><span class="token punctuation" style="color:#393A34">.</span><span class="token plain">ChangeDutyCycle</span><span class="token punctuation" style="color:#393A34">(</span><span class="token operator" style="color:#393A34">-</span><span class="token plain">right</span><span class="token punctuation" style="color:#393A34">)</span><br></div></code></pre></div></div>
<h4 class="anchor anchorTargetStickyNavbar_Vzrq" id="camjam_controllerpy"><code>camjam_controller.py</code><a href="https://mikelikesrobots.github.io/blog/raspi-camjam-ros2#camjam_controllerpy" class="hash-link" aria-label="Direct link to camjam_controllerpy" title="Direct link to camjam_controllerpy" translate="no">​</a></h4>
<p>This file defines the node that brings it all together. It listens for sensor
readings, decides how the robot should move, then sends that command to the
movement node using the <code>cmd_vel</code> topic.</p>
<p>The node works by keeping a state of what it should currently be doing, which is
one of:</p>
<ul>
<li class=""><code>find_line</code></li>
<li class=""><code>follow_line</code></li>
<li class=""><code>avoid_obstacle</code></li>
</ul>
<p>When any data arrives from the sensors, the state is changed depending on the
sensor value.</p>
<p>Assuming the robot is trying to find or follow the line, a line sensor reading
will <a href="https://github.com/mikelikesrobots/camjam_control/blob/main/camjam_control/camjam_controller.py#L75-L85" target="_blank" rel="noopener noreferrer" class="">change its
state</a>
depending on whether the line is present or not.</p>
<div class="language-python codeBlockContainer_Ckt0 theme-code-block" style="--prism-color:#393A34;--prism-background-color:#f6f8fa"><div class="codeBlockContent_QJqH"><pre tabindex="0" class="prism-code language-python codeBlock_bY9V thin-scrollbar" style="color:#393A34;background-color:#f6f8fa"><code class="codeBlockLines_e6Vv"><div class="token-line" style="color:#393A34"><span class="token keyword" style="color:#00009f">if</span><span class="token plain"> msg</span><span class="token punctuation" style="color:#393A34">.</span><span class="token plain">data</span><span class="token punctuation" style="color:#393A34">:</span><span class="token plain"></span><br></div><div class="token-line" style="color:#393A34"><span class="token plain">    </span><span class="token keyword" style="color:#00009f">if</span><span class="token plain"> self</span><span class="token punctuation" style="color:#393A34">.</span><span class="token plain">_mode </span><span class="token operator" style="color:#393A34">==</span><span class="token plain"> </span><span class="token string" style="color:#e3116c">"find_line"</span><span class="token punctuation" style="color:#393A34">:</span><span class="token plain"></span><br></div><div class="token-line" style="color:#393A34"><span class="token plain">        self</span><span class="token punctuation" style="color:#393A34">.</span><span class="token plain">get_logger</span><span class="token punctuation" style="color:#393A34">(</span><span class="token punctuation" style="color:#393A34">)</span><span class="token punctuation" style="color:#393A34">.</span><span class="token plain">info</span><span class="token punctuation" style="color:#393A34">(</span><span class="token string" style="color:#e3116c">"Found line! Following..."</span><span class="token punctuation" style="color:#393A34">)</span><span class="token plain"></span><br></div><div class="token-line" style="color:#393A34"><span class="token plain">    self</span><span class="token punctuation" style="color:#393A34">.</span><span class="token plain">_line_miss_count </span><span class="token operator" style="color:#393A34">=</span><span class="token plain"> </span><span class="token number" style="color:#36acaa">0</span><span class="token plain"></span><br></div><div class="token-line" style="color:#393A34"><span class="token plain">    self</span><span class="token punctuation" style="color:#393A34">.</span><span class="token plain">_mode </span><span class="token operator" style="color:#393A34">=</span><span class="token plain"> </span><span class="token string" style="color:#e3116c">"follow_line"</span><span class="token plain"></span><br></div><div class="token-line" style="color:#393A34"><span class="token plain"></span><span class="token keyword" style="color:#00009f">else</span><span class="token punctuation" style="color:#393A34">:</span><span class="token plain"></span><br></div><div class="token-line" style="color:#393A34"><span class="token plain">    </span><span class="token keyword" style="color:#00009f">if</span><span class="token plain"> self</span><span class="token punctuation" style="color:#393A34">.</span><span class="token plain">_mode </span><span class="token operator" style="color:#393A34">==</span><span class="token plain"> </span><span class="token string" style="color:#e3116c">"follow_line"</span><span class="token punctuation" style="color:#393A34">:</span><span class="token plain"></span><br></div><div class="token-line" style="color:#393A34"><span class="token plain">        self</span><span class="token punctuation" style="color:#393A34">.</span><span class="token plain">get_logger</span><span class="token punctuation" style="color:#393A34">(</span><span class="token punctuation" style="color:#393A34">)</span><span class="token punctuation" style="color:#393A34">.</span><span class="token plain">info</span><span class="token punctuation" style="color:#393A34">(</span><span class="token string" style="color:#e3116c">"Lost line! Finding..."</span><span class="token punctuation" style="color:#393A34">)</span><span class="token plain"></span><br></div><div class="token-line" style="color:#393A34"><span class="token plain">        self</span><span class="token punctuation" style="color:#393A34">.</span><span class="token plain">_direction_change_limit </span><span class="token operator" style="color:#393A34">=</span><span class="token plain"> self</span><span class="token punctuation" style="color:#393A34">.</span><span class="token plain">_starting_search_size</span><br></div><div class="token-line" style="color:#393A34"><span class="token plain">    self</span><span class="token punctuation" style="color:#393A34">.</span><span class="token plain">_line_miss_count </span><span class="token operator" style="color:#393A34">+=</span><span class="token plain"> </span><span class="token number" style="color:#36acaa">1</span><span class="token plain"></span><br></div><div class="token-line" style="color:#393A34"><span class="token plain">    self</span><span class="token punctuation" style="color:#393A34">.</span><span class="token plain">_mode </span><span class="token operator" style="color:#393A34">=</span><span class="token plain"> </span><span class="token string" style="color:#e3116c">"find_line"</span><br></div></code></pre></div></div>
<p>The code says that if the robot is currently finding the line, and the line
sensor detects a line, that means the line has been found and should be
followed. The state is changed accordingly. The reverse happens if the line is
lost. The other variable changes will be explained in the <a href="https://mikelikesrobots.github.io/blog/raspi-camjam-ros2#search-algorithm" class="">line search section</a>.</p>
<p>For the <a href="https://github.com/mikelikesrobots/camjam_control/blob/main/camjam_control/camjam_controller.py#L87-L94" target="_blank" rel="noopener noreferrer" class="">range
messages</a>,
if a range message is received and an obstacle is too close, the robot should
avoid it no matter what state it is in. However, if the robot is already
avoiding an obstacle and a range message says there is no obstacle close, the
robot can go back to trying to find and follow the line.</p>
<div class="language-python codeBlockContainer_Ckt0 theme-code-block" style="--prism-color:#393A34;--prism-background-color:#f6f8fa"><div class="codeBlockContent_QJqH"><pre tabindex="0" class="prism-code language-python codeBlock_bY9V thin-scrollbar" style="color:#393A34;background-color:#f6f8fa"><code class="codeBlockLines_e6Vv"><div class="token-line" style="color:#393A34"><span class="token keyword" style="color:#00009f">def</span><span class="token plain"> </span><span class="token function" style="color:#d73a49">_range_msg_callback</span><span class="token punctuation" style="color:#393A34">(</span><span class="token plain">self</span><span class="token punctuation" style="color:#393A34">,</span><span class="token plain"> msg</span><span class="token punctuation" style="color:#393A34">:</span><span class="token plain"> Range</span><span class="token punctuation" style="color:#393A34">)</span><span class="token punctuation" style="color:#393A34">:</span><span class="token plain"></span><br></div><div class="token-line" style="color:#393A34"><span class="token plain">    </span><span class="token keyword" style="color:#00009f">if</span><span class="token plain"> msg</span><span class="token punctuation" style="color:#393A34">.</span><span class="token builtin">range</span><span class="token plain"> </span><span class="token operator" style="color:#393A34">&lt;=</span><span class="token plain"> self</span><span class="token punctuation" style="color:#393A34">.</span><span class="token plain">_avoid_range</span><span class="token punctuation" style="color:#393A34">:</span><span class="token plain"></span><br></div><div class="token-line" style="color:#393A34"><span class="token plain">        self</span><span class="token punctuation" style="color:#393A34">.</span><span class="token plain">_mode </span><span class="token operator" style="color:#393A34">=</span><span class="token plain"> </span><span class="token string" style="color:#e3116c">"avoid_obstacle"</span><span class="token plain"></span><br></div><div class="token-line" style="color:#393A34"><span class="token plain">        self</span><span class="token punctuation" style="color:#393A34">.</span><span class="token plain">get_logger</span><span class="token punctuation" style="color:#393A34">(</span><span class="token punctuation" style="color:#393A34">)</span><span class="token punctuation" style="color:#393A34">.</span><span class="token plain">info</span><span class="token punctuation" style="color:#393A34">(</span><span class="token string" style="color:#e3116c">"Obstacle too close - avoiding!"</span><span class="token punctuation" style="color:#393A34">)</span><span class="token plain"></span><br></div><div class="token-line" style="color:#393A34"><span class="token plain">    </span><span class="token keyword" style="color:#00009f">elif</span><span class="token plain"> self</span><span class="token punctuation" style="color:#393A34">.</span><span class="token plain">_mode </span><span class="token operator" style="color:#393A34">==</span><span class="token plain"> </span><span class="token string" style="color:#e3116c">"avoid_obstacle"</span><span class="token punctuation" style="color:#393A34">:</span><span class="token plain"></span><br></div><div class="token-line" style="color:#393A34"><span class="token plain">        self</span><span class="token punctuation" style="color:#393A34">.</span><span class="token plain">_mode </span><span class="token operator" style="color:#393A34">=</span><span class="token plain"> </span><span class="token string" style="color:#e3116c">"find_line"</span><span class="token plain"></span><br></div><div class="token-line" style="color:#393A34"><span class="token plain">        self</span><span class="token punctuation" style="color:#393A34">.</span><span class="token plain">_direction_change_limit </span><span class="token operator" style="color:#393A34">=</span><span class="token plain"> self</span><span class="token punctuation" style="color:#393A34">.</span><span class="token plain">_starting_search_size</span><br></div><div class="token-line" style="color:#393A34"><span class="token plain">        self</span><span class="token punctuation" style="color:#393A34">.</span><span class="token plain">get_logger</span><span class="token punctuation" style="color:#393A34">(</span><span class="token punctuation" style="color:#393A34">)</span><span class="token punctuation" style="color:#393A34">.</span><span class="token plain">info</span><span class="token punctuation" style="color:#393A34">(</span><span class="token string" style="color:#e3116c">"Obstacle cleared. Looking for line..."</span><span class="token punctuation" style="color:#393A34">)</span><br></div></code></pre></div></div>
<p>The controller uses a timer to run a control loop every so often - 5 Hz by
default, controllable by parameter. The state is determined by the sensors,
which means that the control loop just needs to decide how to drive based on the
current state.</p>
<p>If it's <a href="https://github.com/mikelikesrobots/camjam_control/blob/main/camjam_control/camjam_controller.py#L105-L108" target="_blank" rel="noopener noreferrer" class="">avoiding an obstacle</a>, it backs away.</p>
<div class="language-python codeBlockContainer_Ckt0 theme-code-block" style="--prism-color:#393A34;--prism-background-color:#f6f8fa"><div class="codeBlockContent_QJqH"><pre tabindex="0" class="prism-code language-python codeBlock_bY9V thin-scrollbar" style="color:#393A34;background-color:#f6f8fa"><code class="codeBlockLines_e6Vv"><div class="token-line" style="color:#393A34"><span class="token keyword" style="color:#00009f">if</span><span class="token plain"> self</span><span class="token punctuation" style="color:#393A34">.</span><span class="token plain">_mode </span><span class="token operator" style="color:#393A34">==</span><span class="token plain"> </span><span class="token string" style="color:#e3116c">"avoid_obstacle"</span><span class="token punctuation" style="color:#393A34">:</span><span class="token plain"></span><br></div><div class="token-line" style="color:#393A34"><span class="token plain">    </span><span class="token comment" style="color:#999988;font-style:italic"># Back away slowly</span><span class="token plain"></span><br></div><div class="token-line" style="color:#393A34"><span class="token plain">    cmd</span><span class="token punctuation" style="color:#393A34">.</span><span class="token plain">linear</span><span class="token punctuation" style="color:#393A34">.</span><span class="token plain">x </span><span class="token operator" style="color:#393A34">=</span><span class="token plain"> </span><span class="token operator" style="color:#393A34">-</span><span class="token plain">self</span><span class="token punctuation" style="color:#393A34">.</span><span class="token plain">_reverse_speed</span><br></div><div class="token-line" style="color:#393A34"><span class="token plain">    self</span><span class="token punctuation" style="color:#393A34">.</span><span class="token plain">get_logger</span><span class="token punctuation" style="color:#393A34">(</span><span class="token punctuation" style="color:#393A34">)</span><span class="token punctuation" style="color:#393A34">.</span><span class="token plain">info</span><span class="token punctuation" style="color:#393A34">(</span><span class="token string" style="color:#e3116c">"I'm avoiding an obstacle..."</span><span class="token punctuation" style="color:#393A34">)</span><br></div></code></pre></div></div>
<p>If it's following the line, it goes <a href="https://github.com/mikelikesrobots/camjam_control/blob/main/camjam_control/camjam_controller.py#L123-L125" target="_blank" rel="noopener noreferrer" class="">forward at a set speed</a>.</p>
<div class="language-python codeBlockContainer_Ckt0 theme-code-block" style="--prism-color:#393A34;--prism-background-color:#f6f8fa"><div class="codeBlockContent_QJqH"><pre tabindex="0" class="prism-code language-python codeBlock_bY9V thin-scrollbar" style="color:#393A34;background-color:#f6f8fa"><code class="codeBlockLines_e6Vv"><div class="token-line" style="color:#393A34"><span class="token keyword" style="color:#00009f">elif</span><span class="token plain"> self</span><span class="token punctuation" style="color:#393A34">.</span><span class="token plain">_mode </span><span class="token operator" style="color:#393A34">==</span><span class="token plain"> </span><span class="token string" style="color:#e3116c">"follow_line"</span><span class="token punctuation" style="color:#393A34">:</span><span class="token plain"></span><br></div><div class="token-line" style="color:#393A34"><span class="token plain">    </span><span class="token comment" style="color:#999988;font-style:italic"># Follow the line!</span><span class="token plain"></span><br></div><div class="token-line" style="color:#393A34"><span class="token plain">    cmd</span><span class="token punctuation" style="color:#393A34">.</span><span class="token plain">linear</span><span class="token punctuation" style="color:#393A34">.</span><span class="token plain">x </span><span class="token operator" style="color:#393A34">=</span><span class="token plain"> self</span><span class="token punctuation" style="color:#393A34">.</span><span class="token plain">_follow_speed</span><br></div></code></pre></div></div>
<p>Finally, if the robot is trying to find the line, it <a href="https://github.com/mikelikesrobots/camjam_control/blob/main/camjam_control/camjam_controller.py#L119-L122" target="_blank" rel="noopener noreferrer" class="">moves left or
right</a>
to search for it.</p>
<div class="language-python codeBlockContainer_Ckt0 theme-code-block" style="--prism-color:#393A34;--prism-background-color:#f6f8fa"><div class="codeBlockContent_QJqH"><pre tabindex="0" class="prism-code language-python codeBlock_bY9V thin-scrollbar" style="color:#393A34;background-color:#f6f8fa"><code class="codeBlockLines_e6Vv"><div class="token-line" style="color:#393A34"><span class="token keyword" style="color:#00009f">if</span><span class="token plain"> self</span><span class="token punctuation" style="color:#393A34">.</span><span class="token plain">_search_direction </span><span class="token operator" style="color:#393A34">==</span><span class="token plain"> </span><span class="token string" style="color:#e3116c">"left"</span><span class="token punctuation" style="color:#393A34">:</span><span class="token plain"></span><br></div><div class="token-line" style="color:#393A34"><span class="token plain">    cmd</span><span class="token punctuation" style="color:#393A34">.</span><span class="token plain">angular</span><span class="token punctuation" style="color:#393A34">.</span><span class="token plain">z </span><span class="token operator" style="color:#393A34">=</span><span class="token plain"> self</span><span class="token punctuation" style="color:#393A34">.</span><span class="token plain">_turn_speed</span><br></div><div class="token-line" style="color:#393A34"><span class="token plain"></span><span class="token keyword" style="color:#00009f">else</span><span class="token punctuation" style="color:#393A34">:</span><span class="token plain"></span><br></div><div class="token-line" style="color:#393A34"><span class="token plain">    cmd</span><span class="token punctuation" style="color:#393A34">.</span><span class="token plain">angular</span><span class="token punctuation" style="color:#393A34">.</span><span class="token plain">z </span><span class="token operator" style="color:#393A34">=</span><span class="token plain"> </span><span class="token operator" style="color:#393A34">-</span><span class="token plain">self</span><span class="token punctuation" style="color:#393A34">.</span><span class="token plain">_turn_speed</span><br></div></code></pre></div></div>
<p>Finally, it <a href="https://github.com/mikelikesrobots/camjam_control/blob/main/camjam_control/camjam_controller.py#L130" target="_blank" rel="noopener noreferrer" class="">publishes the <code>Twist</code>
message</a>,
which will be received by the movement node to actually move the robot.</p>
<div class="language-python codeBlockContainer_Ckt0 theme-code-block" style="--prism-color:#393A34;--prism-background-color:#f6f8fa"><div class="codeBlockContent_QJqH"><pre tabindex="0" class="prism-code language-python codeBlock_bY9V thin-scrollbar" style="color:#393A34;background-color:#f6f8fa"><code class="codeBlockLines_e6Vv"><div class="token-line" style="color:#393A34"><span class="token plain">self</span><span class="token punctuation" style="color:#393A34">.</span><span class="token plain">publisher_</span><span class="token punctuation" style="color:#393A34">.</span><span class="token plain">publish</span><span class="token punctuation" style="color:#393A34">(</span><span class="token plain">cmd</span><span class="token punctuation" style="color:#393A34">)</span><br></div></code></pre></div></div>
<h5 class="anchor anchorTargetStickyNavbar_Vzrq" id="search-algorithm">Search Algorithm<a href="https://mikelikesrobots.github.io/blog/raspi-camjam-ros2#search-algorithm" class="hash-link" aria-label="Direct link to Search Algorithm" title="Direct link to Search Algorithm" translate="no">​</a></h5>
<p>The robot uses a slightly more complex version of finding the line than <a href="https://github.com/CamJam-EduKit/EduKit3/blob/master/CamJam%20Edukit%203%20-%20RPi.GPIO/Code/8-linefollower.py#L100-L118" target="_blank" rel="noopener noreferrer" class="">the
EduKit
version</a>.
It tracks whether it should be looking left or right, but it also tracks how
many range readings it has had while looking left or right, which determines how
big an area it has searched for the line.</p>
<p>If the number of range measurements reaches a limit, the robot will <a href="https://github.com/mikelikesrobots/camjam_control/blob/main/camjam_control/camjam_controller.py#L112-L117" target="_blank" rel="noopener noreferrer" class="">change
search
direction</a>.</p>
<div class="language-python codeBlockContainer_Ckt0 theme-code-block" style="--prism-color:#393A34;--prism-background-color:#f6f8fa"><div class="codeBlockContent_QJqH"><pre tabindex="0" class="prism-code language-python codeBlock_bY9V thin-scrollbar" style="color:#393A34;background-color:#f6f8fa"><code class="codeBlockLines_e6Vv"><div class="token-line" style="color:#393A34"><span class="token keyword" style="color:#00009f">if</span><span class="token plain"> self</span><span class="token punctuation" style="color:#393A34">.</span><span class="token plain">_search_direction </span><span class="token operator" style="color:#393A34">==</span><span class="token plain"> </span><span class="token string" style="color:#e3116c">"right"</span><span class="token punctuation" style="color:#393A34">:</span><span class="token plain"></span><br></div><div class="token-line" style="color:#393A34"><span class="token plain">    self</span><span class="token punctuation" style="color:#393A34">.</span><span class="token plain">get_logger</span><span class="token punctuation" style="color:#393A34">(</span><span class="token punctuation" style="color:#393A34">)</span><span class="token punctuation" style="color:#393A34">.</span><span class="token plain">info</span><span class="token punctuation" style="color:#393A34">(</span><span class="token string" style="color:#e3116c">"Trying left..."</span><span class="token punctuation" style="color:#393A34">)</span><span class="token plain"></span><br></div><div class="token-line" style="color:#393A34"><span class="token plain">    self</span><span class="token punctuation" style="color:#393A34">.</span><span class="token plain">_search_direction </span><span class="token operator" style="color:#393A34">=</span><span class="token plain"> </span><span class="token string" style="color:#e3116c">"left"</span><span class="token plain"></span><br></div><div class="token-line" style="color:#393A34"><span class="token plain"></span><span class="token keyword" style="color:#00009f">else</span><span class="token punctuation" style="color:#393A34">:</span><span class="token plain"></span><br></div><div class="token-line" style="color:#393A34"><span class="token plain">    self</span><span class="token punctuation" style="color:#393A34">.</span><span class="token plain">get_logger</span><span class="token punctuation" style="color:#393A34">(</span><span class="token punctuation" style="color:#393A34">)</span><span class="token punctuation" style="color:#393A34">.</span><span class="token plain">info</span><span class="token punctuation" style="color:#393A34">(</span><span class="token string" style="color:#e3116c">"Trying right..."</span><span class="token punctuation" style="color:#393A34">)</span><span class="token plain"></span><br></div><div class="token-line" style="color:#393A34"><span class="token plain">    self</span><span class="token punctuation" style="color:#393A34">.</span><span class="token plain">_search_direction </span><span class="token operator" style="color:#393A34">=</span><span class="token plain"> </span><span class="token string" style="color:#e3116c">"right"</span><br></div></code></pre></div></div>
<p>On top of this, the limit for how far to search for the line increases over
time, controlled by the <code>search_increment</code> and <code>starting_search_size</code>
parameters. The robot searches until it has received <code>starting_search_size</code>
range measurements, then <a href="https://github.com/mikelikesrobots/camjam_control/blob/main/camjam_control/camjam_controller.py#L118" target="_blank" rel="noopener noreferrer" class="">increases the limit by
<code>search_increment</code></a>.
This means that the robot moves left, then more to the right, then more <em>still</em>
to the left. This allows the robot to find the line quickly if it's close, but
eventually find the line if it has moved far away.</p>
<div class="language-python codeBlockContainer_Ckt0 theme-code-block" style="--prism-color:#393A34;--prism-background-color:#f6f8fa"><div class="codeBlockContent_QJqH"><pre tabindex="0" class="prism-code language-python codeBlock_bY9V thin-scrollbar" style="color:#393A34;background-color:#f6f8fa"><code class="codeBlockLines_e6Vv"><div class="token-line" style="color:#393A34"><span class="token plain">self</span><span class="token punctuation" style="color:#393A34">.</span><span class="token plain">_direction_change_limit </span><span class="token operator" style="color:#393A34">+=</span><span class="token plain"> self</span><span class="token punctuation" style="color:#393A34">.</span><span class="token plain">_search_increment</span><br></div></code></pre></div></div>
<figure><p><img decoding="async" loading="lazy" alt="Increasing search area in front of robot" src="https://mikelikesrobots.github.io/assets/images/search_area-0c980a0a3030f0985b4860fcdd01b0d4.webp" width="782" height="440" class="img_ev3q">
</p><figcaption>Robot searches blue, then through red, then through green.</figcaption><p></p></figure>
<h4 class="anchor anchorTargetStickyNavbar_Vzrq" id="camjam_controllaunchpy"><code>camjam_control.launch.py</code><a href="https://mikelikesrobots.github.io/blog/raspi-camjam-ros2#camjam_controllaunchpy" class="hash-link" aria-label="Direct link to camjam_controllaunchpy" title="Direct link to camjam_controllaunchpy" translate="no">​</a></h4>
<p>This is the file that launches everything from both packages to move the robot.
It is very simple, as it simply declares each node that should be run as part of
the launch, such as <a href="https://github.com/mikelikesrobots/camjam_control/blob/main/launch/camjam_control.launch.py#L6-L11" target="_blank" rel="noopener noreferrer" class="">the distance sensor node</a>:</p>
<div class="language-python codeBlockContainer_Ckt0 theme-code-block" style="--prism-color:#393A34;--prism-background-color:#f6f8fa"><div class="codeBlockContent_QJqH"><pre tabindex="0" class="prism-code language-python codeBlock_bY9V thin-scrollbar" style="color:#393A34;background-color:#f6f8fa"><code class="codeBlockLines_e6Vv"><div class="token-line" style="color:#393A34"><span class="token plain">Node</span><span class="token punctuation" style="color:#393A34">(</span><span class="token plain"></span><br></div><div class="token-line" style="color:#393A34"><span class="token plain">    package</span><span class="token operator" style="color:#393A34">=</span><span class="token string" style="color:#e3116c">'camjam_sensors'</span><span class="token punctuation" style="color:#393A34">,</span><span class="token plain"></span><br></div><div class="token-line" style="color:#393A34"><span class="token plain">    namespace</span><span class="token operator" style="color:#393A34">=</span><span class="token string" style="color:#e3116c">'camjam01'</span><span class="token punctuation" style="color:#393A34">,</span><span class="token plain"></span><br></div><div class="token-line" style="color:#393A34"><span class="token plain">    executable</span><span class="token operator" style="color:#393A34">=</span><span class="token string" style="color:#e3116c">'distance'</span><span class="token punctuation" style="color:#393A34">,</span><span class="token plain"></span><br></div><div class="token-line" style="color:#393A34"><span class="token plain">    name</span><span class="token operator" style="color:#393A34">=</span><span class="token string" style="color:#e3116c">'distance'</span><span class="token punctuation" style="color:#393A34">,</span><span class="token plain"></span><br></div><div class="token-line" style="color:#393A34"><span class="token plain"></span><span class="token punctuation" style="color:#393A34">)</span><span class="token punctuation" style="color:#393A34">,</span><br></div></code></pre></div></div>
<p>The launch file can do a lot more, though. For example, it can change parameters
and topic mappings. If you wanted to add a second line sensor, you could add
another Node that changes the pin configuration using parameters, and changes
the topic it publishes to from <code>line_detected</code> to <code>right_line_detected</code>.</p>
<p>There is a parameter <a href="https://github.com/mikelikesrobots/camjam_control/blob/main/launch/camjam_control.launch.py#L24-L32" target="_blank" rel="noopener noreferrer" class="">set in this
file</a>
which changes the maximum speed the robot can drive at. Try changing this
parameter to control how fast your robot moves around the line following course.</p>
<div class="language-python codeBlockContainer_Ckt0 theme-code-block" style="--prism-color:#393A34;--prism-background-color:#f6f8fa"><div class="codeBlockContent_QJqH"><pre tabindex="0" class="prism-code language-python codeBlock_bY9V thin-scrollbar" style="color:#393A34;background-color:#f6f8fa"><code class="codeBlockLines_e6Vv"><div class="token-line" style="color:#393A34"><span class="token plain">Node</span><span class="token punctuation" style="color:#393A34">(</span><span class="token plain"></span><br></div><div class="token-line" style="color:#393A34"><span class="token plain">    package</span><span class="token operator" style="color:#393A34">=</span><span class="token string" style="color:#e3116c">'camjam_control'</span><span class="token punctuation" style="color:#393A34">,</span><span class="token plain"></span><br></div><div class="token-line" style="color:#393A34"><span class="token plain">    namespace</span><span class="token operator" style="color:#393A34">=</span><span class="token string" style="color:#e3116c">'camjam01'</span><span class="token punctuation" style="color:#393A34">,</span><span class="token plain"></span><br></div><div class="token-line" style="color:#393A34"><span class="token plain">    executable</span><span class="token operator" style="color:#393A34">=</span><span class="token string" style="color:#e3116c">'move'</span><span class="token punctuation" style="color:#393A34">,</span><span class="token plain"></span><br></div><div class="token-line" style="color:#393A34"><span class="token plain">    name</span><span class="token operator" style="color:#393A34">=</span><span class="token string" style="color:#e3116c">'movement'</span><span class="token punctuation" style="color:#393A34">,</span><span class="token plain"></span><br></div><div class="token-line" style="color:#393A34"><span class="token plain">    parameters</span><span class="token operator" style="color:#393A34">=</span><span class="token punctuation" style="color:#393A34">[</span><span class="token plain"></span><br></div><div class="token-line" style="color:#393A34"><span class="token plain">        </span><span class="token punctuation" style="color:#393A34">{</span><span class="token string" style="color:#e3116c">"max_duty_cycle"</span><span class="token punctuation" style="color:#393A34">:</span><span class="token plain"> </span><span class="token number" style="color:#36acaa">50</span><span class="token punctuation" style="color:#393A34">}</span><span class="token punctuation" style="color:#393A34">,</span><span class="token plain"></span><br></div><div class="token-line" style="color:#393A34"><span class="token plain">    </span><span class="token punctuation" style="color:#393A34">]</span><span class="token plain"></span><br></div><div class="token-line" style="color:#393A34"><span class="token plain"></span><span class="token punctuation" style="color:#393A34">)</span><span class="token punctuation" style="color:#393A34">,</span><br></div></code></pre></div></div>
<h3 class="anchor anchorTargetStickyNavbar_Vzrq" id="deep-dive-recap">Deep Dive Recap<a href="https://mikelikesrobots.github.io/blog/raspi-camjam-ros2#deep-dive-recap" class="hash-link" aria-label="Direct link to Deep Dive Recap" title="Direct link to Deep Dive Recap" translate="no">​</a></h3>
<p>Between two packages, we have:</p>
<ul>
<li class="">a node publishing line sensor readings at 100 Hz rate</li>
<li class="">a node publishing distance sensor readings at 4 Hz rate</li>
<li class="">a movement node that understands how to move the motors of the robot based on
messages on <code>cmd_vel</code></li>
<li class="">a controller that uses sensor readings to determine what the robot should do
before publishing motor speed requests to the movement node.</li>
</ul>
<p>One package also contains a launch file, which we can use to launch all the
nodes at the same time, plus reconfigure them. We could change pins used for the
nodes, the speed of the robot, or even add extra sensors and launch nodes to
control them using this file.</p>
<h2 class="anchor anchorTargetStickyNavbar_Vzrq" id="overall-summary">Overall Summary<a href="https://mikelikesrobots.github.io/blog/raspi-camjam-ros2#overall-summary" class="hash-link" aria-label="Direct link to Overall Summary" title="Direct link to Overall Summary" translate="no">​</a></h2>
<p>In this post, we saw how to run ROS 2 on a Raspberry Pi Zero 2W to control the
CamJam EduKit #3 robot. Using ROS 2, we were able to program the robot to follow
a line while also backing away from any obstacles it finds.</p>
<p>Using ROS 2 isn't necessary for an application this simple, but it does help to
separate out code into different nodes. It also means we could scale up to add
more sensors more easily, give our code to other people, or even control the
robot with a gamepad or keyboard.</p>
<p>We saw how to install ROS 2 on the Raspberry Pi, check out and build the
workspace, and run the launch file. This spawns ROS 2 nodes that will read both
sensors, decide how to move the robot, and move the motors to accomplish the
line following and obstacle avoidance.</p>
<p>Finally, we took a deeper look into how ROS 2 packages and nodes are structured,
working up from the simplest example in the line sensor to a full controller
node with increasing search area to locate and follow a line, plus back away
from obstacles as they appear.</p>
<p>Give the code a try for yourself, and if you're feeling ready to challenge
yourself, try to add more parameters to configure the ROS 2 nodes.</p>]]></content>
        <author>
            <name>Michael Hart</name>
            <uri>https://mikelikesrobots.github.io</uri>
        </author>
        <category label="robotics" term="robotics"/>
        <category label="ros2" term="ros2"/>
        <category label="edukit" term="edukit"/>
    </entry>
    <entry>
        <title type="html"><![CDATA[Getting Started with ROS 2]]></title>
        <id>https://mikelikesrobots.github.io/blog/getting-started-ros-2</id>
        <link href="https://mikelikesrobots.github.io/blog/getting-started-ros-2"/>
        <updated>2025-01-24T00:00:00.000Z</updated>
        <summary type="html"><![CDATA[Many of the blogs on this site and the videos on [my YouTube]]></summary>
        <content type="html"><![CDATA[<p>Many of the blogs on this site and the videos on <a href="https://youtube.com/@mikelikesrobots" target="_blank" rel="noopener noreferrer" class="">my YouTube
channel</a> make use of ROS 2, but I have yet
to describe what ROS 2 is or why it's worth taking the time to learn. This
article is an entry level post on what ROS 2 is, the basic concepts, and why you
might want to learn it.</p>
<p>If you'd prefer to see this post in video form, please check the following link
for the YouTube video:</p>
<div class="video_jswG"><button type="button" class="poster_B6DH" aria-label="Play video: Getting Started with ROS 2"><img src="https://i.ytimg.com/vi/8aoFndU7jos/hqdefault.jpg" alt="" width="480" height="360" loading="lazy"><span class="play_lEvZ" aria-hidden="true">▶</span><span class="caption_yrhJ">Watch: <!-- -->Getting Started with ROS 2</span></button></div><noscript><p><a href="https://www.youtube.com/watch?v=8aoFndU7jos&amp;t=0">Watch <!-- -->Getting Started with ROS 2<!-- --> on YouTube</a></p></noscript>
<h2 class="anchor anchorTargetStickyNavbar_Vzrq" id="why-learn-ros-2-at-all">Why learn ROS 2 at all?<a href="https://mikelikesrobots.github.io/blog/getting-started-ros-2#why-learn-ros-2-at-all" class="hash-link" aria-label="Direct link to Why learn ROS 2 at all?" title="Direct link to Why learn ROS 2 at all?" translate="no">​</a></h2>
<p>ROS 2 provides a useful framework for structuring robotics applications, as well
as tools for interacting with robots and pre-built packages to provide
functionality. This framework and tool set make it easier and faster to write
robotics applications.</p>
<p>The more complex a robot application, the more it benefits from using a scalable
structure, which is what ROS 2 aims to provide. For example, a mobile robot that
needs a localization system to keep track of its position could use multiple
sensors at the same time. Writing one huge robot program with localization
buried inside it makes it increasingly hard to develop.</p>
<p>ROS 2 divides up chunks of software with different responsibilities into
different <code>nodes</code>, and allows <code>nodes</code> to communicate with each other. That means
our localization system can be its own <code>node</code> which uses data from the camera
<code>node</code>, the IMU <code>node</code>, and the wheel encoder <code>node</code>, with each sensor <code>node</code>
written separately.</p>
<div style="text-align:center"><p><img decoding="async" loading="lazy" alt="Localization node reads 3 sensors" src="https://mikelikesrobots.github.io/assets/images/localization-1359844ae2db550605277caa31526090.gif" width="651" height="776" class="img_ev3q"></p></div>
<p>Dividing up the software like this makes it much easier to scale up, add new
functionality (such as new sensors), and distribute parts of the robot software
across teams of engineers. It also makes it possible to inspect parts of the
robot system, such as what each node is doing, or how frequently data is being
read from a particular sensor.</p>
<p>It is not necessary to use ROS 2 to build scalable software. Many robotics
applications can be written as one large program, or follow their own pattern
for splitting up robot software. In fact, robotics companies frequently start
their software in ROS 2, then adapt it to their own custom system over time. It
is your choice whether to use it or not - but if you do, you will benefit from
the de facto standard robotics software, which is being actively worked on and
has a large, supportive community behind it.</p>
<h3 class="anchor anchorTargetStickyNavbar_Vzrq" id="ros-2s-predecessor-ros">ROS 2's Predecessor: ROS<a href="https://mikelikesrobots.github.io/blog/getting-started-ros-2#ros-2s-predecessor-ros" class="hash-link" aria-label="Direct link to ROS 2's Predecessor: ROS" title="Direct link to ROS 2's Predecessor: ROS" translate="no">​</a></h3>
<p>ROS 2 is the successor to ROS, which stands for Robot Operating System. Original
ROS had similar intentions to ROS 2 and proved very popular as a way to get a
robot working quickly, because of the framework and tools it provided, and
because it was free and open source software. ROS is still available for use,
but given it is no longer being actively developed, new applications should use
ROS 2.</p>
<p>ROS 2 takes the excellent starting point from ROS and improves upon the rest. For
a beginner, the changes are not obvious, as the interface and structure is
<em>mostly</em> the same. However, for intermediate level, having a new messaging
system and the ability to secure communications are just a couple of the
important improvements ROS 2 brings. All of this makes ROS 2 easy to recommend as
a starting point for hobby projects and professional developments alike.</p>
<p>The rest of this article will focus on ROS 2 only.</p>
<h2 class="anchor anchorTargetStickyNavbar_Vzrq" id="ros-2-for-beginners">ROS 2 For Beginners<a href="https://mikelikesrobots.github.io/blog/getting-started-ros-2#ros-2-for-beginners" class="hash-link" aria-label="Direct link to ROS 2 For Beginners" title="Direct link to ROS 2 For Beginners" translate="no">​</a></h2>
<p>Let's focus on a few major parts of ROS 2 in order to understand it.
Understanding the concepts here should be enough to get you started following
and understanding ROS 2 tutorials.</p>
<ul>
<li class=""><a href="https://mikelikesrobots.github.io/blog/getting-started-ros-2#messaging-system" class="">Messaging System</a>: how nodes in a ROS 2 network can
interact with one another</li>
<li class=""><a href="https://mikelikesrobots.github.io/blog/getting-started-ros-2#packages" class="">Packages</a>: how software is divided up into standalone units that
can be worked on separately</li>
<li class=""><a href="https://mikelikesrobots.github.io/blog/getting-started-ros-2#topics" class="">Tools</a>: how a ROS 2 user can inspect and interact with a running
application</li>
</ul>
<h3 class="anchor anchorTargetStickyNavbar_Vzrq" id="messaging-system">Messaging System<a href="https://mikelikesrobots.github.io/blog/getting-started-ros-2#messaging-system" class="hash-link" aria-label="Direct link to Messaging System" title="Direct link to Messaging System" translate="no">​</a></h3>
<p>The messaging system is the first major benefit of ROS 2. The idea is to divide
up pieces of code for a robotics application into separate <code>nodes</code>, where each
<code>node</code> runs in a separate process and communicates with other <code>nodes</code>
through messages.</p>
<p>For example, this means that a robot with a distance sensor might have one
<code>node</code> sending distance messages and another <code>node</code> that listens to those
messages to stop the robot if an obstacle is too close.</p>
<p>ROS 2 provides a large number of common message types for use in robotics, such
as an Image from a camera, or a Range measurement from a distance sensor. If
these aren't enough, you can also define your own message types, allowing you to
pass data around in a custom format.</p>
<p>Message passing comes in one of three main forms, explained in detail below:</p>
<ul>
<li class=""><a href="https://mikelikesrobots.github.io/blog/getting-started-ros-2#topics" class="">Topics</a>: publish/subscribe</li>
<li class=""><a href="https://mikelikesrobots.github.io/blog/getting-started-ros-2#services" class="">Services</a>: request/response</li>
<li class=""><a href="https://mikelikesrobots.github.io/blog/getting-started-ros-2#actions" class="">Actions</a>: request/feedback/response</li>
</ul>
<h4 class="anchor anchorTargetStickyNavbar_Vzrq" id="topics">Topics<a href="https://mikelikesrobots.github.io/blog/getting-started-ros-2#topics" class="hash-link" aria-label="Direct link to Topics" title="Direct link to Topics" translate="no">​</a></h4>
<p>Topics are the publish/subscribe model of ROS 2. Any node can publish data on any
topic it wants, as long as that topic is not already in use for a different
message type. Any number of nodes can publish to a particular topic.</p>
<p>On the other side, a node can subscribe to any topic it wants. To do so, a
subscriber says the topic it wants to subscribe to, the message type it is
expecting, and the code to call in case of a new message (a <code>callback</code>). Then,
whenever a new message comes in, the node's <code>callback</code> is called with the
message, allowing it to take action.</p>
<p>For instance, a robot trying to stop in front of obstacles may have two nodes:</p>
<ul>
<li class="">One node reading the distance sensors and publishing <code>Range</code> messages on the
<code>/distance</code> topic</li>
<li class="">One node subscribed to <code>Range</code> messages on the <code>/distance</code> topic with a
callback that stops the robot if the measured <code>Range</code> is too close</li>
</ul>
<p>This allows the robot to stop in front of an obstacle, but also allows any other
node that needs <code>Range</code> measurements to subscribe to the <code>/distance</code> topic as
well.</p>
<div style="text-align:center"><p><img decoding="async" loading="lazy" alt="Distance sensor messaging robot" src="https://mikelikesrobots.github.io/assets/images/two_node_system-cddc5ec70eca02d9e905e770d6d15393.gif" width="388" height="757" class="img_ev3q"></p></div>
<h4 class="anchor anchorTargetStickyNavbar_Vzrq" id="services">Services<a href="https://mikelikesrobots.github.io/blog/getting-started-ros-2#services" class="hash-link" aria-label="Direct link to Services" title="Direct link to Services" translate="no">​</a></h4>
<p>Services are the request/response model of ROS 2. In this model, any node can
offer a service to perform a particular action. Another node can send a message
to request that service; the first node will then perform the action and send
back a response message.</p>
<p>For example, a robot arm with a gripper attachment might offer a service to
close or open the gripper. Another node can request this service, which causes
the gripper to open or close, then receives a response to its request.</p>
<pre tabindex="0" class="codeBlockStandalone_MEMb thin-scrollbar codeBlockContainer_Ckt0 theme-code-block" style="--prism-color:#393A34;--prism-background-color:#f6f8fa"><code class="codeBlockLines_e6Vv"><p>Main Robot -&gt; Gripper: <b style="color:red">[Request ]</b> close gripper
Gripper -&gt; Main Robot: <b style="color:#4298f5">[Response]</b> gripper closed successfully</p></code></pre>
<p>This method makes more sense when a node needs a response to its request before
proceeding. In this example, the robot wants to completely grip an object before
trying to move it, so it should wait for the response saying that the gripper is
closed before moving any further.</p>
<h4 class="anchor anchorTargetStickyNavbar_Vzrq" id="actions">Actions<a href="https://mikelikesrobots.github.io/blog/getting-started-ros-2#actions" class="hash-link" aria-label="Direct link to Actions" title="Direct link to Actions" translate="no">​</a></h4>
<p>Actions are very similar to services, except that they can optionally provide
feedback before sending the final response back to the caller. Therefore, a node
calling an Action will send a Request, receive some Feedback messages, then
receive a final Response message.</p>
<p>In the gripper example from the previous section, the node controlling the
gripper could offer an Action to close the gripper instead of the service. The
Action would send feedback messages with the gripper's current width while it is
closing. The Action might go something like this:</p>
<pre tabindex="0" class="codeBlockStandalone_MEMb thin-scrollbar codeBlockContainer_Ckt0 theme-code-block" style="--prism-color:#393A34;--prism-background-color:#f6f8fa"><code class="codeBlockLines_e6Vv"><p>Main Robot -&gt; Gripper: <b style="color:red">[Request ]</b> close gripper
Gripper -&gt; Main Robot: <b style="color:green">[Feedback]</b> gripper is 8cm apart
Gripper -&gt; Main Robot: <b style="color:green">[Feedback]</b> gripper is 6cm apart
Gripper -&gt; Main Robot: <b style="color:green">[Feedback]</b> gripper is 4cm apart
Gripper -&gt; Main Robot: <b style="color:green">[Feedback]</b> gripper is 2cm apart
Gripper -&gt; Main Robot: <b style="color:green">[Feedback]</b> gripper is 0cm apart
Gripper -&gt; Main Robot: <b style="color:#4298f5">[Response]</b> gripper closed successfully</p></code></pre>
<p>In this way, a node can act upon its feedback while the action is being
performed. This allows the node calling the Action to perform related work; for
example, while navigating along a path, a node could take camera snapshots and
label them with the point along the route they came from.</p>
<h3 class="anchor anchorTargetStickyNavbar_Vzrq" id="packages">Packages<a href="https://mikelikesrobots.github.io/blog/getting-started-ros-2#packages" class="hash-link" aria-label="Direct link to Packages" title="Direct link to Packages" translate="no">​</a></h3>
<p>ROS 2 packages are the next major part of ROS 2 to understand. Packages help
divide up code into different folders, where each package contains one or more
nodes. This helps engineers to keep track of where each part of the robot's code
is.</p>
<p>This has an extra advantage. By splitting up code into different packages, it is
possible to make your code reusable by other people - or reuse code written by
other people. For example, to move a robot arm, you could use the ROS 2 package
provided by the arm manufacturer instead of writing your own, saving you time developing and debugging your own.</p>
<p>Given ROS 2's popularity, there are a lot of packages available that you can use
for yourself. All you have to do is install the package onto your system (or
copy it into your ROS 2 workspace) and you can take advantage of new
functionality. For example, you can use
<a href="https://moveit.picknik.ai/main/index.html" target="_blank" rel="noopener noreferrer" class="">MoveIt</a> to get access to motion
planning, manipulation, 3D perception, kinematics, control, and navigation.</p>
<h3 class="anchor anchorTargetStickyNavbar_Vzrq" id="tools">Tools<a href="https://mikelikesrobots.github.io/blog/getting-started-ros-2#tools" class="hash-link" aria-label="Direct link to Tools" title="Direct link to Tools" translate="no">​</a></h3>
<p>The final major benefit of ROS 2 is the tools provided by it. By building or
installing ROS 2, you get access to tools that can help you inspect and interact
with your robot. A few of the major tools are as follows:</p>
<ul>
<li class=""><strong>Recording</strong>: ROS 2 provides rosbags, which is a way of subscribing to topics
and recording that data into a large file, or rosbag. This bag file can later
be replayed to produce the same data again.</li>
<li class=""><strong>Logging</strong>: ROS 2 allows nodes to log information as they run, which can then
be recorded to see what happened to the robot as it ran, or viewed live using
log viewers.</li>
<li class=""><strong>Visualization</strong>: desktop applications can subscribe to topics, allowing for
visualization tools to exist. For example, <code>rqt</code> can visualize topics and is
commonly used to view a robot and its environment, even allowing the user to
set a goal position for the robot - which actually controls the robot.</li>
<li class=""><strong>Transformations</strong>: ROS 2 provides libraries for managing transformations
between different parts of the robot. For example, the camera and gripper may
be in different places, so if you spot an object you want to pick up from the
camera, you need to <strong>transform</strong> that position to the gripper's frame of
reference.</li>
</ul>
<p>Between these tools, you can investigate the data being passed around on the
robot live and from recording, check what your nodes are reporting in logs as
they are working, and visualize your full robot and its environment - even
sending navigation targets for your robot to move to.</p>
<h2 class="anchor anchorTargetStickyNavbar_Vzrq" id="a-practical-example">A Practical Example<a href="https://mikelikesrobots.github.io/blog/getting-started-ros-2#a-practical-example" class="hash-link" aria-label="Direct link to A Practical Example" title="Direct link to A Practical Example" translate="no">​</a></h2>
<p>Let's take a look at a practical example - <a href="https://clearpathrobotics.com/turtlebot-4/" target="_blank" rel="noopener noreferrer" class="">the TurtleBot
4</a>. This is an autonomous robot with
a large list of sensors, designed to be used as an educational platform for
ROS 2. The site lists the following sensors available:</p>
<ul>
<li class="">2D Lidar</li>
<li class="">Stereo camera</li>
<li class="">IMU</li>
<li class="">Floor tracking sensor</li>
<li class="">Wheel encoders</li>
<li class="">Cliff sensors</li>
<li class="">Bump sensor</li>
<li class="">Slip detection</li>
<li class="">...</li>
</ul>
<p>The robot is here, to give you an idea of everything sitting on top:</p>
<figure><p><img decoding="async" loading="lazy" alt="TurtleBot 4" src="https://mikelikesrobots.github.io/assets/images/turtlebot4-6a11a0ff152fcbb06aec149b3c7c33ab.webp" width="789" height="980" class="img_ev3q">
</p><figcaption>TurtleBot 4 Render - <a href="https://turtlebot.github.io/turtlebot4-user-manual/overview/features.html" target="_blank" rel="noopener noreferrer" class="">TurtleBot 4 User Manual</a></figcaption><p></p></figure>
<p>In this case, we want to use this robot to build a map of a house. We need to
write code to read sensors, move the wheels, and build up a map of the house as
the robot explores it (commonly known as <a href="https://en.wikipedia.org/wiki/Simultaneous_localization_and_mapping" target="_blank" rel="noopener noreferrer" class="">SLAM: Simultaneous Localization and
Mapping</a>).</p>
<p>All of our sensors are likely to be useful for this application to some degree.
Bump sensors can help find the exact wall location, wheel encoders and IMU can
help with keeping track of our position, the cliff sensors make sure we don't
fall off anything. However, that's a lot of sensors to write code for, and a lot
of sensor data to make use of - and that's before we even get to the SLAM
algorithm!</p>
<p>That is a lot of code to write. Writing one large file to control the robot will
be hard to develop and keep track of, especially if multiple people are working
together on it. This is where using ROS 2 would be very helpful to us - we can
write separate nodes for each type of sensor, a node to control moving the
wheels, and one or more nodes to define the behaviour of the robot.</p>
<p>But, it gets better than that. As mentioned, the TurtleBot is an educational
platform for ROS 2. There are already packages for driving the robot and taking
data from its sensors, and for navigation there is a ROS 2 package called
<a href="https://docs.nav2.org/" target="_blank" rel="noopener noreferrer" class="">Nav2</a>. Between these packages, our robot application
stops being a huge file and instead becomes a collection of pre-built packages,
plus some custom code we write to tie it all together and launch it! There is
still have some development to do, but so much of the heavy lifting has been
done already.</p>
<p>We won't always be so lucky when building robots. Most of the time, the robot
will need some custom code for driving the motors and possibly some sensors. If
done correctly, these can still tie in to the rest of the ROS 2 ecosystem, like
the Nav2 package. If you're interested in the code for driving motors, take a
look at my <a class="" href="https://mikelikesrobots.github.io/blog/jetbot-motors-pt2"><code>ros2_control</code></a> post, which goes in-depth
on how to build ROS 2 code to drive motors.</p>
<h2 class="anchor anchorTargetStickyNavbar_Vzrq" id="how-do-i-get-started">How Do I Get Started?<a href="https://mikelikesrobots.github.io/blog/getting-started-ros-2#how-do-i-get-started" class="hash-link" aria-label="Direct link to How Do I Get Started?" title="Direct link to How Do I Get Started?" translate="no">​</a></h2>
<p>Having explained what ROS 2 is, why you might want to learn it, and some of the
major components, you are hopefully ready to learn it for yourself. If so, great
news! ROS 2 has extensive information on how to get up and running, including a
<a href="https://docs.ros.org/en/jazzy/Tutorials.html" target="_blank" rel="noopener noreferrer" class="">whole set of tutorials</a> that use
their <code>turtlesim</code> software to let you try out anything you like without even
needing a robot of your own.</p>
<p>Further to this, ROS 2 is a very popular framework for robotics, meaning that
there are a lot of resources available online for it - including on <a class="" href="https://mikelikesrobots.github.io/blog/tags/ros-2">my own
blog</a>.</p>
<p>If you're looking for a challenge, and to build your own robot, take a look at
the <a class="" href="https://mikelikesrobots.github.io/blog/camjam-edukit">CamJam Edukit post</a>. You can buy your own kit for a
surprisingly low cost and have a go at building it for yourself. I will have a
new post and video up very soon on how to run this post with ROS 2, and I will
update this post once it's published - or you can subscribe to the YouTube
channel to get notified when it's out.</p>
<p>Good luck on your ROS 2 journey!</p>]]></content>
        <author>
            <name>Michael Hart</name>
            <uri>https://mikelikesrobots.github.io</uri>
        </author>
        <category label="robotics" term="robotics"/>
        <category label="ros2" term="ros2"/>
    </entry>
    <entry>
        <title type="html"><![CDATA[AWS IoT Greengrass: Concepts and Components!]]></title>
        <id>https://mikelikesrobots.github.io/blog/greengrass-concepts-components</id>
        <link href="https://mikelikesrobots.github.io/blog/greengrass-concepts-components"/>
        <updated>2025-01-07T00:00:00.000Z</updated>
        <summary type="html"><![CDATA[AWS IoT Greengrass, or Greengrass for short, is a way of deploying software to]]></summary>
        <content type="html"><![CDATA[<p>AWS IoT Greengrass, or Greengrass for short, is a way of deploying software to
an edge device, like a server on a factory floor, and managing the lifecycle of
that software. From the cloud you can configure the software that is deployed
to the edge and how that software is configured, as well as build your own
software to be deployed by Greengrass.</p>
<p>There are three parts: building and deploying <a class="" href="https://mikelikesrobots.github.io/blog/greengrass-concepts-components#building-a-component">software
applications</a>, the device(s) that those applications are
being deployed to, and the <a class="" href="https://mikelikesrobots.github.io/blog/greengrass-concepts-components#management-service">management service</a> doing the
deployment. This post goes over each part to explain how Greengrass as a whole
works, and how you can try it out for yourself.</p>
<p><em>This post was originally published as a video, but given how many people it has
helped, converting it to a blog post made sense. If you prefer video format,
click below.</em></p>
<div class="video_jswG"><button type="button" class="poster_B6DH" aria-label="Play video: AWS IoT Greengrass: Concepts and Components!"><img src="https://i.ytimg.com/vi/2VXIILtiMiU/hqdefault.jpg" alt="" width="480" height="360" loading="lazy"><span class="play_lEvZ" aria-hidden="true">▶</span><span class="caption_yrhJ">Watch: <!-- -->AWS IoT Greengrass: Concepts and Components!</span></button></div><noscript><p><a href="https://www.youtube.com/watch?v=2VXIILtiMiU&amp;t=0">Watch <!-- -->AWS IoT Greengrass: Concepts and Components!<!-- --> on YouTube</a></p></noscript>
<h2 class="anchor anchorTargetStickyNavbar_Vzrq" id="management-service">Management Service<a href="https://mikelikesrobots.github.io/blog/greengrass-concepts-components#management-service" class="hash-link" aria-label="Direct link to Management Service" title="Direct link to Management Service" translate="no">​</a></h2>
<p>The management service is the part of Greengrass running in the AWS cloud. In
the AWS console, there are 3 subheadings under Greengrass devices that show the
main concepts of the management service:</p>
<ul>
<li class=""><a href="https://mikelikesrobots.github.io/blog/greengrass-concepts-components#core-devices" class="">Core devices</a></li>
<li class=""><a href="https://mikelikesrobots.github.io/blog/greengrass-concepts-components#components" class="">Components</a></li>
<li class=""><a href="https://mikelikesrobots.github.io/blog/greengrass-concepts-components#components" class="">Deployments</a></li>
</ul>
<p><img decoding="async" loading="lazy" alt="Greengrass menu options in AWS Console" src="https://mikelikesrobots.github.io/assets/images/greengrass-menu-cbd89362ea56a8ef9ece6aca3ac0f09d.webp" width="327" height="567" class="img_ev3q"></p>
<h3 class="anchor anchorTargetStickyNavbar_Vzrq" id="core-devices">Core Devices<a href="https://mikelikesrobots.github.io/blog/greengrass-concepts-components#core-devices" class="hash-link" aria-label="Direct link to Core Devices" title="Direct link to Core Devices" translate="no">​</a></h3>
<p>Each core device is a server or device at the edge which has been registered
with Greengrass as a core device by the Nucleus software. In the console,
clicking core devices will go to a list of all the core devices registered with
the account.</p>
<p><img decoding="async" loading="lazy" alt="Empty list of core devices" src="https://mikelikesrobots.github.io/assets/images/core-devices-list-a1e83d6b190233e738949f39d732acd9.webp" width="1079" height="305" class="img_ev3q"></p>
<p>The Nucleus is software deployed to all core devices. It is responsible for
registering a device as a core device, managing the lifecycles of all software
deployed to that device, and reporting the device status back to the cloud.</p>
<p>Clicking on any core device brings up more information about that device, such
as its corresponding IoT Thing name, its status, logs, platform, and installed
components. It also has a list of <a href="https://mikelikesrobots.github.io/blog/greengrass-concepts-components#deployments" class="">deployments</a>, as each core
device can have multiple <a href="https://mikelikesrobots.github.io/blog/greengrass-concepts-components#deployments" class="">deployments</a>.</p>
<p><img decoding="async" loading="lazy" alt="Demo Core Device information page" src="https://mikelikesrobots.github.io/assets/images/demo-core-device-16eb01d48c0d44b8fb3245b992c6614f.webp" width="1082" height="411" class="img_ev3q"></p>
<h3 class="anchor anchorTargetStickyNavbar_Vzrq" id="deployments">Deployments<a href="https://mikelikesrobots.github.io/blog/greengrass-concepts-components#deployments" class="hash-link" aria-label="Direct link to Deployments" title="Direct link to Deployments" translate="no">​</a></h3>
<p>A deployment is a group of <a href="https://mikelikesrobots.github.io/blog/greengrass-concepts-components#components" class="">components</a>, with specific version
numbers and configuration per component. When a deployment is created or
revised, the information in that deployment is sent to a core device. The core
device can then download any new <a href="https://mikelikesrobots.github.io/blog/greengrass-concepts-components#components" class="">components</a> it needs, start and
stop software as needed, and apply new configuration as instructed by the
deployment.</p>
<p>In the console, opening a deployment shows its status, time of creation, and
list of <a href="https://mikelikesrobots.github.io/blog/greengrass-concepts-components#components" class="">components</a> within the deployment. Each component is
listed with the version in the deployment. There are bullet points by each
component to allow you to select that component and view its configuration. In
the custom component built for this post, the message has been changed to
"YouTube".</p>
<p><img decoding="async" loading="lazy" alt="List of Greengrass deployments" src="https://mikelikesrobots.github.io/assets/images/greengrass-deployments-48c7f4f6ecc8236692d4dda873b6557e.webp" width="1116" height="320" class="img_ev3q"></p>
<h3 class="anchor anchorTargetStickyNavbar_Vzrq" id="components">Components<a href="https://mikelikesrobots.github.io/blog/greengrass-concepts-components#components" class="hash-link" aria-label="Direct link to Components" title="Direct link to Components" translate="no">​</a></h3>
<p>A component is a defined bundle of software and the configuration needed to
manage and run that software.</p>
<p>There are 3 types of components available from the Components list in the
Console:</p>
<ul>
<li class="">My components</li>
<li class="">Public components</li>
<li class="">Community components</li>
</ul>
<p><strong>My components</strong> are the components that a user has built and uploaded to their
AWS account. This means that you can build your own Greengrass components from
scratch and make use of Greengrass to deploy and configure it to any <a href="https://mikelikesrobots.github.io/blog/greengrass-concepts-components#core-devices" class="">core
devices</a>.</p>
<p><img decoding="async" loading="lazy" alt="Custom Greengrass components in account and region" src="https://mikelikesrobots.github.io/assets/images/my-greengrass-components-9443d9697c33fc829663a613d02ce8bd.webp" width="891" height="445" class="img_ev3q"></p>
<p><strong>Public components</strong> are <a href="https://docs.aws.amazon.com/greengrass/v2/developerguide/public-components.html" target="_blank" rel="noopener noreferrer" class="">components made available by
AWS</a>
directly. There is a long and growing list of components available here: a few
examples are a Secrets Manager, for deploying Secrets to the device in a secure
way; the MQTT bridge, which allows MQTT message passing from cloud to device and
back; and Secure Tunneling, which allows a user to create an SSH tunnel from the
cloud to the core device.</p>
<p><img decoding="async" loading="lazy" alt="Public Greengrass components" src="https://mikelikesrobots.github.io/assets/images/public-greengrass-components-0895a88a7f2861ef00fa03cc67b8977f.webp" width="876" height="673" class="img_ev3q"></p>
<p>Finally, <strong>Community components</strong> are a list of components that the Greengrass
team keeps track of that you can build and upload to your own account, then
deploy to your own devices, just as with <strong>My components</strong>.</p>
<h3 class="anchor anchorTargetStickyNavbar_Vzrq" id="management-service-summary">Management Service Summary<a href="https://mikelikesrobots.github.io/blog/greengrass-concepts-components#management-service-summary" class="hash-link" aria-label="Direct link to Management Service Summary" title="Direct link to Management Service Summary" translate="no">​</a></h3>
<p>Overall, the cloud service is responsible for tracking <a href="https://mikelikesrobots.github.io/blog/greengrass-concepts-components#core-devices" class="">core
devices</a> registered with Greengrass and managing
<a href="https://mikelikesrobots.github.io/blog/greengrass-concepts-components#deployments" class="">deployments</a> for those devices. Each deployment is a list of
<a href="https://mikelikesrobots.github.io/blog/greengrass-concepts-components#components" class="">components</a> with the exact version and configuration to be
deployed. Components are the bundles of software and configuration that can be
deployed to devices, which can be built by yourself (manually or from open
source) or supplied by AWS.</p>
<h2 class="anchor anchorTargetStickyNavbar_Vzrq" id="core-device-demonstration">Core Device Demonstration<a href="https://mikelikesrobots.github.io/blog/greengrass-concepts-components#core-device-demonstration" class="hash-link" aria-label="Direct link to Core Device Demonstration" title="Direct link to Core Device Demonstration" translate="no">​</a></h2>
<p>To demonstrate setting up a core device for Greengrass, I'll use an EC2
instance. Feel free to follow along, although I wrote this as a demo rather than
a lab; some steps may be missing.</p>
<p>You can follow the documentation at <a href="https://docs.aws.amazon.com/greengrass/v2/developerguide/install-greengrass-core-v2.html" target="_blank" rel="noopener noreferrer" class="">Install the AWS IoT Greengrass Core
software</a>,
but I refer to instructions from the <a href="https://docs.aws.amazon.com/greengrass/v2/developerguide/quick-installation.html" target="_blank" rel="noopener noreferrer" class="">automatic
provisioning</a>
link.</p>
<h3 class="anchor anchorTargetStickyNavbar_Vzrq" id="provision-ec2-instance">Provision EC2 Instance<a href="https://mikelikesrobots.github.io/blog/greengrass-concepts-components#provision-ec2-instance" class="hash-link" aria-label="Direct link to Provision EC2 Instance" title="Direct link to Provision EC2 Instance" translate="no">​</a></h3>
<p>First, I'm provisioning an EC2 isntance with these settings:</p>
<ul>
<li class="">Name: Greengrass Server</li>
<li class="">AMI: Amazon Linux 2023 AMI</li>
<li class="">Region: us-east-1</li>
<li class="">Instance type: t2.micro</li>
<li class="">Key pair: Proceed without</li>
<li class="">Network: Any security group that allows port 22</li>
<li class="">Storage: 30GiB gp3</li>
<li class="">Number of instances: 1</li>
</ul>
<p><img decoding="async" loading="lazy" alt="Summary section for EC2 instance launch" src="https://mikelikesrobots.github.io/assets/images/provision-ec2-ec9f317b263bf1fdd2231614e681e361.webp" width="1233" height="801" class="img_ev3q"></p>
<p>It's important that the machine has AWS CLI permissions for Greengrass to
install itself correctly. I'm doing this by creating a role for EC2 with
AdministratorAccess permissions and assigning it to the instance.</p>
<h3 class="anchor anchorTargetStickyNavbar_Vzrq" id="install-greengrass-dependencies">Install Greengrass Dependencies<a href="https://mikelikesrobots.github.io/blog/greengrass-concepts-components#install-greengrass-dependencies" class="hash-link" aria-label="Direct link to Install Greengrass Dependencies" title="Direct link to Install Greengrass Dependencies" translate="no">​</a></h3>
<p>With the instance up, I use Instance Connect to get a command line. I then
install Java using the following command:</p>
<div class="language-bash codeBlockContainer_Ckt0 theme-code-block" style="--prism-color:#393A34;--prism-background-color:#f6f8fa"><div class="codeBlockContent_QJqH"><pre tabindex="0" class="prism-code language-bash codeBlock_bY9V thin-scrollbar" style="color:#393A34;background-color:#f6f8fa"><code class="codeBlockLines_e6Vv"><div class="token-line" style="color:#393A34"><span class="token plain">sudo dnf install java-11-amazon-corretto -y</span><br></div></code></pre></div></div>
<h3 class="anchor anchorTargetStickyNavbar_Vzrq" id="install-greengrass-core">Install Greengrass Core<a href="https://mikelikesrobots.github.io/blog/greengrass-concepts-components#install-greengrass-core" class="hash-link" aria-label="Direct link to Install Greengrass Core" title="Direct link to Install Greengrass Core" translate="no">​</a></h3>
<p>There are a few ways to install Greengrass Core, but I tend to copy the
installation commands from the console. Other ways are listed in the <a href="https://docs.aws.amazon.com/greengrass/v2/developerguide/quick-installation.html" target="_blank" rel="noopener noreferrer" class="">automatic
provisioning</a>
instructions.</p>
<p>In the Console, I navigate to Core Devices, then click Set up one Greengrass
core device. I'm leaving the name as it is, selecting no group, and leaving
Linux as the selected Operating System.</p>
<p>For device setup method, I select "Set up a device by downloading and running an
installer locally on device".</p>
<p>Credentials are already be configured from the <a href="https://mikelikesrobots.github.io/blog/greengrass-concepts-components#provision-ec2-instance" class="">provisioning
step</a>, so I just run the "Download the installer" and
"Run the installer" commands one at a time to deploy the software.</p>
<div class="theme-admonition theme-admonition-note admonition_xJq3 alert alert--secondary"><div class="admonitionHeading_Gvgb"><span class="admonitionIcon_Rf37"><svg viewBox="0 0 14 16"><path fill-rule="evenodd" d="M6.3 5.69a.942.942 0 0 1-.28-.7c0-.28.09-.52.28-.7.19-.18.42-.28.7-.28.28 0 .52.09.7.28.18.19.28.42.28.7 0 .28-.09.52-.28.7a1 1 0 0 1-.7.3c-.28 0-.52-.11-.7-.3zM8 7.99c-.02-.25-.11-.48-.31-.69-.2-.19-.42-.3-.69-.31H6c-.27.02-.48.13-.69.31-.2.2-.3.44-.31.69h1v3c.02.27.11.5.31.69.2.2.42.31.69.31h1c.27 0 .48-.11.69-.31.2-.19.3-.42.31-.69H8V7.98v.01zM7 2.3c-3.14 0-5.7 2.54-5.7 5.68 0 3.14 2.56 5.7 5.7 5.7s5.7-2.55 5.7-5.7c0-3.15-2.56-5.69-5.7-5.69v.01zM7 .98c3.86 0 7 3.14 7 7s-3.14 7-7 7-7-3.12-7-7 3.14-7 7-7z"></path></svg></span>note</div><div class="admonitionContent_BuS1"><p>Greengrass groups are a way of deploying the same deployment to multiple devices
in the same group at once.</p></div></div>
<p>These commands will download a software bundle to install the core device, then
run the bundle. The bundle creates users and permissions both locally and in the
cloud to correctly function, and starts the Nucleus component.</p>
<p><img decoding="async" loading="lazy" alt="Commands to set up an example Greengrass server" src="https://mikelikesrobots.github.io/assets/images/copy-installer-a710e3392396f9bbd8c8514142d3f86b.webp" width="1012" height="352" class="img_ev3q"></p>
<h3 class="anchor anchorTargetStickyNavbar_Vzrq" id="check-core-devices">Check Core Devices<a href="https://mikelikesrobots.github.io/blog/greengrass-concepts-components#check-core-devices" class="hash-link" aria-label="Direct link to Check Core Devices" title="Direct link to Check Core Devices" translate="no">​</a></h3>
<p>With installation complete, the new core device appears in the list. If I click
that device and go to the deployments, there is one deployment available. The
deployment lists only the Cli component to be installed, and it has a
Device status of Healthy and a Deployment status of Active (soon to become
Completed).</p>
<p><img decoding="async" loading="lazy" alt="Active deployment for example device" src="https://mikelikesrobots.github.io/assets/images/active-deployment-a5bacd614cb42e7a4354bbae87560ce0.webp" width="834" height="498" class="img_ev3q"></p>
<p>An Active status means that software is still being deployed to the device.
Completed means a successful deployment.</p>
<p>If we look at the core device again, it now lists several components, rather
than just the Cli. The Cli depends on a few components to work correctly, and
Greengrass will automatically install these dependencies for you.</p>
<p><img decoding="async" loading="lazy" alt="Components installed by default deployment" src="https://mikelikesrobots.github.io/assets/images/default-deployed-components-6114d2a84eb698671bd149049250eb2c.webp" width="801" height="423" class="img_ev3q"></p>
<h3 class="anchor anchorTargetStickyNavbar_Vzrq" id="revise-the-deployment">Revise the Deployment<a href="https://mikelikesrobots.github.io/blog/greengrass-concepts-components#revise-the-deployment" class="hash-link" aria-label="Direct link to Revise the Deployment" title="Direct link to Revise the Deployment" translate="no">​</a></h3>
<p>With the Cli installed on the new core device, it's time to deploy another
component. This is done by revising the deployment. In the deployment screen,
I select the Actions drop-down in the top right and click Revise.</p>
<p><img decoding="async" loading="lazy" alt="Revise deployment button" src="https://mikelikesrobots.github.io/assets/images/revise-deployment-fe2605a928ec9949463701371815b6ff.webp" width="822" height="500" class="img_ev3q"></p>
<p>For the Select components screen, there are two tables available. The first is
My components, which contains all of your custom components. Tick the custom
component from this section.</p>
<p>There are also Public components. Only Cli will be visible here; to see other
available components, uncheck the Show only selected components button.</p>
<p><img decoding="async" loading="lazy" alt="Add custom component to deployment" src="https://mikelikesrobots.github.io/assets/images/add-my-component-b87fd23a84313af3184f516323451762.webp" width="822" height="929" class="img_ev3q"></p>
<p>The next screen is for configuring components. I'm configuring the Hello World
component by checking the circle by it and clicking Configure component. This
shows the default configuration, the configuration paths to reset (clearing that
configuration), and the configuration to merge (adding that configuration). For
more information, see the <a href="https://mikelikesrobots.github.io/blog/greengrass-concepts-components#the-recipe" class="">recipe section</a> later in this post.</p>
<p><img decoding="async" loading="lazy" alt="Screen controls to configure component" src="https://mikelikesrobots.github.io/assets/images/configure-my-component-dd13515ca7bf251f4eb6c29303a44e61.webp" width="860" height="452" class="img_ev3q"></p>
<p>I add a new line in the Configuration to merge section:</p>
<div class="language-json codeBlockContainer_Ckt0 theme-code-block" style="--prism-color:#393A34;--prism-background-color:#f6f8fa"><div class="codeBlockContent_QJqH"><pre tabindex="0" class="prism-code language-json codeBlock_bY9V thin-scrollbar" style="color:#393A34;background-color:#f6f8fa"><code class="codeBlockLines_e6Vv"><div class="token-line" style="color:#393A34"><span class="token plain">{</span><br></div><div class="token-line" style="color:#393A34"><span class="token plain">    "Message": "Your Message Here"</span><br></div><div class="token-line" style="color:#393A34"><span class="token plain">}</span><br></div></code></pre></div></div>
<p><img decoding="async" loading="lazy" alt="Custom component with altered configuration" src="https://mikelikesrobots.github.io/assets/images/configured-custom-component-22aabde50d8144c766222912fae14b65.webp" width="596" height="663" class="img_ev3q"></p>
<p>Then I click Confirm and go to the next screen. This is advanced settings, which
you are welcome to explore, but is out of scope for this post. Again, I click
Next to go to the next screen.</p>
<p>Finally, I double-check the deployment on the Review screen, and click Confirm
to start the deployment. Again, I have to wait for the deployment to complete.</p>
<div class="theme-admonition theme-admonition-note admonition_xJq3 alert alert--secondary"><div class="admonitionHeading_Gvgb"><span class="admonitionIcon_Rf37"><svg viewBox="0 0 14 16"><path fill-rule="evenodd" d="M6.3 5.69a.942.942 0 0 1-.28-.7c0-.28.09-.52.28-.7.19-.18.42-.28.7-.28.28 0 .52.09.7.28.18.19.28.42.28.7 0 .28-.09.52-.28.7a1 1 0 0 1-.7.3c-.28 0-.52-.11-.7-.3zM8 7.99c-.02-.25-.11-.48-.31-.69-.2-.19-.42-.3-.69-.31H6c-.27.02-.48.13-.69.31-.2.2-.3.44-.31.69h1v3c.02.27.11.5.31.69.2.2.42.31.69.31h1c.27 0 .48-.11.69-.31.2-.19.3-.42.31-.69H8V7.98v.01zM7 2.3c-3.14 0-5.7 2.54-5.7 5.68 0 3.14 2.56 5.7 5.7 5.7s5.7-2.55 5.7-5.7c0-3.15-2.56-5.69-5.7-5.69v.01zM7 .98c3.86 0 7 3.14 7 7s-3.14 7-7 7-7-3.12-7-7 3.14-7 7-7z"></path></svg></span>note</div><div class="admonitionContent_BuS1"><p>If you are following along using the component from the <a href="https://mikelikesrobots.github.io/blog/greengrass-concepts-components#building-a-component" class="">Building a
Component</a> section, make sure you <a href="https://docs.aws.amazon.com/greengrass/v2/developerguide/device-service-role.html" target="_blank" rel="noopener noreferrer" class="">Authorize core devices
to interact with AWS
services</a>
- in this case, Greengrass needs to be able to download components from your S3
bucket.</p></div></div>
<h3 class="anchor anchorTargetStickyNavbar_Vzrq" id="debugging-deployment-failures">Debugging Deployment Failures<a href="https://mikelikesrobots.github.io/blog/greengrass-concepts-components#debugging-deployment-failures" class="hash-link" aria-label="Direct link to Debugging Deployment Failures" title="Direct link to Debugging Deployment Failures" translate="no">​</a></h3>
<p>The component fails to deploy, causing the deployment status to become Failed.
In this case, we need to take a look at the device to figure out what went
wrong.</p>
<p><img decoding="async" loading="lazy" alt="Deployment with failed status" src="https://mikelikesrobots.github.io/assets/images/failed-deployment-339f5861f1afe3732e6376e5ce1d8ed5.webp" width="870" height="376" class="img_ev3q"></p>
<p>I go back to the Instance Connect screen. Unless you've changed the installation
path, logs will be stored in <code>/greengrass/v2/logs</code>. I use <code>vim</code> as <code>sudo</code> user
to access this folder, as it is protected against your normal user.</p>
<div class="language-bash codeBlockContainer_Ckt0 theme-code-block" style="--prism-color:#393A34;--prism-background-color:#f6f8fa"><div class="codeBlockContent_QJqH"><pre tabindex="0" class="prism-code language-bash codeBlock_bY9V thin-scrollbar" style="color:#393A34;background-color:#f6f8fa"><code class="codeBlockLines_e6Vv"><div class="token-line" style="color:#393A34"><span class="token plain">sudo vim /greengrass/v2/logs</span><br></div></code></pre></div></div>
<p>Here we can see all the logs available. The <code>greengrass.log</code> file contains the
log for the Nucleus software, and often contains errors to do with deployment
failures. However, in this case, the error will be in the component's log file,
<code>com.mike.HelloWorld.log</code>.</p>
<div class="language-bash codeBlockContainer_Ckt0 theme-code-block" style="--prism-color:#393A34;--prism-background-color:#f6f8fa"><div class="codeBlockContent_QJqH"><pre tabindex="0" class="prism-code language-bash codeBlock_bY9V thin-scrollbar" style="color:#393A34;background-color:#f6f8fa"><code class="codeBlockLines_e6Vv"><div class="token-line" style="color:#393A34"><span class="token plain">../</span><br></div><div class="token-line" style="color:#393A34"><span class="token plain">./</span><br></div><div class="token-line" style="color:#393A34"><span class="token plain">aws.greengrass.Nucleus.log</span><br></div><div class="token-line" style="color:#393A34"><span class="token plain">com.mike.HelloWorld.log</span><br></div><div class="token-line" style="color:#393A34"><span class="token plain">greengrass.log</span><br></div><div class="token-line" style="color:#393A34"><span class="token plain">loader.log</span><br></div><div class="token-line" style="color:#393A34"><span class="token plain">main.log</span><br></div></code></pre></div></div>
<p>Within this log file, we can see that <code>pip</code> was not found as a program on the
system. The component uses <code>pip</code> to install dependencies, but it is not
installed by default.</p>
<div class="language-log codeBlockContainer_Ckt0 theme-code-block" style="--prism-color:#393A34;--prism-background-color:#f6f8fa"><div class="codeBlockContent_QJqH"><pre tabindex="0" class="prism-code language-log codeBlock_bY9V thin-scrollbar" style="color:#393A34;background-color:#f6f8fa"><code class="codeBlockLines_e6Vv"><div class="token-line" style="color:#393A34"><span class="token plain">2025-01-09T16:50:22.098Z [WARN] (Copier) com.mike.HelloWorld: stderr. /usr/bin/python3: No module named pip. {scriptName=services.com.mike.HelloWorld.lifecycle.Install, serviceName=com.mike.HelloWorld, currentState=NEW}</span><br></div><div class="token-line" style="color:#393A34"><span class="token plain">2025-01-09T16:50:22.106Z [WARN] (pool-3-thread-27) com.mike.HelloWorld: shell-runner-error. {scriptName=services.com.mike.HelloWorld.lifecycle.Install, serviceName=com.mike.HelloWorld, currentState=NEW, command=["python3 -m pip install virtualenv &amp;&amp; python3 -m virtualenv venv &amp;&amp; source ./ve..."]}</span><br></div></code></pre></div></div>
<p>We need to install <code>pip</code>:</p>
<div class="language-bash codeBlockContainer_Ckt0 theme-code-block" style="--prism-color:#393A34;--prism-background-color:#f6f8fa"><div class="codeBlockContent_QJqH"><pre tabindex="0" class="prism-code language-bash codeBlock_bY9V thin-scrollbar" style="color:#393A34;background-color:#f6f8fa"><code class="codeBlockLines_e6Vv"><div class="token-line" style="color:#393A34"><span class="token plain">sudo dnf install -y python3-pip</span><br></div></code></pre></div></div>
<p>Once complete, I revise the deployment in the AWS Console without changing any
settings. You can just skip straight to the Review screen to do this. This time
around, the console should show a health device and successful deployment.</p>
<h3 class="anchor anchorTargetStickyNavbar_Vzrq" id="viewing-messages-from-the-component">Viewing Messages from the Component<a href="https://mikelikesrobots.github.io/blog/greengrass-concepts-components#viewing-messages-from-the-component" class="hash-link" aria-label="Direct link to Viewing Messages from the Component" title="Direct link to Viewing Messages from the Component" translate="no">​</a></h3>
<p>To view the messages printed by the console, you can see the log messages and
the MQTT messages.</p>
<p>The log messages are visible from within the text editor. Just as in the
<a href="https://mikelikesrobots.github.io/blog/greengrass-concepts-components#debugging-deployment-failures" class="">debugging</a> section, I use <code>vim</code> to open
<code>com.mike.HelloWorld.log</code>. This shows a list of messages showing that the
configured message has been repeatedly printed. Greengrass will capture any log
output from an application and store it in the logs directory for you to view.</p>
<p>We can also see MQTT messages by going to the MQTT Test Client and subscribing
to the <code>#</code> topic, which receives all MQTT messages. Here, we should see two
messages per second with the custom message inside.</p>
<p><img decoding="async" loading="lazy" alt="MQTT Test Client showing Greengrass messages" src="https://mikelikesrobots.github.io/assets/images/mqtt-test-client-7f9164bdc7f42378c1a3047bcb014894.webp" width="883" height="954" class="img_ev3q"></p>
<h3 class="anchor anchorTargetStickyNavbar_Vzrq" id="summary">Summary<a href="https://mikelikesrobots.github.io/blog/greengrass-concepts-components#summary" class="hash-link" aria-label="Direct link to Summary" title="Direct link to Summary" translate="no">​</a></h3>
<p>In this section, we saw how to provision an EC2 instance and configure it as a
Greengrass core device. We saw that Greengrass automatically deploys the Cli
component to it, after which we can revise the deployment to include our own
components. We also saw how to debug a deployment failure. Finally, we saw our
successfully deployed Hello World component printing messages to log files and
sending MQTT messages to IoT Core.</p>
<h2 class="anchor anchorTargetStickyNavbar_Vzrq" id="building-a-component">Building a Component<a href="https://mikelikesrobots.github.io/blog/greengrass-concepts-components#building-a-component" class="hash-link" aria-label="Direct link to Building a Component" title="Direct link to Building a Component" translate="no">​</a></h2>
<p>To show building a custom component, I'll use the source code in the
<a href="https://github.com/mikelikesrobots/greengrass-hello-world" target="_blank" rel="noopener noreferrer" class="">greengrass-hello-world Github
repository</a>. This
component will print a configurable message to the log file and send the same
message to IoT Core using MQTT.</p>
<p>Let's take a look at the important files in the repository.</p>
<h3 class="anchor anchorTargetStickyNavbar_Vzrq" id="the-readme">The README<a href="https://mikelikesrobots.github.io/blog/greengrass-concepts-components#the-readme" class="hash-link" aria-label="Direct link to The README" title="Direct link to The README" translate="no">​</a></h3>
<p>The
<a href="https://github.com/mikelikesrobots/greengrass-hello-world/blob/main/README.md" target="_blank" rel="noopener noreferrer" class="">README</a>
is less useful to understand the anatomy of a component, but it is the best
starting point for figuring out how to build and deploy the component for
yourself.</p>
<h3 class="anchor anchorTargetStickyNavbar_Vzrq" id="main-file">Main file<a href="https://mikelikesrobots.github.io/blog/greengrass-concepts-components#main-file" class="hash-link" aria-label="Direct link to Main file" title="Direct link to Main file" translate="no">​</a></h3>
<p>The entry point of the software is
<a href="https://github.com/mikelikesrobots/greengrass-hello-world/blob/main/HelloWorld/main.py" target="_blank" rel="noopener noreferrer" class=""><code>HelloWorld/main.py</code></a>.
This is a simple script which receives <a href="https://github.com/mikelikesrobots/greengrass-hello-world/blob/main/HelloWorld/main.py#L10-L11" target="_blank" rel="noopener noreferrer" class="">command line
arguments</a>
from Greengrass to determine what message to send and how often to send it. It
will print the message directly using a <a href="https://github.com/mikelikesrobots/greengrass-hello-world/blob/main/HelloWorld/main.py#L18" target="_blank" rel="noopener noreferrer" class="">debug
log</a>,
and it will use the helper class <code>IoTPublisher</code> to <a href="https://github.com/mikelikesrobots/greengrass-hello-world/blob/main/HelloWorld/main.py#L17" target="_blank" rel="noopener noreferrer" class="">post it as an MQTT message
to IoT
Core</a>.</p>
<h3 class="anchor anchorTargetStickyNavbar_Vzrq" id="iotpublisher"><code>IoTPublisher</code><a href="https://mikelikesrobots.github.io/blog/greengrass-concepts-components#iotpublisher" class="hash-link" aria-label="Direct link to iotpublisher" title="Direct link to iotpublisher" translate="no">​</a></h3>
<p><code>IoTPublisher</code> is defined in the <a href="https://github.com/mikelikesrobots/greengrass-hello-world/blob/main/HelloWorld/src/iot_publisher.py" target="_blank" rel="noopener noreferrer" class=""><code>HelloWorld/src/iot_publisher.py</code>
file</a>.
It uses the IoT SDK from AWS to pass messages to the Nucleus, using
<a href="https://en.wikipedia.org/wiki/Inter-process_communication" target="_blank" rel="noopener noreferrer" class="">Inter-Process Communication
(IPC)</a> to do so. This
library can be used to pass requests to the Nucleus, such as requesting a
message be published on a particular topic. The Nucleus checks that the
requester has enough permissions for the request before carrying it out.</p>
<h3 class="anchor anchorTargetStickyNavbar_Vzrq" id="the-recipe">The Recipe<a href="https://mikelikesrobots.github.io/blog/greengrass-concepts-components#the-recipe" class="hash-link" aria-label="Direct link to The Recipe" title="Direct link to The Recipe" translate="no">​</a></h3>
<p>This is the most important file of a Greengrass component. It is defined as
<a href="https://github.com/mikelikesrobots/greengrass-hello-world/blob/main/HelloWorld/recipe.yaml" target="_blank" rel="noopener noreferrer" class=""><code>HelloWorld/recipe.yaml</code></a>
in this repository, but it can also be defined in JSON. This file instructs the
core device on how to retrieve the software to run, how to unpack it, the
required configuration, and how to control its lifecycle.</p>
<p>For this component, the configuration includes <a href="https://github.com/mikelikesrobots/greengrass-hello-world/blob/main/HelloWorld/recipe.yaml#L9-L10" target="_blank" rel="noopener noreferrer" class="">two fields for the
application</a>:</p>
<div class="language-yaml codeBlockContainer_Ckt0 theme-code-block" style="--prism-color:#393A34;--prism-background-color:#f6f8fa"><div class="codeBlockContent_QJqH"><pre tabindex="0" class="prism-code language-yaml codeBlock_bY9V thin-scrollbar" style="color:#393A34;background-color:#f6f8fa"><code class="codeBlockLines_e6Vv"><div class="token-line" style="color:#393A34"><span class="token key atrule" style="color:#00a4db">Message</span><span class="token punctuation" style="color:#393A34">:</span><span class="token plain"> </span><span class="token string" style="color:#e3116c">"World"</span><span class="token plain"></span><br></div><div class="token-line" style="color:#393A34"><span class="token plain"></span><span class="token key atrule" style="color:#00a4db">Period</span><span class="token punctuation" style="color:#393A34">:</span><span class="token plain"> </span><span class="token number" style="color:#36acaa">0.5</span><br></div></code></pre></div></div>
<p>These are the default parameters, but can be overridden by a deployment. They
tell the application what message to write and how frequently.</p>
<p>The component also has <a href="https://github.com/mikelikesrobots/greengrass-hello-world/blob/main/HelloWorld/recipe.yaml#L11-L19" target="_blank" rel="noopener noreferrer" class="">another YAML
block</a>
to define its default access control:</p>
<div class="language-yaml codeBlockContainer_Ckt0 theme-code-block" style="--prism-color:#393A34;--prism-background-color:#f6f8fa"><div class="codeBlockContent_QJqH"><pre tabindex="0" class="prism-code language-yaml codeBlock_bY9V thin-scrollbar" style="color:#393A34;background-color:#f6f8fa"><code class="codeBlockLines_e6Vv"><div class="token-line" style="color:#393A34"><span class="token key atrule" style="color:#00a4db">accessControl</span><span class="token punctuation" style="color:#393A34">:</span><span class="token plain"></span><br></div><div class="token-line" style="color:#393A34"><span class="token plain">  </span><span class="token key atrule" style="color:#00a4db">aws.greengrass.ipc.mqttproxy</span><span class="token punctuation" style="color:#393A34">:</span><span class="token plain"></span><br></div><div class="token-line" style="color:#393A34"><span class="token plain">    </span><span class="token key atrule" style="color:#00a4db">com.mike.HelloWorld:pubsub:1</span><span class="token punctuation" style="color:#393A34">:</span><span class="token plain"></span><br></div><div class="token-line" style="color:#393A34"><span class="token plain">      </span><span class="token key atrule" style="color:#00a4db">policyDescription</span><span class="token punctuation" style="color:#393A34">:</span><span class="token plain"> Publish and subscribe to any topic</span><br></div><div class="token-line" style="color:#393A34"><span class="token plain">      </span><span class="token key atrule" style="color:#00a4db">operation</span><span class="token punctuation" style="color:#393A34">:</span><span class="token plain"></span><br></div><div class="token-line" style="color:#393A34"><span class="token plain">        </span><span class="token punctuation" style="color:#393A34">-</span><span class="token plain"> aws.greengrass</span><span class="token comment" style="color:#999988;font-style:italic">#PublishToIoTCore</span><span class="token plain"></span><br></div><div class="token-line" style="color:#393A34"><span class="token plain">        </span><span class="token punctuation" style="color:#393A34">-</span><span class="token plain"> aws.greengrass</span><span class="token comment" style="color:#999988;font-style:italic">#SubscribeToIoTCore</span><span class="token plain"></span><br></div><div class="token-line" style="color:#393A34"><span class="token plain">      </span><span class="token key atrule" style="color:#00a4db">resources</span><span class="token punctuation" style="color:#393A34">:</span><span class="token plain"></span><br></div><div class="token-line" style="color:#393A34"><span class="token plain">        </span><span class="token punctuation" style="color:#393A34">-</span><span class="token plain"> </span><span class="token string" style="color:#e3116c">"*"</span><br></div></code></pre></div></div>
<p>This access control block allows the application to publish and subscribe to any
topic. This can also be changed in a deployment, which means that an
administrator can override this block to allow an application to be able to
publish on <code>topic/test</code> only, for example.</p>
<p>After the configuration is the <a href="https://github.com/mikelikesrobots/greengrass-hello-world/blob/main/HelloWorld/recipe.yaml#L20-L34" target="_blank" rel="noopener noreferrer" class="">manifests
block</a>.
This defines all the system configurations that are acceptable to run the
component on. For this component, as it is written in Python, it can run on any
system; hence, there is <a href="https://github.com/mikelikesrobots/greengrass-hello-world/blob/main/HelloWorld/recipe.yaml#L22" target="_blank" rel="noopener noreferrer" class="">only one entry with <code>os: all</code></a>
set.</p>
<p>The manifest <a href="https://github.com/mikelikesrobots/greengrass-hello-world/blob/main/HelloWorld/recipe.yaml#L23-L25" target="_blank" rel="noopener noreferrer" class="">defines the
<code>Artifacts</code></a>
as all the locations software must be downloaded from.</p>
<div class="language-yaml codeBlockContainer_Ckt0 theme-code-block" style="--prism-color:#393A34;--prism-background-color:#f6f8fa"><div class="codeBlockContent_QJqH"><pre tabindex="0" class="prism-code language-yaml codeBlock_bY9V thin-scrollbar" style="color:#393A34;background-color:#f6f8fa"><code class="codeBlockLines_e6Vv"><div class="token-line" style="color:#393A34"><span class="token key atrule" style="color:#00a4db">Artifacts</span><span class="token punctuation" style="color:#393A34">:</span><span class="token plain"></span><br></div><div class="token-line" style="color:#393A34"><span class="token plain">  </span><span class="token punctuation" style="color:#393A34">-</span><span class="token plain"> </span><span class="token key atrule" style="color:#00a4db">URI</span><span class="token punctuation" style="color:#393A34">:</span><span class="token plain"> </span><span class="token string" style="color:#e3116c">"s3://BUCKET_NAME/COMPONENT_NAME/COMPONENT_VERSION/HelloWorld.zip"</span><span class="token plain"></span><br></div><div class="token-line" style="color:#393A34"><span class="token plain">    </span><span class="token key atrule" style="color:#00a4db">Unarchive</span><span class="token punctuation" style="color:#393A34">:</span><span class="token plain"> ZIP</span><br></div></code></pre></div></div>
<p>This block says to download the <code>HelloWorld.zip</code> file from an S3 bucket, which
must be accessible to the core device. The core device can then unzip the file
to get access to the Python files.</p>
<p>Finally, the lifecycle of the component is defined. This component has two
lifecycle stages: Install and Run.</p>
<p>In the <a href="https://github.com/mikelikesrobots/greengrass-hello-world/blob/main/HelloWorld/recipe.yaml#L27-L30" target="_blank" rel="noopener noreferrer" class="">Install
stage</a>,
it is set to create a virtual environment and install all dependencies into it.</p>
<p>In the <a href="https://github.com/mikelikesrobots/greengrass-hello-world/blob/main/HelloWorld/recipe.yaml#L31-L34" target="_blank" rel="noopener noreferrer" class="">Run
stage</a>,
it is set to activate the virtual environment and run the main script using the
configuration parameters set above.</p>
<div class="theme-admonition theme-admonition-tip admonition_xJq3 alert alert--success"><div class="admonitionHeading_Gvgb"><span class="admonitionIcon_Rf37"><svg viewBox="0 0 12 16"><path fill-rule="evenodd" d="M6.5 0C3.48 0 1 2.19 1 5c0 .92.55 2.25 1 3 1.34 2.25 1.78 2.78 2 4v1h5v-1c.22-1.22.66-1.75 2-4 .45-.75 1-2.08 1-3 0-2.81-2.48-5-5.5-5zm3.64 7.48c-.25.44-.47.8-.67 1.11-.86 1.41-1.25 2.06-1.45 3.23-.02.05-.02.11-.02.17H5c0-.06 0-.13-.02-.17-.2-1.17-.59-1.83-1.45-3.23-.2-.31-.42-.67-.67-1.11C2.44 6.78 2 5.65 2 5c0-2.2 2.02-4 4.5-4 1.22 0 2.36.42 3.22 1.19C10.55 2.94 11 3.94 11 5c0 .66-.44 1.78-.86 2.48zM4 14h5c-.23 1.14-1.3 2-2.5 2s-2.27-.86-2.5-2z"></path></svg></span>tip</div><div class="admonitionContent_BuS1"><p>For more options in the recipe file, take a look at the <a href="https://docs.aws.amazon.com/greengrass/v2/developerguide/component-recipe-reference.html" target="_blank" rel="noopener noreferrer" class="">component recipe
reference</a>.</p></div></div>
<h3 class="anchor anchorTargetStickyNavbar_Vzrq" id="gdk-configjson"><code>gdk-config.json</code><a href="https://mikelikesrobots.github.io/blog/greengrass-concepts-components#gdk-configjson" class="hash-link" aria-label="Direct link to gdk-configjson" title="Direct link to gdk-configjson" translate="no">​</a></h3>
<p>One last file to mention is the
<a href="https://github.com/mikelikesrobots/greengrass-hello-world/blob/main/HelloWorld/gdk-config.json" target="_blank" rel="noopener noreferrer" class=""><code>gdk-config.json</code></a>
file. This file defines how to use the <a href="https://docs.aws.amazon.com/greengrass/v2/developerguide/greengrass-development-kit-cli.html" target="_blank" rel="noopener noreferrer" class="">Greengrass Development Kit
(GDK)</a>
to build and deploy the component into the cloud.</p>
<p>Those are the most important files. If you want to see more complicated
examples, take a look at the <a href="https://github.com/aws-greengrass/aws-greengrass-software-catalog" target="_blank" rel="noopener noreferrer" class="">community components
Github</a>.</p>
<h2 class="anchor anchorTargetStickyNavbar_Vzrq" id="summary-and-challenge">Summary and Challenge<a href="https://mikelikesrobots.github.io/blog/greengrass-concepts-components#summary-and-challenge" class="hash-link" aria-label="Direct link to Summary and Challenge" title="Direct link to Summary and Challenge" translate="no">​</a></h2>
<p>This post showed the three main elements of Greengrass to understand. First, the
management service, which tracks Core Devices and deploys software to them using
Deployments, with each Deployment containing a list of Components to be
deployed.</p>
<p>The post also showed how to set up a Linux device as a core device,
demonstrating how to do so using a new Amazon EC2 instance. After setting up as
a core device, we deployed a custom component to it and saw it producing logs
and MQTT messages.</p>
<p>Finally, we looked at the anatomy of a component. A component is essentially a
recipe file which defines default configuration and how to download, install,
and run software for one or more target configurations.</p>
<p>Now that you understand Greengrass Concepts and Components, try to set up your
own EC2 instance as a core device and deploy the custom component to it. Then
change the configuration so that the printed message changes. If you can manage
to do this, you'll have all the basics necessary to work with Greengrass
yourself!</p>]]></content>
        <author>
            <name>Michael Hart</name>
            <uri>https://mikelikesrobots.github.io</uri>
        </author>
        <category label="aws" term="aws"/>
        <category label="cloud" term="cloud"/>
        <category label="iot" term="iot"/>
        <category label="greengrass" term="greengrass"/>
    </entry>
    <entry>
        <title type="html"><![CDATA[Your First Robot Kit: CamJam EduKit #3]]></title>
        <id>https://mikelikesrobots.github.io/blog/camjam-edukit</id>
        <link href="https://mikelikesrobots.github.io/blog/camjam-edukit"/>
        <updated>2024-12-11T00:00:00.000Z</updated>
        <summary type="html"><![CDATA[If you want a cheap robot kit, it's hard to do better than the CamJam EduKit #3. This is a small kit which you can assemble into a two-wheeled robot with a caster, as long as you buy a few extras. It comes with a line sensor and ultrasound distance sensor, plus a series of exercise sheets to work through in order to build the robot and get it running. You can optionally get your own chassis, or you can use the box the kit comes in.]]></summary>
        <content type="html"><![CDATA[<p>If you want a cheap robot kit, it's hard to do better than the CamJam EduKit #3. This is a small kit which you can assemble into a two-wheeled robot with a caster, as long as you buy a few extras. It comes with a line sensor and ultrasound distance sensor, plus a series of <a href="https://github.com/CamJam-EduKit/EduKit3/tree/master/CamJam%20Edukit%203%20-%20GPIO%20Zero" target="_blank" rel="noopener noreferrer" class="">exercise sheets</a> to work through in order to build the robot and get it running. You can optionally get your own chassis, or you can use the box the kit comes in.</p>
<p>I have recorded videos that cover all of the exercises given by the repository and uploaded them to YouTube. This post goes through each video and briefly explains what it shows, so you can follow along if you choose to buy the kit. I also use the box as the chassis!</p>
<p>Next, I'm planning on getting ROS2 running on the robot, and using that to run collision avoidance and line following software at the same time. I will write a post on how to do that here, but if you want to see the video form, you can also <a href="https://www.youtube.com/@mikelikesrobots?sub_confirmation=1" target="_blank" rel="noopener noreferrer" class="">subscribe</a> to my <a href="https://www.youtube.com/@mikelikesrobots" target="_blank" rel="noopener noreferrer" class="">YouTube channel</a> to be notified about it.</p>
<h2 class="anchor anchorTargetStickyNavbar_Vzrq" id="parts-required">Parts Required<a href="https://mikelikesrobots.github.io/blog/camjam-edukit#parts-required" class="hash-link" aria-label="Direct link to Parts Required" title="Direct link to Parts Required" translate="no">​</a></h2>
<p>To be able to follow along, you will need to buy the robot kit and a few extra parts. You can use substitutes for any of these except for the robot kit; these links are to the parts that I used for my videos.</p>
<ul>
<li class=""><a href="https://thepihut.com/products/camjam-edukit-3-robotics" target="_blank" rel="noopener noreferrer" class="">CamJam Edukit #3</a></li>
<li class="">A Raspberry Pi:<!-- -->
<ul>
<li class=""><a href="https://thepihut.com/products/raspberry-pi-zero-2" target="_blank" rel="noopener noreferrer" class="">Raspberry Pi Zero 2 W</a> OR</li>
<li class=""><a href="https://www.amazon.co.uk/Raspberry-Pi-Model-4GB/dp/B09TTNF8BT?" target="_blank" rel="noopener noreferrer" class="">Raspberry Pi 4</a> OR</li>
<li class=""><a href="https://www.amazon.co.uk/Raspberry-Pi-SC1112-5-8GB/dp/B0CK3L9WD3" target="_blank" rel="noopener noreferrer" class="">Raspberry Pi 5</a></li>
</ul>
</li>
<li class=""><a href="https://thepihut.com/products/-ansmann-10-000mah-type-c-18w-pd-power-bank" target="_blank" rel="noopener noreferrer" class="">Power Bank</a>
<ul>
<li class=""><em>Note: this is too large to fit in the robot! You should consider buying a slightly smaller power bank.</em></li>
</ul>
</li>
<li class=""><a href="https://www.amazon.co.uk/-Duracell-Plus-Alkaline-Batteries-MN1500/dp/B093LVB4P7" target="_blank" rel="noopener noreferrer" class="">AA batteries</a></li>
<li class=""><a href="https://www.amazon.co.uk/-SanDisk-128GB-microSDXC-adapter-Performance/dp/B0B7NTY2S6" target="_blank" rel="noopener noreferrer" class="">MicroSD Card</a></li>
</ul>
<p>Once you have all the parts, you can begin assembly!</p>
<h2 class="anchor anchorTargetStickyNavbar_Vzrq" id="building-the-robot">Building the Robot<a href="https://mikelikesrobots.github.io/blog/camjam-edukit#building-the-robot" class="hash-link" aria-label="Direct link to Building the Robot" title="Direct link to Building the Robot" translate="no">​</a></h2>
<p>If you want to watch the whole series in order, navigate to <a href="https://www.youtube.com/playlist?list=PLBrq1OKRHMwUbbujTlmt1YGRzL9O0LfNJ" target="_blank" rel="noopener noreferrer" class="">the playlist</a>. Otherwise, I list out all of the videos and what I show in them, so you can choose which parts you want to follow.</p>
<p>Each video has extra resources depending on the specific video, but all the videos require:</p>
<ul>
<li class=""><a href="https://camjam.me/?page_id=1035" target="_blank" rel="noopener noreferrer" class="">EduKit website</a></li>
<li class=""><a href="https://github.com/CamJam-EduKit/EduKit3" target="_blank" rel="noopener noreferrer" class="">Github repository</a></li>
</ul>
<h3 class="anchor anchorTargetStickyNavbar_Vzrq" id="introduction">Introduction<a href="https://mikelikesrobots.github.io/blog/camjam-edukit#introduction" class="hash-link" aria-label="Direct link to Introduction" title="Direct link to Introduction" translate="no">​</a></h3>
<p>This is a short introduction explaining what I'll be going over in the series. There isn't much more in the video than I've written in this post.</p>
<div class="video_jswG"><button type="button" class="poster_B6DH" aria-label="Play video: Your First Robot Kit: CamJam EduKit #3"><img src="https://i.ytimg.com/vi/dH0sKmp1DMw/hqdefault.jpg" alt="" width="480" height="360" loading="lazy"><span class="play_lEvZ" aria-hidden="true">▶</span><span class="caption_yrhJ">Watch: <!-- -->Your First Robot Kit: CamJam EduKit #3</span></button></div><noscript><p><a href="https://www.youtube.com/watch?v=dH0sKmp1DMw&amp;t=0">Watch <!-- -->Your First Robot Kit: CamJam EduKit #3<!-- --> on YouTube</a></p></noscript>
<h3 class="anchor anchorTargetStickyNavbar_Vzrq" id="initial-build">Initial Build<a href="https://mikelikesrobots.github.io/blog/camjam-edukit#initial-build" class="hash-link" aria-label="Direct link to Initial Build" title="Direct link to Initial Build" translate="no">​</a></h3>
<p>This video is a top-down view of assembling the robot from its contents. I don't attach the sensors yet - this is to get the batteries, motors, and Raspberry Pi ready to roll. After this, the robot is physically ready to begin moving around, and the next step is setting up the software.</p>
<div class="video_jswG"><button type="button" class="poster_B6DH" aria-label="Play video: Your First Robot Kit: CamJam EduKit #3 — supporting video"><img src="https://i.ytimg.com/vi/q2bKTyTTquU/hqdefault.jpg" alt="" width="480" height="360" loading="lazy"><span class="play_lEvZ" aria-hidden="true">▶</span><span class="caption_yrhJ">Watch: <!-- -->Your First Robot Kit: CamJam EduKit #3 — supporting video</span></button></div><noscript><p><a href="https://www.youtube.com/watch?v=q2bKTyTTquU&amp;t=0">Watch <!-- -->Your First Robot Kit: CamJam EduKit #3 — supporting video<!-- --> on YouTube</a></p></noscript>
<h3 class="anchor anchorTargetStickyNavbar_Vzrq" id="sd-card-setup">SD Card Setup<a href="https://mikelikesrobots.github.io/blog/camjam-edukit#sd-card-setup" class="hash-link" aria-label="Direct link to SD Card Setup" title="Direct link to SD Card Setup" translate="no">​</a></h3>
<p>This video shows how to set up the SD card ready to move the motors, with one key difference: I install Ubuntu instead of Debian to make it easier to install ROS2 down the road.</p>
<p>Some extra resources for this video are as follows:</p>
<ul>
<li class=""><a href="https://www.raspberrypi.com/software/" target="_blank" rel="noopener noreferrer" class="">Raspberry Pi Imager</a> - to flash the SD card</li>
<li class=""><a href="https://learn.microsoft.com/en-us/viva/glint/setup/sftp-ssh-key-gen" target="_blank" rel="noopener noreferrer" class="">Create an SSH key pair</a> - to explain the SSH key generation steps</li>
<li class=""><a href="https://code.visualstudio.com/download" target="_blank" rel="noopener noreferrer" class="">Visual Studio Code</a> - to download Visual Studio Code (VSCode), the editor I recommend for this course (and in general!)</li>
</ul>
<div class="video_jswG"><button type="button" class="poster_B6DH" aria-label="Play video: Your First Robot Kit: CamJam EduKit #3 — supporting video"><img src="https://i.ytimg.com/vi/MzBFo65xnbA/hqdefault.jpg" alt="" width="480" height="360" loading="lazy"><span class="play_lEvZ" aria-hidden="true">▶</span><span class="caption_yrhJ">Watch: <!-- -->Your First Robot Kit: CamJam EduKit #3 — supporting video</span></button></div><noscript><p><a href="https://www.youtube.com/watch?v=MzBFo65xnbA&amp;t=0">Watch <!-- -->Your First Robot Kit: CamJam EduKit #3 — supporting video<!-- --> on YouTube</a></p></noscript>
<h3 class="anchor anchorTargetStickyNavbar_Vzrq" id="adding-sensors">Adding Sensors<a href="https://mikelikesrobots.github.io/blog/camjam-edukit#adding-sensors" class="hash-link" aria-label="Direct link to Adding Sensors" title="Direct link to Adding Sensors" translate="no">​</a></h3>
<p>This video is the follow up to the <a href="https://mikelikesrobots.github.io/blog/camjam-edukit#initial-build" class="">initial build</a>, where I show how to add both sensors to the robot.</p>
<div class="video_jswG"><button type="button" class="poster_B6DH" aria-label="Play video: Your First Robot Kit: CamJam EduKit #3 — supporting video"><img src="https://i.ytimg.com/vi/oPJ07Bl87Ts/hqdefault.jpg" alt="" width="480" height="360" loading="lazy"><span class="play_lEvZ" aria-hidden="true">▶</span><span class="caption_yrhJ">Watch: <!-- -->Your First Robot Kit: CamJam EduKit #3 — supporting video</span></button></div><noscript><p><a href="https://www.youtube.com/watch?v=oPJ07Bl87Ts&amp;t=0">Watch <!-- -->Your First Robot Kit: CamJam EduKit #3 — supporting video<!-- --> on YouTube</a></p></noscript>
<h3 class="anchor anchorTargetStickyNavbar_Vzrq" id="testing-the-line-sensor">Testing the Line Sensor<a href="https://mikelikesrobots.github.io/blog/camjam-edukit#testing-the-line-sensor" class="hash-link" aria-label="Direct link to Testing the Line Sensor" title="Direct link to Testing the Line Sensor" translate="no">​</a></h3>
<p>I show how to test and adjust the line sensor to get a reliable reading on the robot.</p>
<div class="video_jswG"><button type="button" class="poster_B6DH" aria-label="Play video: Your First Robot Kit: CamJam EduKit #3 — supporting video"><img src="https://i.ytimg.com/vi/1jSZvPHQuDo/hqdefault.jpg" alt="" width="480" height="360" loading="lazy"><span class="play_lEvZ" aria-hidden="true">▶</span><span class="caption_yrhJ">Watch: <!-- -->Your First Robot Kit: CamJam EduKit #3 — supporting video</span></button></div><noscript><p><a href="https://www.youtube.com/watch?v=1jSZvPHQuDo&amp;t=0">Watch <!-- -->Your First Robot Kit: CamJam EduKit #3 — supporting video<!-- --> on YouTube</a></p></noscript>
<h3 class="anchor anchorTargetStickyNavbar_Vzrq" id="testing-the-distance-sensor">Testing the Distance Sensor<a href="https://mikelikesrobots.github.io/blog/camjam-edukit#testing-the-distance-sensor" class="hash-link" aria-label="Direct link to Testing the Distance Sensor" title="Direct link to Testing the Distance Sensor" translate="no">​</a></h3>
<p>I show how to test the ultrasound sensor to get a distance reading from the robot.</p>
<div class="video_jswG"><button type="button" class="poster_B6DH" aria-label="Play video: Your First Robot Kit: CamJam EduKit #3 — supporting video"><img src="https://i.ytimg.com/vi/WDr2CTLzRRg/hqdefault.jpg" alt="" width="480" height="360" loading="lazy"><span class="play_lEvZ" aria-hidden="true">▶</span><span class="caption_yrhJ">Watch: <!-- -->Your First Robot Kit: CamJam EduKit #3 — supporting video</span></button></div><noscript><p><a href="https://www.youtube.com/watch?v=WDr2CTLzRRg&amp;t=0">Watch <!-- -->Your First Robot Kit: CamJam EduKit #3 — supporting video<!-- --> on YouTube</a></p></noscript>
<h3 class="anchor anchorTargetStickyNavbar_Vzrq" id="first-robot-movement">First Robot Movement<a href="https://mikelikesrobots.github.io/blog/camjam-edukit#first-robot-movement" class="hash-link" aria-label="Direct link to First Robot Movement" title="Direct link to First Robot Movement" translate="no">​</a></h3>
<p>At last, we can move the robot around for the first time! I also show moving the weight to make sure the wheels get more grip, as before that, it mostly just spins in place.</p>
<div class="video_jswG"><button type="button" class="poster_B6DH" aria-label="Play video: Your First Robot Kit: CamJam EduKit #3 — supporting video"><img src="https://i.ytimg.com/vi/ZzPUg-0znsI/hqdefault.jpg" alt="" width="480" height="360" loading="lazy"><span class="play_lEvZ" aria-hidden="true">▶</span><span class="caption_yrhJ">Watch: <!-- -->Your First Robot Kit: CamJam EduKit #3 — supporting video</span></button></div><noscript><p><a href="https://www.youtube.com/watch?v=ZzPUg-0znsI&amp;t=0">Watch <!-- -->Your First Robot Kit: CamJam EduKit #3 — supporting video<!-- --> on YouTube</a></p></noscript>
<h3 class="anchor anchorTargetStickyNavbar_Vzrq" id="line-following-course">Line Following Course<a href="https://mikelikesrobots.github.io/blog/camjam-edukit#line-following-course" class="hash-link" aria-label="Direct link to Line Following Course" title="Direct link to Line Following Course" translate="no">​</a></h3>
<p>Having moved the robot for the first time, I show the script provided to follow a line course and explain why the robot is spinning from side to side so much while following.</p>
<div class="video_jswG"><button type="button" class="poster_B6DH" aria-label="Play video: Your First Robot Kit: CamJam EduKit #3 — supporting video"><img src="https://i.ytimg.com/vi/0NGg4-DZkBA/hqdefault.jpg" alt="" width="480" height="360" loading="lazy"><span class="play_lEvZ" aria-hidden="true">▶</span><span class="caption_yrhJ">Watch: <!-- -->Your First Robot Kit: CamJam EduKit #3 — supporting video</span></button></div><noscript><p><a href="https://www.youtube.com/watch?v=0NGg4-DZkBA&amp;t=0">Watch <!-- -->Your First Robot Kit: CamJam EduKit #3 — supporting video<!-- --> on YouTube</a></p></noscript>
<h3 class="anchor anchorTargetStickyNavbar_Vzrq" id="obstacle-avoidance">Obstacle Avoidance<a href="https://mikelikesrobots.github.io/blog/camjam-edukit#obstacle-avoidance" class="hash-link" aria-label="Direct link to Obstacle Avoidance" title="Direct link to Obstacle Avoidance" translate="no">​</a></h3>
<p>This is the last video based on the exercises provided by CamJam. In it, I show how to get the robot avoiding collisions with objects in the view of the sensor, again using a provided script.</p>
<div class="video_jswG"><button type="button" class="poster_B6DH" aria-label="Play video: Your First Robot Kit: CamJam EduKit #3 — supporting video"><img src="https://i.ytimg.com/vi/CSdSrhLD8iQ/hqdefault.jpg" alt="" width="480" height="360" loading="lazy"><span class="play_lEvZ" aria-hidden="true">▶</span><span class="caption_yrhJ">Watch: <!-- -->Your First Robot Kit: CamJam EduKit #3 — supporting video</span></button></div><noscript><p><a href="https://www.youtube.com/watch?v=CSdSrhLD8iQ&amp;t=0">Watch <!-- -->Your First Robot Kit: CamJam EduKit #3 — supporting video<!-- --> on YouTube</a></p></noscript>
<h2 class="anchor anchorTargetStickyNavbar_Vzrq" id="next-steps">Next Steps<a href="https://mikelikesrobots.github.io/blog/camjam-edukit#next-steps" class="hash-link" aria-label="Direct link to Next Steps" title="Direct link to Next Steps" translate="no">​</a></h2>
<p>Having finished the exercise sheets, I plan to install ROS2 on to the board. I need to experiment to figure out if directly compiling ROS2 or installing via Docker has the best performance. Once ROS2 is installed, I'll show how to set up a project to:</p>
<ul>
<li class="">move the robot around</li>
<li class="">follow a line</li>
<li class="">avoid obstacles</li>
<li class="">to accomplish all of these at the same time</li>
</ul>
<p>It is also possible I could add more sensors to the robot in future, such as another line sensor or wheel encoder. If you're interested, please leave a comment here or on my YouTube videos.</p>]]></content>
        <author>
            <name>Michael Hart</name>
            <uri>https://mikelikesrobots.github.io</uri>
        </author>
        <category label="robotics" term="robotics"/>
        <category label="edukit" term="edukit"/>
        <category label="ros2" term="ros2"/>
    </entry>
    <entry>
        <title type="html"><![CDATA[Why would I connect my robots to the cloud?]]></title>
        <id>https://mikelikesrobots.github.io/blog/why-use-cloud-robotics</id>
        <link href="https://mikelikesrobots.github.io/blog/why-use-cloud-robotics"/>
        <updated>2024-09-13T00:00:00.000Z</updated>
        <summary type="html"><![CDATA[Explore the benefits and trade-offs before connecting your robot fleet to the cloud.]]></summary>
        <content type="html"><![CDATA[<p>This is a crucial question when deciding whether to use the cloud at all for robotics development, let alone how much to use it. Why connect my robots to the cloud at all? What benefits does it bring me, and what trade-offs am I making in order to use the cloud? This post is all about the <em>why</em>, rather than the <em>how</em>.</p>
<p>If you want the short answer, here it is: you should use the cloud if you ever plan to scale your robot fleet past around 10 robots, and if you do intend to scale up, integrate with the cloud <em>as early as possible</em> to avoid integration pains. If you're never intending to scale that much, the cloud can still be of use, but it depends on your use case as to whether the benefits outweigh the costs.</p>
<p>If you're not convinced, read on! The rest of this post is explaining my statement above.</p>
<h2 class="anchor anchorTargetStickyNavbar_Vzrq" id="what-is-cloud-robotics">What is Cloud Robotics?<a href="https://mikelikesrobots.github.io/blog/why-use-cloud-robotics#what-is-cloud-robotics" class="hash-link" aria-label="Direct link to What is Cloud Robotics?" title="Direct link to What is Cloud Robotics?" translate="no">​</a></h2>
<p>First, a foreword on what I mean by Cloud Robotics, as this is a term used by different people to mean different things.</p>
<p>In this post, Cloud Robotics means the use of cloud technologies in any part of robotics development. It may mean robots offload computation to servers in the cloud, or it could mean machine learning for a model that is deployed to a robot. It could even mean co-ordinating a fleet of robots using applications that are running in the cloud. As soon as a cloud provider is involved somewhere in development or in production, it's Cloud Robotics.</p>
<h2 class="anchor anchorTargetStickyNavbar_Vzrq" id="benefits-and-drawbacks">Benefits and Drawbacks<a href="https://mikelikesrobots.github.io/blog/why-use-cloud-robotics#benefits-and-drawbacks" class="hash-link" aria-label="Direct link to Benefits and Drawbacks" title="Direct link to Benefits and Drawbacks" translate="no">​</a></h2>
<p>I'll use the rest of the post to discuss these points in detail, but the main benefits and drawbacks of using Cloud Robotics are as follows:</p>
<h3 class="anchor anchorTargetStickyNavbar_Vzrq" id="benefits">Benefits<a href="https://mikelikesrobots.github.io/blog/why-use-cloud-robotics#benefits" class="hash-link" aria-label="Direct link to Benefits" title="Direct link to Benefits" translate="no">​</a></h3>
<ol>
<li class=""><a href="https://mikelikesrobots.github.io/blog/why-use-cloud-robotics#scaling-up" class="">Scaling Up</a>: scaling software complexity, fleet size, or number of locations is difficult to do without a central system, which is a great fit for the cloud.</li>
<li class=""><a href="https://mikelikesrobots.github.io/blog/why-use-cloud-robotics#high-power-computing" class="">High Power Computing</a>: Machine Learning, GenAI, Simulation - all have high demands for computational power that are hard to meet with personal computers. The cloud offers powerful servers on demand for these resource-intensive tasks.</li>
<li class=""><a href="https://mikelikesrobots.github.io/blog/why-use-cloud-robotics#offloading-computation" class="">Offloading Computation</a>: more complex robot behaviours can be achieved on simple robots by offloading the complex parts to other servers, such as those in the cloud. You can even have the full robotics stack in the cloud, with just a thin client on every robot to read sensors and move motors.</li>
</ol>
<h3 class="anchor anchorTargetStickyNavbar_Vzrq" id="drawbacks">Drawbacks<a href="https://mikelikesrobots.github.io/blog/why-use-cloud-robotics#drawbacks" class="hash-link" aria-label="Direct link to Drawbacks" title="Direct link to Drawbacks" translate="no">​</a></h3>
<ol>
<li class=""><a href="https://mikelikesrobots.github.io/blog/why-use-cloud-robotics#new-skills" class="">New skills</a>: delving into the world of cloud computing means developing a whole new skillset, which is an investment of time, effort, and money.</li>
<li class=""><a href="https://mikelikesrobots.github.io/blog/why-use-cloud-robotics#costs" class="">Costs</a>: new users of cloud technologies find it difficult to predict cloud computing costs, which is daunting in itself. However, correctly used, moving workloads to the cloud can reduce costs by only paying for resources while they're in use.</li>
<li class=""><a href="https://mikelikesrobots.github.io/blog/why-use-cloud-robotics#integration" class="">Integration</a>: integrating cloud technologies with your robotics stack is <em>work</em>. It often means taking a longer route to get to the same outcome during development, and the more mature a robotics stack, the more difficult it is to integrate cloud technologies.</li>
<li class=""><a href="https://mikelikesrobots.github.io/blog/why-use-cloud-robotics#connectivity" class="">Connectivity</a>: the availability of the cloud is a key consideration when deciding how much to use the cloud. Robots that cannot consistently access the internet should be less reliant on the cloud. Even if the internet is available, sending messages to the cloud is slightly slower than communicating locally, so the round trip time must be justified.</li>
<li class=""><a href="https://mikelikesrobots.github.io/blog/why-use-cloud-robotics#security" class="">Security</a>: sending messages between robot and cloud means exposing those messages to the internet. There is inherently more risk with this process, but can still be secure if security is factored in to the design.</li>
</ol>
<h2 class="anchor anchorTargetStickyNavbar_Vzrq" id="benefits-discussion">Benefits Discussion<a href="https://mikelikesrobots.github.io/blog/why-use-cloud-robotics#benefits-discussion" class="hash-link" aria-label="Direct link to Benefits Discussion" title="Direct link to Benefits Discussion" translate="no">​</a></h2>
<p>For each benefit and drawback, let's take a look in more detail.</p>
<h3 class="anchor anchorTargetStickyNavbar_Vzrq" id="scaling-up">Scaling Up<a href="https://mikelikesrobots.github.io/blog/why-use-cloud-robotics#scaling-up" class="hash-link" aria-label="Direct link to Scaling Up" title="Direct link to Scaling Up" translate="no">​</a></h3>
<p>The <em>major</em> benefit that the cloud brings is the ability to <em>scale up</em>. For more complex software, the size of the fleet, or the number of locations that the robots are deployed to, using the cloud is a way to tie together and support your ability to scale. Once your robotics systems are using cloud technologies, the limiting factor is no longer the support systems for the robots, but the number of robots.</p>
<p>This is the crucial part of using the cloud for robotics, so I'll go into depth with a few use cases in particular, although many more cases exist. For each use case, consider the difficulty of implementing the feature for 10-20 robots versus 100-200 or even 10,000+ robots:</p>
<ol>
<li class="">
<p><strong>Logging and Data Storage</strong>: the ability to stream, record, and store data and logs from a robot is vital for debugging and monitoring.</p>
<ol>
<li class=""><strong>Without the cloud</strong>, this means increased storage capacity per robot and a server cluster that must be expanded with the number of robots and number of users that need to access the data.</li>
<li class=""><strong>With the cloud</strong>, this process is much simpler, with services such as <a href="https://aws.amazon.com/s3/" target="_blank" rel="noopener noreferrer" class="">Amazon S3</a> and <a href="https://aws.amazon.com/cloudwatch/" target="_blank" rel="noopener noreferrer" class="">Amazon CloudWatch</a> offering to store and provide access to users with fine-grained permissions in a way that will scale with the number of robots automatically.</li>
<li class=""><strong>One resource</strong> is <a href="https://youtu.be/cCZwQfaE6Jc" target="_blank" rel="noopener noreferrer" class="">this video</a>, showing how to store and access logs in CloudWatch from ROS2 robots.</li>
</ol>
</li>
<li class="">
<p><strong>Monitoring &amp; Co-ordination</strong>: monitoring and co-ordinating gets more and more complicated as the number of robots grows.</p>
<ol>
<li class=""><strong>With the cloud</strong>, enabling auto-scaling to more servers or more powerful servers is made simple (see <a href="https://aws.amazon.com/ec2/" target="_blank" rel="noopener noreferrer" class="">Amazon EC2</a>), and it's possible to use serverless technologies to make parallel execution easier to manage (see <a href="https://aws.amazon.com/lambda/" target="_blank" rel="noopener noreferrer" class="">AWS Lambda</a> and <a href="https://aws.amazon.com/step-functions/" target="_blank" rel="noopener noreferrer" class="">AWS Step Functions</a>).</li>
<li class=""><strong>Without the cloud</strong>, this is a much more difficult engineering problem, as you will need to design solutions that can be scaled up, then monitor server use to determine when to scale to more servers.</li>
<li class=""><strong>Some resources</strong> include <a class="" href="https://mikelikesrobots.github.io/blog/simulation-in-cloud">running simulations on EC2</a>, <a class="" href="https://mikelikesrobots.github.io/blog/coordinating-with-lambda">co-ordinating robot fleets with Lambda</a>, and <a class="" href="https://mikelikesrobots.github.io/blog/step-function-make-smoothies">ordering smoothies with Step Functions</a>.</li>
</ol>
</li>
<li class="">
<p><strong>Deployment and OTA Updates</strong>: setting up new robots to become part of the fleet and updating existing robots Over-The-Air (OTA) is a necessary part of scaling up. A manual update process becomes increasingly impractical as the number of robots grows.</p>
<ol>
<li class=""><strong>With the cloud</strong>, services such as <a href="https://aws.amazon.com/greengrass/" target="_blank" rel="noopener noreferrer" class="">AWS IoT Greengrass</a> can make this setup and update process secure and automatic, with extra features available such as rolling back failed updates and storing per-robot configuration centrally.</li>
<li class=""><strong>Without the cloud</strong>, you will need to build OTA updates and initial deployment process from scratch, making them as lean as possible so that adding new robots to the fleet is simple.</li>
<li class=""><strong>Some resources</strong> include <a href="https://youtu.be/2VXIILtiMiU" target="_blank" rel="noopener noreferrer" class="">Greengrass Concepts and Components</a> and <a class="" href="https://mikelikesrobots.github.io/blog/docker-compose-in-gg">deploying Docker Compose in Greengrass</a>.</li>
</ol>
</li>
<li class="">
<p><strong>Dashboards</strong>: Once data from the robots is in the cloud, it becomes simple to manage and gain insights from that data.</p>
<ol>
<li class=""><strong>With the cloud</strong>, services such as <a href="https://aws.amazon.com/iot-sitewise/" target="_blank" rel="noopener noreferrer" class="">AWS IoT SiteWise</a> allow users to build dashboards from their industrial data, allowing a view at-a-glance into fleet health and operational capacity.</li>
<li class=""><strong>Without the cloud</strong>, these dashboards must be built manually along with the controls to access data from the entire fleet in one location.</li>
<li class=""><strong>Some resources</strong> include <a class="" href="https://mikelikesrobots.github.io/blog/robot-fleet-overview">building a fleet overview with IoT Fleet Indexing</a>, and <a href="https://youtu.be/68G4wrLXeq4" target="_blank" rel="noopener noreferrer" class="">this video</a> showing how to set up SiteWise to show battery measurements from a fleet of robots.</li>
</ol>
</li>
</ol>
<p>Once the cloud is used for these tasks, it is much simpler to scale the number and complexity of robots. Simply put, if you're developing in a lab setting, the cloud <em>can</em> help. If you're putting robots into production, using the cloud is the <em>best</em> way to work.</p>
<h3 class="anchor anchorTargetStickyNavbar_Vzrq" id="high-power-computing">High Power Computing<a href="https://mikelikesrobots.github.io/blog/why-use-cloud-robotics#high-power-computing" class="hash-link" aria-label="Direct link to High Power Computing" title="Direct link to High Power Computing" translate="no">​</a></h3>
<p>Some tasks have very high computational requirements, such as Machine Learning (ML), Generative AI (GenAI), and simulation. Each of these have such high requirements that performing them on a personal computer would be too slow to be useful. These high performance computers are available in the cloud, on demand.</p>
<ul>
<li class="">For machine learning, the cloud can store huge data sets and use powerful machines to crunch through the data to train ML models.</li>
<li class="">For GenAI, the cloud can refine an existing Foundational Model (FM), and is capable of performing inference using an FM. FMs are very large networks, so performing inference locally is difficult. GenAI inference commonly requires multiple graphics cards working together to compute in reasonable time.</li>
<li class="">For simulation, the cloud can offer virtual machines with a large memory capacity and high-power processors for performing simulations. Depending on the simulation complexity, it can be performed on a personal computer with high enough system specs, but the cloud makes it easier to get hold of the right hardware for running the simulation at an effective speed.</li>
</ul>
<p>Overall, the cloud can offer powerful machines on demand for performing difficult tasks. This is particularly well-suited for bursty workloads; all of the use cases here require high compute for short periods before turning off again.</p>
<h3 class="anchor anchorTargetStickyNavbar_Vzrq" id="offloading-computation">Offloading Computation<a href="https://mikelikesrobots.github.io/blog/why-use-cloud-robotics#offloading-computation" class="hash-link" aria-label="Direct link to Offloading Computation" title="Direct link to Offloading Computation" translate="no">​</a></h3>
<p>Robots, particularly mobile robots, are limited in how much compute they can bring to bear on a problem. For more intense workloads, such as building up a map from sensor data, there are two options:</p>
<ol>
<li class="">Upgrade the robot with more powerful hardware</li>
<li class="">Send the required data to more powerful hardware, then get the result back</li>
</ol>
<p>However, there are a few reasons why you might not want to upgrade the hardware on the robot:</p>
<ol>
<li class="">You are unable to upgrade the hardware. You have the best hardware available, or don't have power for more compute, or wouldn't be able to disperse the extra heat.</li>
<li class="">You have to stick to a budget, either for the current development, or a per-robot budget to keep future designs affordable.</li>
<li class="">You don't want to have to support more complex hardware or multiple compute devices.</li>
</ol>
<p>In this case, your best option is to offload the computation to another server. You could deploy a server on-site to manage the computation, or you could use the pre-built servers available in the cloud, on demand. This is the kind of use case where the cloud shines - servers in the cloud are always available and ready to work, and you only pay for what you use.</p>
<h2 class="anchor anchorTargetStickyNavbar_Vzrq" id="drawbacks-discussion">Drawbacks Discussion<a href="https://mikelikesrobots.github.io/blog/why-use-cloud-robotics#drawbacks-discussion" class="hash-link" aria-label="Direct link to Drawbacks Discussion" title="Direct link to Drawbacks Discussion" translate="no">​</a></h2>
<p>The drawbacks of using the cloud in robotics are in the time and effort to learn the skills, the cost of building in the cloud, and in the security and connectivity considerations when designing the cloud into your system.</p>
<p><strong>Integration</strong> is also hugely important to consider up front. Due to how deeply nested into the system cloud technologies can be, integrating them later in development can cause a lot of integration pain. If you decide that cloud technologies are a good fit for your stack, it makes sense to integrate them early, even though it feels like an overcomplicated solution at the time.</p>
<h3 class="anchor anchorTargetStickyNavbar_Vzrq" id="new-skills">New Skills<a href="https://mikelikesrobots.github.io/blog/why-use-cloud-robotics#new-skills" class="hash-link" aria-label="Direct link to New Skills" title="Direct link to New Skills" translate="no">​</a></h3>
<p>As with any new technology, there is always a cost in introducing it to your system. That might be in hiring developers with the right skills or learning the skills in the current development team. Cloud robotics is an emerging field, which makes this even more important to consider. Expect slow development while your engineers are getting up to speed with cloud technologies.</p>
<p>As the field develops, more learning resources and cloud services will become available to support it, meaning that the benefits will increase and the drawbacks will decrease.</p>
<h3 class="anchor anchorTargetStickyNavbar_Vzrq" id="costs">Costs<a href="https://mikelikesrobots.github.io/blog/why-use-cloud-robotics#costs" class="hash-link" aria-label="Direct link to Costs" title="Direct link to Costs" translate="no">​</a></h3>
<p>Cloud services do cost money and it can be difficult to predict those costs in advance, especially for the inexperienced. The key is to use any available tools to predict costs accurately, and adjust use over time: one of the benefits of the cloud in general is the ability to adjust workload up or down at a moment's notice. If costs are going up faster than you would like, you can turn off any non-critical systems in seconds.</p>
<p>However, though this is a drawback for the inexperienced, it is arguably a benefit as well. Another of the general benefits of the cloud is paying less overall, as you only pay for the services and compute that you use. Cloud providers frequently claim that moving your workload to the cloud is cheaper overall.</p>
<h3 class="anchor anchorTargetStickyNavbar_Vzrq" id="integration">Integration<a href="https://mikelikesrobots.github.io/blog/why-use-cloud-robotics#integration" class="hash-link" aria-label="Direct link to Integration" title="Direct link to Integration" translate="no">​</a></h3>
<p>Just as there is a cost to learning cloud technologies, there is also a cost in integrating cloud technologies into your system.</p>
<p>Early in development, integrating the cloud could result in a more complex method of achieving the same outcome. For example, sending a message to another machine on the same network is straightforward, but if scalability is your goal, you might prefer routing that message through the cloud to get to the other machine. During development, this means extra setup and increased round trip time to send messages between two machines, but once your robots get out into the field, you already know the messaging works reliably and can be extended to other applications in the cloud.</p>
<p>The issue is that using the cloud feels overcomplicated early in development, but the later you leave integration, but more challenging it will be to get it working correctly. My advice is to build a proof of concept with your preferred technology, then switch to using the cloud as early as you can. This slightly increases overhead early on, but it means your systems will all be built ready to take advantage of the cloud, making the transition to production much easier.</p>
<h3 class="anchor anchorTargetStickyNavbar_Vzrq" id="connectivity">Connectivity<a href="https://mikelikesrobots.github.io/blog/why-use-cloud-robotics#connectivity" class="hash-link" aria-label="Direct link to Connectivity" title="Direct link to Connectivity" translate="no">​</a></h3>
<p>The cloud is not always accessible to robots. Some robots operate outside areas with good connectivity, such as underwater or in space; even robots in industrial facilities are not guaranteed a consistent internet connection. This is an important consideration for how much cloud to use in the system. Submarine robots should be able to operate completely independently, but may connect to the internet after returning from mission. Industrial robots may use the cloud for non-critical systems, such as uploading logs or captured data, and cache that data until an internet connection is re-established in case it drops. Only those robots with a guaranteed internet connection should rely on the cloud for their critical systems.</p>
<p>One extra possibility here is to deploy a server near the robots using so-called edge technologies, such as Greengrass. This is the term that the cloud uses to describe any hardware acting outside of the data centre, such as your robots, or a server you deploy on-site.</p>
<h3 class="anchor anchorTargetStickyNavbar_Vzrq" id="security">Security<a href="https://mikelikesrobots.github.io/blog/why-use-cloud-robotics#security" class="hash-link" aria-label="Direct link to Security" title="Direct link to Security" translate="no">​</a></h3>
<p>Sending and receiving data using the public internet inherently comes with risk, especially compared to a system which operates entirely within an isolated network. This is another consideration when using the cloud; sensitive data travelling unsecured could be a big problem for your stack.</p>
<p>Having said that, cloud providers are very focused on providing good security to their customers exactly for this reason. A cloud system that has been well-designed could end up having increased security due to the layers of encryption, authentication, identity management, and private networks that come from a full cloud setup.</p>
<p>When deciding whether to use the cloud with your robotics, consider how sensitive the data you are dealing with is. The more sensitive the data, the more effort you should put into ensuring good security practice - even without the cloud! This drawback does not mean you shouldn't use the cloud - even highly secure government branches use some cloud providers, given sufficient security guarantees. This drawback is more around the design effort needed to maintain a secure system.</p>
<h2 class="anchor anchorTargetStickyNavbar_Vzrq" id="summary">Summary<a href="https://mikelikesrobots.github.io/blog/why-use-cloud-robotics#summary" class="hash-link" aria-label="Direct link to Summary" title="Direct link to Summary" translate="no">​</a></h2>
<p>Overall, cloud robotics can unlock use cases that would be incredibly difficult to accomplish otherwise. Cloud providers base their businesses on highly available, secure, powerful, and scalable systems, which are exactly what's required to scale up your robotics development out of the lab. The cloud can also help support robots in the field with extra compute resources to accomplish challenging tasks, and can support development through high power compute tasks such as GenAI and Simulation.</p>
<p>These benefits do come at a cost. In particular, hiring in cloud experts or learning to use the technologies means time and effort with training, ambiguity with cost predictions, additional system design to ensure security, and extra effort to integrate cloud technologies into your systems - more so if the cloud is being integrated into more mature systems. The cloud is also not constantly available for all robots, which must be considered when choosing how much to rely on the cloud.</p>
<p>Whether the cloud is mature enough and offers enough benefits depends on your use case. My advice is that if you want to build very complex robots, or you want to scale your fleet past around 10-20 robots, the benefits outweigh the drawbacks; try to integrate the cloud as soon as possible to avoid integration and security issues. However, if you're developing smaller or simpler fleets, the cloud is not a hard requirement, but can still be helpful as a simple way to access powerful servers and large storage capacity. Take a look at some of my other blog posts for more ideas of what you can accomplish with the cloud!</p>]]></content>
        <author>
            <name>Michael Hart</name>
            <uri>https://mikelikesrobots.github.io</uri>
        </author>
        <category label="robotics" term="robotics"/>
        <category label="cloud" term="cloud"/>
        <category label="discussion" term="discussion"/>
    </entry>
    <entry>
        <title type="html"><![CDATA[Automatically Sending ROS2 Data to IoT Core with Greengrass]]></title>
        <id>https://mikelikesrobots.github.io/blog/automatic-ros2-greengrass-conversion</id>
        <link href="https://mikelikesrobots.github.io/blog/automatic-ros2-greengrass-conversion"/>
        <updated>2024-08-20T00:00:00.000Z</updated>
        <summary type="html"><![CDATA[This post is about connecting ROS2 robots to the cloud with a quick and simple Greengrass setup. I'll guide you through building a sample component that can be hosted on a server connected to your robot fleet, which will connect the robots to AWS IoT Core without modifying the robot software in any way. Setup requires installing only a few prerequisites. Let's see how it works!]]></summary>
        <content type="html"><![CDATA[<p>This post is about connecting ROS2 robots to the cloud with a quick and simple Greengrass setup. I'll guide you through building a sample component that can be hosted on a server connected to your robot fleet, which will connect the robots to AWS IoT Core without modifying the robot software in any way. Setup requires installing only a few prerequisites. Let's see how it works!</p>
<p>This article also includes a video walkthrough.</p>
<div class="video_jswG"><button type="button" class="poster_B6DH" aria-label="Play video: Automatically Sending ROS2 Data to IoT Core with Greengrass"><img src="https://i.ytimg.com/vi/kyW57FHPU6k/hqdefault.jpg" alt="" width="480" height="360" loading="lazy"><span class="play_lEvZ" aria-hidden="true">▶</span><span class="caption_yrhJ">Watch: <!-- -->Automatically Sending ROS2 Data to IoT Core with Greengrass</span></button></div><noscript><p><a href="https://www.youtube.com/watch?v=kyW57FHPU6k&amp;t=0">Watch <!-- -->Automatically Sending ROS2 Data to IoT Core with Greengrass<!-- --> on YouTube</a></p></noscript>
<h2 class="anchor anchorTargetStickyNavbar_Vzrq" id="methods-of-connecting-to-iot-core">Methods of Connecting to IoT Core<a href="https://mikelikesrobots.github.io/blog/automatic-ros2-greengrass-conversion#methods-of-connecting-to-iot-core" class="hash-link" aria-label="Direct link to Methods of Connecting to IoT Core" title="Direct link to Methods of Connecting to IoT Core" translate="no">​</a></h2>
<h3 class="anchor anchorTargetStickyNavbar_Vzrq" id="ros2-conversion-by-robot">ROS2 Conversion by Robot<a href="https://mikelikesrobots.github.io/blog/automatic-ros2-greengrass-conversion#ros2-conversion-by-robot" class="hash-link" aria-label="Direct link to ROS2 Conversion by Robot" title="Direct link to ROS2 Conversion by Robot" translate="no">​</a></h3>
<p>A reliable way of connecting robots to the cloud is to provision a Thing for each robot. In AWS, this means registering a Thing in your AWS account and downloading a certificate for each robot, which is then used for authentication and authorization. I have a video on how to set this up, including sample code that you can run through, available here:</p>
<div class="video_jswG"><button type="button" class="poster_B6DH" aria-label="Play video: Automatically Sending ROS2 Data to IoT Core with Greengrass — supporting video"><img src="https://i.ytimg.com/vi/OnVewSeayjI/hqdefault.jpg" alt="" width="480" height="360" loading="lazy"><span class="play_lEvZ" aria-hidden="true">▶</span><span class="caption_yrhJ">Watch: <!-- -->Automatically Sending ROS2 Data to IoT Core with Greengrass — supporting video</span></button></div><noscript><p><a href="https://www.youtube.com/watch?v=OnVewSeayjI&amp;t=0">Watch <!-- -->Automatically Sending ROS2 Data to IoT Core with Greengrass — supporting video<!-- --> on YouTube</a></p></noscript>
<p>I also have another video which extends this setup by connecting all the robots to a single server with AWS IoT Greengrass installed on it, acting as a single connection point to the public internet. This is a hub-and-spoke model where all robots connect to the Greengrass server and the server connects to the cloud. It has the advantage of being easier to manage remotely, offering the ability to download more Greengrass components to the server, and managing a single connection to AWS IoT Core, which reduces costs. I have a video on setting this up as well:</p>
<div class="video_jswG"><button type="button" class="poster_B6DH" aria-label="Play video: Automatically Sending ROS2 Data to IoT Core with Greengrass — supporting video"><img src="https://i.ytimg.com/vi/3FHvtxQ62nY/hqdefault.jpg" alt="" width="480" height="360" loading="lazy"><span class="play_lEvZ" aria-hidden="true">▶</span><span class="caption_yrhJ">Watch: <!-- -->Automatically Sending ROS2 Data to IoT Core with Greengrass — supporting video</span></button></div><noscript><p><a href="https://www.youtube.com/watch?v=3FHvtxQ62nY&amp;t=0">Watch <!-- -->Automatically Sending ROS2 Data to IoT Core with Greengrass — supporting video<!-- --> on YouTube</a></p></noscript>
<p>With this method, the individual robots are responsible for converting any messages destined for the cloud into JSON blocks that could be sent as MQTT messages, which requires coding manually and setting up each robot individually with its own certificate and conversion nodes.</p>
<h3 class="anchor anchorTargetStickyNavbar_Vzrq" id="ros2-conversion-by-greengrass">ROS2 Conversion by Greengrass<a href="https://mikelikesrobots.github.io/blog/automatic-ros2-greengrass-conversion#ros2-conversion-by-greengrass" class="hash-link" aria-label="Direct link to ROS2 Conversion by Greengrass" title="Direct link to ROS2 Conversion by Greengrass" translate="no">​</a></h3>
<p>In this method, the Greengrass server has a component which operates by subscribing to ROS2 topics and converting the messages to MQTT directly. This has two major advantages:</p>
<ol>
<li class="">The robots do not need certificates, conversion nodes, or any custom code to convert topics.</li>
<li class="">The Greengrass component can be configured from a central location with the topics it should subscribe to.</li>
</ol>
<p>In addition, the Greengrass server provisions its own AWS IoT certificate, which means that all the server setup requires is installing Greengrass and Docker for running the components. Everything else can be configured from the cloud!</p>
<p>This method comes with its own downsides, including:</p>
<ol>
<li class="">The Greengrass component does no verification on the device publishing messages on its subscribed topics. That is, if an attacker published messages on the ROS2 network, the Greengrass component would treat them as if they came from a real robot. That means this solution is best used in a closed, protected system, or where the ROS2 network is secured.</li>
<li class="">The component only has public messages available to it. If you use custom messages in your ROS2 applications, you will need to build these into the Greengrass component or provide them separately so the component can convert ROS2 messages to JSON correctly.</li>
</ol>
<p>If these downsides don't sound too detrimental to use in your system, then let's continue! We'll start by building the Greengrass component and publishing it to our AWS account.</p>
<h2 class="anchor anchorTargetStickyNavbar_Vzrq" id="building-the-greengrass-component">Building the Greengrass Component<a href="https://mikelikesrobots.github.io/blog/automatic-ros2-greengrass-conversion#building-the-greengrass-component" class="hash-link" aria-label="Direct link to Building the Greengrass Component" title="Direct link to Building the Greengrass Component" translate="no">​</a></h2>
<p>For this sample, we will build a Greengrass component that runs a Docker Compose application. This is the same setup as in my <a class="" href="https://mikelikesrobots.github.io/blog/docker-compose-in-gg">Deploying Docker Compose with Greengrass</a> post, and uses the same code as a base. We will use the Docker Compose application to run a ROS2-based Docker container that can be configured to subscribe to any ROS2 topic, and it will dynamically import the relevant message class, subscribe to the topic, convert incoming messages to JSON, and send them over local pub/sub to other Greengrass components. By deploying additional components that include an MQTT broker, we can then automatically forward those messages into the cloud.</p>
<p>Overall, this means we have a system where changing the configuration of our component on the Greengrass server will result in all messages from connected robots being converted and sent to the cloud automatically.</p>
<p>In order to build the Greengrass components, we need a system with a few prerequisites installed. I used a fresh EC2 instance to build the components and run the demo system.</p>
<h3 class="anchor anchorTargetStickyNavbar_Vzrq" id="system-setup">System Setup<a href="https://mikelikesrobots.github.io/blog/automatic-ros2-greengrass-conversion#system-setup" class="hash-link" aria-label="Direct link to System Setup" title="Direct link to System Setup" translate="no">​</a></h3>
<p>Any platform that can run Docker and Greengrass will work for this demo. I used Ubuntu 24.04, so feel free to translate the commands to your preferred system. The version of Ubuntu does not matter here, as we can use Docker to run any version of ROS2.</p>
<p>First, before installing any prerequisites, make sure your system is up to date:</p>
<div class="language-bash codeBlockContainer_Ckt0 theme-code-block" style="--prism-color:#393A34;--prism-background-color:#f6f8fa"><div class="codeBlockContent_QJqH"><pre tabindex="0" class="prism-code language-bash codeBlock_bY9V thin-scrollbar" style="color:#393A34;background-color:#f6f8fa"><code class="codeBlockLines_e6Vv"><div class="token-line" style="color:#393A34"><span class="token plain">sudo apt update &amp;&amp; sudo apt upgrade -y</span><br></div></code></pre></div></div>
<p>Then, we can proceed to install the build requirements.</p>
<h4 class="anchor anchorTargetStickyNavbar_Vzrq" id="aws-cli">AWS CLI<a href="https://mikelikesrobots.github.io/blog/automatic-ros2-greengrass-conversion#aws-cli" class="hash-link" aria-label="Direct link to AWS CLI" title="Direct link to AWS CLI" translate="no">​</a></h4>
<p>We can follow the <a href="https://docs.aws.amazon.com/cli/latest/userguide/getting-started-install.html" target="_blank" rel="noopener noreferrer" class="">user guide</a> for installing the AWS CLI, and the simplest thing to do is execute these commands:</p>
<div class="language-bash codeBlockContainer_Ckt0 theme-code-block" style="--prism-color:#393A34;--prism-background-color:#f6f8fa"><div class="codeBlockContent_QJqH"><pre tabindex="0" class="prism-code language-bash codeBlock_bY9V thin-scrollbar" style="color:#393A34;background-color:#f6f8fa"><code class="codeBlockLines_e6Vv"><div class="token-line" style="color:#393A34"><span class="token plain">sudo apt install -y unzip</span><br></div><div class="token-line" style="color:#393A34"><span class="token plain">curl "https://awscli.amazonaws.com/awscli-exe-linux-x86_64.zip" -o "awscliv2.zip"</span><br></div><div class="token-line" style="color:#393A34"><span class="token plain">unzip awscliv2.zip</span><br></div><div class="token-line" style="color:#393A34"><span class="token plain">sudo ./aws/install</span><br></div></code></pre></div></div>
<p>We also need to provide AWS permissions to the system. In my case, I assigned an IAM role with admin permissions to my EC2 instance.</p>
<p>Check that the installation is working and has valid credentials by running the following command:</p>
<div class="language-bash codeBlockContainer_Ckt0 theme-code-block" style="--prism-color:#393A34;--prism-background-color:#f6f8fa"><div class="codeBlockContent_QJqH"><pre tabindex="0" class="prism-code language-bash codeBlock_bY9V thin-scrollbar" style="color:#393A34;background-color:#f6f8fa"><code class="codeBlockLines_e6Vv"><div class="token-line" style="color:#393A34"><span class="token plain">aws sts get-caller-identity</span><br></div></code></pre></div></div>
<h4 class="anchor anchorTargetStickyNavbar_Vzrq" id="docker">Docker<a href="https://mikelikesrobots.github.io/blog/automatic-ros2-greengrass-conversion#docker" class="hash-link" aria-label="Direct link to Docker" title="Direct link to Docker" translate="no">​</a></h4>
<p>The simplest way to install Docker is using the <a href="https://get.docker.com/" target="_blank" rel="noopener noreferrer" class="">Get Docker script</a>, as follows:</p>
<div class="language-bash codeBlockContainer_Ckt0 theme-code-block" style="--prism-color:#393A34;--prism-background-color:#f6f8fa"><div class="codeBlockContent_QJqH"><pre tabindex="0" class="prism-code language-bash codeBlock_bY9V thin-scrollbar" style="color:#393A34;background-color:#f6f8fa"><code class="codeBlockLines_e6Vv"><div class="token-line" style="color:#393A34"><span class="token plain">curl https://get.docker.com/ | sh</span><br></div></code></pre></div></div>
<p>Once installed, make sure your user has permission to run containers as follows:</p>
<div class="language-bash codeBlockContainer_Ckt0 theme-code-block" style="--prism-color:#393A34;--prism-background-color:#f6f8fa"><div class="codeBlockContent_QJqH"><pre tabindex="0" class="prism-code language-bash codeBlock_bY9V thin-scrollbar" style="color:#393A34;background-color:#f6f8fa"><code class="codeBlockLines_e6Vv"><div class="token-line" style="color:#393A34"><span class="token plain">sudo usermod -aG docker $USER</span><br></div><div class="token-line" style="color:#393A34"><span class="token plain"># To activate in current shell:</span><br></div><div class="token-line" style="color:#393A34"><span class="token plain">newgrp docker</span><br></div></code></pre></div></div>
<p>Check that the installation worked by getting responses from the following commands:</p>
<div class="language-bash codeBlockContainer_Ckt0 theme-code-block" style="--prism-color:#393A34;--prism-background-color:#f6f8fa"><div class="codeBlockContent_QJqH"><pre tabindex="0" class="prism-code language-bash codeBlock_bY9V thin-scrollbar" style="color:#393A34;background-color:#f6f8fa"><code class="codeBlockLines_e6Vv"><div class="token-line" style="color:#393A34"><span class="token plain">docker --version</span><br></div><div class="token-line" style="color:#393A34"><span class="token plain">docker compose --help</span><br></div></code></pre></div></div>
<h4 class="anchor anchorTargetStickyNavbar_Vzrq" id="greengrass-development-kit">Greengrass Development Kit<a href="https://mikelikesrobots.github.io/blog/automatic-ros2-greengrass-conversion#greengrass-development-kit" class="hash-link" aria-label="Direct link to Greengrass Development Kit" title="Direct link to Greengrass Development Kit" translate="no">​</a></h4>
<p>Finally, to build the Greengrass component, <a href="https://docs.aws.amazon.com/greengrass/v2/developerguide/install-greengrass-development-kit-cli.html" target="_blank" rel="noopener noreferrer" class="">install the Greengrass development kit</a> as follows:</p>
<div class="language-bash codeBlockContainer_Ckt0 theme-code-block" style="--prism-color:#393A34;--prism-background-color:#f6f8fa"><div class="codeBlockContent_QJqH"><pre tabindex="0" class="prism-code language-bash codeBlock_bY9V thin-scrollbar" style="color:#393A34;background-color:#f6f8fa"><code class="codeBlockLines_e6Vv"><div class="token-line" style="color:#393A34"><span class="token plain">sudo apt install -y pipx</span><br></div><div class="token-line" style="color:#393A34"><span class="token plain">pipx ensurepath</span><br></div><div class="token-line" style="color:#393A34"><span class="token plain">pipx install git+https://github.com/aws-greengrass/aws-greengrass-gdk-cli.git@v1.6.2</span><br></div></code></pre></div></div>
<p>Then reload the shell for the PATH changes to take effect, or execute <code>source ~/.bashrc</code>. Once complete, you can check the library is working by executing:</p>
<div class="language-bash codeBlockContainer_Ckt0 theme-code-block" style="--prism-color:#393A34;--prism-background-color:#f6f8fa"><div class="codeBlockContent_QJqH"><pre tabindex="0" class="prism-code language-bash codeBlock_bY9V thin-scrollbar" style="color:#393A34;background-color:#f6f8fa"><code class="codeBlockLines_e6Vv"><div class="token-line" style="color:#393A34"><span class="token plain">gdk --version</span><br></div></code></pre></div></div>
<h3 class="anchor anchorTargetStickyNavbar_Vzrq" id="cloning-and-building-the-sample">Cloning and Building the Sample<a href="https://mikelikesrobots.github.io/blog/automatic-ros2-greengrass-conversion#cloning-and-building-the-sample" class="hash-link" aria-label="Direct link to Cloning and Building the Sample" title="Direct link to Cloning and Building the Sample" translate="no">​</a></h3>
<p>With the system prerequisites installed, let's clone the sample application!</p>
<div class="language-bash codeBlockContainer_Ckt0 theme-code-block" style="--prism-color:#393A34;--prism-background-color:#f6f8fa"><div class="codeBlockContent_QJqH"><pre tabindex="0" class="prism-code language-bash codeBlock_bY9V thin-scrollbar" style="color:#393A34;background-color:#f6f8fa"><code class="codeBlockLines_e6Vv"><div class="token-line" style="color:#393A34"><span class="token plain">git clone https://github.com/mikelikesrobots/gg-ros2-mqtt-converter</span><br></div><div class="token-line" style="color:#393A34"><span class="token plain">cd gg-ros2-mqtt-converter</span><br></div><div class="token-line" style="color:#393A34"><span class="token plain">git submodule update --init --recursive</span><br></div></code></pre></div></div>
<p>The next step is to create two ECR repositories to host the Docker images built by this repository. You can accomplish this in the console or by using the following commands:</p>
<div class="language-bash codeBlockContainer_Ckt0 theme-code-block" style="--prism-color:#393A34;--prism-background-color:#f6f8fa"><div class="codeBlockContent_QJqH"><pre tabindex="0" class="prism-code language-bash codeBlock_bY9V thin-scrollbar" style="color:#393A34;background-color:#f6f8fa"><code class="codeBlockLines_e6Vv"><div class="token-line" style="color:#393A34"><span class="token plain">aws ecr create-repository --repository-name aws-iot-robot-connectivity-samples-ros2</span><br></div><div class="token-line" style="color:#393A34"><span class="token plain">aws ecr create-repository --repository-name ros2-mqtt-converter</span><br></div></code></pre></div></div>
<p>Extract the base URI from either repository URI and edit the <code>.env</code> file with the new value. These commands can also accomplish the same automatically:</p>
<div class="language-bash codeBlockContainer_Ckt0 theme-code-block" style="--prism-color:#393A34;--prism-background-color:#f6f8fa"><div class="codeBlockContent_QJqH"><pre tabindex="0" class="prism-code language-bash codeBlock_bY9V thin-scrollbar" style="color:#393A34;background-color:#f6f8fa"><code class="codeBlockLines_e6Vv"><div class="token-line" style="color:#393A34"><span class="token plain">URI=$(aws ecr describe-repositories --query repositories[0].repositoryUri --output text | cut -d/ -f1)</span><br></div><div class="token-line" style="color:#393A34"><span class="token plain">sed -i -e "s/REPLACE_ME/$URI/g" .env</span><br></div></code></pre></div></div>
<p>You should then be ready to build and publish the Docker images and Greengrass component using the following scripts:</p>
<div class="language-bash codeBlockContainer_Ckt0 theme-code-block" style="--prism-color:#393A34;--prism-background-color:#f6f8fa"><div class="codeBlockContent_QJqH"><pre tabindex="0" class="prism-code language-bash codeBlock_bY9V thin-scrollbar" style="color:#393A34;background-color:#f6f8fa"><code class="codeBlockLines_e6Vv"><div class="token-line" style="color:#393A34"><span class="token plain">./build_all.sh</span><br></div><div class="token-line" style="color:#393A34"><span class="token plain">./publish_all.sh</span><br></div></code></pre></div></div>
<p>This is all that's needed to build the software. This process only needs to be completed once per AWS account, no matter how many Greengrass deployments are created from it.</p>
<p>Let's take a look at what it's doing to understand how it works.</p>
<h3 class="anchor anchorTargetStickyNavbar_Vzrq" id="understanding-the-component">Understanding the Component<a href="https://mikelikesrobots.github.io/blog/automatic-ros2-greengrass-conversion#understanding-the-component" class="hash-link" aria-label="Direct link to Understanding the Component" title="Direct link to Understanding the Component" translate="no">​</a></h3>
<p>This repository builds one Greengrass component which runs two Docker images. The component only needs one of the two for message conversion - the other image is used to produce mock data so we can see the system working. We can see this in the <code>components/io.github.mikelikesrobots.Ros2MqttConverter/docker-compose.yml</code> file:</p>
<div class="language-yaml codeBlockContainer_Ckt0 theme-code-block" style="--prism-color:#393A34;--prism-background-color:#f6f8fa"><div class="codeBlockContent_QJqH"><pre tabindex="0" class="prism-code language-yaml codeBlock_bY9V thin-scrollbar" style="color:#393A34;background-color:#f6f8fa"><code class="codeBlockLines_e6Vv"><div class="token-line" style="color:#393A34"><span class="token key atrule" style="color:#00a4db">ros2-mqtt-converter</span><span class="token punctuation" style="color:#393A34">:</span><span class="token plain"></span><br></div><div class="token-line" style="color:#393A34"><span class="token plain">  </span><span class="token key atrule" style="color:#00a4db">image</span><span class="token punctuation" style="color:#393A34">:</span><span class="token plain"> </span><span class="token string" style="color:#e3116c">"{ECR_REPO}/ros2-mqtt-converter:latest"</span><span class="token plain"></span><br></div><div class="token-line" style="color:#393A34"><span class="token plain"></span><span class="token comment" style="color:#999988;font-style:italic"># ...</span><span class="token plain"></span><br></div><div class="token-line" style="color:#393A34"><span class="token plain"></span><span class="token key atrule" style="color:#00a4db">robot-1</span><span class="token punctuation" style="color:#393A34">:</span><span class="token plain"></span><br></div><div class="token-line" style="color:#393A34"><span class="token plain">  </span><span class="token key atrule" style="color:#00a4db">image</span><span class="token punctuation" style="color:#393A34">:</span><span class="token plain"> </span><span class="token string" style="color:#e3116c">"{ECR_REPO}/aws-iot-robot-connectivity-samples-ros2:latest"</span><br></div></code></pre></div></div>
<p>This is showing the converter using the <code>ros2-mqtt-converter</code> Docker image and three robots using the <code>aws-iot-robot-connectivity-samples-ros2</code>. If we had a system with real data, we could strip these services from the Docker Compose and remove the related folder from the <code>docker</code> folder.</p>
<p>We can also see each of the three robot services have namespaces set:</p>
<div class="language-yaml codeBlockContainer_Ckt0 theme-code-block" style="--prism-color:#393A34;--prism-background-color:#f6f8fa"><div class="codeBlockContent_QJqH"><pre tabindex="0" class="prism-code language-yaml codeBlock_bY9V thin-scrollbar" style="color:#393A34;background-color:#f6f8fa"><code class="codeBlockLines_e6Vv"><div class="token-line" style="color:#393A34"><span class="token key atrule" style="color:#00a4db">robot-1</span><span class="token punctuation" style="color:#393A34">:</span><span class="token plain"></span><br></div><div class="token-line" style="color:#393A34"><span class="token plain">  </span><span class="token key atrule" style="color:#00a4db">image</span><span class="token punctuation" style="color:#393A34">:</span><span class="token plain"> </span><span class="token string" style="color:#e3116c">"{ECR_REPO}/aws-iot-robot-connectivity-samples-ros2:latest"</span><span class="token plain"></span><br></div><div class="token-line" style="color:#393A34"><span class="token plain">  </span><span class="token key atrule" style="color:#00a4db">command</span><span class="token punctuation" style="color:#393A34">:</span><span class="token plain"> ros2 run telemetry_mqtt mock_telemetry_pub </span><span class="token punctuation" style="color:#393A34">-</span><span class="token punctuation" style="color:#393A34">-</span><span class="token plain">ros</span><span class="token punctuation" style="color:#393A34">-</span><span class="token plain">args </span><span class="token punctuation" style="color:#393A34">-</span><span class="token plain">r __ns</span><span class="token punctuation" style="color:#393A34">:</span><span class="token plain">=/robot1</span><br></div></code></pre></div></div>
<p>This is to separate the mock telemetry produced by each of the robots. In your own robot fleet, the messages should be namespaced to include the robot they came from so that this information can be included when ingesting data to the cloud.</p>
<p>The converter component works by taking a list of topics to subscribe to and trying to dynamically import the relevant message class for those topics. This is done at startup and periodically afterwards, to account for the cases where a topic isn't yet available, so the message type cannot be determined. The logic is contained in the <code>_update_subscriptions</code> method on line 56 of <code>converter.py</code>:</p>
<div class="language-python codeBlockContainer_Ckt0 theme-code-block" style="--prism-color:#393A34;--prism-background-color:#f6f8fa"><div class="codeBlockContent_QJqH"><pre tabindex="0" class="prism-code language-python codeBlock_bY9V thin-scrollbar" style="color:#393A34;background-color:#f6f8fa"><code class="codeBlockLines_e6Vv"><div class="token-line" style="color:#393A34"><span class="token keyword" style="color:#00009f">def</span><span class="token plain"> </span><span class="token function" style="color:#d73a49">_update_subscriptions</span><span class="token punctuation" style="color:#393A34">(</span><span class="token plain">self</span><span class="token punctuation" style="color:#393A34">)</span><span class="token punctuation" style="color:#393A34">:</span><span class="token plain"></span><br></div><div class="token-line" style="color:#393A34"><span class="token plain">    topic_tuples </span><span class="token operator" style="color:#393A34">=</span><span class="token plain"> self</span><span class="token punctuation" style="color:#393A34">.</span><span class="token plain">get_topic_names_and_types</span><span class="token punctuation" style="color:#393A34">(</span><span class="token punctuation" style="color:#393A34">)</span><span class="token plain"></span><br></div><div class="token-line" style="color:#393A34"><span class="token plain">    available_topics </span><span class="token operator" style="color:#393A34">=</span><span class="token plain"> </span><span class="token builtin">dict</span><span class="token punctuation" style="color:#393A34">(</span><span class="token punctuation" style="color:#393A34">(</span><span class="token plain">key</span><span class="token punctuation" style="color:#393A34">,</span><span class="token plain"> val</span><span class="token punctuation" style="color:#393A34">[</span><span class="token number" style="color:#36acaa">0</span><span class="token punctuation" style="color:#393A34">]</span><span class="token punctuation" style="color:#393A34">)</span><span class="token plain"> </span><span class="token keyword" style="color:#00009f">for</span><span class="token plain"> key</span><span class="token punctuation" style="color:#393A34">,</span><span class="token plain"> val </span><span class="token keyword" style="color:#00009f">in</span><span class="token plain"> topic_tuples</span><span class="token punctuation" style="color:#393A34">)</span><span class="token plain"></span><br></div><div class="token-line" style="color:#393A34"><span class="token plain">    </span><span class="token keyword" style="color:#00009f">for</span><span class="token plain"> topic </span><span class="token keyword" style="color:#00009f">in</span><span class="token plain"> self</span><span class="token punctuation" style="color:#393A34">.</span><span class="token plain">_config</span><span class="token punctuation" style="color:#393A34">:</span><span class="token plain"></span><br></div><div class="token-line" style="color:#393A34"><span class="token plain">        </span><span class="token comment" style="color:#999988;font-style:italic"># topic already exists in both? Continue</span><span class="token plain"></span><br></div><div class="token-line" style="color:#393A34"><span class="token plain">        </span><span class="token keyword" style="color:#00009f">if</span><span class="token plain"> topic </span><span class="token keyword" style="color:#00009f">in</span><span class="token plain"> available_topics </span><span class="token keyword" style="color:#00009f">and</span><span class="token plain"> topic </span><span class="token keyword" style="color:#00009f">in</span><span class="token plain"> self</span><span class="token punctuation" style="color:#393A34">.</span><span class="token plain">_dynamic_subscriptions</span><span class="token punctuation" style="color:#393A34">:</span><span class="token plain"></span><br></div><div class="token-line" style="color:#393A34"><span class="token plain">            self</span><span class="token punctuation" style="color:#393A34">.</span><span class="token plain">get_logger</span><span class="token punctuation" style="color:#393A34">(</span><span class="token punctuation" style="color:#393A34">)</span><span class="token punctuation" style="color:#393A34">.</span><span class="token plain">info</span><span class="token punctuation" style="color:#393A34">(</span><span class="token string" style="color:#e3116c">"Subbed to {} already"</span><span class="token punctuation" style="color:#393A34">.</span><span class="token builtin">format</span><span class="token punctuation" style="color:#393A34">(</span><span class="token plain">topic</span><span class="token punctuation" style="color:#393A34">)</span><span class="token punctuation" style="color:#393A34">)</span><span class="token plain"></span><br></div><div class="token-line" style="color:#393A34"><span class="token plain">            </span><span class="token keyword" style="color:#00009f">continue</span><span class="token plain"></span><br></div><div class="token-line" style="color:#393A34"><span class="token plain">        </span><span class="token comment" style="color:#999988;font-style:italic"># if topic is subscribed but has no topic name, delete</span><span class="token plain"></span><br></div><div class="token-line" style="color:#393A34"><span class="token plain">        </span><span class="token keyword" style="color:#00009f">elif</span><span class="token plain"> topic </span><span class="token keyword" style="color:#00009f">not</span><span class="token plain"> </span><span class="token keyword" style="color:#00009f">in</span><span class="token plain"> available_topics </span><span class="token keyword" style="color:#00009f">and</span><span class="token plain"> topic </span><span class="token keyword" style="color:#00009f">in</span><span class="token plain"> self</span><span class="token punctuation" style="color:#393A34">.</span><span class="token plain">_dynamic_subscriptions</span><span class="token punctuation" style="color:#393A34">:</span><span class="token plain"></span><br></div><div class="token-line" style="color:#393A34"><span class="token plain">            self</span><span class="token punctuation" style="color:#393A34">.</span><span class="token plain">get_logger</span><span class="token punctuation" style="color:#393A34">(</span><span class="token punctuation" style="color:#393A34">)</span><span class="token punctuation" style="color:#393A34">.</span><span class="token plain">info</span><span class="token punctuation" style="color:#393A34">(</span><span class="token string" style="color:#e3116c">"Destroying sub for {}"</span><span class="token punctuation" style="color:#393A34">.</span><span class="token builtin">format</span><span class="token punctuation" style="color:#393A34">(</span><span class="token plain">topic</span><span class="token punctuation" style="color:#393A34">)</span><span class="token punctuation" style="color:#393A34">)</span><span class="token plain"></span><br></div><div class="token-line" style="color:#393A34"><span class="token plain">            self</span><span class="token punctuation" style="color:#393A34">.</span><span class="token plain">destroy_subscription</span><span class="token punctuation" style="color:#393A34">(</span><span class="token plain">self</span><span class="token punctuation" style="color:#393A34">.</span><span class="token plain">_dynamic_subscriptions</span><span class="token punctuation" style="color:#393A34">.</span><span class="token plain">pop</span><span class="token punctuation" style="color:#393A34">(</span><span class="token plain">topic</span><span class="token punctuation" style="color:#393A34">)</span><span class="token punctuation" style="color:#393A34">)</span><span class="token plain"></span><br></div><div class="token-line" style="color:#393A34"><span class="token plain">        </span><span class="token comment" style="color:#999988;font-style:italic"># if topic is not subscribed but should be, subscribe to it</span><span class="token plain"></span><br></div><div class="token-line" style="color:#393A34"><span class="token plain">        </span><span class="token keyword" style="color:#00009f">elif</span><span class="token plain"> topic </span><span class="token keyword" style="color:#00009f">in</span><span class="token plain"> available_topics </span><span class="token keyword" style="color:#00009f">and</span><span class="token plain"> topic </span><span class="token keyword" style="color:#00009f">not</span><span class="token plain"> </span><span class="token keyword" style="color:#00009f">in</span><span class="token plain"> self</span><span class="token punctuation" style="color:#393A34">.</span><span class="token plain">_dynamic_subscriptions</span><span class="token punctuation" style="color:#393A34">:</span><span class="token plain"></span><br></div><div class="token-line" style="color:#393A34"><span class="token plain">            self</span><span class="token punctuation" style="color:#393A34">.</span><span class="token plain">_subscribe_to</span><span class="token punctuation" style="color:#393A34">(</span><span class="token plain">topic</span><span class="token punctuation" style="color:#393A34">,</span><span class="token plain"> available_topics</span><span class="token punctuation" style="color:#393A34">[</span><span class="token plain">topic</span><span class="token punctuation" style="color:#393A34">]</span><span class="token punctuation" style="color:#393A34">)</span><br></div></code></pre></div></div>
<p>ROS2 provides a method to get all available topic names and types. These are then compared to the list of topics to subscribe to, and if any topic is available that hasn't already been subscribed to, the method <code>_subscribe_to</code> is called with the topic name and type:</p>
<div class="language-python codeBlockContainer_Ckt0 theme-code-block" style="--prism-color:#393A34;--prism-background-color:#f6f8fa"><div class="codeBlockContent_QJqH"><pre tabindex="0" class="prism-code language-python codeBlock_bY9V thin-scrollbar" style="color:#393A34;background-color:#f6f8fa"><code class="codeBlockLines_e6Vv"><div class="token-line" style="color:#393A34"><span class="token keyword" style="color:#00009f">def</span><span class="token plain"> </span><span class="token function" style="color:#d73a49">_subscribe_to</span><span class="token punctuation" style="color:#393A34">(</span><span class="token plain">self</span><span class="token punctuation" style="color:#393A34">,</span><span class="token plain"> topic_name</span><span class="token punctuation" style="color:#393A34">,</span><span class="token plain"> topic_type</span><span class="token punctuation" style="color:#393A34">)</span><span class="token punctuation" style="color:#393A34">:</span><span class="token plain"></span><br></div><div class="token-line" style="color:#393A34"><span class="token plain">    logger </span><span class="token operator" style="color:#393A34">=</span><span class="token plain"> self</span><span class="token punctuation" style="color:#393A34">.</span><span class="token plain">get_logger</span><span class="token punctuation" style="color:#393A34">(</span><span class="token punctuation" style="color:#393A34">)</span><span class="token plain"></span><br></div><div class="token-line" style="color:#393A34"><span class="token plain">    logger</span><span class="token punctuation" style="color:#393A34">.</span><span class="token plain">info</span><span class="token punctuation" style="color:#393A34">(</span><span class="token string" style="color:#e3116c">"Creating subscription to topic {}"</span><span class="token punctuation" style="color:#393A34">.</span><span class="token builtin">format</span><span class="token punctuation" style="color:#393A34">(</span><span class="token plain">topic_name</span><span class="token punctuation" style="color:#393A34">)</span><span class="token punctuation" style="color:#393A34">)</span><span class="token plain"></span><br></div><div class="token-line" style="color:#393A34"><span class="token plain">    pkg </span><span class="token operator" style="color:#393A34">=</span><span class="token plain"> </span><span class="token string" style="color:#e3116c">"."</span><span class="token punctuation" style="color:#393A34">.</span><span class="token plain">join</span><span class="token punctuation" style="color:#393A34">(</span><span class="token plain">topic_type</span><span class="token punctuation" style="color:#393A34">.</span><span class="token plain">split</span><span class="token punctuation" style="color:#393A34">(</span><span class="token string" style="color:#e3116c">"/"</span><span class="token punctuation" style="color:#393A34">)</span><span class="token punctuation" style="color:#393A34">[</span><span class="token punctuation" style="color:#393A34">:</span><span class="token operator" style="color:#393A34">-</span><span class="token number" style="color:#36acaa">1</span><span class="token punctuation" style="color:#393A34">]</span><span class="token punctuation" style="color:#393A34">)</span><span class="token plain"></span><br></div><div class="token-line" style="color:#393A34"><span class="token plain">    _cls </span><span class="token operator" style="color:#393A34">=</span><span class="token plain"> topic_type</span><span class="token punctuation" style="color:#393A34">.</span><span class="token plain">split</span><span class="token punctuation" style="color:#393A34">(</span><span class="token string" style="color:#e3116c">"/"</span><span class="token punctuation" style="color:#393A34">)</span><span class="token punctuation" style="color:#393A34">[</span><span class="token operator" style="color:#393A34">-</span><span class="token number" style="color:#36acaa">1</span><span class="token punctuation" style="color:#393A34">]</span><span class="token plain"></span><br></div><div class="token-line" style="color:#393A34"><span class="token plain">    logger</span><span class="token punctuation" style="color:#393A34">.</span><span class="token plain">info</span><span class="token punctuation" style="color:#393A34">(</span><span class="token string" style="color:#e3116c">"from {} import {}"</span><span class="token punctuation" style="color:#393A34">.</span><span class="token builtin">format</span><span class="token punctuation" style="color:#393A34">(</span><span class="token plain">pkg</span><span class="token punctuation" style="color:#393A34">,</span><span class="token plain"> _cls</span><span class="token punctuation" style="color:#393A34">)</span><span class="token punctuation" style="color:#393A34">)</span><span class="token plain"></span><br></div><div class="token-line" style="color:#393A34"><span class="token plain">    msg_type </span><span class="token operator" style="color:#393A34">=</span><span class="token plain"> </span><span class="token builtin">getattr</span><span class="token punctuation" style="color:#393A34">(</span><span class="token builtin">__import__</span><span class="token punctuation" style="color:#393A34">(</span><span class="token plain">pkg</span><span class="token punctuation" style="color:#393A34">,</span><span class="token plain"> </span><span class="token builtin">globals</span><span class="token punctuation" style="color:#393A34">(</span><span class="token punctuation" style="color:#393A34">)</span><span class="token punctuation" style="color:#393A34">,</span><span class="token plain"> </span><span class="token builtin">locals</span><span class="token punctuation" style="color:#393A34">(</span><span class="token punctuation" style="color:#393A34">)</span><span class="token punctuation" style="color:#393A34">,</span><span class="token plain"> </span><span class="token punctuation" style="color:#393A34">[</span><span class="token plain">_cls</span><span class="token punctuation" style="color:#393A34">]</span><span class="token punctuation" style="color:#393A34">,</span><span class="token plain"> </span><span class="token number" style="color:#36acaa">0</span><span class="token punctuation" style="color:#393A34">)</span><span class="token punctuation" style="color:#393A34">,</span><span class="token plain"> _cls</span><span class="token punctuation" style="color:#393A34">)</span><span class="token plain"></span><br></div><div class="token-line" style="color:#393A34"><span class="token plain" style="display:inline-block"></span><br></div><div class="token-line" style="color:#393A34"><span class="token plain">    sub </span><span class="token operator" style="color:#393A34">=</span><span class="token plain"> self</span><span class="token punctuation" style="color:#393A34">.</span><span class="token plain">create_subscription</span><span class="token punctuation" style="color:#393A34">(</span><span class="token plain"></span><br></div><div class="token-line" style="color:#393A34"><span class="token plain">        msg_type</span><span class="token punctuation" style="color:#393A34">,</span><span class="token plain"></span><br></div><div class="token-line" style="color:#393A34"><span class="token plain">        topic_name</span><span class="token punctuation" style="color:#393A34">,</span><span class="token plain"></span><br></div><div class="token-line" style="color:#393A34"><span class="token plain">        </span><span class="token keyword" style="color:#00009f">lambda</span><span class="token plain"> msg</span><span class="token punctuation" style="color:#393A34">:</span><span class="token plain"> self</span><span class="token punctuation" style="color:#393A34">.</span><span class="token plain">_callback</span><span class="token punctuation" style="color:#393A34">(</span><span class="token plain">topic_name</span><span class="token punctuation" style="color:#393A34">,</span><span class="token plain"> msg</span><span class="token punctuation" style="color:#393A34">)</span><span class="token punctuation" style="color:#393A34">,</span><span class="token plain"></span><br></div><div class="token-line" style="color:#393A34"><span class="token plain">        </span><span class="token number" style="color:#36acaa">10</span><span class="token plain"></span><br></div><div class="token-line" style="color:#393A34"><span class="token plain">    </span><span class="token punctuation" style="color:#393A34">)</span><span class="token plain"></span><br></div><div class="token-line" style="color:#393A34"><span class="token plain">    </span><span class="token comment" style="color:#999988;font-style:italic"># self._subscriptions is in use by the base class</span><span class="token plain"></span><br></div><div class="token-line" style="color:#393A34"><span class="token plain">    self</span><span class="token punctuation" style="color:#393A34">.</span><span class="token plain">_dynamic_subscriptions</span><span class="token punctuation" style="color:#393A34">[</span><span class="token plain">topic_name</span><span class="token punctuation" style="color:#393A34">]</span><span class="token plain"> </span><span class="token operator" style="color:#393A34">=</span><span class="token plain"> sub</span><br></div></code></pre></div></div>
<p>This function parses the message type string to find the import path, then tries to import the class. If successful, the node will create a subscription that calls the <code>_callback</code> method with the topic name and message contents:</p>
<div class="language-python codeBlockContainer_Ckt0 theme-code-block" style="--prism-color:#393A34;--prism-background-color:#f6f8fa"><div class="codeBlockContent_QJqH"><pre tabindex="0" class="prism-code language-python codeBlock_bY9V thin-scrollbar" style="color:#393A34;background-color:#f6f8fa"><code class="codeBlockLines_e6Vv"><div class="token-line" style="color:#393A34"><span class="token keyword" style="color:#00009f">def</span><span class="token plain"> </span><span class="token function" style="color:#d73a49">_callback</span><span class="token punctuation" style="color:#393A34">(</span><span class="token plain">self</span><span class="token punctuation" style="color:#393A34">,</span><span class="token plain"> topic_name</span><span class="token punctuation" style="color:#393A34">,</span><span class="token plain"> msg</span><span class="token punctuation" style="color:#393A34">)</span><span class="token punctuation" style="color:#393A34">:</span><span class="token plain"></span><br></div><div class="token-line" style="color:#393A34"><span class="token plain">    mqtt_topic </span><span class="token operator" style="color:#393A34">=</span><span class="token plain"> </span><span class="token string" style="color:#e3116c">"robots/"</span><span class="token plain"> </span><span class="token operator" style="color:#393A34">+</span><span class="token plain"> topic_name</span><br></div><div class="token-line" style="color:#393A34"><span class="token plain">    mqtt_topic </span><span class="token operator" style="color:#393A34">=</span><span class="token plain"> mqtt_topic</span><span class="token punctuation" style="color:#393A34">.</span><span class="token plain">replace</span><span class="token punctuation" style="color:#393A34">(</span><span class="token string" style="color:#e3116c">"//"</span><span class="token punctuation" style="color:#393A34">,</span><span class="token plain"> </span><span class="token string" style="color:#e3116c">"/"</span><span class="token punctuation" style="color:#393A34">)</span><span class="token plain"></span><br></div><div class="token-line" style="color:#393A34"><span class="token plain" style="display:inline-block"></span><br></div><div class="token-line" style="color:#393A34"><span class="token plain">    ordered_dict </span><span class="token operator" style="color:#393A34">=</span><span class="token plain"> message_to_ordereddict</span><span class="token punctuation" style="color:#393A34">(</span><span class="token plain">msg</span><span class="token punctuation" style="color:#393A34">)</span><span class="token plain"></span><br></div><div class="token-line" style="color:#393A34"><span class="token plain">    mqtt_msg </span><span class="token operator" style="color:#393A34">=</span><span class="token plain"> json</span><span class="token punctuation" style="color:#393A34">.</span><span class="token plain">dumps</span><span class="token punctuation" style="color:#393A34">(</span><span class="token plain">ordered_dict</span><span class="token punctuation" style="color:#393A34">)</span><span class="token plain"></span><br></div><div class="token-line" style="color:#393A34"><span class="token plain" style="display:inline-block"></span><br></div><div class="token-line" style="color:#393A34"><span class="token plain">    self</span><span class="token punctuation" style="color:#393A34">.</span><span class="token plain">get_logger</span><span class="token punctuation" style="color:#393A34">(</span><span class="token punctuation" style="color:#393A34">)</span><span class="token punctuation" style="color:#393A34">.</span><span class="token plain">debug</span><span class="token punctuation" style="color:#393A34">(</span><span class="token string" style="color:#e3116c">"Publishing on topic {} with message {}"</span><span class="token punctuation" style="color:#393A34">.</span><span class="token builtin">format</span><span class="token punctuation" style="color:#393A34">(</span><span class="token plain">mqtt_topic</span><span class="token punctuation" style="color:#393A34">,</span><span class="token plain"> mqtt_msg</span><span class="token punctuation" style="color:#393A34">)</span><span class="token punctuation" style="color:#393A34">)</span><span class="token plain"></span><br></div><div class="token-line" style="color:#393A34"><span class="token plain" style="display:inline-block"></span><br></div><div class="token-line" style="color:#393A34"><span class="token plain">    binary_message </span><span class="token operator" style="color:#393A34">=</span><span class="token plain"> BinaryMessage</span><span class="token punctuation" style="color:#393A34">(</span><span class="token plain">message</span><span class="token operator" style="color:#393A34">=</span><span class="token builtin">bytes</span><span class="token punctuation" style="color:#393A34">(</span><span class="token plain">mqtt_msg</span><span class="token punctuation" style="color:#393A34">,</span><span class="token plain"> </span><span class="token string" style="color:#e3116c">"utf-8"</span><span class="token punctuation" style="color:#393A34">)</span><span class="token punctuation" style="color:#393A34">)</span><span class="token plain"></span><br></div><div class="token-line" style="color:#393A34"><span class="token plain">    publish_message </span><span class="token operator" style="color:#393A34">=</span><span class="token plain"> PublishMessage</span><span class="token punctuation" style="color:#393A34">(</span><span class="token plain">binary_message</span><span class="token operator" style="color:#393A34">=</span><span class="token plain">binary_message</span><span class="token punctuation" style="color:#393A34">)</span><span class="token plain"></span><br></div><div class="token-line" style="color:#393A34"><span class="token plain">    self</span><span class="token punctuation" style="color:#393A34">.</span><span class="token plain">_ipc_client</span><span class="token punctuation" style="color:#393A34">.</span><span class="token plain">publish_to_topic</span><span class="token punctuation" style="color:#393A34">(</span><span class="token plain">topic</span><span class="token operator" style="color:#393A34">=</span><span class="token plain">mqtt_topic</span><span class="token punctuation" style="color:#393A34">,</span><span class="token plain"> publish_message</span><span class="token operator" style="color:#393A34">=</span><span class="token plain">publish_message</span><span class="token punctuation" style="color:#393A34">)</span><br></div></code></pre></div></div>
<p>Inside the callback, the message is converted to an ordered dictionary by a ROS2 method, then converted to JSON by the <code>json</code> package. This is sufficient to package and publish, so the node then publishes the request to publish over local pub/sub to Greengrass. From there, the Bridge and MQTT broker take the message and publish it to AWS IoT Core. This mechanism is described more in <a href="https://mikelikesrobots.github.io/blog/automatic-ros2-greengrass-conversion#testing-the-component" class="">Testing the Component</a>.</p>
<p>Now we understand how the converter functions, let's see how to use it, and discuss the data flow through Greengrass to publish to the cloud.</p>
<h2 class="anchor anchorTargetStickyNavbar_Vzrq" id="testing-the-component">Testing the Component<a href="https://mikelikesrobots.github.io/blog/automatic-ros2-greengrass-conversion#testing-the-component" class="hash-link" aria-label="Direct link to Testing the Component" title="Direct link to Testing the Component" translate="no">​</a></h2>
<p>To test the component out, we need a Greengrass installation. I will continue to use the same machine for testing, as the prerequisites for building the code are also useful for installing Greengrass. We only have one more dependency to install:</p>
<div class="language-bash codeBlockContainer_Ckt0 theme-code-block" style="--prism-color:#393A34;--prism-background-color:#f6f8fa"><div class="codeBlockContent_QJqH"><pre tabindex="0" class="prism-code language-bash codeBlock_bY9V thin-scrollbar" style="color:#393A34;background-color:#f6f8fa"><code class="codeBlockLines_e6Vv"><div class="token-line" style="color:#393A34"><span class="token plain">sudo apt install -y default-jre</span><br></div></code></pre></div></div>
<p>To set up Greengrass, including with a deployment of our new component, we only need to run the <code>scripts/setup_greengrass.sh</code> script. This script downloads the Greengrass installer and runs it with some parameters that you may need to update, such as the region. Once complete, it retrieves the ARN of the Greengrass core device you just created, then creates a deployment for it that includes all of the components we need.</p>
<p>If you would like to learn more about Greengrass and see a more thorough guide on installing it, take a look at my video linked below:</p>
<div class="video_jswG"><button type="button" class="poster_B6DH" aria-label="Play video: Automatically Sending ROS2 Data to IoT Core with Greengrass — supporting video"><img src="https://i.ytimg.com/vi/2VXIILtiMiU/hqdefault.jpg" alt="" width="480" height="360" loading="lazy"><span class="play_lEvZ" aria-hidden="true">▶</span><span class="caption_yrhJ">Watch: <!-- -->Automatically Sending ROS2 Data to IoT Core with Greengrass — supporting video</span></button></div><noscript><p><a href="https://www.youtube.com/watch?v=2VXIILtiMiU&amp;t=0">Watch <!-- -->Automatically Sending ROS2 Data to IoT Core with Greengrass — supporting video<!-- --> on YouTube</a></p></noscript>
<p>The components and config are defined in the <code>scripts/greengrass_deployment_config.json</code> file. This defines a few components with some configuration:</p>
<ol>
<li class="">Nucleus - needed for all Greengrass operations.</li>
<li class="">Cli - not required in this instance, but useful to modify the installation locally.</li>
<li class="">EMQX - an MQTT broker provided by AWS. This will be used to publish messages to AWS IoT Core.</li>
<li class="">MQTT Bridge - a component that can be configured to pass messages between AWS IoT Core, the local MQTT broker, or Greengrass's pub sub mechanism. In this case, it is configured to forward any message received on local pub/sub that begins with <code>robots/</code> up to AWS IoT Core.</li>
<li class="">Docker Application Manager - required to run Docker containers, including the ROS2 MQTT Converter.</li>
<li class="">ROS2 MQTT Converter - our custom component, configured to listen to the <code>mock_telemetry</code> topic of three robots.</li>
</ol>
<p>Between these components, the data flows as follows:</p>
<ol>
<li class="">Robots 1, 2, and 3 in the Greengrass component publish mock telemetry messages.</li>
<li class="">ROS2 MQTT Converter is subscribed to these topics. It receives the messages, converts them to JSON, and publishes them using Greengrass pub/sub.</li>
<li class="">The MQTT Bridge subscribes to these messages and packs them into MQTT messages, then uses the MQTT Broker to publish to AWS IoT Core.</li>
<li class="">The messages are received in AWS IoT Core.</li>
</ol>
<p>Try updating the script with your region and any other parameters you wish to change, then run it to see the results:</p>
<div class="language-bash codeBlockContainer_Ckt0 theme-code-block" style="--prism-color:#393A34;--prism-background-color:#f6f8fa"><div class="codeBlockContent_QJqH"><pre tabindex="0" class="prism-code language-bash codeBlock_bY9V thin-scrollbar" style="color:#393A34;background-color:#f6f8fa"><code class="codeBlockLines_e6Vv"><div class="token-line" style="color:#393A34"><span class="token plain">./scripts/setup_greengrass.sh</span><br></div></code></pre></div></div>
<p>Once the Greengrass core device has had a few minutes to start up and receive its deployment, it should start a few Docker containers and begin publishing messages to AWS IoT Core. We can check this using the <a href="https://us-west-2.console.aws.amazon.com/iot/home?region=us-west-2#/test" target="_blank" rel="noopener noreferrer" class="">MQTT Test Client</a> by subscribing to the <code>#</code> topic and seeing the messages come through:</p>
<p><img decoding="async" loading="lazy" alt="Mock telemetry data in MQTT Test Client" src="https://mikelikesrobots.github.io/assets/images/mqtt-test-client-61a2e9684b586c4f50c8a86837a6df78.webp" width="1222" height="836" class="img_ev3q"></p>
<h2 class="anchor anchorTargetStickyNavbar_Vzrq" id="next-steps">Next Steps<a href="https://mikelikesrobots.github.io/blog/automatic-ros2-greengrass-conversion#next-steps" class="hash-link" aria-label="Direct link to Next Steps" title="Direct link to Next Steps" translate="no">​</a></h2>
<p>In this post, I showed how to set up a Greengrass component that will subscribe to ROS2 topics and send messages up to AWS IoT Core automatically, with the option to configure the subscription topics in the cloud via Greengrass. With this working, I would recommend removing the mock data generator and connecting it to your robot fleet. You will soon find that the component is missing messages you need, either from custom ones you have defined or standard ones in extra packages, such as nav messages. See if you can figure out how to add the message definitions to the Greengrass component!</p>
<p>You could also work on <a href="https://youtu.be/9ZRZhrJFz7A" target="_blank" rel="noopener noreferrer" class="">ingesting the data into AWS IoT SiteWise</a>, or <a href="https://youtu.be/cCZwQfaE6Jc" target="_blank" rel="noopener noreferrer" class="">retrieving logs and posting them to Amazon Cloudwatch</a>. Both are topics I have covered in previous videos, but with a different way of connecting robots to the cloud. Try using the new method to ingest data and collect logs into the cloud!</p>]]></content>
        <author>
            <name>Michael Hart</name>
            <uri>https://mikelikesrobots.github.io</uri>
        </author>
        <category label="robotics" term="robotics"/>
        <category label="aws" term="aws"/>
        <category label="iot" term="iot"/>
        <category label="greengrass" term="greengrass"/>
        <category label="cloud" term="cloud"/>
    </entry>
    <entry>
        <title type="html"><![CDATA[Simulating Robots in the Cloud with EC2 and O3DE]]></title>
        <id>https://mikelikesrobots.github.io/blog/simulation-in-cloud</id>
        <link href="https://mikelikesrobots.github.io/blog/simulation-in-cloud"/>
        <updated>2024-07-30T00:00:00.000Z</updated>
        <summary type="html"><![CDATA[Simulators such as Gazebo, NVIDIA Isaac Sim, and O3DE are incredibly helpful tools when it comes to robotics development. Robots are very slow and expensive to develop, and a large part of the reason is not being able to test how the robot works for real because of how slow it is to set up and run tests. With simulations, we can repeatedly run a robot through exactly the same setup every time to see how it behaves, allowing us to more quickly modify the robot software and run it again.]]></summary>
        <content type="html"><![CDATA[<p>Simulators such as <a href="https://gazebosim.org/home" target="_blank" rel="noopener noreferrer" class="">Gazebo</a>, <a href="https://developer.nvidia.com/isaac/sim" target="_blank" rel="noopener noreferrer" class="">NVIDIA Isaac Sim</a>, and <a href="https://o3de.org/" target="_blank" rel="noopener noreferrer" class="">O3DE</a> are incredibly helpful tools when it comes to robotics development. Robots are very slow and expensive to develop, and a large part of the reason is not being able to test how the robot works for real because of how slow it is to set up and run tests. With simulations, we can repeatedly run a robot through exactly the same setup every time to see how it behaves, allowing us to more quickly modify the robot software and run it again.</p>
<p>There's one issue - the more realistic the simulation, the more powerful the computer needed to run it. That's where the cloud comes in; instead of buying the hardware outright and running the computer in-house, you can run simulations <em>on demand</em> in the cloud, and only pay for the server while you're using it!</p>
<p>In this post, I'll show you how to run a multi-robot sample simulation using O3DE in the cloud, using an on-demand EC2 instance with graphics hardware available. If you'd like to follow along, this post is also available in video form using the link below:</p>
<div class="video_jswG"><button type="button" class="poster_B6DH" aria-label="Play video: Simulating Robots in the Cloud with EC2 and O3DE"><img src="https://i.ytimg.com/vi/GOcf0bCtINM/hqdefault.jpg" alt="" width="480" height="360" loading="lazy"><span class="play_lEvZ" aria-hidden="true">▶</span><span class="caption_yrhJ">Watch: <!-- -->Simulating Robots in the Cloud with EC2 and O3DE</span></button></div><noscript><p><a href="https://www.youtube.com/watch?v=GOcf0bCtINM&amp;t=0">Watch <!-- -->Simulating Robots in the Cloud with EC2 and O3DE<!-- --> on YouTube</a></p></noscript>
<h2 class="anchor anchorTargetStickyNavbar_Vzrq" id="o3de">O3DE<a href="https://mikelikesrobots.github.io/blog/simulation-in-cloud#o3de" class="hash-link" aria-label="Direct link to O3DE" title="Direct link to O3DE" translate="no">​</a></h2>
<p><a href="https://o3de.org/" target="_blank" rel="noopener noreferrer" class="">O3DE</a> is the world's first high-fidelity, real-time open source 3D engine - and the engine we will be using today. High fidelity means that the simulation it runs is close to the real world in behaviour. Simulation generally has a trade-off between speed and fidelity - the more accurately you simulate the world, the more effort and time it takes for the computer to do so.</p>
<p>O3DE does not require any payment or account setup to be able to use it, which makes it a great candidate for this tutorial. By removing the signup steps, we can get to a full simulation more quickly.</p>
<p>O3DE also has ROS2 integration, which is a huge benefit for us, as a lot of the tutorials I write use ROS2. We can use O3DE to <em>simulate</em> robots running instead of running them for real in a lab, which is incredibly useful for testing our behaviour without the slow loop of manually setting up a real robot and testing. In fact, O3DE received a lot of attention in the last ROSCon, and is co-sponsoring the only platinum sponsor for the <a href="https://o3de.org/events/roscon-2024/" target="_blank" rel="noopener noreferrer" class="">upcoming ROSCon 2024</a> along with its member company, <a href="https://robotec.ai/" target="_blank" rel="noopener noreferrer" class="">Robotec.AI</a>. The demo that O3DE and Robotec.AI showed is <a href="https://github.com/RobotecAI/ROSCon2023Demo" target="_blank" rel="noopener noreferrer" class="">available online</a>, and it's the demo we will be running today!</p>
<p>This tutorial shows how to set up an EC2 instance for the simulation, then working through the rest of the setup steps for the application. By the end, we will have a fully working simulator, visible through a remote desktop, running on hardware in the cloud. We will interact with the simulation using a desktop viewer that will allow us to install, run, and control the demo.</p>
<h2 class="anchor anchorTargetStickyNavbar_Vzrq" id="amazon-ec2">Amazon EC2<a href="https://mikelikesrobots.github.io/blog/simulation-in-cloud#amazon-ec2" class="hash-link" aria-label="Direct link to Amazon EC2" title="Direct link to Amazon EC2" translate="no">​</a></h2>
<p>EC2 is a service that allows a user to launch virtual machines in the cloud. I frequently use this service for my tutorials, as it provides a clean installation for running demos on, making sure that the setup steps work for everyone.</p>
<p>In this case, we will use EC2 to launch a virtual machine with access to a graphics card and a reasonable size of hard disk for running simulations. Generally, you only pay for the instance while it's running. When the instance is offline, you pay a small amount for the virtual hard disk not currently in use. It is possible to reduce even this cost by storing files in S3, but that's beyond the scope of this tutorial. This would be a good stretch goal for learning EC2!</p>
<h3 class="anchor anchorTargetStickyNavbar_Vzrq" id="launching-an-instance-for-simulation">Launching an Instance for Simulation<a href="https://mikelikesrobots.github.io/blog/simulation-in-cloud#launching-an-instance-for-simulation" class="hash-link" aria-label="Direct link to Launching an Instance for Simulation" title="Direct link to Launching an Instance for Simulation" translate="no">​</a></h3>
<p>To launch an instance, you need a valid AWS account. Log in and navigate to the EC2 page, then click Launch Instance.</p>
<p><img decoding="async" loading="lazy" alt="EC2 Console page with red box around launch instance button" src="https://mikelikesrobots.github.io/assets/images/ec2-console-1c73d71635f4cb3eccc86ef58cd1c0ec.png" width="1311" height="633" class="img_ev3q"></p>
<p>Give the instance a reasonable name, like "Simulation Instance", then go on to select the Ubuntu AMI. Click the drop-down underneath and select the Deep Learning Base OSS Nvidia Driver GPU AMI - this is the Ubuntu instance with graphics drivers already installed.</p>
<div class="theme-admonition theme-admonition-info admonition_xJq3 alert alert--info"><div class="admonitionHeading_Gvgb"><span class="admonitionIcon_Rf37"><svg viewBox="0 0 14 16"><path fill-rule="evenodd" d="M7 2.3c3.14 0 5.7 2.56 5.7 5.7s-2.56 5.7-5.7 5.7A5.71 5.71 0 0 1 1.3 8c0-3.14 2.56-5.7 5.7-5.7zM7 1C3.14 1 0 4.14 0 8s3.14 7 7 7 7-3.14 7-7-3.14-7-7-7zm1 3H6v5h2V4zm0 6H6v2h2v-2z"></path></svg></span>info</div><div class="admonitionContent_BuS1"><p>AMI stands for Amazon Machine Image, which means the base image that an EC2 instance will start up with. You can select a particular AMI for a different Operating System, such as selecting between Amazon Linux 2, Windows, and Ubuntu.</p></div></div>
<p><img decoding="async" loading="lazy" alt="Instance settings with instance name and AMI highlighted" src="https://mikelikesrobots.github.io/assets/images/ubuntu-ami-0d50542a17bb2b90453efda0a1b6ce9c.png" width="809" height="737" class="img_ev3q"></p>
<p>Under instance type, select any instance in the g5 family. I'll use g5.4xlarge, as this meets the recommended specifications of the sample application.</p>
<div class="theme-admonition theme-admonition-info admonition_xJq3 alert alert--info"><div class="admonitionHeading_Gvgb"><span class="admonitionIcon_Rf37"><svg viewBox="0 0 14 16"><path fill-rule="evenodd" d="M7 2.3c3.14 0 5.7 2.56 5.7 5.7s-2.56 5.7-5.7 5.7A5.71 5.71 0 0 1 1.3 8c0-3.14 2.56-5.7 5.7-5.7zM7 1C3.14 1 0 4.14 0 8s3.14 7 7 7 7-3.14 7-7-3.14-7-7-7zm1 3H6v5h2V4zm0 6H6v2h2v-2z"></path></svg></span>info</div><div class="admonitionContent_BuS1"><p>EC2 instances are grouped into families based on their purpose. <code>g5</code> instances are intended for graphics applications, and come with access to a graphics card.</p><p>Don't be worried about selecting the wrong instance type here. It is easy to change the instance type after initial selection - in fact, one of the advantages of EC2 is how easy it is to restart with a more powerful instance type, perform a task, then downgrade again afterwards. You only pay for what you use.</p></div></div>
<p><img decoding="async" loading="lazy" alt="Instance type selected as g5.xlarge" src="https://mikelikesrobots.github.io/assets/images/instance-type-c80e2782796147cadebc40d47b311894.png" width="808" height="286" class="img_ev3q"></p>
<p>For keypairs, select the no keypair option. We don't need keypairs for EC2 Connect, and we won't need much setup before changing to the remote desktop viewer.</p>
<p><img decoding="async" loading="lazy" alt="Key pair menu with no keypair selected" src="https://mikelikesrobots.github.io/assets/images/no-keypair-7b845b8d6a12b756fa9da5acb5dd9763.png" width="793" height="242" class="img_ev3q"></p>
<p>The next section is to allow outside connections. EC2 blocks any traffic that isn't on approved ports. In this case, we need to allow port 22 for remote control over SSH and port 8443 for our remote desktop viewer. Click Edit at the top of Network settings, then make sure there are two rules: one for SSH access; and one for TCP access on port 8443. Copy the image below for the exact details.</p>
<p><img decoding="async" loading="lazy" alt="Security group rules for EC2 instance" src="https://mikelikesrobots.github.io/assets/images/security-groups-34063ae835d6e2906a51cc5834dbc8ad.png" width="791" height="526" class="img_ev3q"></p>
<p>Finally, we need to configure Storage. The default drive size at time of writing is 65GB, but we'll need more than that for the simulator and its dependencies. We will increase that amount to 120GB.</p>
<p><img decoding="async" loading="lazy" alt="Storage configuration with 120GB AMI volume" src="https://mikelikesrobots.github.io/assets/images/storage-config-c690fbb7d7185b6fa2d700dd1e904291.png" width="796" height="220" class="img_ev3q"></p>
<p>With that, we're ready to launch! Click Launch instance, then go back to the Instances list and monitor its status until it is fully online (Running status).</p>
<div class="theme-admonition theme-admonition-warning admonition_xJq3 alert alert--warning"><div class="admonitionHeading_Gvgb"><span class="admonitionIcon_Rf37"><svg viewBox="0 0 16 16"><path fill-rule="evenodd" d="M8.893 1.5c-.183-.31-.52-.5-.887-.5s-.703.19-.886.5L.138 13.499a.98.98 0 0 0 0 1.001c.193.31.53.501.886.501h13.964c.367 0 .704-.19.877-.5a1.03 1.03 0 0 0 .01-1.002L8.893 1.5zm.133 11.497H6.987v-2.003h2.039v2.003zm0-3.004H6.987V5.987h2.039v4.006z"></path></svg></span>warning</div><div class="admonitionContent_BuS1"><p>Make sure to stop the instance when you aren't using it! Instances with graphics card access are more expensive, and it can be easy to forget that the instance is running.</p></div></div>
<p>Once online, tick the instance and click the Connect button in the top right. Leave the options as default and click Connect. You should now have full command line access to a virtual machine running in the cloud with access to a graphics card!</p>
<p>We can check this by executing one command: <code>nvidia-smi -q</code>. If the graphics drivers are installed and working properly, it should print out a lot of information about the available graphics card.</p>
<p>Now let's look at how to install our remote desktop viewer - DCV!</p>
<h3 class="anchor anchorTargetStickyNavbar_Vzrq" id="remote-desktop-viewer">Remote Desktop Viewer<a href="https://mikelikesrobots.github.io/blog/simulation-in-cloud#remote-desktop-viewer" class="hash-link" aria-label="Direct link to Remote Desktop Viewer" title="Direct link to Remote Desktop Viewer" translate="no">​</a></h3>
<p>EC2 provides licensing for <a href="https://aws.amazon.com/hpc/dcv/" target="_blank" rel="noopener noreferrer" class="">DCV</a> at no extra cost. This is a high performance desktop viewer that we can use for the sample application setup. As the networking ports have been set up in the previous step, we just need to install and configure the server before connecting.</p>
<div class="theme-admonition theme-admonition-info admonition_xJq3 alert alert--info"><div class="admonitionHeading_Gvgb"><span class="admonitionIcon_Rf37"><svg viewBox="0 0 14 16"><path fill-rule="evenodd" d="M7 2.3c3.14 0 5.7 2.56 5.7 5.7s-2.56 5.7-5.7 5.7A5.71 5.71 0 0 1 1.3 8c0-3.14 2.56-5.7 5.7-5.7zM7 1C3.14 1 0 4.14 0 8s3.14 7 7 7 7-3.14 7-7-3.14-7-7-7zm1 3H6v5h2V4zm0 6H6v2h2v-2z"></path></svg></span>info</div><div class="admonitionContent_BuS1"><p>Using DCV with a full license on the EC2 instance does require that the instance has permission to retrieve the license from an S3 bucket, which I've skipped over to keep the AWS setup portion shorter. You can read more in the <a href="https://docs.aws.amazon.com/dcv/latest/adminguide/setting-up-license.html" target="_blank" rel="noopener noreferrer" class="">licensing documentation</a>. This setup isn't needed for the initial installation.</p></div></div>
<h4 class="anchor anchorTargetStickyNavbar_Vzrq" id="prerequisites">Prerequisites<a href="https://mikelikesrobots.github.io/blog/simulation-in-cloud#prerequisites" class="hash-link" aria-label="Direct link to Prerequisites" title="Direct link to Prerequisites" translate="no">​</a></h4>
<p>The <a href="https://docs.aws.amazon.com/dcv/latest/adminguide/setting-up-installing-linux.html" target="_blank" rel="noopener noreferrer" class="">instructions for installing DCV</a> has a <a href="https://docs.aws.amazon.com/dcv/latest/adminguide/setting-up-installing-linux-prereq.html" target="_blank" rel="noopener noreferrer" class="">prerequisites step</a>. We can skip most of these prerequisites, but a couple are still important for our instance.</p>
<p>Before we can connect to the remote desktop, we need to install a new desktop manager that DCV can interface with. Execute the steps below:</p>
<div class="language-bash codeBlockContainer_Ckt0 theme-code-block" style="--prism-color:#393A34;--prism-background-color:#f6f8fa"><div class="codeBlockContent_QJqH"><pre tabindex="0" class="prism-code language-bash codeBlock_bY9V thin-scrollbar" style="color:#393A34;background-color:#f6f8fa"><code class="codeBlockLines_e6Vv"><div class="token-line" style="color:#393A34"><span class="token plain">sudo apt update &amp;&amp; sudo apt upgrade -y</span><br></div><div class="token-line" style="color:#393A34"><span class="token plain">sudo apt install -y ubuntu-desktop gdm3 mesa-utils</span><br></div><div class="token-line" style="color:#393A34"><span class="token plain">sudo sed -i s/'#WaylandEnable=false'/'WaylandEnable=false'/g /etc/gdm3/custom.conf</span><br></div><div class="token-line" style="color:#393A34"><span class="token plain">sudo systemctl restart gdm3</span><br></div><div class="token-line" style="color:#393A34"><span class="token plain">sudo nvidia-xconfig --preserve-busid --enable-all-gpus</span><br></div><div class="token-line" style="color:#393A34"><span class="token plain">sudo systemctl isolate multi-user.target</span><br></div><div class="token-line" style="color:#393A34"><span class="token plain">sudo systemctl isolate graphical.target</span><br></div></code></pre></div></div>
<p>This will install a new desktop manager and configure it so DCV can use it, then restart the desktop service.</p>
<h4 class="anchor anchorTargetStickyNavbar_Vzrq" id="dcv-server-installation">DCV Server Installation<a href="https://mikelikesrobots.github.io/blog/simulation-in-cloud#dcv-server-installation" class="hash-link" aria-label="Direct link to DCV Server Installation" title="Direct link to DCV Server Installation" translate="no">​</a></h4>
<p>With the prerequisites installed, we can proceeed to the <a href="https://docs.aws.amazon.com/dcv/latest/adminguide/setting-up-installing-linux-server.html" target="_blank" rel="noopener noreferrer" class="">installation step</a>. Run the following to install the server and reboot:</p>
<div class="language-bash codeBlockContainer_Ckt0 theme-code-block" style="--prism-color:#393A34;--prism-background-color:#f6f8fa"><div class="codeBlockContent_QJqH"><pre tabindex="0" class="prism-code language-bash codeBlock_bY9V thin-scrollbar" style="color:#393A34;background-color:#f6f8fa"><code class="codeBlockLines_e6Vv"><div class="token-line" style="color:#393A34"><span class="token plain">mkdir ~/dcv-install &amp;&amp; cd ~/dcv-install</span><br></div><div class="token-line" style="color:#393A34"><span class="token plain">wget https://d1uj6qtbmh3dt5.cloudfront.net/NICE-GPG-KEY</span><br></div><div class="token-line" style="color:#393A34"><span class="token plain">gpg --import NICE-GPG-KEY</span><br></div><div class="token-line" style="color:#393A34"><span class="token plain">wget https://d1uj6qtbmh3dt5.cloudfront.net/2023.1/Servers/nice-dcv-2023.1-16388-ubuntu2204-x86_64.tgz</span><br></div><div class="token-line" style="color:#393A34"><span class="token plain">tar -xvzf nice-dcv-2023.1-16388-ubuntu2204-x86_64.tgz &amp;&amp; cd nice-dcv-2023.1-16388-ubuntu2204-x86_64</span><br></div><div class="token-line" style="color:#393A34"><span class="token plain">sudo apt install -y ./nice-dcv-server_2023.1.16388-1_amd64.ubuntu2204.deb</span><br></div><div class="token-line" style="color:#393A34"><span class="token plain">sudo usermod -aG video dcv</span><br></div><div class="token-line" style="color:#393A34"><span class="token plain" style="display:inline-block"></span><br></div><div class="token-line" style="color:#393A34"><span class="token plain"># Complete setup with a reboot</span><br></div><div class="token-line" style="color:#393A34"><span class="token plain">sudo reboot</span><br></div></code></pre></div></div>
<p>This step installs the DCV server. At this point, we only need a bit more configuration before enabling the service and connecting. Wait for the EC2 instance to reboot, then refresh the page to connect once more.</p>
<h4 class="anchor anchorTargetStickyNavbar_Vzrq" id="automatic-session">Automatic Session<a href="https://mikelikesrobots.github.io/blog/simulation-in-cloud#automatic-session" class="hash-link" aria-label="Direct link to Automatic Session" title="Direct link to Automatic Session" translate="no">​</a></h4>
<p>With the server installed, we now need to set up automatic sessions. DCV works by creating a session that a user can join. By default, it will not create a session until explicitly told to do so; we can configure the server to <a href="https://docs.aws.amazon.com/dcv/latest/adminguide/managing-sessions-start.html#managing-sessions-start-auto" target="_blank" rel="noopener noreferrer" class="">automatically create a session</a> for the <code>ubuntu</code> user when it starts up. To do so, we need to edit <code>/etc/dcv/dcv.conf</code>. The following commands will make the required edits:</p>
<div class="language-bash codeBlockContainer_Ckt0 theme-code-block" style="--prism-color:#393A34;--prism-background-color:#f6f8fa"><div class="codeBlockContent_QJqH"><pre tabindex="0" class="prism-code language-bash codeBlock_bY9V thin-scrollbar" style="color:#393A34;background-color:#f6f8fa"><code class="codeBlockLines_e6Vv"><div class="token-line" style="color:#393A34"><span class="token plain">sudo sed -i s/"#create-session = true"/"create-session = true"/g /etc/dcv/dcv.conf</span><br></div><div class="token-line" style="color:#393A34"><span class="token plain">sudo sed -i s/'#owner = ""'/'owner = "ubuntu"'/g /etc/dcv/dcv.conf</span><br></div><div class="token-line" style="color:#393A34"><span class="token plain"># Also enable clipboard for easier copy/paste</span><br></div><div class="token-line" style="color:#393A34"><span class="token plain">sudo bash -c "cat &lt;&lt;EOF &gt;&gt; /etc/dcv/dcv.conf</span><br></div><div class="token-line" style="color:#393A34"><span class="token plain" style="display:inline-block"></span><br></div><div class="token-line" style="color:#393A34"><span class="token plain">[clipboard]</span><br></div><div class="token-line" style="color:#393A34"><span class="token plain">primary-selection-paste=true</span><br></div><div class="token-line" style="color:#393A34"><span class="token plain">primary-selection-copy=true</span><br></div><div class="token-line" style="color:#393A34"><span class="token plain">EOF"</span><br></div></code></pre></div></div>
<p>This will configure the server to automatically start a session for the <code>ubuntu</code> user. If you want to view the result, you can open the file <code>/etc/dcv/dcv.conf</code> with your favourite text editor.</p>
<h4 class="anchor anchorTargetStickyNavbar_Vzrq" id="start-the-server">Start the Server<a href="https://mikelikesrobots.github.io/blog/simulation-in-cloud#start-the-server" class="hash-link" aria-label="Direct link to Start the Server" title="Direct link to Start the Server" translate="no">​</a></h4>
<p>We can now enable the server and start it up:</p>
<div class="language-bash codeBlockContainer_Ckt0 theme-code-block" style="--prism-color:#393A34;--prism-background-color:#f6f8fa"><div class="codeBlockContent_QJqH"><pre tabindex="0" class="prism-code language-bash codeBlock_bY9V thin-scrollbar" style="color:#393A34;background-color:#f6f8fa"><code class="codeBlockLines_e6Vv"><div class="token-line" style="color:#393A34"><span class="token plain">sudo systemctl enable dcvserver</span><br></div><div class="token-line" style="color:#393A34"><span class="token plain">sudo systemctl start dcvserver</span><br></div></code></pre></div></div>
<p>Next, we can try to log in. By default, the <code>ubuntu</code> user has no password, which means we can't connect without first setting a password.</p>
<div class="language-bash codeBlockContainer_Ckt0 theme-code-block" style="--prism-color:#393A34;--prism-background-color:#f6f8fa"><div class="codeBlockContent_QJqH"><pre tabindex="0" class="prism-code language-bash codeBlock_bY9V thin-scrollbar" style="color:#393A34;background-color:#f6f8fa"><code class="codeBlockLines_e6Vv"><div class="token-line" style="color:#393A34"><span class="token plain">sudo passwd ubuntu</span><br></div></code></pre></div></div>
<p>Once complete, we can try to connect using the <a href="https://www.nice-dcv.com/" target="_blank" rel="noopener noreferrer" class="">DCV client</a>! Look up the IP address of the running address in the EC2 console, then open the DCV client and paste it in. Accept the certificate, enter <code>ubuntu</code> as the user and the password that you set, then continue.</p>
<p>You should now be able to see a full Ubuntu remote desktop. Success!</p>
<h2 class="anchor anchorTargetStickyNavbar_Vzrq" id="installing-ros2">Installing ROS2<a href="https://mikelikesrobots.github.io/blog/simulation-in-cloud#installing-ros2" class="hash-link" aria-label="Direct link to Installing ROS2" title="Direct link to Installing ROS2" translate="no">​</a></h2>
<p>ROS2 can be installed by executing the following steps from <a href="https://docs.ros.org/en/humble/Installation/Ubuntu-Install-Debians.html" target="_blank" rel="noopener noreferrer" class="">this guide</a>. Be ready to hit Enter to accept adding the software repository and wait for completion.</p>
<div class="language-bash codeBlockContainer_Ckt0 theme-code-block" style="--prism-color:#393A34;--prism-background-color:#f6f8fa"><div class="codeBlockContent_QJqH"><pre tabindex="0" class="prism-code language-bash codeBlock_bY9V thin-scrollbar" style="color:#393A34;background-color:#f6f8fa"><code class="codeBlockLines_e6Vv"><div class="token-line" style="color:#393A34"><span class="token plain">sudo apt install software-properties-common</span><br></div><div class="token-line" style="color:#393A34"><span class="token plain">sudo add-apt-repository universe</span><br></div><div class="token-line" style="color:#393A34"><span class="token plain">sudo apt update &amp;&amp; sudo apt install curl -y</span><br></div><div class="token-line" style="color:#393A34"><span class="token plain">sudo curl -sSL https://raw.githubusercontent.com/ros/rosdistro/master/ros.key -o /usr/share/keyrings/ros-archive-keyring.gpg</span><br></div><div class="token-line" style="color:#393A34"><span class="token plain">echo "deb [arch=$(dpkg --print-architecture) signed-by=/usr/share/keyrings/ros-archive-keyring.gpg] http://packages.ros.org/ros2/ubuntu $(. /etc/os-release &amp;&amp; echo $UBUNTU_CODENAME) main" | sudo tee /etc/apt/sources.list.d/ros2.list &gt; /dev/null</span><br></div><div class="token-line" style="color:#393A34"><span class="token plain">sudo apt update &amp;&amp; sudo apt upgrade -y</span><br></div><div class="token-line" style="color:#393A34"><span class="token plain">sudo apt install -y ros-humble-desktop ros-dev-tools</span><br></div></code></pre></div></div>
<p>Once installation is complete, we want to source the ROS tools automatically, and we have a few extra ROS dependencies to install. Execute the following to automatically source the ROS installation and set CycloneDDS as the <a href="https://docs.ros.org/en/iron/Installation/DDS-Implementations.html" target="_blank" rel="noopener noreferrer" class="">default messaging middleware</a>:</p>
<div class="language-bash codeBlockContainer_Ckt0 theme-code-block" style="--prism-color:#393A34;--prism-background-color:#f6f8fa"><div class="codeBlockContent_QJqH"><pre tabindex="0" class="prism-code language-bash codeBlock_bY9V thin-scrollbar" style="color:#393A34;background-color:#f6f8fa"><code class="codeBlockLines_e6Vv"><div class="token-line" style="color:#393A34"><span class="token plain">echo "source /opt/ros/humble/setup.bash" &gt;&gt; ~/.bashrc</span><br></div><div class="token-line" style="color:#393A34"><span class="token plain">echo "export RMW_IMPLEMENTATION=rmw_cyclonedds_cpp" &gt;&gt; ~/.bashrc</span><br></div><div class="token-line" style="color:#393A34"><span class="token plain">source ~/.bashrc</span><br></div></code></pre></div></div>
<p>Then, execute the following to install some remaining ROS dependencies using <code>apt</code>:</p>
<div class="language-bash codeBlockContainer_Ckt0 theme-code-block" style="--prism-color:#393A34;--prism-background-color:#f6f8fa"><div class="codeBlockContent_QJqH"><pre tabindex="0" class="prism-code language-bash codeBlock_bY9V thin-scrollbar" style="color:#393A34;background-color:#f6f8fa"><code class="codeBlockLines_e6Vv"><div class="token-line" style="color:#393A34"><span class="token plain">sudo apt install -y ros-${ROS_DISTRO}-rmw-cyclonedds-cpp \</span><br></div><div class="token-line" style="color:#393A34"><span class="token plain">                    ros-${ROS_DISTRO}-ackermann-msgs \</span><br></div><div class="token-line" style="color:#393A34"><span class="token plain">                    ros-${ROS_DISTRO}-control-toolbox \</span><br></div><div class="token-line" style="color:#393A34"><span class="token plain">                    ros-${ROS_DISTRO}-nav-msgs \</span><br></div><div class="token-line" style="color:#393A34"><span class="token plain">                    ros-${ROS_DISTRO}-gazebo-msgs \</span><br></div><div class="token-line" style="color:#393A34"><span class="token plain">                    ros-${ROS_DISTRO}-vision-msgs \</span><br></div><div class="token-line" style="color:#393A34"><span class="token plain">                    ros-${ROS_DISTRO}-ur-msgs \</span><br></div><div class="token-line" style="color:#393A34"><span class="token plain">                    ros-${ROS_DISTRO}-moveit-servo \</span><br></div><div class="token-line" style="color:#393A34"><span class="token plain">                    ros-${ROS_DISTRO}-moveit-visual-tools \</span><br></div><div class="token-line" style="color:#393A34"><span class="token plain">                    ros-${ROS_DISTRO}-moveit ros-${ROS_DISTRO}-pilz-industrial-motion-planner \</span><br></div><div class="token-line" style="color:#393A34"><span class="token plain">                    ros-${ROS_DISTRO}-controller-manager \</span><br></div><div class="token-line" style="color:#393A34"><span class="token plain">                    ros-${ROS_DISTRO}-ur-client-library \</span><br></div><div class="token-line" style="color:#393A34"><span class="token plain">                    ros-${ROS_DISTRO}-nav2-common \</span><br></div><div class="token-line" style="color:#393A34"><span class="token plain">                    ros-${ROS_DISTRO}-navigation2 \</span><br></div><div class="token-line" style="color:#393A34"><span class="token plain">                    python3-colcon-common-extensions \</span><br></div><div class="token-line" style="color:#393A34"><span class="token plain">                    python3-vcstool \</span><br></div><div class="token-line" style="color:#393A34"><span class="token plain">                    python3-rosdep2</span><br></div></code></pre></div></div>
<p>The final ROS dependencies will come from the <code>rosdep</code> tool, but first we need to install O3DE and clone the source for the ROS code.</p>
<h2 class="anchor anchorTargetStickyNavbar_Vzrq" id="installing-o3de">Installing O3DE<a href="https://mikelikesrobots.github.io/blog/simulation-in-cloud#installing-o3de" class="hash-link" aria-label="Direct link to Installing O3DE" title="Direct link to Installing O3DE" translate="no">​</a></h2>
<h3 class="anchor anchorTargetStickyNavbar_Vzrq" id="prerequisites-1">Prerequisites<a href="https://mikelikesrobots.github.io/blog/simulation-in-cloud#prerequisites-1" class="hash-link" aria-label="Direct link to Prerequisites" title="Direct link to Prerequisites" translate="no">​</a></h3>
<p>If you want to install O3DE completely from source, there are <a href="https://docs.o3de.org/docs/welcome-guide/setup/setup-from-github/building-linux/" target="_blank" rel="noopener noreferrer" class="">instructions available here</a>. However, we're going to save this step by downloading a pre-built version of the O3DE SDK, which we can use to compile the sample application. To make it work, there are still a few more dependencies to install. Execute the following to <a href="https://docs.o3de.org/docs/welcome-guide/requirements/#linux" target="_blank" rel="noopener noreferrer" class="">install the Linux prerequisites</a>:</p>
<div class="language-bash codeBlockContainer_Ckt0 theme-code-block" style="--prism-color:#393A34;--prism-background-color:#f6f8fa"><div class="codeBlockContent_QJqH"><pre tabindex="0" class="prism-code language-bash codeBlock_bY9V thin-scrollbar" style="color:#393A34;background-color:#f6f8fa"><code class="codeBlockLines_e6Vv"><div class="token-line" style="color:#393A34"><span class="token plain">sudo apt install -y git \</span><br></div><div class="token-line" style="color:#393A34"><span class="token plain">                    git-lfs \</span><br></div><div class="token-line" style="color:#393A34"><span class="token plain">                    wget \</span><br></div><div class="token-line" style="color:#393A34"><span class="token plain">                    cmake \</span><br></div><div class="token-line" style="color:#393A34"><span class="token plain">                    libstdc++-12-dev \</span><br></div><div class="token-line" style="color:#393A34"><span class="token plain">                    clang ninja-build \</span><br></div><div class="token-line" style="color:#393A34"><span class="token plain">                    libglu1-mesa-dev libxcb-xinerama0 \</span><br></div><div class="token-line" style="color:#393A34"><span class="token plain">                    libxcb-xinput0 libxcb-xinput-dev \</span><br></div><div class="token-line" style="color:#393A34"><span class="token plain">                    libxcb-xfixes0-dev libxcb-xkb-dev \</span><br></div><div class="token-line" style="color:#393A34"><span class="token plain">                    libxkbcommon-dev libxkbcommon-x11-dev \</span><br></div><div class="token-line" style="color:#393A34"><span class="token plain">                    libfontconfig1-dev libpcre2-16-0 zlib1g-dev \</span><br></div><div class="token-line" style="color:#393A34"><span class="token plain">                    mesa-common-dev libunwind-dev \</span><br></div><div class="token-line" style="color:#393A34"><span class="token plain">                    libzstd-dev</span><br></div></code></pre></div></div>
<p>With this complete, we can now download and install O3DE.</p>
<h3 class="anchor anchorTargetStickyNavbar_Vzrq" id="download-o3de">Download O3DE<a href="https://mikelikesrobots.github.io/blog/simulation-in-cloud#download-o3de" class="hash-link" aria-label="Direct link to Download O3DE" title="Direct link to Download O3DE" translate="no">​</a></h3>
<p>Execute the following to download and install a stable build of O3DE:</p>
<div class="language-bash codeBlockContainer_Ckt0 theme-code-block" style="--prism-color:#393A34;--prism-background-color:#f6f8fa"><div class="codeBlockContent_QJqH"><pre tabindex="0" class="prism-code language-bash codeBlock_bY9V thin-scrollbar" style="color:#393A34;background-color:#f6f8fa"><code class="codeBlockLines_e6Vv"><div class="token-line" style="color:#393A34"><span class="token plain">cd ~/Downloads</span><br></div><div class="token-line" style="color:#393A34"><span class="token plain">wget https://o3debinaries.org/stabilization-2409/Latest/Linux/o3de_latest.deb</span><br></div><div class="token-line" style="color:#393A34"><span class="token plain">sudo dpkg -i o3de_latest.deb</span><br></div></code></pre></div></div>
<p>With the engine itself installed, we also want to download some optional gems, which are supplementary packages for the O3DE engine. Some of these can be downloaded directly from the O3DE User Interface (UI) itself, but given that some packages do need to be cloned from Github, we will install all of the dependencies using the command line to simplify the process.</p>
<p>First, we define a work directory to clone our repositories into:</p>
<div class="language-bash codeBlockContainer_Ckt0 theme-code-block" style="--prism-color:#393A34;--prism-background-color:#f6f8fa"><div class="codeBlockContent_QJqH"><pre tabindex="0" class="prism-code language-bash codeBlock_bY9V thin-scrollbar" style="color:#393A34;background-color:#f6f8fa"><code class="codeBlockLines_e6Vv"><div class="token-line" style="color:#393A34"><span class="token plain">echo 'export WORKDIR=$HOME/o3de-workdir' &gt;&gt; ~/.bashrc</span><br></div><div class="token-line" style="color:#393A34"><span class="token plain">source ~/.bashrc</span><br></div></code></pre></div></div>
<p>Then, we clone the <code>o3de-extras</code> repository and a few extra repositories, then register them with the engine. This makes them available for use in any O3DE projects. To download and register the extras, execute the following commands:</p>
<div class="language-bash codeBlockContainer_Ckt0 theme-code-block" style="--prism-color:#393A34;--prism-background-color:#f6f8fa"><div class="codeBlockContent_QJqH"><pre tabindex="0" class="prism-code language-bash codeBlock_bY9V thin-scrollbar" style="color:#393A34;background-color:#f6f8fa"><code class="codeBlockLines_e6Vv"><div class="token-line" style="color:#393A34"><span class="token plain"># Clone repositories</span><br></div><div class="token-line" style="color:#393A34"><span class="token plain">mkdir $WORKDIR &amp;&amp; cd $WORKDIR</span><br></div><div class="token-line" style="color:#393A34"><span class="token plain">git clone --branch development https://github.com/RobotecAI/o3de-humanworker-gem.git</span><br></div><div class="token-line" style="color:#393A34"><span class="token plain">git clone --branch development https://github.com/RobotecAI/o3de-ur-robots-gem.git</span><br></div><div class="token-line" style="color:#393A34"><span class="token plain">git clone --branch development https://github.com/RobotecAI/o3de-otto-robots-gem.git</span><br></div><div class="token-line" style="color:#393A34"><span class="token plain">git clone --branch stabilization/2409 --single-branch https://github.com/o3de/o3de-extras</span><br></div><div class="token-line" style="color:#393A34"><span class="token plain">cd o3de-extras</span><br></div><div class="token-line" style="color:#393A34"><span class="token plain">git lfs install</span><br></div><div class="token-line" style="color:#393A34"><span class="token plain">git lfs pull</span><br></div><div class="token-line" style="color:#393A34"><span class="token plain" style="display:inline-block"></span><br></div><div class="token-line" style="color:#393A34"><span class="token plain"># Register all gems</span><br></div><div class="token-line" style="color:#393A34"><span class="token plain">cd $WORKDIR</span><br></div><div class="token-line" style="color:#393A34"><span class="token plain">/opt/O3DE/24.09/scripts/o3de.sh register --gem-path o3de-extras/Gems/ROS2</span><br></div><div class="token-line" style="color:#393A34"><span class="token plain">/opt/O3DE/24.09/scripts/o3de.sh register --gem-path o3de-extras/Gems/WarehouseAssets</span><br></div><div class="token-line" style="color:#393A34"><span class="token plain">/opt/O3DE/24.09/scripts/o3de.sh register --gem-path o3de-extras/Gems/WarehouseAutomation</span><br></div><div class="token-line" style="color:#393A34"><span class="token plain">/opt/O3DE/24.09/scripts/o3de.sh register --gem-path o3de-humanworker-gem</span><br></div><div class="token-line" style="color:#393A34"><span class="token plain">/opt/O3DE/24.09/scripts/o3de.sh register --gem-path o3de-ur-robots-gem</span><br></div><div class="token-line" style="color:#393A34"><span class="token plain">/opt/O3DE/24.09/scripts/o3de.sh register --gem-path o3de-otto-robots-gem</span><br></div></code></pre></div></div>
<p>Once complete, we have all the dependencies for the sample application. The next step is to download and build it!</p>
<h3 class="anchor anchorTargetStickyNavbar_Vzrq" id="roscon-2023-demo-setup">ROSCon 2023 Demo Setup<a href="https://mikelikesrobots.github.io/blog/simulation-in-cloud#roscon-2023-demo-setup" class="hash-link" aria-label="Direct link to ROSCon 2023 Demo Setup" title="Direct link to ROSCon 2023 Demo Setup" translate="no">​</a></h3>
<p>The following commands will download the source code and assets for the sample application:</p>
<div class="language-bash codeBlockContainer_Ckt0 theme-code-block" style="--prism-color:#393A34;--prism-background-color:#f6f8fa"><div class="codeBlockContent_QJqH"><pre tabindex="0" class="prism-code language-bash codeBlock_bY9V thin-scrollbar" style="color:#393A34;background-color:#f6f8fa"><code class="codeBlockLines_e6Vv"><div class="token-line" style="color:#393A34"><span class="token plain">cd $WORKDIR</span><br></div><div class="token-line" style="color:#393A34"><span class="token plain">git clone --branch development https://github.com/RobotecAI/ROSCon2023Demo</span><br></div><div class="token-line" style="color:#393A34"><span class="token plain">cd ROSCon2023Demo</span><br></div><div class="token-line" style="color:#393A34"><span class="token plain">git checkout 3f90b36</span><br></div><div class="token-line" style="color:#393A34"><span class="token plain">git lfs install</span><br></div><div class="token-line" style="color:#393A34"><span class="token plain">git lfs pull</span><br></div></code></pre></div></div>
<p>With the download complete, we can use <code>rosdep</code> to automatically install any final dependencies that we didn't install in the <a href="https://mikelikesrobots.github.io/blog/simulation-in-cloud#installing-ros2" class="">Installing ROS2</a> section:</p>
<div class="language-bash codeBlockContainer_Ckt0 theme-code-block" style="--prism-color:#393A34;--prism-background-color:#f6f8fa"><div class="codeBlockContent_QJqH"><pre tabindex="0" class="prism-code language-bash codeBlock_bY9V thin-scrollbar" style="color:#393A34;background-color:#f6f8fa"><code class="codeBlockLines_e6Vv"><div class="token-line" style="color:#393A34"><span class="token plain">cd ${WORKDIR}/ROSCon2023Demo/ros2_ws</span><br></div><div class="token-line" style="color:#393A34"><span class="token plain">./setup_submodules.bash</span><br></div><div class="token-line" style="color:#393A34"><span class="token plain">rosdep update</span><br></div><div class="token-line" style="color:#393A34"><span class="token plain">rosdep install --ignore-src --from-paths src/Universal_Robots_ROS2_Driver -y</span><br></div></code></pre></div></div>
<p>Now that <strong>all</strong> ROS dependencies are installed, we can build the ROS2 workspace supplied by the demo. This contains all of the packages needed to run multiple robots in the simulation, including the launch files and scripts to easily get them running.</p>
<div class="language-bash codeBlockContainer_Ckt0 theme-code-block" style="--prism-color:#393A34;--prism-background-color:#f6f8fa"><div class="codeBlockContent_QJqH"><pre tabindex="0" class="prism-code language-bash codeBlock_bY9V thin-scrollbar" style="color:#393A34;background-color:#f6f8fa"><code class="codeBlockLines_e6Vv"><div class="token-line" style="color:#393A34"><span class="token plain">cd ${WORKDIR}/ROSCon2023Demo/ros2_ws</span><br></div><div class="token-line" style="color:#393A34"><span class="token plain">colcon build --symlink-install</span><br></div><div class="token-line" style="color:#393A34"><span class="token plain">source install/setup.bash</span><br></div></code></pre></div></div>
<div class="theme-admonition theme-admonition-warning admonition_xJq3 alert alert--warning"><div class="admonitionHeading_Gvgb"><span class="admonitionIcon_Rf37"><svg viewBox="0 0 16 16"><path fill-rule="evenodd" d="M8.893 1.5c-.183-.31-.52-.5-.887-.5s-.703.19-.886.5L.138 13.499a.98.98 0 0 0 0 1.001c.193.31.53.501.886.501h13.964c.367 0 .704-.19.877-.5a1.03 1.03 0 0 0 .01-1.002L8.893 1.5zm.133 11.497H6.987v-2.003h2.039v2.003zm0-3.004H6.987V5.987h2.039v4.006z"></path></svg></span>warning</div><div class="admonitionContent_BuS1"><p>For the next few steps, you may have issues launching the simulator, such as it not responding or responding very slowly, or just showing a grey screen. If this is the case, try rebooting the EC2 instance and attempting the steps again. Only one reboot should be required.</p></div></div>
<p>All of our dependencies are now installed, and all that remains is importing and building the project. Use the <code>o3de</code> command from this terminal view to open the UI:</p>
<div class="language-bash codeBlockContainer_Ckt0 theme-code-block" style="--prism-color:#393A34;--prism-background-color:#f6f8fa"><div class="codeBlockContent_QJqH"><pre tabindex="0" class="prism-code language-bash codeBlock_bY9V thin-scrollbar" style="color:#393A34;background-color:#f6f8fa"><code class="codeBlockLines_e6Vv"><div class="token-line" style="color:#393A34"><span class="token plain">o3de</span><br></div></code></pre></div></div>
<p>This will open a project selection screen. We need to use the top right button to open an existing project, then navigate to our sample application directory at <code>/home/ubuntu/o3de-workdir/ROSCon2023Demo/Project</code> and open the <code>project.json</code> file inside.</p>
<p><img decoding="async" loading="lazy" alt="Opening existing project within O3DE" src="https://mikelikesrobots.github.io/assets/images/o3de-select-project-39cd6ee221254331c6f043b68492e838.png" width="1195" height="737" class="img_ev3q"></p>
<p>This step should say that the project was successfully imported. However, you may have the issue that the HumanWorker gem version is not available. This issue will stop the project from building correctly. You can fix this by using any text editor to open the <code>/home/ubuntu/o3de-workdir/ROSCon2023Demo/Project/project.json</code> file and changing the required version from <code>==2.0.0</code> to <code>&gt;=2.0.0</code>. Once complete, repeat the step of importing the project and it should work correctly.</p>
<p>We can now tell O3DE to build the project. This step may take some time, so be prepared!</p>
<p><img decoding="async" loading="lazy" alt="O3DE menu with option to build project" src="https://mikelikesrobots.github.io/assets/images/o3de-build-project-b0af046099feb187232d5c006d548db0.png" width="450" height="352" class="img_ev3q"></p>
<p>With the project built, we can now select Open Editor on the front of the project. This will open a level selection menu. Again, click open existing, then expand Levels and select DemoLevel1. It's fine to ignore the error log here, as all the entries are warnings that won't affect the level.</p>
<p><img decoding="async" loading="lazy" alt="Select DemoLevel1 level from sample project" src="https://mikelikesrobots.github.io/assets/images/o3de-select-level-b696f214a9aac3b050ae29594eb20b11.png" width="692" height="423" class="img_ev3q"></p>
<p>Once loaded, we should be able to view the simulation and control it using DCV. We can click the play button in the top right to start the simulation.</p>
<p>Finally, let's launch some robots! Switch windows back to Terminal and open a new tab. We can use the launch script supplied by the demo in this tab as follows:</p>
<div class="language-bash codeBlockContainer_Ckt0 theme-code-block" style="--prism-color:#393A34;--prism-background-color:#f6f8fa"><div class="codeBlockContent_QJqH"><pre tabindex="0" class="prism-code language-bash codeBlock_bY9V thin-scrollbar" style="color:#393A34;background-color:#f6f8fa"><code class="codeBlockLines_e6Vv"><div class="token-line" style="color:#393A34"><span class="token plain">cd ${WORKDIR}/ROSCon2023Demo/ros2_ws</span><br></div><div class="token-line" style="color:#393A34"><span class="token plain">source install/setup.bash</span><br></div><div class="token-line" style="color:#393A34"><span class="token plain">ros2 launch roscon2023_demo ROSCon2023Demo.launch.py</span><br></div></code></pre></div></div>
<p>Success! We have launched 4 robots in the simulation. We can now use the number keys 1-6 to view different areas of the workshop. Keys 1-4 show the bays where robot arms load packages onto pallets carried by mobile robots. The remaining keys show the different areas for the mobile robots to travel through in order to load the packages onto a truck.</p>
<p><img decoding="async" loading="lazy" alt="O3DE robot arms loading packages onto mobile robots" src="https://mikelikesrobots.github.io/assets/images/robot-load-bays-2bac9b56f2ca27f0777cbfe29341c6db.png" width="975" height="696" class="img_ev3q"></p>
<p>Our simulation is running, and we can restart it at any time from a known state, saving us the need to set up a whole system of robots working together in real life in order to test new functionality.</p>
<h2 class="anchor anchorTargetStickyNavbar_Vzrq" id="teardown">Teardown<a href="https://mikelikesrobots.github.io/blog/simulation-in-cloud#teardown" class="hash-link" aria-label="Direct link to Teardown" title="Direct link to Teardown" translate="no">​</a></h2>
<p>Now that we have finished with our simulation, we could stop the instance until we need to run more simulations, or we can fully terminate the instance. Terminating the instance will release its associated assets and make sure there are no outstanding costs. From the EC2 instance list, select the instance and click Instance State -&gt; Terminate Instance.</p>
<h2 class="anchor anchorTargetStickyNavbar_Vzrq" id="conclusion">Conclusion<a href="https://mikelikesrobots.github.io/blog/simulation-in-cloud#conclusion" class="hash-link" aria-label="Direct link to Conclusion" title="Direct link to Conclusion" translate="no">​</a></h2>
<p>This post showed how to provision an EC2 instance with a graphics card that can be started and stopped on demand, and used to run robotics simulations <em>on demand</em>. I showed how to install O3DE, a modern real-time open source simulation engine, along with a ROS2 sample application showing a warehouse with robot arms and mobile robots running in real time. In the future, you could use this setup for robotics development, or even build the simulation into a Docker image for automated testing.</p>
<p>See if you can build the simulation for yourself, then go one step further and enable 32 robots running at once using DemoLevel2!</p>]]></content>
        <author>
            <name>Michael Hart</name>
            <uri>https://mikelikesrobots.github.io</uri>
        </author>
        <category label="robotics" term="robotics"/>
        <category label="simulation" term="simulation"/>
        <category label="aws" term="aws"/>
        <category label="ec2" term="ec2"/>
        <category label="cloud" term="cloud"/>
    </entry>
    <entry>
        <title type="html"><![CDATA[How to Build a Fleet Overview with AWS IoT Fleet Indexing]]></title>
        <id>https://mikelikesrobots.github.io/blog/robot-fleet-overview</id>
        <link href="https://mikelikesrobots.github.io/blog/robot-fleet-overview"/>
        <updated>2024-06-10T00:00:00.000Z</updated>
        <summary type="html"><![CDATA[Congratulations! You have a whole lab full of robots running your latest software. Now you want to start looking at an overall view of your robots. It's time to build a fleet overview, and this post will show you how to use Fleet Indexing from AWS IoT Device Management to start your overview.]]></summary>
        <content type="html"><![CDATA[<p>Congratulations! You have a whole lab full of robots running your latest software. Now you want to start looking at an <strong>overall</strong> view of your robots. It's time to build a fleet overview, and this post will show you how to use Fleet Indexing from AWS IoT Device Management to start your overview.</p>
<p>Fleet Indexing is a feature of AWS IoT Core that collects and indexes information about all of your selected Things and allows you to execute queries on them and aggregate data about them. For example, you can check which of your Things are online, giving you an easy way to determine which of your robots are connected.</p>
<p>I want to walk you through this process and show you what it looks like in the console and using Command Line Interface (CLI) commands. We'll be using the sample code from <a href="https://github.com/aws-samples/aws-iot-robot-connectivity-samples-ros2" target="_blank" rel="noopener noreferrer" class="">aws-iot-robot-connectivity-samples-ros2</a>, but I've forked it to add some helper scripts that make setup a little easier for multiple robots. It also adds a launch script so multiple robots can be launched at the same time.</p>
<p>This guide is also available in video form - see the link below!</p>
<div class="video_jswG"><button type="button" class="poster_B6DH" aria-label="Play video: How to Build a Fleet Overview with AWS IoT Fleet Indexing"><img src="https://i.ytimg.com/vi/IbCCwTWp0ec/hqdefault.jpg" alt="" width="480" height="360" loading="lazy"><span class="play_lEvZ" aria-hidden="true">▶</span><span class="caption_yrhJ">Watch: <!-- -->How to Build a Fleet Overview with AWS IoT Fleet Indexing</span></button></div><noscript><p><a href="https://www.youtube.com/watch?v=IbCCwTWp0ec&amp;t=0">Watch <!-- -->How to Build a Fleet Overview with AWS IoT Fleet Indexing<!-- --> on YouTube</a></p></noscript>
<h2 class="anchor anchorTargetStickyNavbar_Vzrq" id="fleet-indexing">Fleet Indexing<a href="https://mikelikesrobots.github.io/blog/robot-fleet-overview#fleet-indexing" class="hash-link" aria-label="Direct link to Fleet Indexing" title="Direct link to Fleet Indexing" translate="no">​</a></h2>
<p><a href="https://docs.aws.amazon.com/iot/latest/developerguide/iot-indexing.html" target="_blank" rel="noopener noreferrer" class="">Fleet Indexing</a> is a feature of IoT Device Management that allows you to index, search, and aggregate your device data from multiple AWS IoT sources. Once the index has been enabled and built, you would be able to run queries such as:</p>
<ul>
<li class="">How many devices do I have online?</li>
<li class="">How many devices have less than 30% battery left?</li>
<li class="">Which devices are currently on a mission?</li>
<li class="">What is the average metres travelled for my fleet of robots at this location?</li>
</ul>
<p>To perform these queries, AWS has a query language which can be used for console or CLI commands. There is also the option to aggregate data over time, post that aggregated data to CloudWatch (allowing for building dashboards), and enabling alarms on the aggregate state of your fleet based on pre-defined thresholds.</p>
<p>Device Management has a suite of features, including bulk registration, device jobs (allowing for Over The Air updates, for example), and secure tunnelling. I won't go into depth on these - Fleet Indexing is the focus of this post. If you are interested in these other features, you can read more <a href="https://aws.amazon.com/iot-device-management/" target="_blank" rel="noopener noreferrer" class="">in the docs</a>, or let me know directly!</p>
<h3 class="anchor anchorTargetStickyNavbar_Vzrq" id="pricing">Pricing<a href="https://mikelikesrobots.github.io/blog/robot-fleet-overview#pricing" class="hash-link" aria-label="Direct link to Pricing" title="Direct link to Pricing" translate="no">​</a></h3>
<p>Fleet Indexing is a paid service at AWS, and it's worth understanding where the costs come from. The <a href="https://aws.amazon.com/iot-device-management/pricing/" target="_blank" rel="noopener noreferrer" class="">Device Management pricing page</a> has the most detail. In short, there is a very low charge for registering devices, then additional charges for updating the index and querying the index.</p>
<p>Fleet Indexing is opt-in. Every service added to the index, such as connectivity or shadow indexing, will increase the size of the index and the operations that will trigger an index update. For example, if connectivity is not enabled, then a device coming online or offline will not update the index, so there will be no additional fleet indexing charge. If shadow indexing is enabled, then every update of an indexed shadow will incur a charge. At time of writing, update charges are measured in a few USD per million updates, and queries cost a few cents per thousand queries.</p>
<p>Overall, we can keep this in mind when deciding which features to include in the Fleet Index given a particular budget. Frequent shadow updates from a large robot fleet will have a larger associated cost.</p>
<p>If you'd like to learn more about pricing estimates and monitoring your usage at AWS, take a look at my video on the topic:</p>
<div class="video_jswG"><button type="button" class="poster_B6DH" aria-label="Play video: How to Build a Fleet Overview with AWS IoT Fleet Indexing — supporting video"><img src="https://i.ytimg.com/vi/LreFpJDXZs0/hqdefault.jpg" alt="" width="480" height="360" loading="lazy"><span class="play_lEvZ" aria-hidden="true">▶</span><span class="caption_yrhJ">Watch: <!-- -->How to Build a Fleet Overview with AWS IoT Fleet Indexing — supporting video</span></button></div><noscript><p><a href="https://www.youtube.com/watch?v=LreFpJDXZs0&amp;t=0">Watch <!-- -->How to Build a Fleet Overview with AWS IoT Fleet Indexing — supporting video<!-- --> on YouTube</a></p></noscript>
<h2 class="anchor anchorTargetStickyNavbar_Vzrq" id="setup-guide">Setup Guide<a href="https://mikelikesrobots.github.io/blog/robot-fleet-overview#setup-guide" class="hash-link" aria-label="Direct link to Setup Guide" title="Direct link to Setup Guide" translate="no">​</a></h2>
<p>Now we know a bit more about what Fleet Indexing is, I want to show you how to set it up. I'll use a sample application with multiple ROS2 nodes posting frequent shadow updates so we can see the changes in the shadow index. Each pair of ROS2 nodes is acting as one robot. I'll show you how to enable Fleet Indexing first only with Connectivity data, then add named shadows.</p>
<h3 class="anchor anchorTargetStickyNavbar_Vzrq" id="sample-application-setup">Sample Application Setup<a href="https://mikelikesrobots.github.io/blog/robot-fleet-overview#sample-application-setup" class="hash-link" aria-label="Direct link to Sample Application Setup" title="Direct link to Sample Application Setup" translate="no">​</a></h3>
<p>For the sample application, use a computer with Ubuntu 22.04 and <a href="https://docs.ros.org/en/humble/Installation/Ubuntu-Install-Debians.html" target="_blank" rel="noopener noreferrer" class="">ROS2 Humble</a> installed. Install <code>ros-dev-tools</code> as well as <code>ros-humble-desktop</code>. Also install the AWS CLI and the AWS IoT SDK - instructions are in the <a href="https://github.com/mikelikesrobots/aws-iot-robot-connectivity-samples-ros2" target="_blank" rel="noopener noreferrer" class="">repository's README</a> and my video on setting up the sample application:</p>
<div class="video_jswG"><button type="button" class="poster_B6DH" aria-label="Play video: How to Build a Fleet Overview with AWS IoT Fleet Indexing — supporting video"><img src="https://i.ytimg.com/vi/OnVewSeayjI/hqdefault.jpg" alt="" width="480" height="360" loading="lazy"><span class="play_lEvZ" aria-hidden="true">▶</span><span class="caption_yrhJ">Watch: <!-- -->How to Build a Fleet Overview with AWS IoT Fleet Indexing — supporting video</span></button></div><noscript><p><a href="https://www.youtube.com/watch?v=OnVewSeayjI&amp;t=0">Watch <!-- -->How to Build a Fleet Overview with AWS IoT Fleet Indexing — supporting video<!-- --> on YouTube</a></p></noscript>
<p>Once the necessary tools are installed, clone the repository:</p>
<div class="language-bash codeBlockContainer_Ckt0 theme-code-block" style="--prism-color:#393A34;--prism-background-color:#f6f8fa"><div class="codeBlockContent_QJqH"><pre tabindex="0" class="prism-code language-bash codeBlock_bY9V thin-scrollbar" style="color:#393A34;background-color:#f6f8fa"><code class="codeBlockLines_e6Vv"><div class="token-line" style="color:#393A34"><span class="token plain">cd ~</span><br></div><div class="token-line" style="color:#393A34"><span class="token plain">git clone https://github.com/mikelikesrobots/aws-iot-robot-connectivity-samples-ros2.git</span><br></div></code></pre></div></div>
<p>Make sure that the application builds correctly by building the ROS2 workspace:</p>
<div class="language-bash codeBlockContainer_Ckt0 theme-code-block" style="--prism-color:#393A34;--prism-background-color:#f6f8fa"><div class="codeBlockContent_QJqH"><pre tabindex="0" class="prism-code language-bash codeBlock_bY9V thin-scrollbar" style="color:#393A34;background-color:#f6f8fa"><code class="codeBlockLines_e6Vv"><div class="token-line" style="color:#393A34"><span class="token plain">cd ~/aws-iot-robot-connectivity-samples-ros2/workspace</span><br></div><div class="token-line" style="color:#393A34"><span class="token plain">source /opt/ros/humble/setup.bash</span><br></div><div class="token-line" style="color:#393A34"><span class="token plain">colcon build --symlink-install</span><br></div><div class="token-line" style="color:#393A34"><span class="token plain">source install/setup.bash</span><br></div></code></pre></div></div>
<p>Next, set the CERT_FOLDER_PATH so that the certificates are written to the right place:</p>
<div class="language-bash codeBlockContainer_Ckt0 theme-code-block" style="--prism-color:#393A34;--prism-background-color:#f6f8fa"><div class="codeBlockContent_QJqH"><pre tabindex="0" class="prism-code language-bash codeBlock_bY9V thin-scrollbar" style="color:#393A34;background-color:#f6f8fa"><code class="codeBlockLines_e6Vv"><div class="token-line" style="color:#393A34"><span class="token plain">export CERT_FOLDER_LOCATION=~/aws-iot-robot-connectivity-samples-ros2/iot_certs_and_config/</span><br></div><div class="token-line" style="color:#393A34"><span class="token plain">echo "export CERT_FOLDER_LOCATION=$CERT_FOLDER_LOCATION" &gt;&gt; ~/.bashrc</span><br></div></code></pre></div></div>
<p>At this point we can set up a few robots for the sample application. For this, we can use the new script in the forked repository:</p>
<div class="language-bash codeBlockContainer_Ckt0 theme-code-block" style="--prism-color:#393A34;--prism-background-color:#f6f8fa"><div class="codeBlockContent_QJqH"><pre tabindex="0" class="prism-code language-bash codeBlock_bY9V thin-scrollbar" style="color:#393A34;background-color:#f6f8fa"><code class="codeBlockLines_e6Vv"><div class="token-line" style="color:#393A34"><span class="token plain">cd ~/aws-iot-robot-connectivity-samples-ros2</span><br></div><div class="token-line" style="color:#393A34"><span class="token plain"># Install python dependencies for the script</span><br></div><div class="token-line" style="color:#393A34"><span class="token plain">python3 -m pip install -r scripts/requirements.txt</span><br></div><div class="token-line" style="color:#393A34"><span class="token plain"># Create certificates, policies etc for robot1, robot2, and robot3</span><br></div><div class="token-line" style="color:#393A34"><span class="token plain">python3 scripts/make_robots.py robot1 robot2 robot3</span><br></div></code></pre></div></div>
<p>This will create Things, certificates, policies and so on for three robots.</p>
<div class="theme-admonition theme-admonition-info admonition_xJq3 alert alert--info"><div class="admonitionHeading_Gvgb"><span class="admonitionIcon_Rf37"><svg viewBox="0 0 14 16"><path fill-rule="evenodd" d="M7 2.3c3.14 0 5.7 2.56 5.7 5.7s-2.56 5.7-5.7 5.7A5.71 5.71 0 0 1 1.3 8c0-3.14 2.56-5.7 5.7-5.7zM7 1C3.14 1 0 4.14 0 8s3.14 7 7 7 7-3.14 7-7-3.14-7-7-7zm1 3H6v5h2V4zm0 6H6v2h2v-2z"></path></svg></span>Cleaning Up Resources</div><div class="admonitionContent_BuS1"><p>Once you're finished working with the sample application, you can clean all of these resources up using the corresponding cleanup script:</p><div class="language-bash codeBlockContainer_Ckt0 theme-code-block" style="--prism-color:#393A34;--prism-background-color:#f6f8fa"><div class="codeBlockContent_QJqH"><pre tabindex="0" class="prism-code language-bash codeBlock_bY9V thin-scrollbar" style="color:#393A34;background-color:#f6f8fa"><code class="codeBlockLines_e6Vv"><div class="token-line" style="color:#393A34"><span class="token plain">cd ~/aws-iot-robot-connectivity-samples-ros2</span><br></div><div class="token-line" style="color:#393A34"><span class="token plain">python3 scripts/delete_robots.py robot1 robot2 robot3</span><br></div></code></pre></div></div></div></div>
<p>With your robots created, you now need to launch the shadow service launch script. Execute the command:</p>
<div class="language-bash codeBlockContainer_Ckt0 theme-code-block" style="--prism-color:#393A34;--prism-background-color:#f6f8fa"><div class="codeBlockContent_QJqH"><pre tabindex="0" class="prism-code language-bash codeBlock_bY9V thin-scrollbar" style="color:#393A34;background-color:#f6f8fa"><code class="codeBlockLines_e6Vv"><div class="token-line" style="color:#393A34"><span class="token plain">ros2 launch iot_shadow_service crack_all_safes.launch.py certs_path:=$CERT_FOLDER_LOCATION</span><br></div></code></pre></div></div>
<p>This should find all the robots you've created in the certificates folder and launch an instance of the sample application for each one. In this case, three "safe cracker" robots will start up. The logs will show shadow updates for each one. We now have three robots in our fleet, each connecting to AWS IoT Core to post their shadow updates.</p>
<p>You can now leave this application running while following the rest of the instructions.</p>
<h3 class="anchor anchorTargetStickyNavbar_Vzrq" id="enabling-fleet-index-with-connectivity">Enabling Fleet Index with Connectivity<a href="https://mikelikesrobots.github.io/blog/robot-fleet-overview#enabling-fleet-index-with-connectivity" class="hash-link" aria-label="Direct link to Enabling Fleet Index with Connectivity" title="Direct link to Enabling Fleet Index with Connectivity" translate="no">​</a></h3>
<p>For each step, I'll show how to use the console and CLI for enabling Fleet Indexing.</p>
<h4 class="anchor anchorTargetStickyNavbar_Vzrq" id="enabling-in-console">Enabling in Console<a href="https://mikelikesrobots.github.io/blog/robot-fleet-overview#enabling-in-console" class="hash-link" aria-label="Direct link to Enabling in Console" title="Direct link to Enabling in Console" translate="no">​</a></h4>
<p>In the console, navigate to the AWS Console IoT Core page, and scroll to the bottom of the navigation bar. Open the Settings page.</p>
<p><img decoding="async" loading="lazy" alt="IoT Settings Navbar Menu" src="https://mikelikesrobots.github.io/assets/images/IoTSettings-fc8e0f6fc71d74e3a1f4f4f213cdbaf7.png" width="332" height="339" class="img_ev3q"></p>
<p>Fleet indexing is partway done the page. Click the Manage indexing button.</p>
<p><img decoding="async" loading="lazy" alt="Manage Fleet Indexing" src="https://mikelikesrobots.github.io/assets/images/ManageIndexing-49ac866e4864721b23c2457b62b4f38c.png" width="1042" height="250" class="img_ev3q"></p>
<p>In the title bar of the Thing indexing box, there's a check box to enable indexing. Check this box.</p>
<p><img decoding="async" loading="lazy" alt="Enable Fleet indexing" src="https://mikelikesrobots.github.io/assets/images/EnableIndexing-d024bfff7d8f8af0def057e9e74fe7cd.png" width="1049" height="237" class="img_ev3q"></p>
<p>At this point, you could confirm the update and see the Fleet Index include the names of your Things. However, to get some utility from it, we can also include Connectivity to see whether devices are online or not. To do this, scroll down and check the box next to "Add thing connectivity".</p>
<p><img decoding="async" loading="lazy" alt="Enable Connectivity" src="https://mikelikesrobots.github.io/assets/images/EnableConnectivity-d81dafc8f20a980c6ec41e53ded59a44.png" width="1036" height="183" class="img_ev3q"></p>
<p>Now scroll to the bottom of the page and click Update.</p>
<p><img decoding="async" loading="lazy" alt="Confirm Indexing Update" src="https://mikelikesrobots.github.io/assets/images/ConfirmIndexingUpdate-7ef482458097b67f1ead3ba997b93ecd.png" width="1061" height="489" class="img_ev3q"></p>
<p>Once enabled, it may take a few minutes to build the Index. You can proceed to the next section, and if the searches are not returning results, wait for a few minutes before trying again.</p>
<h4 class="anchor anchorTargetStickyNavbar_Vzrq" id="enabling-using-cli">Enabling using CLI<a href="https://mikelikesrobots.github.io/blog/robot-fleet-overview#enabling-using-cli" class="hash-link" aria-label="Direct link to Enabling using CLI" title="Direct link to Enabling using CLI" translate="no">​</a></h4>
<p>To enable Fleet Indexing with only Connectivity, execute the following command:</p>
<div class="language-bash codeBlockContainer_Ckt0 theme-code-block" style="--prism-color:#393A34;--prism-background-color:#f6f8fa"><div class="codeBlockContent_QJqH"><pre tabindex="0" class="prism-code language-bash codeBlock_bY9V thin-scrollbar" style="color:#393A34;background-color:#f6f8fa"><code class="codeBlockLines_e6Vv"><div class="token-line" style="color:#393A34"><span class="token plain">aws iot update-indexing-configuration --thing-indexing-configuration '{</span><br></div><div class="token-line" style="color:#393A34"><span class="token plain">    "thingIndexingMode": "REGISTRY",</span><br></div><div class="token-line" style="color:#393A34"><span class="token plain">    "thingConnectivityIndexingMode": "STATUS"</span><br></div><div class="token-line" style="color:#393A34"><span class="token plain">}'</span><br></div></code></pre></div></div>
<p>The index may take a few minutes to build. If the following section does not immediately work, wait for a few minutes before trying again.</p>
<h3 class="anchor anchorTargetStickyNavbar_Vzrq" id="querying-the-fleet-index">Querying the Fleet Index<a href="https://mikelikesrobots.github.io/blog/robot-fleet-overview#querying-the-fleet-index" class="hash-link" aria-label="Direct link to Querying the Fleet Index" title="Direct link to Querying the Fleet Index" translate="no">​</a></h3>
<p>Now that connectivity is enabled, we can query our Fleet Index to find out how many devices are online.</p>
<h4 class="anchor anchorTargetStickyNavbar_Vzrq" id="console-advanced-search">Console Advanced Search<a href="https://mikelikesrobots.github.io/blog/robot-fleet-overview#console-advanced-search" class="hash-link" aria-label="Direct link to Console Advanced Search" title="Direct link to Console Advanced Search" translate="no">​</a></h4>
<p>In the AWS Console, go to the IoT Core page and open the Things page.</p>
<p><img decoding="async" loading="lazy" alt="Things Navigation Menu Item" src="https://mikelikesrobots.github.io/assets/images/NavMenuThings-aa119a88b63fff959c47e467ca05dd23.png" width="388" height="454" class="img_ev3q"></p>
<p>In the controls at the top, two buttons are available that require Fleet Indexing to work. Let's start with Advanced Search.</p>
<p><img decoding="async" loading="lazy" alt="Advanced Search Button" src="https://mikelikesrobots.github.io/assets/images/AdvancedSearchButton-45572c15ce3f24b1e09418e7fdf9362c.png" width="552" height="450" class="img_ev3q"></p>
<p>Within the Query box, enter <code>connectivity.connected = true</code>. Press enter to add it as a query, then click Search.</p>
<p><img decoding="async" loading="lazy" alt="Query Connected Devices" src="https://mikelikesrobots.github.io/assets/images/QueryConnectedDevices-3e6b5c85cbf89e8c176845c09dba25a4.png" width="545" height="560" class="img_ev3q"></p>
<p>This should give all three robots as connected devices.</p>
<p><img decoding="async" loading="lazy" alt="Connected Device Results" src="https://mikelikesrobots.github.io/assets/images/ConnectedDeviceResults-e49a5d10be261c1bf3daed3f40651a48.png" width="715" height="414" class="img_ev3q"></p>
<p>Success! We have listed three devices as connected. You can also experiment with the query box to see what other options are available. We can also increase the options available by allowing other IoT services to be indexed.</p>
<div class="theme-admonition theme-admonition-caution admonition_xJq3 alert alert--warning"><div class="admonitionHeading_Gvgb"><span class="admonitionIcon_Rf37"><svg viewBox="0 0 16 16"><path fill-rule="evenodd" d="M8.893 1.5c-.183-.31-.52-.5-.887-.5s-.703.19-.886.5L.138 13.499a.98.98 0 0 0 0 1.001c.193.31.53.501.886.501h13.964c.367 0 .704-.19.877-.5a1.03 1.03 0 0 0 .01-1.002L8.893 1.5zm.133 11.497H6.987v-2.003h2.039v2.003zm0-3.004H6.987V5.987h2.039v4.006z"></path></svg></span>caution</div><div class="admonitionContent_BuS1"><p>The console uses queries with a slightly different syntax to the CLI and examples page. If you use an example, be careful to translate the syntax!</p></div></div>
<p>As a next step, we can see how to aggregate data. Go back to the Things page and instead click the "Run aggregations" button.</p>
<p><img decoding="async" loading="lazy" alt="Run Aggregations Button" src="https://mikelikesrobots.github.io/assets/images/RunAggregationsButton-41142f9779f6107b232f918e6ad1df47.png" width="908" height="347" class="img_ev3q"></p>
<p>Search for "thingName = robot*", and under aggregation properties, select "connectivity.connected" with aggregation type "Bucket". This search will return that 3 devices are connected. Explore the page - in particular the Fleet metrics section - to see what else this tool is able to do.</p>
<p><img decoding="async" loading="lazy" alt="Count Connected Devices" src="https://mikelikesrobots.github.io/assets/images/CountConnectedDevices-27d960a528b54f755cac7f2be993654f.png" width="2022" height="1102" class="img_ev3q"></p>
<p>You can use the console to explore the data available.</p>
<h4 class="anchor anchorTargetStickyNavbar_Vzrq" id="cli-queries-and-aggregations">CLI Queries and Aggregations<a href="https://mikelikesrobots.github.io/blog/robot-fleet-overview#cli-queries-and-aggregations" class="hash-link" aria-label="Direct link to CLI Queries and Aggregations" title="Direct link to CLI Queries and Aggregations" translate="no">​</a></h4>
<p>To search for the names of connected devices, the CLI command is:</p>
<div class="language-bash codeBlockContainer_Ckt0 theme-code-block" style="--prism-color:#393A34;--prism-background-color:#f6f8fa"><div class="codeBlockContent_QJqH"><pre tabindex="0" class="prism-code language-bash codeBlock_bY9V thin-scrollbar" style="color:#393A34;background-color:#f6f8fa"><code class="codeBlockLines_e6Vv"><div class="token-line" style="color:#393A34"><span class="token plain">aws iot search-index \</span><br></div><div class="token-line" style="color:#393A34"><span class="token plain">    --index-name "AWS_Things" \</span><br></div><div class="token-line" style="color:#393A34"><span class="token plain">    --query-string "connectivity.connected:true"</span><br></div></code></pre></div></div>
<p>This will return a json structure containing all of the things that are currently connected. This can further be processed, such as with the tool <code>jq</code>:</p>
<div class="language-bash codeBlockContainer_Ckt0 theme-code-block" style="--prism-color:#393A34;--prism-background-color:#f6f8fa"><div class="codeBlockContent_QJqH"><pre tabindex="0" class="prism-code language-bash codeBlock_bY9V thin-scrollbar" style="color:#393A34;background-color:#f6f8fa"><code class="codeBlockLines_e6Vv"><div class="token-line" style="color:#393A34"><span class="token plain">sudo apt install jq</span><br></div><div class="token-line" style="color:#393A34"><span class="token plain">aws iot search-index \</span><br></div><div class="token-line" style="color:#393A34"><span class="token plain">    --index-name "AWS_Things" \</span><br></div><div class="token-line" style="color:#393A34"><span class="token plain">    --query-string "connectivity.connected:true" \</span><br></div><div class="token-line" style="color:#393A34"><span class="token plain">    | jq '.things[].thingName'</span><br></div></code></pre></div></div>
<p>This returns the following lines:</p>
<div class="language-bash codeBlockContainer_Ckt0 theme-code-block" style="--prism-color:#393A34;--prism-background-color:#f6f8fa"><div class="codeBlockContent_QJqH"><pre tabindex="0" class="prism-code language-bash codeBlock_bY9V thin-scrollbar" style="color:#393A34;background-color:#f6f8fa"><code class="codeBlockLines_e6Vv"><div class="token-line" style="color:#393A34"><span class="token plain">"robot1"</span><br></div><div class="token-line" style="color:#393A34"><span class="token plain">"robot2"</span><br></div><div class="token-line" style="color:#393A34"><span class="token plain">"robot3"</span><br></div></code></pre></div></div>
<p>Success! We can even watch this whole command to view the connected devices over time:</p>
<div class="language-bash codeBlockContainer_Ckt0 theme-code-block" style="--prism-color:#393A34;--prism-background-color:#f6f8fa"><div class="codeBlockContent_QJqH"><pre tabindex="0" class="prism-code language-bash codeBlock_bY9V thin-scrollbar" style="color:#393A34;background-color:#f6f8fa"><code class="codeBlockLines_e6Vv"><div class="token-line" style="color:#393A34"><span class="token plain">watch "aws iot search-index --index-name 'AWS_Things' --query-string 'connectivity.connected:true' | jq '.things[].thingName'"</span><br></div></code></pre></div></div>
<p>We could get a number of connected devices by counting the lines in the response:</p>
<div class="language-bash codeBlockContainer_Ckt0 theme-code-block" style="--prism-color:#393A34;--prism-background-color:#f6f8fa"><div class="codeBlockContent_QJqH"><pre tabindex="0" class="prism-code language-bash codeBlock_bY9V thin-scrollbar" style="color:#393A34;background-color:#f6f8fa"><code class="codeBlockLines_e6Vv"><div class="token-line" style="color:#393A34"><span class="token plain">aws iot search-index \</span><br></div><div class="token-line" style="color:#393A34"><span class="token plain">    --index-name 'AWS_Things' \</span><br></div><div class="token-line" style="color:#393A34"><span class="token plain">    --query-string 'connectivity.connected:true' \</span><br></div><div class="token-line" style="color:#393A34"><span class="token plain">    | jq '.things[].thingName' \</span><br></div><div class="token-line" style="color:#393A34"><span class="token plain">    | wc -l</span><br></div></code></pre></div></div>
<p>Or, we can use an aggregation. To search for Things with a name starting with <code>robot</code> that are connected, we can use this command:</p>
<div class="language-bash codeBlockContainer_Ckt0 theme-code-block" style="--prism-color:#393A34;--prism-background-color:#f6f8fa"><div class="codeBlockContent_QJqH"><pre tabindex="0" class="prism-code language-bash codeBlock_bY9V thin-scrollbar" style="color:#393A34;background-color:#f6f8fa"><code class="codeBlockLines_e6Vv"><div class="token-line" style="color:#393A34"><span class="token plain">aws iot get-buckets-aggregation \</span><br></div><div class="token-line" style="color:#393A34"><span class="token plain">    --query-string "thingName:robot*" \</span><br></div><div class="token-line" style="color:#393A34"><span class="token plain">    --aggregation-field connectivity.connected \</span><br></div><div class="token-line" style="color:#393A34"><span class="token plain">    --buckets-aggregation-type '{"termsAggregation": {"maxBuckets": 10}}'</span><br></div></code></pre></div></div>
<p>This gives the following response:</p>
<div class="language-bash codeBlockContainer_Ckt0 theme-code-block" style="--prism-color:#393A34;--prism-background-color:#f6f8fa"><div class="codeBlockContent_QJqH"><pre tabindex="0" class="prism-code language-bash codeBlock_bY9V thin-scrollbar" style="color:#393A34;background-color:#f6f8fa"><code class="codeBlockLines_e6Vv"><div class="token-line" style="color:#393A34"><span class="token plain">{</span><br></div><div class="token-line" style="color:#393A34"><span class="token plain">    "totalCount": 3,</span><br></div><div class="token-line" style="color:#393A34"><span class="token plain">    "buckets": [</span><br></div><div class="token-line" style="color:#393A34"><span class="token plain">        {</span><br></div><div class="token-line" style="color:#393A34"><span class="token plain">            "keyValue": "true",</span><br></div><div class="token-line" style="color:#393A34"><span class="token plain">            "count": 3</span><br></div><div class="token-line" style="color:#393A34"><span class="token plain">        }</span><br></div><div class="token-line" style="color:#393A34"><span class="token plain">    ]</span><br></div><div class="token-line" style="color:#393A34"><span class="token plain">}</span><br></div></code></pre></div></div>
<p>In both cases, we can see that 3 devices are connected. The latter command is more complicated, but can be altered to provide other aggregated data - you can now explore the different aggregation types to perform more queries on your Fleet Index!</p>
<h3 class="anchor anchorTargetStickyNavbar_Vzrq" id="indexing-named-shadows">Indexing Named Shadows<a href="https://mikelikesrobots.github.io/blog/robot-fleet-overview#indexing-named-shadows" class="hash-link" aria-label="Direct link to Indexing Named Shadows" title="Direct link to Indexing Named Shadows" translate="no">​</a></h3>
<p>Next, we will see how to add Named Shadows to the Fleet Index. Again, we will see both the console and CLI methods of accomplishing this.</p>
<div class="theme-admonition theme-admonition-caution admonition_xJq3 alert alert--warning"><div class="admonitionHeading_Gvgb"><span class="admonitionIcon_Rf37"><svg viewBox="0 0 16 16"><path fill-rule="evenodd" d="M8.893 1.5c-.183-.31-.52-.5-.887-.5s-.703.19-.886.5L.138 13.499a.98.98 0 0 0 0 1.001c.193.31.53.501.886.501h13.964c.367 0 .704-.19.877-.5a1.03 1.03 0 0 0 .01-1.002L8.893 1.5zm.133 11.497H6.987v-2.003h2.039v2.003zm0-3.004H6.987V5.987h2.039v4.006z"></path></svg></span>caution</div><div class="admonitionContent_BuS1"><p>As described in the <a href="https://mikelikesrobots.github.io/blog/robot-fleet-overview#pricing" class="">pricing</a> section, anything that increases the number of updates to the index will incur additional charges. In this sample application, each robot updates its shadow multiple times per second. Be careful with your own system design if you plan to index your shadow with how many shadow updates are required!</p></div></div>
<p>Enabling named shadows is a two-step process. First, you must enable indexing named shadows; then, you must specify the shadows to be indexed. This is to allow you to optimize the fleet index for cost and performance - you can select which shadows should be included to avoid unnecessary updates.</p>
<h4 class="anchor anchorTargetStickyNavbar_Vzrq" id="enabling-named-shadows-using-the-console">Enabling Named Shadows using the Console<a href="https://mikelikesrobots.github.io/blog/robot-fleet-overview#enabling-named-shadows-using-the-console" class="hash-link" aria-label="Direct link to Enabling Named Shadows using the Console" title="Direct link to Enabling Named Shadows using the Console" translate="no">​</a></h4>
<p>Back in the Fleet Indexing settings, check the box for Add named shadows, then add the shadow names <code>robot1-shadow</code>, <code>robot2-shadow</code>, <code>robot3-shadow</code>.</p>
<p><img decoding="async" loading="lazy" alt="Adding Shadows to Index" src="https://mikelikesrobots.github.io/assets/images/IndexNamedShadows-d08cd6fb767128f6204e74d5edf6590c.png" width="1122" height="687" class="img_ev3q"></p>
<p>Click Update. This will result in a banner on the page saying that the index is updating. Wait for a couple of minutes, and if the banner persists, continue with the next steps regardless - this banner can remain on screen past when the indexing is complete.</p>
<h4 class="anchor anchorTargetStickyNavbar_Vzrq" id="enabling-named-shadows-using-the-cli">Enabling Named Shadows using the CLI<a href="https://mikelikesrobots.github.io/blog/robot-fleet-overview#enabling-named-shadows-using-the-cli" class="hash-link" aria-label="Direct link to Enabling Named Shadows using the CLI" title="Direct link to Enabling Named Shadows using the CLI" translate="no">​</a></h4>
<p>To add named shadows to the index, you need to both enable the named shadow indexing and specify the shadow names to be indexed. This must be done all in one command - the configuration in the command overwrites the previous configuration, meaning that if you omit the connectivity configuration argument, it will remove connectivity information from the index.</p>
<p>The command to add the shadows to the existing configuration is as follows:</p>
<div class="language-bash codeBlockContainer_Ckt0 theme-code-block" style="--prism-color:#393A34;--prism-background-color:#f6f8fa"><div class="codeBlockContent_QJqH"><pre tabindex="0" class="prism-code language-bash codeBlock_bY9V thin-scrollbar" style="color:#393A34;background-color:#f6f8fa"><code class="codeBlockLines_e6Vv"><div class="token-line" style="color:#393A34"><span class="token plain">aws iot update-indexing-configuration --thing-indexing-configuration '{</span><br></div><div class="token-line" style="color:#393A34"><span class="token plain">    "thingIndexingMode": "REGISTRY",</span><br></div><div class="token-line" style="color:#393A34"><span class="token plain">    "namedShadowIndexingMode": "ON",</span><br></div><div class="token-line" style="color:#393A34"><span class="token plain">    "thingConnectivityIndexingMode": "STATUS",</span><br></div><div class="token-line" style="color:#393A34"><span class="token plain">    "filter": {"namedShadowNames": ["robot1-shadow", "robot2-shadow", "robot3-shadow"]}</span><br></div><div class="token-line" style="color:#393A34"><span class="token plain">}'</span><br></div></code></pre></div></div>
<p>The command keeps the indexing mode and connectivity mode the same, but adds named shadow indexing and the specific shadow names to the index.</p>
<h3 class="anchor anchorTargetStickyNavbar_Vzrq" id="querying-shadow-data">Querying shadow data<a href="https://mikelikesrobots.github.io/blog/robot-fleet-overview#querying-shadow-data" class="hash-link" aria-label="Direct link to Querying shadow data" title="Direct link to Querying shadow data" translate="no">​</a></h3>
<p>Shadow data can be indexed using the console and CLI - however, the use of wildcards with named shadows is not supported at time of writing. It is possible to query data using a particular shadow name, but currently can't query across the whole fleet.</p>
<h4 class="anchor anchorTargetStickyNavbar_Vzrq" id="querying-shadow-via-console">Querying Shadow via Console<a href="https://mikelikesrobots.github.io/blog/robot-fleet-overview#querying-shadow-via-console" class="hash-link" aria-label="Direct link to Querying Shadow via Console" title="Direct link to Querying Shadow via Console" translate="no">​</a></h4>
<p>To query for <code>robot1-shadow</code>, open the Advanced search page again. Enter the query <code>shadow.name.robot1-shadow.hasDelta = true</code>, then click search. It may take a few searches depending on the shadow's delta, but this should return <code>robot1</code> as a Thing.</p>
<p><img decoding="async" loading="lazy" alt="Shadow Query Results" src="https://mikelikesrobots.github.io/assets/images/NamedShadowQuery-d5d83b62cf2363128f3328fd1a4c439f.png" width="1094" height="740" class="img_ev3q"></p>
<p>You can then select any of the Things returned to see more information about that Thing, including viewing its shadow.</p>
<h4 class="anchor anchorTargetStickyNavbar_Vzrq" id="querying-shadow-via-cli">Querying Shadow via CLI<a href="https://mikelikesrobots.github.io/blog/robot-fleet-overview#querying-shadow-via-cli" class="hash-link" aria-label="Direct link to Querying Shadow via CLI" title="Direct link to Querying Shadow via CLI" translate="no">​</a></h4>
<p>With the console, searching for your <code>robot*</code> things will return a table of links, which means clicking through each Thing to see the shadow. The query result from the CLI has more detail in one place, including the entire indexed shadow contents for all things matching the query. For example, the following query will return the thing name, ID, shadow, and connectivity status for all <code>robot*</code> things.</p>
<div class="language-bash codeBlockContainer_Ckt0 theme-code-block" style="--prism-color:#393A34;--prism-background-color:#f6f8fa"><div class="codeBlockContent_QJqH"><pre tabindex="0" class="prism-code language-bash codeBlock_bY9V thin-scrollbar" style="color:#393A34;background-color:#f6f8fa"><code class="codeBlockLines_e6Vv"><div class="token-line" style="color:#393A34"><span class="token plain">aws iot search-index --index-name 'AWS_Things' --query-string 'connectivity.connected:true'</span><br></div></code></pre></div></div>
<p>Example output:</p>
<div class="language-json codeBlockContainer_Ckt0 theme-code-block" style="--prism-color:#393A34;--prism-background-color:#f6f8fa"><div class="codeBlockContent_QJqH"><pre tabindex="0" class="prism-code language-json codeBlock_bY9V thin-scrollbar" style="color:#393A34;background-color:#f6f8fa"><code class="codeBlockLines_e6Vv"><div class="token-line" style="color:#393A34"><span class="token plain">{</span><br></div><div class="token-line" style="color:#393A34"><span class="token plain">    "things": [</span><br></div><div class="token-line" style="color:#393A34"><span class="token plain">        {</span><br></div><div class="token-line" style="color:#393A34"><span class="token plain">            "thingName": "robot1",</span><br></div><div class="token-line" style="color:#393A34"><span class="token plain">            "thingId": "13032b27-e770-4146-8706-8ec1249b7015",</span><br></div><div class="token-line" style="color:#393A34"><span class="token plain">            "shadow": "{\"name\":{\"robot1-shadow\":{\"desired\":{\"digit\":59},\"reported\":{\"digit\":59},\"metadata\":{\"desired\":{\"digit\":{\"timestamp\":1718135446}},\"reported\":{\"digit\":{\"timestamp\":1718135446}}},\"hasDelta\":false,\"version\":55137}}}",</span><br></div><div class="token-line" style="color:#393A34"><span class="token plain">            "connectivity": {</span><br></div><div class="token-line" style="color:#393A34"><span class="token plain">                "connected": true,</span><br></div><div class="token-line" style="color:#393A34"><span class="token plain">                "timestamp": 1718134574557</span><br></div><div class="token-line" style="color:#393A34"><span class="token plain">            }</span><br></div><div class="token-line" style="color:#393A34"><span class="token plain">        },</span><br></div><div class="token-line" style="color:#393A34"><span class="token plain">        {</span><br></div><div class="token-line" style="color:#393A34"><span class="token plain">            "thingName": "robot2",</span><br></div><div class="token-line" style="color:#393A34"><span class="token plain">            "thingId": "7e396088-6d02-461e-a7ca-a64076f8a0ca",</span><br></div><div class="token-line" style="color:#393A34"><span class="token plain">            "shadow": "{\"name\":{\"robot2-shadow\":{\"desired\":{\"digit\":70},\"reported\":{\"digit\":70},\"metadata\":{\"desired\":{\"digit\":{\"timestamp\":1718135462}},\"reported\":{\"digit\":{\"timestamp\":1718135463}}},\"hasDelta\":false,\"version\":55353}}}",</span><br></div><div class="token-line" style="color:#393A34"><span class="token plain">            "connectivity": {</span><br></div><div class="token-line" style="color:#393A34"><span class="token plain">                "connected": true,</span><br></div><div class="token-line" style="color:#393A34"><span class="token plain">                "timestamp": 1718134574663</span><br></div><div class="token-line" style="color:#393A34"><span class="token plain">            }</span><br></div><div class="token-line" style="color:#393A34"><span class="token plain">        },</span><br></div><div class="token-line" style="color:#393A34"><span class="token plain">        {</span><br></div><div class="token-line" style="color:#393A34"><span class="token plain">            "thingName": "robot3",</span><br></div><div class="token-line" style="color:#393A34"><span class="token plain">            "thingId": "b5cf7c73-3b97-4d8e-9ccf-a1d5788873c8",</span><br></div><div class="token-line" style="color:#393A34"><span class="token plain">            "shadow": "{\"name\":{\"robot3-shadow\":{\"desired\":{\"digit\":47},\"reported\":{\"digit\":22},\"delta\":{\"digit\":47},\"metadata\":{\"desired\":{\"digit\":{\"timestamp\":1718135446}},\"reported\":{\"digit\":{\"timestamp\":1718135447}},\"del</span><br></div><div class="token-line" style="color:#393A34"><span class="token plain">ta\":{\"digit\":{\"timestamp\":1718135446}}},\"hasDelta\":true,\"version\":20380}}}",</span><br></div><div class="token-line" style="color:#393A34"><span class="token plain">            "connectivity": {</span><br></div><div class="token-line" style="color:#393A34"><span class="token plain">                "connected": true,</span><br></div><div class="token-line" style="color:#393A34"><span class="token plain">                "timestamp": 1718134574573</span><br></div><div class="token-line" style="color:#393A34"><span class="token plain">            }</span><br></div><div class="token-line" style="color:#393A34"><span class="token plain">        }</span><br></div><div class="token-line" style="color:#393A34"><span class="token plain">    ]</span><br></div><div class="token-line" style="color:#393A34"><span class="token plain">}</span><br></div></code></pre></div></div>
<p>We can filter this again using <code>jq</code> to get all of the current reported digits for the shadows. The following command uses a few chained Linux commands to parse the desired data. The purpose of the command is to show that the data returned by the query can be further parsed for particular fields, or used by a program to take further action.</p>
<div class="language-bash codeBlockContainer_Ckt0 theme-code-block" style="--prism-color:#393A34;--prism-background-color:#f6f8fa"><div class="codeBlockContent_QJqH"><pre tabindex="0" class="prism-code language-bash codeBlock_bY9V thin-scrollbar" style="color:#393A34;background-color:#f6f8fa"><code class="codeBlockLines_e6Vv"><div class="token-line" style="color:#393A34"><span class="token plain">aws iot search-index \</span><br></div><div class="token-line" style="color:#393A34"><span class="token plain">    --index-name 'AWS_Things' \</span><br></div><div class="token-line" style="color:#393A34"><span class="token plain">    --query-string 'connectivity.connected:true' \</span><br></div><div class="token-line" style="color:#393A34"><span class="token plain">    | jq -r '.things[].shadow | fromjson | .name | to_entries[] | {name: .key, desired: .value.desired.digit}'</span><br></div></code></pre></div></div>
<p>The above command searches for all connected devices, then for those devices, retrieves the desired digit field from all of its shadows and places them into a map of the following format:</p>
<div class="language-json codeBlockContainer_Ckt0 theme-code-block" style="--prism-color:#393A34;--prism-background-color:#f6f8fa"><div class="codeBlockContent_QJqH"><pre tabindex="0" class="prism-code language-json codeBlock_bY9V thin-scrollbar" style="color:#393A34;background-color:#f6f8fa"><code class="codeBlockLines_e6Vv"><div class="token-line" style="color:#393A34"><span class="token plain">{</span><br></div><div class="token-line" style="color:#393A34"><span class="token plain">  "name": "robot1-shadow",</span><br></div><div class="token-line" style="color:#393A34"><span class="token plain">  "desired": 24</span><br></div><div class="token-line" style="color:#393A34"><span class="token plain">}</span><br></div><div class="token-line" style="color:#393A34"><span class="token plain">{</span><br></div><div class="token-line" style="color:#393A34"><span class="token plain">  "name": "robot2-shadow",</span><br></div><div class="token-line" style="color:#393A34"><span class="token plain">  "desired": 54</span><br></div><div class="token-line" style="color:#393A34"><span class="token plain">}</span><br></div><div class="token-line" style="color:#393A34"><span class="token plain">{</span><br></div><div class="token-line" style="color:#393A34"><span class="token plain">  "name": "robot3-shadow",</span><br></div><div class="token-line" style="color:#393A34"><span class="token plain">  "desired": 8</span><br></div><div class="token-line" style="color:#393A34"><span class="token plain">}</span><br></div></code></pre></div></div>
<p>We can again wrap this in a <code>watch</code> command to see how frequently the values update:</p>
<div class="language-bash codeBlockContainer_Ckt0 theme-code-block" style="--prism-color:#393A34;--prism-background-color:#f6f8fa"><div class="codeBlockContent_QJqH"><pre tabindex="0" class="prism-code language-bash codeBlock_bY9V thin-scrollbar" style="color:#393A34;background-color:#f6f8fa"><code class="codeBlockLines_e6Vv"><div class="token-line" style="color:#393A34"><span class="token plain">watch "aws iot search-index --index-name 'AWS_Things' --query-string 'connectivity.connected:true' | jq -r '.things[].shadow | fromjson | .name | to_entries[] | {name: .key, desired: .value.desired.digit}'"</span><br></div></code></pre></div></div>
<p>Success! We can see the desired digit of our three safe cracking robots update live on screen, all from the fleet index.</p>
<h2 class="anchor anchorTargetStickyNavbar_Vzrq" id="cloudwatch-metrics-and-device-management-alarms">CloudWatch Metrics and Device Management Alarms<a href="https://mikelikesrobots.github.io/blog/robot-fleet-overview#cloudwatch-metrics-and-device-management-alarms" class="hash-link" aria-label="Direct link to CloudWatch Metrics and Device Management Alarms" title="Direct link to CloudWatch Metrics and Device Management Alarms" translate="no">​</a></h2>
<p>Fleet Indexing is a launching point for sending specific data to CloudWatch Metrics or activating Device Management Alarms. AWS allows you to set up queries and aggregated data that you're interested in, such as the average battery level across a fleet of mobile robots, and perform actions based on that. You could set an alarm to get an alert when the average battery drops too low, emit metrics based on queries that are tracked in CloudWatch, and even start building a CloudWatch Dashboard to view a graph of the average battery level over time.</p>
<p>These are just a few examples of how valuable it is to connect robots to the cloud. Once they are connected and data starts flowing, you can set up monitoring, alarms, and actions to take directly in the cloud, without needing to deploy any of your own infrastructure.</p>
<h2 class="anchor anchorTargetStickyNavbar_Vzrq" id="summary">Summary<a href="https://mikelikesrobots.github.io/blog/robot-fleet-overview#summary" class="hash-link" aria-label="Direct link to Summary" title="Direct link to Summary" translate="no">​</a></h2>
<p>Overall, Fleet Indexing from IoT Device Management is a useful tool for collecting data from your fleet into one place, then allowing you to query and aggregate data across the fleet or even subsections of the fleet. This post shows how to index device connectivity and named shadow data, plus how to query and aggregate data, both using the console and using the command line. Finally, I briefly mentioned some of the future possibilities with the Fleet Index data, such as setting up alarms, metrics, and dashboards - all from data already flowing into AWS!</p>
<p>Have a try for yourself using the sample code - but remember, frequent updates of the index will incur higher costs. Be careful with your system design and the IoT services you select to index to optimize costs and performance.</p>]]></content>
        <author>
            <name>Michael Hart</name>
            <uri>https://mikelikesrobots.github.io</uri>
        </author>
        <category label="robotics" term="robotics"/>
        <category label="iot" term="iot"/>
        <category label="monitoring" term="monitoring"/>
        <category label="fleet" term="fleet"/>
        <category label="cloud" term="cloud"/>
    </entry>
</feed>